
Good morning! It’s Wednesday and CLING STAMP SALE DAY @ Stampin’ Up! Here’s the scoop… all cling stamps are 15% off until 11:59 PM TONIGHT the 20th – that’s Mountain Time. Here on the East Coast, that would be until 1:59 AM. See the list …HERE! Get your list together… and place that order. Click here to go my store. Remember that with your order of $50 (before tax & shipping) you are able to choose a SU! product of choice valued to $10. Use my current HOST CODE 26QYRFXB to be able to get that benefit. Now is also a perfect time to use that cling stamps purchase toward a STARTER KIT as a demonstrator… WooHoo … what a deal is that! Choose your own starter kit for $99. You may do that here.
And here’s more info about the demonstrator & rewards… Not have a demonstrator so you can order? If you do not have a demonstrator and need an Annual 2021 Catalog OR Jul-Dec 2021 Mini Catalog, please reach out to me – happy to send one to you. Please also use my current host code when ordering: 26QYRFXB I offer my customers a free item from Stampin’ Up! item valued to $10 with your order of $50 and above. Click here to go my store. When the order is over $150, you still receive that free gift from me, but SU! has Stampin’ Rewards that may be used for additional products, so don’t use the host code at that time. If you have questions just let me know. If you would like to be able to order products early from catalogs AND enjoy that 20% discount, join my team now… you may do that here. We have lots of fun and are a creative bunch that encourages & supports one another. Would love to have you!
I’m showcasing another Arrow Fold card today as I have a card c lass tomorrow that is going to make this as a 8 1/2 x 5 1/2 card, but will also make a 4 1/4 x 11 size card with this fun fold. I posted the other card a few days ago and you can see that card here, with all it’s dimensions and glory. Today’s card though…

This card was made with a retired DSP from the recent Sale-a-bration as a FREE product with a $50 purchase. It is called Peaceful Prints. I need lots of Christmas cards and this was a perfect use for this paper. :O) But you may use lots of other Designer Series Papers. Here are details:
Step 1 – Cutting & scoring
- Card base: Basic Black 8 1/2 x 5 1/2 scored at 4 1/4 for this card. Score on the front panel from the right corner score line to the center point (2 3/4″). Do the same from the score at the left top corner to the center point. Mark 2″ up from the bottom on the short side of the front on both short sides. Score again from the 2″ mark to the center point on both sides of the front panel. Burnish well.
- Layer 1: Basic White 5 3/8 x 4 1/8,(cut 2) Mark center on the long side on both panels at 2 1/16″. CUT from right corner to center point. Do the same from the left corner to the point. Do this to both Basic White panels. I strongly encourage marking on the back side of the center triangle the top of the triangle for both triangular panels.
- Layer 2: DSP – Peaceful Prints 5 1/4 x 4. Mark the center point on the bottom of the DSP @ 2″. CUT from the right upper corner to the center point. Do the same from the upper left corner to the center point.
Step 2 ~ Adhering
- Adhere DSP to correct panels. There will be a Basic White triangular panel for the inside of the card to stamp. There will be an extra set of Basic White corner panels that will not be used.
- Add corner panels to the INSIDE of the card.
- Turn in the front corner scores and adhere. See photo…

Arrow Fold 8 1/2 x 5 1/2.2 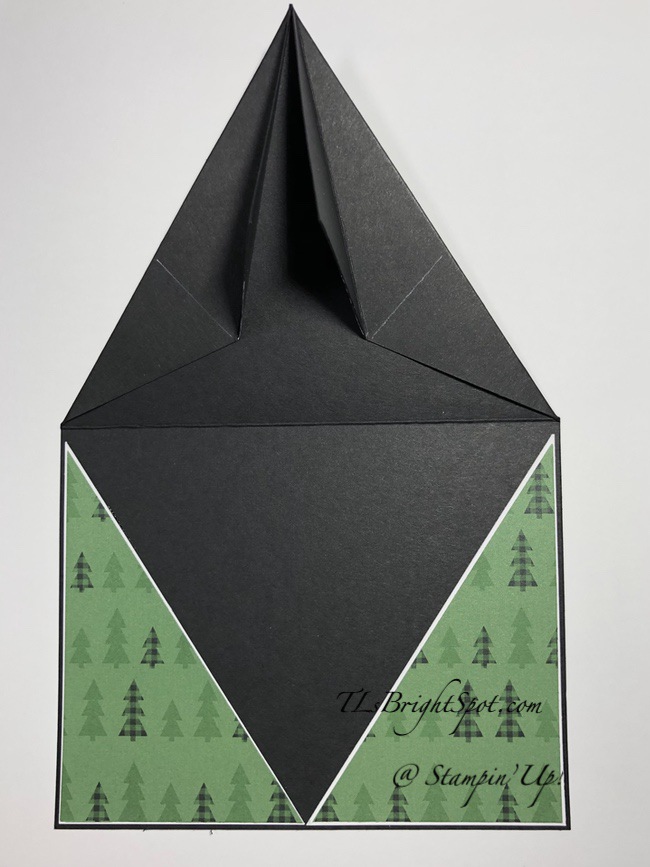
- Turn the second score line (the 2″ score) and mark a line to indicate where the glue should be placed. Refer to 1st photo above. Adhere these score lines outward.
- Add center panels to the FRONT of the card.
Step 3 ~ Decorate Front
- Cut a 3″ square of Basic White and die cut a scalloped circle.
- Cut a 2 3/4″ square of Garden Green and die cut a circle. Adhere together.
- Cut a 2 1/2″ square of Vellum and die cut a circle.
- Adhere with dimensionals, a Wonderful snowflake to the center of the Vellum circle.
- Adhere Vellum piece with a bit of glue in the center, to the Garden Green circles.
- Adhere this Wonderful Snowflake/ circle to the triangle on the front of the card as shown, allowing room for a sentiment banner.
- Stamp with Garden Green ink the sentiment on a 5/8″ wide strip. The sentiment comes from Snowman Season stamp set. Trim ends with Pick a Banner Punch. Add banner to the front of the card with dimensionals on the extended panels.
Step 4 ~ Decorate the inside
- With the remaining Basic White triangular panel (note the top mark on the back!), stamp the sentiment from Snowman Season in Garden Green ink.
- Stamp snowflakes from Snowman Season stamp set in Memento Black ink
- Adhere triangular panel to the inside of the card – and the card is done!

Step 5 ~ the Envelope
- Stamp the front of the envelope with the very cute dancing snowman in Memento Black ink from the Snowman Season stamp set.
- Adhere a 2 14 x 6 panel of coordinating Peaceful Prints DSP to the flap, trim to fit & voila… another Christmas Card.

Isn’t this a fun fold, AND a fun, happy Christmas card? I’m very please with it and think this will make a hit at our card class tomorrow. Maybe we’ll take some photos of their completed cards :O)
REMEMBER 15% OFF CLING STAMP SALE – TODAY ONLY (20TH) UNTIL 11:59 PM MOUNTAIN TIME.
Thanks for stopping by. May you have a beautiful day. Nothing beats a handmade card.
Inspire. Create. Share.

Love this card – this fold is next on my list! 🙂
LikeLiked by 1 person
You always do a super job!
LikeLike
Very pretty Terry Lynn! Great fun fold design! 🙂
LikeLiked by 1 person
Thanks!
LikeLike