
Hi Folks – it’s Sunday! Do you hav e your ‘Sunday go to meetin’ clothes laid out? As for me, I do know what I will be wearing :). I enjoy Sundays ~ it’s an opportunity for me to regroup, think about my week and how to be a better person. So, having said all that, are you ready to see my card today? Let me say first – this was so fun to do, I love this Words of Cheer bundle, but true confessions… I used some retired Sale-a-bration paper but you could use any DSP 😳 Here’s the card…

Isn’t this bright? Let me tell you about the shiny white paper – I cheated! I used the Christmas Cheer Dies and some leftover ‘paper’ from the Wonderful Snowflakes to die cut the holly leaves & stars. I wanted the shine, kind of like foil, to make this stand out. More info…
Basics: Words of Cheer Bundle (includes Christmas Cheer Dies)
- Die cut the cheer outline from Red Foil sheets
- Die the letters from Crumb Cake. Adhere letters to the Red Foil die cut
- Die cut the holly leavers and stars from Wonderful Snowflakes scraps. Adhere holly leaves to the back of the Red Foil die cut
- Adhere this to a panel of Vellum 1 3/8 x 5 1/4. TIP: I recommend using glue dots to secure holly leaves to the Vellum.
Card cuts:
- Card base – Garden Green 5 1/2 x 11 scored at 1 3/4, 4 1/4, & 6 3/4
- Basic White panels -1 5/8 x 5 3/8 (2); 2 3/8 x 5 3/8 (2); 4 1/8 x 5 3/8
- Coordinating DSP – 1 1/2 x 5 1/4 (2); 2 1/4 x 5 1/4 (2); 1 3/4 x 5 1/4
- Burnish score lines firmly. see photo below for guide

Attach papers as shown below. Remember the Cheer for the front of the card!

You can clearly see how I decorated the various panels: the holly leaves were die cut from the leftover Wonderful Snowflakes pieces; the tree is the Pine Tree punch and the ornaments are die cut from Real Red c s & Shimmer Paper with Wink of Stella added for glam (the die came from Christmas Trees Dies); the stars are also from the Cheer Dies and Wonderful Snowflakes paper scraps. There is no sentiment, but plenty of room for writing a precious message.
This is a thick card when closed and held securely by a belly band. To create the belly band: cut a length of Garden Green 1 x 11; cut a length of Basic White 7/8 x 11 and adhere together. Cut a label with the Tasteful Labels Dies from Garden Green & Basic White as shown. Stamp sentiment in Real Red ink using the Words of Cheer stamp set. Die cut holly leaves from garden Green & pine branches from Pear Pizzazz. Adhere as shown. Attach to the belly band with Tear n Tape.
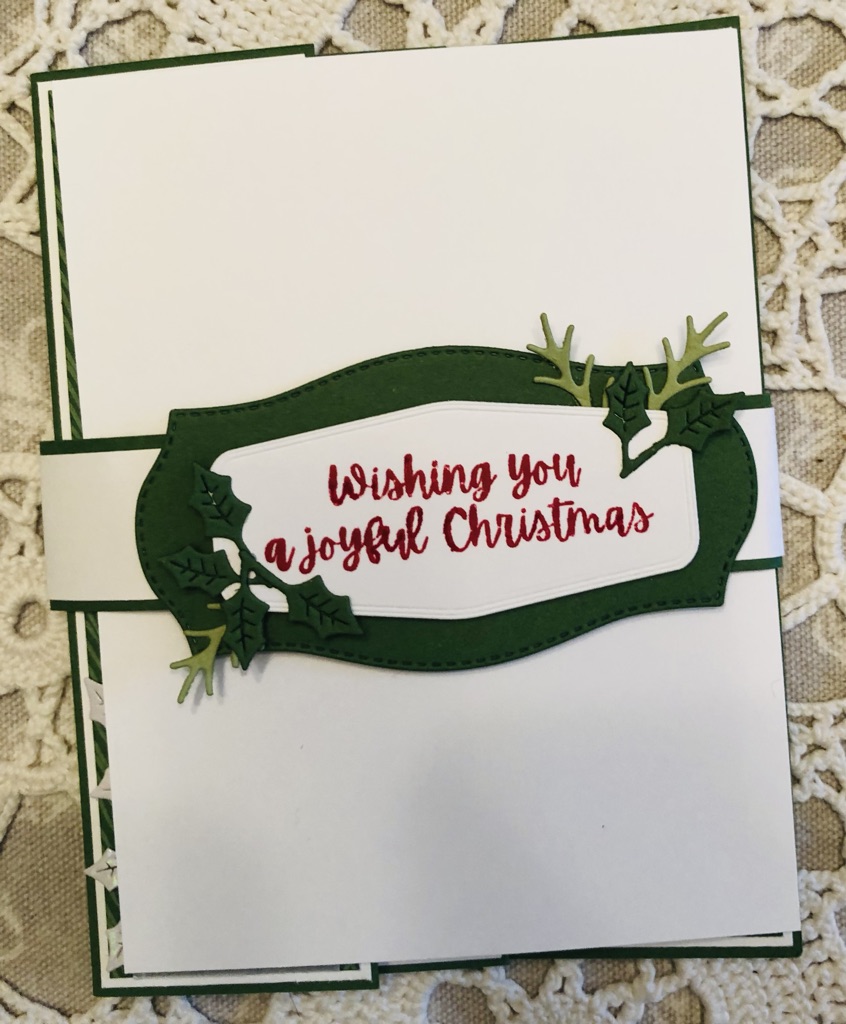
This is a thick card when closed and held securely by a belly band. To create the belly band: cut a length of Garden Green 1 x 11; cut a length of Basic White 7/8 x 11 and adhere together. Cut a label with the Tasteful Labels Dies from Garden Green & Basic White as shown. Stamp sentiment in Real Red ink using the Words of Cheer stamp set. Die cut holly leaves from garden Green & pine branches from Pear Pizzazz. Adhere as shown. Attach to the belly band with Tear n Tape.
You can also see in this photo that I covered the front of the card with a panel of card stock – to protect the delicate leaves on the ‘Cheer’ front :O)
Not have a demonstrator so you can order? If you do not have a demonstrator and need an Annual 2021 Catalog OR Jul-Dec 2021 Mini Catalog, please reach out to me – happy to send one to you. Please also use my current host code when ordering: 26QYRFXB I offer my customers a free item from Stampin’ Up! item valued to $10 with your order of $50 and above. Click here to go my store. When the order is over $150, you still receive that free gift from me, but SU! has Stampin’ Rewards that may be used for additional products, so don’t use the host code at that time. If you have questions just let me know. If you would like to be able to order products early from catalogs AND enjoy that 20% discount, join my team now… you may do that here. We have lots of fun and are a creative bunch that encourages & supports one another. Would love to have you!
Thanks for stopping by. May you have a beautiful day. Nothing beats a handmade card!
Inspire. Create. Share.

Such a pretty card Terry Lynn! Love the colors and the fancy fold design is perfect! 🙂
LikeLike
Love this! Fun Fold. Awesome sentiment die cut. Great Christmas colors. Yep – it’s got all the things!! 🙂
LikeLike