Stampin’ Up! Gallery Blooms Frames

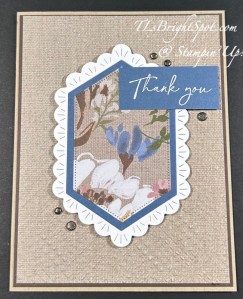
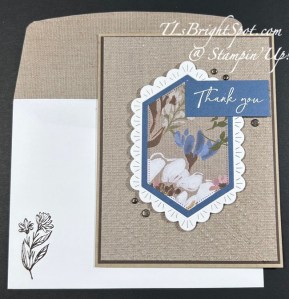
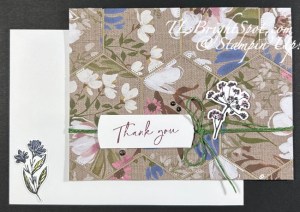
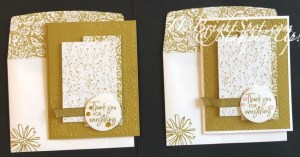
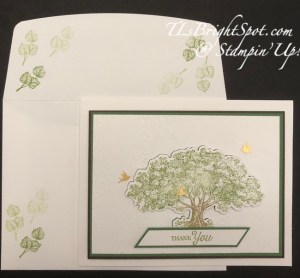
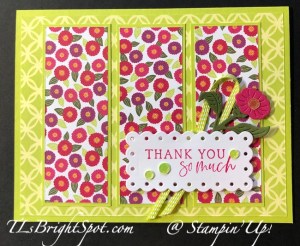
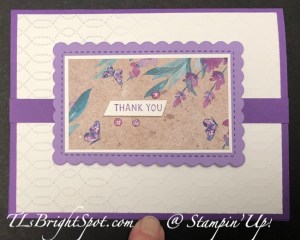
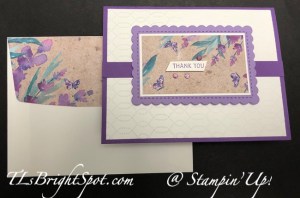
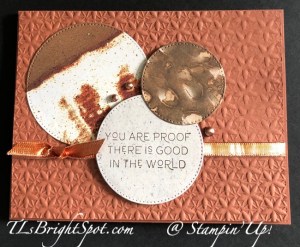
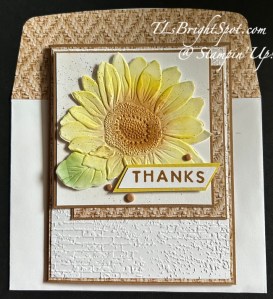
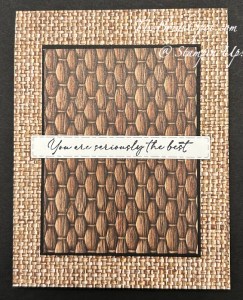
Good Monday! It’s going to be another gorgeous day here on the East coast – sunny & 71! I have two cards to share with you today, both with the same layout, just different colors. I used the stunning rose image in the Gallery Blooms bundle, the coordinating Damask Designs embossing folder and for sentiments, the Beautiful Motifs stamp set (part of a bundle). Both use Subtles 6×6 DSP in Petal Pink and Gray Granite card stock. Let’s look…

Stampin' Up! Gallery Blooms in Petal Pink card front
Stampin' Up! Gallery Blooms in Gray Granite card front

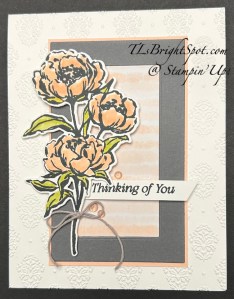
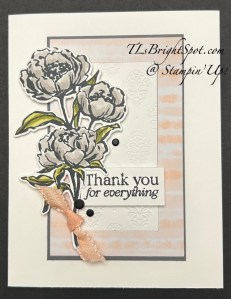
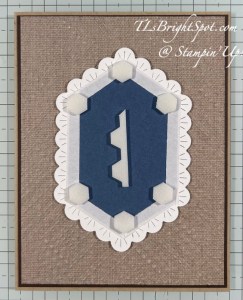
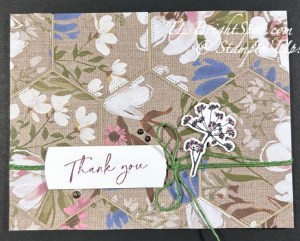
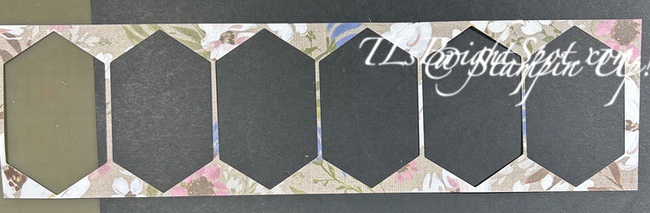
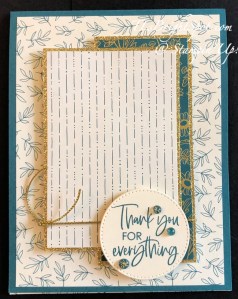
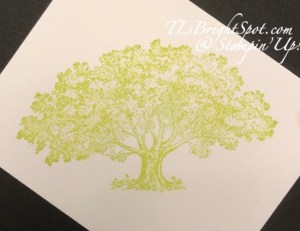
I stamped the roses in Memento black ink and colored each with Stampin’ Blends: Petal Pink, Old Olive & Lemon Lime Twist for the card on left and Gray Granite, Old Olive & Lemon Lime Twist for the card on right. I’m just curious, do you have a preference? I used the framing dies in the Gallery Blooms dies to die cut from Gray Granite, Subtles 6×6 DSP & Basic White the two portions of the framing: the center portion and the ‘frame’ of that. I pieced these together as you see and attached to a slightly larger panel – Petal Pink and Gray Granite. These were attached to the card base. Oh… and the card with the pink roses – I embossed a separate piece of Basic White and attached it to the card front before adhering the rest. The roses are added with dimensionals. On each is a bow – Baker’s Twine Essentials Pack in gray and Scalloped Ribbon in Petal Pink. I tied each around the stem holding them in polace with either liquid glue or a glue dot. The embellishments are Low Profile Dots in pink and Neutral Matte Dots in black. The sentiments are both from Beautiful Motifs stamp set, stamped on scraps of Basic White with Memento ink. Each was attached with dimensionals.

Stampin' Up! Gallery Blooms inside in pink

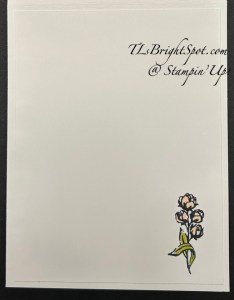
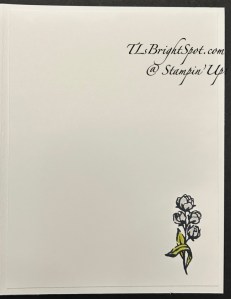
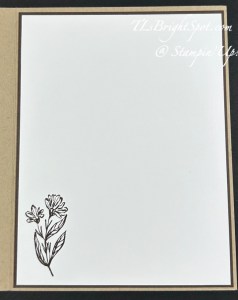
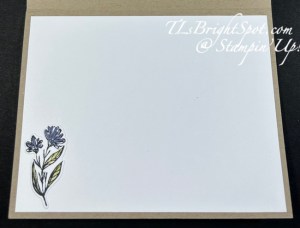
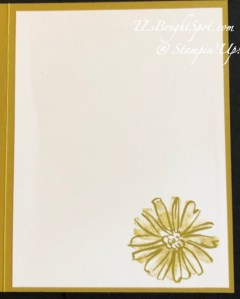
I stamped the small rose bouquet from Gallery Blooms in Memento ink on a Basic White panel & colored in Stampin’ Blends as before: Petal Pink or Gray Granite for the roses, Old Olive & Lemon Lime Twist on the leaves. Each was adhered to the appropriate card.

Stampin' Up! Gallery Blooms in Petal Pink w/ envelope

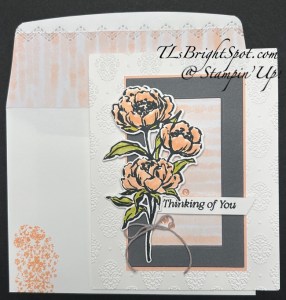
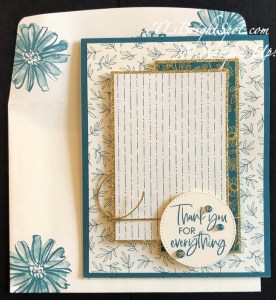
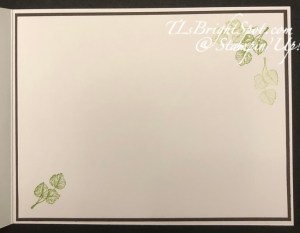
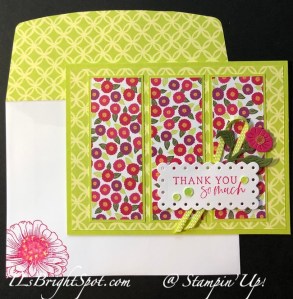
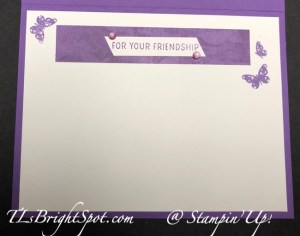
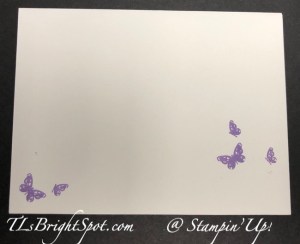
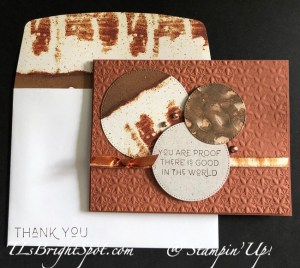
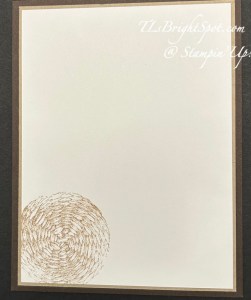
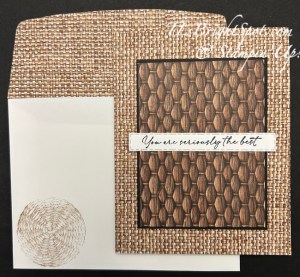
This envelope has an added strip of Subtles 6×6 DSP to the flap & trimmed to fit. I used a one of the Basic Borders Dies to create to delicate stitching at the edge of the DSP & on the envelope. I stamped the front in Petal Pink using a stamp from Gallery Blooms stamp set.

Stampin' Up! Gallery Blooms in Gray Granite w/ envelope

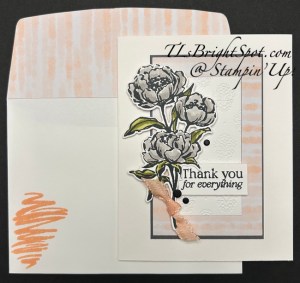
On this envelope, a strip of the Subtles 6×6 DSP was added to the flap & trimmed to fit. A different image from Gallery Blooms stamp set was stamped in Petal Pink on the envelope front.

I am curious if you have a preference in the cards – Petal Pink or Gray Granite. Not certain for me…

Today begins a great Kits Collection SALE 10-30% off all kits. Click here for more info.

Thanks for stopping by. May you have a beautiful day. Make someone happy by sending them a handmade card filled with ❤️


Product List

Card cuts:

  • Thick Basic White – 4 1/4 x 11 scored @ 5 1/2; 8 1/2 x 5 1/2 scored @ 4 1/4
  • Basic White – 4 1/4 x 5 12 (embossed for card front); 3 x 5 (embossed & die cut); 2 1/2 x 4 1/2 (2) for rose die cuts; 4 x 5 1/4 (2) for inside panels + scraps for sentiments
  • Petal Pink – 2 3/4 x 4 1/2
  • Gray Granite – 2 3/4 x 4 1/2
  • Subtles 6×6 DSP – 3 x 4 3/4; 2 1/4 x 6 & 2 x 6 for envelope flaps

Stampin’ Up! Sunflower 3D and Woven Textures DSP for the Happy Inkin’ Thursday Blog Hop

Welcome to our Blog Hop! I want to give a shout out to a new person in our Thursday lineup for the blog hop – Nicole Bloxom. Can’t wait to see what she has created for today’s sketch challenge. Welcome Nicole!

So… this has been a stressful week – I learned I must have a heart catheterization tomorrow (7/18) with the possibility of a stent. I’m not used to this – having a cardiologist & all that, testing & so forth. It took my mojo & I’m having a bit of trouble creating… so bear with me. You may remember, I had a knee replacement back in early May – that has meant PT 3 x/ week since then. Today’s card is for my Physical Therapist as today is my last day for PT. WOOHOO!!! And just so you know, I can bend my knee on my own to 120 degrees and walk without a limp – no one would ever know I had a knee replacement. 😀

Stampin' Up! Blog hop Logo
Stampin' Up! Hop Sketch Challenge

Stampin' Up! Sunflower 3D & Woven Textures card front

I used a new embossing folder from the July ONLINE EXCLUSIVES called Sunflower 3D embossing folder. It’s a stand alone item, which is unusual. I embossed the sunflower then colored it with Stampin’ Blends Darling duckling, Pecan Pie & Garden Green then fussy cut this single flower with my paper snips. I put dimensionals on the back and attached it to a Basic White panel 3 1/2″ square then to Pecan Pie card stock 1/8″ larger. I took Woven Textures DSP & cut it 3 1/2″ square and added that to Pecan Pie cardstock 1/8″ larger, then adhered these squares together as shown. For the background I ran a 4 x 5 14 panel of Basic White through the Exposed Brick 3D embossing folder then to another of the same design Woven Textures DSP 1/8″ larger – and attached to the Pecan Pie A2 card base. I used my Early Espresso Marker to ‘flip’ some splatters to the upper portion.The sentiment is from Sunshine Vibes stamp set stamped in Pecan Pie ink on a 1/2″ strip of Basic White adhered to Darling Duckling just 1/8″ wider. This was added to the flower with liquid glue then I added a single mini dimensional under the ‘s’. Myn final touch was three Neutral Matte Dots in Pecan Pie.

Stampin' Up! Sunshine Vibes inside card

For the inside… I wanted something light & positive. Pulling out that same Sending Sunshine stamp set, I stamped the half sun in Darling duckling then the rays (stamped twice) in Crushed Curry, then the sentiment in Pecan Pie – all on a Basic White 4 x 5 1/4. I added this to the same pattern of Woven Textures DSP 4 1/8 x 5 3/8, added them both to the inside of the card – and done! As I mentioned, this card is to my Physical Therapist, but there are two therapists in this office. We joke with one another, share stories, kid around and WORK OUR ROUTINE to get where we need to be. It has been a good experience and I will miss these folks.

Stampin' Up! Sunflower 3D & Woven textures card & envelope

The envelope – keeping it simple, a piece of the same pattern of Woven Textures DSP adhered to the flap & trimmed to fit. That’s it. Want to purchase the products to make this card? See below for all the pertinent information. Also – continue on the hop by clicking the ‘next’ button or clicking on a name. Enjoy the hop!

Stampin' Up! Hop button

Amy Koenders

Mary Deatherage

Karen Ksenzakovic

Tara Carpenter

Terry Lynn Brightyou are here!!!

Nicole Bloxom

For online Exclusive’s click here. Use that same link to see the KITS COLLECTION, LAST CHANCE PRODUCTS and all items in the 2025-2026 Annual Catalog, & Paper Pumpkin info.

Thanks for Stopping by. May you have a beautiful day!

Create for someone else – be a positive influence for others. ❤️

Product List

Stampin’ Up! Woven Textures + Textured Notes for the Happy Inkin’ Thursday Blog Hop

Hello again to this weekly Happy Inkin’ Thursday Blog hop! We have a sketch challenge today that is quick & easy and can be used for any sentiment or card needed – depending on the DSP (Designer Series Paper) used & the stamp set. I’ve used the Woven Textures 12×12 DSP and the Textured Notes Bundle for the sentiments & die cutting.

I hope you like the updates made to my blog – still a work in progress. Thanks to a special teammate for their help and my daughter Wendy as well. I have more work to do on it, but I’m liking what’s happening :O) I’m still recovering from a knee replacement on 5/5, so limited in what I can really do yet.

Stampin' Up! Happy Inkin' thursday Blog Hop
Stampin' Up! Sketch Challenge
Stampin' Up! Woven Textures & Textured Notes card front

I began with an Early Espresso card base 84 1/4 x 11 and scored at 5 1/2. I added this gorgeous pattern directly to the card base, from the Woven Textures 12×12 DSP cut at 4 1/4 x 5 1/2. Use the adhesive of choice, but I tend to use liquid glue. I then cut a piece of Early Espresso 3 1/8 x 4 1/8 and added a different pattern from the Woven Textures DSP cut 3 x 4 to it – again with liquid glue. These were attached to the card front with dimensionals. I then stamped the sentiment from the Textured Notes Bundle on a scrap of Basic White using Early Espresso ink – then die cut it with the Textured Notes Dies. I added this to the card front with liquid glue. And while you cannot see them, I also added Adhesive-Backed Textured Dots – and the card front was complete.

Stampin' Up! Woven Textures + Textured Notes card inside

For the inside.. I cut a Crumb Cake piece 4 x 5 1/4 and added it to the inside of the card, trimmed a Basic White panel to 3 7/7 x 5 1/8, stamped it with the fun basket weave image from textured Notes stamp set with Crumb Cake ink. This was added to the Crumb Cake piece already attached to the inside of the card – and bingo – card is ready.

Stampin' Up! Woven Textures + Textured Notes card & envelope

For the envelope… more of the Woven Textures 12×12 DSP was added to the flap & trimmed to fit. I again used the same basket weave stamp from the Textured Notes stamp set and Crumb Cake ink to stamp the front of the envelope. Yay! Such a nice masculine card – and can be a thank you, or thinking of you – again, versatility.

Below is information on how to purchase products from me, but please don’t forget to make your way around those participating in today’s hop. Click on the ‘next’ button to take you to Amy or click on a name to take you to another person’s blog.

Stampin' Up! Next icon

Amy Koenders

Mary Deatherage

Akiko Sudano

Karen Ksenzakovic

Tara Carpenter

Terry Lynn Bright

Thanks to everyone already making the most of our newly added Notify Me feature in the online store. If selected, this tool sends an email notification when an out-of-stock item becomes available—it’s already proving helpful to streamline the ordering process for demonstrators.
Unfortunately, the notification service experienced a disruption from May 6 to 11. As a result, back-in-stock emails weren’t sent for the following items:

  • Beautiful Butterflies Hybrid Embossing Folder (164614), Beautiful Butterflies Bundle (164615), and Papillons Superbes Bundle (164616)
  • Mixed Florals Dies (164641), Mixed Florals Bundle (164642), Mixed Florals Suite Collection (164659), and Fleurs et Techniques Mixtes Suite Collection (164660)
  • Elements of Text Cling Stamp Set (164774)

This issue was resolved on May 12. However, back-in-stock emails that should have sent during the impacted timeframe will not send for the items listed above. All messages moving forward should function properly. Just remember to ask for that option to be notified when placing the order if it comes up not currently available.

OK – info on ordering from me…. first of all – no more HOST CODE is needed – YAY! Instead for every order of $20 + Stampin’ Up! has it’s own rewards. And for every $30 order from me in my ONLINE STORE you will earn Darling Daisy Points – one Darling Daisy for every $30 purchase from me. Save those Darling Daisy Points up to 15points and you’ll be able to order a free gift from me valued to $40. And for that $30 purchase from me, you’ll also receive the monthly tutorial – and for May it features the Gallery Blooms bundle.

As you probably already know, the 2025-2026 Annual Catalog is now LIVE to customers AND there were two new kits unveiled in the Kits Collection, PLUS more ONLINE EXCLUSIVES released! Stampin’ Up! is ROCKIN’ IT. And here’s another thing – the JOINING PROMOTION. Become a demonstrator (would love to have you on my team!)

Starter Kit Special is NOW AVAILABLE!

Have you heard? From May 6–31, new demonstrators get $165 USD | $220 CAD worth of products in their Starter Kit for just $99 USD | $135 CAD. (That’s $66 USD | $85 CAD in extra products—our biggest Starter Kit Special yet!) As a bonus, new demonstrators also score FREE shipping on their Kit, FREE business supplies, and a FREE Paper Pumpkin kit! Become a demonstrator and enjoy all the perks that come with that, like a 20–25% product discount, exclusive early access to products, the opportunity to earn a modest supplemental income, the chance to attend incredible training and crafting events, and so much more! 

Stampin' Up! Joining Promotion

Become a Stampin’ Up! demonstrator between May 6–31 and choose $165 worth of products for only $99! (And did we mention your Starter Kit comes with FREE shipping, FREE business supplies, AND a bonus, FREE Paper Pumpkin kit?) Click the link in the image above to join with me & create your Starter Kit! What’s to lose – 20% discount/ 20% commission on all orders.

See the list below of items used for this card. Questions? Connect with me! Thanks for stopping by today – may you have a beautiful day! Send a card – make someone happy. 😀

***************************************************************************************************************** Product List

Stampin’ Up! Wildly Flowering Suite for the Happy Inkin’ Thursday Blog Hop

It’s Thursday and time for a fabulous hop from. the Happy Inkin’ Thursday Blog Hop Group! We have a color challenge today and I need thank you cards for some special folks. I created two for this color challenge using the Wildly Flowering Suite of products.

Stampin' Up! Happy Inkin' Krew Blog Hop
Stampin' Up! blog hop color challenge
Stampin' Up! Wildly Flowering Suite. card front

This is the 1st card, using several of the fabulous dies in the Wildflower Designs Dies, the dashing Designs 3D embossing Folder and the stunning Wildly Flowering DSP. Oh, and let’s not forget the embellishments: the Adhesive-Backed Adhesive Dots. Here’s what I did… Crumb Cake card base with a layer of Early Espresso on the front, then a layer of the Wildly Flowering DSP that I embossed with the Dashing Designs 3D embossing folder – adhered to the Early Espresso. Next some die cutting: Basic White for the scalloped outline, Misty Moonlight and finally the DSP for the center. I had the Basic White piece already die cut and saved, but did die cut the Misty Moonlight – this scallop die cuts the scallop piece and from it the center – the Misty Moonlight panel you see in the photo. I used Tear n’ Tape to adhere the blue to the Basic White on the back side and added dimensionals in strategic places to adhere to the card front, centering it- see photo. I then adhered the DSP panel in place & wow, it looks great!

Stampin' Up! Wildflower Design Dies adhering together pieces

I took another piece of Misty Moonlight, rubbed it with my embossing buddy from the Embossing Additions kit (item 159971), stamped the sentiment from Wildflower Designs stamp set in VersaMark ink, sprinkled with with White Embossing Powder and heat set it with the heat tool. I adhered this in place with liquid glue on the left side and mini dimensionals on the two right corners.I added five of the Adhesive-Backed Textured Dots – and the card front was complete.

Stampin' Up! Wildflowers Designs card inside
Stampin' Up! Wildflower Designs card & envelope

I used the same floral stamp to and Early Espresso ink to decorate the Basic White panel for inside the card and the envelope. More of the same Wildly Flowering DSP covers the envelope flap.

Stampin' Up! Wildflower Designs card front.card 2

This was fun – I die cut several hexagon shapes from the Wildly Flowering DSP, laying them in a row so as to have them ‘match’ as you look at the card. The matching is from left to right, not top to bottom. Here’s a photo of how I die cut these.

Stampin' Up! Wildflower Designs Dies  from DSP strip

I should have taken a photo as I put the die cuts together on this card front, but didn’t 😦 Oh well. Adhere the DSP panels across the bottom, then add additional die cuts to fill in; trimming down and filling in the entire front. I stamped the flower in Memento ink and the sentiment in Moody Mauve ink – both stamps are from the Wildflower Designs stamp set. I used the Light Moody Mauve Stampin’ Blend to color the flower tips. I wrapped this gorgeous Natural Tones Linen Thread (in Garden Green) around the card front twice and tied a bow. I added the flower with mini dimensionals. The sentiment panel I punched with the Labeled with Love Punch and adhered it over the thread with dimensionals. Three Adhesive-Back Textured Dots were added near the sentiment panel.

Stampin' Up! card 2 of Wildly Flowering Suite Collection

On the inside of the card and the envelope, I stamped a different flower from Wildflower Designs stamp set in Memento ink and colored each with Stampin’ Blends Light Misty Moonlight and Light Old Olive.

These two card were a total CASE of cards shown in the Annual catalog page 40 – I just changed colors of thread, inks and DSP. I love these two cards and am excited to have them ready for those special notes I need to write. Handmade cards are simply the best! They share a bit of myself with each one made.

Time to visit the others on this hop. Click the next button or click a name, just make sure to make the rounds. Happy Hopping!

Stampin' Up! blog hop button

Amy Koenders

Mary Deatherage

Karen Finkle

Akiko Sudano

Karen Ksenzakovic

Tara Carpenter

Terry Lynn Bright

Carol Buckalew

Want to purchase any or all of the products to make these cards? Shop with me here and get benefits from me: for a $50 order a SU product valued up to $10 PLUS the current months tutorial. :O) Join my team and be able to participate in valuable meetings, conventions and have a super support team.

Stampin’ Up! Full of Life 6×6 DSP + Paper Pumpkin Thanks & Beyond Dies

Good Sunday morning! It’s Memorial Day weekend here at the Jersey Shore and traffic is heavy. You know, everyone wants to go to the beach, etc., etc. We heard lots of fireworks last night! In memory of those who served our country by the giving of their life – thank you, we honor you and are so grateful for your dedication. We kneel in humble gratitude.

My card today is one of thanks, made with the Full of Life 6×6 DSP as the background and dies that coordinated with Paper Pumpkin kits these past couple of months – Thanks & Beyond Dies. They are available to those with active Paper Pumpkin subscriptions. If you are not a subscriber, a different kit arrives each month to make cards or to be creative and make something else from the kit. See below for more information in how to subscribe with me.

Stampin' Up! Full of Life DSP 6x6 + bPP Thanks & Beyond Dies, card front

I cut down a 6×6 sheet of the Full of Life DSP to 3 7/8 x 5 1/8 and stamped it with the Painted Lavender stamp set – leaf. I used Garden Green ink and added a bit of Shaded Spruce with a sponge dauber – stamped once, then twice and a third time without re-inking. I like the depth it creates when doing this. It looks like a field of leaves. I used another piece of the Full of Life 6×6 DSP to die cut the butterfly. This is created with two dies, one with the detail and another for the outline. It remains connected in the ‘body’ of the butterfly. I adhered this die cut with dabs of liquid glue then added the two Pretty Peacock Foiled Gems. I die cut the thanks from another portion of Full of Life 6×6 DSP and then a Basic White scrap and adhered the two together, creating a bit of shadow. I attached this with mini dimensionals cut in half. This panel was attached to a Basic White piece cut 4 x 5 1/4 then to a Balmy Blue card stock 4 1/4 x 11 scored at 5 1/2.

Stampin' Up! Painted Lavender stamp set

For the inside, I stamped the flowers in Melon Mambo ink using the Painted Lavender stamp set. This carries the color from the card front to the inside. The butterflies are stamped in Balmy Blue ink and are also from the Painted Lavender stamp set.

The envelope flap is covered with more of the Full of Life 6×6 DSP and stamped with the same butterfly stamp from Panted Lavender stamp set in Balmy Blue ink. Notice there are five butterflies – this is a two butterfly stamp, so I covered one of the butterflies before re-inking, removed the tape and stamped. Make sense?

I just received the new Sketched Butterflies Bundle yesterday and it’s FULL of butterflies :O). :O). :O) Can’t wait to P-L-A-Y!

OK – now for some links to purchase these gorgeous items…

The 24-25 Annual Catalog is now live… here’s a link to take you directly to the items available in this catalog – Happy shopping!

Choose this link to subscribe to Paper Pumpkin with me

Stampin’ Up! has a fabulous joining opportunity from May 1-31.

Stampin' Up! Joining Promotion

To join is $99 and what comes with joining, besides your 15-20% discount on every order… FOUR FREE IN COLOR PRODUCTS valued to $82 plus your choice of $125 worth of products. Those FREE items – the IN COLOR products – Classic stampin’ pad bundle – 5 of them, package of 8 1/2 x 11 cardstock – 5 of those, 6×6 Designer Series Paper – 5 colors in the pack, and the coordinating Stampin’ Write markers. That’s $82 worth of products – for FREE if you join between now and May 31. You will also receive free shipping on these products + free business supplies. What’s not to like about this joining special!

Join with me by following this link...

To view all the available ONLINE EXCLUSIVES, click here.

The adhesive-Backed Shiny Sequins are an ONLINE Exclusive item.

Clearance items may be found here

While you’re looking around in my store, remember there are some stunning kits available, for all ages and all seasons – even Christmas! And while you’re shopping, I offer fringe benefits to my customers: free tutorial of the month and a FREE Stampin’ Up! item valued to $10 – all for a $50 order, before shipping and taxes. Use my current host code to receive those benefits – especially when your order does not exceed $150. Make certain my name is listed as your demonstrator when checking out! :O)

HOST CODE  BAQG9RSE

Thanks for stopping by. May you have a beautiful day. Make someone happy when sending them a handmade card filled with love.


Stampin’ Up! Retiring DSP Thank You Cards

HelIo again – it is April 30 – the final day of two catalogs: the Jan-Apr 2024 catalog and the 2023-2024 Annual Catalog. decided to share one more card – or 3 – of the same layout, but in retiring papers… These cards use Forever Love 12×12 SDSP and Poetic Expressions DSP. + the Color & Contour bundle. Here they are…

Stampin' Up! Forever Love SDSP Thank you card front
Card 1 w/ Forever Love SDSP
Stampin' Up! Poetic Expressions DSP Thank You card front
Cards 3 & 2 w/ Poetic Expressions DSP

Card 1 uses Pretty Peacock card base and is layered with Forever Love SDSP and Gold Adhesive-Backed Glimmer Paper, Pretty Peacock Foil Gems and Gold ribbon. I used Stitched Shapes Dies to create the sentiment .

Card 2 uses Thick Basic White for the card base, a layer of Wild Wheat embossed with the Distressed Tile Embossing Folder, then the layers of Poetic Expressions DSP. This card uses the Textured Ribbon in Wild Wheat, the Color & Contour stamp set for the sentiment, die cut with the same Stitched Shapes Dies circle. This was embellished with the 24-26 In Color Shimmer Gems in pink.

Card 3 is so similar… the difference is Wild Wheat card base and embellishments of 23-25 In Color Dots in Wild Wheat. Everything else is the same as card 2.

Stampin' Up! Forever Love & Pretty Peacock thank you card, inside
Card 1, inside
Stampin' Up! Poetic Expressions Thank You Card, inside
Cards 2 & 3 same inside

The inside of the cards are similar as well… a flower stamped then stamped again with a filler stamp w/ second generation ink. On the Pretty Peacock card, I added a layer of the Forever Love SDSP before adhering the inner panel – and of course the flower is stamped with Pretty Peacock ink. The other two cards have no DSP layer for the inside, just the stamped panel in Wild Wheat and second generation ink for the flower ‘filler’.

Card 1, Pretty Peacock
Poetic Expressions DSP Thank You Card
Cards 3 & 2 w/ Poetic Expressions DSP

The envelopes… Pretty Peacock ink was used to stamp the flower on both the envelope flap and the envelope front. On the other two cards I adhered Poetic Expressions DSP to the flap & trimmed to fit and stampoed the flower image in Wild Wheat ink. Finis.

LAST CHANCE PRODUCTS MAY BE FOUND HERE

Clearance items may be found here

While you’re looking around in my store, remember there are some stunning kits available, for all ages and all seasons – even Christmas! And while you’re shopping, I offer fringe benefits to my customers: free tutorial of the month and a FREE Stampin’ Up! item valued to $10 – all for a $50 order, before shipping and taxes. Use my current host code to receive those benefits – especially when your order does not exceed $150.

HOST CODE 4JF6ZWC9

Tomorrow, May 1, the NEW 2024-2025 Annual Catalog goes LIVE – woohoo! Not only that, but during the month of May – so May 1 – 31, Stampin’ Up! is offering a joining special to become a demonstrator. Here are the details… To join is $99 and what comes with joining, besides your 15-20% discount on every order… FOUR free IN COLOR PRODUCTS valued to $82 plus your choice of $125 worth of products. Those FREE items – the IN COLOR products – Classic stampin’ pad bundle – 5 of them, package of 8 1/2 x 11 cardstock – 5 of those, 6×6 Designer Series Paper – 5 colors in the pack, and the coordinating Stampin’ Write markers. You will also receive free shipping on these products + free business supplies. What’s not to like about this joining special – remember it begins May 1! Join with me by following this link...

Stampin' Up! Joining Promo 1-31 May

The new 2024-2025 Annual Catalog goes live on May 1 as well. Here’s a photo of me receiving my catalog in Houston at the SU! convention.

Stampin' Up! 24-25 Annual Catalog & me - in Houston

I can’t publish any of the photos inside the catalog until May 1 – so stay tuned… What I CAN SAY is there are some awesome new products in the catalog that I’ve been playing with – and if you’ve been following me, you have seen several of them. Absolutely LOVING the new 2024-2025 In Colors!!! If you do not have a demonstrator, connect with me. That new catalog will be on it’s way to you lickety-split!

Thanks for stopping by. May you have a beautiful day. Make someone happy when sending them a handmade card filled with love.

Stampin’ Up! Sneakie Peek of Loveliest Trees Thank You Card

Good Sunday morning. It’s SUNNY here this morning – after days of rain AND a 4.8 earthquake – we live in central, east coast New Jersey and earthquakes are not common here, so it was strange to have the whole house shaking! No damage and everyone is ok…

My card today uses a new bundle – Loveliest Trees and it is… well, lovely.

Stampin' Up! Loveliest Tree Thank You card front

The card base is Thick Basic White. The colored card stock layers are Early Espresso (3 3/4 x 4 7/8) and Garden Green (3 5/8 x 4 3/4). The Basic White top panel was embossed after stamping & die cutting the tree image – with what else – Timber 3D Embossing Folder. The grain is going up & down – as a tree grows :O) Unfortunately it doesn’t show well in the photo.

I inked the tree from Loveliest Trees stamp set with Granny Apple Green ink, then with a sponge dauber tapped in Pecan Pie ink on the trunk and a bit of the branches, then stamped it on the Basic White panel and die cut it with the Loveliest Trees die. That’s when I ran the panel through the Timber 3D EF – after adhering the layers together, I attached the tree in the open die on dimensionals. Then all the layers were added to the Thick Basic White card base with dimensionals. I stamped the sentiment from Loveliest Trees stamp set in Garden Green ink, trimmed the Basic White strip down to 3/8″ x about 2 7/8″, added it to a slightly larger Garden Green strip & attached it as shown with dimensionals near the ends of the strips. With all in place I added three brass birds from the Adhesive-Backed Dragonflies & Birds that retire the end of April.

Stampin' Up! Loveliest Trees thank you, inside

For the inside, I stamped this sweet leaf from Loveliest Trees stamp set in Garden Green ink, and stamped it twice more without re-inking. Love how it gives shades of the same color! I adhered this to a Garden Green slightly larger panel then to the inside of the card.

Stampin' Up! Loveliest Trees Thank You card & envelope

For the envelope, I used the same process as the inside of the card – inked the stamp with Garden Green ink, stamped it once then twice more without re-inking. I did the same on the envelope flap – and it’s ready to send!

Just to share, here are two more sample of the stamped image… Granny Apple Green ink for the entire image and Granny Apple Green (stamped off once) with Pecan Pie added by sponge dauber. I rfeally like this second image a lot.

Stampin' Up! Loveliest Trees in Granny Apple Green ink
Stampin' Up! Loveliest Trees, Granny Apple Green stamped off w/ Pecan Pie  sponged on

And here’s the stamp & die bundle.

Stampin' Up! Loveliest Trees stamp set
Stampin' Up! Loveliest Tree Dies

Keep in mind… this stamp & die bundle is not available until May 1 – but to demonstrators :O) it is possible to purchase this bundle NOW. And how do you do that – join my team here of course. With 20% off every order, what’s to lose? There’s more benefits than that of course, that’s just the surface deal. Connect with me for more info :O)

Stampin' Up! 24-25 Annual Catalog & TL Bright

Here’s a picture of me & receiving the new catalog in Houston TX. For information regarding my DSP & Ribbon Shares, click here

Thanks so much for stopping by. May you have a beautiful day!

Stampin’ Up! Happy Inkin’ Thursday Blog Hop

It’s Thursday… and the theme challenge for today’s hop is “Thank you” I’m using the soon to be released Flowering Zinnia 12×12 DSP. The coordinating stamp set & dies is called the Simply Zinnia Bundle – and they are wonderful. The embellishments that are part of the suite are the Adhesive-Backed Shiny Sequins. But what really pops on this card is the DSP.

Stampin' Up! Happy Inkin' Thursday Blog Hop Theme Challenge
Stampin' Up! Flowering Zinnias 12x12 Thank you Card front

Do you see – the DSP is the focus of this card and it’s so bright & cheery! The lovely sweet zinnia is created by using the Simply Zinnia Dies: Melon Mambo card stock for the zinnia and Mossy Meadow card stock for the stem/ leaf die. The ribbon is from the Ribbon Duo Pack. The sentiment banner is die cut with the Scalloped Contour Dies using Basic White card stock. Of course, the sentiment is stamped in Melon Mambo ink to pull it all together – and the final touch is the Adhesive-Backed Shiny Sequins in Lemon Lime Twist. I used a single Lemon Lolly sequin from the same pack for the flower center. And that’s it! Fun, quick, easy, bright & cheerful too.

Stampin' Up! Simply Zinnias thank you card, inside

For the inside… I stamped the zinnia in Melon Mambo ink then used my Blender pen to move the ink around a bit. I added Lemon Lolly ink to the center of the zinnia. The leaf image is stamped in Lemon Lime Twist ink. I added a bit of Wink of Stella both to the flower and the leaf image.

Stampin' Up! Flowering Zinnias thank you card & envelope

For the envelope, more of the same Flowering Zinnias 12×12 DSP for the flap & trimmed to fit. On the env elope front, the same zinnia stamped from Simply Zinnias stamp set with Melon Mambo ink and highlighted with Lemon Lolly Blends for the center.

The zinnia suite of products is a new ONLINE EXCLUSIVE product that will be available March 5. If you would like to pick up this product EARLY, JOIN MY TEAM – and if you do that PRIOR TO end of day Feb 29, there are all kinds of FREE PRODUCT available to you. Read more below the list of blog hop names.

Amy Koenders

Mary Deatherage

Jaimie Babarczy

Karen Finkle

Akiko Sudano

Karen Ksenzakovic

Tara Carpenter

Terry Lynn Bright

Carol Buckalew

Nel Thames

One of the best parts about making Stampin’ Up! purchases right now is the benefits of the Jan-Feb 2024 Sale-Bration opportunity. During Sale-a-Bration, when making qualified purchases, you receive FREE items from Stampin’ Up! – and you get to choose what those items are from a generous selection of products.

Click here to view items when making a $50 purchase (before shipping & taxes) of any Stampin’ Up products.

Click here to view items when making a $100 purchase (before shipping & taxes).

Click here to view all items in the Jan-Apr 2024 Mini Catalog

Click here to view all items in the 2024 Annual Catalog

Click here to view all items available as part of the ONLINE EXCLUSIVES

Click here to view all Clearance Rack items

If you do not have a demonstrator, reach out to me and I’ll send a catalog right away, plus a Jan-Feb Sale-a-Bration catalog as well. Sale-a-Bration is a special time for Stampin’ Up! folks – a time when there are product bonuses for qualifying orders. For instance, a $50 order qualifies for certain FREE ITEMS in the Sale-a-Bration Catalog and a $100 purchase qualifies for other FREE PRODUCT in that catalog. And there’s no limit to the free items. And if you think you might want to join as a demonstrator, there are bonuses there as well – extra special bonuses not offered at other times. See below for more info about joining as a demonstrator. When placing an order of $50 or more (prior to shipping & postage) you will also receive from me a monthly tutorial :O) with all kinds of ideas for gorgeous creations.

HOST CODE PV2QWYHJ

If your purchase is over $150, do NOT use the host code as SU! has rewards of it’s own. You STILL receive the FREE ITEM FROM ME. :O)

Nothing brings people together quite like creativity. As an independent demonstrator, you can share what you love and expand your circle of friends to build a close-knit, collaborative community of crafters. You’ll meet, connect, learn from, and create with other demonstrators from all around the world through virtual events, in-person conventions, support groups, and social media. And don’t forget the importance of hosting your own crafting parties! You can host events with your favorite people and show off your favorite Stampin’ Up! projects.Let’s discover the joy of being a demonstrator together!

Stampin' Up! JOINING PROMOTION

Join by 29 February 2024 and choose between two fabulous offers:

Option 1: Get $125 worth of product PLUS our new Stampin’ Glass Mat Studio (a $60 value) for just $99!

Option 2: Get $125 worth of product PLUS an additional $30 worth of product of your choice when you join for $99. That’s a $155 value!

Click here to JOIN MY TEAM

Thanks for stopping by. May you have a beautiful day!

Make someone happy by sending them a handmade card made with love.

Stampin’ Up! Perennial Postage Thank You Card

Snow is covering everything and it’s a beautiful sight. I’m glad I don’t HAVE to go anywhere though :O) My card today is a Thank You for a special friend who recently gave me a gift.

Stampin' Up! Perennial Postage Thank You Card

The card base is Gorgeous Grape with an added layer of Basic White run through the Softly Sophisticated 3D embossing folder. This is a FREE ITEM in the Jan-Feb 2024 Sale-a-Bration Catalog with a qualifying order. It comes with a stamp set called Softly Sophisticated. Back to the card… I pulled out my Scallop Contour Dies and die cut a piece of Highland Heather, then with my paper trimmer cut a Basic White piece to fit inside and a panel of Perennial Lavender DSP. I layered these together with liquid glue, then used my Wink of Stella to add some sparkle to the butterflies. Before attaching it to the card front, I added a narrow strip of Gorgeous Grape across the center, then attached the panels with dimensionals. The Perennial Postage stamp set has a wonderful sentiment – Thank You for Your Friendship – I taped off the latter part and stamped the Thank You with Gorgeous Grape ink on a scrap of Basic White, trimmed the ends and added it with dimensionals. I added three Purple Fine Shimmer Gems around the sentiment.

Stampin' Up! Perennial Thank You Card, inside

For the inside I stamped the remainder of the sentiment on a scrap of Basic White in Gorgeous Grape ink, trimmed the ends and adhered the sentiment to a larger scrap of Perennial Lavender DSP, then to a Basic White insert. I stamped the butterflies from Perennial Postage stamp set in Highland Heather ink.

Stampin' Up! Perennial Postage Thank You Card & Envelope
Stampin' Up! Perennial Postage Thank You Card, envelope front

For the envelope, more of the same piece of Perennial Lavender DSP on the flap, trimmed to fit. For the envelope front, I again stamped the butterflies in Highland Heather ink, scattering them. .

What a sweet card – love the colors & DSP -so cheery & fresh.

Remember that this bundle – Perennial Postage – is in the Jan-Apr 2024 Mini Catalog and can be found as part of a suite of products on pages 22-25. If you do not have a demonstrator and need a mini catalog or the Sale-a-Bration catalog, please reach out to me. I’ll get one to you lickety split. To see the catalog in my shop, click to the image below.

Stampin' Up! Jan-Apr 2024 Mini Catalog

For every $50 you spend (prior to shipping and handling) you can receive FREE product from the Sale-a-Bration catalog. Click here to see those products.

Stampin' Up! Jan-Feb 2024 Sale-a-Bration Catalog

Sale-A-Bration is one of our biggest promotions of the year! It’s packed with perks, overflowing with opportunities for customers, and filled with fun for everyone. 

For every $50 of purchase, there are opportunities for FREE ITEMS from the Sale-a-bration Catalog. Enjoy the demonstrator perk of having early access to product by redeeming exclusive Sale-A-Bration products for FREE when you reach $50 USD | $60 CAD or $100 USD | $120 CAD spend levels.

While you’re at it, consider checking out the Stampin’ Up! Clearance Rack, the Kits Collection, Paper Pumpkin – and oh yes, consider JOINING MY TEAM to get regular discounts on every order.

Nothing brings people together quite like creativity. As an independent demonstrator, you can share what you love and expand your circle of friends to build a close-knit, collaborative community of crafters. You’ll meet, connect, learn from, and create with other demonstrators from all around the world through virtual events, in-person conventions, support groups, and social media. And don’t forget the importance of hosting your own crafting parties! You can host events with your favorite people and show off your favorite Stampin’ Up! projects. Let’s discover the joy of being a demonstrator together!

Become a Stampin’ Up! demonstrator and for just $99, you’ll get your own customized Starter Kit with $125 worth of products. And we’ll include all the business supplies you need to help you get started, plus free shipping. Don’t wait! Talk to me today to begin your creative journey! You may do that here!

Stampin' Up! Joining Promotion

Join my Stampin’ Up! team as a demonstrator using one of the options below…

Option #1:

  • Pay $99 USD for your Starter Kit
  • Choose $125 worth of products of your choice in your Starter Kit
  • PLUS receive the Stampin’ Glass Mat Studio for FREE (a $60 value) (Item #163987) I AM LOVING MINE!!!
Stampin' Up! Glass Mat Studio

Option #2:

  • Pay $99 USD for your Starter Kit
  • Choose $125 worth of products of your choice in your Starter Kit
  • PLUS receive an additional $30 worth of products of your choice in your Starter Kit
  • That’s a total of $155 worth of products for just $99! This is such a great deal!

Of course, there are other great benefits to becoming a Stampin’ Up! Demonstrator, such as free shipping on your Starter Kit, a 20%+ discount on demonstrator orders, early access to new catalogs and promotion information, early ordering of new products, attend conventions and workshops, being part of a team of creativity, no pressure to sell products and my full support as a valued team member!

If you’ve made up your mind and are ready to do join my team, you may do that here.

When ordering from me please use my NEW HOST CODE TJRE9W6M so that I receive proper notification and YOU GET THE Benefits of a FREE SU! item valued up to $10 :O) AND the Monthly Card Tutorial. (I like to treat my customers!) If your order is over $150, please don’t use the host code as SU! has benefits. I’ll still be notified and you can receive that FREE ITEM!

Note: Make sure that you can see my name on the final checkout page listed as your Demonstrator when you order so that you know that you’re ordering with me and you’ll get my rewards! PLUS… the monthly Online Tutorial when your order is over $50. 

Stampin’ Up! has lots of other ‘goodies’ in it’s line of products: Clearance Rack, Kits Collection, Paper Pumpkin’. See ALL THE PRODUCTS AVAILABLE BY CLICKING HERE – AND SHOP WITH ME.

Thanks for stopping by. May you have a beautiful day –

Stampin’ Up! Earthen Textures for the Happy Inkin’ Thursday Blog Hop

Good morning! We have a sketch challenge for today’s hop and it was extra fun.

Stampin' Up! Happy Inkin' Thursday Blog hop
Stampin' Up! Blog hop Sketch Challenge
Stampin' Up! Earthen Textures for the Hop 9/28

You can see I did not deviate from the sketch at all… and that’s unusual for me. I usually do something different. This is a great masculine card – and I have trouble making those. But this DSP: Earthen Elegance DSP is perfect for a ‘man card.’ I used the Stylish Shapes Dies to die cut the various patterns from the Earthen Elegance DSP. The card base is Copper Clay card stock (4 1/4 x 11 scored at 5 1/2) which coordinates with this designer series paper. I cut another piece of the Copper Clay just slightly smaller than the card front and ran it through a Basic 3D Embossing Folder (flower) from the ONLINE EXCLUSIVES. There are three embossing folders in this set. I wrapped a Copper Ribbon around it after embossing and secured it in back with Stampin’ Seal. The ribbon comes from the Copper & Natural Ribbon Combo Pack found in the September-December 2023 Mini Catalog. (You will find links both to the ONLINE EXCLUSIVES and to the mini catalog below.) I then attached the die cut circles: the largest with liquid glue, the next size with dimensionals and the smallest with dimensionals and liquid glue where it overlaps. I added three Brushed Metallic Adhesive-Backed Dots in Copper for a bit of glam. I also tied a knot with more of the Copper Ribbon and secured it in place with a glue dot. And the front was complete!

Stampin' Up! Earthen Elegance card inside
Stampin' Up!
 Earthen Elegance card inside.2

I stamped the sentiment using Early Espresso ink with the Earthen Textures stamp set on a Basic White panel. I appreciate how clean the words are! I then ran a die through on this same panel from Earthen Textures Dies that does not cut, but leaves an impression instead. The second photo above shows that better.

Stampin' Up! Earthen Elegance card & envelope

For the envelope I used more of the Earthen Elegance DSP for the flap and trimmed it to fit. For the front, I stamped another sentiment from the Earthen Textures stamp set in Early Espresso ink – and one & done! I really like how this card turned out and alrecy know to whom it will be given :O)

Now… time to move on with the hop. Click on the ‘next’ button or click on a name to take you to each of those participating today. Have fun on the hop!

Stampin' Up! Happy Inkin' Thursday Blog Hop next button

Amy Koenders

Mary Deatherage

Jaimie Babarczy

Akiko Sudano

Karen Ksenzakovic

Tara Carpenter

Terry Lynn Bright

Carol Buckalew

For links to the ONLINE EXCLUSIVE STORE, click here. Be sure to check out the SPECIAL RELEASE DESIGNER SERIES PAPERS ALSO! They are available only while supplies last.

Stampin' Up! September-December 2023 Mini Catalog

For the Mini Catalog, click the image above to see all the very neat products available! Remember, these items are only available through the end of December!

October 7 is World Card Making DAY and Amy’s Inkin’ Krew is hosting an online event with demonstrators in the group (me too!). We start at 9 AM and go until the official start of Stampin’ Up’s event, then come back on again.

Stampin' Up! World Card Making Day

Who: Anyone!
When: 7 October from 2:00–5:00 p.m. (MT)
Where: Online
Price of Event: Free
Registration Dates: 6 September–7 October 2023

Which specific browsers are supported?
For the optimal viewing experience, we recommend using Chromium based browsers such as Google Chrome or Microsoft Edge. You can also get good results on Mozilla Firefox or Safari; however, there can be times where there may be slight visual differentiation (video controls, website design, etc.). We recommend always using the latest version of your chosen browser.

Can I watch the event with people that didn’t register?
That’s a big yes! Anyone and everyone are welcome to join in the fun. Registration is the best way to keep up on event details, but it’s not required.

Connect with me to register for this event!

Celebrate 35 Years with Us: Upcoming Starter Kit Special

We’re celebrating our 35th anniversary this year, and what better way to do that than with a special Starter Kit offer? From 3–31 October, new demonstrators will be able to choose either 35% OFF the cost of their Starter Kit or get 35% MORE product with their Starter Kit! Let me know how I can help you :O)