Stampin’ Up! Impressions Ablooms Apreciation Card

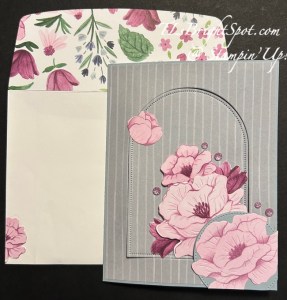
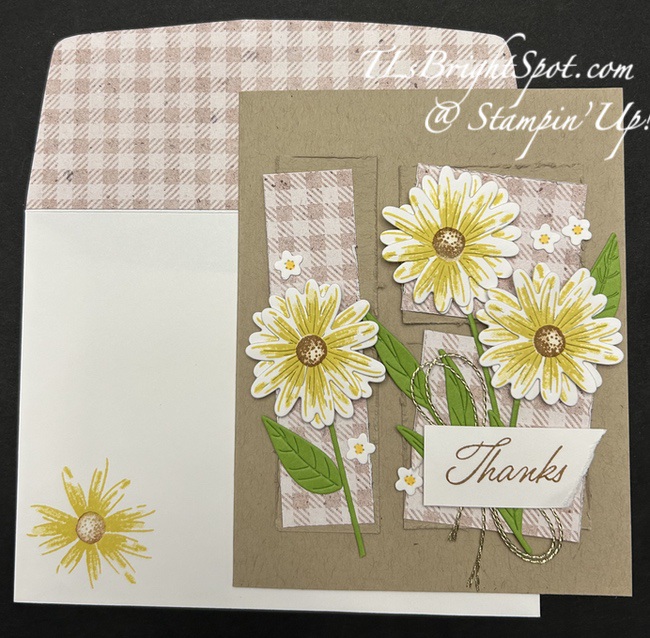
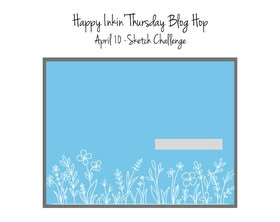
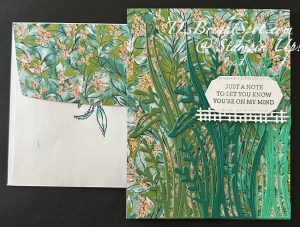
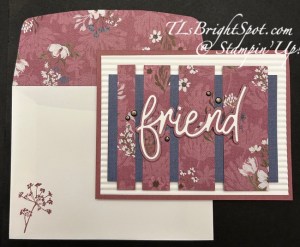
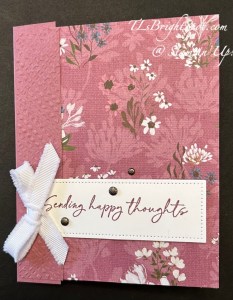
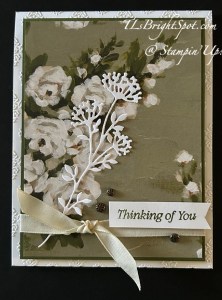
Today’s card has a bit of modern look to it and uses most of the new In Colors for 2025-2027: Strawberry Slush, Darling Duckling, Timid Tiger and for the sentiments… Secret Sea. The flowers are a two-step stamp, meaning they have an outline stamp & a filler stamp. For the flowers on this card, I only used the outline stamp. An additional color was used for the stems/ leaves and that is Granny Apple Green. And of course, Wink of Stella in all the flower centers :O) This layout was given to us at the convention a few weeks back.

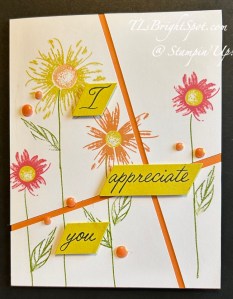
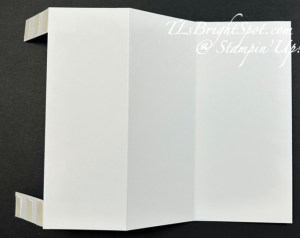
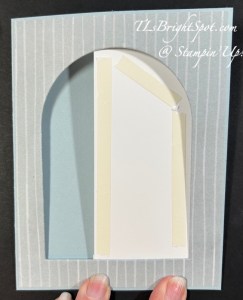
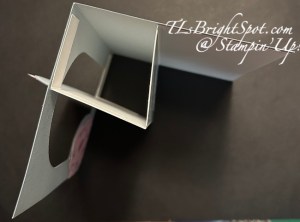
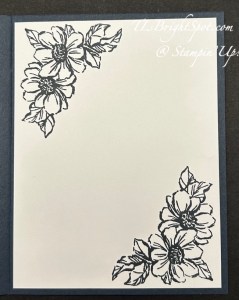
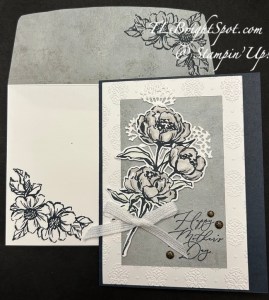
The card base is Timid Tiger in an A2 size, folded in half. The layer (4 1/4 x 5 1/2) is stamped then cut in two directions on diagonals, then attached to the card front leaving the card base to show through and the excess of the layer removed. It sounds a little funky doesn’t it, but it works! A little explanation maybe… it’s necessary to begin with a layer that is the full size so the layers fit nicely into the corners. When adhering the layer, I kept the separation as even as possible, using my grid paper to help. I began attaching with the left top piece, which needed no trimming. Then I adhered the bottom left panel, keeping the left edge even with the card fold. This meant there was excess at the bottom to be removed when all panels are on. I added the top right layer even at the top but left that gap between & used my grid paper for straightness. Last panel to attach, bottom right. Where is the excess to remove: right side and bottom & you can use your paper trimmer for that by turning the card over and lining up the card base edge. Perfect! Sentiment- stamp in Secret Sea ink on Darling Duckling card stock, trim and add to card front with dimensionals. This particular sentiment is all one, so I taped off the various words to ink up each word separately and I wanted to angle the cut as well. The embellishments are the 2025-2027 In Color Flat Pearls in Timid Tiger.

Stampin' Up! Impressions Abloom Appreciate You card front

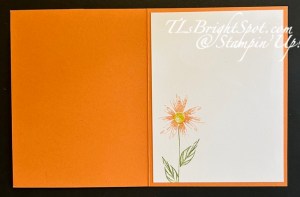
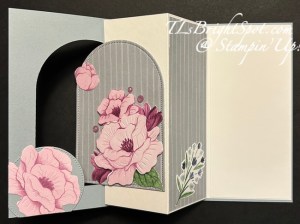
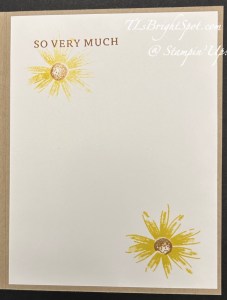
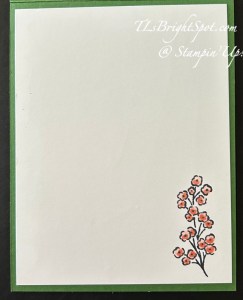
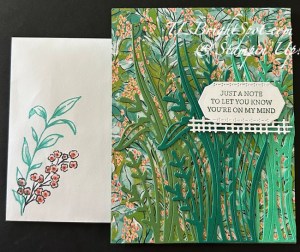
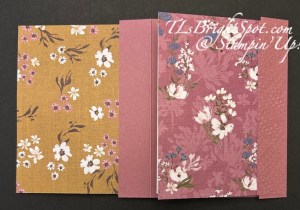
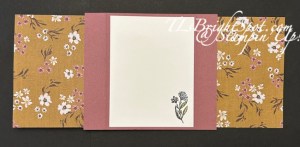
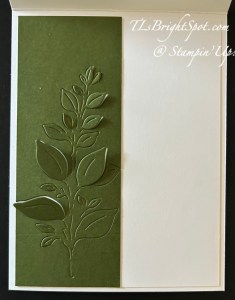
The inside… a panel cut 4 x 5 1/4 then stamped: Timid Tiger for the flower, Darling Duckling for the center and Granny Apple Green for the stem/ leaves. And yes, Wink of Stella added to the flower center.

Stampin' Up! Impressions Abloom Appreciation card& envelope

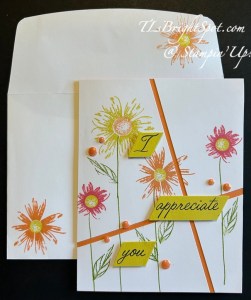
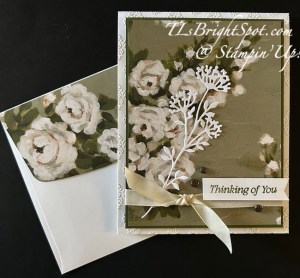
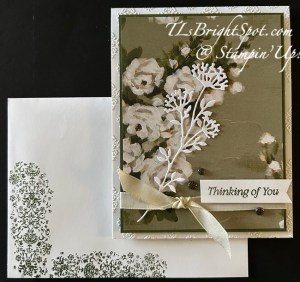
For the envelope, I stamped the flower both on the card front & on the flap in Timid Tiger with the center in Darling Duckling and Wink of Stella also in the centers. I am loving the new In Colors and hope you are as well.

These items will all be available May 6 when the new catalog goes live to the customers. I hope you, my customers, have received the new 2025-2026 Annual Catalog. If you have not, reach out to me so that can be remedied. :O)

Remember too, that today, April 15, is the day the new Stampin’ Rewards program goes into effect. That means things will be shut down for a bit so the computers can do their task… and when everything goes back on again, you, the customer will have a fresh start.  You’ll be earning 10% rewards with all orders of $20+, a 10% reward that can be used on your next order! YAY! And what’s also really neat – you can save those rewards & use them all at once – or a bit at a time – they are GOOD FOR A WHOLE YEAR! Make sure you have a Stampin’ Up! online store account at stampinup.com so you can earn & redeem those rewards.

Thanks for stopping by. May you have a beautiful day!

Window Pop-Out Card with Florals in Bloom DSP & More

Hello Monday! It’s a new week, actually a new day – – and it is NOT raining here. Whew! We need the rain to fill our reservoirs; I like rain; but the days are a bit gloomy. We had sunshine for a bit of the day & it felt good. Thank you for the rain; and thank you for the sunshine!

My card today uses the ever-popular Arches Dies found in the ONLINE EXCLUSIVES. I’ve paired it with one of the new In Colors for 2025-2026 called Cloud Cover plus a beautiful Florals In Bloom DSP. I either fussy cut the flowers with my paper snips, or die cut them with a die from Pretty Florals Dies or Sweet Blooms Dies. Both of these dies and the DSP are part of a new suite of products in the 2025-2026 Annual Catalog – the Florals In Bloom Suite.

Stampin' Up! Window Pop-Out card front with Florals in Bloom Suite

This card begins with a standard A2 card base in Cloud Cover. The DSP layer is just 1/8″ smaller all around and is from the Florals In Bloom pack. It is from the other side of this sheet that I either fussy cut or die cut the flowers for the front of this card. :O) Ah, but I jump ahead… after adhering the DSP to the card front, open card & use the 4th largest die in the Arches Dies to center it on the front & die cut the arch. This may take running it back & forth a couple of times.

Stampin' Up! Window Pop-Out Card, die cutting front

Now prepare the inside panel… 6 1/2 x 5 3/8 scored at 2 & 4 on the long side. Prepare two ‘hinges’ cutting 3″ x 1 1/4″, scored @ 1 1/2. Add Tear n’ Tape in several places then cut in half lengthwise, thereby creating 2 hinges. Add Tear n’ Tape to the BACK SIDE of the 2 1/2″ panel. On that same back side, add the hinges with the fold at the outside edge, one at top & one at bottom. Refer to photos below.

Stampin' Up! Window Pop-Out Card template 1
Stampin' Up! Window Pop-Out Card front side of insert - template 2

back side of card insert front side of card insert

Remove tape cover & add insert to to inside of card with 1/8″ edge top, right & bottom. Fold insert along score lines, remove tape cover on hinges and with them flat & sticky side up, close card front. Boom! Now, with card closed & ‘window’ uncovered, add adhesive or Tear n’ Tape to open area – see photo… & attach die cut arch & decorate! ….

Stampin' Up! Window Pop-Out Card Template 3
Stampin' Up! Window Pop-Out Card front.2

As mentioned earlier, I either fussy cut with my paper snips or die cut with appropriate dies all the flowers. On the bottom right, this flower was Cloud Cover so that when the card is opened, there is a ‘like’ image inside – cut 2. After adhering, circle & flower were trimmed to card front edges.

Stampin' Up! Window Pop-Out card inside.

Additional info:

  • DSP added to inside of card is 1 7/8 x 5 1/4, decorated with a die cut from the DSP (Sweet Blooms Dies)
  • Basic White panel on far right is 2 3/8 x 5 1/4
  • Embellishments on fron are 2024-2026 In Color Shimmer Gems
  • Wink of Stella was added to shaded areas of all flowers
  • This is what the card looks like from the top
Stampin' Up! Window Pop-Out card, top down photo

For the envelope…

Stampin' Up! Window Pop-Out card & envelope

More of the same DSP from Florals In Bloom DSP pack (just the other side) adhered to the flap & trimmed to fit. On the front, another fussy cut flower added to the edge of the envelope front.

I had so much fun creating this card. It was pretty easy really and the fun came in the decorating. I would love to see what you do with this Window Pop-Out card design.

As I mentioned earlier, this suite of products are all available in the 2025-2026 Annual catalog, which goes live to customer May 6. That’s a few short weeks away. But… if you were to join my team, you could purchase the items to make this card (& more) as part of your starter kit. Wouldn’t that be fun? And in any future orders you would always get at least 20% off your purchase, just for being a demonstrator. And being a part of this team – well, lots of creative folks to inspire & encourage and learn more & more. so, think about it & come join the fun. Join with me here.

Want to just shop? You can see everything in my store by clicking here… Kits Collections, Last chance Products, ONLINE EXCLUSIVES, specials, Paper Pumpkin – it’s all in that link. Need a new 2025-2026 Annual Catalog – just let me know!

In just a couple of days… April 15 to be exact, Stampin’ Up! is going to be offering rewards to every customer beginning with a $20 purchase & above. No more host codes to worry about, just order & reap the benefits.

Thanks for stopping by.

May you have a beautiful day!

Stampin’ Up! Impressions Abloom Thanks Card

Impressions Abloom is one of the new bundles in the Stampin’ Up! 2025-2026 Annual Catalog – and it’s wonderful. This card was one inspired by the After Hours program at the Stampin’ Up! Convention recently. I confess it’s a direct CASE of one in the After Hours booklet :O)

Stampin' Up! Impressions Abloom Thanks card front

This card begins with a Crumb Cake card base, standard A2 size. Several pieces of Crumb Cake were trimmed down for layering with Perennial Lavender DSP. This DSP is a carry over 12×12 paper and is gorgeous. What you are seeing here is a checkered pattern. Notice how the edges of both the Crumb Cake pieces and the DSP pieces have frayed edges. That was done by holding the scissors at an angle on each piece and ‘scratching’ down the side. It sometimes even tears a bit, which is ok. It gives it a country look. Each of the flower heads is stamped in Darling Duckling ink then die cut with the appropriate die with two layers per flower head. The centers are stamped with Pecan Pie ink then Wink of Stella for a bit of sparkle in the centers. The stems & leaves are die cut using this same Impressions Abloom bundle – using Granny Apple Green card stock. These were attached to the card front, then the flowers heads added with dimensionals. The tiny flowers were die cut from Basic White then a Stampin’ Blends in Daffodil Delight colored the center. These were added with dots of liquid glue. A double bow was created using the Gold thread and attached with a glue dot. The sentiment was stamped in Pecan Pie ink, an edge torn and added with dimensionals.

Here’s a photo of all the daisy die cuts:

Stampin' Up! Impressions Abloom daisy die cuts
Stampin' Up! Impressions Abloom card inside

For the inside…

I stamped the daisy image in Darling Duckling ink and the centers in Pecan Pie – same as the card front. I stamped the sentiment, also from Impressions Abloom stamp set, in Pecan Pie ink. The panel was added to the inside of the card.

The envelope …

Stampin' Up! Impressions Abloom card & envelope

More of the Perennial Lavender 12×12 DSP was added to the flap & trimmed to fit. The very same flower from Impressions Abloom stamp set was stamped on the envelope front: Darling Duckling for the flower and Pecan Pie for the center. And of course, Wink of Stella was added to the center :O) This would be a great birthday or hello card – just change the sentiment. It’s cheerful – a real lift me up kind of card.

This bundle and DSP will be available May 6, both in the ONLINE Exclusives AND in the 2025-2026 Annual Catalog. Remember too, the Stampin’ rewards are changing as well. – no more HOST CODES, but customers will begin receiving rewards with a $20 purchase – and that reward can be used toward their NEXT purchase. It’s quite a nice deal.

Feel free to look through my store by clicking the link here. This link will allow you to view any specials going on, ONLINE EXCLUSIVES, Paper Pumpkin, the Kits Collection – like that. And if you have any questions, reach out to me. I’m here to help… to inspire, to create, to answer questions.

card cuts:

  • card base: 8 1/2 x 5 1/2 scored @ 4 1/4
  • layer: 1 1/8 x 4; 2 x 2; 1 3/4 x 2
  • DSP layer: 1 x 4; 1 3/4 x 2; 1 3/4 x 1 5/8
  • Basic White: 4 x 5 1/4, inside; 4 x 5 1/4 die cutting flowers
  • Granny Apple Green: 1 3/4 x 5 3/4, leaves/ stems
  • DSP: 2 14 x 6, envelope flap

Stampin’ Up! Happy Inkin’ Thursday Blog Hop

Hello – and WELCOME to the Happy In kin’ Thursday Blog Hop. We have a sketch challenge today & I’ve maybe stretched the parameters just a bit, but I like the card and think it works.

Stampin' Up! Happy Inkin' Thursday Blog Hop
Stampin' Up! Blog Hop Sketch Challenge
Stampin' Up! Mixed Media Florals, Mixed Labels & Mixed Florals

I’ve used some ONLINE EXCLUSIVE products for this card – primarily the Mixed Media Florals DSP, the Mixed Labels Bundle and the Mixed Florals Bundle. I LOVE this DSP for the background. It reminds me a bit of a jungle and it was adhered directly to the Garden Green card base. The multiple die cut leaves are in Garden Green, Shaded Spruce and Shy Shamrock & I used the Mixed Florals Dies to create them. I simply adhered them with dabs of liquid glue but could very easily have used Adhesive Sheets as a backing, I just didn’t. The next step was to stamp the sentime on a Basic White scrap in Garden Green ink using the Mixed Labels stamp set. I die this and the rectangular piece using the Mixed Labels Dies. I adhered the fence-like piece to the back of the sentiment label then added dimensionals to the sentiment & attached it to the card. Viola!

Stampin' Up! Mixed Florals

For the inside… I stamped this beautiful floral image in Memento ink on the Basic White panel then colored it with Calypso Coral Stampin’ Blends. Done!

Stampin' Up! Mixed Media Florals card & envelope back
Stampin' Up! Mixed Media Florals card & envelope front

For the envelope… I added more of the Mixed Media Florals DSP to the flap (after messing up the stamp image of the leaf!), trimmed the paper to fit. Since the mess-up of the stamped image on the flap, I decided to add some ink ‘edging’ to the remaining leaves, making them look like the leaves on the DSP :O) I added some extra ‘doodles’ for fun – all this with a SU! Journaling Pen. For the envelope front, I stamped the image of the leaves (just fine) with Shy Shamrock ink & used a Blends in Shy Shamrock to add some extra color depth. I also stamped the same sweet image as on the inside of the card in Memento ink & colored the flowers with Calypso Coral Stampin’ Blends. Finis…

This is such pretty DSP and the coordinating bundles are so perfect to layer or use individually. I encourage you to visit my ONLINE EXCLUSIVE store – see info below.

Now, make the rounds of the hop – don’t miss a single one :O) & have fun! Click on the next button or click on a name to make the rounds.

Stampin' Up! Blog Hop icon

Amy Koenders

Mary Deatherage

Karen Finkle

Akiko Sudano

Karen Ksenzakovic

Tara Carpenter

Terry Lynn Bright

When shopping with me and your purchase is $50 or more, you will receive a SU! item valued up to $10 and the current months fabulous tutorial – for April, it’s Memorable Blooms. And use my HOST CODE until April 12. If you do not have a demonstrator, I would love to support, encourage and help you create your best. Contact me!

HOST CODE Y3TPZVYN

HOST CODES are going away April 12, but something even better for you is happening – you will be earning Stampin’ Rewards when your purchases are $20 or more.

Remember the LAST CHANCE LIST ? Click here to shop that list.

Click this link to see all that’s available in the Stampin’ Up! world – this includes the link to ONLINE EXCLUSIVES – and make sure my name is at the top when checking out. This link allows you to see the online exclusives, Kits Collection, The Paper Pumpkin information, etc., etc. If you have questions, please connect with me!

Thanks for stopping by. May you have a beautiful day!

Stampin’ Up! Beautiful Gallery Suite for Amy’s Inkin’ Krew Team Blog Hop

Welcome to ‘the hop’! We have a great lineup of folks participating so be sure you visit each post. The theme for this month’s hop is “for the ladies/ girls” and we can interpret that any way that suits. Mother’s Day cards are difficult for me as my mother is gone and well, it just feels weird. April 8 is actually her birthday, so this works for me. Having said that, my card IS a Mother’s Day card and I will send it to our daughter who has three not so little ones (the oldest is 6’5″, the next is maybe 5’11” and the third is about 5’3″).

My card features products from the new 2025-2026 Annual Catalog. If you haven’t received yours from me yet, be patient… sometimes the mail takes a bit :O( Look for the Beautiful Gallery Suite of products that are showcased on pages 52-57. They are a really fun suite of products: frame dies, floral & leaf dies, stamps & more stamps, an embossing folder, a wonderful set of embellishments, ribbon, DSP – it’s quite grand! I’m also showcasing some of the new 2025-2027 In Colors: Cloud Cover and Secret Sea.

Stampin' Up! Amy's Inkin' Krew Team blog Hop
Stampin' Yp! Beautiful Gallery Suite Mother's Day card front

I’m loving this rose stamp & die from the Gallery Blooms bundle in this suite! And the Damask Designs embossing folder is evident on the ‘frame’ of this image. The ‘frame is also from the Gallery Blooms bundle. And the sweet background floral die cut is from the Beautiful Motifs Dies in the suite. The ribbon on this card is NOT part of this suite – it IS part of the Botanical Textured Suite of products that are ONLINE EXCLUSIVES. Lastly – the embellishments – gorgeous – are part of the Beautiful Gallery Suite and are called Pressed Flower Motifs. Let’s see, what did I leave out – oh, the DSP… is Beautiful Gallery 6×6 DSP and from the Beautiful Gallery Suite.

So, how to make this card… The card base is Secret Sea cut 8 1/2 x 5 1/2 & scored at 4 1/4. I embossed a 4 x 5 1/4 Basic White panel with the Damask Designs embossing folder; then die cut with the Gallery Blooms Dies that are the frames. This die is so cool – it die cuts two frames at the same time and creates a center panel as well. I used the larger of the frames for this card. I adhered the frame to the desired Beautiful Gallery 6×6 DSP, then trimmed the DSP even with the frame. I stamped the rose image in the new Secret Sea ink – it’s a deep blue black – on a piece of Basic White. I used Stampin’ Blends in Gray Granit &, Smoky Slate to color the roses and Dark Sea Foam to color the leaves. I die cut with the coordinating die in Gallery Blooms Dies. I then die cut from Basic White, the flower used in the background – which came from the Beautiful Motifs Dies. I placed both floral dies without adhering them so I would know where to stamp my sentiment. The sentiment is from Stippled Roses stamp set and is stamped in Secret Sea ink. I then added the two dies to the card, adhering the white die cut with dabs of liquid glue and the roses with dimensionals. I wanted a ribbon, so pulled out the 1/4″ Basic White Ribbon from the Botanical Textured Suite (an ONLINE EXCLUSIVE) and adhered that with a glue dot. I added three of these gorgeous Pressed Flower Motifs around the sentiment. The card needed some sparkle – Wink Of Stella to the rescue on all the roses! I didn’t cover them completely but that Wink of Stella did the trick I was looking for.

Stampin' Up! Beautiful Gallery Suite card inside

For the inside – I stamped another sweet rose stamp from the Gallery Blooms stamp set in Secret Sea ink in each corner. I decided not to color the roses – let the card front be all the glory.

Stampin' Up! Beautiful Gallery card & envelope

For the envelope, I covered the flap in the remaining piece of the Beautiful Gallery 6×6 DSP & trimmed to fit. I used the same image as the inside of the card & Secret Sea ink to stamp on the flap & on the envelope front. Love, love. This suite of products will be available to you, the customer, on May 6, 2025, less than a month away!

Now – on to the others on the hop. Be sure to check out all the fun creations. Click the previous or the next button to make the full circuit.

Stampin' Up! Blog Hop icon, previous
Stampin' Up! 'next' icon for hop
  1. Christine King
  2. Karen Ksenzakovic
  3. Karen Finkle
  4. Ann Louise Fodgaard
  5. Terry Lynn Bright
  6. Tara Carpenter
  7. Akiko Sudano
  8. Amy Koenders

When shopping with me and your purchase is $50 or more, you will receive a SU! item valued up to $10 and the current months fabulous tutorial – for April, it’s Memorable Blooms. And use my HOST CODE until April 12. If you do not have a demonstrator, I would love to support, encourage and help you create your best. Contact me!

HOST CODE Y3TPZVYN

Remember the LAST CHANCE LIST ? Click here to shop that list.

Click this link to see all that’s available in the Stampin’ Up! world and make sure my name is at the top when checking out. This link allows you to see the Kits Collection, The Paper Pumpkin information, etc., etc. If you have questions, please connect with me!

Thanks for stopping by. May you have a beautiful day!

Stampin’ Up! Friend Card with Wildly Flowering DSP

Good Monday! It’s turned cold again after a very beautiful day of 81 degrees – ah, that’s Spring. That 81 degrees made the hostas pop up, helebores are in full bloom (they love the cool!), daffodils & crocus are blooming as well. I really enjoy this time of year.

My card today is for a friend who isn’t feeling all that great, I’ve combined the Friends For Life Dies and the Wanted To Say Dies to create my messages – and the last of my Wildly Flowering 12×12 DSP.

Stampin' Up! Wildly Flowering Friend card front

To make this card I began with my card base: Moody Mauve cut 8 1/2 x 5 1/2 and scored at 4 1/4. I layered a panel of Basic White 4 x 5 1/4 that I ran through a brand new Mini Corrugated 3D embossing folder, a new favorite. This piece was adhered directly to the card base. Next I cut a piece of the Wildly Flowering DSP 4 x 3, that coordinates with the strips of another piece of the Wildly Flowering DSP. This was cut 3 1/2 x 3 1/2, then into strips 1/2, 3/4, 1 & 1 1/4. I spaced then evenly along the 4 x 3 panel & adhered with Stampin’ Seal. I took a scrap of the Wildly Flowering DSP 4 x 2 1/2 & die cut the background for the word ‘friend’ from the Friends For Life Dies. Next I took a piece of Basic White 4 x 2 5/8 and covered the back with Adhesive Sheets. I then die cut the word ‘friend’ from that, removed the backing of the Adhesive Sheet and attached it to the DSP background die cut. I put this on dimensionals and adhered it over the DSP strips, added dimensionals to the 4 x 3 DSP panel and attached to the card front. As a final touch, I added five (5) Adhesive-Backed Textural Dots and the card front was complete.

Stampin' Up! Wildly Flowering Friend card inside

For the inside, I took another piece of the Wildly Flowering DSP in Moody Mauve, 2 1/2 x 3 1/2, attached aAdhesive Sheet to that & die cut the sentiment from the Wanted To Say Dies. I attached this to the center of a Basic White piece 4 x 5 1/4. I then used a Blending Brush & Moody Masuve ink to add some color to the edges of this Basic White panel, then attached it to the inside of the card.

Stampin' Up! Wildly Flowering Friend Card & envelope

For the envelope, more Wildly Flowering DSP, 2 1/4 x 6, attached to the flap & trimmed to fit. A simple flower from the Wildflower Designs stamp set was stamped in Moody Mauve ink on the envelope front. Done, ready to send in hopes my friend will ‘feel better soon’!

The 2024-2025 Annual Catalog is quickly coming to an end – and the 2025-2026 catalog will be released soon. I believe this Wildly Flowering DSP is on the Last Chance List. Tomorrow, the list will be updated with all the retiring items and I’ll include it in my post. If there is something you want, get it quickly as once it is gone, it will not be replaced. Use my host code below to receive benefits from me when you purchase is $50 & up… a SU! item valued up to $10 & the monthly tutorial.

HOST CODE Y3TPZVYN

The 2025-2026 Annual Catalog will be released May 6. Items from that catalog can be viewed then, but not until then :O) – unless you are a Demonstrator, then that’s different. Preorders for demonstrators have begun. Want to be a demonstrator and always get at least 20% off each order? Sign up with me now & you will be able to order items for your Starter Kit from the new catalog. For $99 you will be able to order $125 worth of products. click this link, then the join menu :O)

Inked Occasions Paper Pumpkin

Subscribe March 11 – April 10

Subscribe March 11 – April 10

Stampin' Up! Inked occasions PP

I’m extra excited about this particular PP. We had something similar in the past & it was gorgeous – looking forward! Craft stunning cards with hand-painted, alcohol ink designs!
• Makes 9 cards: 3 each of 3 designs with 9 coordinating envelopes
• Textured gold foil on the card bases and sentiments
• Precut paper pieces and butterfly embellishments
• Coordinating colors: Berry Burst (Classic Stampin’ Spot), Flirty Flamingo,
Fresh Freesia, Gorgeous Grape, Peach Pie, Pool Party

Cards come in a beautiful coordinating box!

Subscribe to the April Paper Pumpkin Kit between 11 March and 10 April by clicking here.

Thanks for stopping by. May you have a beautiful day!

Stampin’ Up! You are Remarkable Friend Card

Stampin' Up! You Are Remarkable Fieind card front

It is amazing what one finds when tidying their desk! That would be me :O) What I found is this pretty piece of watercolor paper and I decided not to set it aside any longer. I stamped this gorgeous image of the flower from the You Are Remarkable stamp set – in Secret Sea ink – one of the new In Colors available May 6. This is a two step stamp, so the flowers have a ‘filler’ stamp and I used Melon Mambo ink for that; again the leaves have a ‘filler’ stamp and I used Granny Apple Green; and finally, the center is a stamp that is Crushed Curry ink. I stamped the sentiment, also from the You Are Remarkable stamp set, in Secret Sea ink. I adhered this panel to Melon Mambo card stock, giving it a small border, put dimensionals on that and adhered to a 4 x 5 1/4 Secret Sea panel die cut with the largest Textures Notes Dies. This was adhered directly to the 8 1/2 x 5 1/2 card front, scored at 4 1/4 of course. Two steps more for the card front – Wink of Stella on the flower – petals & center and three Iridescent Pearls Basic Jewels scattered in a bit of triangle.

Stampin' Up! You Are Remarkable Friend card inside

For the inside… I used the second largest die from Textured Notes Dies – again available May 6 – and Basic White card stock, to die cut the inside panel. I then stamped the very cute bee buzzing in Secret Sea ink.

Stampin' Up! You Are Remarkable card & envelope

The envelope… Another sweet buzzing bee stamped in Secret Sea ink in the front and another of the same flower stamped on the flap, just a portion of it though – with same coloring as the card front. Silly me did not photograph that! :O(

The stamp set, Secret Sea ink and dies will all be available May 6. The other products are in the annual catalog.

Thanks for stopping by. May you have a beautiful day!

Stampin’ Up! Turtle-Y Awesome Birthday card for the Happy Inkin Thursday Blog Hop

Welcome to our fun weekly hop. We have a sketch challenge today that stumped me for a bit. I hope you find it still fits the sketch as it’s a bit ‘outside the box’.

Stampin' Up! Blog Hop Group
Stampin' Up! Sketch challenge
Stampin' Up! Turtle-Y Awesome Birthday card front

This is a brand newy suite of products that I used on this card… the Turtle-Y Awesome Suite: DSP, stamp set/ dies, embellishments & ribbon. I did not use the dies for this project – I fussy cut the turtles, and I did not use the ribbon. This is a cute set – very different than we’ve had in the past. I don’t see this as a totally kids kind of suite of products. It’s light and fun – at least, that’s the way I look at it!

So the circles are die cut using the Stitched Shapes Dies, second from largest for the bottom circle; 3rd from largest for the next circle and then one more. Honestly I forget where it fits in. I die cut circles from the Turtle-Y Awesome 12 x 12 DSP specifically cuz this card is for a retired piano teacher and there are music notes all over this sheet- and she was fun! And this card, to me, is fun Because the circles were die cut from DSP which is not as strong as cardstock, I layered each on a die cut Basic White circle and adhered them together for strength. The bottom one and middle circles are on dimensionals. The smallest is adhered directly to the card. The turtles, as I mentioned, were fussy cut with my paper snips from the Turtle-Y Awesome DSP and attached with liquid glue. Additional dimensionals were added under the balloon & the chefs cap. The birthday package is die cut from Granny Apple Green and Poppy Parade using the Wanted To Say Dies. I found this gold banner in the Wildflower Birthday SDSP, wrote the recipients name with a fine tip marker and attached it with glue dots. The last touch was the Shades of Green Hexagons from this Turtle-Y Awesome Suite. All these will become available May 6 as part of the ONLINE EXCLUSIVES. Now that I look at this card – some Wink of Stella is called for: balloon, icing on the cake and the bow!

Stampin' Up! Turtle-Y Awesome birthday card inside

For the inside… I pulled out two sets of dies for the inside: the Wanted to Say Dies for the Happy birthday sentiment and background, and the Alphabet A La Mode Dies for the #90. I used adhesive sheets on the back of the DSP for the numbers as well as for the Happy Birthday. It made attaching those to the inside of the card so easy! The numbers were die cut from the Turtle-Y Awesome 12×12 DSP. The background of the happy birthday was die cut from the same DSP. The words themselves were from Petal Pink card stock.

Stampin' Up! Turtle-Y Awesome Birthday card and envelope

For the envelope… more of the Turtle-Y Awesome DSP (do you notice the music notes on the paper?) attached to the flap & trimmed to fit. For the card front I used Garden Green ink for the sentiment, pulled from the Turtle-Y Awesome stamp set and memento ink for the music notes, also from the Turtle-Y Awesome stamp set. Card cuts are listed at the bottom of this post.

For information to order from me – see below the list of names.

Time to see what everone else has created. Follow the links below & enjoy the hop!

Stampin' Up! Blog link

Amy Koenders

Mary Deatherage

Karen Finkle

Akiko Sudano

Karen Ksenzakovic

Tara Carpenter

Terry Lynn Bright

Ordering from me… click this link to look & shop in my store. At the top of the page is a menu: what’s new, specials, join – and my name should be at the top of the page. You can shop the current 2024-2025 Annual Catalog, the Jan-Apr 2025 Catalog, ONLINE EXCLUSIVES – it’s all right here! If you need help, connect with me :O) Use the HOST CODE below to receive a free gift from me when your order is $50 or above – plus my monthly tutorial. Host codes will go away mid April – but for now – use them – and make certain my name is listed as your demonstrator!

HOST CODE Y3TPZVYN

The 2025-2026 Annual Catalog will be released May 6. Items from that catalog can be viewed then, but not until then :O) – unless you are a Demonstrator, then that’s different. Preorders for demonstrators have begun. Want to be a demonstrator and always get at least 20% off each order? Sign up with me now & you will be able to order items for your Starter Kit from the new catalog. For $99 you will be able to order $125 worth of products. click this link, then the join menu :O)

Inked Occasions Paper Pumpkin

Subscribe March 11 – April 10

Stampin' Up! Inked occasions PP

I’m extra excited about this particular PP. We had something similar in the past & it was gorgeous – looking forward! Craft stunning cards with hand-painted, alcohol ink designs!
• Makes 9 cards: 3 each of 3 designs with 9 coordinating envelopes
• Textured gold foil on the card bases and sentiments
• Precut paper pieces and butterfly embellishments
• Coordinating colors: Berry Burst (Classic Stampin’ Spot), Flirty Flamingo,
Fresh Freesia, Gorgeous Grape, Peach Pie, Pool Party

Cards come in a beautiful coordinating box!

Subscribe to the April Paper Pumpkin Kit between 11 March and 10 April by clicking here.

Thanks for stopping by. May you have a beautiful day!

Stampin’ Up! Wildly Flowering DSP Happy Card

Good Monday – and a new week begins… and I’m feeling better, not great, but better. It’s amazing how a cold can wear a person down. But I have a pretty card today to cheer us. It’s made with Wildly Flowering 12×12 DSP with the Moody Mauve papers – and it’s a bit of a fun fold also.

Stampin' Up! Wildflower Designs card front

This Designer Series Paper is so pretty and it uses the In Colors from 2023-2025, which means it will be retiring when the new 2025-2026 Annual catalog goes live May 6. And I want to use it!

The original directions for this card call for two Designer Series panels 3 1/2 x 5 1/4, which is what I did. BUT I prefer the panels be 5 1/2 so it stands evenly. Next time… to continue… adhere the panels to the card base 6 1/4 x 5 1/2 scored at 1 & 5 1/4 on the long side. Here I used Moody Mauve card stock. Cut two pieces of Moody Mauve 7/8 x 5 1/4 (or 5 1/2 if revising the DSP panels) and emboss. Here I used the Dashing Designs embossing folder, which is part of the suite.. Adhere these panels on the ends covering where the DSP is attached to the card base.

Stampin' Up! Wildflower Designs card, semi closed

I stamped the sentiment using moody Mauve ink and the Wildflower Designs stamp set onto a Basic White piece and die cut it with a Tailor Tags die that I extended. I popped this up on dimensionals and attached a bow with a glue dot using the Frayed Grosgrain ribbon from the Iconic Suite (an ONLINE EXCLUSIVE). The final touch was three Adhesive-Backed Textured Dots.

For the inside… I cut a Basic White panel slightly smaller – 3 7/8 x 5 1/8 to be sure it did not show when either end of the card was closed. I stamped the image in Memento ink using the Wildflower Designs stamp set, and colored it with Stampin’ Blends, Misty Moonlight & Old Olive. It was added to the inside and the card was complete. Make note of how the opposite side of the DSP shows when the card is open – I love that!

Stampin' Up! Wildflower Designs card inside

For the envelope, more of the same Wildly Flowering DSP on the flap, adhered & trimmed to fit, and another stamp on the front (same as inside the card) colored with Moody Mauve Marker and Old Olive Stampin’ Blends. This suite of products may be found on pages 40-41 of the 2024-2025 Annual Catalog.

What’s nice about this layout is that it works for so many of Stampin’ Up! Designer Series Papers, showing off both sides.

Want to look around in my store? Do that here. When shopping with me and spending at least $50 on a single order, receive the monthly tutorial. And while you’re at it, consider what it would be like to be a demonstrator. For $99 get $125 worth of products when you join.

  • 20% off every order
  • getting early access to new products – and ordering them
  • the possibility of creating with others around the world
  • being part of a team, getting positive reinforcement and encouragement
  • Join my team – Do that here…

Thanks for stopping by. May you have a beautiful day.

Stampin’ Up! Sneak Peek of Beautiful Motifs Bundle in a Sympathy Card

Good Saturday morning. I’v e been under the weather this week – got a full blown head cold, lost my voice, all those things. Ugh… I’m beginning to feel better and hoping to be able to play in my craft room. Today’s card is a sympathy card made with products that as demonstrators we can order early before they become available to the general population. It helps build excitement and give you, the customer a chance to see new products. These will become available May 6 as ONLINE EXCLUSIVES.

Stampin' Up! Beautiful Motifs card front

This is stunningly beautiful DSP that is called Beautiful Gallery 6×6 DSP. This photo doesn’t show the colors very well (hmmm) but they are Mossy Meadow & other similar shades of green, Basic White, Basic Beige.

I’ve cut the DSP 3 3/4 x 5 and layered it on Mossy Meadow 3 7/8 x 5 1/8. I wrapped a 3/8″ Classic Ribbon in Basic Beige around this, securing it in back with Tear n’ Tape. I took another length and tied a half knot around the ribbon and secured it in place with a glue dot. I die cut this fabulous flower in Basic White using the Beautiful Motifs Dies and slipped it under the ribbon and secured it in place with dots of liquid glue. It’s quite delicate and next time I’ll use Adhesive Sheets adhered to the card stock prior to die cutting. :O) The sentiment also comes from the Beautiful Motifs stamp set and is stamped in Mossy Meadow ink. I adhered this in place with dimensionals. I took another piece of Basic White 4 1/4 x 5 1/2 and ran it through a new embossing folder (part of this fantastic suite!) called the Damask Designs embossing folder and adhered it to the Thick Basic White card base 4 1/4 x 11 scored at 5 1/2. The entire card front was attached to the card base over the embossed front, with dimensionals. As a final touch I added three Pressed Flower Motif embellishments.

Stampin' Up! Beautiful Motifs card inside

For the inside… I was playing with the gorgeous dies in this set and this leaf die fascinated me. It die cuts edges but not the entire piece, so sections can be raised. Really cool! It would be a fabulous card front – but that’s for another day… Anyway – this Mossy Meadow panel is 2 x 5 1/4 and adhered to a 4 x 51/4 Basic White and added to the inside of the card.

Stampin' Up! Beautiful Motifs card & envelope back
Stampin' Up! Beautiful Motifs card & envelope front

More Beautiful Gallery 6×6 DSP adhered to the flap & trimmed to fit. On the envelope front is this very fun stamp from the Beautiful Motifs stamp set, stamped in Mossy Meadow ink.

Stampin’ Up! is doing much more of an online presence these days, adding new products about every 2 months. Want early access to see what’s being added? For $99 get $125 worth of products when joining my team. Do that here… AND after joining, get 20% off all orders. Connecting with other demonstrators is part of the fun of being on a team- there’s always something new to learn. Want to look around in my store? Do that here.