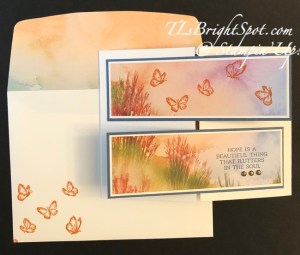
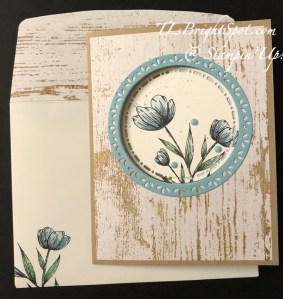
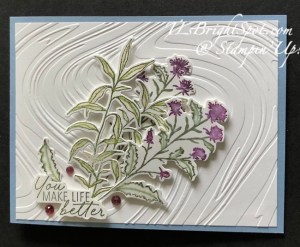
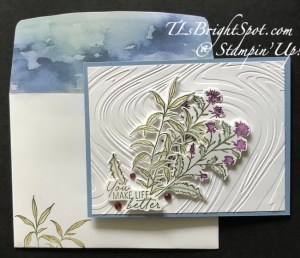
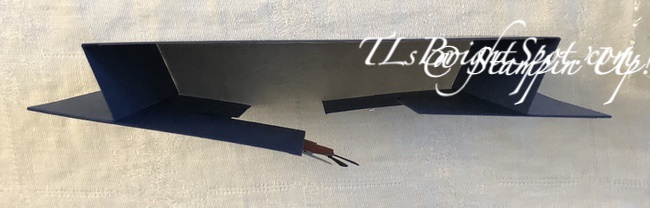
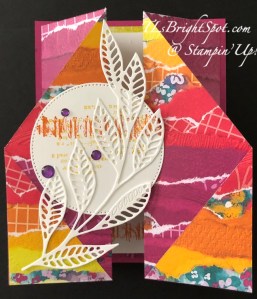
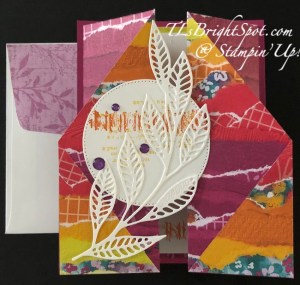
Welcome to Thursday and this fun hop… … I made a slider card – something I have not done before. It’s easy enough, I just haven’t done it. We have a color challenge today and I’ve chosen Petal Pink, Pool Party and Smoky Slate. Hope you like…


The Country Flowers bundle has become a favorite. I didn’t think it would, but the coloring is fun and it relaxes me. AND… besides being a bundle and always 10% off when purchased as a bundle, it is on sale at an additional 10% off through end of June (June 30). What’s not to like about that?! I also used the dies of another bundle – Wildflower Designs Dies, but as a bundle, it is also on sale at the additional 10% off.
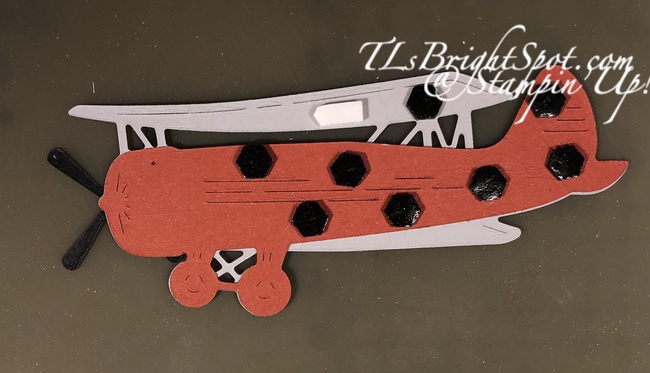
My first step to create this card was to stamp the images of the flower and container from the Country Flowers stamp set and color them with Stampin ‘ Blends: Petal Pink, Flirty Flamingo, Lemon Lolly, Granny Apple Green, Old Olive, Smoky Slate and Basic Black. I die cut the images with coordinating Country Flowers Dies and set them aside to create the card itself.
My next step was to cut the card stock and DSP pieces:
- Pool Party – 8 1/2 x 5 1/2 scored at 4 & 8 on the long side; 3/4 x 3 1/4; 3 1/2 x 2 (slider)
- DSP – Country Woods was my choice for this card – 3 3/4 x 5 1/4, adhered to the card front between the 4 & 8 score lines
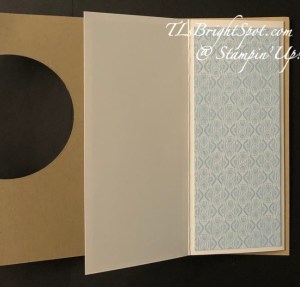
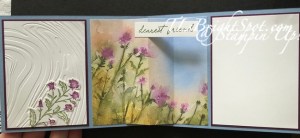
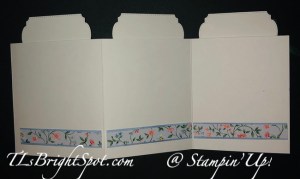
- Basic White – 3 3/4 x 5 14 (for the inside slide); 3 1/2 x 2 1/4 (slider) 2 1/2 x 4 (flowers & container)
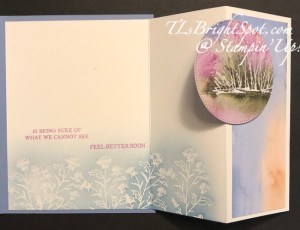
Use the Wildflower Designs Dies to die cut the slider sections for flowers & container, adhere the two layers together. Place the flowers & container together adding adhesive just at the base of the flowers, so they are now one piece. Position them for ‘placement purposes’ on the two slider pieces to know where to stamp the sentiment. The sentiment is from Country Flowers stamp set and stamped in Memento ink. Now add dimensionals on the back of the flowers & container only where they will adhere to the slider & attach. Set aside.
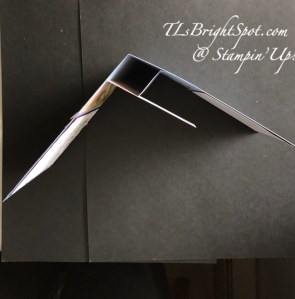
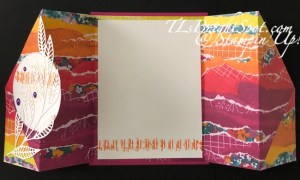
For the card base… adhere the DSP (Country Woods DSP) in the area between the 4 & 8 score lines. Burnish all score lines. On the 1/2″ end add tear n’ tape. Now place the small scored end into the paper trimmer to 1 1/2″, cut from the 1″ mark to the 4 1/2″ mark on your paper trimmer. This will be cutting through both the card stock and the DSP. Take the 3/4 x 3 1/4 strip and add a dimensional to one end and slipit into the slit all the way to the bottom of the slit. Turn card over and add tear n’ tape to the back side of the 3/4 x 3 14″ strip – see photo titled … “from inside.1”. Remove cover on tear n’ tape and add Basic White panel so it is even at the top and adhere to that tear n’ tape. It will be rather floppy at this point as it is only attached at the tear n’ tape.


Remove Tear n’ tape cover on the 1/2″ side, fold to inside and close back of card over the strip.
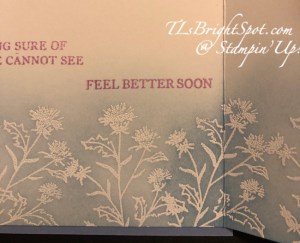
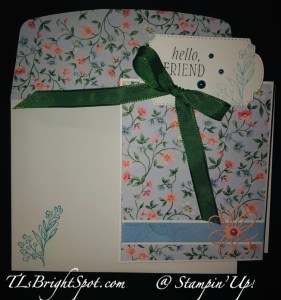
Use a 1 3/4″ circle punch to punch only the card front, not the Basic White piece that will slide. Add a length of ribbon – Petal Pink and White Diagonal Trim Combo Pack – and hold in place with a glue dot – staple it to secure. Pull panel up and stamp sentiment – again from Country Flowers stamp set in Memento ink.


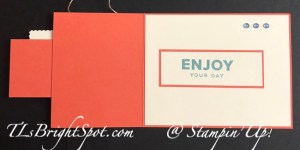
Add the decorated piece to the single dimensional for the card front – and done! You will notice that I added another strip of the Pool Party to the inside of my card… I made a booboo and needed to cover it :O)
Inside card slides easily up & down :O). For the envelope, I kept it really simple – covered the flap in more of the Country Woods DSP and trimmed to fit. One & done.

Such a fun card to make… and super easy. Now, don’t forget a couple of things… stamp & die bundles are still on sale through Jun 30. See my link below. Second thing is – check out what everyone has created for today’s hop by following the links below – the ‘next’ button or click on a name. Happy hopping.

here’s a link to take you directly to the items available in this catalog –
and to shop with me.
STAMPIN’ UP! STAMP & DIE BUNDLE 10% OFF SALE!!
Sales Period: 5–30 June 2024
Ordering Deadlines
Phone: 28 June 2024 at 6:59 p.m. (MT)
Online: 30 June 2024 at 11:59 p.m. (MT)
Get an additional 10% discount on stamp and die bundles only (that’s a total of 20% discount on stamp and die bundles!). This excludes suite collections, stamp and punch bundles, bundles not yet released to customers, and any other bundles*.
Save 10% on Stampin’ Cut & Emboss Machine and Mini Stampin’ Cut & Emboss Machine (white and Boho Blue).
The 10% discount applies automatically to stamp and die bundles in all orders… including Starter Kit orders.
See and shop all qualifying bundles in the online store. or click here.
Please note Close to My Heart products are not included in this promotion.

Stampin’ Up! Demonstrators get the SAME discounts and sales that CUSTOMERS do – on TOP OF their demonstrator discount
Keeping that information in the forefront of your mind,
NOW is a perfect time to JOIN THE TEAM!
Join with me by following this link...
To view all the available ONLINE EXCLUSIVES, click here.
Clearance items may be found here
While you’re looking around in my store, remember there are some stunning kits available, for all ages and all seasons – even Christmas! And while you’re shopping, I offer fringe benefits to my customers: free tutorial of the month and a FREE Stampin’ Up! item valued to $10 – all for a $50 order, before shipping and taxes. Use my current host code to receive those benefits – especially when your order does not exceed $150. Make certain my name is listed as your demonstrator when checking out! :O)
HOST CODE BAQG9RSE
Thanks for stopping by. May you have a beautiful day. Make someone happy when sending them a handmade card filled with love.