SU! So Much Happy/ Warm Hugs

Hi Everyone – gosh it is a gorgeous day today… cooler than it has been with a light breeze… this is easy to take. Remember my S-I-L who shattered his elbow? (He’s progressing very well BTW) His birthday was yesterday and I created a fun little gift bag for him using the Warm Hugs bundle, So Much Happy bundle and the Celebration Labels Dies. Let’s take a look at the final product…

Warm Hugs/ So Much Happy gift
#1

He’s a bit of a coffee person and this set just jumped out at me as a perfect little gift for him. He also loves peanut M & Ms – so…. the Heartwarming Hugs Suite is just right. It can be found on pg 8-10 in the Aug- Dec 2020 Mini catalog.

I began by putting the Mini Coffee Carrier together – just unfold and crease… no glue, nothing. But then I decided to fancy it up a bit. I covered the base with some of the Heartwarming Hugs DSP. Then I took a strip of In Good Taste DSP and adhered that over it with liquid glue. I also added a length of Early Espresso 1/4″ Faux Suede Ribbon with Tear ‘n Tape, then included a bow with a glue dot. I did the same on the back side without including the bow.

Next I took the Warm Wraps Dies and die cut the various pieces to create a trim around the Mini Coffee Cup. I used the same In Good Taste DSP for the large pieces, then the scallops were die cut from Soft Suede cs. I put these together with liquid glue then slid it onto the cup. Once I had the wrap where I wanted it I slid it down just a bit and drizzled in a bit of liquid glue and slid the wrap back into place again. This keeps it from falling off :O)

Then I did the tag for the cup… circle is die cut from Soft Suede cs, the hexagon in Whisper White. Before die cutting the hexagon, I stamped the the sentiment in Crumb Cake, then the hexagon stamp in Soft Suede. TIP: I had stamped these in reverse order and didn’t get the sentiment centered correctly in the hexagon, disappointment! There a redo…The hexagon is more open and therefore you can see better to center it over the circle sentiment. easy peasy… Die cut the stamped hexagon and affix it to the Soft Suede circle with dimensionals. This then was adhered to the cup also with dimensionals. And bingo the cup was ready. I filled a Gusseted Cellophane Bag with the peanut M & Ms and tied it with Real Red 3/16″ Braided Linen Trim and put it in the other part of the coffee carrier. Cute, right? I then created another tag, this time the circle was die cut in Mossy Meadow cs. Before die cutting the hexagon, I stamped the sentiment in Real Red ink and the hexagon stamp in Mossy Meadow ink. It was then attached to the coffee carrier with dimesnionals.

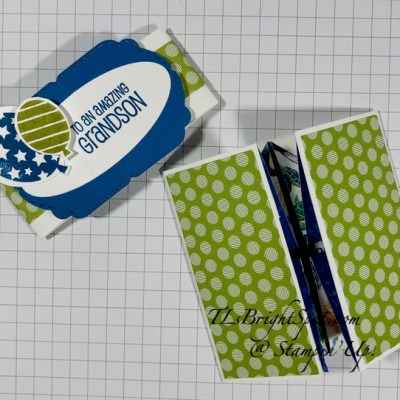
I put all of this (plus the coffee beans) in a Stampin’ Up! cello bag that I had in my stash as a demonstrator. And of course it needed a large something to hold it together…. out came the Celebration Labels Dies  – so perfect! I first cut one in the same In Good Taste DSP then another in Soft Suede cs. I then took the Happy Dies and die cut the word HAPPY from the In Good Taste label. Next I stamped the word birthday from the So Much Happy stamp set in Soft Suede ink.This panel was adhered onto the Soft Suede label and it clearly shows through just as I wanted – yay! Then I stapled it all together over the cello bag. Voila! And by the way – he loved it!!!

Warm Hugs, So Much Happy gift
#2

Thanks for stopping by.

May you have a beautiful day.

Make someone happy by giving/ sending them a handmade card made with love.

Cuts for todays project:

  • Heartwarming Hugs DSP 3 x 5 7/8 (2)
  • In Good Taste DSP 1 x 5 7/8 (2) (carrier); 2 1/2 x almost 12 for the cups wraps
  • Soft Suede – scraps (circle & trim on the coffee wrap)
  • Whisper White – scraps
  • Mossy Meadow – scraps for one circle


SU! Autumn Greetings Bundle

The other day I participated in a blog hop and the theme was Fall Frenzy – cute name for our theme! I was ‘on a roll’ and made another fall-themed card – here ’tis…

Autumn Greetings Bundle

It is made using the Autumn Greetings stamp set with coordinating dies, Autumn Essential Dies. Aren’t these wheat stalks perfect? And the pumpkins…. Here’s the deets:

Begin with Thick Very Vanilla for your card base; add a layer of Cajun Craze cs with liquid glue. Die cut several wheat fronds with the Autumn Essential Dies out of Crumb Cake cs and sponge dauber them with either Crumb Cake or Cajun Craze inks. Die cut the pumpkins: for the larger one I used Mango Melody cs for the outline die and Pumpkin Pie cs for the detail die; for the smaller I used Pumpkin Pie cs for the outline and Cajun Craze cs for the detail. Once I glued the detail die cut to the outline die cuts with liquid glue, I used a sponge dauber and sponged them with Crumb Cake ink to give them that aged look, as if they have just come from the pumpkin patch. 🙂  I also die cut a circle from Cajun Craze and another from Early Espresso. The Early Espresso piece I ran through the Forever Greenery embossing folder for some added texture.

Autumn Greetings Bundle

Now to begin the layering… Adhere a strip of Gilded Autumn Specialty DSP to a strip of Cajun Craze and adhere to regular Very Vanilla panel with liquid glue. Adhere the circles with liquid glue to this strip.  Stamp the sentiment from the Autumn Greetings stamp set in Cajun Craze ink. Don’t you love this font? So fresh! Adhere the wheat fronds with liquid glue. I then took a short length of Braided Linen Thread and gently stretched it, pulling the threads almost apart. I attached this with a dab of liquid glue and placed the larger pumpkin over it that had dimensionals on the back. The smaller pumpkin also got dimesnionals. For the final touch I added several fun Artistry Blooms Adhesive- Backed Sequins.

Fun, fun… love all the texture and layers. And this can so easily be a masculine card if you need it to be. I often find it difficult to create a masculine card and I think this one fits that masculine category.

Autumn Greetings Bundle

Thanks for stopping by.

May you have a beautiful day.

Make someone happy by sending them a handmade card.

Card cuts for today’s card…

  • Thick Very Vanilla 4 1/4 x 11 scored at 5 1/2
  • Regular Very Vanilla 4 x 5 1/4
  • Cajun Craze 4 1/8 x 5 3/8; 1 3/4 x 4; 2 3/8 circle
  • Early Espresso 2 12/4 circle
  • DSP 1 1/2 x 4

SU! Celebrate Sunflowers Duo

Hi folks! Today I’m sharing a card and ‘tot’ with you using the Celebrate Sunflowers Bundle – which means using the Sunflower Dies AND the stamp set. I can’t stand it, these are so pretty…

All Dressed Up tote

Celebrate Sunflowers card


So much fun to create! And the dies and stamp set make it so easy… For the tote: Begin by Die cutting the tote using the All Dressed Up Dies. This is die cut from Flirty Flamingo. Remember you have to die cut two and put them together. Then die cut the straps and do two of those as well. I sponged the edges of the tote in Flirty Flamingo to give it some depth. It doesn’t really show in the picture, but it does make a difference. Once the tote is put together, set it aside and create the sunflower: stamp the sunflower in Flirty Flamingo ink on Whisper White cs and die cut with the outline die. Die cut the full sunflower in Petal Pink and using a sponge dauber, ‘color’ with Flirty Flamingo. I also used my Wink of Stella and covered the petals only.  Color the center area with Stampin’ Blends using both light and dark Crumb Cake. Die cut the tiny center out of Crumb Cake cs and sponge the edges of this with Crumb Cake and adhere with dimensionals. Add three Gold Glitter Enamel Dots. Adhere the finely detailed Sunflower die cut to the outline die cut, lining up the edges so they match or not. (It gives it a different look if it isn’t lined up and I like it both ways. This one is lined up.) I used liquid glue and just adhered the larger center area leaving the petals loose/ free. Die cut the leaves in Just Jade – you can see I did several. Adhere the leaves to the back of the Sunflower die cut, then adhere to the front of the tote with liquid glue. Tie a length of the 5/8″ Polka Dot Tulle ribbon in a knot to one one of the straps. Then I tied a bow out of the 1/2″ Whisper White Faux Linen Ribbon and adhered with a glue dot. Love this – so feminine and so cute!

The card… Die cut a panel of the Flowers for Every Season 6×6 DSP using the die from the Ornate Layers Dies. This creates a beautiful feminine background for this sunflower. This was adhered to a Thick Whisper White card base (4 1/4 x 11). Another piece of the DSP was cut using the Stitched Rectangles Dies to create another layer and fun background. Next I stamped the sunflower in Memento black in on panel of Whisper White cs and die cut using the Stitched Squares dies. Color with both the light and dark Flirty Flamingo Blends.Notice it is lightly colored with lots of white showing. This gives it wonderful depth and really makes it more realistic. And I actually stamped two sunflowers and after coloring cut into one of them and added it to the Square one using dimensionals. I die cut the detailed sunflower from Flirty Flamingo and used the outline die cut to create a vellum background. I adhered the detailed die cut to the vellum, retaining a few of the petal insets and adhered those with liquid glue. The sunflower was adhered to the card front with liquid glue then the square one with dimensionals. I stamped the sentiment from the Celebrate Sunflowers stamp set in Memento black ink, cut it apart and adhered it with dimensionals. Love this look!

Celebrate Sunflowers closeup

For the inside I stamped several leaves in Just Jade ink on a Whisper White panel (4 x 5 1/4) and adhered that to Just Jade (4 1/8 x 5 3/8) and then into the card base. While the stamp was out I stamped the envelope front and flap continuing in the Just Jade ink.

Celebrate Sunflowers card inside

Celebrate Sunflowers card envelope

Are these two items fun? I’m giving them together to a special friend. :o)

Want to make these? I can help you do that… join my team or order from me. Remember when byou order from me and your purchase is between $50-$150 and you use my current host code (4TEZ7HWY – good throughout August!) I will send a SU! item of your choice worth $10.

Thanks for stopping by.

May you have a beautiful day.

Make someone happy by sending them a handmade card made with love.


SU! Warm Hugs Bundle

It’s Monday – and a glorious day! I’m thankful for so much… and one of those I have the opportunity to play with some amazing SU! products. What I did prior to SU! was just muddle around in mediocre stuff. Once I found SU!, there was no turning back. All products are made well; products coordinate. I can’t say enough. So if you are ‘on the fence’, jump in. I’ll help you navigate and create – we could make a great team. Contact me at tlsbrightspot@gmail.com and let’s talk about how to make this happen.

For today’s card I pulled out a stamp set I haven’t used before – yep – from the amazing Aug-Dec 2020 Mini Catalog. It’s called the Warm Hugs Bundle and is actually part of a suite of products that can be found on pages 8-11. I used many of the products from the suite but incorporated some other items as well.

Warm Hugs Bundle #1

I started with a Crumb Cake card base. Then took a panel of Mossy Meadow cs and ran it through the Wrapped in Texture embossing folder twice. This embossing folder is narrow, and probably is not meant to emboss a card front, but I did and think it turned out really well. I took a strip of Heartwarming Hugs DSP cut a banner at the bottom and adhered it with liquid glue to the card front. I took another very narrow strip of this same DSP, cut a side angle at the bottom and slipped it under the right of the banner. Next I took the Mossy Meadow Diagonal Stripe ribbon and wrapped it back and forth on the card front, adhering in various places with Stampin Seal. The sentiment was extra fun and easy to create using the Warm Wraps Dies and the Warm Hugs stamp set. Don’t you love this hexagonal look?

Stamp the sentiment in Real Red ink on a Whisper White scrap. The sentiment comes from the Wrapped in Christmas stamp set which is part of the Heartwarming Hugs Suite of products. Stamp the hexagonal decoration around it in Mossy Meadow ink and die cut with the Warm Wraps Dies. Put dimensionals on it and adhere to a circle cut from Pear Pizzazz cs. That circle also is in this die set. The Pear Pizzazz also got dimensionals and was adhered over the Diagonal Stripe Ribbon.  Since the card front is complete, let’s move to the inside.

Warm Hugs #2

So, so simple but I love how the inside coordinates with the outside… another strip of DSP adhered to Whisper White panel. This was adhered to Mossy Meadow and attached to the Crumb Cake card base. And voila, your card is complete!

Warm Hugs Bundle #3

For the envelope I stamped a fun little cup in Mossy Meadow, then the steam rising from the cup in Crumb cake. The envelope flap got the same Heartwarming Hugs DSP as the card front. Fait accompli! While this card is done in Holiday-type colors, it could so easily be used as a card of encouragement or a birthday card, and it’s a bit masculine too.

Warm Hugs Bundle #4

Here’s a link to the cattie to help you find everything.

20200804_AD_en_US

Thanks for stopping by.

May you have a beautiful day.

Make someone happy by sending them a handmade card filled with love.

Card cuts for today’s card:

  • Crumb cake card base 4 1/4 x 11, scored at 5 1/2
  • Mossy Meadow 4 x 5 1/4 (2)
  • Heartwarming Hugs DSP – 2 1/2 x 5, 3/8 x about 5 (front), 3/8 x 5 (inside) and 2 1/4 x 6 (envelope flap)
  • Whisper White 3 3/4 x 5 (inside) + scrap for front sentiment
  • Pear Pizzazz for front circle

SU! Ornamental Envelopes

Hi Everyone – have you visited the UPDATED SU! site yet? Oh my goodness – it’s wonderfully exciting…the techs have worked miracles! AND the new Aug-Dec 2020 Mini Catalog is now live… see that right here…08.01.20_HAPPENING_NOW_AD_CATALOG_GOLIVE_ENG

OK, I have two cards for you today, both using the Ornamental Envelopes stamp set with coordinating dies.

Ornamental Envelopes #1 a

Ornamental Envelopes Card #2 a


I really appreciate how different and yet how similar these two cards are… similar due to colors mostly, and different as different elements were used from the stamp set.

Card #1:

  • stamp the ornaments using Versamark ink on Whisper White panel, sprinkle with silver embossing powder then heat emboss to set.
  • Once embossing has cooled sufficiently, color with Stampin’ Blends: Light Misty Moonlight, Lt Highland Heather, Lt Granny Apple Green, and Lt Melon Mambo
  • Add a pearl to the one ornament and color with the Lt Misty Moonlight Blends
  • Adhere this panel to Pear Pizzazz with liquid glue
  • Adhere both of these to Silver Foil sheets with dimensionals
  • Place but DO NOT ADHERE on the Pear Pizzazz card base.
  • Using your Stamparatus, place the ‘Merry” sentiment and the ornament in the appropriate position, remove the ornament panel and stamp with Versamark ink. sprinkle with silver embossing powder and heat set. Again, once cooled, color the ornament with Lt Misty Moonlight and Lt Melon Mambo Blends
  • Adhere the ornament panel and your card front is complete :O)

For the inside:

  • Stamp the sentiment on a Whisper White panel with Melon Mambo ink. The sentiment comes from Festive Corners stamp set (an awesome versatile stamp set I might add!)
  • Because I colored the single ornament on the card front with Blends, the colors bled through – what to do? Cover the offending panel with DSP – this comes from Heartwarming Hugs DSP and coordinates perfectly!

    Ornamental Envelopes – card inside using Festive Corners

    The envelope got the same DSP on the flap and then using a die from the coordinating dies, create this incredibly beautiful edge. Can you see that cuteness?

    Ornamental Envelopes with Envelope Dies

    The card is complete… yay!

    Card cuts for Card #1

  • Whisper White: 2 1/2 x 4 1/2, 4 x 5 1/4
  • Pear Pizzazz 2 3/4 x 4 3/4, 8 1/2 x 5 1/2 scored at 4 1/4
  • Silver Foil sheet 3 x 5
  • Heartwarming Hugs DSP 4x 5 1/4 + 2 1/4 x 6 for envelope flap

Thanks for stopping by

May you have a beautiful day

Create something wonderful and send it to a friend.

OH PS… I’ll share directions for Card #2 tomorrow :O) 😏

SU! Mini Gatefold

Hello there… Weather advisory for the East coast is to stay INSIDE today – it will feel like 104! Yeck!  Be safe…I have been doing doing several different fun folds lately and well, I just couldn’t stop… todays is a mini version, a little 3″ card for a grandson turning 20… Cannot believe he is 20! 6’4″ and handsome – oh my…I’m just a little bit prejudiced. 😍 Anyway, the card… This young man has come to expect something fun in the way of a card, not something you can buy at the store – yay.. getting them trained. :o) So here it is…

Mini Gate Fold
#1

Mini Gate Fold #2

Mini Gate Fold
#3

This is so cute – perhaps because it is small. And I just love the way the folds are… here it is from a another angle.

Mini Gate Fold
#4

Now you can really see all the folds. Here are the products used in this cute mini card:

  • Whale of a Tail DSP
  • Whisper White card base + belly band
  • Details Bands Dies – oval in Whisper White cs
  • Celebration Labels and Dies for the larger portion of the banner, Pacific Point cs
  • So Much Happy stamp set – balloons, fussy cut
  • A Grand Kid stamp set – front banner sentiment
  • Little Treats stamp set – inside sentiment
  • Pear Pizzazz and Pacific Point inks

Let’s see if I can tell you how to do this…

  • card stock base (Whisper White) is 3 x 6 scored at 1 1/2 and 4 1/2 on long side. Burnish well.
  • DSP panel (Whale of a Time) is 3 x 6. Mark center on the long side, at the top & bottom lightly with pencil. Fold from the top left to center bottom making a triangle – burnish and open. Fold from the left bottom to the center top making another triangle – burnish and open. Fold left portion to center, as in step one – burnish and open.
  • Do the same on the right side: right top to center bottom making a triangle, burnish and open. Right bottom to center top making a triangle, burnish and open. Right to center, burnish and open. It will look like picture #4 above even though it isn’t attached to anything yet. 😊
  • Cut a panel in Whisper White for inside sentiment, 2″ square. Stamp the sentiment from Little Treats stamp set in Pacific Point ink. Then stamp the party favors in Pear Pizzazz ink. Remember to stamp ON THE DIAGONAL. Adhere to the DSP.

Mini Gate Fold
#3

  • Now adhere adhere the DSP to the Whisper White card base: triangle on the left first making certain it is al the way to the edge. With the papers flat, adhere the center diagonal square then the right triangle.
  • Belly band: 1″ x about 7″ to go around in Whisper White, DSP is 3/4″ x about 7. Adhere the papers together and wrap around card. Secure in front with Tear n Tape. It should slide easily on and off the card.
  • Cut banner in Pacific Point using the smallest Celebration Labels & Dies. Put dimensionals on back and attach to belly band where it overlaps.
  • Stamp the banner sentiment from A Grand Kid in Pacific Point – off to the right side to allow room for the balloons. Cut with the oval from Detailed bands dies. Adhere with liquid glue to the Pacific Point banner.
  • Stamp balloons from the So Much Happy stamp set: one in Pacific point and one in Pear pizzazz. Fussy cut both. Adhere the larger with liquid glue and the smaller with a dimensional. Slide over the card and bingo this cute little mini is ready for giving.

I love this. Mini cards are just a different kind of treat and this one is extra special cuz it’s a Gate Fold.

That does it for today. Think about shopping during SU! Bonus Days. Items for this card are listed in the Aug-Dec 2020 Mini Catalog which goes live to customers 4 Aug. AND the 2020 – 2021Annual catalog. Don’t have a catalog or a demonstrator? Then talk to me and we can fix that 😁

SU! has some awesome items in their 2020-2021 Annual Catalog and a real bonus going on now – called BONUS DAYS. For every purchase of $50 from now until 3 Aug. you will receive from SU! by email, a $5 coupon that is redeemable 4-31 Aug. Such a deal!

Bonus Days. Earn in July, spend in August.

And when you order from me, please use my July host code to receive a SU! item worth $10 when your purchase is $50-$150. Sounds like another good deal, right?! It is…

Thanks for stopping by.

May you have a beautiful day.

Make someone happy by sending them a handmade card made with love.


SU! Poinsettia Place Suite and Gatefold Card

Hello… Yesterday was a glorious day – started out with an early morning sail. It was perfect – 8-9 mph winds, no power boats to make us rock. We were the only sailboat. on the river… After sailing, we came home, had a hearty breakfast, walked the dog, then I settled in to create this very cool card…

Poinsettia Place Suite
Gate Fold
#1

It is made with several items from the Poinsettia Place Suite of products found on pg 16 of the Aug-Dec 2020 Mini catalog. Don’t have a catalog??? I can fix that 😁. If you don’t have a demonstrator, let’s connect before the catalog goes live to customers Aug 4.

Back to the card and the details…

  • 8 1/2 x 5 1/2 Soft Sea Foam, scored at 2 1/8 from both ends on the long side
  • Plush Poinsettia Specialty Paper 1 7/8 x 5 1/4 (x2). Adhere to side panels of the card base
  • 2 7/8″ square of Soft Sea Foam cs
  • Square Doily adhered to the square with a swipe of Stampin Seal just in the middle
  • Poinsettia Dies: Die cut the 3 poinsettia pieces and with a sponge dauber, gently brush along each petal edge with Blushing Bride ink, and sometimes swipe in the center of the bracht as well. Adhere together with liquid glue. Adhere this sweet Beaded Pearls to the center. These are such COOL dies… one portion embosses the bracht while another portion die cuts – running these through the die cutting machine at the same time…
  • Stamp the leaf outline/ veins in Garden Green ink using the Poinsettia Petals stamp set. There are two sizes of leaves – I did two large (one I used on the inside of the card) and two of the smaller.
  • Stamp the leaf centers with Soft Sea Foam ink – again two options in the Poinsettia Petals stamp set. I used the slimmer version on the smaller leaf and the broader version on the larger leaf. Die cut the leaves with the outline die. Attach to the backside of the poinsettia with liquid glue, then adhere the completed poinsettia to the doily/ card stock piece.
  • For the inside… Whisper White panel 4 x 5 1/4… stamp the two sentiments in Garden Green ink from the Poinsettia Petals stamp set. Gorgeous fonts! Adhere to the inside with liquid glue.
  • Attach the additional leaf to the inside of the right panel and your card is complete!!!

Poinsettia Petals Suite
Gate Fold
#2

Poinsettia Place Suite
Gate Fold
#3

  • The envelope got some special treatment:
    • Again from the Poinsettia Place Suite is Poinsettia Place DSP – cut a 2 1/4 x 6 piece for the envelope flap. Adhere with liquid glue, trim.
    • The front of the envelope got a fun berry stamp from the Poinsettia Petals stamp set, stamped in Crumb Cake ink. Color the berries with Dark So Saffron Blends marker. TIP: be sure to put a scrap piece in your envelope when colored with the blends so it does not bleed through to the back of the envelope.

Whee! Your beautiful card is complete and ready to put in your stash for the upcoming holidays. It’s a start, right? Remember I mentioned the Aug-Dec 2020 Mini Catalog going live to customers 4 Aug? SU! has some fabulous Bonus Days offering right now… spend $50 in product between now and 3 Aug and receive a $5 coupon to redeem $-31 Aug. Such a good deal! Spend $100 and get two coupons. These coupons are sent by email, so you do have to provide that to SU! to receive them, but that’s not a big deal. Their security system is top notch!Bonus Days. Earn in July, spend in August.


And when you order from me, please use my July host code to receive a SU! item worth $10 when your purchase is $50-$150. Sounds like a deal, right?!

Thanks for stopping by.

May you have a beautiful day.

Make someone happy by sending them a handmade card made with love.


SU! Daisy Lane, Forever Gold Laser-Cut Specialty Paper

Hello again… can you believe it is Thursday already? My goodness this week has flown ~ at least for me. Today’s card is full of bright colors and just says ‘happy” all over it. I’m excited no share it with you… it uses some products from last years catalog and some from this years 2020-2021 Annual Catalog.

Daisy Lane stamp set
Large and Medium Daisy Punch
Forever Gold Laser-Cut Specialty Paper and 2020-2022 In Color 6×6 DSP
#1

Bright, cheerful, it is just F-U-N. Created on the Note Cards/ Envelopes pack, this card is smaller than a regular size card. Finished it measures 3 1/2 x 5, a perfect size.

  • Layer Magenta Madness 3 3/8 x 4 7/8 onto the note card front
  • Layer the Magenta Madness 2020-2022 In Color 6×6 DSP 3 1/4 x 4 3/4
  • Layer one of the Forever Gold Laser-Cut Specialty DSP, but on the white side. Adhere with Stampin Seal
  • Stamp two large daisies with Bumblebee from the Daisy Lane stamp set and punch with the large daisy punch.
  • Do the same with the Medium daisy: stamp 2 in Bumblebee, punch 2
  • Gently curl the petals with a bone folder, going up
  • Adhere together with liquid glue
  • Adhere to the Forever Gold Laser-
  • Cut Specialty Paper with two glue dots. Put Basic Pearls in the center ~ I used five
  • Tie a bow using the 1/4″ Gingham Ribbon in Bumblebee and adhere with a glue dot. Your card front is complete.

The best part about this card is that the inside could be absolutely anything you wanted it to be: get well, thinking of you, you got this, just about anything. Since a shower card was requested, that’s what I did… made it a shower card.

Under My Umbrella stamp set
#2

Cute, right?

  • Stamp the umbrella in Magenta Madness.
  • Stamp the flowers in Bumblebee
  • Now go back and stamp the sentiment

I keep saying this over and over – it’s like a broken record, but SU! coordinates its products so they may be used in so many different ways.

Remember these are Bonus Days at SU! For every $50 spent by you, a coupon is sent via email worth $5 toward purchases in August. Such a deal! The August – December 2020 Mini Catalog is now out and I have sent mine to my customers. If you do not have a demonstrator, I would be happy to send you a catalog – just let me know! This is the perfect time to get connected. 😁

Bonus Days. Earn in July, spend in August.

Use my host code when your SU! purchase is between $50-$150 to earn a SU! item from me worth $10. You’ll still receive your coupon from SU! during July and get this bonus from me.

Thanks for stopping by

May you have a beautiful day.

Make someone happy by sending them a handmade card n- it’s a gift of love.

SU! Playful Alphabet Dies and Z Fold

Hello… last baby card I promise! Made with the Playing with Patterns 6×6 DSP and the Playful Alphabet Dies, this is another fun fold card. Here ’tis…

Playful Alphabet Dies
Playing with Patterns 6×6 DSP
#1

The card base is Purple Posy 4 1/4 x 11 scored at 2 3/4 and 5 1/2. Burnish the 5 1/2 as though the card were going flat, then fold back the 2 3/4 scored panel – this makes a z – therefore… ta da… a Z Fold Card. Cut a panel of Coastal Cabana 2 3/8 x 4. Adhere a panel of the Playing with Patterns 6×6 DSP cut to 2 x 3 7/8. Wrap a length of the Silver/ Misty Moonlight ribbon from the Flowers for Every Season Ribbon Combo Pack three times around and tie in knot. Hold in place on the back with tape. Put dimesnionals on this panel back and set aside.

Adhere Foam Adhesive Sheet strip (about 1 x 2 1/2) to a piece of coordinating DSP then die cut the letters B-O-Y using the Playful Alphabet Dies. Adhere to the card front by simply removing the backing on the Foam Adhesive strip! Now adhere this completed panel to the front of your Z-Fold. Add three 2020-2022 In Color Enamel Dots – these are Just Jade.

For the inside… Coastal Cabana 4 x 5 1/4 then Whisper White 3 3/4 x 5, then add a coordinating strip 1/4″ from right end. Voila! The envelope got the same DSP adhered to the flap. Baby card #5 is done…

#2

Playful Alphabet Dies
Playing with Patterns 6×6 DSP
#3

Here are all five cards – and yes, they have been sent already! What a fun gift set to forward to a new Mom. Hope she really likes them; I had such fun creating them for her.

Playful Alphabet Dies
Playing with Patterns 6×6 DSP
Pattern Play stamp set

Playful Alphabet Dies
Waterfall card

Playing with Patterns 6×6 DSP
Playful Alphabet Dies
Gatefold

Tasteful Labels Dies
Playing with Patterns 6×6 DSP

Thanks for stopping by.

May you have a beautiful day.

Make someone happy by sending them a handmade card.

SU!Tasteful Labels Dies, Playing with Patterns 6×6 DSP

Hello again… baby card #4. So different from the other three and still from the very same DSP! Love this… and this may be my favorite so far…

Playing with Patterns 6×6 DSP
Tasteful Labels Dies
#1

I love how this turned out, maybe because it’s bright, cheerful and has several coordinating colors. The base of the card is Thick Whisper White 4 1/4 x 11 scored at 5 1/2. Cut a panel of Purple Posy 4 x 5 1/4 and run through your die cutting/ embossing folder using the gorgeous and very versatile Tasteful Textile 3D embossing folder. Adhere with Stampin Seal to the card front. TIP: When adhering embossed panels I find it helpful to use Stampin Seal. I find it covers better somehow and I just prefer the way it holds the panel. 

The next layer is Coastal Cabana 4 1/4 x 3 1/4. Then cut three panels of the Playing with Patterns 6×6 DSP that coordinate and compliment each other. These are cut 1 1/2 x 3, 1 x 3, and 1 1/4 x 3. TIP: Adhere the two end pieces first and the center one last. This allows for perfect centering of all panels. Cut a length of Night of Navy 1/2″ Frayed Grosgrain Ribbon from the Boho Indigo Product Medley. (This gorgeous ribbon – just sayin’) Know where you want the ribbon to end and adhere that section with Stampin Seal. Then wrap the end of the ribbon to the back of the card creating a loop. Adhere to the back with Stampin Seal. I love the way this looks, as though it is creating a banner :O). Put dimensionals on this panel and set aside.

Die cut a circle from Coastal Cabana with the Layering Circles Dies. Die cut another circle using the Tasteful Labels Dies (there is such a collections of cool labels in this die set!) from Whisper White. Stamp the sentiment with Night of Navy from the Best Year stamp set. Adhere this to the Coastal Cabana circle with liquid glue. Add three Artistry Blooms Adhesive-Backed Sequins. Put dimensionals on this circle duo (top and bottom only) and adhere over the ribbon.

Take this Coastal Cabana panel and attach to the card front about 1/2″ from the right edge. Your card front is now complete. Again, the inside is super duper easy: layer Purple Posey 4 x 5 1/4 and Whisper White 3 3/4 x 5; add a strip of coordinating DSP; adhere to the card inside and the card is done. The envelope gets a strip 2 1/4 x 6 adhered to the flap and trimmed. Done, done, done.

Tasteful Labels Dies
Playing with Patterns 6×6 DSP
#2

Since this is card #4, here are the other three to be sent as a new baby gift. I have intentionally not put thank you sentiments or congratulations on any of these as they can be used as an announcement or any other purpose., sharing a photo even.

Playing with Patterns 6×6 DSP
Playful Alphabet Dies
Gatefold

Waterfall card

Playful Alphabet Dies
Playing with Patterns 6×6 DSP
Pattern Play stamp set

Aren’t these a fun assortment? Tomorrow I will share the last of the baby cards, then move on to something else… 😳

Thanks for stopping by.

May you have a beautiful day.

Make someone happy by sending them a handmade card.

Not for nothin’… today, Jul 2, SU! Demonstrators around the world will be ordering from the Aug- Dec Mini Catalog. This used to be called the Holiday catalog but SU! decided to have a longer sales period for this cattie and renamed it. Smart, right? Anyway – I can’t share anything just yet, but will soon! Keep your eyes peeled 😜 for more new stuff!