Stampin’ Up! Window Flip Fun Fold

Hello Friday! Today’s card is a fun fold using the Everyday Arches Dies, the Everyday Skies 6×6 DSP and more. It begins with a full sheet of card stock scored at 4 1/4 on the short side, turn and score at 5 1/2 on the long side. Depending how you want the card to fold will determine which quadrant to remove. For this card, it is in portrait style and I removed the upper left quadrant along the score lines. Burnish all score lines. I trimmed an additional 1/16″ off the inside upper quadrant so it would fold nicely.

Stampin' Up! Window Flip Fun Fold
Stampin' Up! Window Flip Fun Fold, open

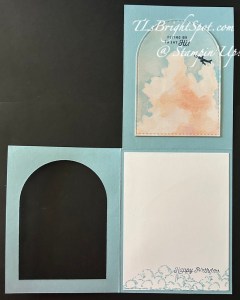
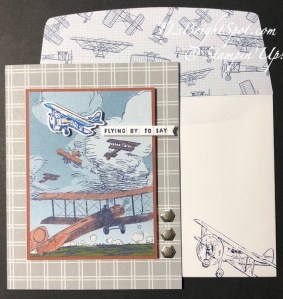
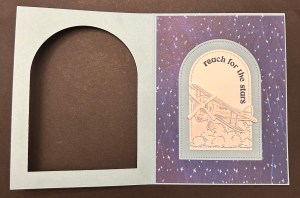
In the first photo you see the card closed and the image of the plane that peeks through the ‘window’. In the second photo, it shows the card fully open, with the upper left quadrant removed. :O)

Directions:

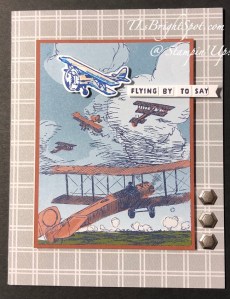
  • Adhere a 4 1/8 x 5 3/8 panel of DSP to the card front, inking only along the edges
  • Using the Everyday Arches Dies, 3rd from largest, center die on the front panel and die cut, creating this wonderful window.
  • Remove the DSP from the card stock die cut piece. This is a bit tricky as the holes in the die cut tend to hold the pieces together. Be careful not to tear either the DSP or the card stock.
  • Adhere the DSP to the inside of the upper inside panel of the card as shown in photo 2. I stamped mine using the Adventurous Sky stamp set for the sentiment and the Everyday Arches stamp set for the airplane and Night of Navy ink.
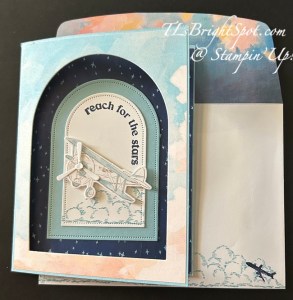
  • With the upper flip flap closed, adhere another piece of the Everyday Skies DSP, 4 x 5 1/4, to the flip panel, closed – photo 3.
  • With that die cut card stock window that you saved, die cut it again, this time using the 5th from largest die in the Everyday Arches Dies, making it a smaller arch.
  • Close the card front and add arch to the ‘star’ covered panel, centering with the card front arch.
  • With Basic White card stock and the 7th from largest die in the Everyday Arches Dies, die cut a white arch.
    • Stamp this piece using the Adventurous Sky stamp set and Balmy blue ink for the clouds.
    • Stamp the sentiment using Night of Navy ink and the coordinating Everyday Arches stamp set. Adhere to the Balmy Blue panel, centering it.
  • Stamp the airplane in Smoky Slate ink on a scrap of Basic White, using the Adventurous Sky stamp set.
    • Add color to the plane with Stampin’ Blends Balmy Blue
    • Die cut propellers from Basic White scrap using the Adventurous Sky Dies. Add with dab of liquid glue.
    • Add plane to this panel with dimensionals.
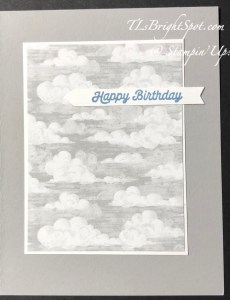
  • The last panel – the sentiment panel… stamp the clouds from the Adventurous Sky stamp set in Balmy Blue ink. I did this twice overlapping just a tiny bit.
  • Stamp the sentiment in Night of Navy ink – also from Adventurous Sky stamp set.
Stampin' Up! Window Flip Fun Fold card & envelope
  • Envelope…
    • Add another piece of the Everyday Skies DSP to the flap, trim.
    • Stamp the clouds on the lower portion of the envelope front with Balmy Blue ink and the Adventurous Sky stamp set.
    • Stamp the airplane from Everyday Arches stamp set in Night of Navy ink.

This is just a great masculine card! And a fun fold to boot just makes it all the more fun.

The Everyday Arches bundle and the Everyday Skies 6×6 DSP is available in my store through the Stampin’ Up! ONLINE EXCLUSIVES. Go to that link here.

The Adventurous Skies Bundle is in the 2024-2025 Annual Catalog and you can find that here.

And if you want to visit the Jan-April 2025 Mini Catalog – go here.

Thanks for stopping by. May you have a beautiful day!!!

Stampin’ Up! Birthday Celebration for the Happy Inkin Thursday Blog Hop

Welcome to Thursday & the Happy Inkin’ Thursday Blog Hop. We have a sketch challenge today & I have chosen to use items in the Wildflower Birthday Suite for my card.

Stampin' Up! Birthday Celebrations card front

I’ve taken some liberties with the sketch… in lieu of the circle, I used the banner die in the Birthday Celebrations Dies with Peach Pie card stock and behind it is Gold Foil attached to Lost Lagoon card stock for the vertical element. But I am ahead of myself. :O)

The card base is Lost Lagoon 4 1/4 x 11 scored at 5 1/2. The next two layers are Timeless Plaid 6×6 DSP 4 x 5 1/4 adhered to Gold Foil 4 1/8 x 5 3/8 and added to the card base with dimensionals. The vertical element is adhered directly to Timeless Plaid with liquid glue. The banner die (used in lieu of the circle for the sketch) is die cut from Peach Pie card stock and attached with dimensionals. The cake is one of the awesome die cuts supplied in the Wildflower Birthday 12×12 Specialty Designer Series Paper. I attached it directly to the banner with liquid glue. The two floral images are also part of the die cuts in the Wildflower 12×12 SDSP and are attached with min i dimensionals. As a final touch, three Party Dots (part of the Wildflower Birthday Suite) were added to the card front,

Stampin' Up! Birthday Celebration card inside

Because this card is for someone specific… and it’s their 41st birthday :O), I again used stamps & dies in the Birthday Celebration bundle. The sentiments are all stamped in Lost Lagoon ink. The numbers are die cut in both Peach Pie and Gold Foil sheets and adhered offset with liquid glue- all on the Basic White panel 4 x 5 1/4. This piece was added to the Lost Lagoon card base on the inside – and the card was done.

Stampin' Up! Birthday Celebration card & envelope back
Stampin' Up! Birthday Celebration card & envelope front

For the envelope front I added elements of the Wildflower 12×12 SDSP with die cuts supplied in the DSP package – and more of the Timeless Plaid 6×6 DSP on the flap.

Now – time to see what others on the hop have prepared for you. Please check the ‘next’ button or click on a name to take ypou around the hop. Enjoy!!! Please see below the list of names to see how to purchase these products from me, how to earn benefits from me and how to join my team.

Amy Koenders

Mary Deatherage

Karen Finkle

Akiko Sudano

Karen Ksenzakovic

Tara Carpenter

Terry Lynn Bright

These items can all be purchased through me – and I would appreciate your business! To view the ONLINE EXCLUSIVES, CLICK HERE. To see the items in the Jan-Apr 2025 Mini Catalog – click here And if you do not have a demonstrator and need either of these catalogs, let me know! For all those coloring tools, the basics of card stock and embossing/ die cut machines, more stamps & dies, watercolor pencils, click this link for the 2024-2025 Annual Catalog. Remember that when purchasing from me, to use my current host code…and make certain my name is listed as your demonstrator :O)

Use my CURRENT HOST CODE WTGKS9DH

When you shop with me and your purchase is $50 or more – you will receive a free giftie valued up to $10 that is a Stampin’ Up! item. You will also receive the monthly tutorial – January is the Terrific Toadstool and it has some really cute ideas!

If you’ve been thinking about becoming a Stampin’ Up! demonstrator, then there’s no better time than right now during Sale-A-Bration! When you join by February 28, 2025, you can choose between two fabulous offers:

Option 1: Get $125 worth of product PLUS a choice of two Stampin’ Write Marker Assortment packs AND the Handmade Designs Cling Stamp Set (an exclusive stamp set designed to work with the markers). That’s a $216 value for just $99! I strongly recommend Option 1

Option 2: Get $125 worth of product PLUS an additional $30 worth of product when you join Stampin’ Up! That’s a $155 value for just $99!

If you’d like to join the team, we’d love to have you!  Once you join, you’ll get at least a 20% discount on all of your Stampin’ Up! purchases and you can preorder from the upcoming catalogs!

Another key thought for joining now during Sale-a-bration… you will receive either an extra $30 in free product in your Starter Kit or your choice of two packs of Stampin’ Write Markers and an exclusive stamp set! 

Stampin’ Up! and our particular team welcome all types of Demonstrators – those only purchasing to get the discount for themselves

those who want to run a business and…

– those anywhere in between!  Let’s stamp and have fun doing it!

Demonstrators get lots of perks including at least a 20% discount on all orders that you place as a Demonstrator, invitations to Stampin’ Up! Demonstrator events and preordering from upcoming catalogs and promotions. And if joining this Jan-Feb makes sense to you, you will have the opportunity to view the new catalog early and preorder as well. Opportunity knocks! Click the link in the image below to join with me now.

Stampin' Up! Joining Promotion

Thanks for stopping by. May you have a beautiful day!

Make someone happy by sending them a handmade card filled with love.

Stampin’ Up! Happiest Day for the Happy Inkin’Thursday Blog Hop

Welcome, welcome. It’s Thursday and time for another Happy Inkin’ Krew Blog Hop! You may have popped in from Tara – or from another Krew member. Enjoy as you make the rounds 😀


Stampin' UIp! Happy Inkin' Krew Blog hop Group
Ssampin' Up! Blog Hop Sketch Challenge
Stampinb' Up! Happiest Day card front

So this sketch was a fun challenge! There are so MAN papers I could have used, but I needed a birthday card and also to play with this stamp set. After adding co0lor to each of the dragonflies, I stamped again with VersaMark ink, sprinkled with clear embossing powder and heat set it for a nice ‘glow, then fussy cut each one with my fabulous Stampin’ Up! Paper Snips. The top left dragonfly is Azure Afternoon for the top wings and Balmy Blue for the bottom wings. The upside down dragonfly is Lemon Lime Twist for the smaller wings and Poppy Parade for the larger wings. The last dragonfly is Misty Moonlight for the larger wings and Poppy Parade for the smaller wings. The top left and bottom dragonflies are added with a single mini dimensional while the remaining dragonfly was adhered with liquid glue. I drew antennae with a Basic Black Marker with the fine tip end.

Card Cuts:

  • Card base 8 1/2 x 5 1/2 scored at 4 1/4 (Misty Moonlight)
  • DSP layer from Country Lace is 4 1/8 x 5 3/8
  • The square is Misty Moonlight 3 x 3 with a layer of Country Lace 2 7/8 x 2 7/8 and adhered directly to the card front
  • The sentiment panel is 1 11/16 x 2 with more Country Lace 1 1/2 x 1 7/8 and attached with dimensionals. The sentiment is from Happiest Day and stamped in Misty Moonlight ink.

As a final touch on the card front, I added 3 Adhesive-Backed Dots

Stampin' Up! Happies Day birthday card inside

For the inside I cut a panel of Basic Beige 4 x 5 1/4, stamped it in the center with memento ink (sentiment is from Happiest Days). I then stamped the dragonfly in Mementop in, added color with additional wing stamps: Misty Moonlight and Balmy Blue inks and drew the antennae with the same Basic Black marker with the fine tip. I did the same as before by stamped over the color with VersaMark ink, sprinkling with Clear embossing Powder and heat set. It gives a nice glowy to the wings.

Stampin' Up! Happies 
Days birthday card & envelope

On the envelope I stamped the same dragonfly as before – Memento ink – colored it with Balmy Blue ink for the top wings and Lemon Lime Twist for the smaller wings. On the flap I added another panel of the Country Lace DSP – and done!

Time to make the rounds and see what everyone else is creating with this sketch challenge. Click the next button to take you to Carol – or click on a name. Whatever you do – don’t miss a single new creation from this Krew!

Stampin' Up! Happy Inkin' Thursday Blog hop next button

Amy Koenders

Mary Deatherage

Jaimie Babarczy

Karen Finkle

Akiko Sudano

Karen Ksenzakovic

Tara Carpenter

Terry Lynn Bright

Carol Buckalew

Starter Kit Special Ending Soon!

Stampin' Up! Starter Kit Special

There’s only a few more days to take advantage of our Starter Kit Special! Those who sign up to be Stampin’ Up! demonstrators by October 31 will get $125 USD | $165 CAD $155 USD | $206 CAD worth of products in their Starter Kit for just $99 USD | $135 CAD! This offer also includes FREE business supplies and FREE shipping. Not to mention all the FUN that comes with being part of our fantastic crafting community. Join with me here…

The Kits Collection Sale Ends Soon

Our Kits Collection sale is coming to an end. These are the last few days for you to shop all our kits at up to 30% off. Shop our wide selection of kits before it’s too late! See the Kits Collections here.

OK – so time to order… don’t forget to use a HOST CODE FYAH4HG3 when placing a $50 order or more. This gets you a free item from me valued up to $10 for a Stampin’ Up! item.

Stampin’ Up! Shaker Card with Fluffiest Friends for the Happy Inkin’ Thursday Blog Hop

Hello , hello – it’s Thursday and time for another fun hop with the Inkin’ Krew! We have a theme challenge today – Critters – and I chose to use the Fluffiest Friends Bundle and coordinated it with the Friends for Life Bundle to make this cute shaker card.

Stampin' Up! Happy Inkin' Thursday Blog Hop
Stampin' Up! Fluffiest Friends Shaker Birthday card front

The DSP is from the 24-26 In Color 6×6 pack of papers and the color is Pretty In Pink. I cut it 4 x 5 1/4, then die cut this sweet heart shape using the Friends for Life Dies. While I had those at my fingertips, I also die cut the word ‘friend’ in Basic White and a background in Pretty in Pink. I adhered these two word ‘frames’ together and set them aside. I turned the DSP over, ran a Stampin’ Seal along the edges and teeny tiny dots of liquid glue to areas of the center of the heart, then laid a window sheet on top (3 3/4 x 5) – adhering these together. Using the Foam Adhesive Strips, I created a boarder around the heart, then also around the edge of the DSP, placed several of the pink Loose Frosted Dots in the center of the heart area, peeled the backing off the adhesive strips and attached a Basic White panel, creating the background to the shaker card. :O) Next I stamped this adorable fluffy rabbit from the Fluffiest Friends stamp set: Memento ink on a Basic White scrap about 2×2 and colored it with Stampin’ Blends: Smoky Slate, Light Pretty in Pink, Light Real Red for the cherry and Light Crumb Cake for the cupcake wrapper – and die cut it using the coordinating Fluffiest Friends Dies. I adhered it in place with dimensionals. I also added Wink of Stella to the cupcake icing. I attached the word friend with liquid glue. As a final touch for the front, I added three 24-26 In Color Shimmer Gems – in Pretty in Pink of course. I added this completed front panel to a Thick Basic White card base 5 1/2 x 8 1/2 scored at 4 1/4.

Stampin' Up! Fluffiest Friends & Friends for Life birthday card inside

That thin piece of die cut heart from the front is a very narrow strip, but I added teeny tiny dabs of liquid glue to it and attached it to the inside of the card. I stamped the sentiment in Pretty In Pink ink using the Friends for Life stamp set. I stamped another adorable ‘fluffy’ – a cat from Fluffiest Friends stamp set – in Memento ink on another Basic White scrap about 2 1/2 x 2 3/4. I did very little coloring on it: Stampin’ Blends Light Pretty in Pink for the ears, nose and flower and Crumb Cake on the flower pot., Light Old Olive for the leaf. I added a single yellow Loose Frosted Dot to the center of the flower. This was die cut with the coordinating Fluffiest Friends Die and added in place with liquid glue.

Stampin' Up! Fluffiest Friends and Friends For Life Birthday card & envelope

For the envelope, another piece of the same 24-26 In Color 6×6 DSP adhered to the flap and trimmed to fit. On the envelope front… another adorable beast, this time colored with Stampin’ Blends Crumb Cake and Pretty In Pink. The balloon was also colored with Light Pretty in Pink and I added Wink of Stella to that as well. It gives a nice sparkle to the balloon!

I love a shaker card – they just add an element of fun for whomever receives it – and they are fun to make as well! These products may be found in the 24-25 Annual Catalog – except for the Loose Frosted Dots, they are an ONLINE only product. I’ll post links below so you can find them easily :O)

Now, time to see what the others have created using the theme challenge of ‘Critters’. Use the next button to take you to Carol or click on a name to visit someone else. Happy Hopping!!!

Stampin' Up! BLOG HOP NEXT BUTTON

Amy Koenders

Mary Deatherage

Jaimie Babarczy

Karen Finkle

Akiko Sudano

Karen Ksenzakovic

Tara Carpenter

Terry Lynn Brightyou are here!

Carol Buckalew

Shop with me to earn fringe benefits to my customers: free tutorial of the month and a FREE Stampin’ Up! item valued to $10 – all for a $50 order, before shipping and taxes. Use my current host code to receive those benefits – especially when your order does not exceed $150. Make certain my name is listed as your demonstrator when checking out! :O) Shop here with me! And redeem those coupons earned during July.

Redemption Period: 1–31 August 2024
Ordering Deadlines
Phone: 30 August 2024 at 6:59 p.m. (MT) 
Online: 31 August 2024 at 11:59 p.m. (MT)

NEW HOST CODE KWTJJQZY

Now is also a big, big Designer Series Paper Sale –

15% off is a perfect time to purchase some beautiful papers.

Stampin' Up! Designer Series Paper Sale

NEW HOST CODE KWTJJQZY

Click here to order Designer Series Paper on SALE!

Click here for CLEARANCE ITEMS

Just for a teaser… August 6, Stampin’ Up! demonstrators all over the world are able to pre-order from the NEW… SEPTEMBER-DECEMBER 2024 CATALOG and I did just that. I also ordered catalogs to send to my customers – so as soon as they arrive I’ll get them sent. If you haven’t ordered from me in a bit, it’s possible you will not receive a catalog from me. But check with me – just in case!

And if you like making kits – and halloween is your thing – Stampin’ Up! just released a Haunted Home kit – click here to see the kits available

Stampin' Up! Haunted home Kit
Haunted Home Kit

Thanks so much for stopping by. If I can be of help in supporting you and your crafting, please get in touch with me. May you have a beautiful day!

Stampin’ Up! Hearts & Hugs for the Happy Inkin’ Thursday Blog Hop

Hello folks – it’s Thursday and we have a sketch challenge today. Because I needed a birthday card I pulled out the very cute & fun Hearts & Hugs bundle to create this card.

Stampin' Up! Happy Inkin' Thursday Blog Hop
Stampin' Up! Hearts & Hugs card front

The creatures in this Hearts & Hugs bundle are just so incredibly C-U-T-E! I used Stampin’ Blends to color them after stamping on Basic White scraps with Memento ink: Gray Granite and Light Smoky Slate & the Color Lifter. For the ears/ cheeks, just a bit of Pretty in Pink. I used the Basic Black Marker to darken the noses. Once all colored I die cut them with the coordinating die from the Hearts & Hugs Dies. After coloring, I pulled the rest of the card together.

  • Card base: Smoky Slate 8 1/2 x 5 1/2 scored at 4 1/4
  • Layer the card front with Take To The Sky DSP 4 1/4 x 5 1/2
  • To meet the sketch challenge, I cut a piece of Basic White 3 x 4 and added another layer of DSP from Take To The Sky DSP 2 7/8 x 3 7/8. These were added to the card front with dimensionals
  • I put dimensionals on the back of the two hugging beasts (what are they?) and added them to the lower left corner.
  • Using the banner die from Hearts & Hugs Dies, I die cut a Blueberry Bushel tag & added it to the card front with liquid glue. I stamped the sentiment in Memento ink – from Hearts & Hugs stamp set, trimmed it down and added it with dimensionals to the banner.
  • As a final touch, I added three 2023-2025 In Color Dots in Pebbled Path
Stampin' Up! Hearts & Hugs birthday card inside
  • For the inside of the card, I stamped another cute beast – is this a chipmonk?) on a Basic White panel 4 x 5 14 and colored him similarly to the two on the card front
    • stamp in Memento ink
    • color with Stampin’ Blends – Gray Granite, Light Smoky Slate, Color Lifter and bits of Pretty in Pink for the ears and cheekbones. The nose & eyes I used Basic Black Marker to darken.
  • I stamped the hearts in Pretty In Pink ink – again from the hearts & Hugs stamp set
Stampin' Up! Hearts & Hugs card & envelope
  • For the envelope… more of the Take To The Sky DSP adhered to the flap & trimmed to fit.
  • Along the bottom of the envelope front I stamped the sentiment from Sweetly Scripted stamp set in Pebbled Path ink.

Sweet birthday card – right? Today is August 1 – so time to redeem those coupons! Each coupon is valued so don’t let them slip through your fingers … See below for how to redeem with me as your demonstrator.

Now… time to see what the rest of the crew have created. Click the ‘next’ button or… click on a name. Be sure not to miss anyone :O)

Stampin' Up! blog hop 'next' button

Amy Koenders

Mary Deatherage

Karen Finkle

Akiko Sudano

Karen Ksenzakovic

Tara Carpenter

Terry Lynn Bright – you are here!

Carol Buckalew

Nel Thames

Stampin' Up! REDEEM coupons

Redemption Period: 1–31 August 2024
Ordering Deadlines
Phone: 30 August 2024 at 6:59 p.m. (MT) 
Online: 31 August 2024 at 11:59 p.m. (MT)

  • There is no limit to the number of coupon codes participants can redeem on an order during the redemption period. If using multiple codes, they must be separated by a space. 
  • Coupon codes may be redeemed one time only. They cannot be redeemed after the 31 August. 
  • Coupon codes may be redeemed for any product (excluding Starter Kits and demonstrator supply items). They cannot be used on exchanges.
  • Bonus Days coupon codes can be applied to new prepaid Paper Pumpkin subscriptions.
  • Coupon codes will reduce the commissionable amount of an order

MORE BIG STAMPIN’ UP! NEWS… Aug 6 Designer Series Paper Sale… 15% off Designer Series Paper during the month of August

Sales Period: 6–31 August 2024

Ordering Deadlines

  • Phone: 30 August at 6:59 p.m. (MT)
  • Online: 31 August at 11:59 p.m. (MT)

Our Designer Series Paper is hand created in house. Our artists design, sketch, paint, etc. the patterns you see on the paper. Its durability and utility are perfect for all types of paper crafts. The following paper is part of the sale: 

  • Bright & Beautiful 
  • Countryside Inn 
  • Country Lace 
  • Country Woods
  • Full of Life
  • Lily Pond Lane
  • Mediterranean Blooms 
  • Perennial Lavender 
  • Take to the Sky 
  • Thoughtful Journey 
  • To Market 
  • Unbounded Beauty 
  • Wildly Flowering 
  • Winter Meadow 

Please note, the following paper is featured in the Annual Catalog, but is from previous product releases: 

  • Bright & Beautiful 
  • Countryside Inn 
  • Perennial Lavender 
  • Winter Meadow
Stampin' Up! DSP SALE

Shop with me to earn fringe benefits to my customers: free tutorial of the month and a FREE Stampin’ Up! item valued to $10 – all for a $50 order, before shipping and taxes. Use my current host code to receive those benefits – especially when your order does not exceed $150. Make certain my name is listed as your demonstrator when checking out! :O) Shop here with me!

HOST CODE THNSVC2P

Thanks for stopping by. May you have a beautiful day. Make someone happy by sending them a handmade card filled with love.

Stampin’ Up! Thoughtful Journey Gatefold

Welcome to JUNE! I can’t believe it is the 6th month of the year already… time marches on. :O) The Thoughtful Journey 6×6 DSP has lots of watercolor type images of streams, landscapes with flowers, grasses, etc, and is perfect for cutting apart and piecing back together again. A traditional gatefold uses panels on each ‘gate’, while this uses panels attached to each ‘gate’. Let’s look…

Stampin' Up! Thoughtful Journey Gatefold card front
Stampin' Up! Thoughtful Journey Gatefold, 2

In the two photos at left, you can see how the panels are attached to each side of the card front – or gates – and it allows the card to be opened easily. Here are some simple instructions for re-creating this type of gatefold.

  • The card base is 4 1/4 x 11 scored at 2 3/4 on the long side. You can score again @ 8 1/4 but I prefer to close the scored left side and fold the left side to meet it and burnish well with my bone folder. This guarantees no gap or possible overlapping if you have not been particular about scoring.
  • Layers for the front: cut and adhere together
    • Misty Moonlight: cut 2, 1 3/4 x 5
    • Basic White:: cut 2, 1 5/8 x 4 7/8
    • DSP: cut 2, 1 1/2 x 4 3/4 (in this case Thoughtful Journey 6×6)
      • I stamped my DSP at this point: butterflies on the top are from Sketched Butterflies stamp set, stamped with Pumpkin Pie ink; sentiment on the bottom panel is also from Sketched Butterflies stamp set and is stamped in Misty Moonlight ink.
  • Close left ‘gate’ of card base and adhere top completed layer to the ‘gate’ only, leaving equal distance at top & left at score line
  • Now do the same on the right side. Notice that when the card is closed there are equal distances between the top & bottom panels as well.
Stampin' Up! Sketched Butterflies, card inside

For the inside:

  • Misty Moonlight 4 x 5 1/4 is adhered to the inside of the card
  • On Basic White 3 7/8 x 5 1/8, stamp the butterfly image in the center with Pumpkin Pie ink. This is from Sketched Butterflies stamp set. Add color to specific areas with Stampin’ Blends Peach Peach Pie and Misty Moonlight.
  • I added some doodles around the body of the butterfly with my Basic Black Marker.
  • Stamp the sentiment from Sketched Butterflies stamp set in Misty Moonlight ink; adhere panel to the inside of the card

To complete the card front, I added three Adhesive-Backed Textured Dots.

Stampin' Up! Thoughtful Journey Gatefold card & envelope

For the envelope, I added another panel of Thoughtful Journey 6×6 DSP to the flap and trimmed to fit. I then stamped the butterflies from Sketched Butterflies stamp set in Pumpkin Pie ink on the envelope front. And done!

Interestingly, there is no die cutting on this card! It’s just stamps, ink, paper and an easy fun fold. There are so many ways to make this gatefold different.

Stampin’ Up! has a new offer beginning June 5 – 30, 10% off any Stamp & Die set bundle AND 10% off the Mini Die Cut & Emboss machine as well as the standard size Die Cut & Emboss machine. I encourage you to make your list and take advantage of this generous offering.

Click here to see all SU! bundles available in the Stampin’ Up! 2024-2025 Annual Catalog.

And remember, bundles in the ONLINE EXCLUSIVE SU! store are also part of this offering – click here to see those

Thanks for stopping by. May you have a beautiful day!

Stampin’ Up! Wildly Flowering DSP for the Happy Inkin’ Thursday Blog Hop

Good morning! Happy Thursday and welcome to our hop… We have a sketch challenge today and I have chosen to create two cards using the Wildly Flowering 12 x 12 Designer Series Paper. One is a bit simpler than the other, just to show a comparison.

Stampin' Up! Wildly Flowering DSP card front

This DSP is so stunning… love the colors and pretty images too! You notice I took a bit of liberty with the sketch by changin g where I placed the sentiment. I did not want to cover up the flower! Here are the basics:

  • Card base is 8 1/2 x 5 1/2 scored at 4 1/4 (Misty Moonlight)
  • DSP largest layer 4 1/4 x 5 1/2 adhered directly to card front
  • Bubble Bath layer 3 1/4 x 4 1/2 adhered directly to DSP layer
  • DSP layer 3 1/8 x 4 3/8 adhered directly to Bubble Bath layer
  • Sentiment is stamped in Moody Mauve ink on 5/8 x 3 Basic White (Sweetly Scripted stamp set – ONLINE ONLY). This was added with dimensionals
  • Embellishment: Flat Adhesive-Backed Pearls, 3
Stampin' Up! Textured Floral stamp set, inside of card

For the inside… A layer of Bubb leBath card stock cut 4 x 5 1/4 was adhered directly to the inside of the card. A Basic White panel was stamped with images from the Textured Floral stamp set: Bubble Bath for the flower/ Moody Mauve for the stamen. For the leaves, I inked them with Old Olive ink then used the Mossy Meadow Marker to add some depth and shadow. This panel (3 7/8 x 4 1/8) was added to the inside – and the card was complete.

Stampin' Up! Wildly Flowering DSP card & envelope

For the envelope… more of the same Wildly Flowering 12 x 12 DSP on the flap, trimmed to fit. On the front, Textured Floral stamp set, Bubble Bath ink for the flower and Moody Mauve for the stamen. This completes the look and coordinates the entire card. :O)

Here is the other, more minimalistic card – no stamping except for the sentiment: Sweetly Scripted in Moody Mauve ink and same Flat Adhesive- Backed Pearls.

Stampin' Up! Wildly Flowering DSP  Card 2, card & envelope
Stampin' Up! Wildly Flowering DSP, card 2, inside

This card 2 is so similar, yet, simpler. Forthe beginning crafter, little stamping and supplies needed. Must the sentiment be on dimensionals – no! Must the beginning crafter add embellishments – no! I did because I like the look of layers and depth dimensionals create, and I like the added embellishments, but it is NOT necessary. Use what you have. Could I have added a Linen Thread bow behind the sentiment – on both cards? Absolutely!!! But for this, I kept it fairly simple.

Now, on with the hop… I can’t wait to see what others on the team have created! Click on the ‘next’ button or click on a name. Either way, enjoy the hop! See below how to purchase the products shown in this cardn. – from me!

Amy Koenders

Mary Deatherage

Jaimie Babarczy

Karen Finkle

Akiko Sudano

Karen Ksenzakovic

Tara Carpenter

Terry Lynn Bright ~ you are here!

Carol Buckalew

Nel Thames

The 24-25 Annual Catalog is now live… here’s a link to take you directly to the items available in this catalog – Happy shopping!

Stampin’ Up! has a fabulous joining opportunity from May 1-31.

Stampin' Up! Joining Promotion

To join is $99 and what comes with joining, besides your 15-20% discount on every order… FOUR FREE IN COLOR PRODUCTS valued to $82 plus your choice of $125 worth of products. Those FREE items – the IN COLOR products – Classic stampin’ pad bundle – 5 of them, package of 8 1/2 x 11 cardstock – 5 of those, 6×6 Designer Series Paper – 5 colors in the pack, and the coordinating Stampin’ Write markers. That’s $82 worth of products – for FREE if you join between now and May 31. You will also receive free shipping on these products + free business supplies. What’s not to like about this joining special!

Join with me by following this link...

To view all the available ONLINE EXCLUSIVES, click here.

Clearance items may be found here

While you’re looking around in my store, remember there are some stunning kits available, for all ages and all seasons – even Christmas! And while you’re shopping, I offer fringe benefits to my customers: free tutorial of the month and a FREE Stampin’ Up! item valued to $10 – all for a $50 order, before shipping and taxes. Use my current host code to receive those benefits – especially when your order does not exceed $150.

HOST CODE WDY4XUVD

Thanks for stopping by. May you have a beautiful day. Make someone happy when sending them a handmade card filled with love.


Stampin’ Up! Take To The Sky Suite for Amy’s Inkin’ Krew Team Blog Hop

WELCOME TO AMY’S INKIN’ KREW TEAM BLOG HOP! We have a theme challenge for today – ‘for the boys/ men’ and we can interpret that any way we like. I chose to use the Take To The Sky Suite for the challenge.

Stampin' Up! Amy's Inkin' Krew Team Blog Hop
Stampin' Up! Adventurous Sky Birthday card front

The Take to T/he Sky 12×12 DSP is so perfect for the flyers in our lives or for anyone really. Here’s what I did for this card…

The card base is 8 1/2 x 5 1/2 Smoky Slate card stock scored at 4 1/4. I added the plaid pattern in Smoky Slate from the Take To The Sky 12×12 DSP cut 4 14 x 5 1/2. I then took a design from the Take to The Sky 12×12 cut 3 x 4 and added it to Cajun Craze card stock cut 3 1/8 x 4 1/8. This got dimensionals and was attached to the card front, centering it. I stamped an airplane in Blueberry Bushel ink from the Adventurous Sky stamp set on a Basic White scrap and die cut it with a coordinating die from Adventurous Sky Dies. I used a Cajun Craze Watercolor Pencil to add some color to the plane, then moved the color around with a Blender Pen. I added the plane with a couple of small dimensionals. I stamped the sentiment on a Basic White scrap with Night of Navy ink, cut it apart and adhered it to a 1/4″ strip of Basic White, cut the end, added trimmed dimensionals and attached it to the card front, making it look as though the plane were carrying a banner in the sky.. The final touch was three Industrial Trinkets attached with glue dots -and the card front was complete.

Stampin' Up! Take To The Sky DSP for the card inside

For the inside of the card… another panel of the Take To The Sky DSP 3 x 4 adhered to a Basic White 3 1/8 x 4 1/8 and attached with glue to the inside of the card. The sentiment was stamped in Boho Blue ink using a stamp from Adventurous Sky stamp set. This was die cut with a coordinating die from Adventurous Sky Dies and added with glue to the inside of the card. I offset it to make it look as though it too was being trailed behind the airplane.

Stampin' Up! Take to the Sky Birthday card & envelope

For the envelope, I stamped another size plane from the Adventurous Sky stamp set, this time in Night of Navy ink – to the envelope front. On the flap I attached a piece of Take To The Sky 12×12 DSP and trimmed it to fit. And done! YAY! I love this card and it is so perfect for a special someone.

Now, click on the links below to visit thew other team members participating in today’s hop.

  1. Mary Deatherage
  2. Tara Carpenter
  3. Karen Ksenzakovic
  4. Ann Louise Fodgaard
  5. Akiko Sudano
  6. Carol Buckalew
  7. Terry Lynn Bright
  8. Karen Finkle
  9. Amy Koenders

The 24-25 Annual Catalog is now live… here’s a link to take you directly to the items available in this catalog – specifically the Take to The Sky Suite of products. These particular embellishments are on page 114. Happy shopping!

Stampin’ Up! has a fabulous joining opportunity from May 1-31.

Stampin' Up! Joining Promotion

To join is $99 and what comes with joining, besides your 15-20% discount on every order… FOUR FREE IN COLOR PRODUCTS valued to $82 plus your choice of $125 worth of products. Those FREE items – the IN COLOR products – Classic stampin’ pad bundle – 5 of them, package of 8 1/2 x 11 cardstock – 5 of those, 6×6 Designer Series Paper – 5 colors in the pack, and the coordinating Stampin’ Write markers. You will also receive free shipping on these products + free business supplies. What’s not to like about this joining special – remember it begins May 1! Join with me by following this link...

To view all the available ONLINE EXCLUSIVES, click here.

Clearance items may be found here

While you’re looking around in my store, remember there are some stunning kits available, for all ages and all seasons – even Christmas! And while you’re shopping, I offer fringe benefits to my customers: free tutorial of the month and a FREE Stampin’ Up! item valued to $10 – all for a $50 order, before shipping and taxes. Use my current host code to receive those benefits – especially when your order does not exceed $150.

HOST CODE 4JF6ZWC9

Thanks for stopping by. May you have a beautiful day. Make someone happy when sending them a handmade card filled with love.

Stampin’ Up! Unbounded Beauty Birthday Card

Good Monday morning! It is such a beautiful day here on the Jersey shore… although a cool 48 degrees. I have a showcase of DSP from the Unbounded Love 12×12 pack and I’m using it for a simple layout but gussied up birthday card.

Stampin' Up! Unbounded Beauty Birthday card front

Do you notice the simple layout? The gussied up part is the Bordered Ribbon in Pretty In Pink, the Paper Butterfly Accent and additional 24-26 In Color Shimmer Gems embellishments. Looking at this photo, I must make that bow smaller – it’s just too overpowering.

Measurements:

* Card Base is Thick Basic White 4 1/4 x 11 scored at 5 1/2

* DSP layer is 4 1/4 x 5 12 adhered directly to the card front

* Layer – Berry Burst 3 1/8 x 4 1/8

* DSP layer is 3 x 4 adhered directly to Berry Burst , wrapped with ribbon, bow tied then added to card front with dimensionals

* The sentiment is from Unbounded Love stamp set and is stamped in Pretty In Pink ink on a Basic White piece 2 3/4 x 1 3/4 then diecut with the coordinating Unbounded Love Die and added to the card front with dimensionals

* Three 24-26 In Color Glimmer Gems were added to the sentiment panel – in Pretty In Pink

* The Paper Butterfly Accent was attached with tiny dabs of glue then two 24-26 In Color Glimmer Gems added

Stampin' Up! Flowers of Beauty card inside

For the inside of the card, on a 4 x 45 1/4 Basic White panel I stamped this lovely flower in a two-step manner. It comes from the Flowers of Beauty stamp set that is part of the Unbounded Beauty Suite of products. I stamped the flower outline in Pretty In Pink ink, then the flower filler in stamped off Petal Pink ink. The stamen is stamped in Berry Burst ink. I left the rest of the inside blank as this card is going to be signed by lots of folks.

Stampin' Up! Unbounded Beauty Birthday Card & Envelope

I followed the same process of stamping the flower on the envelope as I did on the inside of the card: flower outline is Pretty In Pink ink, flower filler is stamped off Petal Pink ink, stamen is Berry Burst ink – using stamps from the Flowers of Beauty stamp set. The flap is covered in more of the Unbounded Beauty 12×12 DSP that I used on the card front and trimmed to fit.

The 24-25 Annual Catalog is now live… here’s a link to take you directly to the items available in this catalog – specifically the Unbounded Beauty Suite of products found on pages 52-55. The ribbon is located on page 112 and these particular embellishments are on page 114. Happy shopping!

Stampin’ Up! has a fabulous joining opportunity from May 1-31.

Stampin' Up! Joining Promotion

To join is $99 and what comes with joining, besides your 15-20% discount on every order… FOUR FREE IN COLOR PRODUCTS valued to $82 plus your choice of $125 worth of products. Those FREE items – the IN COLOR products – Classic stampin’ pad bundle – 5 of them, package of 8 1/2 x 11 cardstock – 5 of those, 6×6 Designer Series Paper – 5 colors in the pack, and the coordinating Stampin’ Write markers. You will also receive free shipping on these products + free business supplies. What’s not to like about this joining special – remember it begins May 1! Join with me by following this link...

To view all the available ONLINE EXCLUSIVES, click here.

Clearance items may be found here

While you’re looking around in my store, remember there are some stunning kits available, for all ages and all seasons – even Christmas! And while you’re shopping, I offer fringe benefits to my customers: free tutorial of the month and a FREE Stampin’ Up! item valued to $10 – all for a $50 order, before shipping and taxes. Use my current host code to receive those benefits – especially when your order does not exceed $150.

HOST CODE 4JF6ZWC9

Thanks for stopping by. May you have a beautiful day. Make someone happy when sending them a handmade card filled with love.

Stampin’ Up! Thoughtful Wishes for the Happy Inkin’ Thursday Blog Hop

Happy Thursday – and you know what that means – another blog hop by the fabulous Happy Inkin’ group! We have a sketch challenge today and I have chosen a new product – Thoughtful Wishes stamp set (part of a bundle & suite of products available May 1) AND a couple of cards created with the Sweet Thoughts Memories & More Cards + Card & Envelopes (from the Jan-Apr 2024 Mini catalog.)

Stampin' Up! Happy Inkin' Thursday Blog Hop
Stampin' Up! Hop Sketch Challenge
Stampin' Up! Thoughtful Wishes card front

This card uses the beautiful Thoughtful Journey 6×6 DSP (available May 1 in the NEW 2024-2025 Annual Catalog) The sentiment is from the coordinating Thoughtful Wishes stamp set, stamped in Mossy Meadow ink. Notice that new in-color behind the scened DSP? That Petunia Pop! The ribbon is from a two pack that is a White diagonal stripe. The card base is Mossy Meadow with an overlay of Garden Green cut just slightly smaller. The embellishments are Brushed Brass Butterflies that are carrying over as an ONLINE EXCLUSIVE product.

For the inside of the card I stamped the very same image as I stamped on the envelope and forgot to take a photo… so imagine it on a Basic White panel and stamped in Mossy Meadow ink. :O) Ugh!

Stampin' Up! Thoughtful Wishes card & envelope

For the envelope I stamped this wonderful floral image all across the bottom of the envelope front in Mossy Meadow ink.

I mentioned that I had done some Sweet Memories & More Cards using this same sketch challenge.

Stampin' Up! Sweet Thoughts Memories & More Card Pack + Cards & Envelopes.card 1
Stampin' Up! Stampin' Up! Sweet Thoughts Memories & More Card Pack + Cards & Envelopes.card 1 inside
Stampin' Up! Stampin' Up! Sweet Thoughts Memories & More Card Pack + Cards & Envelopes.card 2
Stampin' Up! Stampin' Up! Sweet Thoughts Memories & More Card Pack + Cards & Envelopes.card 2 inside
Stampin' Up! Stampin' Up! Sweet Thoughts Memories & More Card Pack + Cards & Envelopes.card 3
Stampin' Up! Stampin' Up! Sweet Thoughts Memories & More Card Pack + Cards & Envelopes.card 3 inside

These cards use 3×4 cards & stickers from the Sweet Thoughts Memories & More card pack plus a couple other supplies: Delightfully Eclectic DSP as a background on the 1st card + Adhesive-Backed Dragonflies & Birds; #2 card in this section uses the Zinnias 3D EF (an ONLINE EXCLUSIVE) as a background for the sentiment on the front and a single Paper Butterfly Accent, a carry-over product; card 3 additional product is the Adhesive-Backed Cork Rounds from the Jan-Apr 2024 Mini Catalog (retiring end of April). These were each such fun to create using the very same sketch challenge for today. And since they were a gift from my upline Mary Deatherage and her upline Amy Koenders – well, I just HAD to show them off!

For more info on how to purchase these products, scroll down below the names listed for the hop :O)

OK – continue the hop by clicking the ‘next’ button or clicking on a name. This is a talented bunch – so enjoy!

Stampin' Up! Next button for the HOP

Amy Koenders

Mary Deatherage

Jaimie Babarczy

Karen Finkle

Akiko Sudano

Karen Ksenzakovic

Tara Carpenter

Terry Lynn Bright – you are here!

Carol Buckalew

Nel Thames

Stampin' Up! Jan-Apr 2024 Mini Catalog

To purchase the products for the Sweet Thoughts Memories & More Card Pack & Sweet Thoughts Memories & More Cards & Envelopes, click here. This link will allow you to see ALL the products in the Jan-Apr Mini Catalog – and shop with me of course.

Shop ONLINE EXCLUSIVES here

Stampin' Up! ONLINE EXCLUSIVES

Shop with me here for products available in the 2023-2024 Annual Catalog

Keep in mind the NEW 2024-2025 Annual Catalog is not available until May 1. HOWEVER, if you JOIN MY TEAM, you can create a pre-order of new items in the catalog. So, 20% off every order, every time is hard to pass. Click HERE to JOIN MY TEAM. Joining a team of creative people brings so many connections and ideas and creativity. It brings challenges too, ones that help you grow as an individual and as a creative entity. Want to learn more? Connect with me!

When purchasing from me, and your order is $50-$149 (before taxes & shipping), you will receive a FREE SU! product valued up to $10. PLUS, the exclusive tutorial of the month and reward!

Thanks for stopping by. Have fun creating! Love to read your comments, so let me know.