Unknown's avatar

About TL's Bright Spot

I love to be creative - in the garden, crafting, and in leadership roles. There is something wonderful that happens when we design something new and share it with others. It's fun and makes everyone happy.

Stampin’ Up! In Bloom

Hello! How is everyone today? It’s Thursday and going to be very windy and cold. When we walk the dog we will need to be quite bundled – and may even put the doggy coat on our Springer.He isn’t used to it as the winter has been extremely mild, but he seems to like it. We’ll decide when it becomes daylight :O)

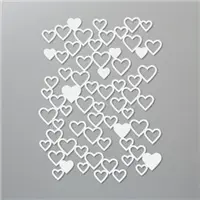
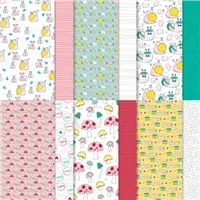
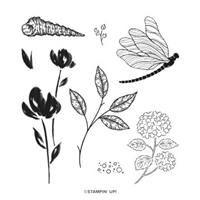
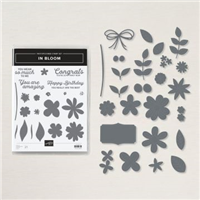
Todays card was made with the extra fun NEW Pierced Bloom Dies that is bundled with the In Blooms stamp set. It also allowed me to die cut flowers from the FREE with a $50 purchase Paper Blooms DSP. Of course, that FREE is only during Sale-a-bration which goes through the end of February. Just sayin ‘… The card ~

In Bloom #1

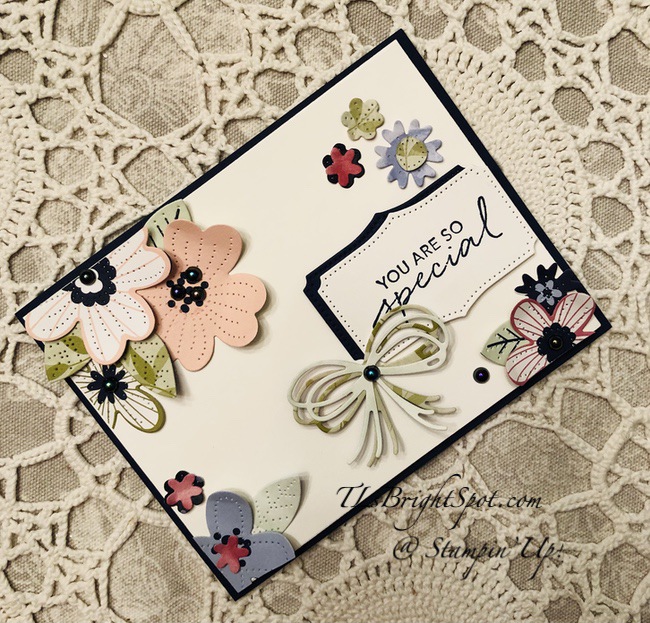
Every single flower and leaf was die cut from the Paper Blooms DSP. Isn’t that cool? The bow is as well. I’ve taken several close-ups so you can see what these dies do – they make these awesome lines, like stitching. I simply kept die cutting flowers and leaves and made a fun pile of them, using what I wanted for this card. I have a few left to play with again. What do I do with the extras? Mostly they go in a small bag and get put in either the stamp set or in with the dies – depends. I like having extras handy. Sometimes they sit in a small container on my desk waiting for inspiration. But the card… all of these were adhered to a Basic White panel . Since there were so many flowers on the panel, I adhered another layer of the Basic White card stock for added strength. I put dimensionals on the back and adhered it to a Night of Navy card base.

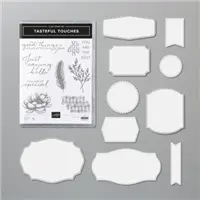
Can you see all the texture these dies add, making these almost ‘real’! And the bow – well, love that bow – so delicate. I’ve die cut two and layered them atop one another, just off-center a bit. I’ve also added several Iridescent Pearls. And the label is from this die set as well. It’s wonderful! The sentiment on the label comes from Tasteful Touches stamp set in the Annual Catalog. I’ve die cut two labels – Basic White and Night of Navy card stocks and layered them together with liquid glue. They sit on dimensionals as does the bow. Everything else is adhered with liquid glue.

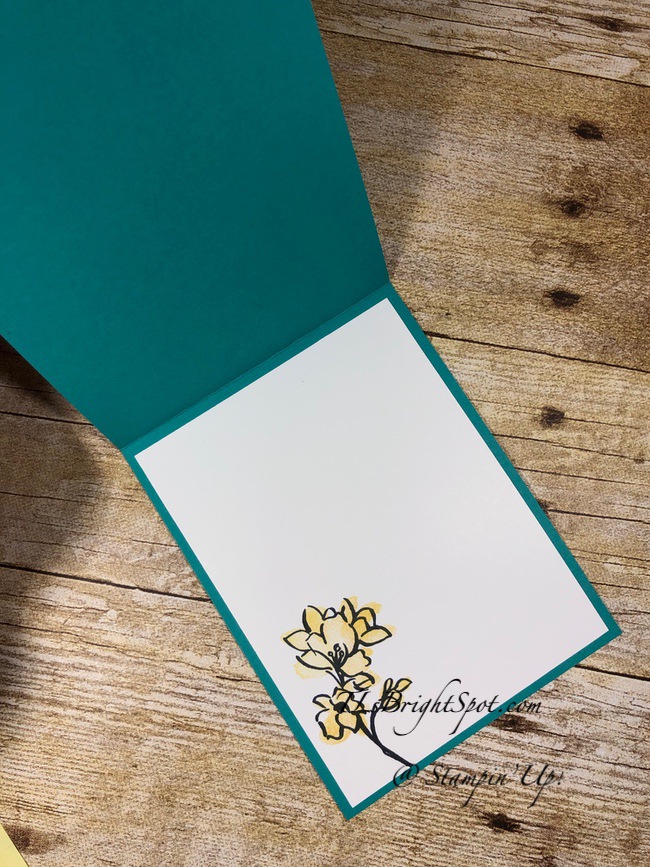
Let’s take a look at the inside of the card.

In Bloom – card inside

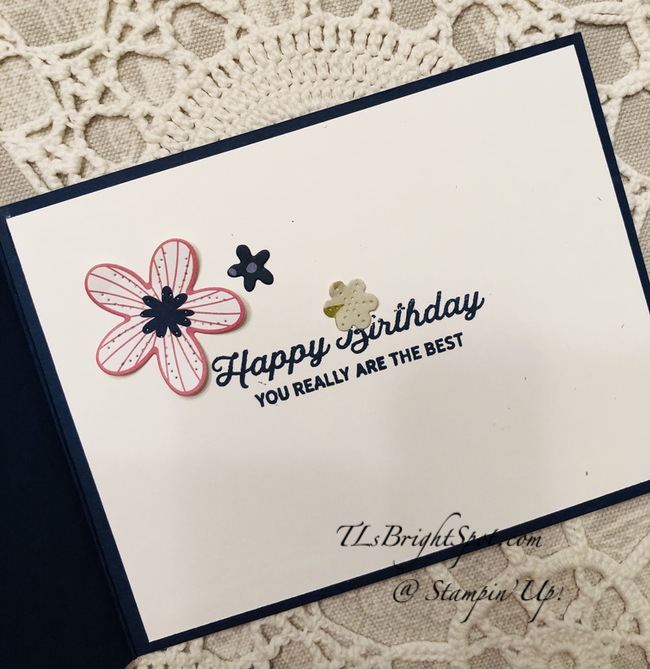
The sentiment comes from the In Bloom stamp set and is stamped in Night of Navy ink on a Basic White panel. The flowers are die cut from the Paper Blooms DSP and adhered with liquid glue. The panel was adhered to the inside of the card with liquid glue.

What do you think – isn’t this a fun card? A friend of ours has a birthday tomorrow and I will hand deliver this since she is local – yep, masked and probably just texting her to say it’s in her mailbox so we don’t come in contact. Her family is health compromised and have to be super careful.

Products for todays card are from the new Jan-Jun 2021 Mini Catalog and the 2020-2021 Annual Catalog ~ and those products are available now for purchase. You will find them in the product list below. As a reminder… I’ve made it easy for you to simply ‘add all to cart’. If I can help you in any way to order these items, or others, please give me a holler. As a thank you to my customers, when the order is between $50-$150 I offer a SU! item of your choice valued at $10. Remember to use MY CURRENT HOST CODE WZBPZ7N4- good Jan 21 – Feb 3. When the order is over $150, you still receive that free gift from me, but SU! has Stampin’ Rewards that may be used for additional products, so don’t use the host code at that time. Now is also Sale-a-bration – a time from now through the end of February when Stampin’ Up! offers FREE items with $50 and $100 purchases. Those products are shown below today’s product list as well. Happy shopping!

Sale-a-bration items FREE with $50 purchase – Level 1

Sale-a-bration items FREE with $100 purchase

And when you HOST an event that has a $300 total or more

During Sale-a-bration is such a perfect time to JOIN MY TEAM… at least a 20% discount on all SU! products, starter kit valued at $125 for only $99, FREE pack of five 6×6 Designer Series Papers, plus the FREE items offered during Sale-a-bration. PLUS – personalized service from me 😊 👍 💕 to talk through any concerns, give instructions on how to use products – the list goes on. Contact me soon!

Thanks for stopping by.

May you have a beautiful day.

Make someone happy sending them a handmade card filled with love.

Stampin’ Up! Floral Heart Dies, Part II

The other day I posted a card using the center heart from the Floral Heart Dies. Todays card features the beautiful ‘rim’ that is just stunning.

I began by die cutting this beauty from Blushing Bride card stock. Then on a piece of Basic White scrap about 1 1/2″ wide by about 4″ in length, I used Stampin Blends Just Jade and Flirty Flamingo to color opposing ends of the strip. Use both light & dark to blend together nicely – no sharp lines. From the Flirty Flamingo end, die cut the three flowers in one die from the Floral Heart Dies. On the Just Jade end of the paper, die cut the four leaves in one die, also from the Floral Heart Dies.

Example of coloring with Blends for die cutting

Next, stamp the single flowers in Crumb Cake ink on a strip of Basic White card stock and color using the Flirty Flamingo Blends. Do this twice so you have six flowers available to play. It’s always advisable to have more to use in lieu of stopping and creating more. TIP: If you don’t use them all, save in either the stamp set or with the appropriate dies. I then added Wink of Stella to all the flowers.

Stamp the leaves in Crumb Cake ink on another strip of Basic White. Again, stamp extra leaves – maybe a total of five or six. Color using Stampin’ Blends Soft Sea Foam. Die cut with dies from the Floral Heart Dies.

Place your heart on a silicone sheet so that as you adhere the flowers and leaves, the heart does not adhere to other card stock or anything else. I didn’t use all the flowers and leaves as I didn’t want the heart too ‘heavy’. All of the flowers were adhered with liquid glue, some attached behind the heart. once everything is adhered, I moved my heart off the silicone sheet and splattered Wink of Stella all over.

Splattered with Wink of Stella

I placed my heart (without glueing!) on a panel of Basic White card stock, noting just where I wanted my sentiment. Using the Stamparatus for this step is so helpful… I removed the heart and stamped the sentiment in Crumb Cake ink from the Always In Your Heart stamp set. Run the Basic White panel through the Subtle 3D embossing folder for some added texture. Now adhere the heart with liquid glue. I adhered an additional flower & leaf to the lower left corner, adhering with liquid glue. The last step is adding the Rhinestone Basic Jewels.

The Basic White panel is adhered to Flirty Flamingo card stock with liquid glue. Place dimensionals on the back and adhere to a Crumb Cake card base and your card front is complete. Love, love, love how this turned out!

I have not completed the inside of the card yet – waiting to determine just who the special recipient will be. But… definitely a Flirty Flamingo panel layered with a Basic White panel 🙂

Products for todays card are from the new Jan-Jun 2021 Mini Catalog and the 2020-2021 Annual Catalog ~ and those products are available now for purchase. You will find them in the product list below. As a reminder… I’ve made it easy for you to simply ‘add all to cart’. If I can help you in any way to order these items, or others, please give me a holler. As a thank you to my customers, when the order is between $50-$150 I offer a SU! item of your choice valued at $10. Remember to use MY CURRENT HOST CODE WZBPZ7N4- good Jan 21 – Feb 3. When the order is over $150, you still receive that free gift from me, but SU! has Stampin’ Rewards that may be used for additional products, so don’t use the host code at that time. Now is also Sale-a-bration – a time from now through the end of February when Stampin’ Up! offers FREE items with $50 and $100 purchases. Those products are shown below today’s product list as well. Happy shopping!

Sale-a-bration items Free with $50 purchase

Sale-a-bration items FREE with $100 purchase

Card cuts for todays project:

  • Crumb Cake card base 8 1/2 x 5 1/2 scored at 4 1/4
  • Flirty flamingo 4 1/8 x 5 3/8 (2 – one for inside)
  • Basic white 4 x 5 1/4 (2 – one for inside), 1 1/2 x about 4 (coloring with Blends), 1 x 5 (4 – for stamping leaves & flowers)
  • Blushing Bride 4 1/4 x 4 1/4

Thanks for stopping by.

May you have a beautiful day.

Make someone happy sending them a handmade card filled with love.

Stampin’ Up! Snailed It

Hello folks. It’s Tuesday and we just might get snow today. If I put it in writing, maybe it will happen. I like snow – it’s soft and beautiful, especially if it’s big flakes. There probably won’t be much, b ut a covering is always nice. 🙂

Todays card is made with a bit of whimsy… clotheslines with hearts dangling, and some falling into the cutest little envelope. And of course, as the title indicates, Herb the snail is on a delivery mission.

Snailed It – #1

The base of the card is Thick Basic White. On this is a layer of Pool Party card stock adhered with dimensionals. The top layer is Flirty Flamingo – and should have been embossed. It would give the card so much more character, texture, ‘oompf’ if I had. 😦

  • Die cut hearts came from many sources: Many Hearts Dies (new), Heart to Heart (new), Stitched Be Mine dies and Detailed Hearts dies. I like the varied shapes and sizes, some hollow, some not. It adds charm.
  • With Linen Thread, string on the open hearts and adhere others with liquid glue. The Linen Thread is adhered to the back of the Flirty Flamingo panel with Stampin’ Seal.
  • Die cut this adorable envelope using the Snail Dies. The paper is Sand & Sea DSP (gorgeous, right?!)
  • On a piece of Basic White card stock, stamp the word ‘hello’ from the Snailed It stamp set in Memento Black ink, then die cut with one of the Snail Dies.
  • On another piece of Basic White card stock, stamp “Herb the snail” from the Snailed It stamp set in Memento Black ink. Color him with several Blends: Bermuda Bay & Pool Party, Petal Pink & Light Lovely Lipstick for the packages and Smoky Slate for Mr Herb. Carefully add Wink of Stella to Herb & the packages, not blending the colors into one another (otherwise they smear – and you don’t want that!).
  • Adhere Herb with dimensionals, the envelope with liquid glue, then add the additional hearts, as though they are falling from the clotheslines. I layered a couple of them. and one is on dimensionals with a cute pink heart from the Sending Hearts Paper Pumpkin kit!
  • For a final touch of glam, add three Rhinestone Basic Jewels.
  • Adhere the Flirty Flamingo panel to the Pool Party with liquid glue and your card front is complete.
Snailed It w/ Heart To Heart – #2

For the inside… Adhere a panel of Pool Party to the inside of the card. with liquid glue. Note just where you want your ‘frame’ and stamp the leaf from the Heart To Heart Bundle in Granny Apple Green ink. Add one of the leftover die cut hearts for the ‘flower’. Now add the frame panel with liquid glue and your card is complete. Now, I suppose you want to know about that inside panel and where it came from… it’s the border of an Ornate frames die.

For the envelope I veered back to the Snail Mail DSP for the envelope flap, then stamped the ‘Happy Mail’ from the Snailed It stamp set in Memento Black ink. I colored the little envelope in Light Pool Party Blends – and the whole kit & kaboodle is ready to send… I’m using mine as a Valentine card for someone special 🙂

Products for todays card are from the new Jan-Jun 2021 Mini Catalog and the 2020-2021 Annual Catalog ~ and those products are available now for purchase. You will find them in the product list below. As a reminder… I’ve made it easy for you to simply ‘add all to cart’. If I can help you in any way to order these items, or others, please give me a holler. As a thank you to my customers, when the order is between $50-$150 I offer a SU! item of your choice valued at $10. Remember to use MY CURRENT HOST CODE WZBPZ7N4- good Jan 21 – Feb 3. When the order is over $150, you still receive that free gift from me, but SU! has Stampin’ Rewards that may be used for additional products, so don’t use the host code at that time. Now is also Sale-a-bration – a time from now through the end of February when Stampin’ Up! offers FREE items with $50 and $100 purchases. Those products are shown below today’s product list as well. Happy shopping!

Sale-a-bration items FREE with $50 purchase – Level 1

Sale-a-bration items FREE with $100 purchase – Level 2

Sale-a-bration items for Hosting an event – $300 & up

Host an event – $450 & up

Card cuts for todays project:

  • basic White thick 4 1/4 x 11 scored at 5 1/2
  • Pool Party (2) 4 1/8 x 5 3/8
  • Flirty Flamingo 4 x 5 1/4
  • Snail Mail DSP 2 1/4 x 6 (envelope flap)
  • Sand & Sea about 3 x 4
  • Basic White – scraps for snail, hearts + 4 x 5 1/4 from Ornate Dies (for inside frame)

Thanks for stopping by.

May you have a beautiful day.

Make someone happy sending them a handmade card filled with love.

Stampin’ Up – Always Dies + Hearts

Hello folks! It’s Saturday – are you doing something creative this weekend? I’m loving all the new products in the Jan-Jun 2021 Mini Catalog, so playing with those is just lots of fun… For todays project I’m using some oldies and some newbies as well – so sit back and I’ll take you through it. It’s easy, just sayin’.

Always Dies + Hearts – #1

Today’s card uses several heart stamps/ dies, cuz I kinda like coordinating what Stampin’ Up! offers. It shows versatility in their product and options for mixing & matching. This is true not only for stamp sets & dies, but their papers too. But… on with the ‘card of the day’.

It begins with a Crumb Cake card base, with the front stamped with Crumb Cake ink with the Tasteful Touches stamp set. It barely shows because of the layering and the softness of the ink, but it is there! I then ran another piece of Crumb Cake card stock through the Scripty 3D embossing folder for some wonderful texture. I layered this on a panel of Blushing Bride card stock using liquid glue. I wrapped Linen Thread around these two layers three times and tied a bow. I die cut the heart using the Floral Heart Dies from another piece of Blushing Bride card stock – and yes, the pretty floral part is on my desk for another project 😁 I took just the heart, put dimensionals on the back and adhered it right over the linen thread. I die cut the word ‘Love’ from the Always Dies in Basic White card stock and adhered it with liquid glue to the heart. Now adhere this layered panel to the card front with dimensionals. Add three adorable Resin Hearts Elements in white above the linen thread and your card front is done! If you don’t have these you could add Pearl Basic Jewels.

Let me say something about the Always Dies ~ it’s part of the Forever & Always bundle, which means a 10% discount when purchased together. And the Floral Heart Dies are part of the Always in My Heart bundle – also a 10% savings. You can find these on pages 10-13 in the Jan to Jun 2021 Mini Catalog, showing the Love You Suite. It has fabulous papers, coordinating with the two bundles, ribbon, treat boxes and heart charms. Stampin’ Up has it all covered ~ for valentines, anniversaries, weddings, or just saying I love you because you can!

Back to the card… the inside…

Always Dies + Hearts – #2

On a panel of Basic White card stock I stamped the heart outline image in Blushing Bride ink. This super sweet heart comes from the Heartfelt stamp set listed in the Annual 2020 Catalog on page 75. I then stamped the sentiment in Crumb Cake ink using the Tasteful Touches stamp set again. (Remember we used this set on the the card base for the front of the card.) Isn’t this sentiment perfect for this card? It isn’t ‘over the top’ and could be used for a friend or a grandchild or a daughter. It might be a bit feminine for a son. Yikes – I digress… adhere this panel to the inside of the card and the cards is complete.

For the envelope, I adhered a piece of the Snail Mail DSP to the envelope flap. This coordinates with the basic colors of the card and pulls it together. I did no stamping on the front of the envelope this time.

Always Dies + Hearts – #3

Products for todays card are from the new Jan-Jun 2021 Mini Catalog and the 2020-2021 Annual Catalog ~ and those products are available now for purchase. You will find them in the product list below. As a reminder… I’ve made it easy for you to simply ‘add all to cart’. If I can help you in any way to order these items, or others, please give me a holler. As a thank you to my customers, when the order is between $50-$150 I offer a SU! item of your choice valued at $10. Remember to use MY CURRENT HOST CODE WZBPZ7N4- good Jan 21 – Feb 3. When the order is over $150, you still receive that free gift from me, but SU! has Stampin’ Rewards that may be used for additional products, so don’t use the host code at that time. Now is also Sale-a-bration – a time from now through the end of February when Stampin’ Up! offers FREE items with $50 and $100 purchases. Those products are shown below today’s product list as well. Happy shopping!

Sale-a-bration items FREE with $50 purchase – Level 1

Sale-a-bration items FREE with $100 purchase – Level 2

Now is the perfect time to join Stampin’ Up! With all the FREE products during Sale-a-bration + now you receive an assortment of five stacks of newest 6×6 DSP. A photo is shown on page 18 in the Sale-a-bration brochure. Receive $125 worth of Stampin’ Up! product for only $99. Build your own Starter Kit! There’s more available to you as well – talk to me about JOINING MY TEAM!

Thanks for stopping by.

May you have a beautiful day.

Make someone happy sending them a handmade card filled with love.

Card cuts for today’s project:

  • Crumb Cake card base 8 1/2 x 5 1/2 scored at 4 1/4
  • Crumb cake card stock 3 1/2 x 4 3/4
  • Blushing Bride card stock 3 3/4 x 5 + enough for heart die (about 4 1/2″ square)
  • Basic White 4 x 5 1/4 + die cut for Love
  • DSP – Snail Mail – 2 1/4 x 6

Stampin’ Up! Lots of heart, Love you

Woohoo… so excited. I got a package from Stampin’ Up! with new stamp sets/ dies… and one of the bundles shouted ‘play with me now’ – so I did… and I paired it with Rainbow Glimmer Paper from the Annual Catalog 🙂

Lots of Heart, Love you – #1

Can you see the gradient of the paper? Oh my goodness… honestly, I didn’t really know how I was going to use this paper, but this is it!!! This is one long die in the bundle – again the bundle is the Lots of Heart bundle and the dies are called Many Heart Dies. Fits, right?! And it has these beautiful ‘frames’ that you can see in the hearts #3 & 4 and #6 (count down from the top). Let me explain… there’s the heart itself, and a tiny frame cutout, cut at the same time. I chose to use only three of the ‘frames’ – the rest are on my desk, waiting inspiration. Got an idea? Share it with me, would you?

Details:

  • Cut a strip of Basic White card stock 2 x 5 1/4.
  • Die cut down the center with the Many Heart Dies.
  • Cut a piece of the Rainbow Shimmer Paper 1 3/4 x 5 1/8 and adhere behind 2″ strip with liquid glue.
  • Add any ‘framing’ from the die cut you want to use, using limited amount of liquid glue Put dimensionals on the back.
  • Stamp a panel of Basic White 4 x 5 1/4 with the sentiment from Heartfelt stamp set in Magenta Madness, then run through the Tasteful Textures 3D embossing folder. Adhere this with liquid glue to a Thick Basic White card base 8 1/2 x 5 1/2 scored at 4 1/4 – and your card fronbt is done!
Lots of Heart, Love you, inside – #2

For the inside…

  • On a Basic White panel 4 x 5 1/4, stamp the dotted heart in Magenta Madness ink, stamping off once.
  • Stamp the floral ‘bouquet’ in Memento Black ink over the top, lining up the flowers with the curve & bottom tip of the heart. Color using Stampin Blends: Magenta Madness & Granny Apple Green
  • Adhere the panel with liquid glue to the card base ~ and voila! Your card is complete!

For the envelope…

Lots of Heart, Love you – #3
  • Run a panel of Magenta Madness card stock (2 1/4 x 6) through the Tasteful Textile 3D embossing folder and adhere to the envelope flap with liquid glue. Trim to fit.
  • On the front of the envelope, stamp this sweet line of hearts along the left side in Magenta Madness ink and the card/ envelope are complete!!!

Products for todays card are from the new Jan-Jun 2021 Mini Catalog and the 2020-2021 Annual Catalog ~ and those products are available now for purchase. You will find them in the product list below. As a reminder… I’ve made it easy for you to simply ‘add all to cart’. If I can help you in any way to order these items, or others, please give me a holler. As a thank you to my customers, when the order is between $50-$150 I offer a SU! item of your choice valued at $10. Remember to use MY CURRENT HOST CODE WZBPZ7N4- good Jan 21 – Feb 3. When the order is over $150, you still receive that free gift from me, but SU! has Stampin’ Rewards that may be used for additional products, so don’t use the host code at that time. Now is also Sale-a-bration – a time from now through the end of February when Stampin’ Up! offers FREE items with $50 and $100 purchases. Those products are shown below today’s product list as well. Happy shopping!

Sale-a-bration items FREE with $50 purchase – Level 1

Sale-a-bration items FREE with $100 purchase – Level 2

Sale-a-bration items FREE when you HOST or spend $300

Do you want that extra discount when shopping with Stampin’ Up? Let me show you how… Join my Team. Contact me for further details.

Thanks for stopping by.

May you have a beautiful day.

Make someone happy sending them a handmade card filled with love.

Stampin’ Up! Hello, A Touch of Ink

Hi there! Today’s card features a gorgeous butterfly from the A Touch of Ink stamp set, available during Sale-a-bration with a $100 order. Also part of today’s card is the Oh So Ombre 6×6 DSP available during Sale-a-bration with a $50 order. So what are you waiting for? 😏 Let’s take a peek at the card…

Hello, A Touch of ink, #1

So let me tell you – I love butterflies ~ and I have stamped on Vellum before, but, when stamping on vellum, one MUST remember to heat set the ink! Guess who forgot that… you betcha, it was me… so, let’s do a step by step…

  • Stamp on vellum using Memento black ink. HEAT SET on low setting of your heating tool. Allow to cool.
  • While that is cooling, pull your supplies together:
    • Bermuda Bay card base 4 1/4 x 11 scored at 5 1/2 + 2 3/4″ square
    • Basic White – (2) 4 x 5 1/4 + 2 3/4″ sq
    • Oh So Ombre 6×6 DSP 3 3/4 x 5 + 2 1/4 x 6 for envelope flap
    • Basic Black scrap 3/4 x about 1 1/2
    • Sentiment banner: this was already on my table from stamping a whole lot of sentiments from the Many Messages stamp set and die cutting with the coordinating Messages Dies.
    • Banner Pick a Punch
    • Stampin Blends: Lt Misty Moonlight, Dk Seaside Spray, Lt Bermuda Bay, Dk Mango Melody ~ all for the butterfly
  • Now the stamped vellum piece is cool – let’s color… TURN VELLUM OVER TO BACK SIDE. Color the butterfly with the various blends mentioned above. Allow to dry. You could heat set again, on the low setting.
  • Adhere this vellum panel to the white square using Stampin Seal. I used the seal only in colored areas, so it doesn’t show through.
  • Adhere this to the Bermuda Bay square, off-setting it. I didn’t want it to look like a picture frame – that’s why it’s off-set. Set aside
  • Adhere the DSP panel to the Basic White piece, then to the card base – all with liquid glue.
  • Adhere the butterfly panel with dimensionals.
  • Crop one end of the Basic Black strip with the Banner pick a Punch. Adhere to the card front with liquid glue
  • Adhere this very tiny sentiment with mini dimensionals and your card front is done!
Hello, A Touch of Ink, inside – #2

Isn’t this a fun flower? The butterfly is headed for it to take the nectar from the center… Stamp the flower in Memento Black ink on the Basic White panel. Stamp the color for the flower with stamped off Daffodil Delight. This is such a cool ‘filler’ stamp. It doesn’t have to line up perfectly; it’s like a shadow kind of stamp. Now, adhere this white panel to the inside of the card and the card is done!!! Super easy and rather elegant.

For the envelope I adhered a left-over piece of the Oh So Ombre 6×6 DSP to the envelope flap and trimmed it to fit. Yep, liquid glue. For the front of the card I stamped a sentiment from the A Touch of Ink stamp set in Memento Black ink and the entire project was ready to send – a friendly note of support or care to someone struggling will be written inside. Want this set? I can help you 👍 😁

Products for todays card are from the new Jan-Jun 2021 Mini Catalog and the 2020-2021 Annual Catalog ~ and those products are available now for purchase. You will find them in the product list below. As a reminder… I’ve made it easy for you to simply ‘add all to cart’. If I can help you in any way to order these items, or others, please give me a holler. As a thank you to my customers, when the order is between $50-$150 I offer a SU! item of your choice valued at $10. Remember to use MY CURRENT HOST CODE WZBPZ7N4- good Jan 21 – Feb 3. When the order is over $150, you still receive that free gift from me, but SU! has Stampin’ Rewards that may be used for additional products, so don’t use the host code at that time. Now is also Sale-a-bration – a time from now through the end of February when Stampin’ Up! offers FREE items with $50 and $100 purchases. Those products are shown below today’s product list as well. Happy shopping!

Sale-a-bration items FREE with $50 purchase – Level 1

Sale-a-bration items FREE with $100 purchase – Level 2

And when you HOST or get orders together totaling $300 or more,

additional FREE product

Want to JOIN MY TEAM? Lots of good things going on… contact me for further info…

Thanks for stopping by.

May you have a beautiful day.

Make someone happy sending them a handmade card filled with love.

Stampin’ Up! Coordinating Annual Catalog Product with Jan-Jun Mini Catalog

Hello again… it’s snowing… ever so slightly. We are just on the edge – and I confess, I like snow. So for me, let’s have some!

Today is Inauguration Day – and we are just a bit anxious about it… violence is just so non-sensical and unnecessary. Our prayer today is for peace, not only in Washington, but in our entire country – as well as the world. Regardless of your politics, please pray for peace.

Today’s card is extra fun – a card on a card, using a new stamp set called Suite Sampler. It is a HOST reward set and may be found on pg 88 in the Jan-Jun 2021 Mini Catalog. Feel free to contact me to see how you may get this set! (LOVE this dragonfly!) I have paired this with one from the Annual Catalog called Sending Sunshine, for the sentiments. Here’s a photo…

Coordinating Old/ New – #1

Isn’t this dragonfly beautiful? Products used in todays project… listed in two columns…

Jan-Jun 2021 Mini Catalog product in left column. Annual Catalog product in right column.

  • Flower & Field DSP – FREE w/ $50 purchase
  • Suite Sampler stamp set – HOST set
  • Pool Party card stock
  • Artistry Blooms Adhesive-Backed Gems
  • Sheer Ribbon – Pool Party
  • Basic White card stock
  • Basic White card stock, Thick
  • Stampin Blends for dragonfly: Pool Party, Lt Misty Moonlight, Dk Seaside Spray
  • Stampin Blends for leaves (inside card): Lt Garden Green
  • Memento Black ink
  • Garden Green ink
  • Wink of Stella – on body of dragonfly

Yep – more product from the Annual Catalog for sure, but how can you resist that dragonfly?

Here’s a picture of the inside… and yes, this is a card on a card, but not really as the the card base is flat; it does not open.

Coordinating Old/ New – #2, inside

These leaves look so great with the Designer Series Paper. Did I mention this paper is FREE with a $50 purchase during Sale-a-bration? Woopie! Sale-a-bration goes to the end of February folks, so don’t waste your precious time. It’s a wastin’…

Card cuts will be listed at the end of this post. Products for todays card are from the new Jan-Jun 2021 Mini Catalog and the 2020-2021 Annual Catalog ~ and those products are available now for purchase. You will find them in the product list below. As a reminder… I’ve made it easy for you to simply ‘add all to cart’. If I can help you in any way to order these items, please give me a holler. As a thank you to my customers, when the order is between $50-$150 I offer a SU! item of your choice valued at $10. Remember to use MY CURRENT HOST CODE RSVNH4XW- good Jan 5-20. (I’ll have a new HOST CODE in tomorrows post.) . When the order is over $150, you still receive that free gift from me, but SU! has Stampin’ Rewards that may be used for additional products, so don’t use the host code at that time. Now is also Sale-a-bration – a time from now through the end of February when Stampin’ Up! offers FREE items with $50 and $100 purchases. Those products are shown below today’s product list as well.

Sale-a-bration items with a $50 purchase – Level 1

Sale-a-bration items with a $100 purchase – Level 2

Now is the perfect time to JOIN MY TEAM – extra benefits for YOU during Sale-a-bration (ends last day of February!). Contact me for more details… tlsbrightspot@gmail.com

Thanks for stopping by.

May you have a beautiful day.

Make someone happy sending them a handmade card filled with love.

Stampin’ Up! Fun Fold w/ Flower & Field DSP

Yesterday was a holiday… did you relax, go for a hike, walk your dog three times around the block? What did you do for the break? Let me know…

I have a fun fold for you today – one using more of the Flower & Field DSP that’s FREE w/ a $50 purchase during Sale-a-bration. You will see more use of this fold as it’s just so easy. I first saw it on a video by another demonstrator, Patty Bennett. I’ve created mine in a landscape position while hers was all portrait. Nevertheless, it works the same – and here’s my card.

Fun fold w/ Flower & Field

Isn’t this happy? I love the colors – bright, cheery ~ and that little snail, oh my…He comes from a new bundle call Snailed It and it comes with dies (Snail Dies no less!).I used several products to make this card, but it could be kept very simple. I just was wanting to u se the snail, so included it 🙂

Detail… beginning…

  • So Saffron card base 8 1/2 x 5 1/2. On the long side, score at 2, 3 1/8, 5 3/8 & 6 1/2. Burnish the folds to make them look like this…
Fun Fold w/ Flower & Field DSP – #2
  • Cut 3 panels of DSP that coordinate: two of the same & 1 different 1 3/4 x 5 1/4: Flower & Field DSP
  • Adhere panels with liquid glue as shown in first photo
  • Stamp a sentiment on Basic White card stock for the front of the card – here I chose a cheerful one from the Happy Thoughts stamp set. The ink is Memento Black
  • Cut it out with a die from Tasteful Labels Dies and adhere with dimensionals
  • To add some extra fun to the card, I pulled out the Snailed it bundle, stamped the snail in Memento Black ink and colored it with Stampin Blends: Just Jade, Light Smoky Slate for the shell (I also added sparkle to the shell with Wink of Stella), Lt Petal Pink for the heart. I die cut him with the Snail Dies and adheredwith liquid glue and mini dimensionals ~ the minis were under the envelope and the snail shell, liquid glue under the body.
  • For another bit of fun, I added the sweet flower on a dimensional. It was stamped in Petal Pink ink and got a Matte Black Dot put in the middle. About the flower… this one comes from the Sweet Strawberry bundle which has a coordinating Strawberry Builder Punch that has this cute flower. BUT – you could fussy cut a flower from the paper! There is also a set of dies that coordinate with this paper – and it’s on it’s way, just not here yet (due Fri the tracker says) It’s called IN BLOOM and can be found in the Jan – Jun 2021 Mini Catalog on pg 45. Several of the dies coordinate with the Flower & Field DSP and will cut them out, adding fun little decoration to the flowers. I can’t wait!!
  • By the way – the front of the card is now complete!

Turn the card over – stamp the word ‘hello’ from the Snailed It stamp set in Memento Black ink on a Basic White card piece – 1 3/4 x 5 1/4. HINT: remember which way your card goes – landscape! Adhere with liquid glue and your card is complete.

Cover the envelope flap with more of the Flower & Field DSP and stamp the front of the envelope with the word bubble in Memento Black ink and the word in So Saffron. Both come from the Snailed It stamp set. Voila!

Products for todays card are from the new Jan-Jun 2021 Mini Catalog ~ and those products are available now for purchase. You will find them in the product list below. As a reminder… I’ve made it easy for you to simply ‘add all to cart’. If I can help you in any way to order these items, please give me a holler. As a thank you to my customers, when the order is between $50-$150 I offer a SU! item of your choice valued at $10. Remember to use MY CURRENT HOST CODE RSVNH4XW- good Jan 5-20. When the order is over $150, you still receive that free gift from me, but SU! has Stampin’ Rewards that may be used for additional products, so don’t use the host code at that time. Now is also Sale-a-bration – a time from now through the end of February when Stampin’ Up! offers FREE items with $50 and $100 purchases. Those products are shown below today’s product list as well.

Sale-a-bration items FREE with $50 purchase – Level 1

Sale-a-bration items FREE with $100 purchase – Level 2

And when you HOST a party – or sales are $300 or more…

Thanks for stopping by.

May you have a beautiful day.

Make someone happy sending them a handmade card filled with love.

Stampin’ Up! Purses by Flower & Fields DSP

This is such a fun little project… and I have made a few to be used for various things: small candies, Young Living Essential Oils, a package of sponge daubers or paper trimmer blades will also fit. Anyway – I think they are adorable.

Flower & Field DSP

Remember this Designer Series Paper is a FREE item with a $50 purchase during Sale-a-bration – just sayin’… this paper is so fun! Here is another photo of more created ~

Flower & Field DSP & Oh So Ombre 6×6 DSP

Cute, cute, cute! No… Measurements & scoring info and several photos to help in the directions. These are not difficult. I just felt photos say 1,000 words.

  • 6×6 DSP scored at 1 1/4 & 4 3/4; turn and score at 21/2 & 3 1/2. Burnish
  • At the side folds, bring up the paper to create a diagonal fold, then adhere from the top to the diagonal fold. I used Stampin Seal at this point. It should look like this…
#3
  • Add Tear n Tape at the top of each end, remove over to the tape and add ribbon (6″ for each end) and it should look like this…
#4
  • Now add decorative trim – 1/2 x 8 1/2 to outside with liquid glue, fold in ends to cover Tear n Tape on inside. I did need to add liquid glue to the area that didn’t have Tear n Tape. And I made certain both ends folded the same direction – see photo…
#5

For a couple of final touches I used the Punch Party stamp set to stamp an oval design in
So Saffron ink on So Saffron card stock, then punched it out with the new Double Oval Punch (this can be purchased separately or bundled with the Oval Occasions stamp set for 10% off). I adhered the oval with liquid glue (just half of it!) to the back of the purse; added a 3/8″ Velcro fastener to the loose end of the oval, pressed it to the purse front to adhere the other portion of the Velcro fastener to stick. Then I added a Matte Black Dot to the front of the oval – and voila!

For the little purses on the right, the ribbon used was both Seaside Spray Metallic Ribbon & Whisper White Metallic Edge Ribbon (silver edge). The ‘button’ on the oval is a retired SU! item called Designer Elements. And there you have it – cute project, isn’t it!

Products for todays card are from the new Jan-Jun 2021 Mini Catalog ~ and those products are available now for purchase. You will find them in the product list below. As a reminder… I’ve made it easy for you to simply ‘add all to cart’. If I can help you in any way to order these items, please give me a holler. As a thank you to my customers, when the order is between $50-$150 I offer a SU! item of your choice valued at $10. Remember to use MY CURRENT HOST CODE RSVNH4XW- good Jan 5-20. When the order is over $150, you still receive that free gift from me, but SU! has Stampin’ Rewards that may be used for additional products, so don’t use the host code at that time. Now is also Sale-a-bration – a time from now through the end of February when Stampin’ Up! offers FREE items with $50 and $100 purchases. Those products are shown below today’s product list as well.

Sale-a-bration items with $50 purchase – Level 1

Sale-a-bration items with $100 purchase – Level 2

Stampin’ Up Sweet Strawberry Mini Paper Pumpkin Box

Hello! It’s Saturday and I have a couple of ladies coming over to make a fun project or two today. Yes, we’ll be wearing masks AND physically distanced – it’s part of what we have to do to be able to craft together. The main project is a mini pizza box all decorated in Berry Delightful DSP and using the Strawberry Punch in coordination with the Sweet Strawberry stamp set. I never knew strawberries could be so easy so make in 3D. What? yes, 3D! I’ve decorated the top and simply added paper to the sides and front to give it a very finished, polished look – perfect for gift giving. Let’s take a peek…

Sweet Strawberry Mini Paper Pumpkin
Box – #1

I love this paper and because of the paper, it gives ideas on other colors for the strawberries – such as the one in the lower right corner. It looks like a strawberry not yet ripened. :O) And, did you notice those on the paper in that color too? Yep… pretty cool. And, in lieu of using the stamp for the seeds, I drew in the seeds with a marker. I love how it turned out. And do you see how it has just a bit of dimension? I put a half dimensional (you could use a mini dimensional as well) just under the top of the berry and adhered the bottom of the berry with liquid glue. All right, let’s take a closer look at the rest & give you more detail.

Sweet Strawberry Mini Paper Pumpkin Box – #2

The background paper on all the sides is Poppy Parade. The next layer is, of course this gorgeous Berry Delightful DSP. Card cuts will be listed at the end of the post. The pink strawberry was punched from one of the papers in the pack and the cap for each strawberry was stamped in on Pear Pizzazz card stock, sometimes using Pear Pizzazz ink and sometimes using Garden Green ink. The leaves… the lightest one is stamped in Soft Sea Foam on Basic White card stock. And this is a two part stamp, background and detail. I tend to stamp the background first, then the detail. Oh, and one of the leaves is stamped from the Designer Series Paper. And the super sweet flowers are stamped in ‘stamped off’ Blusing Bride with a 2020-2022 In Color Enamel Dot for the center.

Let’s see if I can tell you how to do the 3D strawberries… stamp two berries, add the seeds with a Black Marker, fine tip, and punch out with the Berry Builder Punch, fold one in half and adhere with liquid glue to the center of the other berry – running the glue along the fold of the one berry. Press it then let it set for a bit. Prepare the other berry the same way. While those are drying, prepare the caps of the berries: in this case stamp the outline of the berry first then the filler. Make certain the filler is stamped off! Punch with the Berry Builder punch. To glue on the cap… fold the stem up, adhere glue along the top of the berry, just a line of glue and adhere the cap, making certain it is even with the back of the berry. You could easily lay it on a silicone sheet right after putting on the cap – that’s what I did. Now prepare the sweet flowers… stamp in stamped off Blushing Bride ink on Basic White card stock and punch with the Berry Builder punch.

Now let’s put it together… curl the leaves a bit on the very ends. I adhered two of them with liquid glue. The leaf on the far right has a mini dimensional under the curled end of the leaf, then li8quid glue on the the stem of it. The pink berry got a mini dimensional under the top of the berry and the tip of the berry was adhered with liquid glue. The 3D berries were adhered with liquid glue. Two of the flowers were adhered with a glue dot; the one on the far left with a mini dimensional. For a final touch I added the sweet bow – 1/4″ Crinkled Seam Binding.

What a fun project… and this can be filled with candies or with coordinating Notecards & Envelopes – imagine that! I’ll include the info for purchasing those in the product list – just in case you are inspired to those as well 😏 The Berry Delightful DSP is part of the $100 FREE items available during Sale-a-bration.

Products for todays card are from the new Jan-Jun 2021 Mini Catalog ~ and those products are available now for purchase. You will find them in the product list below. As a reminder… I’ve made it easy for you to simply ‘add all to cart’. If I can help you in any way to order these items, please give me a holler. As a thank you to my customers, when the order is between $50-$150 I offer a SU! item of your choice valued at $10. Remember to use MY CURRENT HOST CODE RSVNH4XW- good Jan 5-20. When the order is over $150, you still receive that free gift from me, but SU! has Stampin’ Rewards that may be used for additional products, so don’t use the host code at that time. Now is also Sale-a-bration – a time from now through the end of February when Stampin’ Up! offers FREE items with $50 and $100 purchases. Those products are shown below today’s product list as well.

Sale-a-bration items FREE with a $50 purchase

Sale-a-bration items FREE with a $100 purchase

Card Cuts for todays project:

Poppy Parade ~ 3 5/8 x 5 3/8; 2 @ 3/4 x 3 5/8; 1 @ 3/4 x 5 3/8

Berry Delightful DSP ~ 3 3/8 x 5 1/8; 2 @ 1/2 x 3 3/8; 1 @ 1/2 x 5 1/8

Leaves & berry caps ~ scraps of Granny Apple Green & Soft Sea Foam

Strawberries, flowers ~ scrap of So Saffron, Basic White strips 1 1/2 w x various lengths