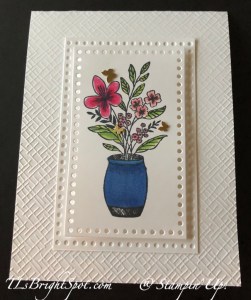
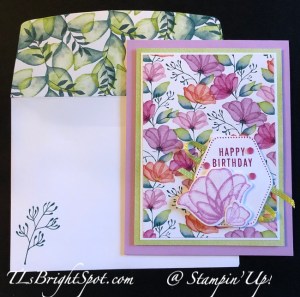
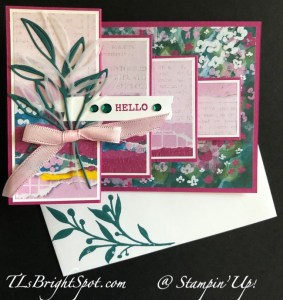
It’s rainy here today and should get to 51 degrees – spring IS in the air… I’m a latecomer to getting the Everyday Details bundle but I couldn’t resist the dies a moment longer. They arrived in the mail yesterday and I made this pretty card.
I paired the stamp set with the Basics 3D Embossing Folder and several Stampin Blends to color the stamped image. What do you think? Here’s how to replicate.
* Run the top half of the Thick Basic White card base through the Basic 3D Embossing folder (Crosshatch)
* Stamp the image from the Everyday Details stamp set on Basic White card stock in Memento ink
Color with Stampin Blends: Petal Pink, Flirty Flamingo, Melon Mambo, Granny Apple Green, Light Shaded Spruce and Blueberry Bushel
* Die cut with the largest of the rectangle dies in Everyday Details Dies. This creates two cuts… the outer one that I adhered directly to the card front and the stamped panel as well. I did have to trim edges of the outer one to the size you see.
* Adhere the stamped image with dimensionals inside the outer ‘frame’
* add Brushed Basics Butterflies for a final touch
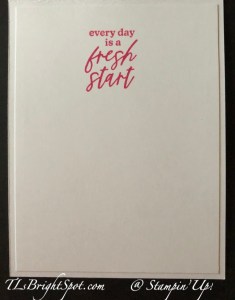
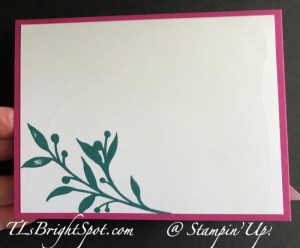
The inside..
For the inside of the card I used a stamp from Garden Meadow stamp set in Melon Mambo ink on the Basic White panel. This was adhered to the inside of the card.
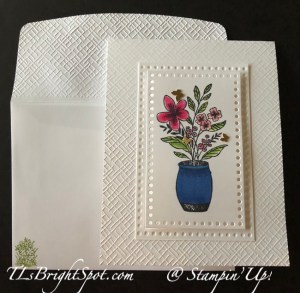
On the envelope… run the flap through the same Basics 3D embossing folder (Crosshatch) and stamp the cute grass and flower image in Granny Apple Green ink on the front. This image is from the Garden Meadow stamp set – and the card and envelope are ready to send. This card is specifically for a woman whose hubby has some health issues and she’s struggling to keep up with all the responsibilities. I should make a dozen of these and send to various folks. It seems lots of individuals are having a hard time these days :O(
If you would to purchase these products…
Click here to see the Jan-April 2024 Mini catalog (page 28) to order Everyday Details Bundle
Click here to view the ONLINE EXCLUSIVES (Basic 3D Embossing Folders, set of 3)
Click here for the 2023-2024 Annual Catalog for the Brushed Basics Butterflies
You will be shopping with me when you click that ‘here’ place – so remember, I have generous bonuses when shopping with me. Use my current HOST CODE G4G2CPRB to help me get the Stampin’ Up! giftie to you when making a qualified order of $50 or more before shipping & taxes. If your purchase is over $150, do NOT use the host code as SU! has rewards of it’s own. You STILL receive the FREE ITEM FROM ME. :O) And with that purchase of at least $50 (before shipping & taxes), you will also receive a BONUS fabulous array of “ideas of the month” with card cuts & all the information to make the designs. (The month of March features the Painted Lavender suite of products in the Jan-Apr 2024 Mini Catalog)
I hope you like todays card. I would love to hear from you. Make this day special by sending someone a handmade card filled with with love. Blessings!
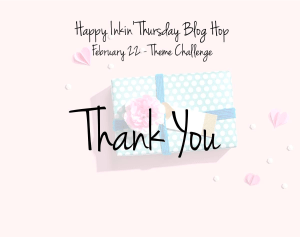
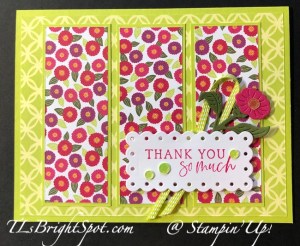
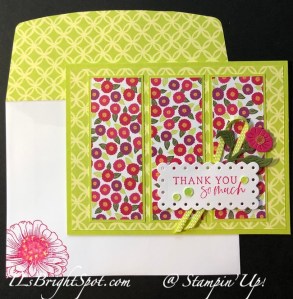
It’s Thursday… and the theme challenge for today’s hop is “Thank you” I’m using the soon to be released Flowering Zinnia 12×12 DSP. The coordinating stamp set & dies is called the Simply Zinnia Bundle – and they are wonderful. The embellishments that are part of the suite are the Adhesive-Backed Shiny Sequins. But what really pops on this card is the DSP.
Do you see – the DSP is the focus of this card and it’s so bright & cheery! The lovely sweet zinnia is created by using the Simply Zinnia Dies: Melon Mambo card stock for the zinnia and Mossy Meadow card stock for the stem/ leaf die. The ribbon is from the Ribbon Duo Pack. The sentiment banner is die cut with the Scalloped Contour Dies using Basic White card stock. Of course, the sentiment is stamped in Melon Mambo ink to pull it all together – and the final touch is the Adhesive-Backed Shiny Sequins in Lemon Lime Twist. I used a single Lemon Lolly sequin from the same pack for the flower center. And that’s it! Fun, quick, easy, bright & cheerful too.
For the inside… I stamped the zinnia in Melon Mambo ink then used my Blender pen to move the ink around a bit. I added Lemon Lolly ink to the center of the zinnia. The leaf image is stamped in Lemon Lime Twist ink. I added a bit of Wink of Stella both to the flower and the leaf image.
For the envelope, more of the same Flowering Zinnias 12×12 DSP for the flap & trimmed to fit. On the env elope front, the same zinnia stamped from Simply Zinnias stamp set with Melon Mambo ink and highlighted with Lemon Lolly Blends for the center.
The zinnia suite of products is a new ONLINE EXCLUSIVE product that will be available March 5. If you would like to pick up this product EARLY, JOIN MY TEAM – and if you do that PRIOR TO end of day Feb 29, there are all kinds of FREE PRODUCT available to you. Read more below the list of blog hop names.
One of the best parts about making Stampin’ Up! purchases right now is the benefits of the Jan-Feb 2024 Sale-Bration opportunity. During Sale-a-Bration, when making qualified purchases, you receive FREE items from Stampin’ Up! – and you get to choose what those items are from a generous selection of products.
Click here to view items when making a $50 purchase (before shipping & taxes) of any Stampin’ Up products.
Click here to view items when making a $100 purchase (before shipping & taxes).
Click here to view all items in the Jan-Apr 2024 Mini Catalog
Click here to view all items in the 2024 Annual Catalog
Click here to view all items available as part of the ONLINE EXCLUSIVES
If you do not have a demonstrator, reach out to me and I’ll send a catalog right away, plus a Jan-Feb Sale-a-Bration catalog as well. Sale-a-Bration is a special time for Stampin’ Up! folks – a time when there are product bonuses for qualifying orders. For instance, a $50 order qualifies for certain FREE ITEMS in the Sale-a-Bration Catalog and a $100 purchase qualifies for other FREE PRODUCT in that catalog. And there’s no limit to the free items. And if you think you might want to join as a demonstrator, there are bonuses there as well – extra special bonuses not offered at other times. See below for more info about joining as a demonstrator. When placing an order of $50 or more (prior to shipping & postage) you will also receive from me a monthly tutorial :O) with all kinds of ideas for gorgeous creations.
HOST CODE PV2QWYHJ
If your purchase is over $150, do NOT use the host code as SU! has rewards of it’s own. You STILL receive the FREE ITEM FROM ME. :O)
Nothing brings people together quite like creativity. As an independent demonstrator, you can share what you love and expand your circle of friends to build a close-knit, collaborative community of crafters. You’ll meet, connect, learn from, and create with other demonstrators from all around the world through virtual events, in-person conventions, support groups, and social media. And don’t forget the importance of hosting your own crafting parties! You can host events with your favorite people and show off your favorite Stampin’ Up! projects.Let’s discover the joy of being a demonstrator together!
Join by 29 February 2024 and choose between two fabulous offers:
Option 1: Get $125 worth of product PLUS our new Stampin’ Glass Mat Studio (a $60 value) for just $99!
Option 2: Get $125 worth of product PLUS an additional $30 worth of product of your choice when you join for $99. That’s a $155 value!
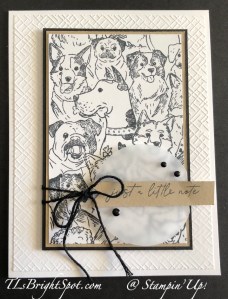
I had such fun working on this card. For one thing, I’m a dog lover and this stamp, Doggone Friends, just makes me smile. It’s single large stamp in the Jan-Apr 2024 Mini Catalog. I used the Notes of Nature stamp set (also from that catalog) to create the sentiment and taped off a portion to use just the part I needed.
Here’s the scoop:
* Thick Basic White 4 1/4 x 11, scored at 5 1/2
* Basic White 4 x 5 1/4 run through the Basics 3D embossing Folder (ONLINE EXCLUSIVE), Cross Hatch – adhere to card base front
* Stamp Doggone Friends image on Basic White with Memento ink; trim to 2 3/4 x 4 1/4
* Add stamped image to Crumb Cake card stock – 2 7/8 x 4 3/8; then to Basic Black card stock 3 x 4 1/2
* Wrap with Black Twine from Basic Twine Essentials Pack, twice around and tie bow. Secure bow with glue dot.
* Add these to card front with dimensionals.
* Using 2″ Circle Punch (ONLINE EXCLUSIVE), punch a Vellum circle; add over twine with mini dimensionals
* Stamp sentiment from Notes of Nature stamp set in Memento ink, taping off the rest of the sentiment. Adhere to Vellum with Stasmpin’ Seal
* Add Classic Matte Dots for embellishment
For the inside…Trim remaining piece from original stamping to fit Basic White panel (4 x 5 1/4). Mine is about 1 1/4 as I wanted full dog faces to show!
For the envelope… A bit of Zany Zoo DSP for the envelope as I wanted to stick with the black & white idea :O) For the front, I cut another section of the remaining stamped piece of Doggone Friends for the card front and adhered it in place with Stampin’ Seal. And that was it! I LOVE THIS CARD!!!! It’s friendly, can be used for a man or woman and for all kinds of occasions. The other part is, change the colors, use just about any DSP in lieu of the stamped panel, use ribbon instead of twine. It’s a fabulous layout.
To get your hands on this stamp and the sentiment stamp set, click here to order from me and the Jan-April 2024 Mini Catalog. The Basics 3D embossing folders (set of 3) and the 2″ Circle Punch are from the ONLINE EXCLUSIVES and can be added to your order here. The Thick Basic White, Basic White, Basic Black, Crumb Cake card stocks, Vellum, Memento ink, Classic Matte Dots and Basic Twine Essentials Pack are from the 2023-2024 Annual Catalog – here.
Make sure you are shopping with me when you check out to receive my customer rewards. When your order is $50 prior to shipping and taxes I offer my customers a free items of choice from Stampin’ Up! products – valued to $10! And… during this time of Jan-Feb Sale-a-Bration, Stampin’ Up! offers FREE PRODUCT with qualified purchases. Click on the photo below to see what’s available.
Sale-A-Bration is one of our biggest promotions of the year! It’s packed with perks, overflowing with opportunities for customers, and filled with fun for everyone.
For every $50 of purchase, there are opportunities for FREE ITEMS from the Sale-a-bration Catalog. Enjoy the demonstrator perk of having early access to product by redeeming exclusive Sale-A-Bration products for FREE when you reach $50 USD | $60 CAD or $100 USD | $120 CAD spend levels.
While you’re at it, consider checking out the Stampin’ Up! Clearance Rack, the Kits Collection, Paper Pumpkin – and oh yes, consider JOINING MY TEAM to get regular discounts on every order.
Nothing brings people together quite like creativity. As an independent demonstrator, you can share what you love and expand your circle of friends to build a close-knit, collaborative community of crafters. You’ll meet, connect, learn from, and create with other demonstrators from all around the world through virtual events, in-person conventions, support groups, and social media. And don’t forget the importance of hosting your own crafting parties! You can host events with your favorite people and show off your favorite Stampin’ Up! projects. Let’s discover the joy of being a demonstrator together!
Become a Stampin’ Up! demonstrator and for just $99, you’ll get your own customized Starter Kit with $125 worth of products. And we’ll include all the business supplies you need to help you get started, plus free shipping. Don’t wait! Talk to me today to begin your creative journey! You may do that here!
Join my Stampin’ Up! team as a demonstrator using one of the options below…
Option #1:
Pay $99 USD for your Starter Kit
Choose $125 worth of products of your choice in your Starter Kit
PLUS receive the Stampin’ Glass Mat Studio for FREE (a $60 value) (Item #163987) I AM LOVING MINE!!!
Option #2:
Pay $99 USD for your Starter Kit
Choose $125 worth of products of your choice in your Starter Kit
PLUS receive an additional $30 worth of products of your choice in your Starter Kit
That’s a total of $155 worth of products for just $99! This is such a great deal!
Of course, there are other great benefits to becoming a Stampin’ Up! Demonstrator, such as free shipping on your Starter Kit, a 20%+ discount on demonstrator orders, early access to new catalogs and promotion information, early ordering of new products, attend conventions and workshops, being part of a team of creativity, no pressure to sell products and my full support as a valued team member!
I would love to talk to you about joining my team and what that means for you. Please connect with me if you have questions: tlsbrightspot@gmail.com There’s no better time to joining as a demonstrator than during Sale-a-Bration
If you’ve made up your mind and are ready to do join my team, you may do that here.
When ordering from me please use my NEW HOST CODETJRE9W6M so that I receive proper notification and YOU GET THE Benefits of a FREE SU! item valued up to $10 :O) AND the Monthly Card Tutorial. (I like to treat my customers!) If your order is over $150, please don’t use the host code as SU! has benefits. I’ll still be notified and you can receive that FREE ITEM!
Note: Make sure that you can see my name on the final checkout page listed as your Demonstrator when you order so that you know that you’re ordering with me and you’ll get my rewards! PLUS… the monthly Online Tutorial when your order is over $50.
Stampin’ Up! has lots of other ‘goodies’ in it’s line of products: Clearance Rack, Kits Collection, Paper Pumpkin’. See ALL THE PRODUCTS AVAILABLE BY CLICKING HERE – AND SHOP WITH ME.
Thanks for stopping by. May you have a beautiful day –
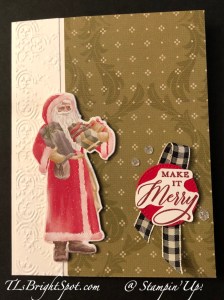
Good Saturday! What are YOU up to these days? Thanksgiving is next week; Christmas is right around the corner… I counted my Christmas Cards yesterday and realized I must “get hot” as I don’t have nearly enough – :O(. Here are two cards using Saint Nicholas Dies and showing off the DSP two sides. I’ll be curious if you prefer one over the other.
Card 1 uses Mossy Meadow card stock for the base and Shining Christmas SDSP (an ONLINE EXCLUSIVE DSP) plus the fun Burlap Ribbon (from the Real Red & Burlap Ribbon Combo Pack.) St. Nick is die cut from the fabulous Traditions of St. Nick DSP using the Saint Nicholas Dies. I added three Festive Pearls under the Saint Nicholas stamp set sentiment.
Card 2 uses the Traditions of St. Nick DSP, Thick Basic White card stock for the card base, an embossed panel suing the Distressed Tile 3D embossing folder, the Large Check Ribbon, Stylish Shaped Dies circle and a sentiment from Wishes All Around stamp set, and of course a different St Nick directly die cut from the Traditions of St. Nick DSP. I also added three Adhesive-Backed Glitter Sequins in white that are difficult to see in this photo.
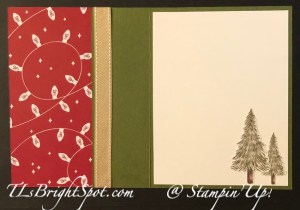
Here are the insides of these two cards… look at the wonderful DSP!Each of the ‘add-ons’ on the Basic White panel are from the Traditions of St. Nick DSP: the tree are fussy cut and adhered in place with liquid glue; St Nick was die cut from an edge and also added with liquid glue.
As you can see… coordinating DSP on the envelope flaps; a sentiment stamped from the Saint Nicholas stamp set in Cherry Cobbler ink on card 1; on card 2 another fussy ct tree from the Traditions of St. Nick DSP. Same layout for both, yet very different.
To order Stampin’ Up! products, please use this link to my online store.The Seasonal Sale is for products in the ANNUAL CATALOG ONLY. You will find ONLINE EXCLUSIVES, Clearance Rack, Sep-Dec Mini Catalog, the Annual Catalog, kits, Paper Pumpkin – you name it. Shop at your convenience :O)
When ordering from me please use my NEW HOST CODEHSJD7BR6 so that I receive proper notification and YOU GET THE Benefits of a FREE SU! item valued up to $10 :O) AND the Monthly Card Tutorial. (I like to treat my customers!) If your order is over $150, please don’t use the host code as SU! has benefits. I’ll still be notified and you can receive that FREE ITEM!
Note: Make sure that you can see my name on the final checkout page listed as your Demonstrator when you order so that you know that you’re ordering with me and you’ll get my rewards! PLUS… the monthly Online Tutorial when your order is over $50. The November Tutorial features the beautiful Winter Meadow suite of products which can found in the Jul-Dec 2023 Mini Catalog on pages 36-38!
Join my team here and still order these products as part of your starter kit – wow! Great time to join!!!
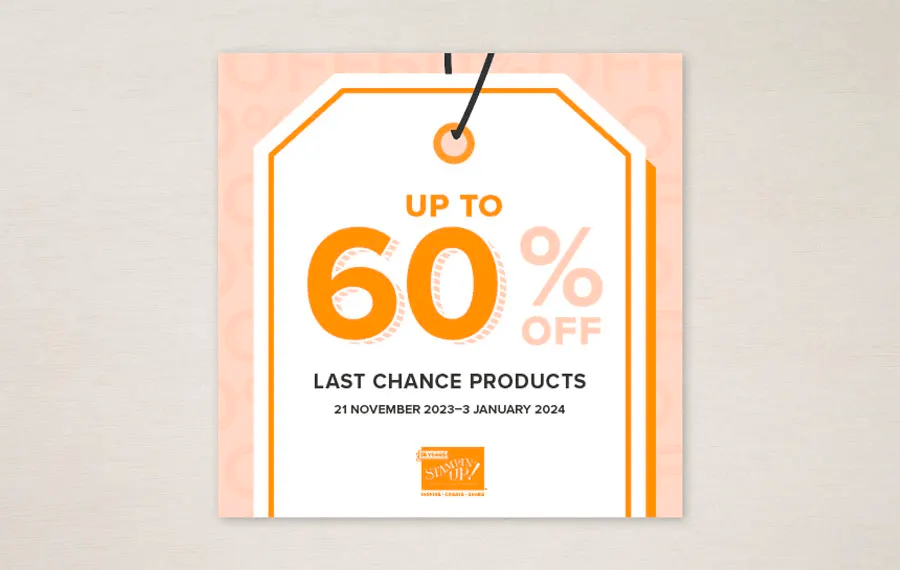
The September–December 2023 Mini Catalog is retiring soon! It’s bittersweet to say goodbye to a Stampin’ Up! catalog, but we’re looking forward to all the new products on their way—and we hope you are, too!
From 21 November 2023–3 January 2024, you can stock up on your favorite seasonal products and save up to 60% on essential craft supplies! So, what are you waiting for? Start shopping and selling! After all, a selection of Last Chance Products will only be available while supplies last.
Kits can be ordered using this link to my online store.
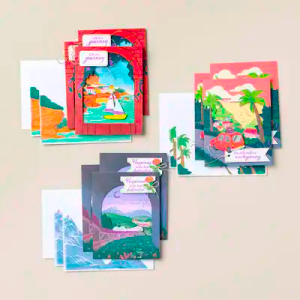
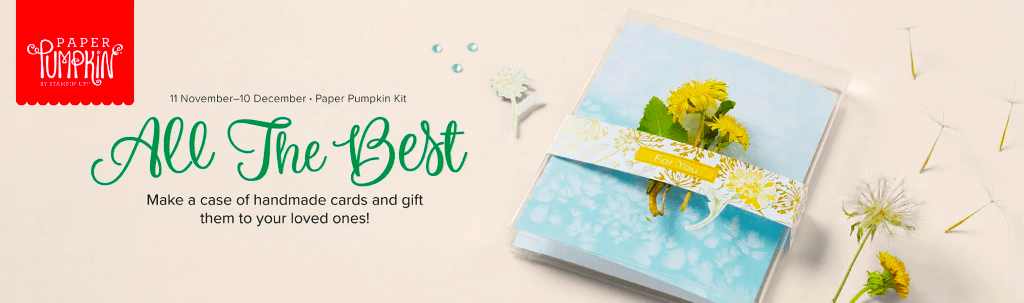
Paper Pumpkin is an all time favorite for many. Each month something new appears in your mailbox. Nov 11 to Dec 10 is the ALL THE BEST PP Kit. Send a wish to all your loved ones with the December Paper Pumpkin Kit! It comes with nine card fronts, three each of three designs, and nine coordinating envelopes. It has paper pieces detailed with gold foil, embellishments, an all-occasion stamp set, and an acetate box where you can store your finished cards! You can gift the kit itself or the finished product in the acetate box; either way, it’s the perfect last minute gift for any occasion.
ACETATE BOX
The All the Best Paper Pumpkin Kit comes with an acetate box that fits your finished cards and envelopes! This makes easy storage of a finished product or allows you to gift your cards to someone. The kit also comes with a belly-band, so you can add your own personal touch to the box. Subscribe by 10 December to make a handmade gift for those you love.
GOLD FOIL DETAILS
The paper pieces in the December Paper Pumpkin kit have gold foil detailing. Whether it’s an elegant boarder, or woven into the floral artwork, it’s a detail that will surely catch your recipient’s eye! It’s the perfect way to take any paper craft to the next level.
HAND DRAWN ARTWORK
The beauty of the December Paper Pumpkin Kit lies in the hand drawn artwork. The bright blue skies and elegant yellow flowers compliment the different design elements perfectly. It’s a simple yet sophisticated design that will catch any recipient’s eye!
Subscribe to the December Paper Pumpkin Kit between 11 November and 10 December by clicking here!
Thanks for stopping by. I hope you enjoyed my card today. Would love to hear from you. If I can be of help in some way, please let me know.
Hello again! It’s Wednesday, midweek and I’m wondering how your week is proceeding. We are hoping to secure our sailboat this week for winter storage. Winds can be an issue for sailing into the channel where we store the boat, but Thursday looks to be on our side. Here’s hoping. I played this afternoon with a Designer Series Paper found in the ONLINE EXCLUSIVES side of the store – Delightfully Floral 12×12 DSP. It has spring-like colors and yes, beautiful florals/ leaves. And it coordinates with Translucent Florals Bundle (stamps & dies). It’s a beautiful set, very feminine, and I enjoyed playing with it.
The Delightfully Floral 12×12 DSP takes venter stage here, really showing off. The flowers are in Berry Burst, Fresh Freesia and Calypso Coral. I used inks from the first two colors + Parakeet Party as an accent. The card base is Fresh Freesia in a top fold A2 size. The next three layers are together & on dimensionals attached to the card base: Delightfully Floral DSP on the non-floral side, Basic White and the front layer of Delightfully Floral DSP with these gorgeous medium flowers. I stamped the hexagon dots with the Heartfelt Hexagon stamp set & Berry Burst ink on a Basic White scrap, then stamped the sentiment using the Translucent Florals stamp set and more Berry Burst ink, then punched it out with the Heartfelt Hexagon Punch. I set this aside and stamped two florals designs from the Translucent Florals stamp set, both in Fresh Freesia ink and die cut them with dies from the Translucent Floral Dies. I adhered the larger floral to the hexagon with dimensionals, then the smaller one close to it with a single dimensional. I added Stampin’ Seal to the back of the hexagon and wrapped a Parakeet Party ribbon from the Ribbon Due Combo Pack in a ‘Z’, I added dimensionals to the hexagon, covering the ribbon and attached this to the card front. For afinal touch I attached Adhesive-Backed Sequins in Berry Burst on the hexagon. And… the front is done!
For the inside, I added a piece of Parakeet Party card stock to the card base. I proceeded to stamp in Berry Burst ink, this larger floral from the Translucent Florals stamp set, then stamped the center in Pretty Peacock ink with the appropriate stamp from this same set on a Basic White panel. I stamped the inside sentiment in Fresh Freesia ink for a nice contrast. I added the same Adhesive-Backed Sequins in Berry Burst around the flower. This was added right over the Parakeet Party panel and the card was complete!
For the envelope, I covered the flap in another panel of the Delightfully Floral 12×12 DSP and trimmed it to fit. For the envelope front, I stamped this delicaste image from the Translucent Florals stamp set in Pretty Peacock ink – done, done. let’s see, have I left out anything? When I first saw this DSP, my thought was – too bold, too bright, too, too. Now that I have it and am mplaying with it, I love it! One of the things I like about it is the contrasting, non-normal colors. I find it gives me creativity. You may see more of this layout in the days ahead!
Today is Wednesday and it’s the 25th – just days away from the END of the Stampin’ Up! Joining Promotion. It’s a 35 year celebration of Stampin’ Up! being in business and it’s a really good deal. Let me run this past you once more…
Stampin’ Up! is offering an amazing deal as they are
celebrating 35 years in business.
Starting Oct 3 and going through to Oct 31 is a Starter Kit Special you will not want to miss. Celebrating 35 years of Stampin’ Up!, new demonstrators will be able to choose 35% OFF the cost of their Starter Kit or get 35% MORE product with their Starter Kit.
With option 1 (35% off the normal cost of the starter kit), the new demo would receive $125 worth of products and pay $64.35 + tax. and of course, shipping is FREE.
With option 2 (35% more SU! product) the new demo would pay the usual $99 plus tax of course, and get $168.75 worth of SU! product that you get to choose! And as before – – shipping is FREE! (This would probably be my suggestion – more product!)
MORE – MORE – MORE… With either option, those who sign up for the starter kit between Oct 3 and Oct 31 will automatically get signed up for the ONSTAGE@HOME Registration, again FREE! This is a virtual event being held November 11. (Normally the cost of registration would be $77) If you join as demonstrator during the time frame mentioned, you will receive in your email, all the information necessary to attend this virtual event.
Have I intrigued you, inspired you, made you think maybe this is the time to join as a demonstrator? If so, – would love to have you. Remember, hobby demonstrator (for the 20% discount) or a business demo (at least 20% off all demonstrator orders – or more) or somewhere in between. It just doesn’t matter. What does matter is if you like to stamp, color, ink up, create – that’s where it all blends into having fun and doing it with others.
Those who sign up for this offer have the opportunity to watch the event independently, gathered together with other demonstrators, or with their Team Leader.
Demonstrators who join during this promotion will be automatically added to the OnStage attendees; you won’t even need to register separately.
Demonstrators who join during this promotion will also receive an email with all the information about this event.
Whether you’d like to start a little side business or simply take advantage of the awesome 20% discount, I would very much love for you to join my Krew team! We have a great time together – even though we live all over the country!
Want to purchase the supplies for this card? Supplies can be ordered using this link to my online store. You will find ONLINE EXCLUSIVES, Clearance Rack, Sep-Dec Mini Catalog, the Annual Catalog, kits, Paper Pumpkin – you name it. Shop at your convenience :O)
When ordering from me please use my HOST CODE2J2X3YRM so that I receive proper notification and YOU GET THE Benefits of a FREE SU! item valued up to $10 :O) AND the Monthly Card Tutorial. (I like to treat my customers!) If your order is over $150, please don’t use the host code as SU! has benefits. I’ll still be notified and you can receive that FREE ITEM!
Note: Make sure that you can see my name on the final checkout page listed as your Demonstrator when you order so that you know that you’re ordering with me and you’ll get my rewards! PLUS… the monthly Online Tutorial when your oder is over $50. The October Tutorial features the beautiful Merriest Trees Bundle which can found in the Jul-Dec 2023 Mini Catalog on page 12!
Thanks so much for stopping by.
I hope you like the card – very fun – and gorgeous.
Good morning! We have returned from convention in Pittsburgh and today I am d-r-a-g-g-i-n-g. Yep – ever return and feel rung out or run over by a mack truck? It’s not quite that bad, but … I made a gift bag last night and took pictures then realized I did it sorta wrong. This morning I made another for this post :O) and I’m hoping instructions will be more clear.
Gift bag made last night after many hours of travel – not decorated yet, but at least has a ribbon! The Designer Series Paper is called Traditions of St. Nick DSP and is found as part of the Special Release on the ONLINE EXCLUSIVES. It’s beautiful, isn’t it? Here’s the how to put this together with photos to help you create it.
DSP is cut 6 x 12 (please make note… better if DSP is non directional) This is Traditions of St Nick 12 x 12 DSP
score on the long side at 1 1/2, 5 3/4, is 7 1/4 and 11 1/2
score on the short side at 1 1/2 and 5 1/2. (the 5 1/2 end is the top of the gift bag)
Trim along score lines of the long side to the 1 1/2 score line on the short side
Remove excess ‘end’ as shown in photo
Please look at photos to the left for proper cutting lines, Then add Tear n’ Tape at spots indicated in the near photo – there are four places. The area at the bottom of the photo becomes the side of the gift bag while the cut flaps become the bottom of the gift bag. The next photos will show how to fold the gift bag.
Fold gift bag as shown in photo below
Remove right length of Tear n’ Tape and close
Remove Tear ‘n Tape from short flaps and fold in; remove Tear ‘n Tape from long flap and fold in; then fold in the remaining long flap.
Secure by using a bone folder and rub against all flaps from the inside of the gift bag.
Pinch in at top and punch holes – see photos
Run Ribbon through holes and tie bow. On the red gift bag I used Burlap Ribbon from the Real Red & Burlap Ribbon Combo Pack.
Heres’ a photo of the bag again completed as a side view and one of the front view.
The first gift bag I made with this design was made with foil paper and turned out really cute, but I had to be so careful when scoring not to tear through the DSP. This is much stronger and I did not have to be so careful. These bags are not decorated yet. I will share a photo later in the week fully decorated :O) But now – you can make your own gift bag with ease :O) HERE is a link to the foiled bag.
Click on the image above to see the rest of the Special Release designer series papers and other ONLINE EXCLUSIVES.
Surprise, surprise! We’re offering a special release of five beautiful new Designer Series Paper options! These papers include fabulous holiday prints, gorgeous seasonal styles, and some spectacular timeless designs.
We originally created these papers to be part of our second Sale-A-Bration offering. However, since our next release of new Online Exclusive products won’t happen until November (and you won’t be able to find any of these papers in a catalog), we’ve adjusted our strategy and decided to release these paper options starting 6 September! That way, you have the chance to get ahead on Christmas cards, seasonal crafts, and much more. These products are available while supplies last.
Stampin’ Up! has two catalogs right now for shopping: theSep-Dec 2023 Mini Catalog has quite a number of holiday stamps/ dies/ and papers & punches as well as some items that are excellent for eveyday use. Click on the catalog image below to shop those products.
Regular card stock & LOTS of products are available in the 2023-2024 Annual catalog. Feel free to click on that image below to take you to what’s available there.
Remember when shopping with me, with every purchase of $50 or more you will receive a Stampin’ Up! item of your choice valued up to $10. You get to choose the item! Unfortunately, due to rising costs of shipping, I am not able to send card stock or designer series papers, but there is so much more from which to choose – from either of the Mini catalog or the Annual catalog. Yeah! Just make sure you are shopping with me when you check out.
Thanks for stopping by. May you have a beautiful day!
Good morning! I’m away right now, attending a convention that has nothing to do with Stampin’ Up!. Can you imagine? :O) The convention is in Pittsburgh, a city of bridges. I learned yesterday Pittsburgh has more bridges than Venice, France, numbering 463 (I think that’s the right number). And they are all so different. But this post isn’t about Pittsburgh, this is a post about today’s creation.
This card has lots of layers using the Joy of Christmas 12×12 DSP. It is beautiful. You can see I used three different designer series papers, with the very top one as kind of a background piece for the sentiment banner. I used the Banners Pick a Punch to make the pointy ends. It’s hard to pick a favorite of these papers. Prior to adhering this strip to the card front, I wrapped it in Metallic Woven Ribbon in Parakeet Party. There are so many shades of green in this paper, this ribbon just adds a sparkle of fun.
The sentiment is stamped using Joy of Noel stamp set in Cherry Cobbler ink on a Basic White panel that was then die cut with Something Fancy Dies. I used Gold Holly Leaves and Loose Holly Gems to decorate the banner. Attached with Stampin’ Seal to the basck of the banner is a Pine bough die cut from Shaded Spruce card stock using a die from Joy of Noel dies. I’m thinking a gold foil pine bough might have been nice as well.
The layers of the card are…
Shaded Spruce card base 4 1/4 x 11 and scored at 5 1/2
Cherry Cobbler 4 x 5 1/4 adhered directly to the card base.
Basic White 3 3/4 x 5 adhered to Joy of Christmas DSP 3 1/2 x 4 3/4, dimensionals on the Basic White and centered onto the card front
Basic White 2 3/4 x 3 3/4 and Joy of Christmas DSP 2 1/2 x 3 1/2 adhered together, dimensionals on the Basic White and again centered onto the card front.
The bannered piece is 3/4 x 4 1/4, trimmed with the Banners Pick A Punch, wrapped in the Metallic Woven Ribbon and adhered with adhesive.
The sentiment banner is attached with dimensionals.
For the inside… Cherry Cobbler layer (4 x 5 1/4) adhered to the card base; the Basic White panel (3 3/4 x 5) is stamped in Cherry Cobbler ink and Shaded Spruce ink using stamps from the Joy of Noel stamp set then added to the inside of the card.
The envelope got more of this gorgeous Joy of Christmas DSP adhered to the flap and trimmed to fit. On the envelope front, I stamped two holly sprigs in Shaded Spruce ink then added tiny dots of Pearlized Enamel Effects. This needed to be set aside to dry so the Enamel Effects doesn’t smear. Love this card and envelope and hope you do as well.
To order this gorgeous Joy of Christmas Designer Series Paper and the Joy of Noel bundle, please visit the Mini Catalog shown below. Click on the banner and it will take you directly to shopping with me in the Mini Catalog.
Remember that when you shop with me and your order is over $50 before shipping & taxes, you will receive a SU! items of your choice valued up to $10. It’s helpful to use my CURRENT HOST CODE SDGXBPZV (this is code from 15 Sep – 30 Sep) so I receive full notification and you get my gift. :O)
There’s lots more going on in the Stampin’ Up world and this time of year with several holidays approaching, you will not want to miss a thing! And what better way to do that than to JOIN MY TEAM – join my teamhere
20%+ Discount on your demonstrator orders
Be a part of a fun and supportive team and the Stampin’ Up! community – this is one of the best parts, meeting new folks and new ideas, creating together
Early access to new catalogs and promotion information
Early ordering for new products
Be a hobby demonstrator or start a business
No pressure to sell products
My full support when you join my team
access to monthly class tutorials :O) Each month it’s different, this month it’s the Autumn Leaves bundle – yippee!
Access to Team meetings with various information about the SU! world if you desire to make it a business
Click on the Special Release banner to take you to the ONLINE EXCLUSIVES.
Let me know if I can help you in any way. May you have a beautiful day!
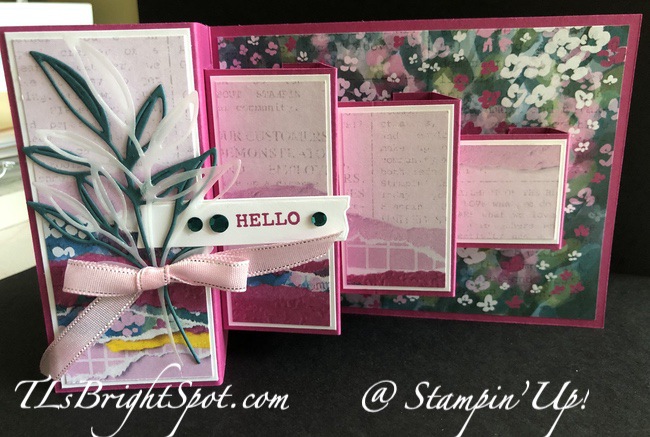
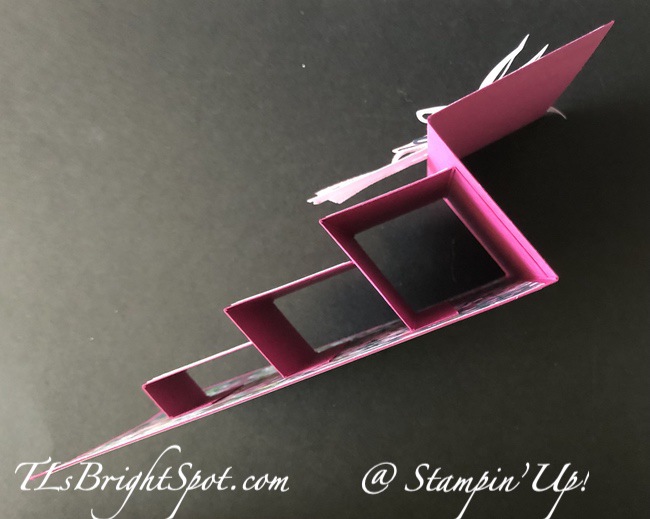
Good Wednesday morning! We took our walk early this morning and it was sprinkling just a bit – and you know what, it was refreshing. :O) But you aren’t here for that… I have a really F-U-N card for you today.
What I like about this card: colors, three dimension, texture and fun fold! All these wrapped up in one :O) I used Masterfully Made DSP for each of the panels; Gorgeously Made bundle for the die cuts and sentiment; Adhesive-Backed Sequin Trio Pack and Sheer Ribbon Combo Pack; and Vellum. The card base is Berry Burst. Here’s a view from the top.
Here’s a view of the back where you add your additional message.
This was stamped in Pretty Peacock ink and the stamp is from Gorgeously Made stamp set;Basic White panel.
Envelope front and envelope back…
The envelope front was stamped in Pretty Peacock ink. The envelope flap was stamped in second generation Smoky Slate – both stamps from Gorgeously Made stamp set.
I’m a SU! demonstrator and have early access to products. That brings me to the Designer Series Papers on the card above. I am offering Paper Shares from the Mini 2023 September-December Catalog – and here are the details.
How my shares work: I order full packs of all the Designer Series Papers listed below. I cut them into 6×6 pieces (or 6×12 for double shares) and give you one panel of each design from each pack on the list. I pack up the paper and get it back out to you just as quickly as possible! Shares give you a good working sample of all of the papers and makes it easier to decide which papers you like most and want to order.
Below is a list of the papers for this Designer Series Paper Share.
A single paper share is $30 plus $8.50 Priority Mail Shipping.
A double paper share is cut 6 x 12 and is $60 plus Priority Mail Shipping.
Remember, one 6×6 sheet of each design from these DSP packs. Most original DSP packs come in 12 x 12 size unless otherwise noted.
The list includes: name of DSP, number of sheets of that DSP in the pack.
A Walk in the Forest – 6
All About Autumn – (6×6 size) -12
Beary Christmas – 6
Melon Mambo & Granny Apple Green Foil Sheets – 2
Garden Walk – (6×6 size) – 8
Glow-In-The-Dark 6×6 Specialty Paper – 1
Joy of Christmas – 6
Joyful Specialty Paper – 4
Merry Bold & Bright – 6
O Holy Night – 6
Oxidized Copper Specialty Paper – 2
Shining Brightly Specialty Paper – 6
Snowflake Magic Specialty Paper – 3
Them Bones – 6
Winter Meadow – 6
Anyone is welcome to join this paper share opportunity, but shipping is limited to addresses within the US. If you would like to join in these shares, please email the following information to tlsbrightspot@gmail.com
Your first & last name (yep, I need both :O)
The email address connected to your PayPal account. You DO NOT need to have a PayPal account to pay the invoice; you can choose to pay by credit card without having a PayPal account.
Deadline to sign up for my shares: Monday, September 4 @ 3 PM ET
Other Stampin’ Up! opportunities…
If you have not received a catalog or do not have a demonstrator, I would be happy to be that person for you. If you are interested in ordering those products now and get 20% off in the bargain, it’s easy to join my teamhere. And when you do join my team, there are other benefits as well.
20%+ Discount on your demonstrator orders
Be a part of a fun and supportive team and the Stampin’ Up! community – this is one of the best parts, meeting new folks and new ideas, creating together
Early access to new catalogs and promotion information
Early ordering for new products
Be a hobby demonstrator or start a business
No pressure to sell products
My full support when you join my team
access to monthly class tutorials :O) Each month it’s different, this month it’s the Timeless Arrangements bundle, and that’s gorgeous!
Kits are fun, quick and easy, and all-inclusive so there’s nothing extra to buy and nothing to store afterward.
Completing a kit gives everyone a sense of artistic accomplishment.
Completed kits make great gifts. Make the projects and then give them away for someone else to use.
Because kits come in so many styles and project types, there’s something for everyone. Want to HOST a kits collection party? Let me know and I’ll help pull that off. Kt together in September with kits on sale now. :O)
KITS COLLECTION BY STAMPIN’ UP! You can shop with me here.
Sales Period: 1–31 August
Just make certain when you’re checking out that my name is at the top as your demonstrator. THANKS! If your order is over $50, please use my HOST CODE 3QH63UB7 so I can send to you a SU! item valued to $10. If your order is over $150, Stampin’ Up! has it’s own rewards, so don’t use the HOST CODE then. I will still send a SU! item valued to $10 :O)
Online Exclusives are just that – not in any Stampin’ Up! catalog. . I use them a LOT. Visit here to shop these EXCLUSIVES.
There’s always more to share about Stampin’ Up! products. Please reach out with your questions if you need more information.
Thanks for stopping by. May you have a beautiful day!
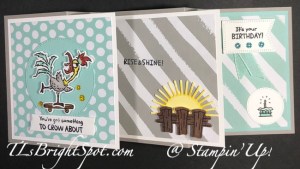
Hello Saturday! We had a couple of days of wonderful temps and now we are back to humidity. Ugh. Well, this is summer and I’m not going to wish it away! Let’s take a peek at my card for today.
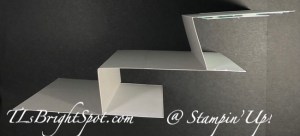
I’m going to confess, I don’t know the name of this fun fold and it needs a name. Help me out here, folks – let’s name it! The card base is 4 1/4 x 11 scored at 2 1/2, 3 3/4, 6 3/4 and 8 1/4. Burnish the folds in an accordion style: mountain, valley, mountain, valley.
I used Gray Granite for my card base. The next layer is Basic White with a layer of DSP: I used Subtles and Neutrals 6×6 DSP. How these layers are attached is important: leaving a border of the card base in each case.
In the first photo, the card base border is about 1/4″ on the left, top & bottom, with the excess free. In the second photo the same is true, 1/4″ from scoreline on left and 1/4″ top & bottom b order. The final panel is smaller and the layer is Pool Party with Subtles 6×6 DSP in Pool Party.
Now let’s decorate each panel:
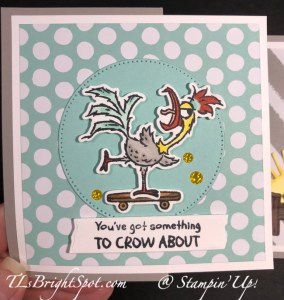
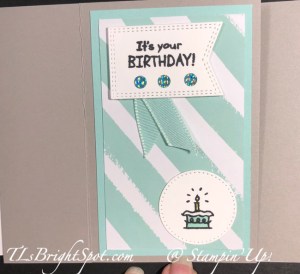
Panel 1: The circle is die cut from Pool Party using the Stylish Shapes Dies and adhered in the center. The chicken and skateboard (from Hey Chuck stamp set) are stamped in Memento ink on Basic White and colored with Stampin’ Blends: Pool Party, Calypso Coral, Gray Granite, Lemon Lolly and Pecan Pie (skateboard). Both were die cut with the Hey Chuck Dies, dimensionals added and adhered to the center of the circle. The sentiment is also from Hey Chuck stamp set and stamped in Memento ink then die cut with the Gorgeously Made banner die and added with dimensionals. Three Glossy Dots Assortment in Daffodil Delight were added for sparkle.
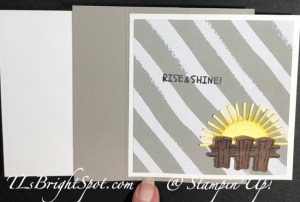
Panel 2: Subtles 6×6 DSP in Gray Granite to the Basic White panel. Die cut the rising sun from Lemon Lolly card stock using the Hey Chuck Dies and color with a bit of Dark Lemon Lolly Stampin’ Blends. Stamp the fence from Hey Chuck stamp set on a scrap of One Horse Open Sleigh 6×6 DSP (ONLINE EXCLUSIVES) in Memento ink and die cut with die from Hey Chuck Dies. Adhere the fence with dimensionals then slip the rising sun behind adhering with liquid glue. The final step for this panel is the sentiment stamped in Memento ink using the Hey Chuck stamp set.
Panel 3: Pool Party card stock with Subtles 6×6 DSP in Pool Party layered together. The birthday cake from Hey Chuck stamp set is stamped in Memento ink on a Basic White scrap and colored with Stampin’ Blends: Lemon Lolly, Pool Party and Wink of Stella on the icing. This was die cut with the smallest circle die from Stylish Shapes Dies and adhered with liquid glue. The sentiment banner was stamped on Basic White using another stamp from Hey Chuck stamp set and Memento ink. It was die cut with a banner die from Nested Essentials Dies, dimensionals added to the back and attached. The ribbon is Grosgrain Ribbon in Pool Party added under the banner with glue dots. Three Glossy Dots Assortment in Pool Party were added to the banner for more sparkle… and the card was done.
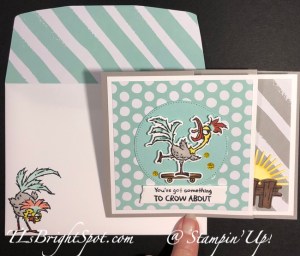
For the envelope… more Subtles 6×6 DSP in Pool Party was added to the flap and trimmed to fit. Another chicken from Hey Chuck stamp set was stamped in Memento ink on the envelope front and colored with Stampin’ Blends: Pool Party, Calypso Coral, Lemon Lolly and Gray Granite.HINT: When coloring with Stampin’ Blends on an envelope, always slip a heavy card stock inside to prevent color bleeding through to the back of the envelope. :O)
Fun, bright card, right? Ok, what else is going on in the Stampin’ Up! world…
Redeem your coupons this month!
the Mini September-December 2023 Catalog is available to demonstrators and my order for catalogs to my customers has shipped. I just don’t have it yet – Monday they say :O( Once I receive the catalogs though, the labels are ready and will be sent first class to my customers. Wait till you see all the fun, new products! I can’t wait to play with what I’ve ordered and share those with you. If you would like to order from the catalogs early as well, join my team. We have lots of fun: support from several team leaders, challenges to participate in, projects to share & inspire. If you join now, you can order items from the new catalog right away. :O) The catalog goes live to customers September 6. You may join my team here.
Kits are fun, quick and easy, and all-inclusive so there’s nothing extra to buy and nothing to store afterward.
Completing a kit gives everyone a sense of artistic accomplishment.
Completed kits make great gifts. Make the projects and then give them away for someone else to use.
Because kits come in so many styles and project types, there’s something for everyone. Want to HOST a kits collection party? Let me know and I’ll help pull that off. Kt together in September with kits on sale now. :O)
KITS COLLECTION BY STAMPIN’ UP! You can shop with me here.
Sales Period: 1–31 August
Card cuts for today’s project:
Card base – Gray Granite 4 1/4 x 11 scored at 2 1/2, 3 3/4, 6 3/4, 8 1/4
Basic White – 4 x 4 (2) + scraps for sentiments, chicken & other images
DSP: Subtles 6×6 DSP – Pool Party 3 3/4 x 3 3/4 + 2 1/4 x 3 3/4 + 2 1/4 x 6 (envelope flap); Gray Granite 3 3/4 x 3 3/4
Pool Party card stock – 2 3/4 square (die cut circle); 2 1/2 x 4 (last panel)