Stampin’ Up! Birthday w/ Gorgeous Leaves

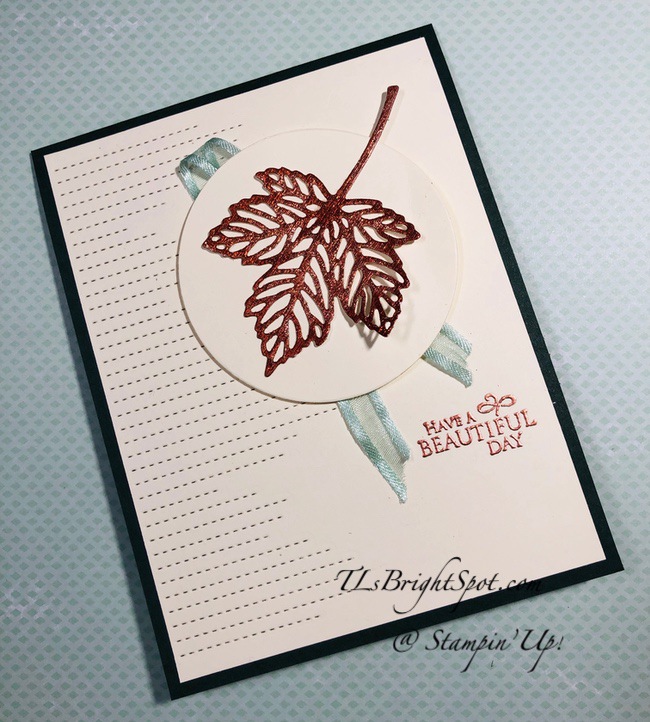
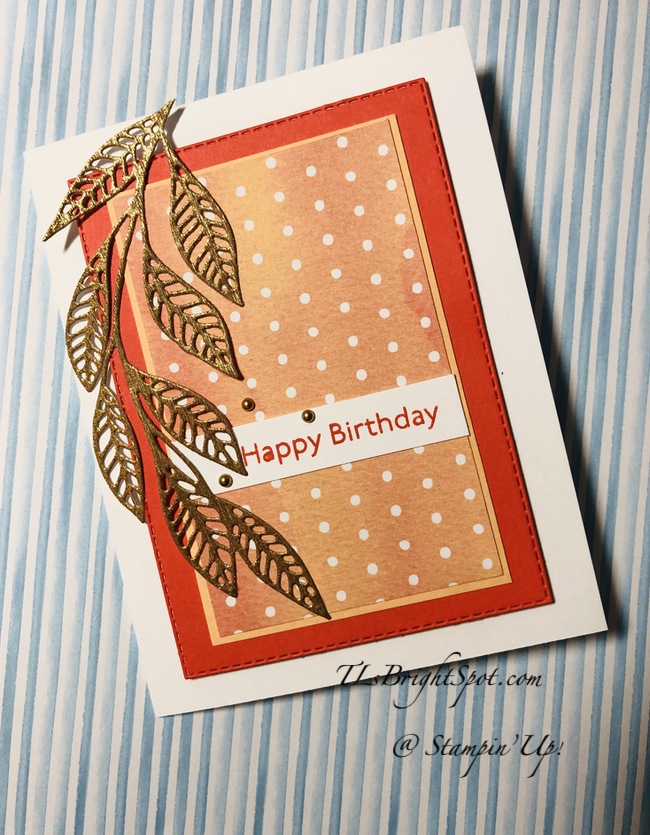
Good Saturday morning! It’s a beaut here ~ 65 degrees and a bit breezy. The day is new & fresh :O) I just recently posted (Thurs) a card with a fun centerpiece created w/ Blending Brushes & several colors. Because there was some card stock left over I decided to put it to use and created today’s card. Because of the sentiments used, it can so easily be used as a ‘thinking of you card’ as well.

Birthday w/ Gorgeous Leaves.1

The three squares are some of what’s remaining of the original coloring, and it’s been backed by Brushed Metallic card stock in a coppery look. The leaves were die cut from Gold/ Rose Gold 6×6 using the gold (you can see I left some of the pieces in the leaves – intentionally), Gold foil sheet and a stamped leaf in stamped off Mango Melody. The dies used are Intricate Leaves Dies which coordinates with the Gorgeous Leaves stamp set. The Cajun Craze card stock was run through the Timeworn Word 3D embossing folder and adhered to a Very Vanilla panel and attached to the Cajun craze card base with dimensionals. The sentiment is from the Heartfelt Wishes stamp set and stamped on a Very Vanilla scrap with Pumpkin Pie ink then fussy cut & also adhered with dimensionals. The three leaves were glued in place and a glue dot was used to adhere a double strand bow of Linen Thread.

Birthday w/ Gorgeous Leaves.2

For the inside…. I used stamped off Pumpkin Pie ink for the leaves, sometimes third generation. The splotch was made with Mango Melody ink ~ both from the Gorgeous Leaves stamp set on a panel of Very Vanilla. The sentiment is again from Heartfelt Wishes stamp set, stamped in Pumpkin Pie…. and the card was done! Kinda nice having left-over pieces to create a card. :O)

Birthday w/ Gorgeous Leaves.3


For the envelope I used the same process as the inside of the card… stamped off Pumpkin Pie for the leaves and Mango Melody ink for the splotch – both on a Very Vanilla envelope.

Here is a photo of the ink colors used to create the original panel with the Blending Brushes.

Birthday w/ Gorgeous Leaves.4

Not have a demonstrator so you can order? If you do not have a demonstrator and need an Annual 2021 Catalog OR Jul-Dec 2021 Mini Catalog, please reach out to me – happy to send one to you. Please also use my current host code when ordering: 26QYRFXB I offer my customers a free item from Stampin’ Up! item valued to $10 with your order of $50 and above. Click here to go my store. When the order is over $150, you still receive that free gift from me, but SU! has Stampin’ Rewards that may be used for additional products, so don’t use the host code at that time. If you have questions just let me know. If you would like to be able to order products early from catalogs AND enjoy that 20% discount, join my team now… you may do that here. We have lots of fun and are a creative bunch that encourages & supports one another. Would love to have you!

INTRODUCING THE LOVE, SANTA TAG KIT—A NEW ADDITION TO THE KITS COLLECTION BY STAMPIN’ UP!

Let your Christmas gifts take ā€œSantaā€ stage with Love, Santa—a new Kits Collection addition!Ā 

The Love, Santa Tag Kit features oversized Christmas tags in festive designs. This kit has everything you need to create 12 whimsically designed tags. That means you will find printed die-cut tags and labels, sequin embellishments, pink and white baker’s twine, an exclusive stamp set, a Night of Navy Classic Stampin’ Spot, and more in this all-inclusive kit! You can get right to crafting without any of the prep work. Plus, the printed and food-safe cellophane Love, Santa Treat Bags (available to purchase separately) are the perfect complementary way to wrap up scrumptious treats.Ā 

The Love, Santa Tag KitĀ (158375) is available starting 6 October! Grab yours today by clicking here

158375
Love, Santa Tag Kit, completed
158375O01
Love, Santa
Tag Kit, parts

ADD SOME BAGS TO YOUR TAGS!

This image has an empty alt attribute; its file name is 158375.jpg
Bags w/ tags
158375O02
Bags, 158381

Remember… these are subject to availability – order before they are sold out! Click here to go my store.

Thanks for stopping by. May you have a beautiful day. Nothing beats a handmade card.

Inspire. Create. Share.

Stampin’ Up! Stitched Triangles Part 2

Hi Everyone, it’s FRIDAY! We have a beautiful day here on the East Coast – cool temps and hav e to say the trees are turning color. Fall is such a beautiful time of year… ah, but to today’s card. :O) We had a card class here yesterday and made a couple of cards using the Stitched Triangles Dies. A couple of days ago I posted a tree design with the Stitched Triangles and we created one of those. We also created one similar to what I posted some time ago (photo below), this time with some different DSP and yes, from just-ended Sale-a-bration. I shouldn’t do this… but the card turned out so very cute, I just had to share. :O)

Tree post may be found here.

The Poinsettia Stitched Triangle card may be found here.

Each of these was created using the Stitched Triangles and I had so much fun – as did those in the card class. The bears, penguins & fox are just so friendly & light-hearted.

  • card base is Soft Sea Foam 4 1/4 x 11 scored at 5 1/2
  • triangle bases are die cut from Fresh Freesia 3 1/2 x 4
  • DSP triangles are cut from various sizes from Penguin Playmates DSP
  • the sentiment was stamped in Just Jade ink using the Snowman Season stamp set (the font seemed perfect!)
  • animals were fussy cut and attached with dimensionals
  • Pastel Pearls were added to make it look as though the fox is chasing them šŸ˜‰

Notice the Fresh Freesia triangles are off-set just a bit, adhered together with liquid glue then adhered to the card base with liquid glue. I used the Stamparatus to place the sentiment after attaching the triangles. The Stamparatus is perfect for this!

The inside – uber easy…

Stitched Triangles Part 2, inside

Oh goodness this looks fuzzy ~ yikes! On a Basic White panel add the two Stitched Triangles as above. Two squares of paper cut 2″ is ample for each triangle. I didn’t want more of a sentiment on this card, so called it done. Love it! Just know this could be done with many different Designer Papers and made into a Thanks or Birthday or Thinking of you. It would make a fantastic masculine card – oh I do have to make one of THOSE!

Stitched Triangles Part 2

Not have a demonstrator so you can order? If you do not have a demonstrator and need an Annual 2021 Catalog OR Jul-Dec 2021 Mini Catalog, please reach out to me – happy to send one to you. Please also use my current host code when ordering: 26QYRFXB I offer my customers a free item from Stampin’ Up! item valued to $10 with your order of $50 and above. Click here to go my store. When the order is over $150, you still receive that free gift from me, but SU! has Stampin’ Rewards that may be used for additional products, so don’t use the host code at that time. If you have questions just let me know. If you would like to be able to order products early from catalogs AND enjoy that 20% discount, join my team now… you may do that here. We have lots of fun and are a creative bunch that encourages & supports one another. Would love to have you!

INTRODUCING THE LOVE, SANTA TAG KIT—A NEW ADDITION TO THE KITS COLLECTION BY STAMPIN’ UP!

Let your Christmas gifts take ā€œSantaā€ stage with Love, Santa—a new Kits Collection addition! 

The Love, Santa Tag Kit features oversized Christmas tags in festive designs. This kit has everything you need to create 12 whimsically designed tags. That means you will find printed die-cut tags and labels, sequin embellishments, pink and white baker’s twine, an exclusive stamp set, a Night of Navy Classic Stampin’ Spot, and more in this all-inclusive kit! You can get right to crafting without any of the prep work. Plus, the printed and food-safe cellophane Love, Santa Treat Bags (available to purchase separately) are the perfect complementary way to wrap up scrumptious treats. 

The Love, Santa Tag Kit  is available starting 6 October! Grab yours today by ordering clicking here

158375
Love, Santa Tag Kit, completed
158375O01
Love, Santa Tag Kit, parts
158375O03
158375 Love, Santa Tag Kit

ADD SOME BAGS TO YOUR TAGS!

This image has an empty alt attribute; its file name is 158375.jpg
Bags w/ tags
158375O02
Treat bags – 158381

Remember… these are subject to availability – order before they are sold out! Click here to go my store.

Stampin’ Up! Gorgeous Leaves

Welcome to the Happy Inkin’ Thursday Blog Hop! The theme this week is LEAVES – and interpret that however we like – so… here goes! Be sure to follow along to see all the wonderful projects.

No photo description available.
Gorgeous Leaves Bundle.1

My goodness, did I have fun with this card. See that stunning color on the inside of the rectangle? Love, love. And it was created with several colors… but I get ahead of myself just a bit. Begin with a panel of Very Vanilla card stock and using the Stitched Rectangle Dies, die cut and remove the center. With Blending Brushes create this gorgeousness: begin with Crushed Curry, then Mango Melody, Pumpkin Pie, Cajun Craze, and finally Cherry Cobbler inks. Beginning with the lightest of colors and continuing to add each layer, this beauty was created. The next step was to use a Water Painter and flick water droplets, which takes some of the color away. I actually did this process twice so I could die cut leaves from the second piece. That second leaf above is cut from the additional creation. Before die cutting it though, I stamped it with Soft Suede ink using the Gorgeous Leaves stamp set, stamped off once, then die cut with Intricate Leaves Dies. The top leaf is also die cut with one of the Intricate Leaves Dies – and from the Gold & Rose Gold Metallic Specialty 6×6 paper. I then colored it with Dark Poppy Parade Stampin’ Blends and accented it with Dark Cherry Cobbler Stampin’ Blends. I added a bit of Soft Suede Stampin’ Blends to the stem and into a bit of the vein on this leaf. My next die cut was the tiny leaf from Gold Foil. I adhered these to the frame of the Very Vanilla with liquid glue. I stamped the sentiment in Soft Suede ink using a sentiment from Forever Blossoms stamp set. I put dimensionals on the back of this Very Vanilla panel but did not attach it yet. First I placed the panel on the card base, then laid the gorgeous colored rectangle on the Very vanilla card front & adhered it with liquid glue. I then adhered the front panel so it was ‘square’ with the inner piece.

Gorgeous Leaves Bundle.2

Here is another of the die cut leaves using the Intricate Leaves Dies, cut from the additional colored panel. Once I adhered the leaf with liquid glue, I flicked Soft Suede ink of the Very Vanilla panel, but not all over, just in places. I then stamped the sentiment (from Party Puffins stamp set) in Pumpkin Pie ink. I adhered the panel to the inside of the card – and bingo, the card was done!

Gorgeous Leaves Bundle.3

For the envelope I stamped this fun leaf (I think it’s a maple leaf) from Gorgeous Leaves stamp set with Pumpkin Pie ink and sponged daubed on the edges Cherry Cobbler ink. The front leaf is full strength. The leaves on the flap were 2nd & 3rd generation stamping. You can see the Blending Brushes used here in this photo – and the beautiful detail of the Intricate Leaves Die to create the top leaf.

For this card in particular, I kept wanting to add something, metallic adhesive-backed gems or linen thread or doodles along the right. But I stopped. The look is clean.

Below is a list of the products used…

Not have a demonstrator so you can order? If you do not have a demonstrator and need an Annual 2021 Catalog OR Jul-Dec 2021 Mini Catalog, please reach out to me – happy to send one to you. Please also use my current host code when ordering: 26QYRFXB I offer my customers a free item from Stampin’ Up! item valued to $10 with your order of $50 and above. Click here to go my store. When the order is over $150, you still receive that free gift from me, but SU! has Stampin’ Rewards that may be used for additional products, so don’t use the host code at that time. If you have questions just let me know. If you would like to be able to order products early from catalogs AND enjoy that 20% discount, join my team now… you may do that here. We have lots of fun and are a creative bunch that encourages & supports one another. Would love to have you!

Here is a list of participants this week:

Amy Koenders

Mary Deatherage

Jaimie Babarczy

Sue Prather

Karen Finkle

Karen Ksenzakovic

Tara Carpenter

Terry Lynn Bright – you are here

No photo description available.


Stampin’ Up! Leaves

It’s Tuesday, rainy & 64 degrees here on the East coast of the US ~ very fall-ish kind of weather. What are YOU up to today? Once the rain stops, our plan is to pick up some firewood from a friend. It’s been covered so will be dry. It will b e the first of the firewood we stash… we order a full cord and use it all during the winter. If all the acorns that have been falling are any indication, this may be a cold winter. uCard today… I love the simplicity of it. It has a hint of sparkle on the die cut leaf – as it was cut from the Gold/ Rose Gold 6×6 Metallic paper. This is gorgeous paper, and I’ve colored this piece with Cajun Craze Stampin’ Blends using both the light and dark. I love how it turned out!

Leaves.1

More particulars about this card…

  • run a panel of Very Vanilla card stock through the die cutting machine using the Stitched Leaves Dies, making this fun design on the left side of the panel. This die doesn’t actually cut the paper so much as emboss the design – love it!
  • die cut a circle using the second largest in the Layering Circles dies – from Very Vanilla card stock.
  • die cut the leaf from the Intricate Leaves Dies (found in the Jul-Dec 2021 Mini Catalog) from the
    Rose Gold paper in the Gold/ Rose Gold 6×6 Metallic Paper pack. Color it with the Light Cajun Craze, then add highlights with the Dark Cajun Craze Stampin’ Blend.
  • Adhere the leaf to the circle with just dots of liquid glue
  • Place the circle but do not adhere… stamp the sentiment with VersaMark ink from Very
    Versailles stamp set, then sprinkle with Copper Embossing powder & heat set.
  • Add the Open Weave Ribbon in Soft Succulent to the back of the circle with Stampin’ Seal+
  • Put dimensionals on the back of the circle and add to the card front.
  • Attach this Very Vanilla panel to the Evening Evergreen card base & voila!, the card front is done
Leaves.2

For the inside…

  • Stamp the sentiment from Very Versailles on a panel of Very Vanilla using VersaMark ink, sprinkle with Copper Embossing Powder & heat set.
  • Stamp the beautiful leaf stamp from the Gorgeous Leaves stamp set with Just Jade ink, stampin off once, then stamping again without re-inking. Do this several times – to your satisfaction.
  • Adhere the Very Vanilla panel to a Just Jade piece, slightly larger, then into the Evening Evergreen card base.

For the envelope…

  • Do the same process on the front of the envelope with Just Jade ink, Gorgeous Leaves stamp set.
  • Emboss with the Stitches Leaves Dies on the envelope flap
Leaves.3

This card is being entered into two challenges: the Color Fusers Blog Hop – October

colorfusers oct.jpeg

and CASEing the Catty sketch Challenge CTC 338

Not have a demonstrator so you can order? If you do not have a demonstrator and need an Annual 2021 Catalog OR Jul-Dec 2021 Mini Catalog, please reach out to me – happy to send one to you. Please also use my current host code when ordering: 26QYRFXB I offer my customers a free item from Stampin’ Up! item valued to $10 with your order of $50 and above. Click here to go my store. When the order is over $150, you still receive that free gift from me, but SU! has Stampin’ Rewards that may be used for additional products, so don’t use the host code at that time. If you have questions just let me know. If you would like to be able to order products early from catalogs AND enjoy that 20% discount, join my team now… you may do that here. We have lots of fun and are a creative bunch that encourages & supports one another. Would love to have you!

Stampin’ Up! Trees, Trees, Trees

Welcome to MONDAY! It’s the beginning of a new week, new challenges, various obligations. I hope yours goes well! Today’s post is a rather different & fun card using the Stitched Triangles Dies and various widths of Christmas paper scraps, along with acrylic sheets. I strongly recommend having grid paper under the acrylic sheet to keep papers straight!

Trees, Trees w/ Stitched Triangles.1

First, choose your papers and cut in various widths. I chose Peaceful Prints DSP and the strips range in width from from 1/4″, 3/8″, 1/2″ and even one is 3/4″ in width. Hold the acrylic sheet in place on the grid paper with tape of some sort. Place papers as desired & hold them in place on the acrylic sheet. Adhere with Stampin’ Seal or liquid glue, depending on width of paper. Place the Stitched Triangle Die over top, move to die cutting machine & cut. Voila – perfect trees! Add a ‘trunk’ to the large tree ~ mine is in Sahara Sand 1/2″ square. You could do the same for the other trees, just make them smaller.

Now create the rest of the card… card base is Real Red. Run a panel of Evening Evergreen card stock through the Tasteful Textile 3D embossing folder and adhere to a slightly larger Basic White panel. Add dimensionals to the back of the Basic White and adhere to the card front. Now add dimensionals to the back of trees making certain they do not show through where strips are separated. Also keep in mind the placement of the trees and if overlap, pay special attention to where the dimensionals are placed. Stamp the sentiment from Heartfelt Wishes stamp set in Evening Evergreen and fussy cut. Put dimensionals on the back and place. Add Gilded Gems to the tree tops.

Trees, Trees w/ Stitched Triangles.2

For the inside… Again I used the Heartfelt Wishes stamp set, again in Evening Evergreen ink on a Basic White panel. Adhere the panel to the inside of the card – and done!

Trees, Tress w/ Stitched Triangles, 3

The envelope, I still had several strips so used them to cover the flap and trimmed to fit. For the front, I stamped the sentiment from Heartfelt Wishes stamp set in Evening Evergreen ink. Another for my Christmas stash! This design was inspired by another demonstrator and found on Pinterest ~ whose name I forget! My sincerest apologies… 😳 Card cuts are listed at the bottom of the post.

Trees, Trees w/ Stitched Triangles.4

Not have a demonstrator so you can order? If you do not have a demonstrator and need an Annual 2021 Catalog OR Jul-Dec 2021 Mini Catalog, please reach out to me – happy to send one to you. Please also use my current host code when ordering: 26QYRFXB I offer my customers a free item from Stampin’ Up! item valued to $10 with your order of $50 and above. Click here to go my store. When the order is over $150, you still receive that free gift from me, but SU! has Stampin’ Rewards that may be used for additional products, so don’t use the host code at that time. If you have questions just let me know. If you would like to be able to order products early from catalogs AND enjoy that 20% discount, join my team now… you may do that here. We have lots of fun and are a creative bunch that encourages & supports one another. Would love to have you!

Thanks for stopping by. May you have a beautiful day. Inspire. Create. Share.

There’s nothing like a handmade card.

Card cuts:


Real Red ~ 4 1/4 x 11 scored at 5 1/2

Basic White ~ 3 7/8 x 5 1/8 (front), 4 x 5 1/4

Evening Evergreen ~ 3 3/4 x 5

Stampin’ Up! Merriest Moments Layered

Hello Crafters… well, I did it, my first Facebook Live. Whew. And it wasn’t so bad. I didn’t shake throughout as I was afraid I might. I WAS crooked, so that’s something I must fix. All in all, a positive experience and I’m thankful & grateful to have been asked to participate in the Inkin’ Krew World Card-Making Day. Today’s post gives all the details about yesterday’s card and some particulars about the Merriest Moments Bundle. It’s confusing to some as it includes a Hybrid Embossing Folder. And what that means is it die cuts & embosses at the same time. What seems to confuse folks is what plates to use. We’ll start with that…

Embossing AND die cutting with Hybrid Embossing Folders: three ‘steps’

  1. Emboss as you normally would using the #1 base plate & #4 Specialty Plate used with 3D embossing folders.
  2. Cut & emboss with the outline die & hybrid folder: the die lies easily in the hybrid folder with the cutting blade facing you and the die in the side with the SU! logo. Place the card stock against it (at least a 4 1/4 x 5 1/2 sheet), close the folder. Use the #1 base plate & the #4 Specialty Plate… the embossing folder is sandwiched between… and roll it through the cut & emboss machine.
  3. Cut & emboss with the detail die and the hybrid folder: the detail die lies easily in the hybrid folder as did the outline die… cutting blade toward you & lying in the SU! logo side of the hybrid folder, place a piece of card stock in the folder (at least 4 1/4 x 5 1/2), close the folder. Use the #1 base plate & the #2 die plate & run it through the machine. Remove the card stock & the detail die, replace the detailed cut piece into the embossing folder & run it through as if embossing (#1 base plate & #4 Specialty Plate). This reinforces the embossing and gives the piece more detail embossing. With the detail die, it is really a two-step process but it gives a beautiful look.

And here’s my finished card.

Merriest Moments Layered.1

Cherry Cobbler card stock is the base (card cuts at the end of this post) with a layer of Cherry Cobbler run through the Merriest Moments Hybrid Embossing Folder, adhered directly to the base. The next layer is the Silver Foil run through the same Hybrid Folder but with the outline die included when running it through the machine. (see step 2 above). This was adhered to the card front with liquid glue just in the center portion of the cut & embossed piece. Then, with Shimmer Paper/ Pearlescent Paper card stock, I ran this through the machine as in step 3 (with the detail die) above PLUS I included the rectangular die also, removing the center portion of the piece.I embossed this center rectangle with silver embossing powder (stamp with versamark first, then sprinkle with embossing powder & heat set)using this fun sentiment from the Merriest Moments stamp set. I adhered this right onto the silver foil, using liquid glue. (you could use Stampin’ Seal). Add Foam Adhesive Strips along the border of the rectangle (back side of course) of this stunning Shimmer Paper/ Pearlescent Paper piece. Adhere to the card front, aligning the pattern just so. What is so nice about this is the way the silver foil peeks through, and how the Shimmer Paper/ Pearlescent Paper piece is raised and gives the sentiment more focus.

I could have stopped there, but didn’t. šŸ˜ I stamped these very nice 2 sizes of flower petals (they look like poinsettia petals to me) in Blushing Bride ink on scraps of Shimmer Paper/ Pearlescent Paper, and die cut them. I also die cut three itty bitty petals just in the Shimmer Paper/ Pearlescent Paper. I layered the two Blushing Bride petals together, adhered the smaller to the larger with a mini dimensional and added a Rhinestone Basic Jewel to the center. This was glued (liquid glue) to the card front in the corner. I then added Rhinestone Basic Jewels to the mini Shimmer Paper/ Pearlescent Paper petals and adhered two of them as you see in the photo. Love, love, love.

Merriest Moments Layered.2

OOPS! This is sideways – blast. Imagine it straight :O)

To a Basic White panel, I stamped the pine frond with VersaMark ink, sprinkled it with silver embossing powder and heat set it. I added the very last Shimmer Paper/ Pearlescent Paper mini petal to the frond with liquid glue, adhered the panel to the inside of the card and the inside was done. In fact, the whole card was done.

The envelope got a panel of Whimsy & Wonder SDSP trimmed to fit & voila! I love how this
SDSP coordinates with the silver foil on the card. And another Christmas card to my card stash for mailing Dec 1! Gosh, now that I think about it, I could begin addressing these :O)

Merriest Moments Layered.3

Now you have complete directions on how to use the Hybrid embossing folder – specifically the Merriest Moments Bundle. Not have a demonstrator so you can order? If you do not have a demonstrator and need an Annual 2021 Catalog OR Jul-Dec 2021 Mini Catalog, please reach out to me – happy to send one to you. Please also use my current host code when ordering: 26QYRFXB I offer my customers a free item from Stampin’ Up! item valued to $10 with your order of $50 and above. Click here to go my store. When the order is over $150, you still receive that free gift from me, but SU! has Stampin’ Rewards that may be used for additional products, so don’t use the host code at that time. If you have questions just let me know. If you would like to be able to order products early from catalogs AND enjoy that 20% discount, join my team now… you may do that here. We have lots of fun and are a creative bunch that encourages & supports one another. Would love to have you!

Thanks for stopping by. May you have a beautiful day. Remember: Inspire, Create, Share.

There’s nothing like a handmade card.

Card cuts:

Cherry Cobbler ~ 4 1/4 x 11 scored at 5 1/2; 4 1/4 x 5 1/2 (embossed panel)

Silver Foil Sheets ~ 4 1/4 x 5 1/2

Pearlescent Paper ~ 4 1/4 x 5 1/2 + scraps

Basic White ~ 4 x 5 1/2

Stampin’ Up! Reflected in Nature – Breathe

Whoa – it’s Oct 1! Oh my how the time has flown…. less than 90 days before Christmas. I’m stunned… and it’s chilly outside. It got down to 45 last night – definite sweater weather. Which b rings me to today’s card – a campsite, maybe fall, maybe winter with some snow. I love the scene! Today’s card is about being in the present, the now. The stamp is called Reflected in Nature. I’ve done it in two tones: Night of Navy and Balmy Blue.

Reflected in Nature – Breathe.1

My Night of Navy is very inky and I had to play with this a bit to get it as I wanted. The picture itself is quite nice and I wanted to be able to see it readily.. inked full strength it was too heavy. This is a single stamp, so in order to do the upper in one color and the lower in another, it was necessary to use a post-it note to cover one side to ink, remove the note then stamp, and follow the same procedure on the other side. This is best done with the Stamparatus. With the stamp in place it is easy to re-stamp if necessary and it’s on a Very Vanilla panel. You can see the background on the card has gone through an embossing folder – Timber 3D to be exact – perfect for the stamp. And that’s Balmy Blue card stock layered on a panel of Night of Navy. And I fussy cut around the inked picture, layered it on a strip of Night of Navy that I had torn the edges to make it look worn – to go with the natural scene. The sentiment is from the same stamp set, Reflected in Nature, and stamped in Night of Navy ink on a Very Vanilla panel. I die cut it with a label die from Harvest Dies. It was added to the card front with dimensionals. Did I mention the cabin stamp is also on dimensionals? I added three Holiday Rhinestone Jewels in navy.

Reflected in Nature – Breathe.2

On the inside Very Vanilla panel I stamped the sentiment – again from Reflected in Nature in Balmy Blue ink, then added the bird stamp in Night of Navy ink. It is really soaring! It is layered on a Night of Navy panel then adhered directly to the inside of the card.

Reflected in Nature – Breathe.3

For the envelope I ran the Night of Navy piece through the Timber 3D embossing folder then adhered it to the flap and trimmed to fit. On the front I stamped another sentiment in Night of Navy ink from Reflected in Nature stamp set. And this card is ready for someone special. It’s tailored, so easily can be masculine. I’ve another one of these I’m working on, in shades of gray.

I’ll do the product list, then I want to share something special about tomorrow – World Card Making Day and what our team is doing to celebrate it :O)

Several of our team have agreed to do a facebook live of a card they are making, including me (yikes!); there will be prizes & a game or two throughout the day… 9-5 – all on facebook. Please join us as we make some cards and have some fun!Ā  There’s a Facebook page set up to host the event.Ā 

Go toĀ https://www.facebook.com/groups/inkinkrewworldcardmakingdayĀ and Join the Page.Ā 

You will get approved, then select All Notifications so you don’t miss a thing!

World Card Making Day Inkin’ Krew FB Live Event!

2 October 2021

And below is the schedule. I can’t wait to see what everyone is doing. It’s going to be a fun day!

Not have a demonstrator so you can order? If you do not have a demonstrator and need an Annual 2021 Catalog OR Jul-Dec 2021 Mini Catalog, please reach out to me – happy to send one to you. Please also use my current host code when ordering: 26QYRFXB I offer my customers a free item from Stampin’ Up! item valued to $10 with your order of $50 and above. Click here to go my store. When the order is over $150, you still receive that free gift from me, but SU! has Stampin’ Rewards that may be used for additional products, so don’t use the host code at that time. If you have questions just let me know. If you would like to be able to order products early from catalogs AND enjoy that 20% discount, join my team now… you may do that here. We have lots of fun and are a creative bunch that encourages & supports one another. Would love to have you!

Thanks for stopping by. May you have a beautiful day. Inspire. Create. Share.

NOTHING BEATS A HANDMADE CARD!

Stampin’ Up! Picture This Christmas

about.LAST DAY OF SALE-A-BRATION!!! Can you believe it? It has gone by f-a-s-t… And, if you didn’t get all those free items, today is the last day for it. Do you need help in deciding to purchase – – or to join as a demonstrator? Let’s talk if you do… send me a message and I will do my best to answer your questions. And if I don’t know, I’ll find out.

Today’s card is, well, different. It’s a bit ‘fussy’ with bows. Don’t ask how I decided to do this, I just did. I started playing and this is the result. I have to say, it puts a smile on my face, it’s cheery. Are you full of suspence?

Picture This Christmas.1

The Whimsy & Wonder SDSP is really special. This silver and white stripe has the dark Mossy Meadow with dots on the opposite side. So when I die cut the silver & white, at first I didn’t know what to do with the cut-outs. I had no intention of using them, but you can see I DID. I sy cut the packages, put dimensionals on the back and attached them to the circles.Of course this needed a backing… Polished Pink card stock to the rescue – it brightens the whole piece. Next, what to do in the smaller circles… I had fussy cut some other items from a different sheet of the SDSP, but didn’t like them. I tied the Open Weave Polished Pink bow and liked it, then the Crinkled Seam Binding Ribbon was next. I wanted to incorporate silver somehow but the Simply Elegant Trim by itself wasn’t enough – so, I colored a length of the Crinkled Seam Binding with Blushing Bride ink, let it dry, and combined the two: Crinkled Seam Binding and the Simply Elegant Trim in Silver. Each of these is attached with a glue dot. I cut another piece of the Whimsy & Wonder SDSP and adhered it to Mint Macaron card stock, then added that to the Thick Basic White card base. The Polished Pink panel got dimensionals and was added to the card front & voila! done.

Picture This Christmas.2

For the inside I stamped the sentiment from the Whimsical Trees stamp set in Mint Macaron ink. Since I had several fussy cut pieces on the desk, I decided an ornament would be fun. But first I took the Mint Macaron Marker & drew a ‘string’ for hanging, then added the bauble with liquid glue. This was adhered to the inside of the card and voila! done again. :O)

Picture This Christmas.3


For the envelope, I stamped the tree on the front – Mint Macaron ink using the Whimsical Trees stamp set. Then on the flap I added a different pattern of the Whimsy & Wonder SDSP. Can you see where the ornament came from on the inside of the card? Fun card, different. This will have to go to someone special – the card looks better in real life – just sayin’.

Ok, what’s next – oh yes… you want to know all the products, right? Here goes…

And… here’s more info about joining my team as a demonstrator or simply order during Sale-a-bration.

Next is to talk to you about Sale-a-bration… it’s about to end ~ today is the 30th and the last day. What ARE you waiting for? Order now, even better, join my team now! When joining during Sale-a-bration, here’s what happens… join for $99, get product valued at $125 PLUS a free bundle!!! The free bundle list is just below and they are WOW bundles you won’t want to miss. You must join before the end of the day Sep 30 to get this value. You may join my team now ~ you may do that here.

Not have a demonstrator so you can order? If you do not have a demonstrator and need an Annual 2021 Catalog OR Jul-Dec 2021 Mini Catalog, please reach out to me – happy to send one to you. And when I send it, there will be a Sale-a-bration catalog in with it! (Probably not at this late date. 😦 That means more FREE items to choose from with every order of $50, or $100 or multiples of that. Please also use my current host code when ordering: R6U3VRBN. I offer my customers a free item from Stampin’ Up! item valued to $10 with your order of $50 and above. Click here to go my store. When the order is over $150, you still receive that free gift from me, but SU! has Stampin’ Rewards that may be used for additional products, so don’t use the host code at that time. If you have questions just let me know. If you would like to be able to order products early from catalogs AND enjoy that 20% discount, join my team now… you may do that here. We have lots of fun and are a creative bunch that encourages & supports one another. Would love to have you!

06.21_HEADER_SAB_ENG


It is during this period that when you place an order of $50 or increments of that, there are FREE items available in the Sale-a-bration catalog. Stampin’ Up! does not usually offer more than one sale-a-bration in a year, but this year, they DID! WooHoo – fun products too… Again, contact me if you do not have a catalog.

How do you pre-earn Sale-A-Bration products? It’s simple! For every $50 USD | $60 CAD and $100 USD | $120 CAD you spend, you’ll be able to take your pick of Sale-A-Bration products to add to your order—for free

And if you JOIN and become a demonstrator during Sale-a-bration… you have the opportunity to get one of the bundles below FREE!

OIN BUNDLE OPTIONSPRICELIMIT
156795Arctic Bears Bundle$47.50 USD | $64.75 CAD1
156819Beauty Of Tomorrow Bundle$50.25 USD | $68.25 CAD1
156801Christmas Season Bundle$54.00 USD | $73.75 CAD1
156806Christmas To Remember Bundle$60.25 USD | $81.75 CAD1
156807Frosted Gingerbread Bundle$48.50 USD | $66.50 CAD1
158609Gorgeous Leaves Bundle$44.00 USD | $60.25 CAD1
156813Nature’s Harvest Bundle$53.00 USD | $72.75 CAD1
156816Peaceful Cabin Bundle$54.00 USD | $72.75 CAD1
156391Peaceful Deer Bundle$36.00 USD | $48.50 CAD1
156789Penguin Place Bundle$31.50 USD | $42.25 CAD1
156798Sweet Little Stockings Bundle$47.50 USD | $64.75 CAD1
156810Whimsical Trees Bundle$51.25 USD | $70.00 CAD1


Those who join Stampin’ Up! during Sale-A-Bration may select one bundle from the list above to

add to their Starter Kit at no additional cost.

Joining during this sale-a-bration time allows you to create your own starter kit: $99 cost, $125 worth of product + a FREE bundle (listed above for no additional cost) + FREE Sale-a-bration items. Oh my – why pass up this deal? Join now… you may do that here.

Thanks for stopping by. May you have a beautiful day. Inspire. Create. Share.

Nothing beats a handmade card.

Stampin’ Up! You’re a Peach Birthday

Hello again… the countdown is zero minus 3 days (counting today) til the end of Sale-a-bration. Do you have all those free goodies yet? If not, better order quick. Better yet, have you become a demonstrator yet? Now is the perfect time… $99 to sign up but $125 worth of products PLUS a FREE BUNDLE ~ then as long as you are a demonstrator 20% (or more) off your purchasing price. The list of possible bundles to choose from is at the end of this post. Buy now ~ join now. šŸ‘ you may do that here.

Today’s post is a birthday card – ordered by our daughter. She said she was down to one, could you send some more please? This is the first of the batch.

You’re A Peach Birthday.1

The DSP is You’re a Peach DSP layered on Pale Papaya, then Calypso Coral that was die cut with Stitched Rectangles Dies. And that beautiful spray? It comes from Artistic Dies and Gold/ Rose Gold 6×6 DSP. Isn’t it absolutely gorgeous – the spray & the Gold? I keep forgetting I have it. I kept the card pretty simple – so mailing would be a single stamp. Postage is increasing and that’s a consideration when I make cards for an order. The Calypso Coral panel is on dimensionals. The sentiment comes from Art Gallery stamp set and was stamped in Calypso Coral ink. I added three Metallic Pearls in gold for the final touch.

You’re A Peach Birthday.2

The inside… a background layer of Calypso Coral, then the Basic White stamped layer. Since I had the Art Gallery stamp set available, I stamped the sentiment then a couple of the small flowers, stamped off Calypso Coral for the larger stamp and Pale Papaya for the second or filler stamp. I took a Micron pen and inked around the flower to give it a bit of definition. I like the added touch. I adered the Basic White panel and the card was done!

You’re A Peach Birthday.3

For the envelope, I added a panel of the same You’re a Peach DSP to the flap & trimmed it to fit – and that was it. This is a bright cheery card and puts a smile on my face ~ I hope it does yours as well. I’ll give the product list, then I’ll share the list of bundles you can get – for FREE is you join up now as a demonstrator. I would love to have you on my team 😁

Remember that Sale-a-bration is now through September 30! It’s the best time to buy (lots of free product) & JOIN ~ read on… it is ending SOON!!!

06.21_HEADER_SAB_ENG


It is during this period that when you place an order of $50 or increments of that, there are FREE items available in the Sale-a-bration catalog. Stampin’ Up! does not usually offer more than one sale-a-bration in a year, but this year, they DID! WooHoo – fun products too… Again, contact me if you do not have a catalog.

How do you pre-earn Sale-A-Bration products? It’s simple! For every $50 USD | $60 CAD and $100 USD | $120 CAD you spend, you’ll be able to take your pick of Sale-A-Bration products to add to your order—for free

And if you JOIN and become a demonstrator during Sale-a-bration… you have the opportunity to get one of the bundles below FREE!

OIN BUNDLE OPTIONSPRICELIMIT
156795Arctic Bears Bundle$47.50 USD | $64.75 CAD1
156819Beauty Of Tomorrow Bundle$50.25 USD | $68.25 CAD1
156801Christmas Season Bundle$54.00 USD | $73.75 CAD1
156806Christmas To Remember Bundle$60.25 USD | $81.75 CAD1
156807Frosted Gingerbread Bundle$48.50 USD | $66.50 CAD1
158609Gorgeous Leaves Bundle$44.00 USD | $60.25 CAD1
156813Nature’s Harvest Bundle$53.00 USD | $72.75 CAD1
156816Peaceful Cabin Bundle$54.00 USD | $72.75 CAD1
156391Peaceful Deer Bundle$36.00 USD | $48.50 CAD1
156789Penguin Place Bundle$31.50 USD | $42.25 CAD1
156798Sweet Little Stockings Bundle$47.50 USD | $64.75 CAD1
156810Whimsical Trees Bundle$51.25 USD | $70.00 CAD1

Those who join Stampin’ Up! during Sale-A-Bration may select one bundle from the list above to

add to their Starter Kit at no additional cost.

Joining during this sale-a-bration time allows you to create your own starter kit: $99 cost, $125 worth of product + a FREE bundle (listed above for no additional cost) + FREE Sale-a-bration items. Oh my – why pass up this deal? Join now… you may do that here.

Thanks for stopping by. May you have a beautiful day. Inspire. Create. Share.

Nothing beats a handmade card.

Stampin’ Up! Simply Elegant and Wonderful Snowflakes

Hi everyone… a bit late today… it’s Monday and a sailing day and silly me didn’t get this written & scheduled last night… but here I am. Today’s card is made with the Simply Elegant DSP, Gold Shimmer Vellum (from the Jul-Dec Mini 2021 Catalog and Encircled in Beauty Dies plus one or two other items. I hadn’t broken open the Encircled in Beauty Dies and am so disappointed I haven’t used them more – they are, well, beautiful :O]

Simply Elegant DSP w/ Wonderful Snowflakes.1

This is such an easy layout to ‘change up’. Besides the Simply Elegant DSP which is a major focus, there is also the Wonderful Snowflake and the background for it is a die cut from Gold Shimmer Vellum using one of the Encircled in Beauty Dies. Another addition is 7/8″ wide Textured Ribbon in Smoky Slate – lots of grays & golds going on here. The special touch is the Silver Embossing Powder for the sentiment. To me, that really brings it all together. The sentiment comes from Snowflake Wishes stamp set. Card cuts will be listed at the bottom of this post.

Simply Elegant DSP &
Wonderful Snowflakes.2

For the inside, more snowflakes from Snowflake Wishes stamp set stamped n a Basic White panel with VersaMark ink, covered with Silver Embossing Powder and heat set. The snowflakes add a finishing touch to the inside – and I didn’t feel another sentiment was necessary, but it would be easy enough to do. Adhere panel to the inside of the card and that’s it!

Simply Elegant DSP & Wonderful Snowflakes.3

The flap got more of the same Simply Elegant DSP trimmed to fit. The front of the envelope got more of the snowflakes from Snowflake Wishes stamp set… stamped w/ VersaMark, covered with Silver Embossing Powder & heat set. And it’s ready for Christmas mailing 😁 This puts me at 31 Christmas cards… more to make with a goal of 100! I’m not good at mass producing, meaning… I don’t like to do it. I certainly can and may have to resort to it, but not yet.

Next is to talk to you about Sale-a-bration… it’s about to end ~ today is the 27th and the last day is Sep 30. What ARE you waiting for? Order now, even better, join my team now! When joining during Sale-a-bration, here’s what happens… join for $99, get product valued at $125 PLUS a free bundle!!! The free bundle list is just below and they are WOW bundles you won’t want to miss. You must join before the end of the day Sep 30 to get this value. You may join my team now ~ you may do that here.

Not have a demonstrator so you can order? If you do not have a demonstrator and need an Annual 2021 Catalog OR Jul-Dec 2021 Mini Catalog, please reach out to me – happy to send one to you. And when I send it, there will be a Sale-a-bration catalog in with it! (Probably not at this late date. 😦 That means more FREE items to choose from with every order of $50, or $100 or multiples of that. Please also use my current host code when ordering: R6U3VRBN. I offer my customers a free item from Stampin’ Up! item valued to $10 with your order of $50 and above. Click here to go my store. When the order is over $150, you still receive that free gift from me, but SU! has Stampin’ Rewards that may be used for additional products, so don’t use the host code at that time. If you have questions just let me know. If you would like to be able to order products early from catalogs AND enjoy that 20% discount, join my team now… you may do that here. We have lots of fun and are a creative bunch that encourages & supports one another. Would love to have you!

First – the list of products from today’s card. THEN the list of FREE Bundles available when you join as a demonstrator before the end of Sep 30.

Remember that Sale-a-bration is now through September 30! It’s the best time to buy (lots of free product) & JOIN ~ read on… it is ending SOON!!!

06.21_HEADER_SAB_ENG


It is during this period that when you place an order of $50 or increments of that, there are FREE items available in the Sale-a-bration catalog. Stampin’ Up! does not usually offer more than one sale-a-bration in a year, but this year, they DID! WooHoo – fun products too… Again, contact me if you do not have a catalog.

How do you pre-earn Sale-A-Bration products? It’s simple! For every $50 USD | $60 CAD and $100 USD | $120 CAD you spend, you’ll be able to take your pick of Sale-A-Bration products to add to your order—for free

And if you JOIN and become a demonstrator during Sale-a-bration… you have the opportunity to get one of the bundles below FREE!

OIN BUNDLE OPTIONSPRICELIMIT
156795Arctic Bears Bundle$47.50 USD | $64.75 CAD1
156819Beauty Of Tomorrow Bundle$50.25 USD | $68.25 CAD1
156801Christmas Season Bundle$54.00 USD | $73.75 CAD1
156806Christmas To Remember Bundle$60.25 USD | $81.75 CAD1
156807Frosted Gingerbread Bundle$48.50 USD | $66.50 CAD1
158609Gorgeous Leaves Bundle$44.00 USD | $60.25 CAD1
156813Nature’s Harvest Bundle$53.00 USD | $72.75 CAD1
156816Peaceful Cabin Bundle$54.00 USD | $72.75 CAD1
156391Peaceful Deer Bundle$36.00 USD | $48.50 CAD1
156789Penguin Place Bundle$31.50 USD | $42.25 CAD1
156798Sweet Little Stockings Bundle$47.50 USD | $64.75 CAD1
156810Whimsical Trees Bundle$51.25 USD | $70.00 CAD1


Those who join Stampin’ Up! during Sale-A-Bration may select one bundle from the list above to

add to their Starter Kit at no additional cost.

Joining during this sale-a-bration time allows you to create your own starter kit: $99 cost, $125 worth of product + a FREE bundle (listed above for no additional cost) + FREE Sale-a-bration items. Oh my – why pass up this deal? Join now… you may do that here.

Thanks for stopping by. May you have a beautiful day. Inspire. Create. Share.

Nothing beats a handmade card.

Card cuts for today’s card:

  • Basic Gray card base 8 1/2 x 5 1/2 scored at 4 14
  • Basic White 4 1/8 x 5 3/8; 4 x 5 1/4 (inside)
  • Simply Elegant DSP 2 x 4
  • Shimmer Vellum in Gold 3 x 3 for die cut