How’s everybody? Are you feeling as though things are getting a wee bit back? Maybe not so scary but still cautious and careful? Well, I do. Maybe it’s because it’s Spring and so much new life in nature, but somehow I feel more secure. Oh yes, still wearing a mask, still not going out much, still washing hands all the time, but I have a very positive feeling. And I’m grateful… about all kinds of things. What do you think about making a grateful list? Be detailed, name exactly what it is or who it is. Ok – don’t know why I got off on a kick like that, but no apologies for it. There are some good things that have come out of Covid. Yes, some not so good as well, but my focus is on the good. So – happy Friday!
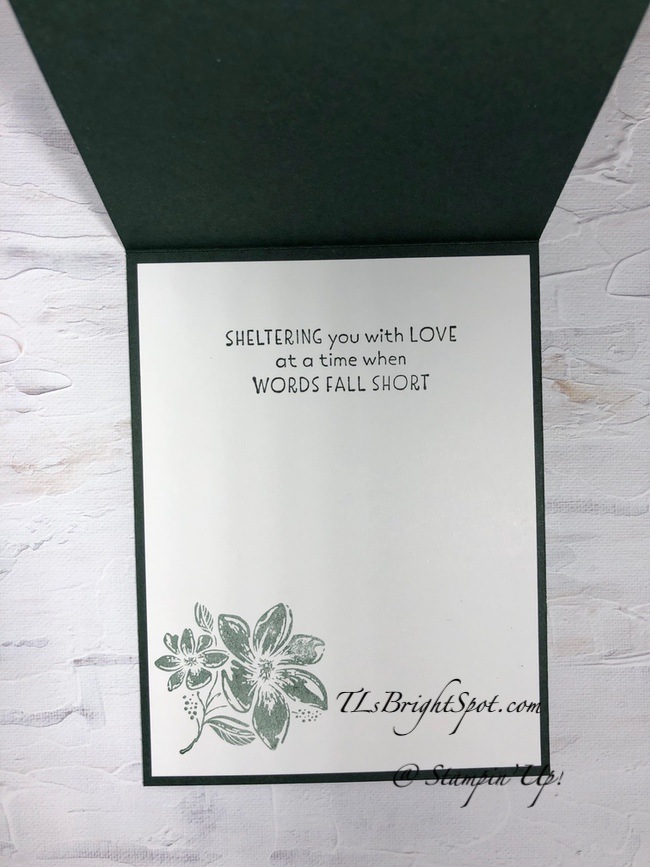
Despite being grateful, we still have loss. Today’s card is one of sympathy and it’s made by a canopy of trees. Yes, this is a NEW 2021-2022 bundle called Inspired Thoughts that includes the Inspiring Canopy Dies. Let’s take a look at the card.

I wanted this to be spring trees in bloom – so imagine that, would you? And that’s a flowering shrub by the sentiment. Imagination is a wonderful thing, isn’t it. I created a bit of sky by using my Blending Brushes on the Basic White panel. I first used Balmy Blue ink, then I moved to Misty Moonlight and that gave me the effect I wanted. These trees are all one die and I die cut them in Soft Suede card stock.. And the leaves/ flowers on the trees are four different dies and I cut several of them. They are from Beauty of the Earth DSP. I’ve left open branches cuz when I look at the trees around us, there are several that have no leaves or flowers. And that’s the way these trees are.
One of the neat aspects of this die set is the trees are connected by a ‘rolling’ ground and included in the set is a curvy die. That is what has created this wonderful rolling green landscape. I used Granny Apple Green card stock to cut two panels. They actually cover the connecting ‘ground’ of the trees cuz that was Soft Suede and I wanted a spring grass – bright and new. Everything is adhered to the card base with liquid glue – I just didn’t flatten the canopy.
The sympathy banner wording is from the stamp set Inspired Thoughts and is stamped on a Basic White panel with Soft Suede ink. I die cut the banner with a Stitched Rectangle Die. This was adhered with dimernsionals at the top of the banner and a dab of liquid glue along the bottom. I added sever Champagne Rhinestones to make it look as though the flowers were being blown off by the wind – and yes, for a bit of glam as well :). This panel was attached to a slightly larger piece of Mossy Meadow card stock with liquid glue. I put dimensionals on the back and attached it to a Thick Basic White card base.

For the inside, I used my Blending Brush again and lightly covered the Basic White panel with just Misty Moonlight ink this time. I stamped the sentiment from Inspired Thoughts stamp set in Soft Suede ink. This panel was adhered to Mossy Meadow, then to the inside of the card with liquid glue. And the card was done!

For the envelope i used a stamp set called Etched In Nature. Unfortunately there have been some difficulties with this set and it will not be sold, even though it is in the new catalog. I should not have used it. 😦 There are some other beautiful butterfly stamps – Positive Thoughts is one of them. I used butterflies as they are a symbol of new life, a rebirth. And when we die, there is a rebirth of our souls in another place. That’s what the butterfly signifies for me. It was stamped in Misty Moonlight ink.
Most of today’s items to make this card will be available come May 4 for customers. Other items, card stock and the inks used, the rhinestones and Blending Brushes are orderable now. If you do not have a demonstrator and would like a catalog, please contact me… TLsBrightSpot@gmail.com. I have more catalogs that just arrived 👍 Other products that CAN be ordered and be ready to make this card may be found below. I’ve made it easy for you to simply ‘add all’ to your cart 🙂 Please use my current HOST CODE 2HWX9GEA that is good Apr 16-30.


Thanks for stopping by.
May you have a beautiful day.
Make some happy sending them a handmade card filled with love.