
So, I’ve played again with the Color & Contour Bundle, die cut some flowers, added some DSP and made two cards. The design was taken primarily from another demonstrator – Amy Koenders, cuz I really like her card, but I wanted to make it my own – so chose different colors etc. and here’s what I did. Thank you Amy, for the inspiration!
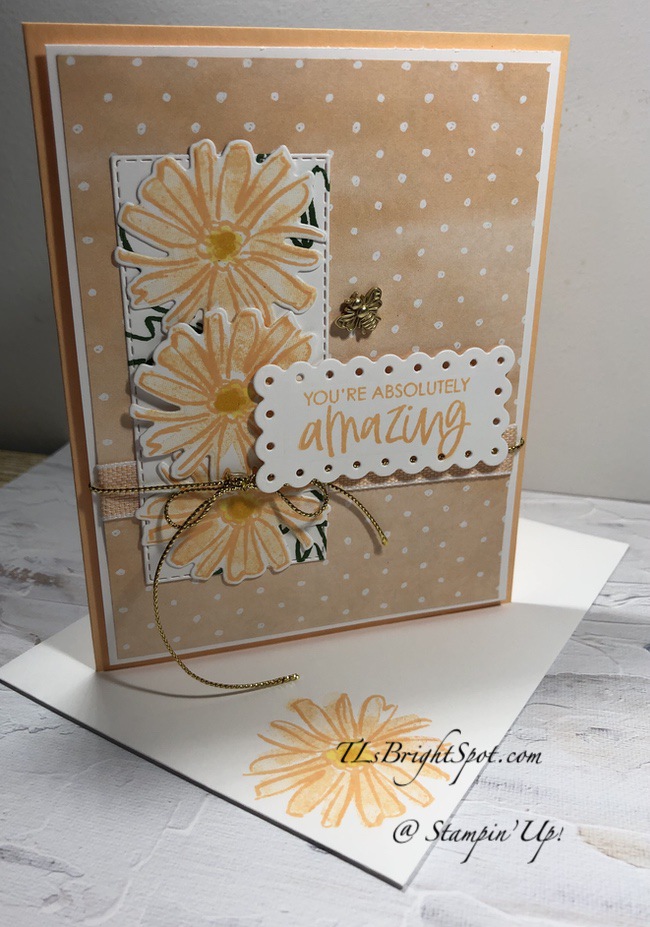


Aren’t these fun? So… same layout, different In Colors, different DSP, different ribbon, different card stock. I REALLY like how these turned out. Change the sentiment and you could do this card for just about anything – except masculine 🙂 NOT a man card at all…
Here’s what I did… I made two cards simultaneously, doing all the stamping for each card, just in different colors.
- Cut a panel of DSP (3 7/8 x 5 1/8) and adhere to a slightly larger panel (4 x 5 1/4) with liquid glue.
- For the Pale Papaya card I used Hand-Penned DSP and adhered it to Basic White
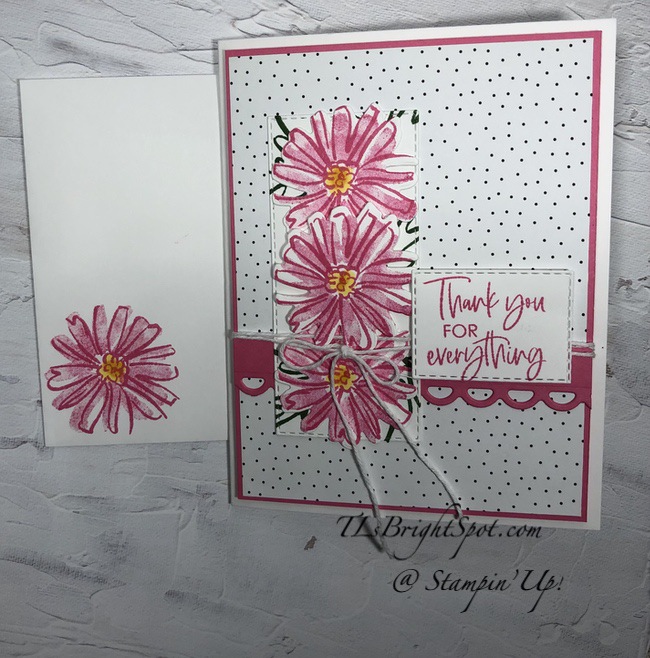
- For the Polished Pink card, I used Pattern Party DSP and adhered it to Polished Pink card stock
- Stitched Rectangle Dies to die cut a Basic White panel – die cut 2
- Stamp the open leaf from the Color & Contour stamp set in Garden Green ink, randomly on the die cut panel, about 4 times. Set aside. Do 2 of these.
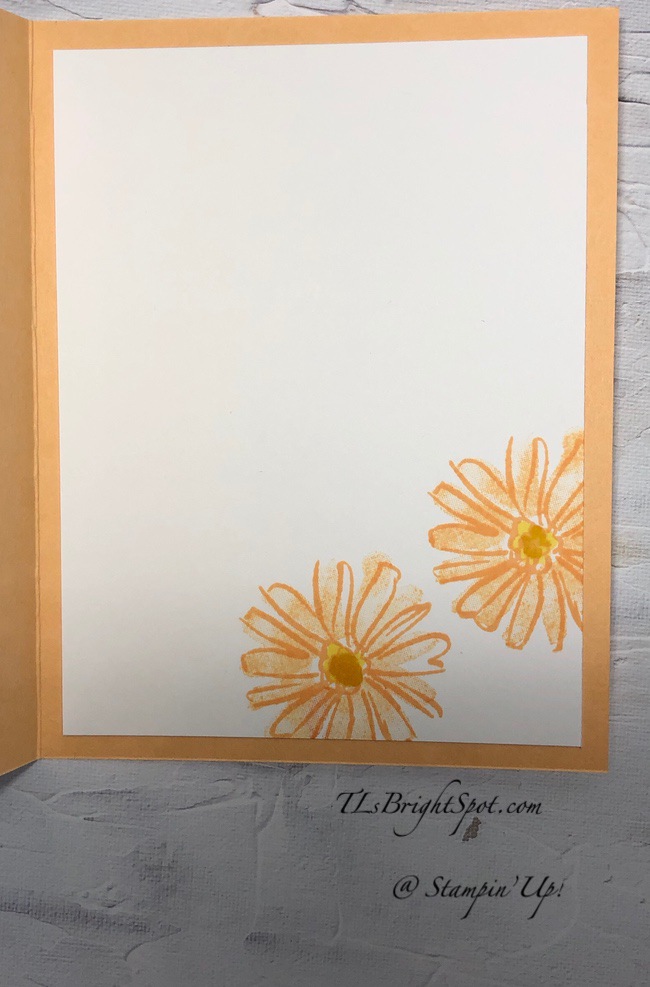
- On another piece of Basic White card stock (about 2 x 5) stamp 3 flowers in outline form using Pale Papaya ink. On a panel 4 x 5 1/4, stamp the two flowers (this is for the inside)
- Stamp this same flower on the envelope front – yep, Pale Papaya ink
- Now do the same thing using Polished Pink ink: 3 flowers on the 2 x 5 Basic White panel, 2 flowers on the 4 x 5 1/4 and one on the front of the envelope.
- Now go back to the Pale Papaya ink and stamp the filler for the flowers, stamping off once each time: ink, stamp off, stamp on the paper
- Fill in the Polished Pink flowers in the same way: ink, stamp off, stamp on the paper.
- Die cut the 3 flowers on the 2 x 5 panel: both Pale Papaya & the Polished Pink.
- Adhere two flowers to each die cut & stamped rectangle with Stampin Seal. Adhere the center flower with a single dimensional
- Add trim to the DSP panel:
- for the Pale Papaya card I added Woven 1/2″ Ribbon in Pale Papaya, securing in back with Seal+
- for the Polished Pink card I die cut the fun scallop with the largest scallop rectangle in the Scalloped Contour Dies and adhered it with liquid glue
- Adhere the Stitched Rectangle that now has the 3 flowers on it to the DSP panel, adhering with Seal+
- Wrap each front with ribbon:
- for the Pale Papaya card I used a new Simply Elegant Trim in gold, wrapped it around the DSP panel and made a bow, tying it over the flowers. I adhered the bow with a glue dot.
- for the Polished pink card I wrapped Snail Mail Twine in White around the DSP panel twice and tied a bow, securing it with a glue dot.
- Create the sentiment panel for each card:
- for the Pale Papaya card the sentiment is stamped in Pale Papaya ink on a Basic White piece and die cut with one of the Scalloped Contour Dies. I put dimensionals on the back and adhered it to the card front.
- For the Polished Pink card the sentiment is stamped in – what else – Polished Pink – and die cut with a Stitched Rectangle Die. Again, Put dimensionals on the back and adhere to the card front.
- For a final touch on the Pale Papaya card, I added a Bumblebee trinket to bring out the gold cord.
- These front panels are adhered to their appropriate card bases with dimensionals – and the card front is complete.
For the inside of the card… the Basic White panels have already been created by doing all the stamping at once – yay.
- For the Pale Papaya card, adhere the inside Basic White panel with liquid glue to the card base and voila – Done!
- For the Polished pink card, adhere the Basic White panel to a slightly larger Polished Pink card stock (4 x 5 1/4) with liquid glue then into the inside of the card – and voila – Done!

You can see in the photo above the stamped envelope which we created when doing all the initial stamping. For the pale Papaya card I added more of the Hand-Penned DSP to the envelope flap. Fun! Love these cards!
Pretty soon (May 4) customers will be order from the NEW 2021-2022 ANNUAL CATALOG. If you do not have a demonstrator and need a catalog, I’m happy to send you one. Just let me know 😁.
I’m also doing a Designer Series Paper Share. What a great way to play with all the new papers without having to purchase all them.
Trying some of the NEW Designer Series Paper from the 2021-2022 Annual Catalog gets you in the spirit of creating with some gorgeous papers. I’m offering a Designer Series Paper share from that Annual Catalog and it would be my pleasure to supply you! I‘ll place my share order early on May 4 and use the expedited shipping option so I should be able to have the shares cut, bundled and back out to you that very next week. Please place your order with me by May 2 @ 9 PM ET.
TLsBrightSpot 2021-2022 Annual Catalog
Designer Series Paper Shares!
New Designer Series Paper Share – $55.00 plus $7.75 for Priority Mail shipping
You will receive one 6×6 sheet of each design from the following DSP packs (the number behind the name indicates how many 6×6 sheets of that paper pack you will receive):
- Beauty Of The Earth – 6
- Bloom Where You’re Planted – 6
- Expressions In Ink Specialty – 6
- Hand-Penned – 6
- In The Wild – 6
- Pansy Petals – 6
- Simply Elegant Specialty – 6
- Sweet Symmetry – 6
- Tidings Of Christmas 6″ x 6″ – 6
- You’re A Peach – 6
- 2020-2022 In Color 6″ x 6″ – 10
- 2021-2023 In Color 6″ x 6″ – 10
- Brights 6″ x 6″ – 20
- Neutrals 6″ x 6″ – 20
- Regals 6″ x 6″ – 20
- Subtles 6″ x 6″ – 20
- Ombre Specialty – 4 (one of each color)
- 2021-2023 In Color Shimmer Vellum – 5 (one of each color)
- Gold & Rose Gold 6″ x 6″ – 2 (one of each color)
- Linen Specialty – 1
- Ombre Gift Bags – 5 (one of each color)
In all, you’ll receive 172 – 6” x 6” sheets of designer or specialty paper plus the awesome food safe gift bags!
Double DSP Share – $110 + $8 Shipping by Priority Mail – if you’d like double shares of the designer paper, I can do that as well. The designer paper sheets will be cut into 6×12 so that you’ll be able to get 3 full A2 size card fronts from each sheet (Tidings Of Christmas, 2020-2022 In color, 2021-2023 In Color, Brights, Neutrals, Regals, Subtles and Gold & Rose Gold 6×6, you’ll get double sheets of those since they’re already precut).
FREE Gift from me! – As a bonus for joining my share, you’ll get a sampling of the new host exclusive Pattern Party 12″ x 12″ Designer Series Paper!
Anyone is welcome to join in my share (please note, I can only ship to addresses within the US). If you’d like to join, either complete the form below or email the following information to tlsbrightspot@gmail.com.
- Your first and last name
- Your share selection
- The email address that is connected to your Paypal account. I only accept Paypal for payment unless you are a customer of mine. If you are a customer, I will accept payment by check. ***You do not need to have a Paypal account to pay the invoice, you can choose to pay by credit card without having a Paypal account.
Deadline to sign up for my share is Sunday, May 2 at 9:00 PM ET.
I hope you enjoyed today’s post. Love reading your comments, thank you very much!
Thanks for stopping by.
May you have a beautiful day.
Make someone happy sending them a handmade card filled with love.

So cute! Love the addition of the bee! Pretty colors too! 🙂
LikeLiked by 1 person
Thanks Amy!
LikeLike