Stampin’ Up! Butterfly Brilliance Love

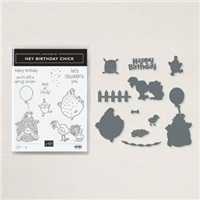
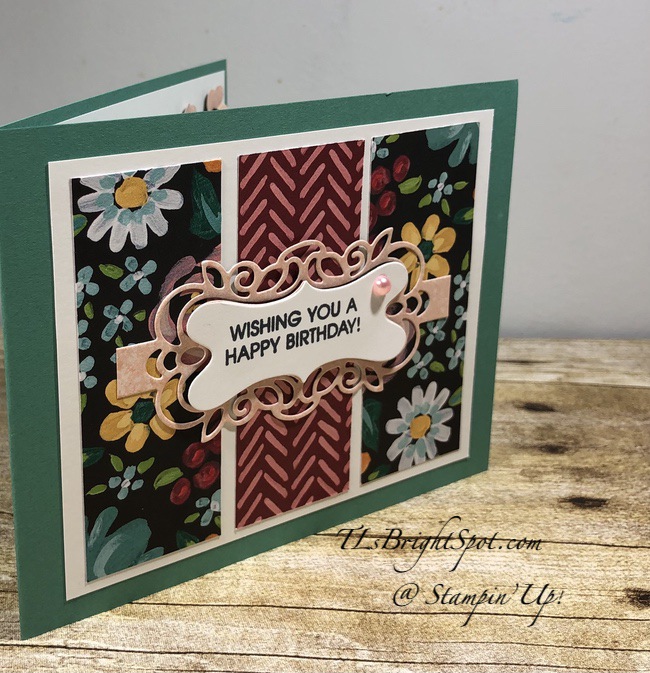
OOOh – Stampin’ Up! has a preorder available to demonstrators of a stamp collection called Butterfly Brilliance Collection – and of course it features butterflies… yeah, who would guess that! :O) My set arrived and I dug right in… here’s what I created.

Butterfly Brilliance Love – #1

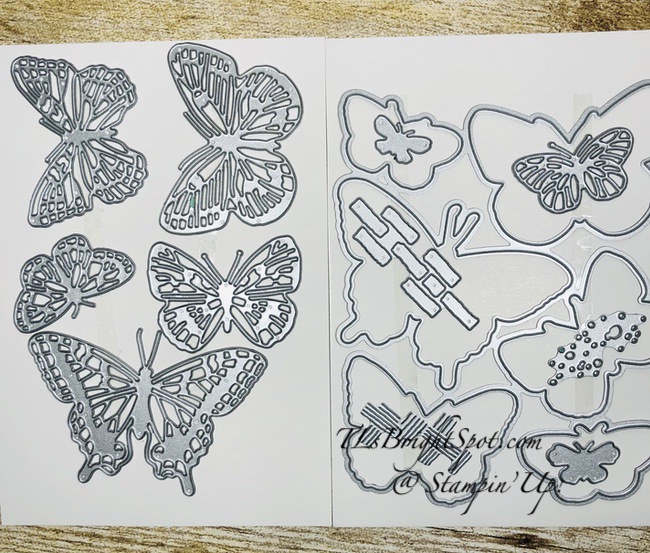
Two of the butterflies on this card were die cut from one of the papers, as I mentioned earlier could be done. The third butterfly is much more detailed and is cut from Vellum – so delicate and lovely. And please notice the little splotches of holes in the background DSP – that is another of the dies in the set.

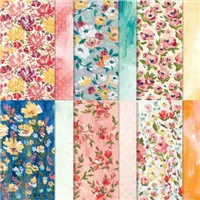
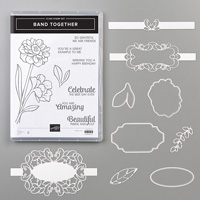
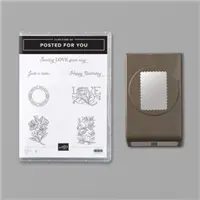
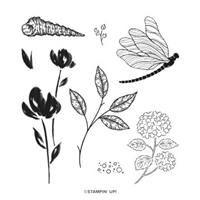
One of the neat things about this collection is the Designer Series Papers – and one of them fits the die perfectly! Another cool thing is the outline of the butterflies is all one die but cuts several individual butterflies – similar to the Many Messages dies. Here’s the stamp set and the dies also.

Isn’t this bundle fabulous? If you join my team NOW – you can get this as part of your starter kit :O) Just sayin’… you may do that here. Back to putting this card together…

  • Bermuda Bay card stock is the card base
  • Die cut at least three ‘splotches’ using a die from the Brilliant Wings dies from the Butterfly Bijou 6×6 DSP. Add this layer of DSP to cover entire front of card, adhering with liquid glue
  • Layer another panel of the Butterfly Bijou 6×6 to a slightly larger panel of Bermuda Bay card stock – adhering with liquid glue. put on dimensionals and add to card front.
  • Die cut butterflies from the Butterfly Bijou 6×6 DSP that matches the line-up of the dies. This will give you six cut butterflies!
  • Put dimensionals on one of the butterflies and adhere to front. Add other butterfly with liquid glue.
  • Die cut the detail butterfly out of Vellum and adhere either with liquid glue or a glue dot. HINT: If using liquid glue, cover the entire center body with the glue, smoothing it. With the entire center body covered, the glue does not seem to show.
  • Stamp the sentiment with VersaMark ink on a strip of Bermuda Bay, cover with White Embossing powder and heat to set. Attach with liquid glue and a dimensional at the far right end (for balance)
  • Add three Artistry Blooms Adhesive-Backed Sequins and the card front is done!
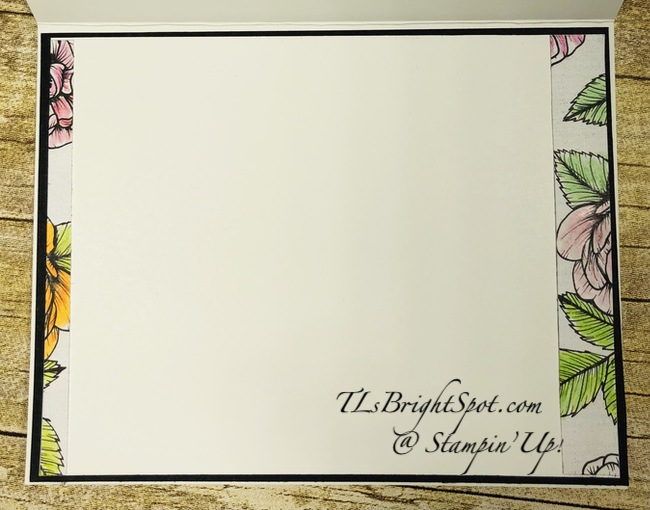
For the inside…

Butterfly Brilliance Love – #2
  • Stamp the butterfly in Smoky Slate ink on a panel of Basic White card stock.
  • Adhere to the inside panel and the card is complete…
Butterfly Brilliance Love – #3

For the envelope…

  • Cover the envelope flap with Butterfly Bijou 6×6 DSP using liquid glue, trim to fit
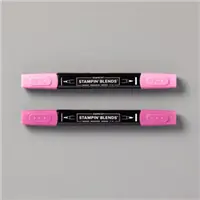
  • Stamp the design from Posted For You stamp set in Smoky Slate ink and color with Blends: Magenta Madness, So Saffron & Just Jade. HINT: when coloring on an envelope with Blends, be certain there is a large scrap in the envelope so it does not bleed through. VOILA! Card cuts are listed at the bottom of this post.

Products for todays card are from the 2020-2021 Annual Catalog and also a promotional release to demonstrators You will find them in the product list below. As a reminder… I’ve made it easy for you to simply ‘add all to cart.’ If I can help you in any way to order these items, or others, please give me a holler. As a thank you to my customers, when the order is between $50-$150 I offer a SU! item of your choice valued at $10. Remember to use MY CURRENT HOST CODE WZBPZ7N4- good Feb 4 – Feb 28. When the order is over $150, you still receive that free gift from me, but SU! has Stampin’ Rewards that may be used for additional products, so don’t use the host code at that time. Now is also Sale-a-bration – a time from now through the end of February when Stampin’ Up! offers FREE items with $50 and $100 purchases. Those products are shown below today’s product list as well. Happy shopping!

Sale-a-bration items FREE with $50 purchase – Level 1

Sale-a-bration items FREE with $100 purchase – Level 2

And receive FREE when you HOST a $300 order during Sale-a-bration

Also available when you HOST a $300 order…

Now is the perfect time to become a team member of Stampin’ Up! – with your choice of items in your $99 Starter Kit (valued at $125!) you will receive five packs of new 6×6 DSP paper packs – only during Sale-a-bration though!!! Act quickly… join my Team here. Being a part of the Stampin’ community brings all kinds of fringe benefits ~ early access to new catalogs, guaranteed 20% discount on all Stampin’ Up! products, free tutorials, access to web sites that will encourage and strengthen your abilities. Join now… Again – you may do that here.

Thanks for stopping by.

May you have a beautiful day.

Make someone happy sending them a handmade card filled with love.

Card Cuts for today’s project:

  • Bermuda Bay 4 1/4 x 11 scored at 5 1/2 + 1/2 x 3 for sentiment + 3 1/2 x 5
  • Butterfly Bijou 6×6 DSP 4 1/4 x 5 1/2; 3 3/8 x 4 7/8; 2 1/4 x 6 (envelope flap)
  • Butterfly Bijou 6×6 DSP for die cut butterflies

Stampin’ Up! Darling Donkeys

Hello. It’s snow again today and it’s coming down in big flakes and sticking! We may get as much as 4-5″ and interestingly, the northern part of the state is to get LESS! Imagine… todays card… features the Darling Donkeys stamp set and Well Suited DSP. I totally cased a layout and some ideas from another demonstrator but changed up several other parts of the card.

Darling Donkeys – #1

I am smitten with these donkeys ~ maybe because they are somewhat sassy-looking and fun-loving. The stamp set is FREE during Sale-a-bration when you purchase $50 worth of product ~ and Sale-a-bration ends Feb 28. Let’s talk through how I created this card.

  • The plaid pattern of this Well-Suited DSP is layered on a a panel of Basic White with liquid glue, then onto the Pacific Point card base with liquid glue as well.
  • The dotted pattern of this DSP was given additional color with a Poppy Parade Blends by adding dots of color where the white dots were. It was then layered on a panel of Basic White, after punching one end with the Tag Topper Punch. It was adhered to the card front with liquid glue.
  • The Poppy Parade piece of the Well Suited DSP was adhered to a panel of Basic White then adhered to the card front… dimensionals on the right side of the strip only.
  • Die cut a circle with the largest of the Stitched Shapes Dies – out of Basic White card stock. Stamp the donkey in Saddle Brown Memento ink then the sentiment in Night of Navy ink and the fun little sparklers in Poppy Parade ink. (It might look better if the donkey were stamped in Memento Black ink!) I added the Artistry Blooms Adhesive-Backed Sequins to the center of each sparkler cluster. This was attached to the card front with dimensionals only on the left side of the circle – to balance the heights of the card stocks.
  • Finally I stamped another donky on a scrap of Basic White – again in the Saddle Brown (this topo would look better in Memento Black ink!). I colored this donkey with Smoky Slate Belnds and added some Poppy Parade Blends to the feet and hair. This donkey was added with dimensionals – and the card front was complete.
Darling Donkeys – #2
  • On the inside I used Light Smoky Slate to color a space, then stamped the sentiment from Darling Donkeys stamp set in Night of Navy ink.
  • I stamped the donkey in Memento Black ink and colored the rose with Poppy Parade Blends and Granny Apple Green Blends.
  • This was adhered to the inside of the card with liquid glue and the card was done!
Darling Donkeys – #3

For the envelope, I took the plaid of the Well Suited DSP and adhered it to the envelope flap, trimmed to fit. I stamped the sentiment in Night of Navy ink and the set was done and ready for a receiver :O)

Darling Donkeys – #4

I think this card will put a smile on someone’s face when they receive it. How could they not? The faces are just too cute! Card cuts are listed at the bottom of this post.

Products for todays card are from the new Jan-Jun 2021 Mini Catalog and the 2020-2021 Annual Catalog ~ and those products are available now for purchase. You will find them in the product list below. As a reminder… I’ve made it easy for you to simply ‘add all to cart. If I can help you in any way to order these items, or others, please give me a holler. As a thank you to my customers, when the order is between $50-$150 I offer a SU! item of your choice valued at $10. Remember to use MY CURRENT HOST CODE WZBPZ7N4- good Feb 4 – Feb 28. When the order is over $150, you still receive that free gift from me, but SU! has Stampin’ Rewards that may be used for additional products, so don’t use the host code at that time. Now is also Sale-a-bration – a time from now through the end of February when Stampin’ Up! offers FREE items with $50 and $100 purchases. Those products are shown below today’s product list as well. Happy shopping!

Sale-a-bration items FREE with $50 purchase – Level 1

Sale-a-bration items FREE with $100 purchase – Level 2

And if you HOST a party or have products totaling $300 during Sale-a-bration…

Now is the perfect time to become a team member of Stampin’ Up! – with your choice of items in your $99 Starter Kit (valued at $125!) you will receive five packs of new 6×6 DSP paper packs – only during Sale-a-bration though!!! Act quickly… join my Team here. Being a part of the Stampin’ community brings all kinds of fringe benefits ~ early access to new catalogs, guaranteed 20% discount on all Stampin’ Up! products, free tutorials, access to web sites that will encourage and strengthen your abilities. Join now… Again – you may do that here.

Thanks for stopping by.

May you have a beautiful day.

Make someone happy sending them a handmade card filled with love.

Card Cuts for todays project…

  • Pacific Point 4 1/4 x 11 scored at 5 1/2
  • Basic White 4 x 5 1/4 (2) + 2 1/8 x 4 3/8, 1 3/8 x 4 3/8 + about 3″ square for circle die cut & scrap for donkey
  • Well Suited DSP: Plaid – 3 7/8 x 5, dots 2 x 4 1/4, Poppy panel 1 1/4 x 4 1/4

Stampin’ Up! You Are Amazing…

Todays card is a fun birthday card made with the You Are Amazing stamp set, but highlighting the Ice Cream Corner DSP. You see, I have a twin brother – ta da – and our birthday is soon – and I wanted a special card for him. He does amazing craftsmanship: woodworking, refinishing, hand carving fish and ducks. And the theme this month for the blog hop is ‘birthday’ so it fits! You are going to see some wonderful cards on the hop today, so let’s get started.

You Are Amazing – #1

My background paper is the Ice Cream Corner DSP and I ran it through the Cut & Emboss machine with the Stitched with Whimsy Dies., then layered it on a panel of Old Olive card stock at an angle, adhering with liquid glue.

In the photos above you can easily see the Stitched with Whimsy Dies markings. It doesn’t cut the paper, but embosses it – such a fun treatment!

Next I stamped the sentiment ‘happy birthday’ from the stamp set You Are Amazing in Bermuda Bay ink on Soft Sea Foam card stock then cut it apart. Each letter of the word ‘happy’ was adhered to a different color of card stock with liquid glue: h on Bermuda Bay, A on Soft Sea Foam, large p on Pear Pizzazz, small p on Old Olive and the y on Pool Party. I then die cut the banner from Sahara Sand card stock using the Floral Heart Dies. This is such a cool banner! It’s too bad it’s so covered.

The word ‘birthday’ was still lying on my desk, so I adhered it to a strip of Basic White card stock with liquid glue and trimmed the ends. I also had a thin strip of the Ice Cream Corner DSP that I used for the background on the card and just turned it over for the extra fun dots and great coordination, and adhered it to the back of the Basic White to set it off.

I adhered the Sahara Sand banner to the card front with liquid glue, folding in the ends then began placing the individual ‘happy’ letters , some going over others and some under ~ all adhered with liquid glue. The ‘birthday’ strip was added with dimensionals on the bottom half and a bit of liquid glue to attach to the banner. You can clearly see, the small p was the last letter to be attached. The completed front panels were adhered to a Bermuda Bay card base and the card front was complete.

You Are Amazing – #4

For the inside… I did a wash with just a bit of water using the widest brush of the Water Painters and Bermuda Bay ink on Basic White card stock and set it aside to dry. Once dry I stamped the sentiment from the You Are Amazing stamp set in Bermuda Bay ink, then added another narrow strip of the Ice Cream Corner DSP to carry the theme from the card front. I adhered this to a panel of Old Olive card stock with liquid glue, then into the Bermuda Bay card ~ and the card was done!

For he envelope …I stamped just the balloon portion from the Hey Birthday Chick stamp set in Old Olive ink to the front. i used the Pool Party Blends to color it lightly, then covered the balloon using the Fine Tip Glue Pen. You must allow this to fully dry without touching it! Once dry, this gave the balloon a nice glossy appearance 🙂

You
Are Amazing with Hey Birthday Chick balloon – #5

For the envelope flap I adhered a panel of the Ice Cream Corner DSP with liquid glue and trimmed to fit.

You Are Amazing stamp set – #6

I hope my brother likes this card as I had extra fun creating it for him. 🤗 Products for todays card are from the new Jan-Jun 2021 Mini Catalog and the 2020-2021 Annual Catalog ~ and those products are available now for purchase. You will find them in the product list below. As a reminder… I’ve made it easy for you to simply ‘add all to cart. If I can help you in any way to order these items, or others, please give me a holler. As a thank you to my customers, when the order is between $50-$150 I offer a SU! item of your choice valued at $10. Remember to use MY CURRENT HOST CODE WZBPZ7N4- good Feb 4 (today) – Feb 28. When the order is over $150, you still receive that free gift from me, but SU! has Stampin’ Rewards that may be used for additional products, so don’t use the host code at that time. Now is also Sale-a-bration – a time from now through the end of February when Stampin’ Up! offers FREE items with $50 and $100 purchases. Those products are shown below today’s product list as well. Happy shopping!

Sale-a-bration items FREE with $50 purchase – Level 1

Sale-a-bration items FREE with $100 purchase – Level 2

And if you HOST a group of orders totaling at least $300 during Sale-a-bration

Now is the perfect time to become a team member of Stampin’ Up! – with your choice of items in your $99 Starter Kit (valued at $125!) you will receive five packs of new 6×6 DSP paper packs – only during Sale-a-bration though!!! Act quickly… join my Team here. Being a part of the Stampin’ community brings all kinds of fringe benefits ~ early access to new catalogs, guaranteed 20% discount on all Stampin’ Up! products, free tutorials, access to web sites that will encourage and strengthen your abilities. Join now… Again – you may do that here.

Card cuts for todays project:

Bermuda Bay card base 8 1/2 x 5 1/2 scored at 4 1/4

Old Olive card stock 4 x 5 1/4 (2)

Ice Cream Corner DSP 4 x 5 1/4 + 2 1/4 x 6 + strips

Basic White 4 x 5 1/4 + scrap for banner

Sahara Sand – 1 1/2 x 6 for banner

Now – on with the blog hop. If you desire to go forward, please use this button:

And if you desire to go back to the prior post, use this button:

Thanks for stopping by.

May you have a beautiful day.

Make someone happy sending them a handmade card filled with love.

Stampin’ Up! Celebrate Sunflowers

Ah, Super Bowl day… do you have a favorite team to win today? I’ll be honest, I don’t, but I will watch and cheer one of them. This has not been a formidable football season. Whatever you decide to do today, be safe.

Todays card was inspired by a magazine I received from a women’s organization to which I belong. The cover artist was Elizabeth Barlow and the painting is beautiful. This doesn’t show off the painting nearly as well but it is a depiction of it using Sunflower Dies.

Jan/ Feb P.E.O. Record – Celebrate Sunflowers – #1

To create the sunflower itself, I used Mango Melody card stock and the sunflower die from Sunflowers Dies. I die cut two of them, punching out all the little pieces from one of them. I did some highlighting and darkening on both pieces using various Stampin Blends. But first… on the sunflower that has the pieces remaining in it, I very carefully turned it over and taped all the backside, holding the pieces in place. I turned it over and began the shading: using first the light and dark Mango Melody Blends, then both the light and dark Pumpkin Pie Blends, shading out into the petals. Around the very center of the flower, I used just a bit of light Cajun Craze Blends. I did the same on the sunflower with all the petals as well. With the very center, I took the Cajun Craze marker and made tiny dots, then did the same with Garden Green marker. They have a finer tip and I could make very tiny dots. I layered the open sunflower on the other with mini dimensionals and set it aside.

Celebrate Sunflowers – #2

The card base is Pacific Point card stock. I took another panel of Pacific Point and ran it through the Tasteful Textile 3D embossing folder, then adhered it with liquid glue to the card base. I put dimensionals on the back of the double sunflower and adhered it to the card front. I then took Garden Green cardstock and the Pierced Blooms Dies and die cut two stems. I adhered them side by side to create a larger stem for the sunflower.

I used the sentiment from the Celebrate Sunflowers stamp set, stamped it in Memento ink on Basic White card stock, then die cut it with a die from Pierced Blooms Dies. This is an awesome banner die – I really like the shape and the size! I put dimensionals on the back of the sentiment banner and adhered it to the card front. I then tied a double bow with the Whisper White Crinkled Seam Binding Ribbon and attached it with a glue dot.

Celebrate Sunflowers – #3

I really like the way this turned out. If I make another, which I might, I would probably use a patterned background that is mostly blue. I think the contrast would be better and would show off the sunflower more. But for this card, I wanted it to be similar to the magazine cover, so stuck with the solid.

Products for todays card are from the new Jan-Jun 2021 Mini Catalog and the 2020-2021 Annual Catalog ~ and those products are available now for purchase. You will find them in the product list below. As a reminder… I’ve made it easy for you to simply ‘add all to cart. If I can help you in any way to order these items, or others, please give me a holler. As a thank you to my customers, when the order is between $50-$150 I offer a SU! item of your choice valued at $10. Remember to use MY CURRENT HOST CODE WZBPZ7N4- good Feb 4 (today) – Feb 28. When the order is over $150, you still receive that free gift from me, but SU! has Stampin’ Rewards that may be used for additional products, so don’t use the host code at that time. Now is also Sale-a-bration – a time from now through the end of February when Stampin’ Up! offers FREE items with $50 and $100 purchases. Those products are shown below today’s product list as well. Happy shopping!

Sale-a-bration items FREE with $50 purchase – Level 1

Sale-a-bration items FREE with $100 purchase – Level 2

Celebrate Sunflowers – #4

Now is the perfect time to become a team member of Stampin’ Up! – with your choice of items in your $99 Starter Kit (valued at $125!) you will receive five packs of new 6×6 DSP paper packs – only during Sale-a-bration though!!! Act quickly… join my Team here. Being a part of the Stampin’ community brings all kinds of fringe benefits ~ early access to new catalogs, guaranteed 20% discount on all Stampin’ Up! products, free tutorials, access to web sites that will encourage and strengthen your abilities. Join now… Again – you may do that here.

Thanks for stopping by.

May you have a beautiful day.

Make someone happy sending them a handmade card filled with love.

Card cuts for todays project:

  • Pacific Point card base 8 1/2 x 5 1/2 scored at 4 1/4, 4 1/4 x 5 1/2
  • Mango Melody card stock 3 1/2 x 7 1/2
  • Garden Green 1 x 10
  • Basic White 1 3/4 x 2 3/4 (front banner)

Stampin’ Up! True Love & Happy

It is Super Bowl weekend! Woohoo! And what are YOU doing during Super Bowl? I’ll probably color something while watching the game – it’s the perfect time. Or fussy cut… but that’s not my preference. Speaking of coloring, todays card uses the Stampin Blends and it gives a bolder look than the card of yesterday with the pencils. I used another one of the True Love DSP papers too. Let’s take a look…

True Love Happy #1

This card incorporates the Pretty Perennials stamp set in the sentiments on the card front and the word ‘happy’ just pops! I colored just the smallest of the flowers using both the Light & Dark Daffodil Delight Stampin Blends – just enough to tie in the Daffodil Delight card stock it sits on and the Ruched Ribbon, also in Daffodil Delight.

I stamped the word ‘happy’ in VersaMark ink on a piece of Basic Black card stock after using the embossing buddy to clear it of any static, then sprinkled White embossing powder over the ink and heat set it. Once it cooled a bit I fussy cut the word. I then adhered it to a piece of Basic White card stock and fussy cut around it again, giving it a white border. I stamped the word ‘birthday’ also from the Pretty Perennials stamp set, in Memento Black ink on a Basic White scrap and punched it with the Classic Label Punch. After deciding where I wanted to place the larger word, I ran a strip of Stampin’ Seal across and wove the Ruched Ribbon to just the way I wanted it, and the Stampin Seal held it nicely in place. I put dimensionals on both sentiments, adhering the larger word first, then the ‘birthday just over the ends, also on dimensionals. I added three 2020-2022 Enamel Dots in Bumblebee for the final touch.

The True Love DSP panel was adhered to Daffodil Delight card stock, put on dimensionals then added to the Thick Basic White card base and the card front was complete.

True Love Happy #2

For the inside I added a 3/4″ strip of the same True Love DSP to the bottom of the Basic White panel after coloring with the Daffodil Delight Stampin blends. This panel was adhered to a Daffodil Delight panel with liquid glue then to inside of the card base, also with liquid glue – and the card was done. Easy peasy…

True Love Happy #3

For the envelope I did no coloring, just added a strip of the True Love DSP to the envelope flap and that’s it. A bright, cheery card ready to send to someone special.

Products for todays card are from the new Jan-Jun 2021 Mini Catalog and the 2020-2021 Annual Catalog ~ and those products are available now for purchase. You will find them in the product list below. As a reminder… I’ve made it easy for you to simply ‘add all to cart. If I can help you in any way to order these items, or others, please give me a holler. As a thank you to my customers, when the order is between $50-$150 I offer a SU! item of your choice valued at $10. Remember to use MY CURRENT HOST CODE WZBPZ7N4- good Feb 4 (today) – Feb 28. When the order is over $150, you still receive that free gift from me, but SU! has Stampin’ Rewards that may be used for additional products, so don’t use the host code at that time. Now is also Sale-a-bration – a time from now through the end of February when Stampin’ Up! offers FREE items with $50 and $100 purchases. Those products are shown below today’s product list as well. Happy shopping!

Sale-a-bration items FREE with $50 purchase – Level 1

Sale-a-bration items FREE with $100 purchase – Level 2

Host a group of orders from your buddies and if it is over $300 – receive this Host Set!

Now is the perfect time to become a team member of Stampin’ Up! – with your $99 Starter Kit (valued at $125!) you will receive five packs of new 6×6 DSP paper packs – only during Sale-a-bration though!!! Act quickly… join my Team here. Being a part of the Stampin’ community brings all kinds of fringe benefits ~ early access to new catalogs, guaranteed 2-% discount on all Stampin’ Up! products, free tutorials, access to web sites that will encourage and strengthen your abilities. Now is the perfect time… Again – you may do that here.

Thanks for stopping by.

May you have a beautiful day.

Make someone happy sending them a handmade card filled with love.

Card cuts for todays project…

  • Basic White Thick card base 4 1/4 x 11 scored at 5 1/2
  • Daffodil Delight 4 x 5 1/4 (2)
  • True Love DSP 3 3/4 x 5 + 3/4 x 3 3/4 + 2 1/4 x 6 (envelope flap)
  • Basic White 3 3/4 x 5 + scrap for sentiments
  • Basic Black scraps for sentiment

Stampin’ Up! Watercolor Pencils and True Love DSP

Hello! I hope today finds you well, in good spirits and ready to create something beautiful ~ oh, and have fun while you’re doing it. 😍 I happen to like coloring and chose to work with my Watercolor Pencils, which I haven’t used in what seems like forever. They give a wonderfully soft look, unlike the Alcohol Blends which are much more bold. Don’t get me wrong, I like the Blends too. They just give a different result. One of the nice parts about coloring, at least for me, is I don’t have to think about it much. I can listen to a podcast, or have the TV on (I don’t do that very often!) – it’s called multi-tasking 😁

Watercolor Pencils & True Love DSP – #1

Isn’t this just soft and lovely? I kept changing the pencils I was using for every flower and the leaves as well. It was so fun to play… The painted flower pot holding my pencils is one I did many, many years ago when I was teaching Tole Painting. 😌 Let’s do a close-up of the flowers on the card.

You can see in these photos how the colors vary. The largest flower in the top left, the pencils used were Flirty Flamingo and Melon Mambo – Melon Mambo for the center. The leaves were Granny Apple Green and Garden Green. The smaller flower in the upper left was the same, just more Melon Mambo. The upper right leaf in that same photo is Granny Apple Green and Old Olive. And the orangey flower & leaf… Pumpkin Pie and the leaf is Granny Apple Green. After using the Watercolor Pencils on each flower, I then used the Blender Pen to smooth the pencil lines.

In the photo at right I used Rich Razzleberry for one of the flowers and Flirty Flamingo by itself for the flower closest to it. The darkest flower is mostly Cherry Cobbler and Melon Mambo in places. I always used the darker colors in the middle and left bare areas for contrast. They almost look real, don’t they?

  • I colored a panel of True Love DSP 4 x 6 then trimmed it to 4 x 5 1/4, removing a portion from each end. I used those trimmings on the inside of the card, which you will see in a bit.
  • Next I took a Stitched Rectangle Die to die cut the inside of the panel.
  • I layered the larger panel on Basic. Black, adhering with liquid glue.
  • I wrapped that panel with Polka Dot Tulle Ribbon and tied it in a knot. I took another, smaller length and tied it on as well.
  • Layer this on the card base with liquid glue. (If I were hand delivering this card I would put it on dimensionals.)
  • Now layer the smaller panel on Basic Black with liquid glue, then to the card front with dimesnionals, matching the flowers and leaves. You do have to be careful as it would be easy for this layer to go on upside down…
  • Using the Double Oval punch and Basic Black, punch the larger oval using the scallop.
  • On Basic White card stock, stamp the sentiment from the Posted For You stamp set in Memento Black ink and punch with the smaller of the ovals using the Double Oval Punch.
  • Add three Opal Rounds to the sentiment banner, add dimensionals to the back and add to the center of the3 card.

For the inside…

Watercolor Pencils & True Love DSP – #4

Remember I removed the ends of the 4 x 6 DSP panel after coloring? And… here they are! The Pumpkin Pie flower is to the left and the Flirty Flamingo to the right. Each strip was adhered with liquid glue to a Basic White panel, then to a slightly larger Basic Black piece – also with liquid glue. This went into the card base with liquid glue and finis… the card is complete! Love, love, love. And I hope you like it too.

Because this card will be part of my class on Tue, Feb 9, I will demonstrate the coloring on a strip for the envelope flap. You’ll just have to use your imagination 🙂

Products for todays card are from the new Jan-Jun 2021 Mini Catalog and the 2020-2021 Annual Catalog ~ and those products are available now for purchase. You will find them in the product list below. As a reminder… I’ve made it easy for you to simply ‘add all to cart. If I can help you in any way to order these items, or others, please give me a holler. As a thank you to my customers, when the order is between $50-$150 I offer a SU! item of your choice valued at $10. Remember to use MY CURRENT HOST CODE WZBPZ7N4- good Feb 4 (today) – Feb 28. When the order is over $150, you still receive that free gift from me, but SU! has Stampin’ Rewards that may be used for additional products, so don’t use the host code at that time. Now is also Sale-a-bration – a time from now through the end of February when Stampin’ Up! offers FREE items with $50 and $100 purchases. Those products are shown below today’s product list as well. Happy shopping!

Sale-a-bration items FREE with $50 purchase – Level 1

Sale-a-bration items FREE with $100 purchase – Level 2

Sale-a-bration items FREE with a $300 order – gather together some friends orders to get this total!

And now is a perfect time to JOIN MY TEAM… get $125 worth of product for $99 + five free packs of 6×6 DSP!!! There are other benefits as well. You can do that here.

Thanks for stopping by.

May you have a beautiful day.

Make someone happy sending them a handmade card filled with love.

Card cuts for todays project:

  • Basic White Thick card stock 8 1/2 x 5 1/2 scored at 4 1/4
  • Basic White 4 x 5 1/4 + scrap for oval
  • Basic Black 4 1/8 x 5 3/8 (2) + 3 11/16 x 2 3/8 + scrap for oval
  • True Love DSP 4 x 6 trimmed to 4 x 5 1/4

Stampin’ Up! Chicks Doing a Barnyard Dance

Our weather has been so strange lately. Temps have hovered around 30-32 day and night, and therefore the confusing snow/ rain/ sleet. We waken this morning to 26 degrees and a light dusting of snow. It’s February after all ~ and we are not in control!

Todays card features the Hey Birthday Chick bundle, which means coordinating dies, Birthday Chick Dies. I’ve used a number of the dies for this card ~ it’s playful and fun.

Hey Birthday Chick – barnyard dance, #1

Do you see all the fun details on this card – they are die cuts: starting at the top ~ the swag banner, the Happy Birthday word, the fence, the feed sack, the two big chicks and the baby chick. Oh my – how cute is that baby chick! I had fun with this… can you tell? Okay – some detail, how to, all that…

I began with a panel of Fine Art Floral DSP and ran it through the Old World 3D embossing folder. I then adhered it to a piece of Pool Party card stock. I pulled out my In Good Taste DSP and die cut two fences with the Birthday Chick Dies. In Good Taste DSP has some marvelous wood- looking sheets. This was just what I wanted for my fence. 🙂 The feed sack is a die cut only – there is no stamp for it. I die cut it from a Basic White scrap then colored it using the Crumb Cake Stampin Blends. I wrote in the word ‘feed’ with a Soft Suede Stampin Write Marker. The loopy banner and happy birthday were die cut from Rainbow Glimmer Paper.

I stamped the chicks: one in Crumb Cake ink, the other in Memento Black ink, both on Basic White card stock, and began coloring with various Stampin Blends. The chick on the left got So Saffron Blends for the body, Daffodil Delight Blends for the beak and top-knot and a dot of Dark Poppy Parade for the waddle. The chick on the right got more treatment… I started at the top with So Saffron Blends, then Daffodil Delight Blends followed by Pumpkin Pie Blends. I used Dark Pumpkin Pie for the beak and top-knot and a dot of Dark Poppy Parade for the waddle. The baby chick was die cut on a tiny scrap of Basic White card stock and colored with the So Saffron Blends, and bit of pumpkin Pie for the beak. I made certain that little wing was sticking out a bit 🙂

Adhering… the loopy banner and birthday were adhered with dabs of liquid glue. And just so you know, I wanted it off-center! I adhered the fence with liquid glue then the feed sack got a mini dimensional at the top and the bottom liquid glue – so it appears to be leaning against the fence. The dancing chicks were adhered with dimensionals and the baby chick a mini dimensional – and the card front was done. Oops – one more thing… I added the Artistry Blooms Adhesive-Backed gems then took this panel and attached it to the Coastal Cabana card base with dimensionals.

For the inside….

Hey Birthday Chick 1, inside

I began by using my Blending Brushes to apply first Pool Party ink, then Coastal Cabana ink, then Balmy Blue ink – to make it look like sky – to a panel of Basic White card stock. I then stamped the chicks in Crumb Cake ink and colored using various Stampin Blends: So Saffron for the body, tail & head feathers got Calypso Coral & Real Red, the beak a bit of Light Cajun Craze. The cupcake used Light Pineapple Punch for the icing followed by Wink of Stella (to give it a glaze), Light Balmy Blue for the candle and cupcake wrapper and Dark So Saffron for the flame. The chick just hatching was colored with Light So Saffron on his body, Dark So Saffron for his feet, Light Balmy Blue for the birthday hat. The sentiment was stamped in Coastal Cabana ink and the confetti in Calypso Coral ink.

With the panel completely colored I adhered it to a piece of PoolParty card stock and into the inside of the card – and the card was complete!!!

For the envelope…

Hey Birthday Chick 1

The envelope flap was covered in Fine Art Floral DSP. On the front, the chick was stamped in Crumb Cake ink then colored with minimal Stampin Blends: So Saffron for the body and Cajun Craze for the beak. The balloon was colored in Pool Party Blends then Wink of Stella for sparkle. Whew – lots of coloring, but it went fast and I like the end result- hope you do too.

The Hey Birthday Chick bundle was just released for purchase Feb 2 – and what a fun set. . Products for todays card are from the new Jan-Jun 2021 Mini Catalog and the 2020-2021 Annual Catalog ~ and those products are available now for purchase. You will find them in the product list below. As a reminder… I’ve made it easy for you to simply ‘add all to cart’. If I can help you in any way to order these items, or others, please give me a holler. As a thank you to my customers, when the order is between $50-$150 I offer a SU! item of your choice valued at $10. Remember to use MY CURRENT HOST CODE WZBPZ7N4- good Jan 21 – Feb 3. When the order is over $150, you still receive that free gift from me, but SU! has Stampin’ Rewards that may be used for additional products, so don’t use the host code at that time. Now is also Sale-a-bration – a time from now through the end of February when Stampin’ Up! offers FREE items with $50 and $100 purchases. Those products are shown below today’s product list as well. Happy shopping!

Sale-a-bration items FREE with $50 purchase – Level 1

Sale-a-bration items FREE with $100 purchase – Level 2

Now is the perfect time to JOIN MY TEAM. You can do that here.

Thanks for stopping by.

May you have a beautiful day.

Make someone happy sending them a handmade card filled with love.

Card cuts for todays project:

  • Coastal Cabana card base 8 1/2 x 5 1/2 scored at 4 1/4
  • Pool Party card stock 4 1/8 x 5 3/8 (2)
  • Basic White card stock 4 x 5 1/4 (2) + another for chickens
  • In Good Taste DSP 2 1/2 square for fence
  • Fine Art Floral 4 x 5 1/4 + 2 1/4 x 6 (envelope flap)

Stampin’ Up! Jan. Paper Pumpkin Fun Fold~Alternative

Hello again! Snow is still on our ground. The neighbor kids were sliding down the hill behind us and WE had such fun watching. They were up and down dozens of times, and played until nearly dark. Ah youth 🤗

On the home front here, I created another Paper Pumpkin Alternative using the January kit called Sending Hearts. I used minimal additional supplies.

Jan. PP Alternative Fun Fold – #1

For the front of the card I used a Floral Heart Die to cut this lacy heart from Basic White card stock. I used a Basic White strip to fussy cut an arrow. Both were adhered with liquid glue. I then colored the sentiment from the kit with a Petal Pink Stampin Blend and adhered it with dimensionals.

Jan. PP Alternative Fun Fold n- #2

I have no idea what this fold is called, I just knew I wanted to try it! The inside is one of the kits card bases, trimmed 1/8″ on the long side and scored one inch on either side of the center fold. The center fold becomes the mountain and the other two the valley folds. Adhere one side first; close card and adhere other side ~ both done with liquid glue. I stamped the very cute snail in Memento Black ink and colored him with Light Smoky Slate Stampin Blends, then covered that with Wink of Stella. I also stamped the sentiment with the same Memento Black ink.

The center heart is one provided in the kit cut down to 3 x 3 1/4. I stamped the hearts from the stamp in the kit using Petal Pink ink, then covered all the solid hearts in Wink of Stella to give it a bit of glam. I colored one of the resin hearts from the kit using Poppy Parade Stampin Blends, added it to the upper right corner over one of the hearts. I then colored the Whisper White Crinkled Ribbon with Poppy Parade Stampin Blends, tied it in a bow and adhered with a glue dot. I mounted the panel on Poppy Parade 3 x 3 3/8 with liquid glue and it was ready to go into the card. It was mounted using liquid glue in the center of the card. And voila!

Jan PP Alternative Fun Fold #3

On the envelope I stamped the XOXO in Memento black ink and called the card done…. Love it when something comes together ~ and most of it from the monthly kit!!!

A couple of things to remember when using this kind of fold… The center panel must be no taller than the dimension from the fold to the edge of the DSP on the bottom of the card – or it will stick out beyond the top of the card… ask me how I know that!

Products for todays card are from the Paper Pumpkin subscription and the 2020-2021 Annual Catalog ~ and those products are available now for purchase. You will find them in the product list below. I have included Paper Pumpkin subscription options as well – so look closely if you are interested in that. Also, there is a listing for the Refill Kit for Sending Hearts. If you are not a subscriber, you would miss the stamp set and the ink spot – just FYI! As a reminder… I’ve made it easy for you to simply ‘add all to cart’. If I can help you in any way to order these items, or others, please give me a holler. As a thank you to my customers, when the order is between $50-$150 I offer a SU! item of your choice valued at $10. Remember to use MY CURRENT HOST CODE WZBPZ7N4- good Jan 21 – Feb 3. When the order is over $150, you still receive that free gift from me, but SU! has Stampin’ Rewards that may be used for additional products, so don’t use the host code at that time. Now is also Sale-a-bration – a time from now through the end of February when Stampin’ Up! offers FREE items with $50 and $100 purchases. Those products are shown below today’s product list as well. Happy shopping!

Now is the perfect time to Join my team – you can do that here. No need to be afraid ~ get the 20% discount and enjoy the Stampin’ Up! products and family 😁. I’m here to support you in whatever your needs are.

Sale-a-bration items FREE with $50 purchase – Level 1

Sale-a-bration items FREE with $100 purchase – Level 2

Thanks for stopping by.

May you have a beautiful day.

Make someone happy sending them a handmade card filled with love.

Stampin’ Up! Jan. Paper Pumpkin Alternatives

We got snow last night! Woohoo! I happen to like snow, so I enjoy it. This snow is pretty wet though. It’s a snow/ rain/ sleet mix, so kind of a funny snow. Fortunately we don’t have to be out driving around in it!

Today I have been playing with the January Sending Hearts Paper Pumpkin kit and have so far created three alternatives. Here they are…

The only thing you really need to know is I trimmed the heart piece so it was a 3 1/4″ square. Other than that, I think you can easily figure what I did by just looking at the pictures. Here are the products I used in addition to the items in the kit.

  • Forever Greenery Ribbon Combo pack – gold cord
  • Shimmer Ribbon in Gray Granite
  • Smoky Slate card stock and Stampin Blends
  • Basic Black card stock & Tuxedo Black Memento ink
  • Petal Pink card stock, ink and Stampin Blends
  • Poppy Parade Stampin Blends
  • Wink of Stella
  • Basic Whiter card stock.

Products for todays card are from the Paper Pumpkin subscription and the 2020-2021 Annual Catalog ~ and those products are available now for purchase. You will find them in the product list below. I have included Paper Pumpkin subscription options as well – so look closely if you are interested in that. Also, there is a listing for the Refill Kit for Sending Hearts. If you are not a subscriber, you would miss the stamp set and the ink spot – just FYI! As a reminder… I’ve made it easy for you to simply ‘add all to cart’. If I can help you in any way to order these items, or others, please give me a holler. As a thank you to my customers, when the order is between $50-$150 I offer a SU! item of your choice valued at $10. Remember to use MY CURRENT HOST CODE WZBPZ7N4- good Jan 21 – Feb 3. When the order is over $150, you still receive that free gift from me, but SU! has Stampin’ Rewards that may be used for additional products, so don’t use the host code at that time. Now is also Sale-a-bration – a time from now through the end of February when Stampin’ Up! offers FREE items with $50 and $100 purchases. Those products are shown below today’s product list as well. Happy shopping!

Sale-a-bration items FREE with $50 purchase – Level 1

Sale-a-bration items FREE with $100 purchase – Level 2

Now is also the perfect time to JOIN MY TEAM… you can do that by clicking here

Thanks for stopping by.

May you have a beautiful day.

Make someone happy sending them a handmade card filled with love.

Stampin’ Up! Free DSP Cards

Today I’m sharing two cards using the Flower & Fields DSP that is FREE with a $50 purchase during Sale-a-bration. They are super easy and the layout can be used for so many options of type of card: sympathy, birthday, thinking of you, congratulations, get well, a ‘lift me up’ kind of sentiment.

Both of these cards use the same measurements, just assorted dies/ stamp sets/ embellishments. So here we go with the details…

  • Card #1
  • Band Together bundle
  • Peony Garden DSP
  • Pastel Pearls
  • Just Jade card stock
  • Basic White card stock
  • Pool Party card stock – sentiment banner
  • Memento Black ink
  • Flower & Fields DSP

For the inside…

Card #1 inside

Card #1 inside info

  • Strawberry Builder Punch – flowers
  • Peony Garden DSP
  • ‘Matte Black Dots
  • Memento Black ink
  • Basic White card stock
Card #1

Products for todays card are from the new Jan-Jun 2021 Mini Catalog and the 2020-2021 Annual Catalog ~ and those products are available now for purchase. You will find them in the product list below. As a reminder… I’ve made it easy for you to simply ‘add all to cart’. If I can help you in any way to order these items, or others, please give me a holler. As a thank you to my customers, when the order is between $50-$150 I offer a SU! item of your choice valued at $10. Remember to use MY CURRENT HOST CODE WZBPZ7N4- good Jan 21 – Feb 3. When the order is over $150, you still receive that free gift from me, but SU! has Stampin’ Rewards that may be used for additional products, so don’t use the host code at that time. Now is also Sale-a-bration – a time from now through the end of February when Stampin’ Up! offers FREE items with $50 and $100 purchases. Those products are shown below today’s product list as well. Happy shopping!

Card stock cuts for both cards:

Card base 8 1/2 x 5 1/2 scored at 4 1/4

Basic White 3 3/4 x 4 3/4 + sentiment & scrap

Basic White inside 4 x 5 1/4

Flower & Field DSP (3) 1 3/8 x 3 1/2 + 2 1/4 x 6 for envelope flap

Thanks for stopping by.

May you have a beautiful day.

Make someone happy sending them a handmade card filled with love.

  • Card #2
    • Friend Like You stamp set
    • Tasteful Labels Dies
    • 20-22 In Color Enamel Dots
    • Sheer Ribbon Pool Party
    • Just Jade card stock
    • Basic White card stock
    • Memento Black ink
    • Flower & Fields DSP
Card #2 inside

Card #2 inside info

  • Friends Like You stamp set
  • Memento Black ink
  • Granny Apple Green ink
  • Basic White card stock
Card #2