Stampin’ Up! Flight & Airy Birthday Card

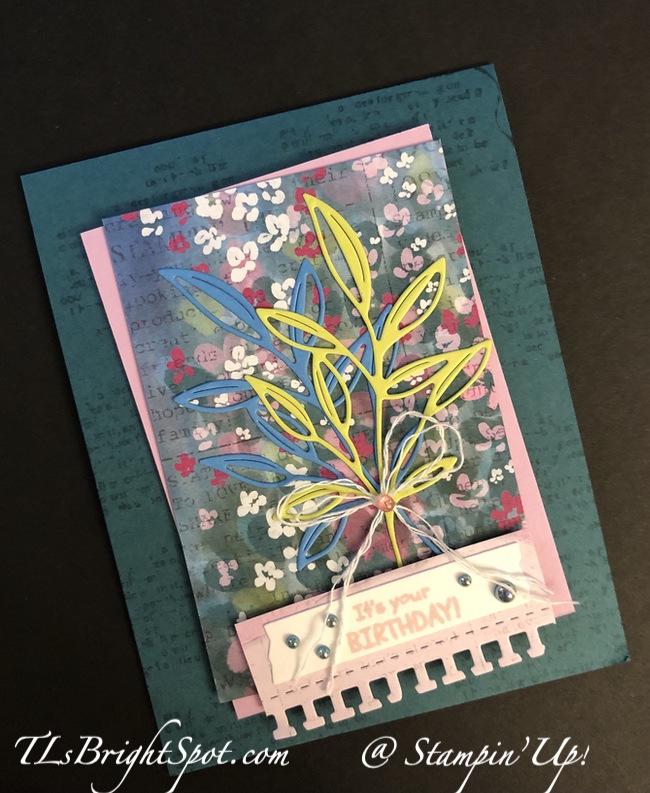
Good Friday morning! Gosh, the 29th of December…. where has the year gone? I’m sharing a new DSP that will be available come Jan 4, 2024 called Flight & Airy 12 x 12 DSP and it is FREE with a $50 order (before taxes & shipping). It is so sweet with birds and delicate branches and soft bright colors. Here’s the card…

Stampin' Up! Flight & Airy Birthday

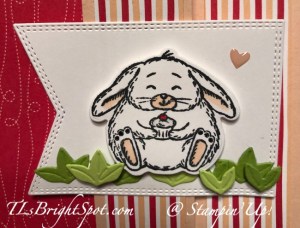
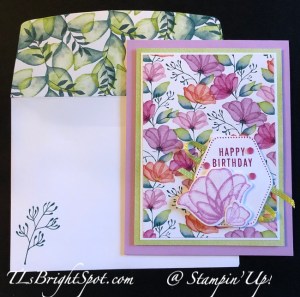
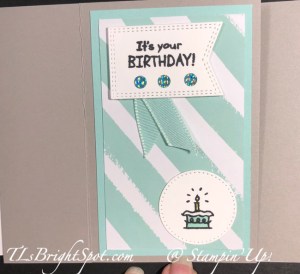
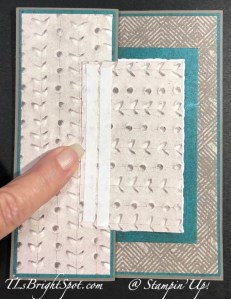
Such a sweet bird! I began by die cutting the Flight & Airy DSP with the third from smallest Countryside Corners Dies, punched a couple of leaves from Vellum using the Bough Punch.I adhered these to the back of the DSP with Stampin’ Seal. I also looked at the backs of the Flight & Airy DSP for my background paper & chose this pretty Pecan Pie piece, adhered it to a Pecan Pie card base. I put dimensionals on the die cut DSP piece and attached it to the card front. I stamped the sentiment using another new stamp set from the Jan-Apr 2024 Mini Catalog called Stippled Roses stamp set (it has coordinating dies!) and Pecan Pie ink. I adhered the stamped piece to another strip of Pecan Pie, put dimensionals on it and attached it under the focal point. The last touch was adding Blooming Pearls (3) in Garden Green – and the card front was complete.

Stampin' Up! Flight & Airy Birthday Card, inside

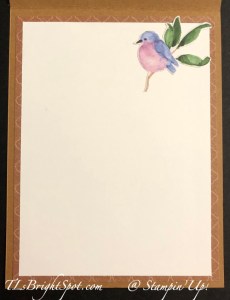
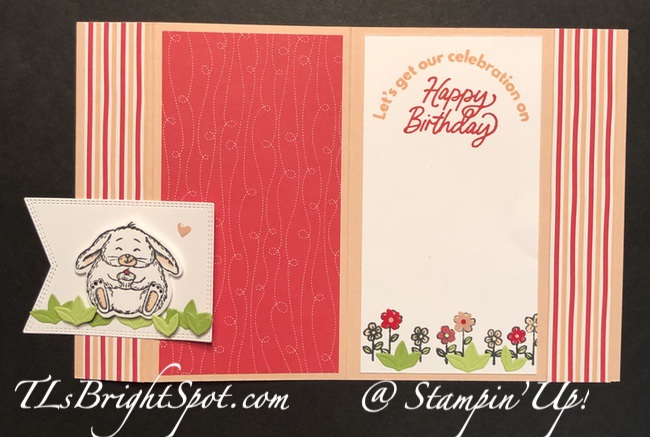
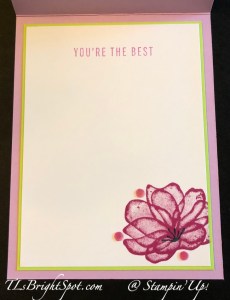
For the inside, I fussy cut one of the birds on a branch with leaves and attached it with liquid glue to the Basic White & Flight & Airy panel – and adhered all to the inside of the card.

Stampin' Up! Flight & Airy Birthdsay card & envelope

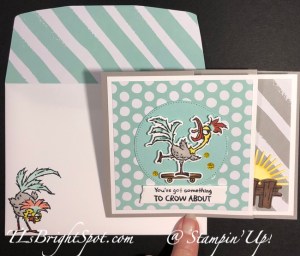
I found a scrap with a wee bird peeking up and fussy cut that too and adhered it to the envelope front. More of the Flight & Airy DSP to the flap and done! Such a sweet card!

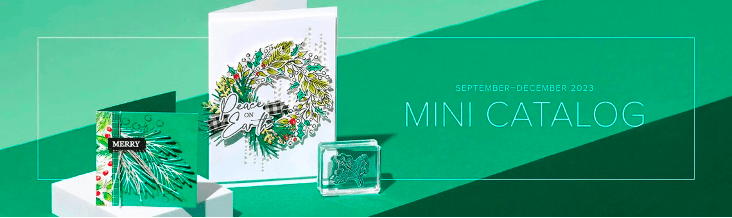
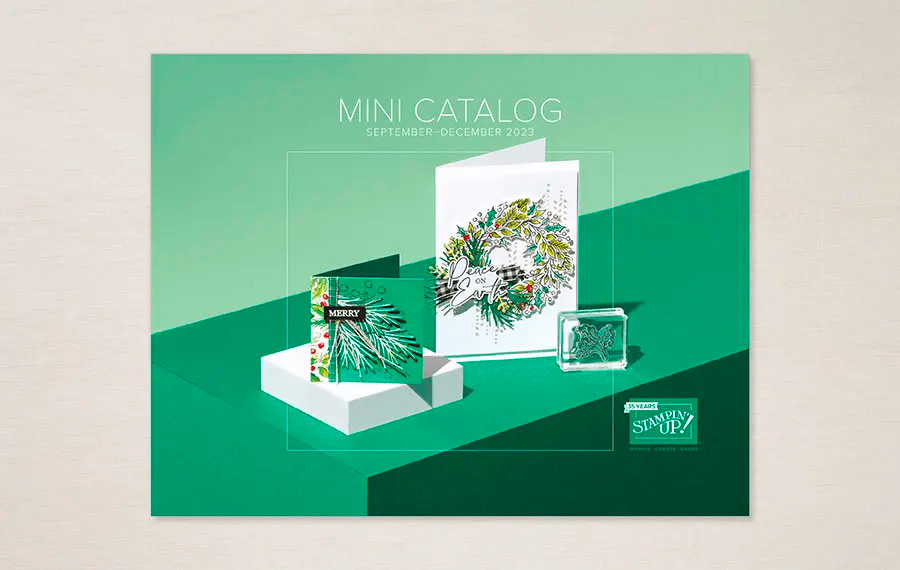
So I’ve mentioned the Jan-Feb 2024 Sale-a-bration Catalog – and the Jan-Apr 2024 Mini Catalog – both going live Jan 4 2024. If you don’t have these, please reach out to me and we can ‘fix’ that :O) While you’re at it, consider checking out the Stampin’ Up! LAST CHANCE PRODUCTS, the Clearance Rack, the Kits Collection, Paper Pumpkin – and oh yes, consider JOINING MY TEAM to get regular discounts on every order.

Stampin' Up! Jan-Apr 2024 Mini Catalog

Sales Period: 4 January to 30 April 2024

Ordering Deadlines

Phone: 30 April 2024 at 6:59 p.m. (MT)

Online: 30 April 2024 at 11:59 p.m. (MT)

Click here to see what is available in this catalog

Along with the Mini catalog comes a special… Jan-Feb 2024 Sale-a-bration cattie

Stampin' Up! Jan-Feb 2024 Sale-a-bration Catalog

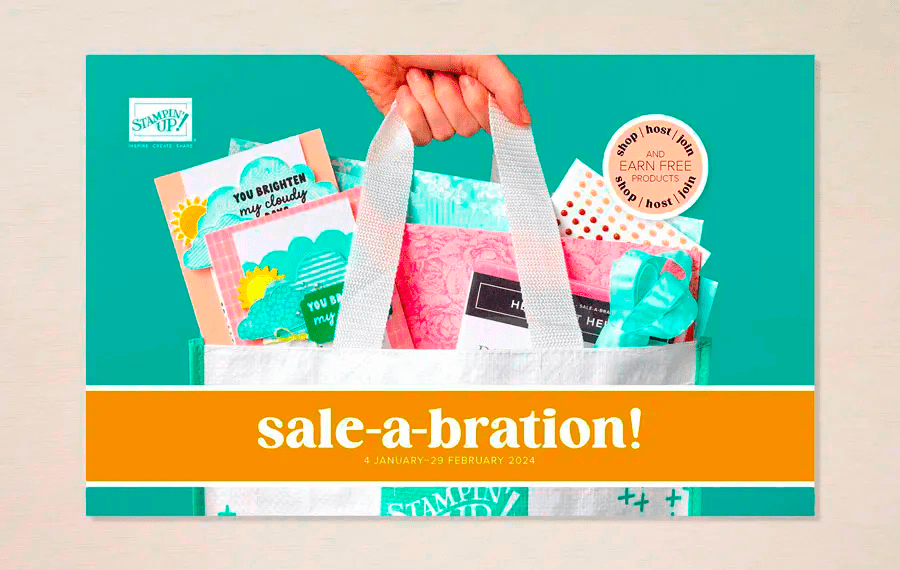
Sale-A-Bration Sales Period: 4 January–29 February 2024

Ordering Deadlines

Phone: 29 February 2024 at 6:59 p.m. (MT) 
Online: 29 February 2024 at 11:59 p.m. (MT)

Sale-A-Bration is one of our biggest promotions of the year! It’s packed with perks, overflowing with opportunities for customers, and filled with fun for everyone. 

For every $50 of purchase, there are opportunities for FREE ITEMS from the Sale-a-bration Catalog. Enjoy the demonstrator perk of having early access to product by redeeming exclusive Sale-A-Bration products for FREE when you reach $50 USD | $60 CAD or $100 USD | $120 CAD spend levels.

Stampin' Up1 LAST CHANCE PRODUCTS

From 21 November 2023–3 January 2024, you can stock up on your favorite seasonal products and save up to 60% on essential craft supplies! So, what are you waiting for? Start shopping and selling! After all, a selection of Last Chance Products will only be available while supplies last.

CLICK HERE to view the Carryover list and you should be able to print it as well

CLICK HERE to view the Last Chance Products List – print this one too

Nothing brings people together quite like creativity. As an independent demonstrator, you can share what you love and expand your circle of friends to build a close-knit, collaborative community of crafters. You’ll meet, connect, learn from, and create with other demonstrators from all around the world through virtual events, in-person conventions, support groups, and social media. And don’t forget the importance of hosting your own crafting parties! You can host events with your favorite people and show off your favorite Stampin’ Up! projects. Let’s discover the joy of being a demonstrator together!

JOIN NOW

Become a Stampin’ Up! demonstrator and for just $99, you’ll get your own customized Starter Kit with $125 worth of products. And we’ll include all the business supplies you need to help you get started, plus free shipping. Don’t wait! Talk to me today to begin your creative journey! You may do that here!

When ordering from me please use my NEW HOST CODE TJRE9W6M so that I receive proper notification and YOU GET THE Benefits of a FREE SU! item valued up to $10 :O) AND the Monthly Card Tutorial. (I like to treat my customers!) If your order is over $150, please don’t use the host code as SU! has benefits. I’ll still be notified and you can receive that FREE ITEM!

Note: Make sure that you can see my name on the final checkout page listed as your Demonstrator when you order so that you know that you’re ordering with me and you’ll get my rewards! PLUS… the monthly Online Tutorial when your order is over $50. 

Thanks for stopping by. I enjoy reading your comments…

Stampin’ Up! Fluffiest Friends Part 2 for Amy’s Inkin’ Krew Blog Hop Group

Good Tuesday! We have an easy challenge for the hop today… “Celebrate” – and we can interpret that however we like. We have a couple of family birthdays this month so that’s what I’m using. And, while I used this same stamp set Sunday, I’m using a different animal today :O)

Stampin' Up! Amy's Inkin' Krew
Stampin' Up 4 Panel fun fold Fluffiest Friends

Look at that sweet bunny holding a cup cake – is that cute or what?! Using the Fluffiest Friends stamp set, I stamped it in Memento Black ink and colored a bit of the ears, nose and feet pads in Stampin’ Blends Dark Petal Pink. I die cut him with the coordinating Fluffiest Friends Dies. Since I had the dies out, I went ahead and die cut several leaves: in both Granny Apple Green and Parakeet Party. I used the Nested Essentials Dies to cut the banner in Basic White. I added a layer of leaves to the banner with liquid glue, then the bunny on dimensionals and a few more leaves on dimensionals. The single heart is from the Adhesive-Backed Hearts & Flowers in the new Jan-Apr 2024 Mini Catalog.

Stampin' Up! Fluffiest Friends, bunny

This is a 4 panel fun fold card and I used Petal Pink card stock for the card base – 8 1/2 x 5 1/2, scored at 1 1/4 and 4 1/4. I added panels of DSP: Bee Mine 12 x 12 DSP, also from the Jan-Apr 2024 Mini Catalog. The pieces are (2) 1 x 5 1/2 and (2) 2 3/4 x 5 1/4. The banner with the bunny was added with Stampin’ Seal to the folded back front panel.

Stampin' Up! Fluffiest Friends 4 panel fun fold

For the inside sentiment panel – Basic White piece – 2 3/4 x 5 1/4 – I pulled out another stamp set, Beautiful Balloons from the Annual Catalog. I stamped the Happy Birthday in Sweet Sorbet ink then the rounded sentiment in Petal Pink ink. The flowers at the bottom come from the Fluffiest Friends stamp set and are stamped in Memento ink and colored with Stampin’ Blends: Dark Petal Pink, Light Sweet Sorbet, Light Lemon Lolly and Light Granny Apple Green. On top of a few of the flowers I added a flower from the Adhesive-Backed Hearts & Flowers. I adhered a few more of the die cut leaves in Granny Apple Green and Parakeet Party, attached the panel to the inside and the card was done.

Stampin' Up! Fluffiest Friends card & envelope, bunny

For the envelope, I added more of the Sweet Sorbet DSP from Bee Mine 12×12 DSP pack to the flap. I stamped the balloon in Sweet Sorbet ink using the Beautiful Balloons stamp set. I used a Basic Black Marker to add a bow and some squiggly string. I think the person receiving this card is going to love it! It’s feminine, full of color and has a super cute bunny :O)

OK, time to move around the hop – be sure to check what everyone has created. You may click on the ‘previous’ button to visit Karen Finkle or click the ‘next’ button to visit Akiko, or… simply click on a name. Whatever you choose, don’t miss anyone :O) Enjoy the hop today.

Stampin' Up! 'previous' button for hop
Stampin' Up! 'next' button for hop

  1. Tara Carpenter
  2. Karen Finkle
  3. Terry Lynn Bright – you are here!
  4. Akiko Sudano
  5. Nel Thames
  6. Ann Louise Fodgaard
  7. Karen Ksenzakovic
  8. Carol Buckalew
  9. Mary Deatherage
  10. Shirley Gentry
  11. Amy Koenders

Get ready… qualifying orders of $75 or more

One day only—get free shipping on all qualifying orders.

Stampin' Up! FREE SHIPPING

Get ready for a spectacular limited time offer because you can shop and save on all qualifying orders! Have something on your wish list? Thinking about stocking up on crafting essentials? Got the urge to splurge? Shop on 14 December and get all the products you love while saving on shipping costs! This incredible deal only lasts for 24 hours, so don’t miss out!

Date: 14 December 2023

Ordering Deadlines

Phone: 14 December 2023 at 6:59 p.m. (MT)

Online: 14 December 2023 at 11:59 p.m. (MT)

  • All order types qualify for this promotion.
  • Free shipping is for 24 hours only. Orders must be opened and closed on 14 December 2023.
  • Free shipping automatically applies to your cart after the qualifying amount has been met, which is $75 USD | $100 CAD (before tax).
  • Coupon codes and product credits are non-commissionable and will lower your order’s retail amount. Orders must meet the qualifying amount to be eligible for free shipping.
  • The additional cost for expedited shipping is not covered by this promotion.
  • Prepaid 3-, 6-, or 12-month Paper Pumpkin subscriptions can contribute to the qualifying amount for free shipping (Month-to-month subscriptions do not qualify). Subscriptions billed and shipped this month will be charged for the normal amount ($24.50 USD | $34.00 CAD shipping included) + tax .
  • Please keep in mind that due to the high volume of orders and the Christmas season, the distribution center may fall behind our typical shipping timeframes. We will do all we can to return to our regular service levels as quickly as possible. Any orders placed during this promotion are not guaranteed to arrive before or by 25 December.

Stock Up on Basics.  Now is the ideal time to stock up on basics (such as cardstock, envelopes, inks, and adhesives) and get free shipping on all qualifying orders of $75 or more before tax. Check out the LAST CHANCE PRODUCTS, KITS COLLECTIONS AND CLEARANCE RACK TOO!

Make your list… check it twice… and hold tight to it ’til 12/14, then order for FREE SHIPPING OF $75 OR MORE BEFORE TAX.

If you have questions, reach out to me!

YOU CAN ORDER RIGHT HERE!

When ordering from me please use my NEW HOST CODE TJRE9W6M so that I receive proper notification and YOU GET THE Benefits of a FREE SU! item valued up to $10 :O) AND the Monthly Card Tutorial. (I like to treat my customers!) If your order is over $150, please don’t use the host code as SU! has benefits. I’ll still be notified and you can receive that FREE ITEM!

Note: Make sure that you can see my name on the final checkout page listed as your Demonstrator when you order so that you know that you’re ordering with me and you’ll get my rewards! PLUS… the monthly Online Tutorial when your order is over $50. 

Stampin' Up! LAST CHANCE PRODUCTS

From 21 November 2023–3 January 2024, you can stock up on your favorite seasonal products and save up to 60% on essential craft supplies! So, what are you waiting for? Start shopping and selling! After all, a selection of Last Chance Products will only be available while supplies last.

CLICK HERE to view the Carryover list and you should be able to print it as well

CLICK HERE to view the Last Chance Products List – print this one too

NEW KIT ADDED!

Make friendships blossom with floral handmade cards full of kind words. It’s time to spread love and kindness this season!

Stampin' Up! Painted Wishes Kit
Stampin' Up! Painted Wishes Kit.2

163235

PAINTED WISHES KIT

$14.00 USD | $20.00 CAD

Available starting 5 December

This kit includes printed die cuts in English, French, German, and Dutch.

This kit includes

  • Enough supplies to create 9 cards—3 each of 3 designs
  • 9 coordinating envelopes
  • Printed card bases, printed die cuts, adhesive, sequins, and gold cord
  • Finished card size: 4-1/4″ x 5-1/2″ (10.8 x 14 cm)
  • Coordinating colors: Garden Green, Lemon Lime Twist, Moody Mauve, Petal Pink, Pretty Peacock, Wild Wheat

You may find other wonderful kits here.

If you like sales… check out the updated CLEARANCE RACK here.

Remember… kits, clearance rack, LAST CHANCE PRODUCTS, items from the Annual catalog like card stock, inks, adhesives … all of these items are available and once you reach $75 on 12/14, shipping is FREE, ONE DAY ONLY – 12/14 – QUALIFYING ORDER $75 BEFORE TAX.

Reach out to me if you do not have a demonstrator and have questions.

Stampin’ Up! Fluffiest Friends Birthday

Good Sunday! My apologies… I thought I had scheduled this to publish and didn’t!!! I have a fun, bright & cheery birthday card for you today, using the Fluffiest Friends bundle.

Stampin' Up! Fluffiest Friends Birthday

This is a very colorful card… because the person to whom it is being sent likes color :O) I started with the Granny Apple Green card base. With scraps of Granny Apple Green I die cut the grassy layers (5 of them) using the Fluffiest Friends Dies. I stamped the animal image (is this a raccoon? I can’t tell!) holding a ballon, colored it with Stampin’ Blends Crumb Cake (body) and Petal Pink (hands & feet) and a dot of black on the nose. I die cut this image, also from the Fluffiest Friends Dies and adhered it to a Basic White panel (3 x 4) I die cut two balloons, one from Pumpkin Pie and one from Berry Burst. I adhered the orange balloon with dimensionals and the other directly to the panel. With my Basic Black marker I drew a couple of squiggly lines. I stamped the word HAPPY in Berry Burst ink using the Biggest Wish stamp set. The grasses were added to the Basic White panel in two layers… the first adhered with liquid glue, the second with strips of cut dimensionals. I added three Adhesive-Backed Sequins Trio Pack in Berry Burst. This entire panel was added to a larger piece of Glorious Gingham 6×6 DSP in Berry Burst and that was added to a Basic White, then attached with liquid glue to the card base.

Stampin' Up! Fluffiest Friends Birthday, inside

For the inside… a strip of the Glorious Gingham 6×6 DSP in Berry Burst was adhered near the bottom of the Basic White panel and the sentiment was stamped in Garden Green ink from Biggest Wish stamp set.

Stampin' Up! Fluffiest Friends Birthday card & envelope

This is such a fun, bright, cheerful card – and could be used for a child or adult, male or female. Love that flexibility! This bundle can be found in the Stampin’ Up! ONLINE EXCLUSIVES which may be found here.

It’s hard to believe products in the Sep-Dec 2023 Mini Catalog are retiring… but they are. Making room for new products means letting go of others. If there is something you have been wanting – get it quickly as products seem to sell very fast.

Stampin' Up! LAST CHANCE PRODUCTS

From 21 November 2023–3 January 2024, you can stock up on your favorite seasonal products and save up to 60% on essential craft supplies! So, what are you waiting for? Start shopping and selling! After all, a selection of Last Chance Products will only be available while supplies last.

CLICK HERE to view the Carryover list and you should be able to print it as well

CLICK HERE to view the Last Chance Products List – print this one too

When ordering from me please use my NEW HOST CODE TJRE9W6M so that I receive proper notification and YOU GET THE Benefits of a FREE SU! item valued up to $10 :O) AND the Monthly Card Tutorial. (I like to treat my customers!) If your order is over $150, please don’t use the host code as SU! has benefits. I’ll still be notified and you can receive that FREE ITEM!

Note: Make sure that you can see my name on the final checkout page listed as your Demonstrator when you order so that you know that you’re ordering with me and you’ll get my rewards! PLUS… the monthly Online Tutorial when your order is over $50. 

If you are a customer of mine, the Jan-Apr 2024 Mini Catalogs AND the Jan-Feb Sale-a-bration catalogs have been sent as of Friday – it should arrive in your mailbox SOON! :O) If you do NOT HAVE a demonstrator and would like to receive a catalog, reach out to me.

Join my team here and still order these products as part of your starter kit – wow! Great time to join!!!

If you like sales… check out the updated CLEARANCE RACK here.

Paper Pumpkin is an all time favorite for many. Each month something new appears in your mailbox. Nov 11 to Dec 10 is the ALL THE BEST PP Kit. Send a wish to all your loved ones with the December Paper Pumpkin Kit! It comes with nine card fronts, three each of three designs, and nine coordinating envelopes. It has paper pieces detailed with gold foil, embellishments, an all-occasion stamp set, and an acetate box where you can store your finished cards! You can gift the kit itself or the finished product in the acetate box; either way, it’s the perfect last minute gift for any occasion. 

ACETATE BOX

The All the Best Paper Pumpkin Kit comes with an acetate box that fits your finished cards and envelopes! This makes easy storage of a finished product or allows you to gift your cards to someone. The kit also comes with a belly-band, so you can add your own personal touch to the box. Subscribe by 10 December to make a handmade gift for those you love. 

GOLD FOIL DETAILS

The paper pieces in the December Paper Pumpkin kit have gold foil detailing. Whether it’s an elegant boarder, or woven into the floral artwork, it’s a detail that will surely catch your recipient’s eye! It’s the perfect way to take any paper craft to the next level. 

HAND DRAWN ARTWORK 

The beauty of the December Paper Pumpkin Kit lies in the hand drawn artwork. The bright blue skies and elegant yellow flowers compliment the different design elements perfectly. It’s a simple yet sophisticated design that will catch any recipient’s eye! 

Subscribe to the December Paper Pumpkin Kit between 11 November and 10 Decembeby clicking here!

NEW KIT ADDED!

Make friendships blossom with floral handmade cards full of kind words. It’s time to spread love and kindness this season!

Stampin' Up! Kit
Stampin' Up! Painted Wishes cards

163235

PAINTED WISHES KIT

$14.00 USD | $20.00 CAD

Available starting 5 December

This kit includes printed die cuts in English, French, German, and Dutch.

This kit includes

  • Enough supplies to create 9 cards—3 each of 3 designs
  • 9 coordinating envelopes
  • Printed card bases, printed die cuts, adhesive, sequins, and gold cord
  • Finished card size: 4-1/4″ x 5-1/2″ (10.8 x 14 cm)
  • Coordinating colors: Garden Green, Lemon Lime Twist, Moody Mauve, Petal Pink, Pretty Peacock, Wild Wheat

Check out this video for more information about this Paper Pumpkin – and remember, it must be ordered prior to 12/10/2023

You may find other wonderful kits here.

Thanks for stopping by. Hope you liked the card today. Would love to hear from you. If I can be of help, please connect with me.

Stampin’ Up! Garden Walk with Artistic Dies

Good Monday morning. Golly – where did the weekend go? It was glorious here on the Jersey Shore – even though we made a quick trip to PA. And it was glorious there too. My card today is a fairly new one called Garden Walk 6×6 DSP. It has an interesting mix of colors and I’ve paired it with Basic White on this card.

Stampin' Up! Garden Walk DSP & Artistic Dies.

This is a very feminine birthday card and I like it a lot. The Artistic Dies are the leaves die cut from Basic White. I’ve also incorporated the Scalloped Contour Dies. The layers are like this: Card base is Thick Basic White; on this is a narrow layer of Garden Walk DSP adhered directly to the card base; the Scalloped Contour Basic White panel with Pretty Peacock and Garden Walk DSP all attached to one another then added to the card front with dimensionals. The Artistic Dies leaves was attached near the bottom with a couple of dabs of liquid glue, a narrow strip of Pretty Peacock added over this, then the sentiment banner on dimensionals. The sentiment is stamped using the Artistically Inked stamp set, which coordinates with the Artistic Dies, with Poppy Parade ink. Two final touches… a sweet bow using the pink in the Ribbon Combo Pack and three Iridescent Pastel Gems.

Stampin' Up! Birthday card with Garden Walk 6x6 DSP

On the inside… I used Poppy Parade ink to stamp the flowers from the Artistically Inked stamp set. They look just like the flowers on this Designer Series Paper :O) I stamped the leaves in Garden Green ink from the Artistically Inked stamp set then the sentiment – also from this stamp set. The stems were my own addition, using the Garden Green Marker to draw them in. The Basic White panel was simply asdded to the inside of the card.

Stampin' Up! Garden Walk & Artistic Die card & envelope

For the envelope, more of the same Garden Walk 6×6 DSP on the flap and the larger flower from Artistically Inked stamp set stamped in Poppy Parade ink on the front. And finis! My hubby particularly likes this card :O)

The countdown is on… Stampin’ Up! offer of the Joining Promotion ends at close of day Oct 31 – tomorrow! Let me refresh your memory about the Joining Promotion.

Stampin' Up! 35 year Joining Promotion

Celebrating 35 years of Stampin’ Up!, new demonstrators will be able to choose 35% OFF the cost of their Starter Kit or get 35% MORE product with their Starter Kit.

With option 1 (35% off the normal cost of the starter kit), the new demo would receive $125 worth of products and pay $64.35 + tax. and of course, shipping is FREE.

MORE – MORE – MORE… With either option, those who sign up for the starter kit between Oct 3 and Oct 31 will automatically get signed up for the ONSTAGE@HOME Registration, again FREE! This is a virtual event being held November 11. (Normally the cost of registration would be $77) If you join as demonstrator during the time frame mentioned, you will receive in your email, all the information necessary to attend this virtual event.

Have I intrigued you, inspired you, made you think maybe this is the time to join as a demonstrator? If so, – would love to have you. Remember, hobby demonstrator (for the 20% discount) or a business demo (at least 20% off all demonstrator orders – or more) or somewhere in between. It just doesn’t matter. What does matter is if you like to stamp, color, ink up, create – that’s where it all blends into having fun and doing it with others.

JOIN MY TEAM HERE.

  • Those who sign up for this offer have the opportunity to watch the event independently, gathered together with other demonstrators, or with their Team Leader.
  • Demonstrators who join during this promotion will be automatically added to the OnStage attendees; you won’t even need to register separately.
  • Demonstrators who join during this promotion will also receive an email with all the information about this event.

Whether you’d like to start a little side business or simply take advantage of the awesome 20% discount, I would very much love for you to join my Krew team! We have a great time together – even though we live all over the country!

Want to purchase the supplies for this card? Supplies can be ordered using this link to my online store. You will find ONLINE EXCLUSIVES, Clearance Rack, Sep-Dec Mini Catalog, the Annual Catalog, kits, Paper Pumpkin – you name it. Shop at your convenience :O)

When ordering from me please use my HOST CODE 2J2X3YRM so that I receive proper notification and YOU GET THE Benefits of a FREE SU! item valued up to $10 :O) AND the Monthly Card Tutorial. (I like to treat my customers!) If your order is over $150, please don’t use the host code as SU! has benefits. I’ll still be notified and you can receive that FREE ITEM!

Note: Make sure that you can see my name on the final checkout page listed as your Demonstrator when you order so that you know that you’re ordering with me and you’ll get my rewards! PLUS… the monthly Online Tutorial when your oder is over $50. The October Tutorial features the beautiful Merriest Trees Bundle which can found in the Jul-Dec 2023 Mini Catalog on page 12!

Thanks for stopping by today. May you have a beautiful day!

Stampin’ Up! Translucent Florals Birthday Card

Hello again! It’s Wednesday, midweek and I’m wondering how your week is proceeding. We are hoping to secure our sailboat this week for winter storage. Winds can be an issue for sailing into the channel where we store the boat, but Thursday looks to be on our side. Here’s hoping. I played this afternoon with a Designer Series Paper found in the ONLINE EXCLUSIVES side of the store – Delightfully Floral 12×12 DSP. It has spring-like colors and yes, beautiful florals/ leaves. And it coordinates with Translucent Florals Bundle (stamps & dies). It’s a beautiful set, very feminine, and I enjoyed playing with it.

Stampin' Up! Translucent Florals & Delightfully Floral DSP

The Delightfully Floral 12×12 DSP takes venter stage here, really showing off. The flowers are in Berry Burst, Fresh Freesia and Calypso Coral. I used inks from the first two colors + Parakeet Party as an accent. The card base is Fresh Freesia in a top fold A2 size. The next three layers are together & on dimensionals attached to the card base: Delightfully Floral DSP on the non-floral side, Basic White and the front layer of Delightfully Floral DSP with these gorgeous medium flowers. I stamped the hexagon dots with the Heartfelt Hexagon stamp set & Berry Burst ink on a Basic White scrap, then stamped the sentiment using the Translucent Florals stamp set and more Berry Burst ink, then punched it out with the Heartfelt Hexagon Punch. I set this aside and stamped two florals designs from the Translucent Florals stamp set, both in Fresh Freesia ink and die cut them with dies from the Translucent Floral Dies. I adhered the larger floral to the hexagon with dimensionals, then the smaller one close to it with a single dimensional. I added Stampin’ Seal to the back of the hexagon and wrapped a Parakeet Party ribbon from the Ribbon Due Combo Pack in a ‘Z’, I added dimensionals to the hexagon, covering the ribbon and attached this to the card front. For afinal touch I attached Adhesive-Backed Sequins in Berry Burst on the hexagon. And… the front is done!

Stampin' Up! Translucent Florals birthday card, inside

For the inside, I added a piece of Parakeet Party card stock to the card base. I proceeded to stamp in Berry Burst ink, this larger floral from the Translucent Florals stamp set, then stamped the center in Pretty Peacock ink with the appropriate stamp from this same set on a Basic White panel. I stamped the inside sentiment in Fresh Freesia ink for a nice contrast. I added the same Adhesive-Backed Sequins in Berry Burst around the flower. This was added right over the Parakeet Party panel and the card was complete!

Stampin' Up! Translucent Florals & Delightfully Floral DSP card & envelope

For the envelope, I covered the flap in another panel of the Delightfully Floral 12×12 DSP and trimmed it to fit. For the envelope front, I stamped this delicaste image from the Translucent Florals stamp set in Pretty Peacock ink – done, done. let’s see, have I left out anything? When I first saw this DSP, my thought was – too bold, too bright, too, too. Now that I have it and am mplaying with it, I love it! One of the things I like about it is the contrasting, non-normal colors. I find it gives me creativity. You may see more of this layout in the days ahead!

Today is Wednesday and it’s the 25th – just days away from the END of the Stampin’ Up! Joining Promotion. It’s a 35 year celebration of Stampin’ Up! being in business and it’s a really good deal. Let me run this past you once more…

Stampin’ Up! is offering an amazing deal as they are

celebrating 35 years in business.

Stampin' Up! 35 year Joining Promotion

Starting Oct 3 and going through to Oct 31 is a Starter Kit Special you will not want to miss. Celebrating 35 years of Stampin’ Up!, new demonstrators will be able to choose 35% OFF the cost of their Starter Kit or get 35% MORE product with their Starter Kit.

With option 1 (35% off the normal cost of the starter kit), the new demo would receive $125 worth of products and pay $64.35 + tax. and of course, shipping is FREE.

MORE – MORE – MORE… With either option, those who sign up for the starter kit between Oct 3 and Oct 31 will automatically get signed up for the ONSTAGE@HOME Registration, again FREE! This is a virtual event being held November 11. (Normally the cost of registration would be $77) If you join as demonstrator during the time frame mentioned, you will receive in your email, all the information necessary to attend this virtual event.

Have I intrigued you, inspired you, made you think maybe this is the time to join as a demonstrator? If so, – would love to have you. Remember, hobby demonstrator (for the 20% discount) or a business demo (at least 20% off all demonstrator orders – or more) or somewhere in between. It just doesn’t matter. What does matter is if you like to stamp, color, ink up, create – that’s where it all blends into having fun and doing it with others.

JOIN MY TEAM HERE.

  • Those who sign up for this offer have the opportunity to watch the event independently, gathered together with other demonstrators, or with their Team Leader.
  • Demonstrators who join during this promotion will be automatically added to the OnStage attendees; you won’t even need to register separately.
  • Demonstrators who join during this promotion will also receive an email with all the information about this event.

Whether you’d like to start a little side business or simply take advantage of the awesome 20% discount, I would very much love for you to join my Krew team! We have a great time together – even though we live all over the country!

Want to purchase the supplies for this card? Supplies can be ordered using this link to my online store. You will find ONLINE EXCLUSIVES, Clearance Rack, Sep-Dec Mini Catalog, the Annual Catalog, kits, Paper Pumpkin – you name it. Shop at your convenience :O)

When ordering from me please use my HOST CODE 2J2X3YRM so that I receive proper notification and YOU GET THE Benefits of a FREE SU! item valued up to $10 :O) AND the Monthly Card Tutorial. (I like to treat my customers!) If your order is over $150, please don’t use the host code as SU! has benefits. I’ll still be notified and you can receive that FREE ITEM!

Note: Make sure that you can see my name on the final checkout page listed as your Demonstrator when you order so that you know that you’re ordering with me and you’ll get my rewards! PLUS… the monthly Online Tutorial when your oder is over $50. The October Tutorial features the beautiful Merriest Trees Bundle which can found in the Jul-Dec 2023 Mini Catalog on page 12!

Thanks so much for stopping by.

I hope you like the card – very fun – and gorgeous.

May you have a beautiful day!

Card cuts for this card:

Fresh Freesia card base: 4 14 x 11, scored @ 5 1/2

DSP layer – Delightfully Floral 4 3/4 x 5; also 3 3/8 x 4 7/8 for the floral design; 2 1/4 x 6 for the envelope flap

Basic White: 3 1/2 x 4 3/4 (layer) 3 3/4 x 5 (inside); 2 3/4 x 4 1/2 (die cuts & punch

Parakeet Party – inside 3 7/8 x 5 1/8

Stampin’ Up! Pop-Out Gate Fold for the Happy Inkin’ Thursday Blog Hop

Welcome to another fun BLOG HOP by our creative group. I can’t wait to see what others have made for the hop today. We have a color challenge.

Stampin' Up! Color Challenge for Inkin' Thursday Blog Hop
Stampin' Up! Happy Inkin' Thursday Blog Hop
Stampin' Up! Pop-Out Gate Fold w/ Bright & Beautiful 6x6

Can you see all those colors in the color challenge in this DSP? Blueberry Bushel is the card base; Lost Lagoon is the ink on the sentiment, and Pretty Peacock is in the DSP, Moody Mauve is in the DSP too. So, I’m covered – whew! Isn’t this a fun card? I had such fun creating it!

  • Card base is 8 x 5 1/2, score at 2, 6 on long side
  • On the short side, cut @ 1 1/4″ on both short sides between score lines
  • On the long side, score @ 3″ & 5″ between cut lines
  • On the long side, score @ 4″ from top & bottom to cut line
Stasmpin' Up! Pop-Out Gate Fold basic form
Stampin' Up! Pop-Out Gate Fold from the top

In far left photo is how your card base should look after all cutting and score lines have been made. The photo next to it shows the image from the top.

Now it’s time to decorate with DSP & die cuts and all that good stuff.

DSP & center layers:

  • DSP for side front panels: 1 7/8 x 5 3/8, cut 2
  • DSP for small sections: 1 7/8 x 1 1/8, cut 4
  • Center card stock: 2 3/8 x 3
  • Center DSP: 2 1/4 x 2 7/8

Adhere center layers together & add to small center section of card.

Stampin' Up! Pop-Out Gate Fold side DSP panels
Stampin' Up! Pop-Out Gate Fold DSP panels & center panel

In photos at left, it is clear where the various panels should be added, whether by liquid glue or Stampin’ Seal. I prefer the liquid glue as it allows for flexibility. It is up to you, however.

Now it’s time to decorate! I used Bright & Beautiful 6×6 DSP for the balloons and the added panels of DSP adhered to the card base & center section. I used Beautiful Balloons stamp set and Beautiful Balloons Dies for all the die cuts – including the center sentiment banner, stars and tassel. The stars & tassel were die cut from the ONLINE EXCLUSIVE Silver & Gold Adhesive-Backed Glitter Paper (LOVE THIS!) Because the glitter paper is adhesive backed, I die cut another tassel in white to adhere to it. On the smaller balloon, I added Gold Celebrations SDSP to the Bright & Beautiful DSP prior to die cutting. I colored a couple of strings of White Baker’s Twine with Light Blueberry Bushel Stampin Blends & tied them around the balloon bottoms and attached the ends with a rolled glue dot. I also added Pastel Adhesive-Backed Sequins in Gold to further the gold effect. On the back, I added a 1 1/2 x 4 Basic White strip to a side panel to write my message. And the card was done!

Stampin' Up! Pop-Out Fun Fold card & envelope

On the envelope I added a 2 1/4 x 6 piece of Bright & Beautiful 6×6 DSP and trimmed it to fit. I stamped the front of the envelope with Lost Lagoon ink and a sentiment from Beautiful Balloons stamp set.

Thanks for stopping by today. Now it’s time to hop along to see what others have created. Click on the next button or name to get you where you want to go. ENJOY!

Stampin' Up! Happy Inkin' Thursday Blog hop 'next' button

Amy Koenders

Mary Deatherage

Karen Finkle

Akiko Sudano

Karen Ksenzakovic

Tara Carpenter

Carol Buckalew

If you would like to order this or any other items, this is a link to my online store. You will find ONLINE EXCLUSIVES, Clearance Rack, Sep-Dec Mini Catalog, the Annual Catalog, kits, Paper Pumpkin – you name it. Shop at your convenience :O)

When ordering from me please use my HOST CODE 2J2X3YRM so that I receive proper notification and YOU GET THE Benefits of a FREE SU! item valued up to $10 :O) AND the Monthly Card Tutorial. If your order is over $150, please don’t use the host code as SU! has benefits. I’ll still be notified and you can receive that FREE ITEM!

Note: Make sure that you can see my name on the final checkout page listed as your Demonstrator when you order so that you know that you’re ordering with me and you’ll get my rewards! PLUS… the monthly Online Tutorial when your oder is over $50. The October Tutorial features the beautiful Merriest Trees Bundle which can found in the Jul-Dec 2023 Mini Catalog on page 12!

Stampin’ Up! is offering an amazing deal as they are celebrating 35 years in business.

Stampin' Up! 35 year Joining Promotion

Starting Oct 3 and going through to Oct 31 is a Starter Kit Special you will not want to miss. Celebrating 35 years of Stampin’ Up!, new demonstrators will be able to choose 35% OFF the cost of their Starter Kit or get 35% MORE product with their Starter Kit.

With option 1 (35% off the normal cost of the starter kit), the new demo would receive $125 worth of products and pay $64.35 + tax. and of course, shipping is FREE.

With option 2 (35% more SU! product) the new demo would pay the usual $99 plus tax of course, and get $168.75 worth of SU! product that you get to choose! And as before – – shipping is FREE!

MORE – MORE – MORE… With either option, those who sign up for the starter kit between Oct 3 and Oct 31 will automatically get signed up for the ONSTAGE@HOME Registration, again FREE! This is a virtual event being held November 11. (Normally the cost of registration would be $77) If you join as demonstrator during the time frame mentioned, you will receive in your email, all the information necessary to attend this virtual event.

Have I intrigued you, inspired you, made you think maybe this is the time to join as a demonstrator? If so, – would love to have you. Remember, hobby demonstrator (for the 20% discount) or a business demo (at least 20% off all demonstrator orders – or more) or somewhere in between. It just doesn’t matter. What does matter is if you like to stamp, color, ink up, create – that’s where it all blends into having fun and doing it with others.

JOIN MY TEAM HERE.

You’ll ALSO get FREE OnStage@Home Registration!

Those who sign up for a Starter Kit during this offer will also be automatically registered for FREE* to our virtual OnStage event on 11 November – that’s a $77 value!  And – you don’t even have to travel – just do it from home.  In your jammies, if you like!

  • Those who sign up for this offer have the opportunity to watch the event independently, gathered together with other demonstrators, or with their Team Leader.
  • Demonstrators who join during this promotion will be automatically added to the OnStage attendees; you won’t even need to register separately.
  • Demonstrators who join during this promotion will also receive an email with all the information about this event.

Whether you’d like to start a little side business or simply take advantage of the awesome 20% discount, I would very much love for you to join my Krew team! We have a great time together – even though we live all over the country!

RUSTIC CHRISTMAS COUNTDOWN KIT

Stampin' Up! Rustic Kit Collection

This kit includes: 

  • Enough supplies to create 25 individual envelopes
  • Printed die cuts, printed labels, adhesive, embellishments, clothespins, and twine
  • Folded envelope size: 4″ x 3″ (10.2 x 7.6 cm)
  • Coordinating colors: Cherry Cobbler, Crumb Cake, Mossy Meadow, Old Olive

This is just one of the kits available – shop here

Thanks for stopping by. May you have a beautiful day!

Stampin’ Up! Garden Walk 6×6 Birthday card

Good Wednesday – happy Sep-Dec 2023 Mini Catalog opening day!!! Wheee. It’s time for customer ‘happy day’, right? My card today features one of the Designer Series Paspers in this new catalog – Garden Walk 6×6 DSP.

Stampin' Up!Garden Walk 6x6 birthday

I’ve paired this designert series paper with Timeless Charm bundle which is part of an ONLINE EXCLUSIVE as I do not yet have the coordinating stamps & dies to the DSP. Aren’t the colors pretty? Calypso Coral, Poppy Parade, and Garden Green plus some softer tones of maybe Balmy Blue, although that is not mentioned on the color coordination label.

The Garden Walk DSP is cut 1 x 4 for the two longer strips & 1 x 2 3/4 for the two end strips. And the cool part about this particular pattern is that the dotted side is the reverse of the flower pattern side :O). These were adhered to a Calypso Coral piece 4 x 5 1/4.n The Basic White piece is 1 5/8 x 2 7/8 and stamped prior to adhering in place. The sentiment comes from Timeless Charm stamp set and was stamped in Poppy Parade ink. The splotches are from the Timeless Charm stamp set and stamped in second generation Calypso Coral ink. Once adhered in place, the die cut flower was adhered with liquid glue. This is a Basic White die cut from the Timeless Charm Dies. The Garden Green leaves are a die cut from Timeless Charm Dies and also adhered with liquid glue. I die cut an additional flower center in Calypso Coral and adhered in in place with mini dimensionals. The final touch for the card front was the Iridescent Pastel Gems in Balmy Blue.

Stampin' Up! Timeless Charm stamp set

Again, using Timeless Charm stamp set, I stamped this ‘blob’ in second generation Calypso Coral then added the flower from Timeless Charm stamp set in Poppy Parade – all on a Basic White panel.

Stampin' Up! Garden Walk 6x6b DSP birthday card & envelope

For the envelope, more of the Garden Walk 6×6 DSP for the flap, adhered & trimmed to fit. The fun leaf stamp is from Timeless Charm stamp set and stamped in stamped off Garden Green ink. A very thin strip of the Garden Walk 6×6 DSP was added at the bottom to tie it all together. A fun, quick and easy card :O)

With the Sep-Dec 2023 Mini Catalog going live today, you can purchase that paper easily right here. And for the Timeless Charm bundle and other Stampin’ Up! ONLINE EXCLUSIVES, shop with me here. While you’re viewing the ONLINE EXCLUSIVES, please note, there is a Special Release of new Designer Series Papers available WHILE SUPPLIES LAST beginning today Sep 6.

Surprise, surprise! We’re offering a special release of five beautiful new Designer Series Paper options! These papers include fabulous holiday prints, gorgeous seasonal styles, and some spectacular timeless designs. 

We originally created these papers to be part of our second Sale-A-Bration offering. However, since our next release of new Online Exclusive products won’t happen until November (and you won’t be able to find any of these papers in a catalog), we’ve adjusted our strategy and decided to release these paper options starting 6 September! That way, you and your customers have the chance to get ahead on Christmas cards, seasonal crafts, and much more. These products are available while supplies last.

When you do shop with me, be sure I’m listed as your demonstrator so that I can send you gifties when your order is $50 or more. That gift is something of your Stampin’ Up! choice valued up to $10. Happy shopping. Use my CURRENT HOST CODE HDN4VQHR so I’m notified properly.

Happy shopping and have a great day!

Stampin’ Up! Gorgeously Made Birthday

Stampin’ Up! has some really beautiful papers – and sometimes I get working with a certain Designer Series Paper and just can quit. That’s the way it is with the Masterfully Made DSP – so another card it is…

Stampin' Up! Gorgeously Made birthday

Look at these beautiful colors. Here’s what I did….

  • Pretty Peacock is the card base and after trimming it to size I stamped the front with the word stamp from the Gorgeously Made stamp set in Pretty Peacock ink.
  • I layered one of the Masterfully Made DSP to a Bubble Bath panel, adhering them together and adding them with dimensionals to the card base.
  • I pulled out two papers: Azure Afternoon and Lemon Lime Twist and using the Gorgeously Made Dies, die cut these two leaves. They were added to the card from with various dot of liquid glue.
  • I pulled out this fun ‘notebook edge’ die from the Gorgeously Made Dies and die cut a scrap of the Masterfully Made DSP. This was to be my background for the sentiment.
  • The sentiment is from the Hey Chuck stamp set and is stamped on Basic White in bubble Bath ink.. It was die cut with Gorgeously Made Dies then added to the ‘notebook edge’ die cut piece, dimensionals on back and added to the card front.
  • I added several Blooming Pearls in Pretty Peacock to the sentiment.
  • I tied a bow with lengths of White twine from the Basic Twine pack, and adhered it in place with a glue dot.
Stampin' Up! August Paper Pumpkin stamp

For the inside of the card, I stamped this fun image using an August Paper Pumpkin stamp and Memento ink. I colored it with Stampin’ Blends to coordinate with the Masterfully Made DSP: Bubble Bath, Berry Burst, Lemon Lime Twist and Lemon Lolly. I added strips of the Masterfully Made DSP then stamped the sentiment – again using Bubble Bath ink and an August Paper pumpkin sentiment. And the card was complete!

Stampin' Up! Gorgeously Made birthday card & envelope

For the envelope, more of the Masterfully Made DSP for the envelope flap and a strip for the envelope front to bring it all together. This is a fun, happy, encouraging card and I can’t wait to send it to a favorite person :O)

Today is August 27 and the Mini Sep-Dec 2023 Catalog goes live Sep 6. As I have mentioned before, Stampin’ Up! offers the best Designer Series Papers – and I am offering Designer Series Paper Shares from the new catalog. Here are the deets:

Stampin' Up! Mini Sep-Dec 2023 Catalog DSP Paper Share

Terry Lynn Bright, Stampin’ Up! Demonstrator

https://Tlsbrightspot.com     tlsbrightspot@gmail.com

How my shares work: I order full packs of all the Designer Series Papers listed below. I cut them into 6×6 pieces (or 6×12 for double shares) and give you one panel of each design from each pack on the list. I pack up the paper and get it back out to you just as quickly as possible! Shares give you a good working sample of all of the papers and makes it easier to decide which papers you like most and want to order.

Below is a list of the papers for this Designer Series Paper Share.

A single paper share is $30 plus $8.50 Priority Mail Shipping.

A double paper share is cut 6 x 12 and is $60 plus Priority Mail Shipping.

Remember, one 6×6 sheet of each design from these DSP packs. Most original DSP packs come in 12 x 12 size unless otherwise noted.

The list includes: name of DSP, number of sheets of that DSP in the pack.

  • A Walk in the Forest – 6
  • All About Autumn – (6×6 size) -12
  • Beary Christmas – 6
  • Melon Mambo & Granny Apple Green Foil Sheets – 2
  • Garden Walk – (6×6 size) – 8
  • Glow-In-The-Dark 6×6 Specialty Paper – 1
  • Joy of Christmas – 6
  • Joyful Specialty Paper – 4
  • Merry Bold & Bright – 6
  • O Holy Night – 6
  • Oxidized Copper Specialty Paper – 2
  • Shining Brightly Specialty Paper – 6
  • Snowflake Magic Specialty Paper – 3
  • Them Bones – 6
  • Winter Meadow – 6

Anyone is welcome to join this paper share opportunity, but shipping is limited to addresses within the US. If you would like to join in these shares, please email the following information to tlsbrightspot@gmail.com

  • Your first & last name (yep, I need both :O)
  • The email address connected to your PayPal account. You DO NOT need to have a PayPal account to pay the invoice; you can choose to pay by credit card without having a PayPal account.
  • Deadline to sign up for my shares: Monday, September 4 @ 3 PM ET

If you do not have a demonstrator nor a catalog, please reach out to me – we can FIX that! There are lots of Stampin’ Up! opportunities for shopping:

  • Kits Collection SALE is through the end of August. You can shop those products with me here.
  • Paper Pumpkin is a monthly subscription: You may find more information and subscribe here.
  • Stampin’ Up ONLINE EXCLUSIVES – not in any Stampin’ Up! catalog: Visit here to shop these EXCLUSIVES.

Stampin’ Up! Hey Chuck Fun Fold

Hello Saturday! We had a couple of days of wonderful temps and now we are back to humidity. Ugh. Well, this is summer and I’m not going to wish it away! Let’s take a peek at my card for today.

Stampin' Up! Hey Chuck Fun Fold

I’m going to confess, I don’t know the name of this fun fold and it needs a name. Help me out here, folks – let’s name it! The card base is 4 1/4 x 11 scored at 2 1/2, 3 3/4, 6 3/4 and 8 1/4. Burnish the folds in an accordion style: mountain, valley, mountain, valley.

Stampin' Up! Hey Chuck Fun Fold top view.

I used Gray Granite for my card base. The next layer is Basic White with a layer of DSP: I used Subtles and Neutrals 6×6 DSP. How these layers are attached is important: leaving a border of the card base in each case.

Stampin' Up! Hey Chuck Fun Fold.1
Stampin' Up! Hey Chuck Fun Fold.2
Stampin' Up! Hey Chuck Fun Fold.3

In the first photo, the card base border is about 1/4″ on the left, top & bottom, with the excess free. In the second photo the same is true, 1/4″ from scoreline on left and 1/4″ top & bottom b order. The final panel is smaller and the layer is Pool Party with Subtles 6×6 DSP in Pool Party.

Now let’s decorate each panel:

  • Panel 1: The circle is die cut from Pool Party using the Stylish Shapes Dies and adhered in the center. The chicken and skateboard (from Hey Chuck stamp set) are stamped in Memento ink on Basic White and colored with Stampin’ Blends: Pool Party, Calypso Coral, Gray Granite, Lemon Lolly and Pecan Pie (skateboard). Both were die cut with the Hey Chuck Dies, dimensionals added and adhered to the center of the circle. The sentiment is also from Hey Chuck stamp set and stamped in Memento ink then die cut with the Gorgeously Made banner die and added with dimensionals. Three Glossy Dots Assortment in Daffodil Delight were added for sparkle.
  • Panel 2: Subtles 6×6 DSP in Gray Granite to the Basic White panel. Die cut the rising sun from Lemon Lolly card stock using the Hey Chuck Dies and color with a bit of Dark Lemon Lolly Stampin’ Blends. Stamp the fence from Hey Chuck stamp set on a scrap of One Horse Open Sleigh 6×6 DSP (ONLINE EXCLUSIVES) in Memento ink and die cut with die from Hey Chuck Dies. Adhere the fence with dimensionals then slip the rising sun behind adhering with liquid glue. The final step for this panel is the sentiment stamped in Memento ink using the Hey Chuck stamp set.
  • Panel 3: Pool Party card stock with Subtles 6×6 DSP in Pool Party layered together. The birthday cake from Hey Chuck stamp set is stamped in Memento ink on a Basic White scrap and colored with Stampin’ Blends: Lemon Lolly, Pool Party and Wink of Stella on the icing. This was die cut with the smallest circle die from Stylish Shapes Dies and adhered with liquid glue. The sentiment banner was stamped on Basic White using another stamp from Hey Chuck stamp set and Memento ink. It was die cut with a banner die from Nested Essentials Dies, dimensionals added to the back and attached. The ribbon is Grosgrain Ribbon in Pool Party added under the banner with glue dots. Three Glossy Dots Assortment in Pool Party were added to the banner for more sparkle… and the card was done.
Stampin' Up! Hey Chuck 
Fun Fold card & envelope

For the envelope… more Subtles 6×6 DSP in Pool Party was added to the flap and trimmed to fit. Another chicken from Hey Chuck stamp set was stamped in Memento ink on the envelope front and colored with Stampin’ Blends: Pool Party, Calypso Coral, Lemon Lolly and Gray Granite. HINT: When coloring with Stampin’ Blends on an envelope, always slip a heavy card stock inside to prevent color bleeding through to the back of the envelope. :O)

Fun, bright card, right? Ok, what else is going on in the Stampin’ Up! world…

  • Redeem your coupons this month!
  • the Mini September-December 2023 Catalog is available to demonstrators and my order for catalogs to my customers has shipped. I just don’t have it yet – Monday they say :O( Once I receive the catalogs though, the labels are ready and will be sent first class to my customers. Wait till you see all the fun, new products! I can’t wait to play with what I’ve ordered and share those with you. If you would like to order from the catalogs early as well, join my team. We have lots of fun: support from several team leaders, challenges to participate in, projects to share & inspire. If you join now, you can order items from the new catalog right away. :O) The catalog goes live to customers September 6. You may join my team here.
  • To order from me: you may do that here.
  • Kits Collection Sale
Stampin' Up! Kits Collection Sale
  • Kits are fun, quick and easy, and all-inclusive so there’s nothing extra to buy and nothing to store afterward.
  • Completing a kit gives everyone a sense of artistic accomplishment.
  • Completed kits make great gifts. Make the projects and then give them away for someone else to use.
  • Because kits come in so many styles and project types, there’s something for everyone. Want to HOST a kits collection party? Let me know and I’ll help pull that off. Kt together in September with kits on sale now. :O)

KITS COLLECTION BY STAMPIN’ UP! You can shop with me here.

Sales Period: 1–31 August

Card cuts for today’s project:

Card base – Gray Granite 4 1/4 x 11 scored at 2 1/2, 3 3/4, 6 3/4, 8 1/4

Basic White – 4 x 4 (2) + scraps for sentiments, chicken & other images

DSP: Subtles 6×6 DSP – Pool Party 3 3/4 x 3 3/4 + 2 1/4 x 3 3/4 + 2 1/4 x 6 (envelope flap); Gray Granite 3 3/4 x 3 3/4

Pool Party card stock – 2 3/4 square (die cut circle); 2 1/2 x 4 (last panel)

Stampin’ Up! Double Pop-Up in Earthen Elegance

Good Sunday morning! Wow – it’s a beautiful c-o-o-l 65 this morning! I’ll take it. My card today is a very fun Pop-Up card that’s really pretty easy & quick. It’s a birthday card for a gentleman and I used He’s All That stamp set for the sentiments and Earthen Elegance Designer Series Paper.

Stampin' Up! Double Pop-Up in Earthen Elegance

This is a bit like a Z-fold card: 8 1/2 x 5 1/2 card base scored at 2 1/8 & 4 1/4. You can see in the photo how to fold it. I used the Earthen Elegance DSP for the mat layer as well as the top layer. It saves on the weight of the card.

Stampin' Up! Double Pop-Up card in progress

The photo at left shows the mat layers in place: the front and the inside sections. The next step is the inside pop-up 4 x 5 1/2 scored @ 1/2, 1, 2, & 2 1/2. Burnish gently since this is DSP, then add tear n’ tape to sections 1, 3, & 4. Remove cover on Tear n’ Tape in section 1 & fold i8n to itself to create the pop-up. Remove Tear n Tape covers in section 3 and attach to inside back panel of card. Remove cover of last strip of Tear n Tape and adhere to 2nd panel of card.

Stampin' Up! Pop-Up card.1
Stampin' Up Pop-Up card.2
Stampin' Up! Pop-Up card.3
Stampin' Up! Pop-Up card insert

This last photo shows the insert (pop-up) looking from the top and how it fits in the card. Now it’s time to decorate the pop-up. I die cut a Basic White piece with the Deckled Rectangle Dies then stamped the image from He’s The Man stamp set in Pretty Peacock ink, adhered it to the pop-up so it had an even border on three sides. I added four 2023-2025 In Color Dots in Pebbled Path under the stamped image.


To create the front image, I used a smaller Deckled Rectangle Die to die cut another Basic White piece to stamp another image from He’s All That stamp set in Pebbled Path ink. I layered a slightly larger piece of Earthen Elegance in Pretty Peacock to this to carry out the ‘frame’. I turned this piece over to know exactly where to add the tear n tape to adhere it to the front section (see photo). Then I removed the cover of the tear n tape & added to the front so you could see a continuous frame of color.

Stampin' Up! Double Pop-Up card add ons
Stampin' Up! Double Pop-up card front

When the card is closed it shows the front panel and the poop-up panel framing it. That’s what I wanted to do. The next photo shows the card open.

Stampin' Up! Double Pop-Up card open

You can see that I also added four Adhesive-Backed Sequins Trio in Pretty Peacock under the sentiment. For the envelope.. more of the Earthen Elegance DSP in Pretty Peacock on the flap and several stamped stars from Alphabest stamp set in Pretty Peacock ink. At the last minute I decided to decorate the card back so I would have a place to write. I stamped the Happy in Pretty Peacock ink using the Biggest Wish stamp set. The numbers were done with the Alphabest stamp set and punched with the Best Label Punch. And now the card was complete!

Stampin' Up! Pop-Up envelope.
Stampin' Up! Pop-Up card back