Stampin’ Up! Decorative Trees Bundle & Two Projects

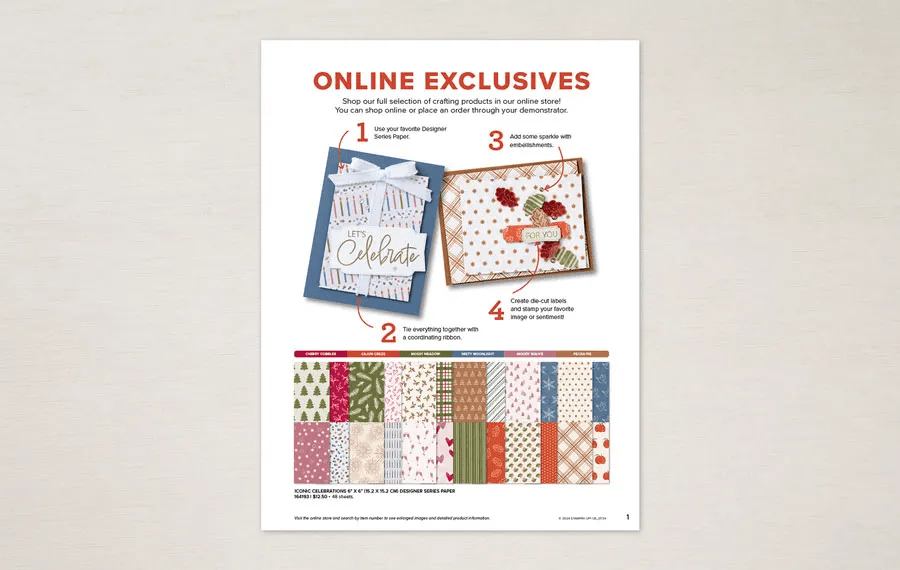
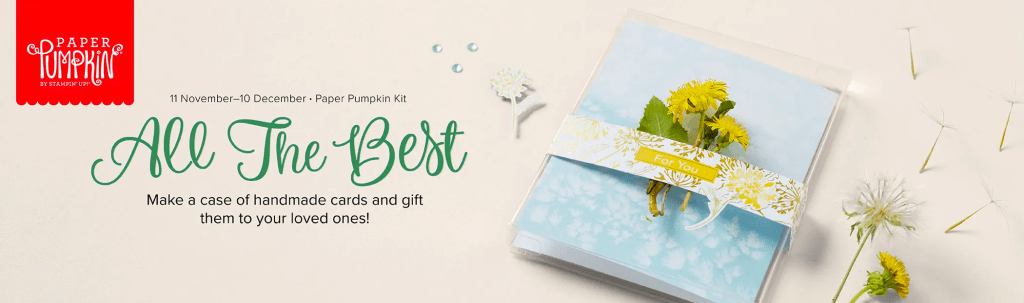
What is your passion? Do you like doodling, creating, doing or making things for others? I enjoy people, most people that is, and I enjoy creating mostly for others. Creating calms me when life sometimes gets out of control. It lowers my stress level when life gets out of balance. Thursday was a card class day and we used the the Decorative Trees bundle. This is in the Sep-Dec 2024 Mini Catalog and I highly recommend it. This catalog goes live Sep 3 – just days away. Let’s look at what we made…

Stampin' Up! Decorative Trees card front

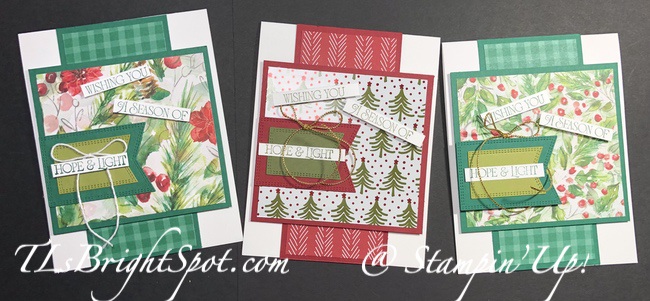
Talk about Christmas – this is it! Oh Christmas tree, Oh Christmas Tree, how lovely are thy branches. Hee Hee. This does NOT show the glittery paper! Darn! However… this is a two step tree die cut, using two dies. The first tree is the background and is die cut from Festive 12 x 12 Glimmer Paper in Granny Apple Green. The next layer is plain Granny Apple Green cardstock with Adhesive Sheet applied to it. The Adhesive Sheet allows you to peel back and stick – similar to how we use dimensionals. :O) When the die cut is delicate, it makes it so easy to use the Adhesive Sheets. Now the tree is together, let’s work on the rest of the card.

  • the card base is Garden Green 4 1/4 x 11 and scored at 5 1/2
  • layer Basic White 4 1/8 x 5 3/8 and adhere to card front.
  • next layer is Granny Apple Green 4 x 5 1/4 and embossed in the Birch Wood 3D embossing folder, then adere directly to the Basic White
  • next layer is Basic White 3 1/8 x 3 1//8
  • final layer is Take A Bow 6x6b DSP cut 3 x 3 and adhered to Basic White: both adhered to card front with equal top & side edges
  • add the tree with dimensionals
  • add a double bow from Natural Tones Linen Thread in Garden Green – a glue dot works well

The card front sentiment comes from the Decorative Trees stamp set. I wanted this sentiment to have a sheen and have heat embossed in clear embossing powder. Here’s how…

  • ink the sentiment with VersaMark ink, then ink right away with Garden Green ink and stamp on the Basic White strip 1 x 3 1/8
  • sprinkle with Clear Embossing Powder and heat set with the heat tool.

Attach the Basic White sentiment strip to the card front with dimensionals and add Adhesive-Backed Shiny Sequins in Granny Apple Green.

Stampin' Up! Decorative Trees card inside

For the inside, I wanted the same sheen to the sentiment from Decorative Trees stamp set:

  • ink sentiment with VersaMark ink, then ink stamp with Garden Green ink – stamp the 4 x 5 1/4 Basic White panel
  • sprinkle the ink with Clear Embossing Powder and heat set with the Heat Tool
Stampin' Up! Decorative Trees card & Envelope

For the envelope…I used the same Take A Bow 6×6 DSP pattern to adhere to the flap and trimmed to fit. On the front I stamped the tree image from Decorative Trees stamp set in Garden Green ink – and done!

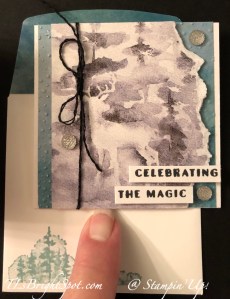
For our second project, we created an ornament using the Decorative Trees Dies only. Below are the front, attached loop for hanging and dimensionals to hold in place and last photo is the back side, DSP only.

I used the Decorative Trees outline die to die cut the tree from another DSP in the Sep-Dec Mini Catalog: Season of Elegance SDSP in Pretty Peacock, cut 2. I die cut the snowflake/ tree detail die from Nests of Winter DSP to which I added Adhesive Sheet for easy adhering. I also added Adhesive-Backed Sparkle Gems to two places on the snowflake diecut. Isn’t this paper gorgeous? It comes in Pretty Peacock, Cherry Cobbler and Basic Beige.

If you do not have a demonstrator and need a catalog – please connect with me soon so you can enjoy all the fun products in this Sep-Dec Mini Catalog. And if you decide to shop with me – you may do that here.

Use my HOST CODE when you order for those fringe benefits… Free item of the month with a $50 order: Drusy Adhesive-Backed Embellishments and the tutorial of the month! These embellishments will be ordered at the end of the month and sent out to customers with that $50 & up order!

host code ZBAU6PKX

Remember that Designer Series Paper Saloe – still 15% off through Aug 31…

Thanks for stopping by. I hope you have found these projects inspiring and helpful. If you have questions, let me know! I’m happy to answer them.

May you have a beautiful day. Make someone happy by sending them a handmade card made with love.

Stampin’ Up! Fun Fold for Amy’s Inkin’ Krew Team Blog Hop

We have a fun fold challenge for this Tuesday team blog hop and I’m using several of the new ONLINE EXCLUSIVE products from the Season of Green & Gold Suite Collection. Let’s take a peek.

Stampin' Up! Season of Green & Gold Easy Flap Fun Fold card front

This card is called a Front Flap Fun Fold.n I did a bit of die cutting using the Golden Greenery Dies and Season of Green & Gold Specialty Designer Series Paper (better known as SDSP) and the Graceful Greenery Vellum. The bells are die cut from the SDSP and the wonderful fronds from the vellum.

Card instructions:

  • Card base is Mossy Meadow 5 1/2 x 4 1/4
  • Layer a panel of SDSP (here I used the Season of Green & Gold SDSP, plaid pattern), attaching with adhesive.
  • Cut a 3 x 8 1/2 Mossy Meadow piece and score at 4 1/4: attach to center of card, with fold at top of card base.
  • Cut 2 panels of Basic White 2 3/4 x 4 1/4 & decorate
    • Front panel of Basic White
      • I cut two Garden Green fronds and one Old Olive frond from the Graceful Greenery Vellum and adhered to one of the Basic White panels, centering them at top
      • I die cut the single bells from the Season of Green & Gold SDSP, adhered them together then added them over the fronds with dimensionals
      • I added a double Linen Thread bow to the top of the bells with a glue dot.
      • Stamp the sentiment and ampersand sign in Cherry Cobbler ink using the Greetings of the Season stamp set (this also comes as a bundle – with dies – but I did not use those for this card)
      • Embellish with several Adhesive-Backed Sparkle Gems
      • Adhere this panel to the folded Mossy Meadow
    • Inside panel of Basic White
      • Stamp the sentiment in Mossy Meadow ink using the Greetings of the Season stamp set
      • Stamp the fronds detail stamp in stamped off once Mossy Meadow ink
      • Stamp the fronds full stamp in stamped off twice Mossy Meadow ink
      • Add panel to inside of flap card panel – and done!
Stampin' Up!

Now for the envelope… cover the flap in a piece of the Season of Green & Gold SDSP and trim to fit. On the envelope front, stamp a different detail front in stamped off once Old Olive ink. Stamp the full frond in stamped off twice Old Olive ink – and this card is ready for that Christmas card pile.

For more information about my card and purchasing these products from my ONLINE EXCLUSIVES, see below the list of Krew participants!

Now it’s time to head over to the rest of the Krew to see what fun folds they have created for the challenge today. Click on the icon or click on a name to take you visiting the others. Have fun hopping!

  1. Mary Deatherage
  2. Tara Carpenter
  3. Ann Louise Fodgaard
  4. Karen Finkle
  5. Akiko Sudano
  6. Karen Ksenzakovic
  7. Shirley Gentry
  8. Carol Buckalew
  9. Terry Lynn Brightthis is me!
  10. Nel Thames
  11. Amy Koenders
Link here to the Supply List

Bonus Days are an exciting time of receiving $5 coupons for every $50 purchase. Below are ALL the details for this Stampin’ Up! promotion. Are you ALL IN? I certainly hope so, ‘cuz I certainly am.

PROMOTION DETAILS

Earning Period: 3–31 July 2024
Ordering Deadlines
Phone: 31 July 2024 at 6:59 p.m. (MT) 
Online: 31 July 2024 at 11:59 p.m. (MT) 

  • All coupon codes will be emailed right after a qualifying purchase has been made. Encourage your customers to create an account on our online store. 
  • If a participant earns multiple codes from a single order, they will receive one email with multiple codes. If they earn multiple codes from multiple orders, they will receive separate emails for each code earned.
  • All order types qualify for this promotion. Phone and email orders still require an email address.
  • Orders started before the promotion begins will not count toward earning coupon codes. For example, if you add items to your cart before 3 July and wait to purchase until that date or later, then those items will not qualify towards earning coupons. You must add items to your cart and complete your purchase during the earning period. 
  • There is no limit to the number of coupon codes participants can earn per order or throughout the duration of the earning period
  • Coupon codes can only be earned on commissionable items. Non-commissionable items (such as catalogs) do not count towards coupon earnings. 
  • Customers must use a valid email address during checkout in order to receive their coupon code. If a customer places an order over the phone, they must still provide a valid email address to receive their coupon code.
  • Starter Kit orders are excluded from this offer. All other order types qualify.
  • For workshop orders, each customer who reaches a qualifying amount will receive a coupon code to their provided email address. 
Stampin' Up! Bonus Days Earning period

After earning those coupons, it’s important to know how to use/n redeem them :O)

Redemption Period: 1–31 August 2024
Ordering Deadlines
Phone: 30 August 2024 at 6:59 p.m. (MT) 
Online: 31 August 2024 at 11:59 p.m. (MT)

  • There is no limit to the number of coupon codes participants can redeem on an order during the redemption period. If using multiple codes, they must be separated by a space. 
  • Coupon codes may be redeemed one time only. They cannot be redeemed after the 31 August. 
  • Coupon codes may be redeemed for any product (excluding Starter Kits and demonstrator supply items). They cannot be used on exchanges.
  • Bonus Days coupon codes can be applied to new prepaid Paper Pumpkin subscriptions.
  • Coupon codes will reduce the commissionable amount of an order.

Check out this video to see what Stampin’ Up! says about BONUS DAYS. Just click on the red arrow

Here are some of the ONLINE EXCLUSIVE PRODUCTS AVAILABLE JUL3

Stampin' Up! Iconic Celebrations Suite
Iconic Celebrations Suite
Stampin' Up! Season of Green & Gold Suite
Season of Green & Gold Suite Collection
Stampin' Up! Changing Leaves Bundle
Changing Leaves Bundle includes Hybrid Embossing Folder
Stampin' Up! Potion & Spells Bundle
Potion & Spells Bundle

Join with me by following this link...

To view all the available ONLINE EXCLUSIVES, click here.

Clearance items may be found here

While you’re looking around in my store, remember there are some stunning kits available, for all ages and all seasons – even Christmas! And while you’re shopping, I offer fringe benefits to my customers: free tutorial of the month and a FREE Stampin’ Up! item valued to $10 – all for a $50 order, before shipping and taxes. Use my current host code to receive those benefits – especially when your order does not exceed $150. Make certain my name is listed as your demonstrator when checking out! :O)

HOST CODE  HFXSJCNB

Thanks for stopping by. May you have a beautiful day. Make someone happy when sending them a handmade card filled with love.

Stampin’ Up! Brightest Glow & Labels Aglow Dies

Good Tuesday morning! Today is an exciting day for us Stampin’ Up! Demonstrators – for we are able to order Jan-Apr 2024 Mini Catalogs for our customers, Sale-a-bration catalogs AND items from the mini catalog to preview & play with. Oh my credit card!!! That is not why you joined me today..,. several days ago I mentioned how I thought all Christmas Cards were made – and then I got an order for 10. I completed them last night, so am sharing them this morning.

Stampin' Up! Brightest Glow & Labels Aglow Dies.1
Stampin' Up! Brightest Glow & Labels Aglow Dies.2
Stampin' Up! Brightest Glow & Labels Aglow Dies.3

You can see I used the same layout for every one of the cards, but different card stock layers & DSP. My card base for all of them is Thick Basic White 4 1/4 x 11 scored at 5 1/2. Colored card stock layers were pretty much the same as well… 2 1/2 x 5 1/2 and 4 x 3 3/4. Designer Series Papers were adhered to each panel and they are 2 1/4 x 5 1/4 & 3 3/4 x 3 1/2: Shining Christmas SDSP, Winter Meadow DSP, Joy of Christmas DSP. The sentiments were stamped in coordinating ink colors for each card: Shaded Spruce, Cherry Cobbler, Blueberry Bushel, Lost Lagoon, and Mossy Meadow. I used the Layered Essential Dies for the sentiment area. For the bows: Linen Thread and Simply Elegant Trim in both Silver & gold. The sentiment is from the Brightest Glow stamp set. I did not take a photo of the inside, but used the circle die from the Labels Aglow Dies, stamped it in VersaMark ink and heat set in White Embossing Powder.

Now for other Stampin’ Up! info:

Shop the clearance rack here with updated items listed.

Stampin' Up! LAST CHANCE PRODUCTS

It’s hard to believe products in the Sep-Dec 2023 Mini Catalog are retiring… but they are. Making room for new products means letting go of others. If there is something you have been wanting – get it quickly as products seem to sell very fast.

From 21 November 2023–3 January 2024, you can stock up on your favorite seasonal products and save up to 60% on essential craft supplies! So, what are you waiting for? Start shopping and selling! After all, a selection of Last Chance Products will only be available while supplies last.

CLICK HERE to view the Carryover list and you should be able to print it as well

CLICK HERE to view the Last Chance Products List – print this one too

When ordering from me please use my NEW HOST CODE TJRE9W6M so that I receive proper notification and YOU GET THE Benefits of a FREE SU! item valued up to $10 :O) AND the Monthly Card Tutorial. (I like to treat my customers!) If your order is over $150, please don’t use the host code as SU! has benefits. I’ll still be notified and you can receive that FREE ITEM!

Note: Make sure that you can see my name on the final checkout page listed as your Demonstrator when you order so that you know that you’re ordering with me and you’ll get my rewards! PLUS… the monthly Online Tutorial when your order is over $50. 

Join my team here and still order these products as part of your starter kit – wow! Great time to join!!!

Stampin' Up! Paper Pumpkin

Paper Pumpkin is an all time favorite for many. Each month something new appears in your mailbox. Nov 11 to Dec 10 is the ALL THE BEST PP Kit. Send a wish to all your loved ones with the December Paper Pumpkin Kit! It comes with nine card fronts, three each of three designs, and nine coordinating envelopes. It has paper pieces detailed with gold foil, embellishments, an all-occasion stamp set, and an acetate box where you can store your finished cards! You can gift the kit itself or the finished product in the acetate box; either way, it’s the perfect last minute gift for any occasion. 

ACETATE BOX

The All the Best Paper Pumpkin Kit comes with an acetate box that fits your finished cards and envelopes! This makes easy storage of a finished product or allows you to gift your cards to someone. The kit also comes with a belly-band, so you can add your own personal touch to the box. Subscribe by 10 December to make a handmade gift for those you love. 

GOLD FOIL DETAILS

The paper pieces in the December Paper Pumpkin kit have gold foil detailing. Whether it’s an elegant boarder, or woven into the floral artwork, it’s a detail that will surely catch your recipient’s eye! It’s the perfect way to take any paper craft to the next level. 

HAND DRAWN ARTWORK 

The beauty of the December Paper Pumpkin Kit lies in the hand drawn artwork. The bright blue skies and elegant yellow flowers compliment the different design elements perfectly. It’s a simple yet sophisticated design that will catch any recipient’s eye! 

Subscribe to the December Paper Pumpkin Kit between 11 November and 10 Decembeby clicking here!

Thanks for stopping by. Hope you liked the card today. Would love to hear from you. If I can be of help, please connect with me.

Stampin’ Up! Shining Christmas and Merriest Trees Dies Gift Card Holder

Good Monday morning! Gosh – here we are really INTO December. Have you decorated the house yet? We are in the midst and it is so very messy with all the boxes of decorations. The tree is the last thing to do… as we purchase a live cut tree. So we wait so it doesn’t become too dry and a hazard. :O)

Today’s post is all about gift card holders – and I have one to share that’s different. I like it!

Stampin' Up! Shining Christmas SDSP & Merriest Trees Dies

Love this little gift card holder and I’m in the process of making a few. This SDSP is shiny and of course, two-sided. The panel is 4 x 12 scored at 3, 6, & 9 1/8. Burnish gently. On last panel mark 1/2″ from the last score line at the top of the segment; make another 1/2″ mark up from the bottom of the end panel and cut diagonally.

Stampin' Up! Shining Christmas & Merries Trees Dies, cutting lines

Add Tear n Tape where the white strips are. Cut a panel of Basic White 2 7/8 x 3 7/8, stamp with sentiment (here I used the Brightest Glow stamp set and Cherry Cobbler ink) and adhere to second panel of SDSP (between 2nd & 3rd score lines). Remove Tear n Tape & close.

Stampin' Up! Shining Christmas & Merriest Trees Dies gift card.3

Cut about 20″ length of ribbon (here I used Real Red from the Real Red & Garden Green combo pack); add Stampin’ Seal to ribbon about 6 1/2 from one end and for about 6″.; add to front panel and to second panel, centering from top to bottom. Now decorate!

Stampin' Up! Shining Christmas SDSP & Merriest Trees Dies

I used the various sections of the Merriest Trees Dies to die cut the layers for the tree in Basic White. I attached each layer with dimensionals and added it over the ribbon – with dimensionals. I used the Silver & Gold Adhesive Backed Glimmer Paper and Merriest Trees Dies to die cut the trim and the star atop the tree and added these ever to easily to the complete the tree. I die cut a banner to add a name with the Tailor Made Tags Dies in Basic White and two circles over the hole in Cherry Cobbler. I colored a length of white twine with Cherry Cobbler Stampin’ Blends and tied it in a bow. This tag was attached with dimensionals. I die cut another tag jst as an illustration of where the gift card or check could be placed in the enclosure. And done!

This could so easily be used as a birthday gift card holder or graduation, or anniversary – just change up the Designer Series Paper and decorating the front panel – and there ya go.

Stampin' Up! Last Chance Products

It’s hard to believe products in the Sep-Dec 2023 Mini Catalog are retiring… but they are. Making room for new products means letting go of others. If there is something you have been wanting – get it quickly as products seem to sell very fast.

From 21 November 2023–3 January 2024, you can stock up on your favorite seasonal products and save up to 60% on essential craft supplies! So, what are you waiting for? Start shopping and selling! After all, a selection of Last Chance Products will only be available while supplies last.

CLICK HERE to view the Carryover list and you should be able to print it as well

CLICK HERE to view the Last Chance Products List – print this one too

When ordering from me please use my NEW HOST CODE HSJD7BR6 so that I receive proper notification and YOU GET THE Benefits of a FREE SU! item valued up to $10 :O) AND the Monthly Card Tutorial. (I like to treat my customers!) If your order is over $150, please don’t use the host code as SU! has benefits. I’ll still be notified and you can receive that FREE ITEM!

Note: Make sure that you can see my name on the final checkout page listed as your Demonstrator when you order so that you know that you’re ordering with me and you’ll get my rewards! PLUS… the monthly Online Tutorial when your order is over $50. 

Join my team here and still order these products as part of your starter kit – wow! Great time to join!!!

Stampin' Up! Paper Pumpkin

Paper Pumpkin is an all time favorite for many. Each month something new appears in your mailbox. Nov 11 to Dec 10 is the ALL THE BEST PP Kit. Send a wish to all your loved ones with the December Paper Pumpkin Kit! It comes with nine card fronts, three each of three designs, and nine coordinating envelopes. It has paper pieces detailed with gold foil, embellishments, an all-occasion stamp set, and an acetate box where you can store your finished cards! You can gift the kit itself or the finished product in the acetate box; either way, it’s the perfect last minute gift for any occasion. 

ACETATE BOX

The All the Best Paper Pumpkin Kit comes with an acetate box that fits your finished cards and envelopes! This makes easy storage of a finished product or allows you to gift your cards to someone. The kit also comes with a belly-band, so you can add your own personal touch to the box. Subscribe by 10 December to make a handmade gift for those you love. 

GOLD FOIL DETAILS

The paper pieces in the December Paper Pumpkin kit have gold foil detailing. Whether it’s an elegant boarder, or woven into the floral artwork, it’s a detail that will surely catch your recipient’s eye! It’s the perfect way to take any paper craft to the next level. 

HAND DRAWN ARTWORK 

The beauty of the December Paper Pumpkin Kit lies in the hand drawn artwork. The bright blue skies and elegant yellow flowers compliment the different design elements perfectly. It’s a simple yet sophisticated design that will catch any recipient’s eye! 

Subscribe to the December Paper Pumpkin Kit between 11 November and 10 Decembeby clicking here!

Thanks for stopping by. Hope you liked the card today. Would love to hear from you. If I can be of help, please connect with me.

Stampin’ Up! Joy of Noel Wreath

Good Wednesday morning… It’s Nov 29 and I thought I was just about finished with making Christmas cards – when an order for 10 came in this AM! Pleasing our customers is what we do, right? Here’s my card for today.

Stampin' Up! Joy of noel Wreath

Using a festive ‘spray’ stamp from Joy of Noel stamp set, I stamped three images on Basic White with Memento ink – and proceeded to color them: Stampin’ Blends: Old Olive, Light Shaded Spruce and Light Real Red. I die cut them with the appropriate die from Joy of Noel Dies and formed them into a wreath, adhering them only on the ends of each of the images. I took another Basic White panel (4 x 5 1/4) and penciled a 2″ circle, then using Shaded Spruce ink and the pine needle stamp from Christmas Classics, stamped several around the circle to go outward ands inward to ‘frame’ the die cut wreath once it was attached. I cut a length of 3/8″ Large Check Ribbon in Very vanilla & Black and adhered it to the panel with Stampin’ Seal, both on the panel front and in back, then attached the wreath with dimensionals. I tied a bow using the same ribbon and added it with a glue dot at the top of the wreath. I die cut a few pine branches from Christmas Classics Dies in Old Olive and tucked them in various places around the wreath to give it more dimension. I stamped the sentiment in Memento ink with the Joy of noel stamp set and fussy cut it with paper snips and adhered it across the center of the wreath with dimensionals. I adhered this completed Basic White panel to a Shaded Spruce piece slightly larger, then to the Thick Basic White card base.

Stampin' Up! Joy of Noel Wreath, card inside

On the inside of the card, I stamped Christmas in Real Red ink, then Merry in Memento ink – both from Christmas Classics stamp set. The final step was the pine bough from the same stamp set stamped in Shaded Spruce ink a couple of times. This Basic White panel was adhered to a Shaded Spruce – same as the card front – then adhered directly to the inside of the card.

Stampin' Up! Joy of Noel Wreath card & envelope

For the envelope, more pine boughs stamped in Shaded Spruce ink using the stamp from Christmas Classics stamp set – and the card was done.

The Joy of Noel and the Christmas Classics bundles are both a part of the Last Chance Products on sale now. See the info below for more details.

Stampin' Up! Last Chance Products

It’s hard to believe products in the Sep-Dec 2023 Mini Catalog are retiring… but they are. Making room for new products means letting go of others. If there is something you have been wanting – get it quickly as products seem to sell very fast.

From 21 November 2023–3 January 2024, you can stock up on your favorite seasonal products and save up to 60% on essential craft supplies! So, what are you waiting for? Start shopping and selling! After all, a selection of Last Chance Products will only be available while supplies last.

CLICK HERE to view the Carryover list and you should be able to print it as well

CLICK HERE to view the Last Chance Products List – print this one too

When ordering from me please use my NEW HOST CODE HSJD7BR6 so that I receive proper notification and YOU GET THE Benefits of a FREE SU! item valued up to $10 :O) AND the Monthly Card Tutorial. (I like to treat my customers!) If your order is over $150, please don’t use the host code as SU! has benefits. I’ll still be notified and you can receive that FREE ITEM!

Note: Make sure that you can see my name on the final checkout page listed as your Demonstrator when you order so that you know that you’re ordering with me and you’ll get my rewards! PLUS… the monthly Online Tutorial when your order is over $50. The November Tutorial features the beautiful Winter Meadow suite of products which can found in the Jul-Dec 2023 Mini Catalog on pages 36-38!

Join my team here and still order these products as part of your starter kit – wow! Great time to join!!!

Stampin' Up! Paper Pumpkin

Paper Pumpkin is an all time favorite for many. Each month something new appears in your mailbox. Nov 11 to Dec 10 is the ALL THE BEST PP Kit. Send a wish to all your loved ones with the December Paper Pumpkin Kit! It comes with nine card fronts, three each of three designs, and nine coordinating envelopes. It has paper pieces detailed with gold foil, embellishments, an all-occasion stamp set, and an acetate box where you can store your finished cards! You can gift the kit itself or the finished product in the acetate box; either way, it’s the perfect last minute gift for any occasion. 

ACETATE BOX

The All the Best Paper Pumpkin Kit comes with an acetate box that fits your finished cards and envelopes! This makes easy storage of a finished product or allows you to gift your cards to someone. The kit also comes with a belly-band, so you can add your own personal touch to the box. Subscribe by 10 December to make a handmade gift for those you love. 

GOLD FOIL DETAILS

The paper pieces in the December Paper Pumpkin kit have gold foil detailing. Whether it’s an elegant boarder, or woven into the floral artwork, it’s a detail that will surely catch your recipient’s eye! It’s the perfect way to take any paper craft to the next level. 

HAND DRAWN ARTWORK 

The beauty of the December Paper Pumpkin Kit lies in the hand drawn artwork. The bright blue skies and elegant yellow flowers compliment the different design elements perfectly. It’s a simple yet sophisticated design that will catch any recipient’s eye! 

Subscribe to the December Paper Pumpkin Kit between 11 November and 10 Decembeby clicking here!

Thanks for stopping by. Would love to hear from you. If I can be of help, please connect with me.

Stampin’ Up! Two Merriest Trees Christmas Cards

Hello fellow stampers! I’ve been doing family things for several days – too much FUN – and did not put in time for blogging. My apologies! Now I’m working on the last of my Christmas cards and because I had a piece of the Holographic SDSP already on my desk, that inspired me. I mixed it with Silver (& Gold) Adhesive-Backed Glimmer Paper, O Holy Night DSP and a few other Stampin’ Up! goodies.

Stampin' Up! 1st card Merriest Trees
Stampin' Up! 2nd card Merriest Trees

Can you see what I did here? I used the Silver Adhesive-Backed Glimmer Paper and the Christmas Classic Dies to die cut the fancy ‘frame’, then used the Holographic SDSP to die cut the tree with the medium size tree in Merriest Trees Dies. The Holographic SDSP was added with dimensionals to the silver ‘frame’ and a star in Basic White was added with a glue dot. I placed a medium size Rhinestone Basic Jewel in the center of the star. I peeled off the backing on the fancy silver ‘frame’ and adhered it to the Oh Holy Night DSP. This was attached to a slightly larger piece of Basic White then added to the Night of Navy card base with dimensionals. Simplicity and gorgeousness.

On the 2nd card I used the ‘negative’ of the silver ‘frame’ from card 1 & added it to a Night of Navy card base, die cut another ‘frame’ in Basic White and added it with liquid glue, slipping it in all the appropriate places. I die cut another piece from the Silver (& Gold) Adhesive-Backed Glimmer Paper and added the die cut tree from the Holographic SDSP with dimensionals. I added a gold Adhesive-Backed Star Trinket to this tree :O) I thought this second card needed a sentiment, so die cut a banner using the Christmas Classics Dies and added the sentiment in Night of Navy ink and the Merriest Trees stamp set. This banner was added with dimensionals and two Brushed Metallic Adhesive-Backed Dots were attached for additional glam.

Stampin' Up! Card 1 Merriest Trees, inside
Stampin' Up! Card 2 Merriest Trees, inside

There is little difference between these two inside panels: card 1 is stamped in Misty Moonlight ink from Brightest Glow stamp set (I love this font!!!); card 2 is stamped in Night of Navy ink, also from the Brightest Glow stamp set. The stars on the two cards are slightly different as well… card 1 is in silver foil with a Rhinestone Basic Jewel in the center; card 2 is also from Silver foil, but no rhinestone is added. Both are on Basic White card stock.

Stampin' Up! Card 1 Merriest Trees w/ envelope
Stampin' Up! Card 2 Merriest Trees card & envelope

On the envelopes I used O Holy Night DSP for the flaps and stamped different sentiments on each: card 1 in Misty Moonlight ink – Brightest Glow stamp set; card 2 in Night of Navy ink – Merriest Trees stamp set. Love being able to use the ‘negatives’ to create a second card! Do you have a favorite? I do, just not going to tell :O)

Stampin’ Up! Joy of Noel for the Happy Inkin’ Thursday Blog Hop 11/16

Good morning! Time for another Inkin’ Hop. The theme challenge this week is a color challenge – imagine that?! Just look at all these wonderful colors.

Stampin' Up! Happy Inkin' Thursday Blog Hop
Stampin' Up! Color Challenge
Stampin' Up! Joy of Noel, card front

Notice all those colors for the challenge? They are in the coloring and the Joy of Christmas DSP. The Joy of Noel Bundle is just so wonderful… I love the words, the decorative stamps and the dies. What I did here is stamp the holly & berry ‘spray’ in Memento ink, twice, on Basic White card stock. I always find it easier to color a larger piece than a small one, so I color it then die cut. Make sense? The coloring is done with Stampin’ Blends: Old Olive (both light & dark) for the leaves, Shaded Spruce (both light & dark) for the holly, Light Real Red for the berries sand a bit of Dark Cherry Cobbler for shading on the berries. I die cut these and set them aside to prep the Thick Basic White card base. I caut a piece of the red plaid pattern from the Joy of Christmas DSP and adhered it to the card front. I laid the two die cut ‘spray’ pieces just for placement purposes to know where to stamp the sentiment. After removing them I stamped the sentiment from Joy of Noel stamp set in Real Red ink. I adhered the two die cut ‘spray’s on dimensionals along the top line of the DSP. I scattered some notes & holly from the Loose Holly Gems & Sequins package. I stamped the word ‘noel’ on Real Red card stock with Real Red ink, die cut them and adhered them directly to the ‘sprays’. As a final touch, I cut a short length of the Large Check Ribbon in Black & Very vanilla and attached it under the spray with a glue dot. Very cheerful & festive!

Stampin' Up! Joy of Noel, card inside

For the inside, I took a panel of Basic White card stock and adhered a very narrow strip of the Joy of Christmas DSP near the bottom of the panel. I then stamped the sentiment in Real Red ink, still using the Joy of Noel stamp set. I attached three red gems from the Loose Holly Gems & Sequins package with a dob of glue, adhered the panel to the inside of the card and done!

Stampin' Up! Joy of Noel card & envelope

For the envelope, I took another pattern from the Joy of Christmas DSP, adhered it to the flap & trimmed it to fit. On the front I stamped the berry spray in Memento ink, then added Stampin’ Blends in Real Red to the berries. This card is so clean & traditional, friendly & bright. – I really like it.

Now… it’s time to move along to visit others participating in today’s hop. Click on a name or use the ‘next’ button to take you to Carol.

Stampin' Up! hop button

Amy Koenders

Mary Deatherage

Jaimie Babarczy

Karen Finkle

Akiko Sudano

Karen Ksenzakovic

Tara Carpenter

Carol Buckalew

Nel Thames

Today is the LAST DAY for the Seasonal sale.

See below for more info.

Sales Period: 14–16 November 2023

Ordering Deadlines

Phone: 16 November 2023 at 6:59 p.m. (MT)

Online: 16 November 2023 at 11:59 p.m. (MT) 

  • 10% off ribbons and trims.
  • 15% off inks, including pads, refills, markers, and Blends. Bundles are not included.
  • 20% off papers, including cardstock, specialty paper, and Designer Series Paper.
  • Shop online to see the full selection of discounted products available. This is a limited time offer.
  • Discounts are automatically applied when sale items are added to any order, including Starter Kits.
  • Please keep in mind that due to the high volume of orders, the distribution center may fall behind our typical shipping timeframes. We will do everything we can to return to our regular service levels as quickly as possible.
  • Please note: Some items may sell out due to high demand. The discount will automatically be applied to qualifying items that are in stock. Per our updated policy, backorders are not available. 

To order Stampin’ Up! products, please use this link to my online store. The Seasonal Sale is for products in the ANNUAL CATALOG ONLY. You will find ONLINE EXCLUSIVES, Clearance Rack, Sep-Dec Mini Catalog, the Annual Catalog, kits, Paper Pumpkin – you name it. Shop at your convenience :O)

When ordering from me please use my NEW HOST CODE HSJD7BR6 so that I receive proper notification and YOU GET THE Benefits of a FREE SU! item valued up to $10 :O) AND the Monthly Card Tutorial. (I like to treat my customers!) If your order is over $150, please don’t use the host code as SU! has benefits. I’ll still be notified and you can receive that FREE ITEM!

Note: Make sure that you can see my name on the final checkout page listed as your Demonstrator when you order so that you know that you’re ordering with me and you’ll get my rewards! PLUS… the monthly Online Tutorial when your order is over $50. The November Tutorial features the beautiful Winter Meadow suite of products which can found in the Jul-Dec 2023 Mini Catalog on pages 36-38!

Join my team here and still order these products as part of your starter kit – wow! Great time to join!!!

Other fun products Stampin’ Up! has right now…

NEW KIT (THE BEST DESTINATION KIT) ADDED AS OF NOVEMBER 1!

Stampin' Up! Destination Kit
Stampin' Up! Destination kit stamp set

163186

THE BEST DESTINATION KIT

$20.00 USD | $28.00 CAD

Available starting 1 November 1.

This kit lets you make nine tri-fold cards with a colorful, nostalgic, travel vibe.

  • Enough supplies to create 9 cards—3 each of 3 designs
  • 9 coordinating envelopes
  • Best Destination Photopolymer Stamp Set
  • One Gorgeous Grape Ink Spot
  • Printed card bases, printed die cuts, adhesive, embellishments, and a clear block
  • Finished card size: 5-1/2″ x 4-1/4″ (14 x 10.8 cm)
  • Coordinating colors: Balmy Blue, Boho Blue, Cajun Craze, Calypso Coral, Coastal Cabana, Crushed Curry, Daffodil Delight, Early Espresso, Flirty Flamingo, Fresh Freesia, Gorgeous Grape, Granny Apple Green, Misty Moonlight, Pecan Pie, Petal Pink, Pretty Peacock, and Shaded Spruce

Kits can be ordered using this link to my online store.

Paper Pumpkin is an all time favorite for many. Each month something new appears in your mailbox. Nov 11 to Dec 10 is the ALL THE BEST PP Kit. Send a wish to all your loved ones with the December Paper Pumpkin Kit! It comes with nine card fronts, three each of three designs, and nine coordinating envelopes. It has paper pieces detailed with gold foil, embellishments, an all-occasion stamp set, and an acetate box where you can store your finished cards! You can gift the kit itself or the finished product in the acetate box; either way, it’s the perfect last minute gift for any occasion. 

ACETATE BOX

The All the Best Paper Pumpkin Kit comes with an acetate box that fits your finished cards and envelopes! This makes easy storage of a finished product or allows you to gift your cards to someone. The kit also comes with a belly-band, so you can add your own personal touch to the box. Subscribe by 10 December to make a handmade gift for those you love. 

GOLD FOIL DETAILS

The paper pieces in the December Paper Pumpkin kit have gold foil detailing. Whether it’s an elegant boarder, or woven into the floral artwork, it’s a detail that will surely catch your recipient’s eye! It’s the perfect way to take any paper craft to the next level. 

HAND DRAWN ARTWORK 

The beauty of the December Paper Pumpkin Kit lies in the hand drawn artwork. The bright blue skies and elegant yellow flowers compliment the different design elements perfectly. It’s a simple yet sophistacted design that will catch any recipient’s eye! 

Subscribe to the December Paper Pumpkin Kit between 11 November and 10 December by clicking here!

Thanks for stopping by. I hope you enjoyed my card today. Would love to hear from you. If I can be of help in some way, please let me know.

Stampin’ Up! 6 x 3 Gift Cards

Good morning! I have some small gift cards for you today. I was inspired by a. post by Artisan Design Team member Tammy White who made 3 x 3 cards. I happen to like something a bit larger in order to write my message, whatever that is. And, I like it in an envelope. Stampin’ Up! has envelopes for 3″ size creations and they really are quite perfect for a 6 x 3 gift card.

Stampin' Up! 6 x 3 Gift Cards
Stampin' Up! 6 x 3 Gift Cards.2

Aren’t these fun? The card stock base is Thick Basic White cut 6 x 3 and scored @ 3. Each uses a panel of Winter Meadow DSP, some torn and one attached on an angle. I like this particular panel of DSP – shades of Pebbled Path & Smoky Slate, trees and deer. It’s comforting and not bold and can be used for a masculine gift as well. Supplies to make these were not a lot, but the list may seem long – I just don’t do two exactly alike and there’s the rub!

For the gift card on the far left: I ran the bottom Winter Meadow DSP through the Snowflake Sky 3D embossing folder and die cut the pine bough from Shaded Spruce card stock using the Joy of Noel Dies. Embellishments the Adhesive-Backed Glitter Sequins. I also used the remaining glitter from the October Paper Pumpkin on the pine bough. It doesn’t show in this photo, but in real life it does! The stamp on the envelope front is from the Magical Meadow stamp set and stamped in Lost Lagoon ink.

The gift card next to it has a piece of the Snowflake Magic SDSP as the bottom layer. The two die cut pieces are from Shimmer Paper and Snowflake Magic SDSP die cut with Magical Meadow Dies. They are held in place with a glue dot and a Metallic Ribbon In Tahitian Tide was added over top. Three Adhesive-Backed Glitter Sequins were added for a bit of bling.

In the next photo, the gift card on the left the Winter Meadow DSP is added at an angle and on dimensionals. The die cuts use the Magical Meadow Dies, Shimmer Paper and Snowflake Magic SDSP. You can see one of the die cuts was trimmed and peeking out from the left side under the DSP. Over top is a double bow tied with separated black twine from the Baker’s Twine Essentials Pack. The envelope front was stamped in Pebbled Path ink using the same stamp from Magical Meadow stamp set.

Stampin' Up! 6 x 3 Gift Card.4
Stampin' Up! 6 x 3 Gift Card 4 inside

The last card is probably my favorite: it has the Snowflake Sky 3D EF embossed panel of Winter Meadow DSP on the card with the layer of the trees/ deer from Winter Meadow DSP on dimensionals. Before attaching the top layer, I wrapped separated black twine around one end and tied a bow, securing it with a glue dot. The twine is from the Baker’s Twine Essentials Pack. On this card I added three gems from the Faceted Gems Trio Pack. I also stamped a portion of the sentiment in Memento ink using the Stars At Night stamp set, then stamped the rest of the sentiment on the inside of the gift card on the adhered torn DSP. The envelope front got the same tree stamp from Magical Meadow stamp set in Lost Lagoon ink.

Want to purchase the supplies for this card? Supplies can be ordered using this link to my online store. You will find ONLINE EXCLUSIVES, Clearance Rack, Sep-Dec Mini Catalog, the Annual Catalog, kits, Paper Pumpkin – you name it. Shop at your convenience :O)

When ordering from me please use my NEW HOST CODE HSJD7BR6 so that I receive proper notification and YOU GET THE Benefits of a FREE SU! item valued up to $10 :O) AND the Monthly Card Tutorial. (I like to treat my customers!) If your order is over $150, please don’t use the host code as SU! has benefits. I’ll still be notified and you can receive that FREE ITEM!

Note: Make sure that you can see my name on the final checkout page listed as your Demonstrator when you order so that you know that you’re ordering with me and you’ll get my rewards! PLUS… the monthly Online Tutorial when your order is over $50. The November Tutorial features the beautiful Winter Meadow suite of products which can found in the Jul-Dec 2023 Mini Catalog on pages 36-38!

NEW KIT (THE BEST DESTINATION KIT) ADDED AS OF NOVEMBER 1!

Stampin' Up! Best Destination kit
Stampin' Up!! Best Destination Kit stamps

163186

THE BEST DESTINATION KIT

$20.00 USD | $28.00 CAD

Available starting 1 November 1

This kit lets you make nine tri-fold cards with a colorful, nostalgic, travel vibe.

  • Enough supplies to create 9 cards—3 each of 3 designs
  • 9 coordinating envelopes
  • Best Destination Photopolymer Stamp Set
  • One Gorgeous Grape Ink Spot
  • Printed card bases, printed die cuts, adhesive, embellishments, and a clear block
  • Finished card size: 5-1/2″ x 4-1/4″ (14 x 10.8 cm)
  • Coordinating colors: Balmy Blue, Boho Blue, Cajun Craze, Calypso Coral, Coastal Cabana, Crushed Curry, Daffodil Delight, Early Espresso, Flirty Flamingo, Fresh Freesia, Gorgeous Grape, Granny Apple Green, Misty Moonlight, Pecan Pie, Petal Pink, Pretty Peacock, and Shaded Spruce

Supplies can be ordered using this link to my online store.

Thanks for stopping by. I hope you enjoyed my card today. Would love to hear from you. If I can be of help in some way, please let me know.

Stampin’ Up! Snowflakes with Wishes All Around

Good morning, good morning! It’s hubby’s & my anniversary today :O) … My card for today uses the amazing Wishes All Around bundle and I’ve chosen to use the snowflake wreath and a similar layout to yesterday’s card, but simpler.

Stampin' Up! Wishes All Around Bundle, Snowflakes

The Winter Meadow 12×12 DSP seemed a perfect backdrop, and I adhered a strip to a Thick Basic White card base. I cut a piece of the Silver & Gold Adhesive-Backed Glimmer Paper (in silver of course) and ran it through the die cutting machine with the snowflakes die from Wishes All Around Dies. This paper is so neat! Just remove the backing and adhere :O) And I did… to a piece of Basic White. At this point I should have stamped the sentiment in the middle. But no, I didn’t do that :O( I die cut more snowflakes and this time from a piece of the same pattern of Winter Meadow 12×12 DSP. I adhered these on top of the other snowflakes, every other one, on black mini dimensionals. That way they don’t show so much. On top of those snowflakes I added these gorgeous Iridescent Pearl Basic Jewels. This square was added to another slightly larger square with dimensionals, then adhered in place with liquid glue to the card base. I used the second smallest die in the Deckled Circles Dies to die cut a circle from Basic White, stamped it in Misty Moonlight ink with the Wishes All Around sentiment. I adhered it in the center of the snowflake wreath ~ and the card front was done.

Stampin' Up! Wishes All Around, Snowflake card inside

For the inside, on another piece of Basic White I adhered more snowflakes die cut with the Wishes All Around Dies: two from the Silver & Gold Adhesive-Backed Glimmer paper and another from Winter Meadow 12×12 DSP. I added a small Iridescent Pearl Basic Jewel to this last snowflake. I opted NOT TO add a sentiment at this point as this could be a very general card. If i need to add a sentiment before sending, I can.

Stampin' Up! Wishes All Around, Snowflake wreath card & envelope

For the Basic White envelope, I stamped this fun three-snowflake stamp in Misty Moonlight ink, also from then Wishes All Around stamp set. I stamped it several times on the envelope front and a couple of times on the flap, re-inking the stamp each time.

I’ll add a link here so you can view yesterday’s card using the same Wishes All Around Bundle and a similar layout. It’s just fun to compare.

Want to purchase the supplies for this card? Supplies can be ordered using this link to my online store. You will find ONLINE EXCLUSIVES, Clearance Rack, Sep-Dec Mini Catalog, the Annual Catalog, kits, Paper Pumpkin – you name it. Shop at your convenience :O)

When ordering from me please use my NEW HOST CODE HSJD7BR6 so that I receive proper notification and YOU GET THE Benefits of a FREE SU! item valued up to $10 :O) AND the Monthly Card Tutorial. (I like to treat my customers!) If your order is over $150, please don’t use the host code as SU! has benefits. I’ll still be notified and you can receive that FREE ITEM!

Note: Make sure that you can see my name on the final checkout page listed as your Demonstrator when you order so that you know that you’re ordering with me and you’ll get my rewards! PLUS… the monthly Online Tutorial when your order is over $50. The November Tutorial features the beautiful Winter Meadow suite of products which can found in the Jul-Dec 2023 Mini Catalog on pages 36-38!

NEW KIT (THE BEST DESTINATION KIT) ADDED AS OF NOVEMBER 1!

Stampin' Up! New Kit!
Stampin' Up! Best Destination Kit stamp set

163186

THE BEST DESTINATION KIT

$20.00 USD | $28.00 CAD

Available starting 1 November

This kit lets you make nine tri-fold cards with a colorful, nostalgic, travel vibe.

  • Enough supplies to create 9 cards—3 each of 3 designs
  • 9 coordinating envelopes
  • Best Destination Photopolymer Stamp Set
  • One Gorgeous Grape Ink Spot
  • Printed card bases, printed die cuts, adhesive, embellishments, and a clear block
  • Finished card size: 5-1/2″ x 4-1/4″ (14 x 10.8 cm)
  • Coordinating colors: Balmy Blue, Boho Blue, Cajun Craze, Calypso Coral, Coastal Cabana, Crushed Curry, Daffodil Delight, Early Espresso, Flirty Flamingo, Fresh Freesia, Gorgeous Grape, Granny Apple Green, Misty Moonlight, Pecan Pie, Petal Pink, Pretty Peacock, and Shaded Spruce

Supplies can be ordered using this link to my online store.

Thanks for stopping by. I hope you enjoyed my card today. Would love to hear from you. If I can be of help in some way, please let me know.

Stampin’ Up! Stars At Night Dies with Watercoloring

Good Tuesday! It’s Oct 31 – trick or treaters went around last night in our area and we had quite a few of them. Thank goodness not much of our candy is left! :O) Today is the last day of the JOINING PROMOTION. This is such a special deal that if you’re on the fence, take a leap of faith & jump right in. My team & I are here to help you. Read more info below.

I’ve a watercolor card for you today and it was fun to create. I was inspired by several folks who have posted watercolor cards, and while I’m not as good at it as I’d like to be, I’m still pleased with the card.

Stampin' Up! Stars At Night Dies w/ watercoloring

Let’s begin by creating the watercolor background: Misty Moonlight ink, Night of Navy ink and finally Orchid Oasis ink. What I like about this is the depth that is created – it really looks like space to me. I wet my paper thoroughly then began with the widest of the Water Painters and added Misty Moonlight ink. Keeping the paper wet, I added Night of Navy ink, but tried to leave the center area mostly just the Misty Moonlight. Then I added the Orchid Oasis ink the same way, keeping the paper wet. I dropped a few drops of clear water on the paper to give more depth, then set aside this piece to dry. Keep in mind, no two pieces are ever the same and that’s the beauty of watercolors.

While this was drying, I pulled out the Holographic Foil Paper and with the silver sheet, used the hybrid folder and die cut this beautiful embossed star (that’s in the center of the card) with the Stars At Night Dies. I also die cut a couple more stars from this same sheet using the Stars At Night Dies. On a scrap of Orchid Oasis paper, I stamped the sentiment from the Night Divine stamp set in VersaMark ink then sprinkled it with Silver Embossing Powder and heat set it. Once it was cool, I fussy cut the sentiment and set it aside.

Now that the watercolor paper was dry I used the Deckled Rectangle Dies to create this fun edge. I ran it through again with the starburst die in the upper center of the card. See all those little openings surrounding the Holographic star? That’s what it does, plus… cut out a starburst which I saved to use on the inside of the card :O). Ok, what’s next… oh yes, cut a piece of 2023-2025 In Color Shimmer Paper in Boho Blue and adhere the deckled watercolor paper over it. I flicked the watercolor piece with Wink of Stella to give it some sparkle. I used liquid glue to adhere the star and little dots of glue for the additional small stars. I put the fussy cut sentiment on dimensionals and attached it over the center of the large star. This panel got dimensionals and was added to an Orchid Oasis card base.

Stampin' Up! Stars At Night w/ Watercolor Paper, inside

On a panel of Very Vanilla card stock, I stamped the sentiment from Night Divine stamp set in Orchid Oasis ink. I added the leftover starburst center then another star die cut from the Holograph Paper in the center of the starburst. This panel was added to the inside of the card and finis.

Stampin' Up! Stars At Night w/ Watercoloring card & envelope

On the Very Vanilla envelope, I stamped the sentiment from Night Divine stamp set in Orchid Oasis ink. We made this in my card class two weeks ago and the ladies loved it.

The countdown is on… Stampin’ Up! offer of the Joining Promotion ends at close of day Oct 31 – today! Let me refresh your memory about the Joining Promotion

Stampin' Up! 35 year JOINING PROMOTION

Celebrating 35 years of Stampin’ Up!, new demonstrators will be able to choose 35% OFF the cost of their Starter Kit or get 35% MORE product with their Starter Kit.

With option 1 (35% off the normal cost of the starter kit), the new demo would receive $125 worth of products and pay $64.35 + tax. and of course, shipping is FREE.

MORE – MORE – MORE… With either option, those who sign up for the starter kit between Oct 3 and Oct 31 will automatically get signed up for the ONSTAGE@HOME Registration, again FREE! This is a virtual event being held November 11. (Normally the cost of registration would be $77) If you join as demonstrator during the time frame mentioned, you will receive in your email, all the information necessary to attend this virtual event.

Have I intrigued you, inspired you, made you think maybe this is the time to join as a demonstrator? If so, – would love to have you. Remember, hobby demonstrator (for the 20% discount) or a business demo (at least 20% off all demonstrator orders – or more) or somewhere in between. It just doesn’t matter. What does matter is if you like to stamp, color, ink up, create – that’s where it all blends into having fun and doing it with others.

JOIN MY TEAM HERE.

  • Those who sign up for this offer have the opportunity to watch the event independently, gathered together with other demonstrators, or with their Team Leader.
  • Demonstrators who join during this promotion will be automatically added to the OnStage attendees; you won’t even need to register separately.
  • Demonstrators who join during this promotion will also receive an email with all the information about this event.

Whether you’d like to start a little side business or simply take advantage of the awesome 20% discount, I would very much love for you to join my Krew team! We have a great time together – even though we live all over the country!

Want to purchase the supplies for this card? Supplies can be ordered using this link to my online store. You will find ONLINE EXCLUSIVES, Clearance Rack, Sep-Dec Mini Catalog, the Annual Catalog, kits, Paper Pumpkin – you name it. Shop at your convenience :O)

When ordering from me please use my HOST CODE 2J2X3YRM so that I receive proper notification and YOU GET THE Benefits of a FREE SU! item valued up to $10 :O) AND the Monthly Card Tutorial. (I like to treat my customers!) If your order is over $150, please don’t use the host code as SU! has benefits. I’ll still be notified and you can receive that FREE ITEM!

Note: Make sure that you can see my name on the final checkout page listed as your Demonstrator when you order so that you know that you’re ordering with me and you’ll get my rewards! PLUS… the monthly Online Tutorial when your oder is over $50. The October Tutorial features the beautiful Merriest Trees Bundle which can found in the Jul-Dec 2023 Mini Catalog on page 12!

Thanks for stopping by today. May you have a beautiful day!