Stampin’ Up! Celebrate for Amy’s Inkin’ Krew Blog Hop Group

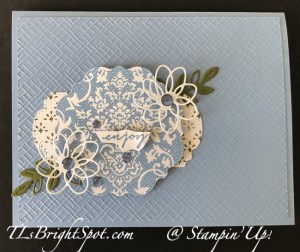
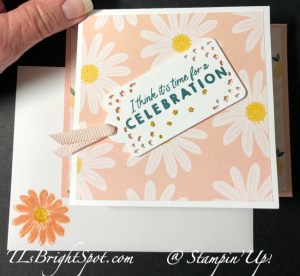
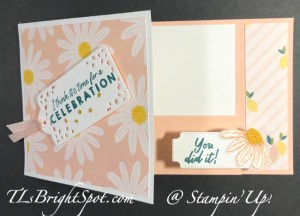
Our theme is ‘celebrate’ and we can interpret that any needed way. I have chosen to use the brand new products in the Lovely & Beautiful suite in the Jan-Apr 2026 Mini Catalog on pages 23-29. This is an absolutely gorgeous suite & I’m highlighting only a small bit of it.

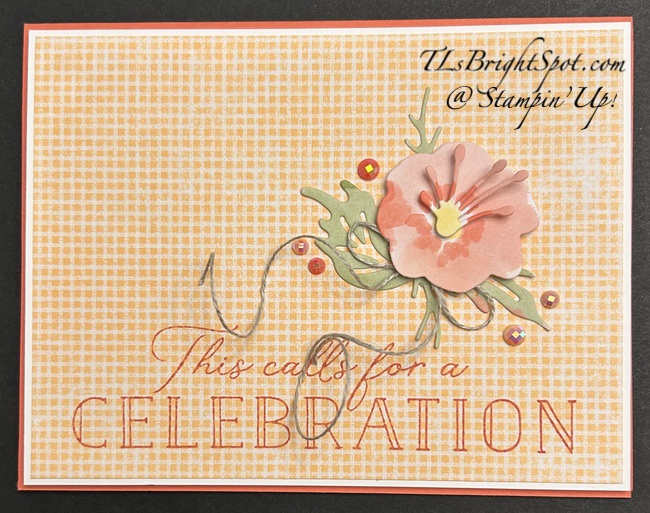
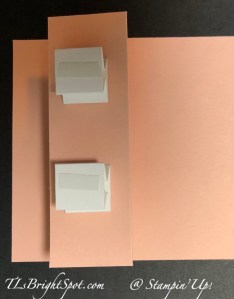
The background is this fun checkered pattern & I’ve stamped this sentiment from the Beautifully Celebrated stamp set in Calypso Coral. I then die cut from the Lovely & Beautiful Specialty Designer Series Paper the flower & leaves using the Simply Beautiful Dies. The leaves & tiny pieces are adhered directly to the card front while the flower is on dimensionals as is the stamen (it’s on a mini dimensional cut in half!) I then added these gorgeous Pearlized Faceted Circles that are also a part of the suite. The Specialty DSP was added to a Basic panel slightly larger then attached to the Calypso Coral card base with dimensionals. I made a small Linen Thread bow and tucked it under the flower, adhering with a dab of glue.

Stampin' Up! Lovely &

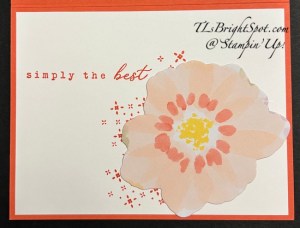
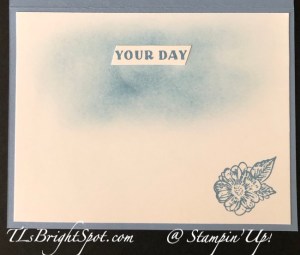
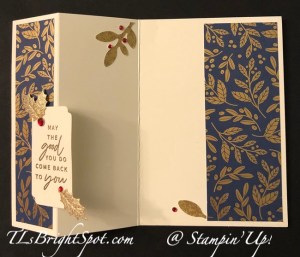
For the inside of the card, I used yet another of the Simply Beautiful Dies to die cut this flower from the Lovely & Beautiful SDSP. Before attaching it in place I stamped this decorative design using a stamp from Beautifully Celebrated stamp set in Calypso Coral ink. I adhered the flower then stamped the sentiment – again in Calypso Coral ink – then adhered the panel to the inside of the card.

Stampin' Up! Lovely & Beautiful Suite card & envelope

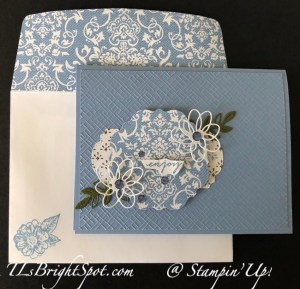
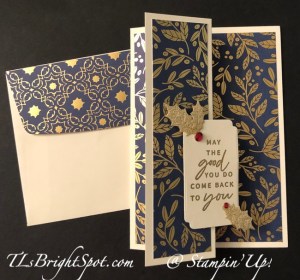
For the envelope… more of the Lovely & Beautiful SDSP was adhered to the flap & trimmed to fit. On the front is this leaf, stamped in Old Olive ink using the Beautifully Celebrated stamp set. While this is very springy in color, I’m using this as a birthday card for my friends birthday in December – something non traditional ‘Decemberish’ 😀 For information on how to get the new Jan-Apr 2026 Mini Catalog, see below. Also see below for other information about joining & purchasing products through my online store.

Please check the list of those participating in the hop today. Click on the ‘next’ button or click on a name to take you around the group. Have fun hopping!

Stampin' Up! Blog hop link
  1. Karen Ksenzakovic
  2. Mary Deatherage
  3. Nicole Bloxom
  4. Ann Louise Fodgaard
  5. Tara Carpenter
  6. Karen Finkle
  7. Terry Lynn Brightyou are here!
  8. Amy Koenders

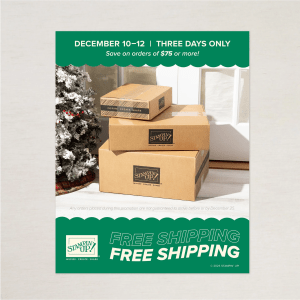
FREE SHIPPING IS DECEMBER 10-12

Get FREE SHIPPING from December 10–12 when you spend $75 USD | $100 CAD or more.

Stampin' Up! FREE SHIPPING
  • All order types qualify for this promotion.
  • Free shipping is for three days only. Orders must be opened and closed from December 10–12.
  • Free shipping automatically applies to your cart after the qualifying amount has been met, which is $75 USD | $100 CAD (before tax).
  • Coupon codes and Stampin’ Rewards will lower your order’s retail amount. Orders must meet the qualifying amount to be eligible for free shipping.
  • The additional cost for expedited shipping is not covered by this promotion.
  • Prepaid 3-, 6-, and 12-month Paper Pumpkin subscriptions and month-to-month subscriptions do not qualify for free shipping. Refills, past kits, and add-ons do qualify toward free shipping, but you must be a subscriber to purchase. Subscriptions billed and shipped this month will be charged for the normal amount ($27.00 USD | $36.75 CAD shipping included) + tax.
  • Please keep in mind that due to the high volume of orders and the Christmas season, the distribution center may fall behind our typical shipping timeframes. We will do all we can to return to our regular service levels as quickly as possible. Any orders placed during this promotion are not guaranteed to arrive before or by December 25.
Stampin' Up! Last Chance Products

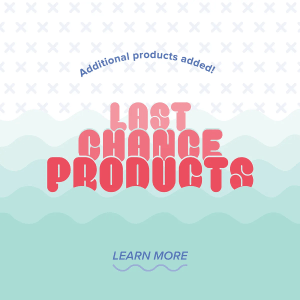
Click on the image above to see the products from the Last Chance list. There are updates and many products from the Sep-Dec 2025 Mini Catalog are included – don’t miss out!
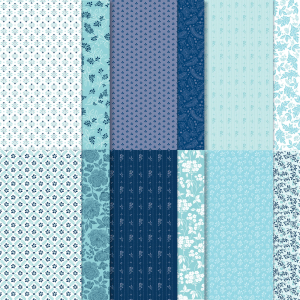
Stampin' Up! Product of the month

167970

TRUE BLUE FLORALS 12″ X 12″ (30.5 X 30.5 CM) DESIGNER SERIES PAPER

$5.00

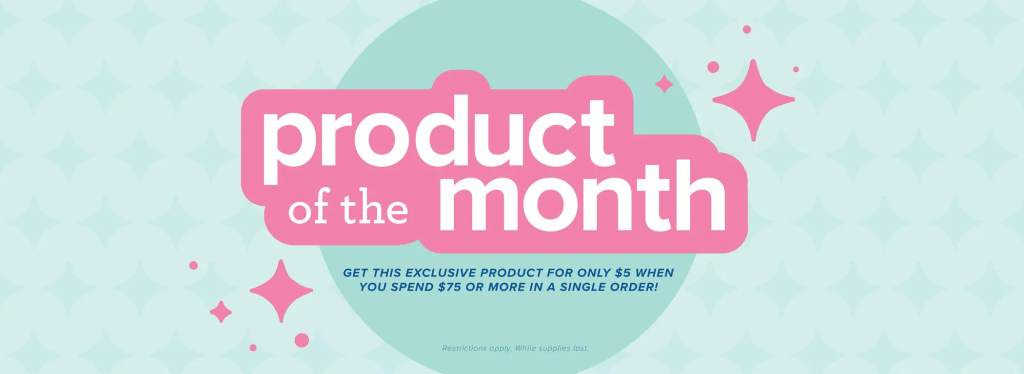
If you love exclusive products, you’re going to love Product of the Month, a promotion centered around a special product release every month. The Product of the Month items are specially designed to be some of the best items Stampin’ Up! has to offer that aren’t available in any of our catalogs or our Online Exclusives. Every month we’ll release a new item that is only available for purchase once per account. These items will be limited quantity and are likely to sell out quickly—once they’re sold out, they’re gone for good! The True Blue Florals 12″ x 12″ (30.5 x 30.5 cm) Designer Series Paper is the exclusive Product of the Month for December 2025! Only available until supplies run out—don’t wait to get yours! This product can be unlocked for just $5 with a single order over $75 (after discounts and rewards).

Paper Pumpkin Refills, Past Kits, and Add-Ons Sale

Big savings start tomorrow! From December 10–12, Paper Pumpkin subscribers can get up to 50% off on refills, past kits, and add-ons! Bonus: they can also qualify for FREE SHIPPING during the sale!

This sale is only open to active subscribers, so invite your customers to subscribe today! They’ll want to act quickly, because today, December 9, is the last day to save on prepaid Paper Pumpkin subscriptions with our Cyber Monday Sale! 

Key dates to keep in mind:

  • December 10: Refills, Past Kits, and Add-Ons Sale starts. This is the last day to subscribe to get the December Watercolor in Bloom Kit.
  • December 11: The first day to subscribe for the January Special Delivery Kit and shop the Beautiful Blooms Dies Add-On.
  • December 12: Refills, Past Kits, and Add-Ons Sale ends. 

Hurry—this sale is only while supplies last! Click here to see the great products you can snag!

Shop withhttps://www.stampinup.com/?demoid=2169800 me here

Thanks for stopping by. May you have a beautiful day. Make someone happy by sending them a handmade card filled with ❤️

Stampin’ Up! Trusty Tools for a Graduation Card

Happy Mother’s Day all you readers… You may remember last weekend I attended a convention, a one of my fellow ‘conventioners’ asked for a special graduation card as the graduate is going into auto mechanics. I pulled out Trusty Tools to see what I could do. I also used a couple of other stamp sets.

Stampin' Up! Trusty Tools graduation card

This doesn’t look much like a graduation card, does it? At least not on the front. Here’s what I did though… I pulled out Boho Blue for the card base (school colors are blue and something else, the woman couldn’t remember) … and stamped the front with what looks like parts welded together, stamped in Smoky Slate. It comes from the new & fabulous Adventurous Sky stamp set. Next I die cut this center panel that looks like a peg board from new Textured Metallic Specialty 12×12 Paper. The color is Tungsten. From the Trusty Tools stamp set and coordinating dies, I pulled out items that I thought an auto mechanic would typically use – wrenches bolts, nuts and an oil can. I stamped in Memento ink the adjustable wrench, the other items I simply die cut. The oil can is from Silver Foil Sheets and cut twice, the other being Blueberry Bushel. I trimmed off the blue oil can top and adhered the blue bottom to the silver oil can – for contrast. I put this on dimensionals and added it to the peg board. The one wrench – the non adjustable one – is adhered directly with liquid glue, the adjustable one is on dimensionals. The screw & bolts are attached with glue as well. I added the peg board to the card front with mini dimensionals.

Stampin' Up! Trusty Tools, card inside

I began the inside by cutting the toolbox bottom from Country Woods DSP. I adhered the base to the Basic White inside panel then attached the leftover hole centers from the peg board to the holes created by the toolbox bottom die cut. (Clever me!!) Using another piece of the Textured Metallic Specialty Paper in Tungsten, I die cut the handle and added it as well. Then it was – now what??? I pulled out Cap & Gown stamp set and stamped the cap in Memento ink & ‘Class of’ in Blueberry Bushel. I stamped the sentiment on the toolbox using the Trusty Toolbox stamp – again in Blueberry Bushel ink. The numbers (Boho Blue ink) & stars (Blueberry Bushel ink) come from Alphabest stamp set, a retired one. The gold hearts are from it’s coordinating dies.

Stampin' Up! Trusty Tools graduation, card back

Since there was noway to send a written greeting on the inside of the card, I added another piece of Basic White to the back of the card. On it is the sentiment stamped in Blueberry Bushel from the Cap & Gown stamp set.

Stampin' Up! Trusty Tools gradiation card & envelope

For the envelope, I did a simple stamp of the cap in Blueberry Bushel and the diploma in Memento black ink – both from the Cap & Gown stamp set.

The 24-25 Annual Catalog is now live… here’s a link to take you directly to the items available in this catalog. The Trusty Tools bundle is in the encore section. The Adventurous Sky bundle is in the Suites section. The cap & Gown stamp set can be found in the ONLINE EXCLUSIVES. Happy shopping!

Stampin’ Up! has a fabulous joining opportunity from May 1-31.

Stampin' Up! Joining Promotion

To join is $99 and what comes with joining, besides your 15-20% discount on every order… FOUR FREE IN COLOR PRODUCTS valued to $82 plus your choice of $125 worth of products. Those FREE items – the IN COLOR products – Classic stampin’ pad bundle – 5 of them, package of 8 1/2 x 11 cardstock – 5 of those, 6×6 Designer Series Paper – 5 colors in the pack, and the coordinating Stampin’ Write markers. You will also receive free shipping on these products + free business supplies. What’s not to like about this joining special – remember it begins May 1! Join with me by following this link...

To view all the available ONLINE EXCLUSIVES, click here.

Clearance items may be found here

While you’re looking around in my store, remember there are some stunning kits available, for all ages and all seasons – even Christmas! And while you’re shopping, I offer fringe benefits to my customers: free tutorial of the month and a FREE Stampin’ Up! item valued to $10 – all for a $50 order, before shipping and taxes. Use my current host code to receive those benefits – especially when your order does not exceed $150.

HOST CODE 4JF6ZWC9

Thanks for stopping by. May you have a beautiful day. Make someone happy when sending them a handmade card filled with love.

Stampin’ Up! Thoughtful Expressions Bundle for the Happy Inkin’ Thursday Blog Hop

Welcome to Thursday – and another Happy Inkin’ Thursday Blog Hop! We have new products to share and lots of fun creations.

Stampin' Up! Happy Inkin' Thursday Blog Hop
Stampin' Up! Hop Sketch Challenge

The Thoughtful Expressions bundle is part of the Poetic Expressions Suite of products found on pages 60-62 in the Jan-Apr 2024 Mini Catalog. It is extraordinary in the number of dies included and the beautiful stamp set and Designer Series Paper. This is a not to be missed suite! The fun patterns of the ‘sort of’ circle die is just super sweet and there are LOTS of them. Here’s how I put this card together. I chose the Boho Blue pattern in the Poetic Expressions 12×12 DSP then a die that incorporated the design I wanted to highlight. For the background pattern, I simply chose another that coordinated from the same Poetic Expressions 12×12 DSP. In this same die set – Thoughtful Expressions Dies – is what I’m calling a ‘banner’ die, also of various sizes. I chose one that seemed right for the blue die cut and elongated it by die cutting only a portion of the paper, then moved the top die cutting plate and lined the die up as closely as I could and made it longer. I die cut this wonderful open flower, twice, from Basic White, then the leaves from Mossy Meadow card stock (again, cut 2). I wanted a background embossing folder & chose one of my ‘favs’ `~ Basics 3D Embossing Folder called Cross Hatch from the ONLINE EXCLUSIVES. (It really comes with a set of 3, each different). That embossed Boho Blue panel was adhered directly to the card base of Boho Blue. The ‘banner’ die was adhered to that and the fancy circle die cut was adhered with dimensionals. The leaves were slipped under the corners and each attached with a glue dot. The die cut flowers were added with a mini dimensional and a 2023-2025 In Color Dots in Boho Blue were added to each flower center. The sentiment comes from the Thoughtful Expressions stamp set – stamped in Boho Blue on a Basic White strip and cut apart. The word ‘enjoy’ was fussy cut around to give it some charm and added with dimensionals. More of the 2023-2025 In Color Dots in Boho Blue were added – totaling five. And the card front was done.

Stampin' Up! Thoughtful Expressions bundle, inside

For the inside… I stamped this sweet flower from Thoughtful Expressions stamp set in Boho Blue in the corner. I used my Blending Brush & Boho Blue ink to color some of the upper portion of the Basic White inside panel. I added the rest of the stamped sentiment with liquid glue.

Stampin' Up! Thoughtful Expressions card & envelope

For the envelope… more of the Poetic Expressions Boho Blue Designer Series Paper on the flap & trimmed to fit. For the front of the envelope, the same flower as the inside of the card – Thoughtful Expressions stamp set & Boho Blue ink. Am LOVING this set – and it’s my first ‘play’. So wonderfully feminine and delicate. If you want to learn more about how to purchase this set from my online store, tune in below the names on the blog hop.

To continue this fun team hop, click the ‘next’ button or click on a name. Enjoy the creativity!

Stampin' Up! next blog

Amy Koenders

Mary Deatherage

Jaimie Babarczy

Karen Finkle

Karen Ksenzakovic

Tara Carpenter

Terry Lynn Bright

Carol Buckalew

Nel Thames

If you do not have a demonstrator and need a mini catalog or the Sale-a-Bration catalog, please reach out to me. I’ll get one to you lickety split. To see the catalog in my shop, click to the image below.

Stampin' Up! Jan-Apr 2024 Mini Catalog

For every $50 you spend (prior to shipping and handling) you can receive FREE product from the Sale-a-Bration catalog. Click here to see those products.

Stampin' Up! Jan-Feb 2024 Sale-a-Bration Catalog

Sale-A-Bration is one of our biggest promotions of the year! It’s packed with perks, overflowing with opportunities for customers, and filled with fun for everyone. 

For every $50 of purchase, there are opportunities for FREE ITEMS from the Sale-a-bration Catalog. Enjoy the demonstrator perk of having early access to product by redeeming exclusive Sale-A-Bration products for FREE when you reach $50 USD | $60 CAD or $100 USD | $120 CAD spend levels.

While you’re at it, consider checking out the Stampin’ Up! Clearance Rack, the Kits Collection, Paper Pumpkin – and oh yes, consider JOINING MY TEAM to get regular discounts on every order.

Nothing brings people together quite like creativity. As an independent demonstrator, you can share what you love and expand your circle of friends to build a close-knit, collaborative community of crafters. You’ll meet, connect, learn from, and create with other demonstrators from all around the world through virtual events, in-person conventions, support groups, and social media. And don’t forget the importance of hosting your own crafting parties! You can host events with your favorite people and show off your favorite Stampin’ Up! projects. Let’s discover the joy of being a demonstrator together!

Become a Stampin’ Up! demonstrator and for just $99, you’ll get your own customized Starter Kit with $125 worth of products. And we’ll include all the business supplies you need to help you get started, plus free shipping. Don’t wait! Talk to me today to begin your creative journey! You may do that here!

Stampin' Up! Joining Promotion

Join my Stampin’ Up! team as a demonstrator using one of the options below…

Option #1:

  • Pay $99 USD for your Starter Kit
  • Choose $125 worth of products of your choice in your Starter Kit
  • PLUS receive the Stampin’ Glass Mat Studio for FREE (a $60 value) (Item #163987) I AM LOVING MINE!!!
Stampin' Up! Glass Mat Studio

Option #2:

  • Pay $99 USD for your Starter Kit
  • Choose $125 worth of products of your choice in your Starter Kit
  • PLUS receive an additional $30 worth of products of your choice in your Starter Kit
  • That’s a total of $155 worth of products for just $99! This is such a great deal!

Of course, there are other great benefits to becoming a Stampin’ Up! Demonstrator, such as free shipping on your Starter Kit, a 20%+ discount on demonstrator orders, early access to new catalogs and promotion information, early ordering of new products, attend conventions and workshops, being part of a team of creativity, no pressure to sell products and my full support as a valued team member!

If you’ve made up your mind and are ready to do join my team, you may do that here.

When ordering from me please use my NEW HOST CODE TJRE9W6M so that I receive proper notification and YOU GET THE Benefits of a FREE SU! item valued up to $10 :O) AND the Monthly Card Tutorial. (I like to treat my customers!) If your order is over $150, please don’t use the host code as SU! has benefits. I’ll still be notified and you can receive that FREE ITEM!

Note: Make sure that you can see my name on the final checkout page listed as your Demonstrator when you order so that you know that you’re ordering with me and you’ll get my rewards! PLUS… the monthly Online Tutorial when your order is over $50. 

Stampin’ Up! has lots of other ‘goodies’ in it’s line of products: Clearance Rack, Kits Collection, Paper Pumpkin’. See ALL THE PRODUCTS AVAILABLE BY CLICKING HERE – AND SHOP WITH ME.

Thanks for stopping by. May you have a beautiful day –

Stampin’ Up! Simple Fun Fold Note Card

It isn’t raining this morning! Wheee – maybe a bit of sunshine once we have daylight. It’s still dark here in NJ at 6 AM. This card is elegant due to the Shining Brightly DSP: deep Night of Navy & Gold are just stunning on Very Vanilla. And I’ve chosen to do this on a note card size, which when folded is 3 1/2 x 5. But it could easily be done on a standard A2 size card: just adjust the front score to maybe 1 3/4″ and change up the DSP measurements. I see another post opportunity! :O)

Stampin' Up! Simple Fun Fold Note Card

Isn’t this Shining Brightly DSP just stunning?! I’ve paired it with Something Fancy stamp set and Something Fancy Dies for the sentiment banner. And these Gold Holly Leaves and Loose Holly Gems and Sequins add a delicate and wonderful touch. I began by scoring the notecard front at 1 1/2 then folded that back on itself. I added the Sining Brightly 1 34 x 4 34 to the front left panel and another strip cut 1 14 x 4 34 to the folded back front section. Next I added another piece 1 34 x 4 34 to the inside right so that when it closes it really is noticeable.

The Very Vanilla sentiment banner was first wiped with an Embossing Buddy to remove any static, then I stamped the sentiment with VersaMark ink and sprinkled Gold Embossing Powder then heat set. After die cutting I added the Gold Holly Leaves and the cute red gems from Loose Holly Gems & Sequins. I added dimensionals only on the left side of banner and secured the banner in place. Nearly done!

Stampin' Up! Simple Fun Fold Note Card inside

For the inside I used the Leaf Punch and Distressed Gold SDSP to punch a leaf. I trimmed it into sections and adhered the multi-leaf section in the top left and the single leaf in the lower right. I added more red gems from the Loose Holly Gems and Sequins to pull it all together. This allows plenty of room for my message :O)

Stampin' Up! Simple Fun Fold Note Card & envelope

For the envelope – very simple… I used another panel of the Shining Brightly DSP to adhere to the flap & trimmed it to fit.

Note Cards are available in the 2023-2024 Annual Catalog as are the Gold Holly Leaves; the Shining Brightly DSP and the Loose Holly Gems & Sequins are shown in the Sep-Dec 2023 Mini Catalog.

Stampin' Up! Sep-Dec 2023 Mini Catalog

You may shop the above catalog by clicking on the photo.

Stampin' Up! 2023-2024 Annual Catalog

You may shop the 2023-2024 Annual Catalog here.

There is always LOTS going on in the Stampin’ Up 1 world – to keep you energized and excited and wanting to create & DO. October 7 is World Card Making DAY and Amy’s Inkin’ Krew is hosting an online event with demonstrators in the group (me too!). We start at 9 AM ET and go until the official start of Stampin’ Up’s event, then come back on again. Note… the times below are listed in MT – so adjust your time line for your area!

Stampin' Up! World Card Making Day event

Who: Everyone, including new customers!

When: 7 October 2023 from 2:00 to 5:00 p.m. (MT)

Where: Online

Price of Event: Free

Registration Dates: 6 September–7 October 2023

Connect with me to register for this event!

Which specific browsers are supported?
For the optimal viewing experience, we recommend using Chromium based browsers such as Google Chrome or Microsoft Edge. You can also get good results on Mozilla Firefox or Safari; however, there can be times where there may be slight visual differentiation (video controls, website design, etc.). We recommend always using the latest version of your chosen browser.

Can I watch the event with people that didn’t register?
That’s a big yes! Anyone and everyone are welcome to join in the fun. Registration is the best way to keep up on event details, but it’s not required.

Celebrate 35 Years with Us: Upcoming Starter Kit Special

We’re celebrating our 35th anniversary this year, and what better way to do that than with a special Starter Kit offer? From 3–31 October, new demonstrators will be able to choose either 35% OFF the cost of their Starter Kit or get 35% MORE product with their Starter Kit! Let me know how I can help you :O)

Stampin’ Up! Delightfully Eclectic Fun Fold

I am so excited to share this Fun Fold with you… it’s called a springboard fun fold and it’s from Susan Campfield, a SU! demonstrator.

Stampin' Up! Delightfully Eclectic Springboard fun Fold card & envelope

Let me show you what it looks like ‘open’ and from the top.

Stampin' Up! Springboard fun fold, open
Stampin' Up! Springb oard fun fold from the top

The photo at far left shows the completed card sort of lying open. The next photo shows an incomplete card from the top. The ‘springs” are on the additional accordion or z-fold of the card. And, here you can see one of the ‘springs’. The springs make the card a bit bouncy, which is fun. In the photo at left, the sentiment on the inside is also on a ‘spring’. Directions… oh, you want them, do you? :O)

Directions:

  • Card base is 4 1/4 x 5 12 – (here I used Petal Pink)
  • Layer 2 is same color of card stock cut 4 1/4 x 5 1/2 scored at 2 3/4 and 4 1/8. The first fold is mountain and the next is valley. Burnish.
  • Cut a piece of DSP (here I used Delightfully Eclectic DSP) 1 1/8 x 4 and adhere to the left side of the card base, giving about a 1/4″ edge.
  • Adhere Layer 2 so it is centered on the card base itself, giving about 1/8″ edge to the DSP
  • Add a strip 1 1/8 x 4 to the card base on the right side, not overlapping Layer 2.
  • HINT: the 1 1/8 x 4 strips could be an embossed panel or DSP
  • Time to make the ‘springs’:
    • cut 3 pieces 3/4 x 3 1/2 and score each the same: 3/4, 1 1/8, 1 1/2, 2 1/4, 2 5/8, 3. Each strip will look as though there are 2 m’s. Burnish.
    • add tear n tape to the inside on the short end
    • adhere over longer end slipping longer end to the fold line. Refer to photos
Stampin' Up! Springboard fun fold, springs.1
Stampin' Up! Springboard fun fold spring.2
Stampin' Up! Springboard fun fold spring together

These end up looking like m’s adhered together :O) Attach 2 of these to the 2 1/8 end of Layer 2 so they are about 1″ from top & bottom of panel.

Stampin' Up! Springboard fun fold, springs attached

Now it’s time to put the rest of the card together.

  • Cut a piece of Delightfully Eclectic DSP 4 x 4 and adhere to a piece of card stock 4 1/4 x 4 1/4. My larger piece is Basic White.
  • Without removing tear n tape on the two springs, place this front on the card base, centering it. Now you know it’s placement, attach to springs.

To complete my card front, I pulled out my Beautiful Balloons stamps and dies. On a piece of Basic White I stamped the sentiment in Pretty Peacock ink and die cut it with this very fun banner die from the Beautiful Balloons Dies. I added a length of Petal Pink ribbon from the Ribbon Combo Duo pack and attached it to the front panel with dimensionals. Notice the small stars on the banner? They were from die cutting the banner – I used my Crushed Curry marker to color them and with a dot of liquid glue added them below the sentiment. As an afterthought I added Wink of Stella to each star for a bit of sparkle. I thought it added the perfect touch. :O)

Now let’s complete the inside:

  • Stamp the daisy from Cheerful Daisies stamp set in Petal Pink ink. Die cut the daisy with the appropriate Cheerful Daisy Dies.
  • Die cut the daisy center using the Cheerful Daisy Dies from a piece of Crushed Curry and add to the daisy center.
  • Stamp the sentiment from Beautiful Balloons stamp set in Pretty Peacock ink on a Basic White piece. Die cut with the pretty banner die from Cheerful Daisy Dies. Adhere die cut daisy to the banner with liquid adhesive.
  • There is one more ‘spring’… attach it to the back of the banner, centering it. Add this to the inside of the card so that when the card is closed, the banner with the daisy does not show.
Stampin' Up! Springboard fun fold.2

I also added a piece of 2 1/2 x 2 1/2 Basic White card stock above the daisy banner so I could write my message on it. This was such a fun card to create! I enjoyed making the fun fold and the springs add a fun touch of bouncy & lightheartedness.

OK, the envelope, which I kept easy, I stamped the daisy in Petal Pink ink using a stamp from, what else, Cheerful Daisies stamp set. The center is stamped in Crushed Curry ink using Cheerful Daisies stamp set. I used my Calypso Coral marker to add a few whimsical dots.

Stampin' Up! Springboard fun fold with Delightfully Eclectic DSP and Cheerful Daieis bundle

All the elements to make this card may be found by following my link – you may do that here to place an order – and yes, you would be ordering from me. Thanks so much! Having said that, there is more to share… Stampin’ Up! kits are on sale this month, so through 31 Aug. Some are as much as 30% off!

Stampin' Up! Kits Collection Sale
  • Kits are fun, quick and easy, and all-inclusive so there’s nothing extra to buy and nothing to store afterward.
  • Completing a kit gives everyone a sense of artistic accomplishment.
  • Completed kits make great gifts. Make the projects and then give them away for someone else to use.
  • Because kits come in so many styles and project types, there’s something for everyone. Want to HOST a kits collection party? Let me know and I’ll help pull that off. Kt together in September with kits on sale now. :O)

KITS COLLECTION BY STAMPIN’ UP! You can shop with me here.

Sales Period: 1–31 August

If you are one of my customers, you know the Mini September – December 2023 Catalog will be coming your way SOON! My shipment arrives at some point today and I have everything all set to send out to you. EXCITEMENT! Ordering from the new catalog begins September 6. And yes, I’m offering PAPER SHARES. There will be 80 sheets in all: one sheet of each design from the DSP offered in this catalog, cut into 6×6 size. The cost is $30 + $8.50 for priority mail shipping. How do I do this? I order all the DSP packs offered in this catalog and cut them down to size (6×6), bundle them and ship them off to you ASAP. I can’t place my order until Sep 6 though, so as soon as I get, get it cut down & packaged, off it goes to you by priority mail. It’s a perfect opportunity to see what paper you want more than others. Yes, you can order DOUBLE SHARES – that would mean cutting paper 6 x 12, except for those already coming in 6×6 size. That cost for Double Shares would be $60 + priority mail shipping.

FYI: Shipping can only go to addresses within the US. Please send an email to: tlsbrightspot@gmail.com. I’ll need: your name, yep, first & last are a must; an email connected to your PayPal account. (you do not need a PayPal account to pay the invoice, but I only accept PayPal.) Deadline to sign up for shares with me is September 4 @ 3PM ET. Let me know if you are interested.

Stampin' Up! Mini September - December 2023 Catalog