Stampin’ Up! Simply Zinnia Flip Front Fun Fold

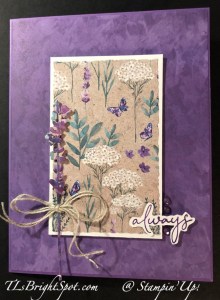
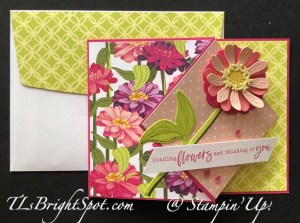
Good morning – we had a team meeting yesterday by ZOOM or in person, whichever folks could do and several of us presented or demonstrated a card. This was mine…

Stampin' Up! Simply Zinnia Flip Front Fun Fold

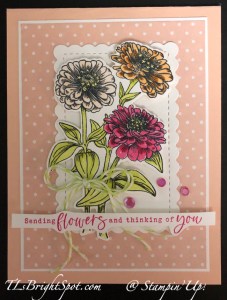
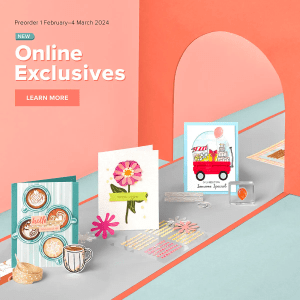
This card uses several NEW ONLINE EXCLUSIVE items: Simply Zinnia Bundle, Flowering Zinnias 12 x 12 DSP and Adhesive-Backed Shiny Sequins. You can see three of the DSP patterns on the front of this card. They go from soft to vivid bright.

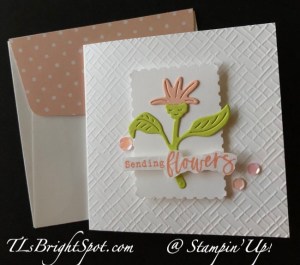
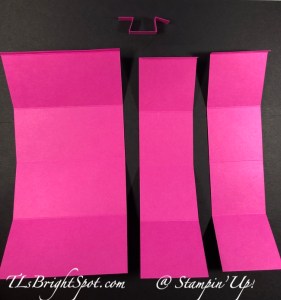
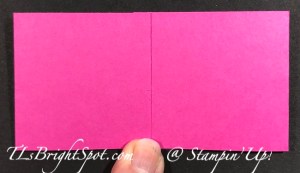
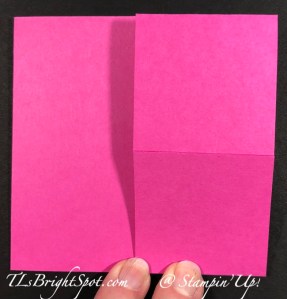
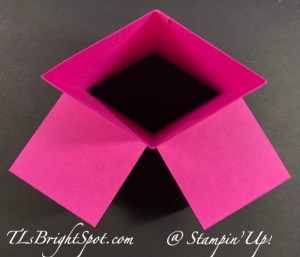
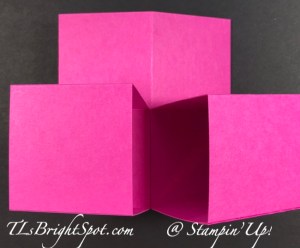
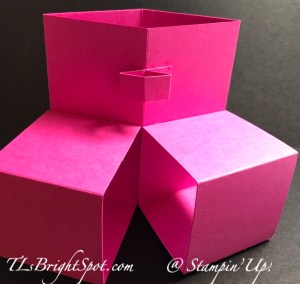
To make this card: Cut the card base (here I used Melon Mambo) 4 1/4 x 11 and score at 2 1/8 & 5 1/2. Burnish in a mountain. valley – the front folds back on itself and the other folds to the inside. On the 4 1/4 side and the end with the first score, mark the center point on the edge at 2 1/8. Cut from first score line to that center point, both from the top & the bottom, creating a point at that end. This is the flip end where the die cut flower will be placed. Cut DSP panels from the Flowering Zinnias DSP: 2 7/8 x 2 7/8 for the flip; 3 1/4 x 4 1/8 for the front left behind the flip; and 5 3/8 x 4 1/8 for the far right side (that’s the green panel in the photo). Adhere each of those to their respective places.

Using the Simply Zinnia Dies, create die cuts for the flower: Melon Mambo (2 1/4 x 2 1/4) for the backing of the flower petals; Flirty Flamingo (2 1/4 x 2) for the back petals layer; Petal Pink (2 1/4 x 2) top petals layer; scrap of Daffodil Delight for flower center and scrap of Lemon Lolly for the overlay of the floral center. Curl the petals with a bone folder then adhere together: Flirty Flamingo petals to Melon Mambo flower base with liquid glue; Petal Pink to Flirty Flamingo with dimensional; then add flower centers with liquid glue. Yay – the flower itself is complete!

With the card closed (as shown) adhere flower petal to the flip of the card, high enough and off the flip a bit so it does not go beyond the card edges. Remember only the bottom portion of the flower should be adhered to the flip! :O) Die cut the two stems (Mossy Meadow & Lemon Lime Twist adhering slightly together to create a shadow, then to the card front adhering under the flower head and just to the flip portion. Stamp the double leaf in Lemon Lime Twist ink on Lemon Lime Twist card stock and die cut with the appropriate die from Simply Zinnia Dies. Adhere to flip panel as shown. Stamp the sentiment from Simply Zinnia stamp set in Melon Mambo ink, trim edges, adhere to flip with dimensionals. Add three Adhesive-Backed Shiny Sequins and the card front is complete.
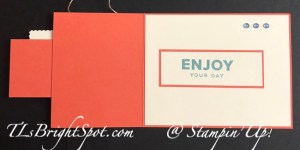
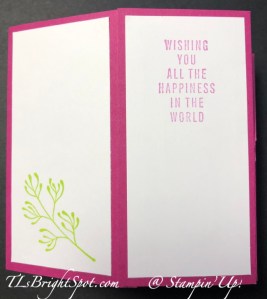
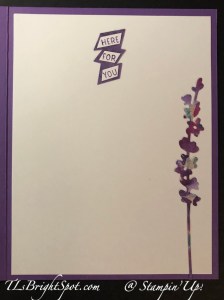
For the inside…

Stampin' Up! Simply Zinnia Flip Front Fun Fold, inside

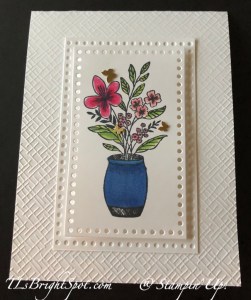
Here you see another panel of the DSP on the inside – it is 3 1/4 x 4 1/8. Adhere it to the inside of the card base. Cut a panel of Basic White 3 1/8 x 4 and stamp with the leaf in Lemon Lime Twist ink; adhere to the inside panel as shown.
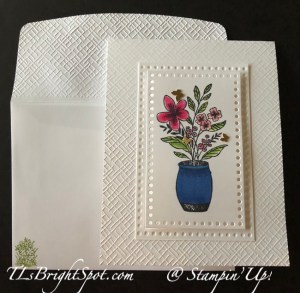
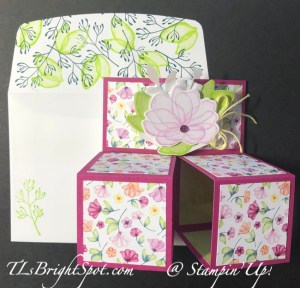
For the envelope…

Stampin' Up! Simply Zinnia Flip Front card & envelope back
Stampin' Up! Simply Zinnia Flip Front card & envelope front

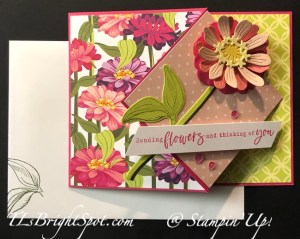
Adhere more of the Flowering Zinnias DSP to the envelope flap and trim. On the envelope front, stamp the double leaf image in Lemon Lime Twist ink – and your card is ready for most any occasion.

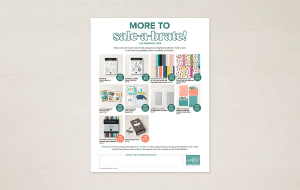
As I mentioned earlier, supplies for this card are mostly ONLINE EXCLUSIVE items. That means you will not find them in a catalog.

Click here to see all the products in that line. This is a new product just offered as of Mar 5.

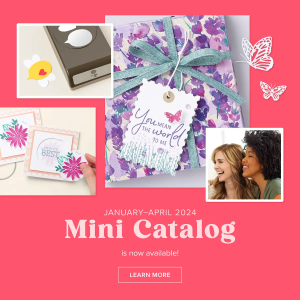
Stampin’ Up! has two catalogs right now from which to shop…

the Jan-Apr 2024 Mini Catalog which you may find here

the 23-24 Annual Catalog may be found here

When clicking those links above, you will shopping with me :O) and I like to treat my customers generously. When placing an order that amounts to at least $50 before taxes & shipping, you have the opportunity to choose a SU! item valued up to $10 as a free gift! So use my current host code. I will also send you a monthly tutorial that has several ideas for a special Stampin’ Up! bundle when your purchase is over $50 :O) If your purchase is $150 & above, don’t use the host code as SU! has its own rewards. I’ll still be notified though and will send the free gift and the tutorial!

Thanks for stopping by today. I hope you like the new ONLINE EXCLUSIVE bundle: I have made several cards with this suite of products. You may find those here, here and here. Can you tell I like this set of products? And tomorrow is another card using these products, so stay tuned!

Thanks for joining me today. May you have a beautiful day. Make someone happy sending them a handmade card created with love.

Stampin’ Up! Celebrating ONLINE EXCLUSIVES

On March 5 there are several new ONLINE EXCLUSIVE sets that will be available for purchase. As a demonstrator, we have an advantage of viewing/ purchasing/ playing with products before they become available to the general public. This Zinnia suite of products is one of them – and I’ve been having a ton of fun with them. For this project I’m making ‘mini cards. Essentially they are 6 x 3 to begin and finished is 3 x 3 ‘gift cards’. I used the Zinnia Dies and another ONLINE EXCLUSIVE, the Basic 3D Embossing Folders (set of 3, this in particular is the Cross Hatch). I also incorporated the Postage Stamp Punch, a part of the 2023-2024 Annual Catalog, on which to adhere the die cuts. And the embellishments are Petal Pink……. The sentiment is from Garden Meadow stamp set, another ONLINE EXCLUSIVE item., stamped in Petal Pink ink. The die cuts are cut from Granny Apple Green card stock & petal Pink card stock, adhered together with liquid glue.

Here you can see the inside of the 3 x 3 card… I had trimmed the stamped sentiment into segments, and fussy cut them. This is adhered directly to the inside of the 3 x 3 card. The envelope has this very sweet Petal Pink Polka dot from the Zinnia 12×12 DSP.

On the second notecard, I used the Zinnia 3D embossing Folder that is part of the bundle (stamps, dies & EF) and Basic White card stock. I stamped the sentiment in Melon Mambo ink from the Simply Zinnia stamp set and fussy cut it as well, putting dimensionals on the back and adding it to the embossed front. I had adhered the Zinnia 12×12 DSP to the 3×3 card front, wrapped a 2022-2024 In Color Twine around it and tied aknot, then added the embossed layer with dimensionals. I added three Petal Pink embellishments…. I used the same DSP for the envelope flap.

The last 3×3 card is the Zinnia 3D embossing Folder embossed on Basic White and adhered. I tied a bow from the 2022-2024 In Color Bakers Twine and adhered it with a glue dot. The sentiment was again stamped in Melon Mambo ink on Basic White and fussy cut with paper snips, adhered with dimensionals. More Adhesive-Backed Shiny Sequins were added to the front for glam. The inside of the card got the rest of the sentiment adhered with liquid glue; the envelope more of the Flowering Zinnias 12×12 DSP on the flap. And done…

Click here to view the ONLINE EXCLUSIVES (Basic 3D Embossing Folders, set of 3) Simply Zinnia Suite, Adhesive-Backed Shiny Sequins)

Click here for the 2023-2024 Annual Catalog for the card stock, inks, embellishments, paper snips, acrylic blocks for stamping, adhesives, twine and the paper trimmer

You will be shopping with me when you click that ‘here’ place – so remember, I have generous bonuses when shopping with me. Use my current HOST CODE G4G2CPRB to help me get the Stampin’ Up! giftie to you when making a qualified order of $50 or more before shipping & taxes. If your purchase is over $150, do NOT use the host code as SU! has rewards of it’s own. You STILL receive the FREE ITEM FROM ME. :O) And with that purchase of at least $50 (before shipping & taxes), you will also receive a BONUS fabulous array of “ideas of the month” with card cuts & all the information to make the designs. (The month of March features the Painted Lavender suite of products in the Jan-Apr 2024 Mini Catalog)

I hope you like todays card. I would love to hear from you. Make this day special by sending someone a handmade card filled with with love. Blessings!

Here are additional photos of cards I have created with the Simply Zinnia suite of products. Click on the photo to take you to the post of the card.

Stampin’ Up! Everyday Details Bundle In White

It’s rainy here today and should get to 51 degrees – spring IS in the air… I’m a latecomer to getting the Everyday Details bundle but I couldn’t resist the dies a moment longer. They arrived in the mail yesterday and I made this pretty card.

Stampin' Up! Everyday Detail Bundle in White

I paired the stamp set with the Basics 3D Embossing Folder and several Stampin Blends to color the stamped image. What do you think? Here’s how to replicate.

  • * Run the top half of the Thick Basic White card base through the Basic 3D Embossing folder (Crosshatch)
  • * Stamp the image from the Everyday Details stamp set on Basic White card stock in Memento ink
    • Color with Stampin Blends: Petal Pink, Flirty Flamingo, Melon Mambo, Granny Apple Green, Light Shaded Spruce and Blueberry Bushel
  • * Die cut with the largest of the rectangle dies in Everyday Details Dies. This creates two cuts… the outer one that I adhered directly to the card front and the stamped panel as well. I did have to trim edges of the outer one to the size you see.
  • * Adhere the stamped image with dimensionals inside the outer ‘frame’
  • * add Brushed Basics Butterflies for a final touch

The inside..

Stampin' Up! Garden Meadow sentiment

For the inside of the card I used a stamp from Garden Meadow stamp set in Melon Mambo ink on the Basic White panel. This was adhered to the inside of the card.

Stampin' Up! Everyday Details Bundle  card & envelope

On the envelope… run the flap through the same Basics 3D embossing folder (Crosshatch) and stamp the cute grass and flower image in Granny Apple Green ink on the front. This image is from the Garden Meadow stamp set – and the card and envelope are ready to send. This card is specifically for a woman whose hubby has some health issues and she’s struggling to keep up with all the responsibilities. I should make a dozen of these and send to various folks. It seems lots of individuals are having a hard time these days :O(

If you would to purchase these products…

Click here to see the Jan-April 2024 Mini catalog (page 28) to order Everyday Details Bundle

Click here to view the ONLINE EXCLUSIVES (Basic 3D Embossing Folders, set of 3)

Click here for the 2023-2024 Annual Catalog for the Brushed Basics Butterflies

You will be shopping with me when you click that ‘here’ place – so remember, I have generous bonuses when shopping with me. Use my current HOST CODE G4G2CPRB to help me get the Stampin’ Up! giftie to you when making a qualified order of $50 or more before shipping & taxes. If your purchase is over $150, do NOT use the host code as SU! has rewards of it’s own. You STILL receive the FREE ITEM FROM ME. :O) And with that purchase of at least $50 (before shipping & taxes), you will also receive a BONUS fabulous array of “ideas of the month” with card cuts & all the information to make the designs. (The month of March features the Painted Lavender suite of products in the Jan-Apr 2024 Mini Catalog)

I hope you like todays card. I would love to hear from you. Make this day special by sending someone a handmade card filled with with love. Blessings!

Stampin’ Up! Inspirational Thoughts Just a Note

I absolutely love the images in the Inspirational Thoughts stamp set! But my favorite is the daisy bunch. I stamped it in Pebbled Path ink on a Basic White piece cut 4 3/4 x 3 1/2. I colored it with Stampin’ Blends Lemon Lolly, just on the flower centers. It doesn’t show but I also added Wink of Stella in those same spots. I ran this through the Softly Sophisticated embossing folder (a FREE item with a qualifying order through Feb 29.). I then added a slightly larger piece of Lemon Lolly card stock to it and wrapped a length of Lemon Lolly Sheer Ribbon around both and tied a knot, holding it in place with a glue dot. I stamped the sentiment from the Inked & Tiled stamp set, again in Pebbled Path ink. I die cut the sentiment with the Something Fancy Dies, put dimensionals on the back and attached it over the ribbon. This entire piece was added to a Thick Basic White card base 4 1/4 x 11 scored at 5 1/2. I added three Adhesive-Backed Solid Gems in Lemon Lolly for more charm.

Stampin' Up! Inspirational Thoughts card front

For the envelope I again used the Softly Sophisticated embossing folder to add pattern to the flap. On the front of the envelope, I stamped this ‘chicken scratch’ image, just for decoration :O)

Stampin' Up! Inspirational Thoughts card & envelope

What do you think? My inclination is to make several cards with the daisy bunch, but maybe changing out the colors, maybe color the flower petals in a pink & add a pink ribbon & embellishments. Anyway, this would make a fun gift with a set of five of these. Of course there are other images in this stamp set that could also be used. This image is just my favorite. You may see more of these in the future :O)

So, how to get your hands on the elements to make this card.?

Click HERE to shop with me!

You will be shopping with me when you click that ‘here’ place – so remember, I have generous bonuses when shopping with me. Use my current HOST CODE G4G2CPRB to help me get the Stampin’ Up! giftie to you when making a qualified order of $50 or more before shipping & taxes. If your purchase is over $150, do NOT use the host code as SU! has rewards of it’s own. You STILL receive the FREE ITEM FROM ME. :O) And with that purchase of at least $50 (before shipping & taxes), you will also receive a BONUS fabulous array of “ideas of the month” with card cuts & all the information to make the designs.

Only a couple more days to get your hands on FREE product during the Jan- Feb Sale-a-bration – like the gorgeous Softly Sophisticated embossing folder.

Those FREE PRODUCTS in the Sale-a-Bration Catalog will no longer be available come March 1, so don’t wait to make those purchases.

Click HERE to see those FREE Items when making a $50 purchase

Click HERE to see those FREE items when making a $100 purchase

During Sale-a-Bration (Jan – end of Feb) is the best time to JOIN as a demonstrator – as there are all kinds of benefits. Nothing brings people together quite like creativity. As an independent demonstrator, you can share what you love and expand your circle of friends to build a close-knit, collaborative community of crafters. You’ll meet, connect, learn from, and create with other demonstrators from all around the world through virtual events, in-person conventions, support groups, and social media. And don’t forget the importance of hosting your own crafting parties! You can host events with your favorite people and show off your favorite Stampin’ Up! projects.Let’s discover the joy of being a demonstrator together!

Stampin' Up! Joining Promotion

Join by 29 February 2024 and choose between two fabulous offers:

Option 1: Get $125 worth of product PLUS our new Stampin’ Glass Mat Studio (a $60 value) for just $99!

Option 2: Get $125 worth of product PLUS an additional $30 worth of product of your choice when you join for $99. That’s a $155 value!

Click here to JOIN MY TEAM

The Jan- April 2024 Mini Catalog is good through the end of April. Click HERE to see those products.

Thanks for stopping by. May you have a beautiful day!

Make someone happy by sending them a handmade card made with love.

Stampin’ Up! Lifetime of Love Bundle

Today’s card is all about using Designer Series Paper to your advantage & dressing up with die cuts and other elements. The Forever Love Specialty DSP coordinates beautifully with the stamps in the A Lifetime of Love bundle.

Stampin' Up! Lifetime of Love

The card base is Thick Very Vanilla with an embossed layer over it. The embossing folder used is one of my new favorites… Softly Sophisticated 3D EF, which is a FREE item as part of the Jan-Feb 2024 Sale-a-Bration catalog. I am so hoping it carries over!!! The two DSP panels are adhered to Pretty Peacock panels just slightly larger, with the layer on top adhered with dimensionals. Before adding them to the card base I wrapped this pretty Satin Edged Ribbon around the back panel and adhered it with a glue dot. I used the 1 3/4″ Circle Punch to use as a layer for the heat embossed flower & die cut leaf. It’ too was adhered with dimensionals to the card front. As a final touch, I added three Pretty Peacock Foiled Gems.

The heat embossed flower: stamped with this cute, cute daisy like stamp from the Lifetime of Love stamp set, with VersaMark ink on a piece of Pretty Peacock card stock., then heat set with the heat tool. It was die cut with the coordinating die from Lifetime of Life Dies. The beautiful leaf die cut uses a die from the Lifetime of Love Dies and Gold Foil Sheets.

Stampin' Up! Lifetime of Love stamp set, card

For the inside of the card, a simple leaf is stamped in Pretty Peacock ink on the Very Vanilla panel. As you can see, this panel was added to a Pretty Peacock piece to complete the inside of the card.

Stampin' Up! Lifetime of Love card & envelope

Fort he envelope… more of the same Forever Love SDSP on the flap, trimmed to fit. On the front, the same simple leaf from Lifetime of Love stamp set, stamped in Pretty Peacock ink. Notice how the leaf stamp is so similar to the leaf on the SDSP!!! That’s Stampin’ Up! coordination :O)

Only a couple more days to get your hands on FREE product during the Jan- Feb Sale-a-bration. – like the gorgeous Softly Sophisticated embossing folder.

Those FREE PRODUCTS in the Sale-a-Bration Catalog will no longer be available come March 1, so don’t wait to make those purchases.

Click HERE to see those FREE Items when making a $50 purchase

Click HERE to see those FREE items when making a $100 purchase

During Sale-a-Bration (Jan – end of Feb) is the best time to JOIN as a demonstrator – as there are all kinds of benefits. Nothing brings people together quite like creativity. As an independent demonstrator, you can share what you love and expand your circle of friends to build a close-knit, collaborative community of crafters. You’ll meet, connect, learn from, and create with other demonstrators from all around the world through virtual events, in-person conventions, support groups, and social media. And don’t forget the importance of hosting your own crafting parties! You can host events with your favorite people and show off your favorite Stampin’ Up! projects.Let’s discover the joy of being a demonstrator together!

Stampin' Up! Joining Promotion

Join by 29 February 2024 and choose between two fabulous offers:

Option 1: Get $125 worth of product PLUS our new Stampin’ Glass Mat Studio (a $60 value) for just $99!

Option 2: Get $125 worth of product PLUS an additional $30 worth of product of your choice when you join for $99. That’s a $155 value!

Click here to JOIN MY TEAM

The Jan- April 2024 Mini Catalog is good through the end of April. Click HERE to see those products.

Thanks for stopping by. May you have a beautiful day!

Make someone happy by sending them a handmade card made with love.

Stampin’ Up! Simply Zinnia Sending Flowers

Good Saturday! I have a pretty card for you today that uses a suite of products from the ONLINE EXCLUSIVES and will be available Mar 5, 2024 – just around the corner.

Stampin' Up! Simply Zinnia, Sending Flowers

This is an all-around lovely card: can be used for birthday to sympathy because of the sentiment. The card base is Petal Pink, 4 1/4 x 11 scored at 5 1/2. The next layer is Basic White cut 3 3/4 x 5 with a panel of the Flowering Zinnia 12×12 DSP cut just slightly smaller (3 5/8 x 4 7/8). Both pieces are adhered directly to the card front. From Basic White I die cut this Scalloped Contour Die and adhered it to the card front, centering. I stamped this bunch of zinnias in Memento Black ink – from the Simply Zinnia stamp set – then colored it with Stampin’ Blends: Petal Pink, Pumpkin Pie, Melon Mambo, Lemon Lolly (for the flower centers) and Lemon Lime Twist (for the stems & leaves.)I die cut the colored piece using the coordinating Simply Zinnia Dies. I put several dimensionals on the back & attached it to the card front. I tied a double bow with the 2022-2024 In Color Bakers Twine Pack in Parakeet Party which blended perfectly. This was attached with a glue dot. The sentiment is stamped in Melon Mambo ink with a stamp from Simply Zinnia stamp set. I fussy cut the sentiment and attached it with dimensionals on the ends. As a final touch of glam, I added three Adhesive-Backed Shiny Sequins in Petal Pink and added wink of Stella to the flowers.

Stampin' Up! Simply Zinnia, Sending Flowers card inside

For the inside of the card, I stamped the same image as the front of the card, with Petal Pink ink to a Basic White panel – and adhered to the inside of the card.

Stampin' Up! Simply Zinnia, Sending Flowers card & envelope

For the envelope… more of the same pattern of DSP from Flowering Zinnias 12×12 DSP pack for the flap, and trimmed to fit. For the front, I stamped the double leaf image from Simply Zinnia stamp set in Lemon Lime Twist ink. Now, who wouldn’t want to receive this super pretty card?!

You can get your hands on this suite of products right here on March 5. To see what else is available in the ONLINE store, click here.

You will be shopping with me when you click that ‘here’ place – so remember, I have generous bonuses when shopping with me. Use my current HOST CODE G4G2CPRB to help me get the Stampin’ Up! giftie to you when making a qualified order of $50 or more before shipping & taxes. If your purchase is over $150, do NOT use the host code as SU! has rewards of it’s own. You STILL receive the FREE ITEM FROM ME. :O)

This is the last week of Sale-a-Bration. Those FREE PRODUCTS in the Sale-a-Bration Catalog will no longer be available come March 1, so don’t wait to make those purchases.

Click HERE to see those FREE Items when making a $50 purchase

Click HERE to see those FREE items when making a $100 purchase

During Sale-a-Bration (Jan – end of Feb) is the best time to JOIN as a demonstrator – as there are all kinds of benefits. Nothing brings people together quite like creativity. As an independent demonstrator, you can share what you love and expand your circle of friends to build a close-knit, collaborative community of crafters. You’ll meet, connect, learn from, and create with other demonstrators from all around the world through virtual events, in-person conventions, support groups, and social media. And don’t forget the importance of hosting your own crafting parties! You can host events with your favorite people and show off your favorite Stampin’ Up! projects.Let’s discover the joy of being a demonstrator together!

Stampin' Up! JOINING PROMOTION

Join by 29 February 2024 and choose between two fabulous offers:

Option 1: Get $125 worth of product PLUS our new Stampin’ Glass Mat Studio (a $60 value) for just $99!

Option 2: Get $125 worth of product PLUS an additional $30 worth of product of your choice when you join for $99. That’s a $155 value!

Click here to JOIN MY TEAM

The Jan- April 2024 Mini Catalog is good through the end of April. Click HERE to see those products.

Thanks for stopping by. May you have a beautiful day!

Make someone happy by sending them a handmade card made with love.

Stampin’ Up! Inked Botanicals Side Fold

Good morning… for today’s card I’ve done something a bit different. I’ve used Inked Botanicals 6×6 DSP in coordinating patterns from the 2023-2024 Annual Catalog and Heartfelt Hellos stamp set which is a FREE item during Jan-Feb 2024 Sale-a-Bration with a qualifying purchase. But that’s not really the different part – let’s view the card.

Stampin' Up! Inked Botanicals Side Fold card - front

Isn’t this paper just oh so pretty? I love the brushed, casual look. The card base is Calypso Coral card stock 4 1/4 x 11 scored at 5 1/2 then 2 1/8 trimmed from the front. I reserved that piece for the light-covered panel. But I get ahead of myself. I decorated the card front with a layer on Very Vanilla 3 1/4 x 4 1/8 then with Inked Botanicals 6×6 DSP 3 1/8 x 4. I covered removed piece with Very Vanilla 2 x 4 1/8 and coordinating Inked Botanicals 6×6 DSP 1 7/8 x 4. I adhered this to the card front with liquid glue. I stamped the sentiment with Lost Lagoon ink on a Very Vanilla scrap & punched it out with the Rectangular Postage Stamp Punch – a perfect size. I adhered a small strip of Lost Lagoon to the punched sentiment and added the sentiment panel & strip to the card front with dimensionals. I tied a double Linen Thread bow and slipped it behind the sentiment, attaching it with a glue dot.

Stampin' Up! Inked Botanicals side fold card inside

For the inside… I first added a panel of Very vanilla card stock 4 1/8 x 5 3/8. I cut a piece of Calypso Coral to be smaller than the front panel – so 3 7/8 x 1 3/8. I stamped a Very Vanilla Panel – again from the FREE Heartfelt Hellos stamp set in Lost Lagoon ink and adhered it to the Calypso Coral piece. I adhered this, centering it, to the inside of the card, then closing the card added several embellishments from the Tinsel Gems Three Pack in Lost Lagoon.

Stampin' Up! Inked Botanicals Side fold card and envelope

For the envelope, more of the Inked Botanicals 6×6 DSP adhered to the flap and trimmed to fit, then a narrow strip adhered to the envelope front. Done!

In order to get your hands on a few FREE products during Sale-a-Bration, you must place a qualifying order. The Heartfelt Hellos stamp set is available with a $50 order prior to shipping & taxes.

Click here to see all the FREE items available with a $50 order.

Click here to see what FREE items are available with a $100 order and above.

And there’s ALWAYS the opportunity to JOIN MY TEAM – and during Jan-Feb Sale-a-Bration, there are EXTRA BENEFITS

Nothing brings people together quite like creativity. As an independent demonstrator, you can share what you love and expand your circle of friends to build a close-knit, collaborative community of crafters. You’ll meet, connect, learn from, and create with other demonstrators from all around the world through virtual events, in-person conventions, support groups, and social media. And don’t forget the importance of hosting your own crafting parties! You can host events with your favorite people and show off your favorite Stampin’ Up! projects. Let’s discover the joy of being a demonstrator together!

JOIN NOW – click to join

If you’ve been thinking about becoming a Stampin’ Up! demonstrator, then there’s no better time than right now during Sale-A-Bration! Join by 29 February 2024 and choose between two fabulous offers:

Option 1: Get $125 worth of product PLUS our new Stampin’ Glass Mat Studio (a $60 value) for just $99!

Option 2: Get $125 worth of product PLUS an additional $30 worth of product of your choice when you join for $99. That’s a $155 value!

May you have a very special day today.

Make someone happy by sending them a handmade card filled with love.

Stampin’ Up! Translucent Florals Triple Box Card

Good morning! I’m still in my birthday week and folks have been so generous, both in sending cards and the giving of gifties. Of course, the best gift of all is the gift of friendship :O) Today’s card is just super cute – a triple box card. I may have done one of these in the past, but some time ago.

Stampin' Up! Translucent Florals Triple Box Card

Is this cute or what?! The Translucent Florals stamp set is a distinctive stamp set, which means it has lots of dimension in the stamp. And it prefers an ink pad that is not too inky. The flower is stamped in Fresh Freesia ink and the leaves are stamped in Parakeet Party ink – both stamps from the Translucent Florals stamp set. Each was die cut with the coordinating Translucent Florals Dies. I also used the Leaves Punch and Vellum to punch some background for the main flower. These are attached to a Basic White Hexagon Punched background, some with with Stampin’ Seal or liquid glue. The flower is on a dimensional in order to tuck the leaves and Vellum elements behind it. The double bow is made with Baker’s Twine Three Color Pack, Lemon Yellow & attached with a single glue dot to hold it in place.

The box itself is made with Berry Burst for the card base and Delightful Floral 12 x 12 DSP.

Card base: 8 1/4 x 4, scored at 2, 4, 6, & 8

Small boxes for front (2) – same color as card base: 8 1/4 x 2 scored at 2, 4, 6, 8

Mechanism to hold decorated element- same color as card base: 3 x 1/2 scored at 1/2, 1, 2, & 2 1/2

DSP (Designer Series Paper): (2) 3 3/4 x 1 3/4; (10) 1 3/4 x 1 3/4

Directions:

  1. Burnish all score lines. See photos for reference
  2. Add adhesive to smallest scored section, fold over and adhere. Do this for all three boxes.
  3. Add DSP to inside of tallest box sections. This will be the inside back of the box.
  4. Adhere one of the smaller boxes to the tall front box.
  5. Adhere the other smaller box beside it.
  6. Decorate fronts of all three boxes with the 1 3/4″ DSP – this will use six (6) pieces
  7. Adhere shorter pieces of DSP to inside of smaller boxes – this will use the last four (4) 1 3/4″ squares.
Stampin' Up! Triple Box Card. cut card stock
All card stock cut pieces
Step 2
Stampin' Up! Triple Box card step 2b
Step 2b
Stampin' Up! Triple Box Card step 4 a
Step 4a
Stampin' Up! Triple Box card step 4a complete
Step 4a complete
Stampin' Up! Triple Box card 4b complete
Step 4b complete, top view
Stampin' Up! Step 4b front view
Step 4b front view
Stampin' Up!Triple Box card mechanism
Step 1.8. – mechanism in place
  1. 8. Attach mechanism to upper portion on fold line half way up
  2. 9. Adhere Hexagon decorated floral piece to mechanism
  3. 10. Cut two (2) Basic White panels 1 3/4 x 3 3/4, stamp & adhere to back for writing message
Stampin' Up! Triple Box card back
Step. 1.8. writing panels in place on back
Stampin' Up! Translucent Florals Triple Box card with envelope
Triple Box card & envelope

Decorate envelope… on flap, stamp leaf image from Translucent Florals stamp set in Parakeet Party ink; then stamp frond image from Translucent Florals stamp set in Pretty Peacock ink. On envelope front, stamp frond image from Translucent Florals stamp set in Parakeet Party ink – and done!

This is just such an incredibly sweet Triple Box card and can fit so many special occasions. I hope you try it.

The products to make this card are both in the 2023-2024 Annual Catalog and the ONLINE EXCLUSIVES (the DSP). You may purchase those products here for the Annual Catalog and here for ONLINE EXCLUSIVES. Click here for Sale-a-Bration products. You will be shopping with me :O) and when you do, please use my current host code listed below to receive benefits from me as well. I like to treat my customers…

CURRENT HOST CODE PV2QWYHJ

It is nearing the end of Sale-a-Bration – the Jan-Feb special time of receiving FREE PRODUCT when making qualified purchases. Whats good to know is… it doesn’t matter how you purchase product from Stampin’ Up! during this time period, the FREE PRODUCTS are still available to you when making qualified purchases. Below are some links that just might encourage you to consider purchasing between now and the end of Sale-a-Bration

Stampin' Up! Jan - Apr 2024 Mini Catalog
Must use item number on flyer to receive these products free
Stampin' Up! ONLINE EXCLUSIVES

Joining Stampin’ Up! as a demonstrator has extra benefits during Sale-a-Bration – but remember those benefits end at midnight Feb 29. Nothing brings people together quite like creativity. As an independent demonstrator, you can share what you love and expand your circle of friends to build a close-knit, collaborative community of crafters. You’ll meet, connect, learn from, and create with other demonstrators from all around the world through virtual events, in-person conventions, support groups, and social media. And don’t forget the importance of hosting your own crafting parties! You can host events with your favorite people and show off your favorite Stampin’ Up! projects. Let’s discover the joy of being a demonstrator together!

Stampin' Up! JOINING PROMOTION

Join by 29 February 2024 and choose between two fabulous offers:

Option 1: Get $125 worth of product PLUS our new Stampin’ Glass Mat Studio (a $60 value) for just $99!

Option 2: Get $125 worth of product PLUS an additional $30 worth of product of your choice when you join for $99. That’s a $155 value!

Click here to JOIN MY TEAMhttps://www.stampinup.com/community/join-stampin-up

Stampin’ Up! Lifetime of Love and Paper Butterfly Accents

Good Friday morning! Another week and where did it go? I have a sweet card for you today using the Lifetime of Love Bundle and then Paper Butterfly Accents. I love a monochromatic look with just a bit of soft color and this card is it.

Stampin' Up! Lifetime of Love & Paper Butterfly Accents

I started with coloring the Paper Butterfly Accent with Orchid Oasis ink and a Blending Brush. Then I took my Stampin’ Blend in Orchid Oasis and flicked color on the butterfly. I set this aside to stamp the floral design from Lifetime of Love stamp set in Pebbled Path ink. I colored the flower with Stampin’ Blends Light Fresh Freesia and Dark Highland Heather. The leaves are colored with Stampin’ Blends Light Parakeet Party and Dark Granny Apple Green. I die cut this with the coordinating Lifetime of Love Dies and set this aside as well.

The card base is Thick Basic White. I added a layer of Basic White trimmed 1/4″ less than the card front and added it with liquid glue.; two layers on dimensionals: one is Basic White cut with a Perennial Postage Dies; the other is a Basic White trimmed to fit inside the die and run through the Softly Sophisticated 3D Embossing Folder. I love this embossing folder. It is one of my favorite! These two pieces were adhered together with liquid glue then added to the card base with dimensionals. I die cut this wonderful leaf circle from the Lifetime of Love Dies in Basic White and centered it on the card front using dabs of liquid glue. I added the colored floral image with dimensionals, then the butterfly both with liquid glue & dimensionals trimmed to fit under various wing areas. I wanted a bit of sparkle so added two of the Purple Fine Shimmer Gems to the butterfly and dabs of Wink of Stella to the flowers. They shimmer beautifully but it doesn’t show well in the photos.

Stampin' Up! Lifetime of Love & Paper Butterfly Accents card inside

For the inside… again, a Basic White panel trimmed 1/4″ smaller than the card was added to the inside. On that is the outside rim of the die cut from the Perennial Postage Die used on the card front. :O) I also stamped a small flower in Orchid Oasis ink and used my Blender Pen to move the ink around on the flower portion only. It gives depth to the flower. I die cut it with the floral di from Lifetime of Love Dies and adhered it with liquid glue.

Stampin' Up! Lifetime of Love & Pasper Butterfly Accents card & envelope

For the envelope… I embossed the flap using the same Softly Sophisticated 3D Embossing Folder. For the envelope front, I again stamped a single flower in Orchid Oasis ink and used my Blender Pen to move the ink on the flower only, not the leaves. And again, I used my Orchid Oasis Stampin’ Blend to flick ink around it. It’s subtle but adds a nice touch. This card could so easily be sympathy card or a birthday card, or happy anniversary or thinking of you – very versatile – and a sentiment may be added or not. Hope you like…

Many of the items needed to make this card are in the Jan-Apr 2024 Mini Catalog; some are in the 2023-2024 Annual Catalog.

Lifetime of Love Bundle –

Paper Butterfly Accents –

Softly Sophisticated 3D Embossing Folder –

Purple Fine Shimmer Gems

Perennial Postage Dies – may be purchased separately (. ) but are also part of a Bundle (. )

Stampin’ Blends

 Orchid Oasis

 Fresh Freesia

 Highland Heather

 Parakeet Party

 Granny Apple Green

Basic White card stock

Orchid Oasis ink

Blender Pen

Wink of Stella

Basic White Medium Envelopes

All these may be purchased from me right here.

If you do not have a demonstrator, reach out to me and I’ll send a catalog right away, plus a Jan-Feb Sale-a-Bration catalog as well. Sale-a-Bration is a special time for Stampin’ Up! folks – a time when there are product bonuses for qualifying orders. For instance, a $50 order qualifies for certain FREE ITEMS in the Sale-a-Bration Catalog and a $100 purchase qualifies for other FREE PRODUCT in that catalog. And there’s no limit to the free items. And if you think you might want to join as a demonstrator, there are bonuses there as well – extra special bonuses not offered at other times. See below for more info about joining as a demonstrator.

Click the Mini Catalog image to see products available for ordering

Click here to see the list of products available with at least a $50 order (prior to taxes & shipping) from the Jan-Feb 2024 Sale-a-Bration Catalog

Click here to see the list of products available with at least a $100 order (prior to taxes & shipping) from the Jan-Feb 2024 Sale-a-Bration Catalog

Stampin' Up! MORE to Sale-a-Brate

Ready for more? There are EVEN MORE PRODUCTS available to shop, earn, and redeem during Sale-A-Bration. We don’t want you to miss out on these great products and incredible deals, so take a look at our newly added products.

Remember, the item numbers in the flyer must be used in order to redeem these products as Sale-A-Bration items. These products have different item numbers in the catalog, which won’t register as part of Sale-A-Bration.

The two kits included with Sale-A-Bration 2nd Release have been marked to discontinue once out of stock. If they do not sell out during Sale-A-Bration, they may be discounted at a later date. 

Note: The newly added products that are now redeemable during Sale-A-Bration are part of Stampin’ Up!’s existing product offering.

Stampin' Up! More to Sale-a-Brate flyer

Nothing brings people together quite like creativity. As an independent demonstrator, you can share what you love and expand your circle of friends to build a close-knit, collaborative community of crafters. You’ll meet, connect, learn from, and create with other demonstrators from all around the world through virtual events, in-person conventions, support groups, and social media. And don’t forget the importance of hosting your own crafting parties! You can host events with your favorite people and show off your favorite Stampin’ Up! projects. Let’s discover the joy of being a demonstrator together!

Stampin' Up! JOINING Promotion

Join by 29 February 2024 and choose between two fabulous offers:

Option 1: Get $125 worth of product PLUS our new Stampin’ Glass Mat Studio (a $60 value) for just $99!

Option 2: Get $125 worth of product PLUS an additional $30 worth of product of your choice when you join for $99. That’s a $155 value!

Click here to JOIN MY TEAM

There’s MORE from Stampin’ UP!

Stampin’ Up! also has a KITS COLLECTION and is offering two new kits. See those below.

163865

BIRTHDAY SPARKLE KIT (ENGLISH)
$23.00
Stampin' Up! Birthday Sparkle Kit
Stampin' Up! Birthday 
Sparkle Kit parts
Stampin' Up! Birthday Sparkle Kit stamps

Happy Houseplants kit
Stampin' Up! Happy Houseplant Kit parts

163873

HAPPY HOUSEPLANTS KIT
$25.00

The Happy Houseplants Kit is an adorable home decor crafting kit! This kit comes with four 6″ x 6″ (15.2 x 15.2 cm) white frames and precut paper pieces for you to curl and assemble inside the frame. You’ll end up with four coordinated houseplant decor pieces. They can stand by themselves, or you can hang them on your wall. Either way, your houseguests will be amazed that you created it yourself!

Thanks for stopping by. May you have a beautiful day! Make someone happy by sending them a handmade card made with love.

Stampin’ Up! Perennial Lavender Here For You card for the Happy Inkin’ Thursday Blog Hop

Today is Thursday – which means, it’s time for another Happy Inkin’ Thursday Blog Hop. We have a color challenge today and I really like these color combinations. Perennial Lavender 12 x 12 DSP fits the bill perfectly!

Stampin' Up! Happy Inkin' Thursday Blog Hop
Stampin' Up! Blog Hop Color Challenge
Stampin' Up! Perennial Lavender Here For you Card front

I started by determining the showy piece of Perennial Lavender DSP for the front of the card. I die cut the piece with a Deckled Rectangle Die. And yes, I could have used the Perennial Postage Dies instead – and you could easily make that change if you decided to CASE this card. I wanted a slightly less ‘edgy’ look and that’s why I used the Deckled Rectangle Dies. I backed the DSP with a Basic White panel. I used another piece of the Perennial Lavender DSP to die cut the floral image. I adhered it to the DSP panel with dimensionals that I trimmed down to size, then added a double Linen Thread bow and attached it with a glue dot. I wanted a sentiment and pulled out the Perennial Postage stamp set and stamped the sentiment in Gorgeous Grape ink, cut it apart & fussy cut around the single word – setting the rest aside. I created a Gorgeous Grape card base and covered it with another Perennial Lavender DSP panel just slightly smaller in size. I attached the showy DSP panel to the card front with dimensionals, then added the sentiment with glue on the one end and a dimensional trimmed down to size on the overhanging end. I added three Purple Fine Shimmer Gems near the sentiment for a glitzy touch.

Stampin' Up! Perennial Lavender Here for you, card inside

For the inside of the card, I used the other floral die cut and adhered it with liquid glue to the Basic White panel. I took the rest of the stamped sentiment from the card front & cut it apart, added it to a same pattern DSP as the large front panel, trimmed it to a unique shape and adhered it with liquid glue.

To purchase items to make this card… Jan- Apr 2024 Mini Catalog. + the 2023-2024 Annual Catalog. Remember, when purchasing SU! products Jan- Feb of 2024, there are all kinds of FREE PRODUCTS to choose from in the Jan-Feb 2024 Sale-a-Bration Catalog. For every purchase of $50 or more, you may choose FREE PRODUCTS. see below for more info!!!

Continue the blog hop by clicking on the ‘next’ button or a name to take you to someone else. ENJOY THE HOP!

Amy Koenders

Mary Deatherage

Karen Finkle

Akiko Sudano

Karen Ksenzakovic

Tara Carpenter

Terry Lynn Brightyou are here!

Carol Buckalew

Nel Thames

If you do not have a demonstrator, reach out to me and I’ll send a catalog right away, plus a Jan-Feb Sale-a-Bration catalog as well. Sale-a-Bration is a special time for Stampin’ Up! folks – a time when there are product bonuses for qualifying orders. For instance, a $50 order qualifies for certain FREE ITEMS in the Sale-a-Bration Catalog and a $100 purchase qualifies for other FREE PRODUCT in that catalog. And there’s no limit to the free items. And if you think you might want to join as a demonstrator, there are bonuses there as well – extra special bonuses not offered at other times. See below for more info about joining.

Stampin' Up! Jan-Apr 2024Mini Catalog

Click the Mini Catalog image to see products available for ordering

Click here to see the list of products available with at least a $50 order (prior to taxes & shipping)

Click here to see the list of products available with at least a $100 order (prior to taxes & shipping)

Stampin' Up! More Sale-a-Bration products

Ready for more? There are EVEN MORE PRODUCTS available to shop, earn, and redeem during Sale-A-Bration. We don’t want you to miss out on these great products and incredible deals, so take a look at our newly added products.

Remember, the item numbers in the flyer must be used in order to redeem these products as Sale-A-Bration items. These products have different item numbers in the catalog, which won’t register as part of Sale-A-Bration.

The two kits included with Sale-A-Bration 2nd Release have been marked to discontinue once out of stock. If they do not sell out during Sale-A-Bration, they may be discounted at a later date. 

Note: The newly added products that are now redeemable during Sale-A-Bration are part of Stampin’ Up!’s existing product offering.

Stampin' Up! Flyer

Nothing brings people together quite like creativity. As an independent demonstrator, you can share what you love and expand your circle of friends to build a close-knit, collaborative community of crafters. You’ll meet, connect, learn from, and create with other demonstrators from all around the world through virtual events, in-person conventions, support groups, and social media. And don’t forget the importance of hosting your own crafting parties! You can host events with your favorite people and show off your favorite Stampin’ Up! projects. Let’s discover the joy of being a demonstrator together!

Stampin' Up! Joining Promotion

Join by 29 February 2024 and choose between two fabulous offers:

Option 1: Get $125 worth of product PLUS our new Stampin’ Glass Mat Studio (a $60 value) for just $99!

Option 2: Get $125 worth of product PLUS an additional $30 worth of product of your choice when you join for $99. That’s a $155 value!

Click here to JOIN MY TEAM

There’s MORE from Stampin’ UP!

Stampin’ Up! also has a KITS COLLECTION and is offering two new kits. See those below.

163865

BIRTHDAY SPARKLE KIT (ENGLISH)
$23.00
Stampin' Up! Birthday Sparkle Kit
Stampin' Up! Birthday Sparkle kit parts
Stampin' Up! Birthday Sparkle Stamps

Stampin' Up! Happy Houseplants kit
Stampin' Up! Happy Houseplants kit parts

163873

HAPPY HOUSEPLANTS KIT
$25.00

The Happy Houseplants Kit is an adorable home decor crafting kit! This kit comes with four 6″ x 6″ (15.2 x 15.2 cm) white frames and precut paper pieces for you to curl and assemble inside the frame. You’ll end up with four coordinated houseplant decor pieces. They can stand by themselves, or you can hang them on your wall. Either way, your houseguests will be amazed that you created it yourself!

Stampin' Up! ONLINE EXCLUSIVES

There are some NEW items being released on March 5. They are available to demonstrators now, so watch for these new products as I will share, share, share.

Thanks for stopping by. May you have a beautiful day! Make someone happy by sending them a handmade card made with love.