Unknown's avatar

About TL's Bright Spot

I love to be creative - in the garden, crafting, and in leadership roles. There is something wonderful that happens when we design something new and share it with others. It's fun and makes everyone happy.

Stampin’ Up! Botanical Textures + Textured Notes Fun Fold

Hello Saturday! It’s beautiful here in New Jersey – and I’m INSIDE… attending a convention for a women’s organization. The great part is that I’m seeing folks I haven’t seen in a while; the unfortunate part is that I’m not out gardening or enjoying the sun. Having said all that – let me share today’s card…

Stampin' Up! Botanical Textures & Textured Notes card front

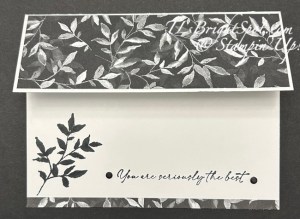
This card is made with items from the Botanical Textures Suite of products: the Botanical Textures 12×12 DSP and the Textured Notes stamp set (which is also a bundle with dies). Black & white cards stand out and this one is no different. It’s made with Thick Basic White card stock 8 1/2 x 5 12, scored at 4 1/4 then 2 1/4 removed. I cut a Botanical Textured DSP1 7/8 x 5 3/8 and adhere to the remaining top portion. Open the card & stamp the inside :O) This is an easy, easy card to make… just stamps, ink, paper!

Stampin' Up! Textured Notes Stamp Set inside card

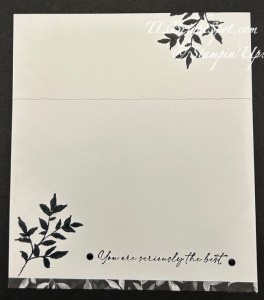
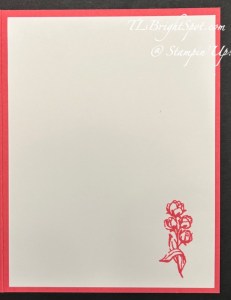
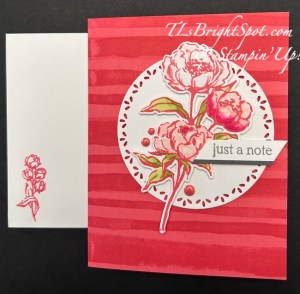
Using the Textured Notes stamp set and Memento ink, I stamped this stunning leaf on the upper right corner and the bottom left corner. I added a 3/8″ strip of the Botanical Textures DSPn to the bottom, then stamped this sentiment – also from the Textured Notes stamp set. LOVE THIS FONT! On each end of the sentiment I added black dots from … I forget which embellishments- maybe the Neutral embellishments from the suite?! And the card itself is done.

Stampin' Up! Botanical Textures + Textured Notes card & envelope

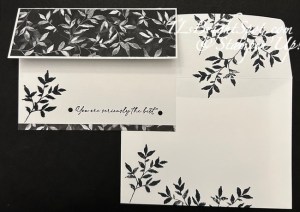
The envelope… Using Memento ink and another leaf stamp in this
Textured Notes stamp set, I stamped on the flap 3 times, reinking the stamp each time. I did the same on the front of the envelope – & boom, complete! Such a quick and gorgeous card. Well, maybe I shouldn’t say that since I made it 🙂

Stampin’ Up! Another DSP Fun Fold

Today is THE day of a two day 2x Stampin’ Rewards for purchases $20 & up. 2 fun! Celebrate National Scrapbooking Day with 2x Rewards for 2 Days!

Stampin' Up! 2x Stampin' Rewards

Have you heard? The global crafting community will be celebrating National Scrapbooking Day on May 3 —and we’re joining in the fun by offering you 2x Stampin’ Rewards for 2 days! Opt in if you haven’t done so yet!
What better way to celebrate one of our favorite crafting holidays? And the best part? This offer applies to ALL products, not just scrapbooking items! (Non-commissionable items and existing Paper Pumpkin subscriptions are excluded.)

  • Earn double rewards (2x rewards) for two days only, from May 2–3!
  • This offer applies to ALL products (excluding non-commissionable products and existing Paper Pumpkin subscriptions).
  • All orders qualify once the rewards threshold of $20 USD | $25 CAD is met.
  • To participate, customers must have a Stampin’ Up! account and be opted in to Stampin’ Rewards.

This includes LAST CHANCE PRODUCTS, items in the Jan-Apr 2025 Mini Catalog, the 2024-2025 Annual Catalog – scrapbooking supplies too!

Now – to the card for this post…

I made this card and was not going to post it, but… here it is. :O) It’s made with the retiring Floral Delight 12×12 DSP, Everyday Arches Dies (an ONLINE EC) AND the wonderful carrying over bundle, Lifetime of Love.

Stampin' Up! DSP Fun Fold w/ Floral Delight DSP

Notice – there is no sentiment on here, and it needs one. It’s screaming for one. I just couldn’t decide. It could be a Mother’s Day card or a birthday card or thinking of you… I need to figure that out. Here are basic directions for this layout.

  • Cut DSP 5 1/2 x 12 and score @ 2, 4, 8, 10. Be award of the direction when cutting AND since both sides show, be aware of that too.
  • On the short side of both ends, make a mark at 2 5/8″ from the top & cut from the closest score line to the mark. (Make certain when cutting each end that the cut is on the top side.) Save those trimmed pieces.
  • Fold mountain, valley, valley & mountain; burnish
  • Adhere those trimmed pieces to each front side
  • Decorate as desired making certain when adding the die cut front pieces, that they adhere to only one side
    • I used the 4th from largest of the Everyday Arches & Basic White card stock
    • The green die cut if from a leftover piece of this same Floral Delight DSP and using the lifetime of Love Dies
    • I stamped the the floral design in Memento ink – again from Lifetime of Love stamp set & colored it with Stampin. Blends Daffodil Delight and Old Olive, then highlighted the flowers with Wink of Stella
    • Final touch on the front was several of the Adhesive Backed Shiny Sequins, another ONLINE EXCLUSIVE
Stampin' Up! DSP Fun Fold w/ Floral Delight DSP

For the inside… on a Basic White 3 3/4 x 5 1/4 stamp the image in Old Olive ink using the Lifetime of Love stamp set. Adhere the Basic White panel to the inside.

Stampin' Up! DSP Fun Fold w/ Floralo Delight DSP

For the envelope… more Floral Delight DSP on the flap, adhered & trimmed to fit – and on the front, the same leaf stamped in Old Olive ink using the Lifetime of Love stamp set.

Shop with me by clicking here. For purchases of $50+ from me, you will receive the May Tutorial bundle in your in-box. Make sure my name is listed as your demonstrator when you check out :O)

Stampin’ Up! Florals in Bloom for the Happy Inkin’ Thursday Blog Hop

Welcome to this fantastic Thursday Hop! We have a color challenge today for the hop… hope you enjoy what you see today.

Stampin' Up! Happy Inkin' Thursday Blog Hop
Stampin' Up! Hop Sketch Challenge
Stampin' Up! Florals in Blooms card front

Oh what a fun, bright, feminine card… and I absolutely love this Florals in Bloom DSP! Here’s what I did… I cut a panel of the DSP 2 3/4 x 4, then cut on the short side @ 1 1/2, trimming that to create two panels 1 3/4 x 1 1/2 & 1 3/4 x 2 1/2. That leaves a 1″ strip which I cut @ 2 1/2, leaving a 1 1/2 pice. I adhered these directly to the Summer Splash 3 x 4 1/4, then to Darling Duckling 3 1/4 x 4 1/2. I wrapped a Strawberry Slush Twine around two times & tied a bow. This twine is from a Bakers Twine 3 color pack. Over this I added the sentiment on dimensionals from Greetings for All Ephemera Pack. I embossed a Basic White piece 4 x 5 1/4 using the Birchwood 3D embossing folder and adhered it to the Thick Basicb White card base (8b 1/2 x 5 1/2 scored at 4 1/4. I attached the front panel with dimensionals and bingo, the front was complete.

Stampin' Up! Florals in Bloom w/ Pretty Florals stamp set

For the inside… On another Basic White panel cut 4 x 5 1/4, I stamped the outline of the flowers in full strength Strawberry Slush, then stamped the fill in flowers in stamped off once Strawberry Slush. I stamped the stem/ leaves stamp in Granny Apple Green. And the sentiment – from the Greetings for All Ephemera Pack. Adhere the panel to the inside of the card. OH… the stamped flowers are from Pretty Florals stamp set – notice how it matches the DSP!!! These items are part of a suite of products available May 6.

Stampin' Up! Florals in Bloom card & envelope

For the envelope… more of the Florals in Bloom DSP on the flap, adhered & trimmed to fit. And yep – that same sweet flower on the envelope front from Pretty Florals. This also comes with dies!!!

Want to get these??? Join with me May 6 to place an order from the new 2025-2026 Annual Catalog AND the new ONLINE EXCLUSIVES. Clicking here to go to my store.

Take a gander at what others on the hop are sharing today… click on the next button to visit Amy or click on a name. Happy hopping!

Stampin' Up! hop next button

Amy Koenders

Akiko Sudano

Karen Ksenzakovic

Tara Carpenter

Terry Lynn Bright

Remember – double rewards from Stampin’ Up! May 2-3 when placing orders those days!!! The global crafting community will be celebrating National Scrapbooking Day on May 3 —and we’re joining in the fun by offering you 2x Stampin’ Rewards for 2 days! Opt in if you have not done so already…What better way to celebrate one of our favorite crafting holidays? And the best part? This offer applies to ALL products, not just scrapbooking items! (Non-commissionable items and existing Paper Pumpkin subscriptions are excluded.)

Stampin' Up! 2x REWARDS

Shop with me by Clicking here to go to my store.

Stampin’ Up! Book Binder Fault Line card

Hello folks – this is my 2nd post for the day and here it is the day before May Day – May 1 – and I’m excited to share this fun fold. It’s made with retiring Country Lace DSP to create the fault line technique :O)

Stampin' Up! BookBinder Fault Line card front

Begin with a Crumb Cake card base 4 1/4 x 11 scored @ 5 1/2 & @ 6 1/2. Burnish the 5 1/2 then burnish the 6 1/2 bringing it forward. Adhere that 1″ area to the card back so just the right side flips up. Add Basic White 7/8 x 4 1/4 to the 1″ area then add Country Lace DSP 3/4 x 4 1/4 over the Basic White.

Holding two layers of Country Lace together (both cut 3 x 4 7/16) & slowly tear at an angle – short side to short side – creating this fun edge. Now separate these pieces and add to a Basic White panel 4 7/16 x 4 1/4, leaving space as shown. Add to the Crumb Cake card front. (If you have seen the falut line technique in videos, I have done this just a bit differently – in that I added the Basic White panel to fit the book binder front) Stamp the sentiment in Crumb Cake ink using the Blooming Phrases stamp set – an ONLINE EXCLUSIVE and available May 6! Because this is a photopolymer stamp, I curved it to fit the curve of the DSP :O) I added three Adhesive-Backed Metallic Gems.

Stampin' Up! Book Binder Fault Line cardinside

For the inside of the card, I stamped the word happy, taping off some of the elements of that stamp before inking with Crumb Cake ink. Then I stamped the word ‘birthday’, also in Crumb Cake ink. These also come from the Blooming Phrases stamp set. Next I stamped the balloons in Memento ink – these come from Spring Corners stamp set, currently available in the ONLINE store. I colored these with Stampin’ Blends: Balmy Blue, Summer splash & Pool Party then added Wink of Stella for a bit of sparkle.

Stampin' Up1 BookBinder Fault Line card & envelope

For the envelope, more of the retiring Country Lace DSP adhered to the flap & trimmed to fit. I colored the balloons in the same manner using the same Stampin’ Blends: Pool Party, Balmy Blue & Summer Splash – and yes, Wink of Stella.

I love the contrast of the balloon colors with the very soft colors of the DSP – they really stand out nicely.

Remember – double rewards from Stampin’ Up! May 2-3 when placing orders those days!!! The global crafting community will be celebrating National Scrapbooking Day on May 3 —and we’re joining in the fun by offering you 2x Stampin’ Rewards for 2 days! Opt in if you have not done so already…What better way to celebrate one of our favorite crafting holidays? And the best part? This offer applies to ALL products, not just scrapbooking items! (Non-commissionable items and existing Paper Pumpkin subscriptions are excluded.)

Shop with me by Clicking here to go to my store.

Stampin’ Up! 2 day 2x Reward Bonus!

2 fun! Celebrate National Scrapbooking Day with 2x Rewards for 2 Days!

Stampin' Up! 2 Days Rewards Bonus

Have you heard? The global crafting community will be celebrating National Scrapbooking Day on May 3 —and we’re joining in the fun by offering you 2x Stampin’ Rewards for 2 days! Opt in if you haven’t done so yet!
What better way to celebrate one of our favorite crafting holidays? And the best part? This offer applies to ALL products, not just scrapbooking items! (Non-commissionable items and existing Paper Pumpkin subscriptions are excluded.)

  • Earn double rewards (2x rewards) for two days only, from May 2–3!
  • This offer applies to ALL products (excluding non-commissionable products and existing Paper Pumpkin subscriptions).
  • All orders qualify once the rewards threshold of $20 USD | $25 CAD is met.
  • To participate, customers must have a Stampin’ Up! account and be opted in to Stampin’ Rewards.

Thjis includes LAST CHANCE PRODUCTS, items in the Jan-Apr 2025 Mini Catalog, the 2024-2025 Annual Catalog – scrapbooking supplies too!

Shop with me by clicking here. For purchases of $50+ from me, you will receive the May Tutorial bundle in your in-box. Make sure my name is listed as your demonstrator when you check out :O)

Stampin’ Up! Cutest Onsie Baby Boy Card

Hello Sunday! We are slated to have a pretty nice day today – after a drenching rain yesterday that we desperately needed. Those fires in South Jersey did not affect us personally, but they weren’t far. Lots of businesses destroyed & 15,000 acres burned. We needed this rain to put out remaining hot spots on the forests floor. Sigh.

Today’s card is about new life – a baby boy – and I’ve used the carrying over Cutest Onsie Bundle to make it, and Balmy Blue.

Stampin' Up! Cutest Onsie Bundle card front

I began with by stamping a Balmy Blue panel (4 x 5 1/4) with these cute ‘clouds’ (think dreamy 🙂 and Balmy Blue ink. I then stamped the ‘onsie’ with Memento ink and with a Balmy Blue Stampin’ Blends, colored the neck, sleeves and bottom edges. I also stamped the star in Memento ink. I die cut the onsie and set it aside. Next I stamped the sentiment on two pieces of Lemon Lolly card stock, inking just a portion of the sentiment for each stamping. It was stamped in Azure Afternoon ink I adhered the strips with liquid glue then paced the onsie on dimensionals and overlaid the strips The embellishments are Adhesive-Backed Solid Gems in Lemon Lolly. This panel was adhered to Basic White 4 1/8 x 5 3/8 then attached to a card base of Balmy Blue (8 1/2 x 5 1/2 scored at 4 1/4) with dimensionals.

Stampin' Up! Cutest Onsie inside card

For the inside of the card, I stamped the onsie with Memento ink on a piece of Subtles 6×6 DSP (Balmy Blue of course) and while die cutting, I also die cut the pocket for the onsie. I adhered it directly to the Basic White inset (4 x 5 1/4) then stamped the sentiment in Azure Afternoon ink and the hearts too. This was attached to the inside of Balmy Blue card base for the completed card.

Stampin' Up! Cutest Onsie card & envelope

For the envelope, more of the Subtles 6×6 DSP in Balmy Blue was added to the flap and trimmed to fit. This added touch just unifies every project – love this! And there ya go… a baby boy card for a new little one.

All the items for today’s card are in the 2024-2025 Annual Catalog, which you may find in my store by – Clicking here to go to my store – and be sure to visit the LAST CHANCE PRODUCTS and the ONLINE EXCLUSIVES too. Remember that when your order is $50+ you will receive in your inbox this months tutorial (Memorable Blooms for April) and with the new Stampin’ Up! rewards system, you will have rewards from Stampin’ Up! that can be used for your next order!

On May 6, 2025, the Stampin’ Up! 2025-2026 Annual Catalog will go ‘live’ and you’ll find this bundle in that catalog as well :O) Need a catalog and don’t have a demonstrator? Please let me know & I can quickly send one to you.

Stampin’ Up! Painted Stripes & Gallery Blooms bundle

This is my 2nd post today – the first being a reminder of the FREE SHIPPING provided by Stampin’ Up! for purchases of $75+ AND… up to 75% off some Paper Pumpkin supplies. If you haven’t ordered or looked – please Click here to go to my store – and be sure to visit the LAST CHANCE PRODUCTS and the ONLINE EXCLUSIVES too.

For my 2nd post, here is this extra pretty card using new products in the 2025-2026 Annual Catalog AND in the ONLINE EXCLUSIVES – both available May 6. That will be an auspicious day!!!

Stampin' UP! Painted Stripes & Gallery Blooms bundle

I used the new IN Color for 2025-2027 called Strawberry Slush both for the card stock base, the Painted Stripes stamp set inked & stamped and the floral design also inked, stamped & die cut. After stamping the flowers, I used Stampin’ Blends to color them: Pretty In Pink, Melon Mambo, also Color Lifter for highlights and Wink of Stella. The leaves were colored with Granny Apple Green Blends. I then die cut and added dimensionals to the back and set it aside. I used the Spotlight on Nature Dies to die cut the circle from Basic White card stock and added it to the card front with dimensionals, off-setting it. I then added the flowers to the circle. The sentiment is from the Beautiful Motifs stamp set & Basic Gray ink. I added a very thin strip to the sentiment piece, then attachecd this to the card front… a dimensional on the back right of the sentiment and a dab of glue on the left. The final step was adding embellishments: 2025-2027 In Color Gems in Strawberry Slush.

Stampin' Up! Painted Stripes & Gallery Blooms card inside

For the inside of the card I kept it really simple: this sweet bouquet of roses from the Gallery Blooms stamp set, stamped in Strawberry Slush ink on the Basic White 4 x 5 1/4 panel.

Stampi' Up! Painted Stripes & Gallery Blooms bundle card & envelope

For the envelope I used the very same sweet rose bouquet from the Gallery Blooms stamp set and Strawberry Slush ink to stamp the envelope front.

Stampin' Up! FREE SHIPPING

What are your favorite items to purchase during FREE SHIPPING? With paper costs going up with the new annual catalog, card stocks are a perfect choice. I also stock up on envelopes which I use a lot, and your adhesives of choice are also a good purchase during free shipping.

Thanks for stopping by. May you have a beautiful day!

Stampin’ Up! LAST DAY FOR FREE SHIPPING!

TODAY, my friends, is the last day for FREE SHIPPING offered by Stampin’ Up! with purchases of $75+ AND up to 75% off some Paper Pumpkin items.

Stampin' Up! FREE SHIPPING
  • All order types qualify for this promotion.
  • Free shipping is for three days only. Orders must be opened and closed April 23–25.
  • Free shipping automatically applies to your cart after the qualifying amount has been met, which is $75 USD | $100 CAD (before tax).
  • Coupon codes and product credits are non-commissionable and will lower your order’s retail amount. Orders must meet the qualifying amount to be eligible for free shipping.
  • The additional cost for expedited shipping is not covered by this promotion.
  • Prepaid 3-, 6-, and 12-month Paper Pumpkin subscriptions and month-to-month subscriptions do not qualify for free shipping. Refills, past kits and add-ons do qualify toward free shipping, but you must be a subscriber to purchase. Subscriptions billed and shipped this month will be charged for the normal amount ($25.00 USD | $34.75 CAD shipping included) + tax.

What are your favorite items to purchase during FREE SHIPPING? With paper costs going up with the new annual catalog, card stocks are a perfect choice. I also stock up on envelopes which I use a lot, and your adhesives of choice are also a good purchase during free shipping.

Thanks for stopping by. May you have a beautiful day!

Stampin’ Up! DSP Gatefold for the Happy Inkin’ Thursday Blog Hop

Good Thursday & WELCOME to our fabulous hop! Today we have a sketch challenge & I’m mixing some items from the retiring Jan-Apr Mini Catalog, a carry over set of dies & a sentiment from the new 2025-2026 Annual Catalog (available May 6).

Stampin' Up! DSP Gatefold card front

The Floral Delight 12 x 12 DSP is just so full of spring & cheer! And the coordinating Delightful Wishes bundle is a fun play :O)

How to put together:

  • Cut DSP 5 1/4 x 12 & score @ 2, 4, 8, & 10; fold & lightly score mountain, valley, valley, mountain
  • On each short end measure down from top 2 5/8″ & mark. (This is 1/2 the 5 1/4). Cut from closest score to mark on each end & retain pieces removed.
  • Add these retained pieces to each front panel, decorating it & making it appear as though the panel was folded forward.
  • Decorate
    • For this card I cut two circles using the Spotlight on Nature Dies- one from the back side of a DSP in Delightful Floral & another from Basic White. These were adhered together with dimensionals
    • Adhere these to the left front panel ONLY, centering left to right
    • Decorate & add embellishments
      • Using the Delightful Wishes Dies, I die cut the branch from Pecan Pie & several flowers from one of the DSP sheets in Floral Delight DSDP
      • I adhered the branch directly to the circle & several of the flowers to the branch.
      • I pulled out the Greetings For All Mix & Match Ephemera Pack (new in the 2025-2026 Annual Catalog coming May 6) and adhered the sentiment with dimensionals
      • I added Adhesive-Backed Shiny Sequins for a bit of shine & sparkle
      • This entire piece was adhered to a 4 1/4 x 5 1/2 Daffodil Delight card base.
      • For the inside… I die cut the outline for the word wishing (Delightful Wishes Dies) in Lemon Lolly & adhered it to the Basic White 3 7/8 x 5 1/8 inside panel. Next I added an Adhesive Sheet to the back of a Daffodil Delight piece and die cut the word itself. This made it easy to adhere to the Lemon Lolly outline. Next I inked the rest of the sentiment in two parts (the word ‘you’ first) with Daffodil Delight ink and stamped them on the insert panel. This was added to the inside of the card – – and boom! This card is ready.
      • For the envelope… a 2 1/4 x 6 piece of Floral Delight DSP was adhered to the flap & trimmed to fit.
Stampin' Up! DSP Gatefold inside
Stampin' Up! DSP Gatefold card & envelope

Quick, easy and lovely to look at & receive – and an excellent way to show off both sides of the Designer Series Paper. Want to purchase these products? See how to do that below the list of those participating in today’s hop. :O) Enjoy the creativity you will see today!

Amy Koenders

Karen Finkle

Akiko Sudano

Karen Ksenzakovic

Tara Carpenter

Terry Lynn Bright

Want to shop? Click here to go to my store – and be sure to visit the LAST CHANCE PRODUCTS and the ONLINE EXCLUSIVES too.

Thanks for stopping by. May you have a beautiful day!

Stampin’ Up!

Stampin' Up! FREE SHIPPING

What are your favorite items to purchase during FREE SHIPPING? With paper costs going up with the new annual catalog, card stocks are a perfect choice. I also stock up on envelopes which I use a lot, and your adhesives of choice are also a good purchase during free shipping.

Want to shop? Click here to go to my store – and be sure to visit the LAST CHANCE PRODUCTS too n& save even more. Now is also that perfect time to check the ONLINE EXCLUSIVES as well.

Thanks for stopping by. May you have a beautiful day!