Hi Everyone! Things have gotten a bit complicated here… it’s called the “concern zone” but it’s nothing to take lightly… our S-I-L is a competitive cyclist (first in the country in his age group last year and several years prior – so, GOOD at it) and has been practicing inside for the past several months – at least since March. He ventured out about 1 1/2 weeks ago, riding 3 hrs, going at 50 mph speeds. Yeah, not something I would ever do… At any rate, he joined a new team recently and they went for a ride Sunday; didn’t touch, fist bump or anything. These guys are cautious and careful.. And guess what… he hit a nasty pothole and went boom… shattered his right elbow. Surgery was today – 4 1/2 hrs long…It’s complicated due to the nerves that run down the elbow, bone fragments and all that. Anyway – appreciate your prayers for him – and our daughter who has been so strong..,.He’s a dentist by vocation and this is a real setback for them, with Covid 19 and all that. So yes, I am one concerned M-I-L trying to stay calm, cool and collected :O)

Prized Peony
#1
Todays card uses the Prized Peony stamp set and the gorgeous Peony Garden DSP. And while I don’t usually enter challenges, this one is loosely based on the Hand Stamped Sentiments Sketch Challenge #344 (HSSSC344). I tuned it sideways…
Elements for this card:
- Prized Peony stamp set
- Peony Garden DSP
- Gray Granite cs – card base
- Petal Pink cs – layering
- Whisper White cs – circle and inside
- Gray Granite ink
- Petal Pink ink
- Wink of Stella
- North Pole Wonder Dies
- Crinkled Seam Binding 1/4″ Whisper White
- Elegant Faceted Gems
Layer the Peony Garden DSP on Petal Pink cs for the front and adhere with liquid glue.Stamp the small peony from the Prized Peony stamp set in Petal Pink and color in Wink of Stella. Die cut using the North Pole Wonder Dies circle. Die cut the pinked circle from the same die set using Whisper White cs. Adhere the two circles together with liquid glue and add dimesnionals: attach. Add a bow from the Crinkled Seam Binding !/4″ Whisper White ribbon with a glue dot. Add three Elegant Faceted Gems in Petal Pink.Your card front is complete!

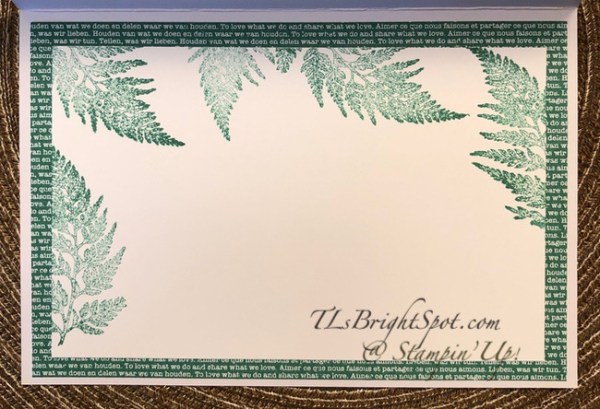
Prized Peony, inside
#2
For the inside, I adhered Petal Pink cs for a layer then stamped the Whisper White panel with the medium peony from the stamp set in Gray Granite stamped off once. I also stamped the sentiment in Gray Granite from the Prized Peony stamp set. Adhere with liquid glue to the Petal Pink panel. And your inside is complete as well.
For the envelope, I used another strip of the Peony Garden DSP for the flap and stamped the front with the same medium peony in Gray Granite ink. So simple, so elegant – and ready. :O)

Prized peony
#3

Prized Peony
#4
Right now SU! has an awesome deal going on called Bonus Days..For every purchase of $50 from now until 3 Aug. you will receive from SU! by email, a $5 coupon that is redeemable 4-31 Aug. Such a deal!

And when you order from me, please use my July host code to receive a SU! item worth $10 when your purchase is $50-$150. Sounds like another good deal, right?! It is…

Thanks for stopping by.
May you have a beautiful day.
Make someone happy by sending them a handmade card made with love.
Card Cuts for todays card:
- Gray Granite 4 1/4 x 11
- Petal Pink 3 1/4″ square + 1 x 31/4 + 2″ scrap for circle; 4 x 51/4
- Peony Garden DSP 3″ square + 3/4 x 3; 2 1/4 x 6 for envelope flap
- Whisper White 2 1/2 square scrap for circle; 3 3/4 x 5 for inside
.