SU! Love of Leaves Bundle

Fall is such a great time of year… and this card says ‘Fall’ all over it. This stamp/ die set is just so lovely – can be used for masculine cards for sure, which I sometimes have a hard time making. But this was so easy peasy and I love how it turned out.
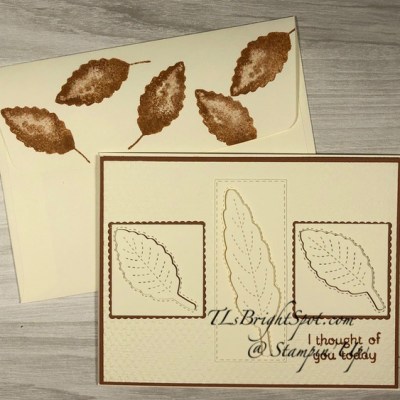
Love of Leaves bundle #1

I kept the look really simple and clean, using the Stitched Leaves Dies as the main focus. Aren’t they stunning? What I especially like about them is the way they have a stitched border around the leaf die cut and the leaf embossing with another die. With one roll through that die cutting machine  I was able to cut the square with the Square Dies AND one set of leaves in Very Vanilla cs! The border color is one of the new In Colors – Cinnamon Cider – a gorgeous shade of golden brown. That was cut with a Square Scalloped Die. The rectangle for the largest leaf was die cut with the Stitched Rectangles Dies, again in Very Vanilla.

I adhered the Very Vanilla square with the leaf ‘hole’ to the Cinnamon Cider with liquid glue. The leaf itself I adhered with dimensionals. I set those aside While I worked on the Very Vanilla background. First I located where the leaf squares would be, then laid the sentiment from Love Of Leaves stamp set in place. I moved the squares off the piece and stamped the sentiment in Cinnamon Cider ink. Then I ran it through the Tasteful Textures. embossing folder. This panel I adhered to a piece of Cinnamon Cider. I laid the leaf dies back on the textured Very Vanilla panel, glued on the squares and the rectangle with liquid glue. Then in the opening, I placed the leaves which had dimensionals on the back.

I put dimesionals on the back of the Cinnamon Cider panel and adhered to a Thick Very Vanilla card base.

Love of Leaves bundle
#2

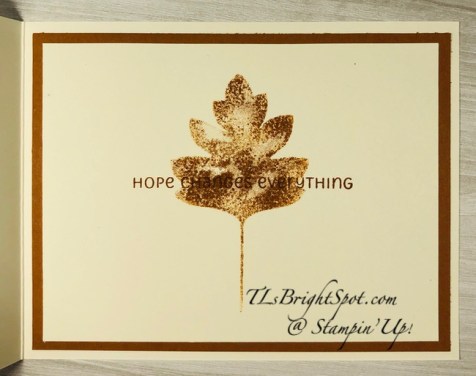
For the inside i stamped another leaf from the Love of Leaves stamp set, stamping off twice, onto Very Vanilla cs in Cinnamon Cider. I then stamped the sentiment from the same stamp set in full strength in Cinnamon Cider. I should probably stamped the sentiment again ass the word ‘changes’ gets a bit lost in the leaf.. ugh.
Love of Leaves bundle #3


Using yet another leaf from the Love of Leaves stamp set, I stamped both the envelope flap and the front as well – in Cinnamon Cider.

This bundle can be found in the new Aug-Dec Mini 2020 catalog that goes live to customers Tue Aug 4. And when purchased as a bundle in lieu of individually, you save 10% I strongly encourage you to. put this on your wish list.

Bonus days are coming to an end soon – now through 3 Aug, just 3 days. That $5 coupon (s) should be eating a hole in your pocket… to use in Aug.


Bonus Days. Earn in July, spend in August.

And when you order from me, please use my Aug host code to receive a SU! item worth $10 when your purchase is $50-$150. Sounds like another good deal, right?! It is…

August Host Code 

4TEZ7HWY

Thanks for stopping by.

May you have a beautiful day.

Make someone happy by sending them a handmade card made with love.

Card cuts for today’s project:

  • Thick Very Vanilla – 4 1/4 x 11, scored at 5 1/2
  • Very Vanilla – 4 x 5 1/4 for the front; 3 3/4 x 5 for the inside + scraps for the die cuts
  • Cinnamon Cider – 4 1/8 x 5 3/8 for the card front; 4 x 5 1/4 for the inside layer

SU! Slimline Diagonal Gatefold Card with Poinsettia Petals Bundle

Hi Everyone… Today’s card is just a gem but I might be a tad prejudiced… I have used this bundle in a previous card and fell in love with the set. Slimline cards seem to be all the rage these days and I had not done any of these. But here I am… and pleased with the results.

Before I get to the card: a couple of days ago I shared two Mini Paper Pumpkin boxes that I had decorated and asked for feedback, comments and said there would be a prize/ gift to one of the ‘commentees’. Karen Andrews – your name “plopped out of the spinner”. Please send your address to my email: tlsbrightspot@gmail.com and I will get that in the mail today Congratulations – hope you like it! The differences in the boxes? All inks, papers and ribbons used were the same; differences listed below. I’ll do a more complete post about the boxes tomorrow, Aug 1.

1) I used a brayer and colored the one box with Pretty Peacock ink

2) That same box was decorated on four sides

3) The top DSP was two (2) pieces

I also want to give an update on our S-I-L: he is doing very well. Recovery will take a while but he is in PT with mostly massage/ stimulation to help reduce the expected swelling in the affected arm. He has an amazing attitude and strong will and that will be to his advantage during the recover. If you are new to my blog, S-I-L had a rather nasty bicycle accident and shattered his right elbow.

Now – to the card of the day: I’m calling it the Slimline Diagonal Gatefold. Card cuts listed at the end of this post.

Slimline Gatefold with Poinsettia Petals
#1

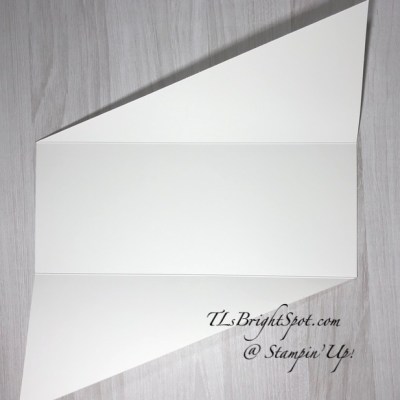
The base is Thick Whisper White, scored in two places, and cut on the diagonal. I then cut a panel of Blushing Bride and cut it on the diagonal – then did the same with the Plush Poinsettia Specialty Paper. TIP: be sure you are cutting the Specialty Paper on the proper diagonal. Ask me how I know that!

Slimline Gate Fold with Poinsettia Petals
#3

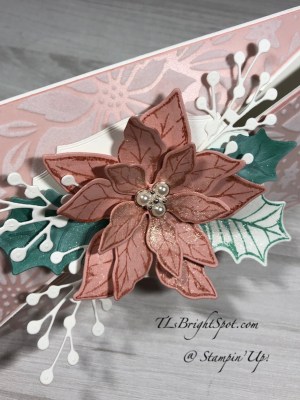
Once those have been adhered to the appropriate diagonal for the card front, you are halfway to completing this gorgeousness. Again using Blushing Bride cs, stamp the three poinsettia in Blushing Bride ink using the Poinsettia Petals stamp set. Die cut those with the coordinating Poinsettia Dies. (This is one fabulous bundle – and 10% off when purchased that way. 😉) With Just Jade cs, die cut two leaves. This die set allows you to not only die cut the outline, but also to ’emboss’ the leaf impression. LOVE THIS! I also took a Whisper White scrap, stamped a leaf in Just Jade ink and using the outline die, cut that out as well. Using additional Whisper White cs, I cut out three berry  sprays. Then I took another die set – the wonderful Tasteful Labels Dies, and cut a label from Whisper White.

Before assembling the poinsettia, I took my Wink of Stella and covered the poinsettia, and the three leaves to give them sparkle. TIP: Be careful not to cover the centers so the glue adheres the layers together better. You can see that pretty clearly in this photo.

Slimline Gate Fold with Poinsettia Petals
#2

Now put the poinsettia together with liquid glue. I did use a dimesnional for the top layer. Add a Beaded Pearl for the center adhering with a glue dot. Are these pretty or what? I layered my poinsettia in the center of the Tasteful Labels die and adhered with liquid glue. Then I added the leaves and finally the berry sprays, adhering with liquid glue.

The last step for the card front is attaching the ‘bouquet ‘to the card. Decide if you want the centerpiece of the card attached to the bottom panel or the top diagonal. It doesn’t really matter. The key is to make certain it is in the middle AND that the adhesive is only on the portion to adhere to the card. You might find it helpful to even mark the back of the label so the adhesive is in the right spot. You don’t want extra adhesive beyond the label.

The inside I kept very simple but it is elegant as well.

Slimline Gate fold with Poinsettia Petals
#4

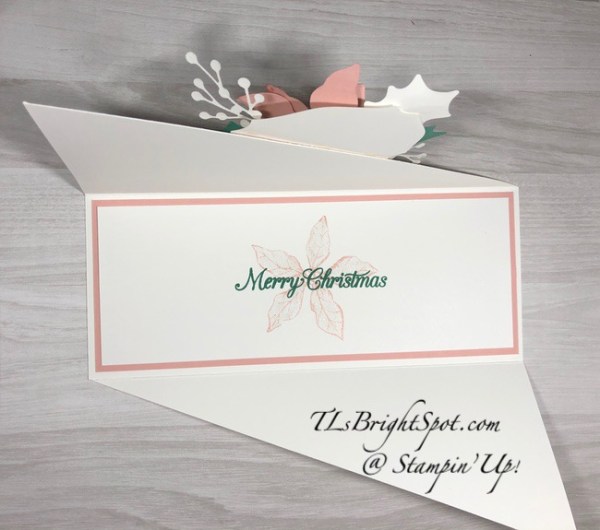
Cut a Blushing Bride panel and set aside. Cut a Whisper White panel: stamp with the next largest poinsettia in stamped off once Blushing Bride ink. Over this stamp the sentiment in full strength Just Jade ink. Adhere the stamped Whisper White panel to the Blushing Bride with liquid glue, then add that to the inside of the card. Voila! Your card is complete…

Slimline Gatefold with Poinsettia Petals
#1

The Poinsettia Petals bundle will be available to customers Aug 4. As demonstrators, we have the opportunity to preorder catalog items to play/ create/ inspire one another to new levels. Interested in being a demo? Join my team and we can create together.

Today is the last day to use my July Host Code – see below. I will post a new Host Code Aug 1

Bonus days are coming to an end soon – now through 3 Aug, just 4 days. That $5 coupon (s) should be eating a hole in your pocket… to use in Aug. Did you make your list?


Bonus Days. Earn in July, spend in August.

And when you order from me, please use my July host code to receive a SU! item worth $10 when your purchase is $50-$150. Sounds like another good deal, right?! It is…

Thanks for stopping by.

May you have a beautiful day.

Make someone happy by sending them a handmade card made with love.

Card cuts for today’s project:

  • Thick Whisper White – 8 1/2 x 10 1/2, scored at 3 1/2 and 7 on the long side
  • Blushing Bride cs – 3 3/8 x 8 for the card front, cut on diagonal + scraps for Poinsettia; 3 1/4 x 8 1/4 for the inside
  • Plush Poinsettia Special Paper – 3 1/8 x 7 3/4, cut on diagonal
  • Whisper White  – scraps for leaf and berry spray; 3 x 8 for inside

SU! Tag Buffet Project Kit

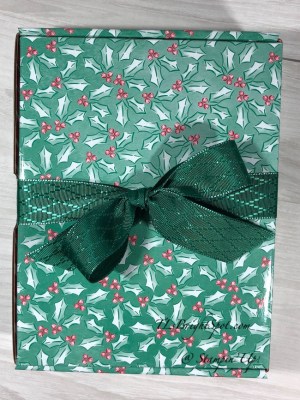
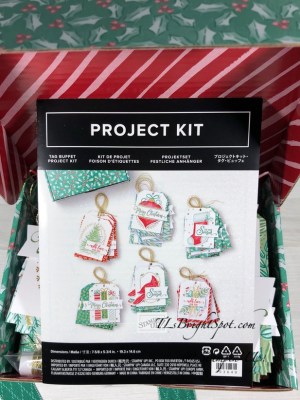
Hello! Welcome… I keep telling myself I am going to stop making Christmas projects, but… once started it’s hard to stop :O) Do you feel a jingle coming on – ha ha ha. The Tag Buffet Project Kit is so cute and fun to put together… and the box to store the completed tags is perfect. The ribbon is from the Wonder of the Season Combo Pack – 1″ Shaded Spruce and it is gorgeous ribbon!

Tag Buffet Project Kit
#1

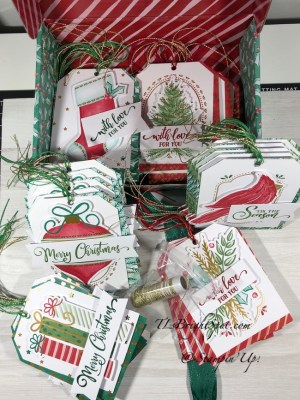
Isn’t this box wonderful? If you didn’t want to use it for tags, it can easily be used to gift a set of cards – just sayin’. So what comes in the kit… enough tags and gold cord to make 30 – yes 30 tags! 5 each for 6 designs and gold cord. And if you wanted you could add some card stock to turn them into cards. You add the Tag Buffet stamp set and inks and bingo – easy peasy. What a fun way to get together – physically distanced of course. You could invite five friends and let them do one of each design. Have them bring their own ink pads and dimensionals if possible: you provide the stamp set, acrylic blocks and wipes for sanitizing. And oh yes, don’t forget the wine, or root beer or your favorite beverage.

Tag Buffet Project kit
#2

Final product…

Tag Buffet Project Kit
#3

If you look closely, you will see more than just gold cord on. my tags. I added either red or green crochet cord with the gold cord provided, just cuz – that’s me… But i9t certainly isn’t necessary. This project kit can be found on page 5 of the August-December 2020 M ini Catalog that goes live to customers 4 Aug. Don’t have a catalog? I can fix that! If you do not have a demonstrator I would be happy to connect with you. During the month of July – yes I know it’s just about over… but when you purchase $50 worth of product SU! sends you an email with a $5 coupon.
For every $50 you spend, you receive another coupon. They are redeemable 4-31 Aug. Such a deal!, what are you waiting for – buy something!


Bonus Days. Earn in July, spend in August.

And when you order from me, please use my July host code to receive a SU! item worth $10 when your purchase is $50-$150. Sounds like another good deal, right?! It is…

Thanks for stopping by.

May you have a beautiful day.

Make someone happy by sending them a handmade card made with love.


SU! Dog Builder Punch and Playful Pets DSP

Hi Everyone. It has been so stiflingly hot lately – the humidity is super high and it just makes it real uncomfortable to have to be outside. I feel so fortunate to have air conditioning – didn’t grow up with it and I remember those days… Let’s see, I told about our S-I-L shattering his elbow in a cycling accident. He’s home now, good spirits and positive attitude. So so thankful for so many things. There does not appear to be nerve damage; he can move all his fingers! Essentially they had to remove the elbow – now he has three metal plates instead… what they can do now is just amazing. So thankful – God was at work (and continues to be!) throughout this in so many ways.

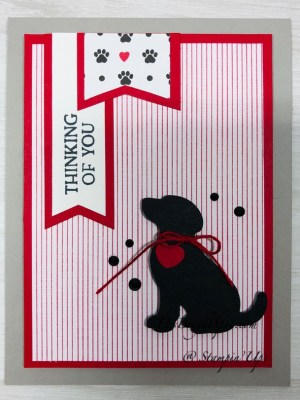
Card for today… for a friend whose dog passed away recently. Pets are such an important part of our lives… and she had this fella 18 years, longer than most.

Playful Pets DSP and Dog Builder Punch
#1

The card base is Gray Granite… layer Real Read then the Playful Pets DSP. This layer has dimensionals. The banners were punched with the Banners Pick a Punch. Those little paws and hearts in the DSP are just sweet, aren’t they? The dog is punched with the Dog Builder punch in Basic Black cs and he’s on dimensional too. I tied a piece of crochet yarn around that little doggies neck before attaching him to the card front.(I know, not a SU! item…) And that heart is part of the punch – and it’s in Real Red. Those little Black Rhinestone Jewels are a retired item (unfortunately!) The ‘Thinking of You’ sentiment is from the Blossoms in Bloom stamp set.

Playful Pets DSP and Dog Builder Punch
#2

Playful Pets DSP and Dog Builder Punch
#3

Thanks for stopping by.

May you have a beautiful day.

Make someone happy by sending them a handmade card.


SU! Prized Peony

Hi Everyone! Things have gotten a bit complicated here… it’s called the “concern zone” but it’s nothing to take lightly… our S-I-L is a competitive cyclist (first in the country in his age group last year and several years prior – so, GOOD at it) and has been practicing inside for the past several months – at least since March. He ventured out about 1 1/2 weeks ago, riding 3 hrs, going at 50 mph speeds. Yeah, not something I would ever do… At any rate, he joined a new team recently and they went for a ride Sunday; didn’t touch, fist bump or anything. These guys are cautious and careful.. And guess what… he hit a nasty pothole and went boom… shattered his right elbow. Surgery was today – 4 1/2 hrs long…It’s complicated due to the nerves that run down the elbow, bone fragments and all that. Anyway – appreciate your prayers for him – and our daughter who has been so strong..,.He’s a dentist by vocation and this is a real setback for them, with Covid 19 and all that. So yes, I am one concerned M-I-L trying to stay calm, cool and collected :O)

Prized Peony
#1


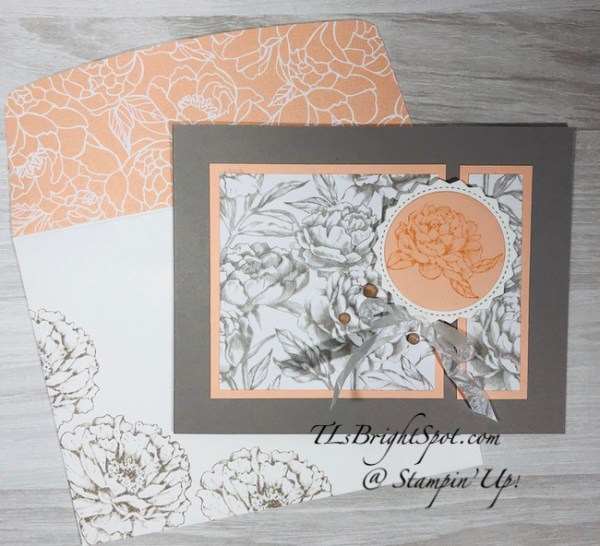
Todays card uses the Prized Peony stamp set and the gorgeous Peony Garden DSP. And while I don’t usually enter challenges, this one is loosely based on the Hand Stamped Sentiments Sketch Challenge #344 (HSSSC344). I tuned it sideways…

Elements for this card:

  • Prized Peony stamp set
  • Peony Garden DSP
  • Gray Granite cs – card base
  • Petal Pink cs – layering
  • Whisper White cs – circle and inside
  • Gray Granite ink
  • Petal Pink ink
  • Wink of Stella
  • North Pole Wonder Dies
  • Crinkled Seam Binding 1/4″ Whisper White
  • Elegant Faceted Gems

Layer the Peony Garden DSP on Petal Pink cs for the front and adhere with liquid glue.Stamp the small peony from the Prized Peony stamp set in Petal Pink and color in Wink of Stella. Die cut using the North Pole Wonder Dies circle. Die cut the pinked circle from the same die set using Whisper White cs. Adhere the two circles together with liquid glue and add dimesnionals: attach. Add a bow from the Crinkled Seam Binding !/4″ Whisper White ribbon with a glue dot. Add three Elegant Faceted Gems in Petal Pink.Your card front is complete!

Prized Peony, inside
#2

For the inside, I adhered Petal Pink cs for a layer then stamped the Whisper White panel with the medium peony from the stamp set in Gray Granite stamped off once. I also stamped the sentiment in Gray Granite from the Prized Peony stamp set. Adhere with liquid glue to the Petal Pink panel. And your inside is complete as well.

For the envelope, I used another strip of the Peony Garden DSP for the flap and stamped the front with the same medium peony in Gray Granite ink. So simple, so elegant – and ready. :O)

Prized peony
#3

Prized Peony
#4

Right now SU! has an awesome deal going on called Bonus Days..For every purchase of $50 from now until 3 Aug. you will receive from SU! by email, a $5 coupon that is redeemable 4-31 Aug. Such a deal!

Bonus Days. Earn in July, spend in August.

And when you order from me, please use my July host code to receive a SU! item worth $10 when your purchase is $50-$150. Sounds like another good deal, right?! It is…

Thanks for stopping by.

May you have a beautiful day.

Make someone happy by sending them a handmade card made with love.

Card Cuts for todays card:

  • Gray Granite 4 1/4 x 11
  • Petal Pink 3 1/4″ square + 1 x 31/4 + 2″ scrap for circle; 4 x 51/4
  • Peony Garden DSP 3″ square + 3/4 x 3; 2 1/4 x 6 for envelope flap
  • Whisper White 2 1/2 square scrap for circle; 3 3/4 x 5 for inside


.


SU! Back On Your Feet Double Z Fold

Hi everyone ~ how’s it going? You doing OK? Some days during this self containment are easier than others, right? So, one day at a time just do the best you can; try not to look ahead too far cuz that can get you kinda crazy. Take the best care you can of yourself and family. Guess I’m feeling a bit philosophical this morning….

Todays card is for a friend who had surgery on their neck – a couple of fuses – and they are struggling, really struggling. I decided a little levity might be helpful and this is what I created.

Back On Your Feet Double Z Fold
#1`

Is this perfect for neck surgery or what! And it’s a double z fold which puts it up a couple of notches in being special. The World of Good Specialty DSP is perfect for this man as he has traveled around the world and then some. I doubt they will notice the significance but I certainly did while making this card.

Here are the products I used… card cuts are listed at the bottom of the post…

  • Back On Your Feet stamp set
  • Crumb Cake cs for the base of the larger Z and the smaller Z
  • Early Espresso cs for layering
  • World of Good Specialty DSP
  • Whisper White cs
  • Old World Paper 3D embossing folder
  • Stitched Rectangles Dies
  • Lovely Labels Pick a Punch
  • Wink of Stella
  • Crumb Cake and Early Espresso inks
  • 2020-2022 In Color Enamel Dots, Cinnamon Cider

When I create a card like this, I do one portion at a time – one Z fold, then the other. You can cut everything and lay it out for efficiency, but I was still working out sizes for the smaller Z. Crumb Cake is the base of the card, layer the Early espresso for all three sections of the larger Z, then layer the World of Good Specialty DSP for the three sections. For the smaller Z, Crumb Cake cs was used for the card base layer, then Early Espresso cs for the first (or front) and last (or back) layers, then DSP on the first and Whisper White for the last (for sentiment). For the front layer, the DSP was run through the Old World Paper 3 D embossing folder. Gosh that embossing folder is amazing… You can see it very clearly in this photo.

Back On Your Feet Double Z fold
#2

I don’t adhere the Whisper White panel until I have the sentiment or design on cuz – you know, mistakes happen… lol. The turtle was stamped in Early Espresso ink. Then I took my Wink of Stella and colored in the shell only. This moved the ink around a bit and gave it some variety. Then I stamped the sentiment in Crumb Cake ink.

Now that both Z folds are created I put them together… I lay the small one on to get an idea where it should sit on the larger Z. When the card is closed, we don’t want to see the last panel of the small Z at all. Once I have seen how it fits, I adhere the back panel first, then the front and it creates this wonderful Z. Take a peek at this photo from the top of the card.

Back On Your Feet Double Z fold
#3

That cute giraffe was stamped on Whisper White in Crumb Cake ink. I used the light Crumb Cake Blends to color in the spots very lightly, then covered the giraffe in Wink of Stella. Again, this moves the ink around a bit and colors the giraffe lightly. The giraffe was adhered with dimensionals. I then stamped the word OUCH! on a 1/2″ wide length of Whisper White in Early Espresso and cut the ends with the Lovely Labels Pick a Punch. I added three 2020-2022 In Color Enamel Dots and attached with liquid glue.

The envelope flap was covered in the World of Good SDSP and then stamped on the front with the word SIGH… several times since this is such a long recovery. The card is complete and guess what – mine is already in the mail as we speak. How fast is that for a turn-around?

Back on Your Feet Double Z Fold
#4

What do you think? I think the man will appreciate the card AND the thought behind it… If you are interested in purchasing these products, they may be found in the SU! 2020 Annual Catalog. And if you do not have a demonstrator, would love to connect with you. Right now SU! has an awesome deal going on called Bonus Days..For every purchase of $50 from now until 3 Aug. you will receive from SU! by email, a $5 coupon that is redeemable 4-31 Aug. Such a deal!

Bonus Days. Earn in July, spend in August.

And when you order from me, please use my July host code to receive a SU! item worth $10 when your purchase is $50-$150. Sounds like another good deal, right?! It is…

Thanks for stopping by.

May you have a beautiful day.

Make someone happy by sending them a handmade card made with love.

Card Cuts for todays card:

Large Z Fold..

  • Crumb Cake cs 4 1/4 x 11, scored at 2 3/4 and 5 1/2
  • Early Espresso cs 4 1/8 x 5 3/8, 2 3/8 x 4 1/8 (x 2)
  • World of Good SDSP 2 1/2 x 4 (x 2), 4 x 5 1/4

Smaller Z Fold…

  • Crumb Cake 2 3/4 x 8 3/8, scored at 2 3/4 and 5 1/2
  • Early Espresso cs 2 5/8 square (x 2)
  • World of Good SDSP 2 1/2 square run through the Old World Paper 3D embossing folder
  • Whisper White cs 2 1/2 square


.


SU! Mini Gatefold

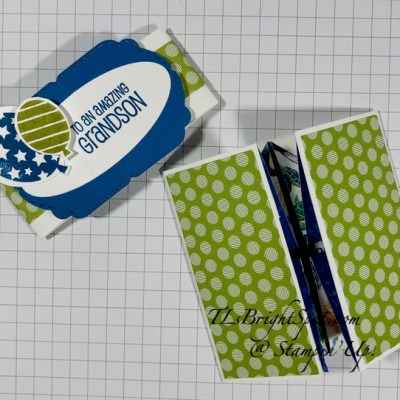
Hello there… Weather advisory for the East coast is to stay INSIDE today – it will feel like 104! Yeck!  Be safe…I have been doing doing several different fun folds lately and well, I just couldn’t stop… todays is a mini version, a little 3″ card for a grandson turning 20… Cannot believe he is 20! 6’4″ and handsome – oh my…I’m just a little bit prejudiced. 😍 Anyway, the card… This young man has come to expect something fun in the way of a card, not something you can buy at the store – yay.. getting them trained. :o) So here it is…

Mini Gate Fold
#1

Mini Gate Fold #2

Mini Gate Fold
#3

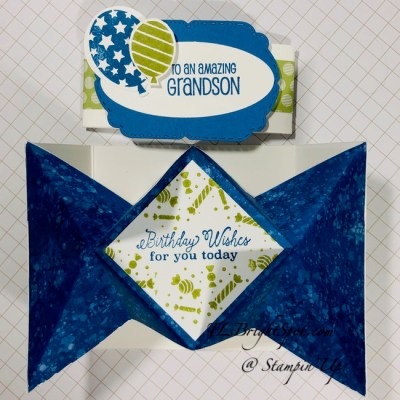
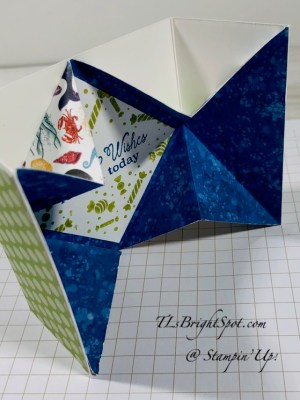
This is so cute – perhaps because it is small. And I just love the way the folds are… here it is from a another angle.

Mini Gate Fold
#4

Now you can really see all the folds. Here are the products used in this cute mini card:

  • Whale of a Tail DSP
  • Whisper White card base + belly band
  • Details Bands Dies – oval in Whisper White cs
  • Celebration Labels and Dies for the larger portion of the banner, Pacific Point cs
  • So Much Happy stamp set – balloons, fussy cut
  • A Grand Kid stamp set – front banner sentiment
  • Little Treats stamp set – inside sentiment
  • Pear Pizzazz and Pacific Point inks

Let’s see if I can tell you how to do this…

  • card stock base (Whisper White) is 3 x 6 scored at 1 1/2 and 4 1/2 on long side. Burnish well.
  • DSP panel (Whale of a Time) is 3 x 6. Mark center on the long side, at the top & bottom lightly with pencil. Fold from the top left to center bottom making a triangle – burnish and open. Fold from the left bottom to the center top making another triangle – burnish and open. Fold left portion to center, as in step one – burnish and open.
  • Do the same on the right side: right top to center bottom making a triangle, burnish and open. Right bottom to center top making a triangle, burnish and open. Right to center, burnish and open. It will look like picture #4 above even though it isn’t attached to anything yet. 😊
  • Cut a panel in Whisper White for inside sentiment, 2″ square. Stamp the sentiment from Little Treats stamp set in Pacific Point ink. Then stamp the party favors in Pear Pizzazz ink. Remember to stamp ON THE DIAGONAL. Adhere to the DSP.

Mini Gate Fold
#3

  • Now adhere adhere the DSP to the Whisper White card base: triangle on the left first making certain it is al the way to the edge. With the papers flat, adhere the center diagonal square then the right triangle.
  • Belly band: 1″ x about 7″ to go around in Whisper White, DSP is 3/4″ x about 7. Adhere the papers together and wrap around card. Secure in front with Tear n Tape. It should slide easily on and off the card.
  • Cut banner in Pacific Point using the smallest Celebration Labels & Dies. Put dimensionals on back and attach to belly band where it overlaps.
  • Stamp the banner sentiment from A Grand Kid in Pacific Point – off to the right side to allow room for the balloons. Cut with the oval from Detailed bands dies. Adhere with liquid glue to the Pacific Point banner.
  • Stamp balloons from the So Much Happy stamp set: one in Pacific point and one in Pear pizzazz. Fussy cut both. Adhere the larger with liquid glue and the smaller with a dimensional. Slide over the card and bingo this cute little mini is ready for giving.

I love this. Mini cards are just a different kind of treat and this one is extra special cuz it’s a Gate Fold.

That does it for today. Think about shopping during SU! Bonus Days. Items for this card are listed in the Aug-Dec 2020 Mini Catalog which goes live to customers 4 Aug. AND the 2020 – 2021Annual catalog. Don’t have a catalog or a demonstrator? Then talk to me and we can fix that 😁

SU! has some awesome items in their 2020-2021 Annual Catalog and a real bonus going on now – called BONUS DAYS. For every purchase of $50 from now until 3 Aug. you will receive from SU! by email, a $5 coupon that is redeemable 4-31 Aug. Such a deal!

Bonus Days. Earn in July, spend in August.

And when you order from me, please use my July host code to receive a SU! item worth $10 when your purchase is $50-$150. Sounds like another good deal, right?! It is…

Thanks for stopping by.

May you have a beautiful day.

Make someone happy by sending them a handmade card made with love.


SU! Wishes and Wonder Bundle

Hello… muggy day here even though it is 67 degrees. Of course it is not quite 5 AM either. Doomed to be a hot one. Yesterdays card was more ornate ~ todays is layered and more country, but still Christmas. It is a CASE of a card on the back of the Aug-Dec 2020 Mini Catalog.

Wishes & Wonder bundle
#1

Gosh, the picture is kinda dark… but I think you can see the many layers. I knew I wanted to play with the papers in ‘Tis the Season 6×6 DSP pack and I knew I wanted to use the stag again. I have used him before and he is so elegant. Anyway, staring me in the face was the back of the catalog and I just went for it… There are so many great dies in the North Pole Wonder Dies. I haven’t quite played with all of them yet, but it’s definitely in the cards 🙂

I started with the die that looks like a tag and die cut two of those, then went to the DSP again for a coordinating paper for the back drop. Love this plaid! I then die cut a single long leaf stem in Shaded Spruce, then played around with the ‘spray’ stamp. That I stamped in Crumb Cake on Whisper White and die cut with the coordinating circle. Notice how the tag has those jagged edges – like pinking shears? So does this particular circle! Gosh, I could go off on a tangent about pinking shears… they bring back so MANY memories. But.. the stag – one gorgeous animal… die cut from Brushed Metallic cs, not as shiny and bold as gold foil. I began layering, didn’t have papers cut yet ~ this off-center look is kinda fun, and then I put the tags together and off-centered them so both showed. They HAD to have a string ~ I found the 1/16″ Gold Cord from the Wonder of the Season Combo Pack and it brought in another element of sparkle that I like. OK, time to cut papers and put things together… and you can see the layering, all adhered with liquid glue. I debated with a banner, wasn’t sure I wanted anything more, but the card needed it…. stamped the sentiment in Real Red ink on a Whisper White scrap, added dimenionals and the card front was complete.  Card cuts are listed at the end of this post.

The inside was easy. I wanted it simple and stamped the sleigh from the Wishes & Wonder stamp set in Real Red on Whisper White. Adhered that to the inside and bingo, the card was done.

Wishes & Wonder
#2

While the sleigh was out I stamped it on the envelope front n- continuing with the Real Red ink. The envelope flap got another piece of the ‘Tis the Season 6×6 DSP. And that was it!

Wonder of the Season 6×6 DSP
Wishes & Wonder stamp set
#3

Let me talk to you about the Wishes & Wonder bundle just a bit… when you purchase a bundle (stamp set with coordinating dies) it is automatically 10% off. And all the products I used in today’s project are part of the Wonder of The Season Suite. When you purchase a suite, it is also less than if you purchased every item individually. So, what are you waiting for? Oh yes… you can order any of these items as a suite or individually, beginning 4 Aug. They are listed in the Aug-Dec 2020 Mini Catalog which goes live to customers 4 Aug. Don’t have a catalog or a demonstrator? Then talk to me and we can fix that 😁

SU! has some awesome items in their 2020-2021 Annual Catalog and a real bonus going on now – called BONUS DAYS. For every purchase of $50 from now until 3 Aug. you will receive from SU! by email, a $5 coupon that is redeemable 4-31 Aug. Such a deal!

Bonus Days. Earn in July, spend in August.

And when you order from me, please use my July host code to receive a SU! item worth $10 when your purchase is $50-$150. Sounds like another good deal, right?! It is…

Card dimesnions and elements used:

  • Shaded Spruce 8 1/2 x 5 1/2 scored at 4 1/4 + scrap for leaf die cut
  • Whisper White 3 1/2 x 4 1/2 + scrap for sentiment and circle for card front; 4 x 5 1/2 for inside
  • ‘TisThe Season 6×6 DSP 3 1/4 x 4 3/8
  • Brushed Metallic cs
  • 1/16″ Gold Cord from Wonder of The Season Combo Pack
  • Crumb Cake ink
  • Real Read ink

Thanks for stopping by.

May you have a beautiful day.

Make someone happy by sending them a handmade card made with love.

SU! Triple Shutter Card with Snowflake Splendor Suite

Hi Everyone – lots of new items to share with you today… products. from the Snowflake Splendor Suite AND using those to make a Triple Shutter Card! First of all, I have never made one of these before and was concerned it would be extremely difficult. It wasn’t… It did take a bit of figuring out, which DSP to go where and making certain I had the die cuts correct. But it was super fun and I felt a sense of accomplishment after. Here’s the card…

Snowflake Splendor in Triple Shutter card
#1

Notice how the center panel is folded mountain, valley. The upper and lower panels are just the opposite: valley, mountain. valley – three folds. Burnishing the score lines in the proper direction is one of the most important aspects of this fun fold. Notice too, that where the sentiment banners are, there is no fold. Those papers are also the same and form what I would call a ‘T’. This will help you if you can remember this when scoring and putting the papers together. Here’s another picture – a flat one that shows off every panel.

Snowflake Splendor SuiteTrifold Shutter Card
#2

And here’s a top–down photo.

Snowflake Splendor SuiteTrifold Shutter Card
#3

This doesn’t quite show that upper strip going in the same direction of the bottom strip, but it does! Here’s a list of products I used to make this card… dimensions are listed at the bottom of the post.

  • Snowflake Splendor Suite…
    • Snowflake Wishes stamp set
    • coordinating So Many Snowflake Dies
    • Blue Adhesive-Backed Gems
    • Snowflake Splendor DSP – 3 patterns
    • Balmy Blue Glimmer Paper
  • Seaside Spray cs – card base 5 1/2 x 12 (scored at 2, 4, 8, 10 on the long side) + extra scraps for the two banners
  • Pacific Point cs – background for all DSP
  • Whisper White scraps
  • Pacific Point ink
  • Detailed Bands Dies
  • Poinsettia Petals stamp set
  • a retired item… Dazzling Diamonds Glimmer Paper – could use Silver Foil Sheets

Basic directions:

  • Score cs base as mentioned earlier at 2, 4, 8, 10 on the long side. Card stock base for this card is Seaside Spray.
  • Turn paper to short side and place at 1 1/2″ mark: cut from first score line to bottom score line. Turn paper over, still on the short side, place at 1 1/2″ mark again and cut from first score line to bottom score line.
  • Burnish top and bottom “strips” so they are valley, mountain, valley
  • Burnish middle strip at second score line, mountain; then third score line valley. Do not burnish the middle strip first or last score lines.
  • Cut Pacific Point cs to dimensions listed below and adhere to appropriate panels
  • Cut DSP to dimensions listed below: there are 3 designs used from the Snowflake Splendor DSP. There are listed below as a, b, c. Adhere to appropriate panels.
  • Die cut snowflakes using the So Many Snowflakes Dies: 2 from Balmy Blue Glimmer Paper and 4 from Dazzling Diamonds (you could also use Whisper White cs and cover snowflakes with Wink of Stella OR cut from Silver Foil sheets)
  • Stamp banner sentiments from Poinsettia Petals stamp set in Pacific point ink (for end panels)
  • Cut banners using the Detailed Bands Dies: 2 from Pacific point, 2 from Seaside Spray (cut in half lengthwise) and 2 stamped sentiments using the oval from Whisper White. The front banner is attached with dimenionals. The other banner is attached with liquid glue.
  • Use liquid glue to adhere snowflakes
  • Attach the Blue Adhesive-Backed Gems
  • Here’s what I did with the bak of the card…

    back of Trifold Shutter card
    #6


Snowflake Splendor Suite Trifold Shutter card
#4

The envelope got a strip of the Snowflake Splendor DSP and a snowflake bunch stamped from the Snowflake Wishes stamp set.

Snowflake Splendor Suite Trifold Shutter card – envelope
#5

This is such a showy card, elegant as well ~ and I had lots of good vibes putting it together. It’s always a special feeling when creating something that I feel so good about. All of these items are available in the Aug-Dec 2020 Mini Catalog, which goes live to customers 4 Aug. If you do not have a demonstrator I would be happy to connect with you, send along this catalog and find out something about you so I can serve you better.

Right now, SU! has a special called BONUS DAYS. For every $50 you spend from now until 3 Aug, you receive an email from SU! with a $5 coupon to be redeemed 4-31 Aug. Got it? It’s a real deal… Bonus Days. Earn in July, spend in August.

And when you order from me, please use my July host code to receive a SU! item worth $10 when your purchase is $50-$150. Sounds like another good deal, right?! It is…

Card dimesnions:

  • Seaside Spray 5 1/2 x 12, scored at 2, 4, 8, 10 + scraps for sentiment banners
  • Pacific Point cs:
    • panels a ~ 1 3/4 x5 1/4 (x 2); 1 1/4 x 2 1/4 (x 2)
    • panels b ~ 1 1/4 x 1 3/4 (x 4)
    • panel c ~ 3 3/4 x 2 1/4 (x 2 – one is for the back of card)
    • + scraps for sentiment banners
  • Snowflake Splendor DSP:
    • design a ~ 1 5/8 x 5 1/8 (x 2); 1 5/8 x 2 1/8 (x 2)
    • design b ~ 1 1/8 x 1 5/8 (x 2); 3 5/8 x 2 1/8 (x 1)
    • design c ~ 3 5/8 x 1 1/8 (x 2)
  • Whisper White:
    • 3 5/8 x 2 1/8 for back of card
    • + scraps for sentiment banners

Thanks for stopping by.

May you have a beautiful day.

Make someone happy by sending them a handmade card made with love.


SU! Poinsettia Place Suite and Gatefold Card

Hello… Yesterday was a glorious day – started out with an early morning sail. It was perfect – 8-9 mph winds, no power boats to make us rock. We were the only sailboat. on the river… After sailing, we came home, had a hearty breakfast, walked the dog, then I settled in to create this very cool card…

Poinsettia Place Suite
Gate Fold
#1

It is made with several items from the Poinsettia Place Suite of products found on pg 16 of the Aug-Dec 2020 Mini catalog. Don’t have a catalog??? I can fix that 😁. If you don’t have a demonstrator, let’s connect before the catalog goes live to customers Aug 4.

Back to the card and the details…

  • 8 1/2 x 5 1/2 Soft Sea Foam, scored at 2 1/8 from both ends on the long side
  • Plush Poinsettia Specialty Paper 1 7/8 x 5 1/4 (x2). Adhere to side panels of the card base
  • 2 7/8″ square of Soft Sea Foam cs
  • Square Doily adhered to the square with a swipe of Stampin Seal just in the middle
  • Poinsettia Dies: Die cut the 3 poinsettia pieces and with a sponge dauber, gently brush along each petal edge with Blushing Bride ink, and sometimes swipe in the center of the bracht as well. Adhere together with liquid glue. Adhere this sweet Beaded Pearls to the center. These are such COOL dies… one portion embosses the bracht while another portion die cuts – running these through the die cutting machine at the same time…
  • Stamp the leaf outline/ veins in Garden Green ink using the Poinsettia Petals stamp set. There are two sizes of leaves – I did two large (one I used on the inside of the card) and two of the smaller.
  • Stamp the leaf centers with Soft Sea Foam ink – again two options in the Poinsettia Petals stamp set. I used the slimmer version on the smaller leaf and the broader version on the larger leaf. Die cut the leaves with the outline die. Attach to the backside of the poinsettia with liquid glue, then adhere the completed poinsettia to the doily/ card stock piece.
  • For the inside… Whisper White panel 4 x 5 1/4… stamp the two sentiments in Garden Green ink from the Poinsettia Petals stamp set. Gorgeous fonts! Adhere to the inside with liquid glue.
  • Attach the additional leaf to the inside of the right panel and your card is complete!!!

Poinsettia Petals Suite
Gate Fold
#2

Poinsettia Place Suite
Gate Fold
#3

  • The envelope got some special treatment:
    • Again from the Poinsettia Place Suite is Poinsettia Place DSP – cut a 2 1/4 x 6 piece for the envelope flap. Adhere with liquid glue, trim.
    • The front of the envelope got a fun berry stamp from the Poinsettia Petals stamp set, stamped in Crumb Cake ink. Color the berries with Dark So Saffron Blends marker. TIP: be sure to put a scrap piece in your envelope when colored with the blends so it does not bleed through to the back of the envelope.

Whee! Your beautiful card is complete and ready to put in your stash for the upcoming holidays. It’s a start, right? Remember I mentioned the Aug-Dec 2020 Mini Catalog going live to customers 4 Aug? SU! has some fabulous Bonus Days offering right now… spend $50 in product between now and 3 Aug and receive a $5 coupon to redeem $-31 Aug. Such a good deal! Spend $100 and get two coupons. These coupons are sent by email, so you do have to provide that to SU! to receive them, but that’s not a big deal. Their security system is top notch!Bonus Days. Earn in July, spend in August.


And when you order from me, please use my July host code to receive a SU! item worth $10 when your purchase is $50-$150. Sounds like a deal, right?!

Thanks for stopping by.

May you have a beautiful day.

Make someone happy by sending them a handmade card made with love.