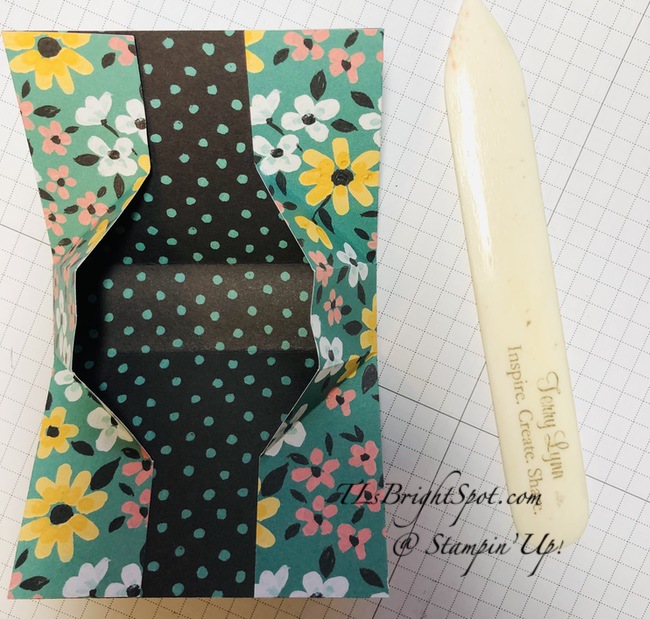
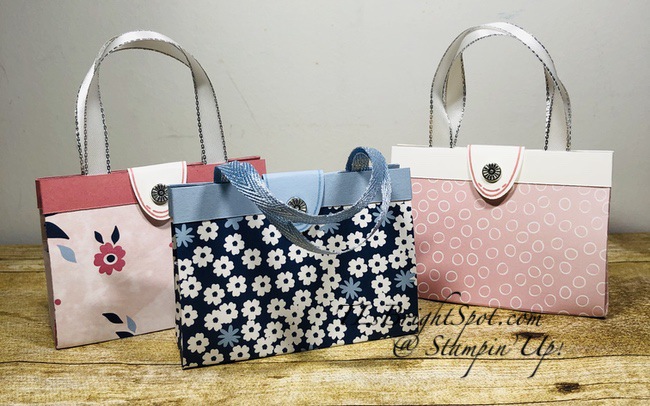
This is such a fun little project… and I have made a few to be used for various things: small candies, Young Living Essential Oils, a package of sponge daubers or paper trimmer blades will also fit. Anyway – I think they are adorable.
Flower & Field DSP
Remember this Designer Series Paper is a FREE item with a $50 purchase during Sale-a-bration – just sayin’… this paper is so fun! Here is another photo of more created ~
Flower & Field DSP & Oh So Ombre 6×6 DSP
Cute, cute, cute! No… Measurements & scoring info and several photos to help in the directions. These are not difficult. I just felt photos say 1,000 words.
6×6 DSP scored at 1 1/4 & 4 3/4; turn and score at 21/2 & 3 1/2. Burnish
At the side folds, bring up the paper to create a diagonal fold, then adhere from the top to the diagonal fold. I used Stampin Seal at this point. It should look like this…
#3
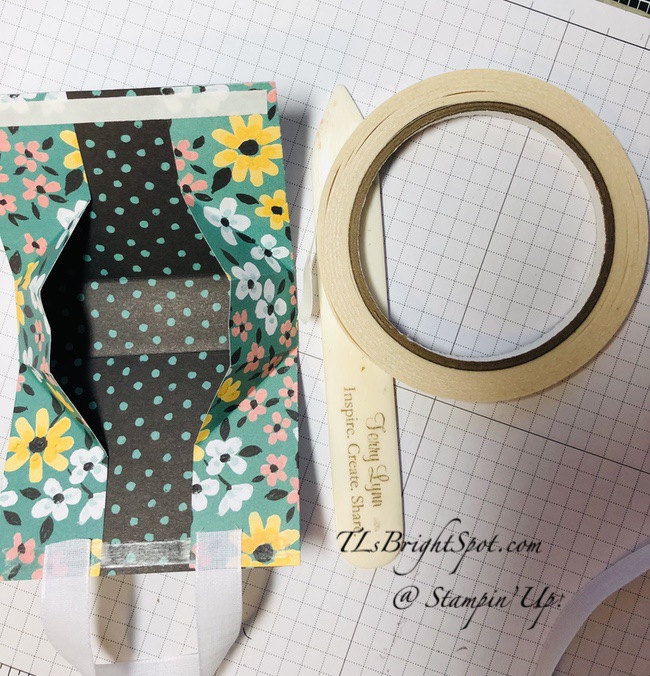
Add Tear n Tape at the top of each end, remove over to the tape and add ribbon (6″ for each end) and it should look like this…
#4
Now add decorative trim – 1/2 x 8 1/2 to outside with liquid glue, fold in ends to cover Tear n Tape on inside. I did need to add liquid glue to the area that didn’t have Tear n Tape. And I made certain both ends folded the same direction – see photo…
#5
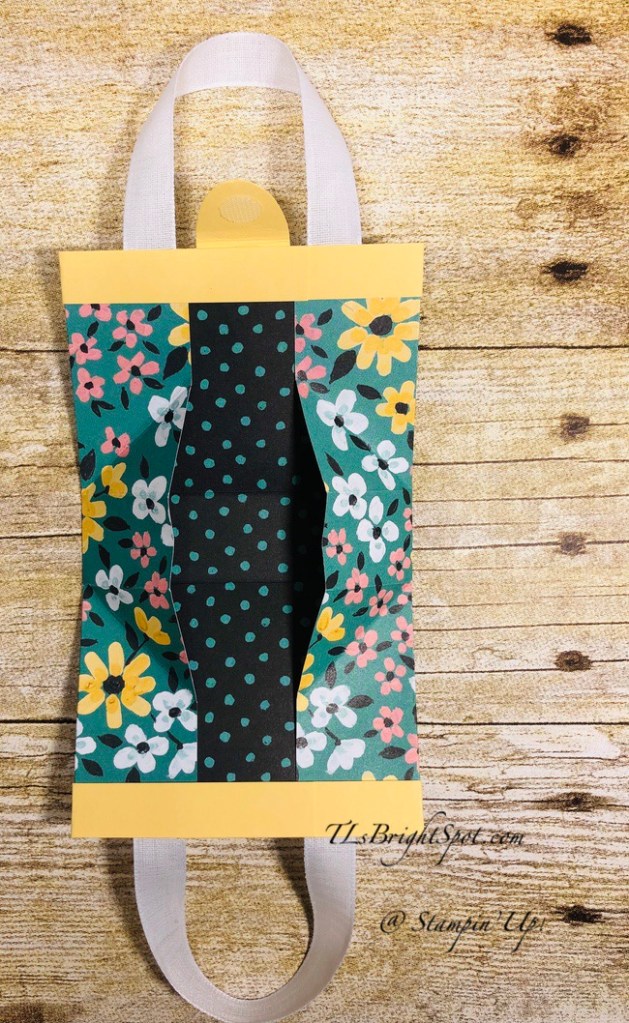
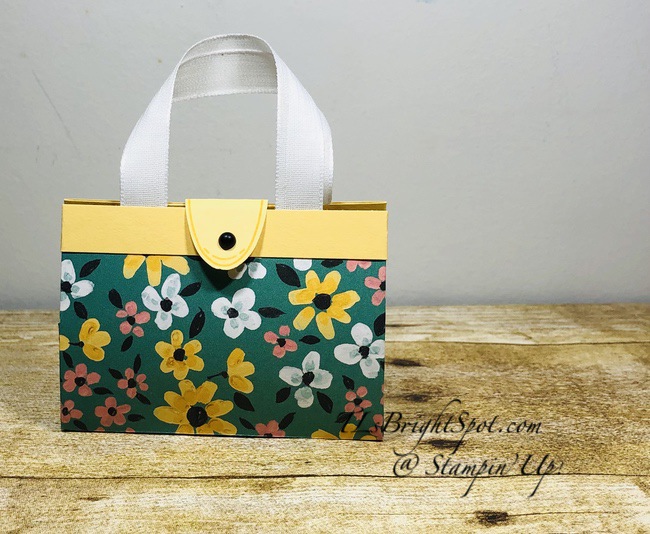
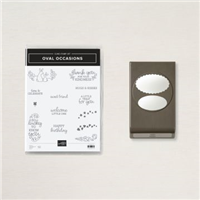
For a couple of final touches I used the Punch Party stamp set to stamp an oval design in So Saffron ink on So Saffron card stock, then punched it out with the new Double Oval Punch (this can be purchased separately or bundled with the Oval Occasions stamp set for 10% off). I adhered the oval with liquid glue (just half of it!) to the back of the purse; added a 3/8″ Velcro fastener to the loose end of the oval, pressed it to the purse front to adhere the other portion of the Velcro fastener to stick. Then I added a Matte Black Dot to the front of the oval – and voila!
Flower & Field DSP + Oh So Ombre 6×6 DSP
For the little purses on the right, the ribbon used was both Seaside Spray Metallic Ribbon & Whisper White Metallic Edge Ribbon (silver edge). The ‘button’ on the oval is a retired SU! item called Designer Elements. And there you have it – cute project, isn’t it!
Products for todays card are from the new Jan-Jun 2021 Mini Catalog ~ and those products are available now for purchase. You will find them in the product list below. As a reminder… I’ve made it easy for you to simply ‘add all to cart’. If I can help you in any way to order these items, please give me a holler. As a thank you to my customers, when the order is between $50-$150 I offer a SU! item of your choice valued at $10. Remember to use MY CURRENT HOST CODERSVNH4XW- good Jan 5-20. When the order is over $150, you still receive that free gift from me, but SU! has Stampin’ Rewards that may be used for additional products, so don’t use the host code at that time. Now is also Sale-a-bration – a time from now through the end of February when Stampin’ Up! offers FREE items with $50 and $100 purchases. Those products are shown below today’s product list as well.
Oh goodness ~ yesterday was an absolutely BONUS DAY… lots of goodies arrived from, where else? Stampin’ Up! Here’s my first card using this new and fabulous Hydrangea Hill bundle…
Hydrangea Hill – #1
Hopefully you can see how three-dimensional the flower itself is… and… here’s what I did:
On a panel of Basic White, stamp the solid ‘splotch’ in Highland Heather, using the Hydrangea Hill stamp set.
Stamp the flowers on top of this in Gorgeous Grape and die cut with the Hydrangea Dies
Die cut petals in both Purple Posy & Vellum – each die will cut nine (9) petals – so you’ll have 18 in all
Adhere the Vellum petals with liquid glue first – it only takes a small dot of glue, then adhere the Purple Posy petals in the same way. This allows some of the stamped petals to show through and gives it dimension.
Apply Pearl Basic Jewels to the Purple Posy petals – set aside
Hydrangea Hill – #2
On another panel of Basic White card stock stamp the sentiment from the Hydrangea Hill stamp set in Gorgeous Grape.
Stamp the stem/ leaves in Memento Black, then stamp with the ‘filler’ stamp in Pear Pizzazz. I really like how this stamp is not full-on solid for it adds texture to the leaves.
Now stamp the splotch of the flower head again in Highland Heather ink, right on top of that stem.
I stamped the petals in Gorgeous Grape, but there’s really no need as you will be covering this.
Place the prepared flower head on dimensionals and add over the splotch but off centering a bit so the splotch shows like a shadow.
Now add a Sheer Ribbon bow in Gorgeous Grape with a glue dot.
It still needed something so I pulled out the new Pastel Pearls and added just one. If you do not have these, you could color one of the Pearl Basic Jewels with a Stampin Blends.
Adhere this completed Basic White panel to Highland Heather with liquid glue, then to another panel of Gorgeous Grape. Put dimensionals on the back and adhere to a purple Posy card base and voila – the front is complete!
Hydrangea Hill – #3
For the inside, I took another panel of Basic White card stock and stamped an elongated ‘splotch’ in Highland Heather, then over-stamped with the sentiment in Gorgeous Grape. Yep, still from the Hydrangea Hill stamp set! I found a Purple Posy petal on the floor (how it got there – who knows!) so adhered it with a dot of liquid glue and added a Pearl Basic jewel. I adhered this panel to another of Highland Heather with liquid glue and then into the Purple Posy card base – and the card was done…
Hydrangea Hill – #4
For the envelope, I took some of the awesome Hydrangea Hill DSP and adhered it to the envelope flap. Then I took another of the ‘splotches’ and stamped it on the corner of the envelope – in Highland Heather ink. With Gorgeous Grape ink, I stamped the pretty posies on top of the splotch – FINIS!
This is such a pretty stamp set and so fun to use. There are some fun dies for the leaves I can’t wait to use… another day. 😁 Card cuts for this project will be listed at the bottom of this post.
Now – let’s talk about the Whisper White – Basic White card stock… Whisper White has been fazed out and is no longer available (the company producing it closed 😞). However, another company is now making the new product and of course it couldn’t be called the same – Basic White it is… and now available in all sizes, envelopes, note cards, you name it. Click on the link and you can start purchasing any time – it includes the numbers & everything – so making it easy peasy for you. https://su-media.s3.amazonaws.com/media/Promotions/2020/Basic-White/BASIC-WHITE-ANNOUNCEMENT-FLYER_US.pdf
You can find the list of those products just below. And I’ve made it easy for you to simply ‘add all to cart’. If I can help you in any way to order these items, please give me a holler. As a thank you to my customers, when the order is between $50-$150 I offer a SU! item of your choice valued at $10. Remember to use MY CURRENT HOST CODERSVNH4XW- good Jan 5-20. When the order is over $150, you still receive that free gift from me, but SU! has Stampin’ Rewards that may be used for additional products.
Remember that now through the end of February is Sale-a-bration which means… drum roll please… FREE select product for every order of $50 or more… see photos below of those items.
Understand that if your order is $100 or more, you may choose two items at the $50 level or one at the $100 level – got it? Hope that is clear! If not, give me a holler… tlsbrightspot@gmail.com
Card cuts for today’s project:
Basic White 3 3/4 x 5 (2) + scrap for flower head die cut
Highland Heather 3 7/8 x 5 1/8 & 4 x 5 1/4 (inside)
Gorgeous Grape 4 1/8 x 5 3/8
Purple Posy 8 1/2 x 5 1/2 scored at 4 1/4
Thanks for stopping by.
May you have a beautiful day.
Make someone happy sending them a handmade card filled with love.
Here it is Jan 3, 2021 ~ did you look forward to a new year, new beginnings, new challenges? Did you set some new goals? And perhaps more importantly, did you leave some worries, hurts behind? That may be the most difficult thing to do, but necessary… I’m rooting for you … and trying to do the same.
I played yesterday… with dragonflies, Laser-Cut Paper, the Dandy Garden Memories & More Card Pack and one or two other things. Let’s take a look at these creations.
Love, love, love this Laser-Cut Paper (available to customers Jan 5!). It’s on both cards 1 & 2. And the dragonfly on card 1 was created with vellum, 99% alcohol and inks. Card #3 uses the Dandy Garden Memories & More Card Pack & Dandy Garden 6×6 DSP. Let’s get into some detail for each of these cards.
Card #1
Thick Whisper White card base; covered on the front with a panel of Oh So Ombre 6×6 DSP (a FREE item during Sale-a-bration with a $50 purchase – begins Jan 5)
Laser-Cut Paper adhered to a panel of the same Oh So Ombre 6×6 DSP, but the ombre paper turned the opposite way. Wrap this with Striped Ribbon in Blackberry Bliss and tie a bow. Secure the ribbon with a glue dot under the knot. (The ribbon will be available Jan 5!) This was adhered to a Blackberry Bliss panel and popped onto the card front with dimensionals.
The sentiment panel was stamped with a sentiment from Dandy Garden stamp set (yep, available Jan 5) on a scrap of the oh So Ombre 6×6 DSP and die cut with Stitched So Sweetly Dies. Put on dimensionals and pop above the bow. Add the super sweet Metallic Pearls in silver.
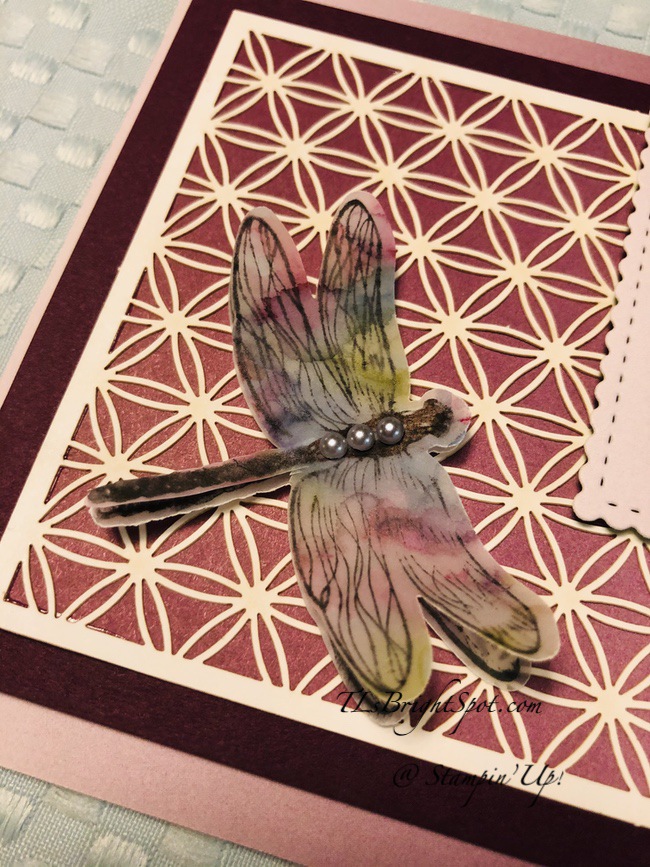
The butterfly was created with vellum, 99% alcohol and inks using a brush. This took a bit of doing as you must work quickly and not get the vellum too saturated or it really wrinkles and becomes un-usable. After drying, I stamped the dragonfly in Tuxedo Black ink and punched it with the Dragonfly Punch. I then stamped another dragonfly on vellum and punched it as well. I adhered the two together with mini dimensionals and popped this onto the card front with additional mini dimensionals. I added three sweet Metallic Pearls in silver to the body and the card front was done.
For the inside of Card #1 I used one of the Laser-Cit Paper flowers and adhered it with dabs of liquid glue. I then added this frame in Blackberry Bliss card stock that was created with Stitched Rectangles Dies and trimmed.
For the envelope, I stamped the single posy from Dandy Garden stamp set in Tuxedo Black Memento ink, colored the center with stamped-off Blackberry Bliss ink with the appropriate stamp from the Dandy Garden stamp set, then colored the leaves with Stampin Blends in Old Olive. The flap was covered with a scrap of the Oh So Ombre 6×6 DSP and the card was complete.
Dandy Garden, Dragonfly Punch Laser-Cut Paper – card 1 inside and completed
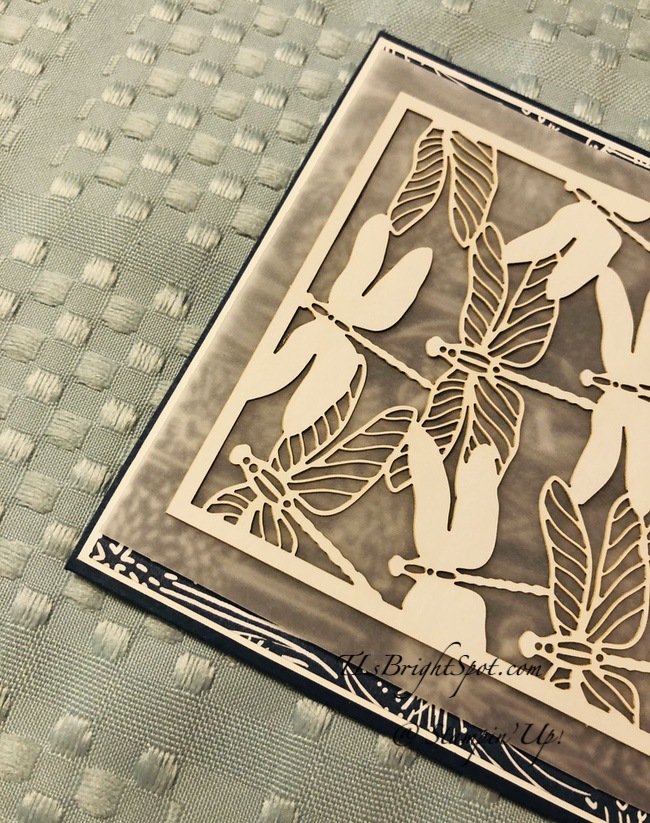
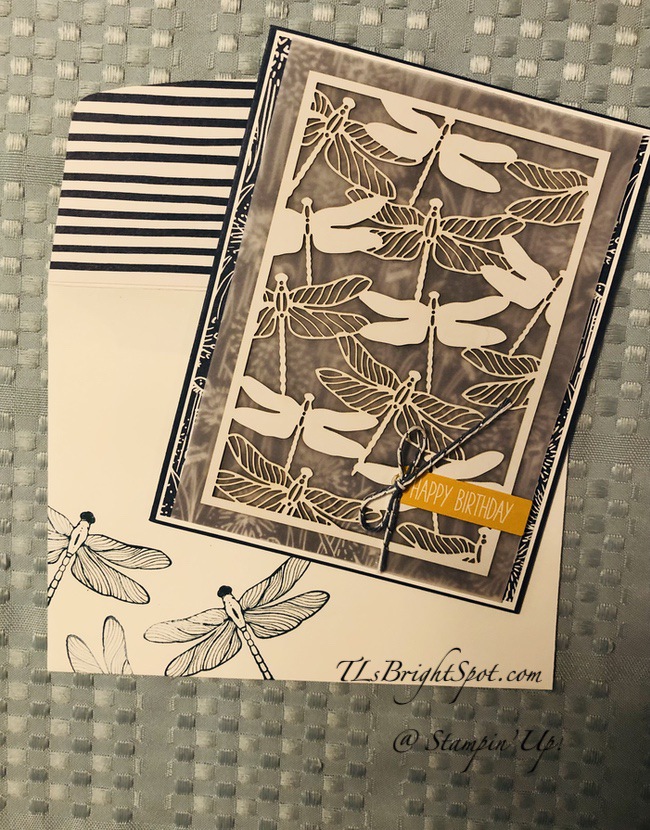
I was enamored of the Dandy Laser-Cut Paper and couldn’t quit!. All these dragonflies in one is just gorgeous. I began by adhering a panel of Dandy Garden 6×6 DSP to a piece of Whisper White card stock. This was adhered to a card base of Misty Moonlight card stock. I then adhered the Dandy Laser-Cut Paper to a piece of vellum with dots of liquid glue, being careful not to use too much. This was popped up on mini dimensionals and adhered to the panel of the Dandy Garden 6×6 DSP. I pulled out the Dandy Garden Memories & More Card Pack and used the sentiment to peel & stick right on the card front. I then added a bow from the Flowers For Every Season Ribbon Combo Pack (in Misty Moonlight & Silver cording) and the front was done.
For the inside I stamped the dragonflies in Misty Moonlight ink from the Dragonfly Garden stamp set onto a panel of Whisper White card stock. I stamped the sentiment from the same stamp set in Misty Moonlight ink. I adhered the finished panel to the inside of he card with liquid glue. For the envelope, I used the same dragonfly from the Dragonfly Garden stamp set and stamped it in Misty Moonlight on the front of the envelope. I used another coordinating piece of the Dandy Garden 6×6 DSP to the envelope flap and finis!
I found a panel in the Dandy Garden Memories & More Card Pack that I wanted to use and adhered it to a slightly larger piece of Whisper White card stock. I wrapped this with the stunning Mossy Meadow Braided Linen Thread and tied a knot. I placed a glue dot under the knot to hold it in place. I then added a super cute Ladybug Trinket climbing on the dandelion. It was added with a glue dot. I had found a piece of the Dandy Garden 6×6 DSP that I thought went really well with the front panel. The DSP was adhered to Bumblebee card stock and that was adhered to the Misty Moonlight card front. I returned to the ribboned panel, put dimensionals on the back and adhered it to finish the card front.
For the inside I stamped the single posy from the Garden Wishes stamp set in Tuxedo Black Memento ink, stamped the filler for the flower in Bumblebee ink and colored the leaves and flower stem with Old Olive Stampin Blends. This Whisper White panel was adhered to a slightly larger piece of Bumblebee card stock and that was then added to the inside of the card – all with liquid glue. For the envelope I stamped the same single dandelion to the front and colored it the same as the inside of the card. I used the same DSP as the card front for the envelope flap.
Dandy Garden Memories & More Card Pack – inside card #3 and completed card
So – what do you think? What is your favorite card? Each is so different – I really like them all. But I think my favorite is the Misty Moonlight with the Dandy Laser-Cut dragonflies.
Most of the elements to create these cards will be available Jan 5 – just two days from now!!! If I can help you in any way to order these products, please give me a holler. As a quick reminder, Stampin’ Up! has a Giant Sale going on until Jan 4. Those products on sale will no longer be available after that date. As a thank you to my customers, when the order is between $50-$150 I offer a SU! item of your choice valued at $10. Remember to use MY CURRENT HOST CODE SAZV3JTK– good until Jan 3. When the order is over $150, you still receive that free gift from me, but SU! has Stampin’ Rewards that may be used for additional products.
Only a couple of days left… check out the Giant Year-end sale here
No minimum purchase required.
Retiring items are available while supplies last.
Exclusions apply: Carryover items will not be discounted.
Due to increased shipping times and possible shipping delays during the month of December, we can’t guarantee delivery before Christmas.
Ordering Deadlines: January 4, 2021 at 11:50 PM (MT)
It is so fun to work with new product… I don’t know why that is ~ learning curve, different inspiration, just new ~ who knows! A Touch of Inkstamp set will be available as part of Sale-a-bration beginning Jan 5, 2021. It’s FREE with a $100 purchase from any Stampin’ Up! catalog. The Jan-Jun 2021 Mini Catalog goes live that day as well, so there will be lots to choose from. If you do not have a demonstrator, feel free to contact me.
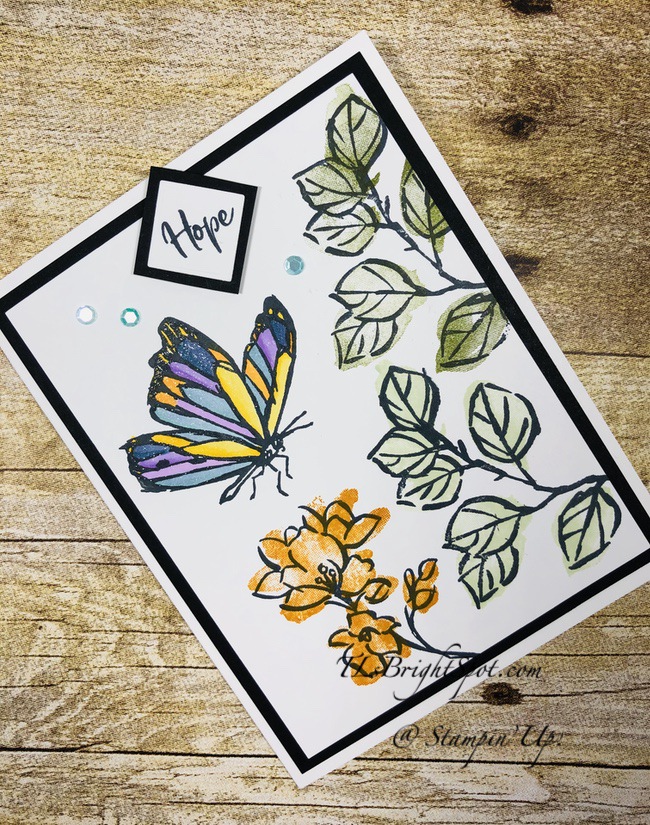
A Touch of Ink – #1
All the images and sentiments are from this new stamp set, A Touch of Ink. It’s a 2-step set, meaning the outline then the ‘coverage’ stamp. And just so you know, the second step is not meant to stay within the lines. It’s artsy and definitely not solid. I hope you can tell that by what you see in the photo above. I did not use the two-step for the butterfly, I chose to use Stampin’ Blends. Let me give you the details…
Stamp the leaves, flower, and butterfly with Tuxedo Black ink on a Whisper White panel
Stamp the 2nd step for the leaves: top set in Old Olive ink, the lower set of leaves in Soft Sea Foam
Stamp the 2nd step for the flowers in Crushed Curry ink
Color the butterfly using various Stampin’ Blends: Daffodil Delight, Mango Melody, Purple Posy, Highland Heather, Seaside Spray and Misty Moonlight. Cover with Wink of Stella
Adhere the panel to Basic Black card stock with liquid glue
Adhere Artistry Blooms Adhesive-Backed Sequins
Stamp the word ‘Hope’ in Tuxedo Black Memento ink on Whisper White scrap. Cut square about 3/4″, make it a diamond in lieu of a square, creating interest. Adhere to Basic Black card stock and trim to desired diamond. Adhere to the card with dimensionals
Adhere completed panel to Thick Whisper White card stock and your card front is complete
A Touch of Ink – #2 & 3
In the left photo I was hoping you could tell I added Wink of Stella to the butterfly ~ does it show up sparkly? I made sure I did each individual color with a single stroke of the brush, otherwise the colors could possibly bleed into one another.
In the photo at right, inside of the card…. On a piece of Whisper White card stock I stamped the butterfly 2nd step with Soft Sea Foam ink, just wanting to create a background for the sentiment. The sentiment is from A Touch of Ink stamp set as mentioned, stamped in Tuxedo Black memento ink. This was adhered to the inside of the card weithn liquid glue – and finis for the card!
A Touch of Ink – #4
For the envelope, I covered the flap with Ornate Garden DSP and trimmed it to fit. I then stamped the leaves from A Touch of Ink in Old Olive ink and stamped the 2nd step in Soft Sea Foam ink and the card was done.
Card stock cuts may be found at the end of this post. Products used for today’s project may be found below. As a thank you to my customers, when the order is between $50-$150 I offer a SU! item of your choice valued at $10. Remember to use MY CURRENT HOST CODE SAZV3JTK– good until Jan 3. When the order is over $150, you still receive that free gift from me, but SU! has Stampin’ Rewards that may be used for additional products 😁
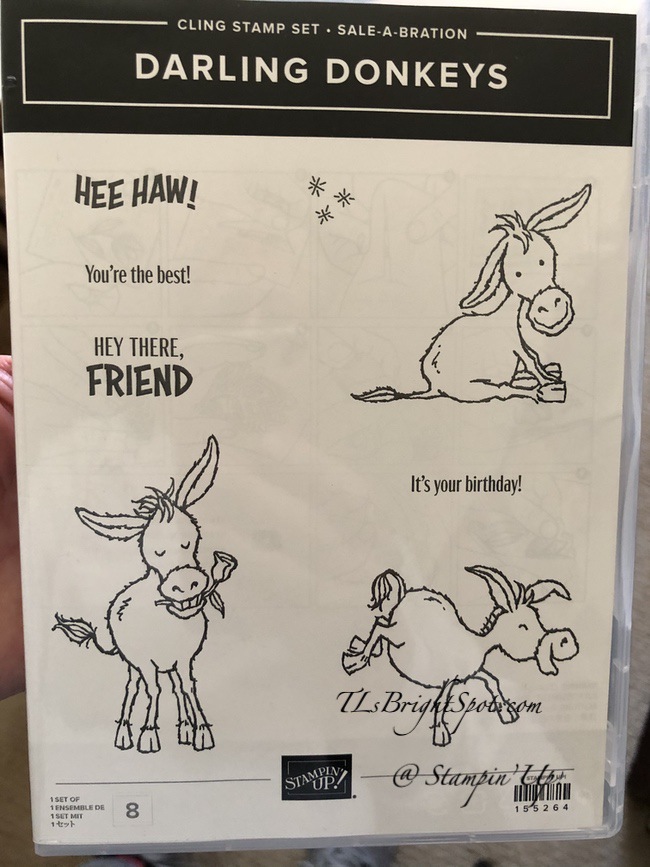
Hello again… Today’s card is full of fun – a birthday card using the Darling Donkey stamp set that will be available Jan 5, 2021 as a FREE ITEM when you purchase $50 in product – it’s Sale-a-bration time Jan 5 – end of Feb 2021. Woohoo! :O)
Darling Donkey stamp set available Jan 5, 2021 – Sale-a bration item
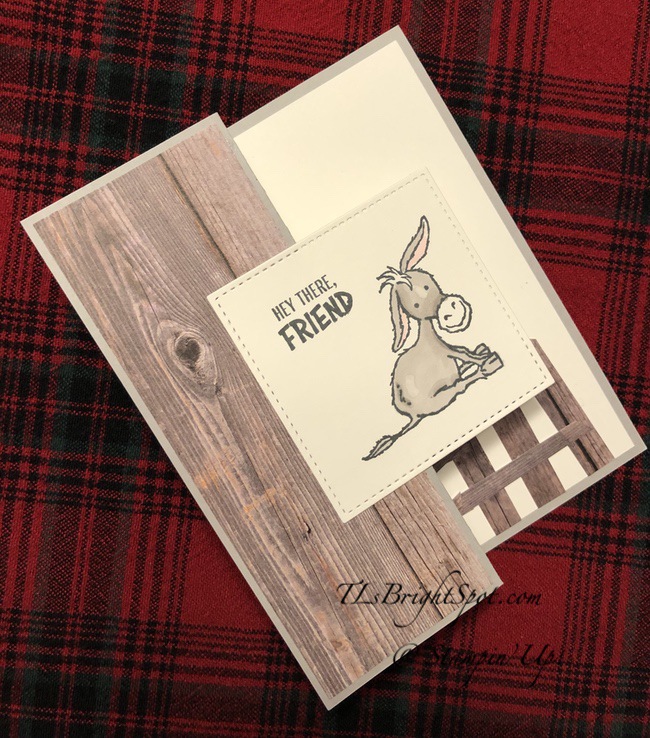
This little donkey is just too cute – love the impish smile… that square needs a back to it though so I may take that off, add a backing and put it on again. But let’s talk through how I did this. It’s a z-fold, so scored in the center and the front panel folded back on itself exactly in half, then the square added. Here’s what you need to create this card…
Fold card base (Gray Granite) in half and fold the front flap in half back on itself – to create a z-fold
Cover the front fold using In Good Taste DSP
Stamp the front donkey in Tuxedo Black Memento ink on Whisper White card stock; color with Stampin’ Blends – light & dark Gray Granite. Use the Color Lifter to highlight – between the eyes & near his backside. (Yes – this one is definitely a male donkey!) Die cut with largest Stitched Shapes Dies (largest square). Here’s where I should have cut a scalloped square out of Basic Black card stock for a backing. Adhere to the front panel with liquid glue, centering.
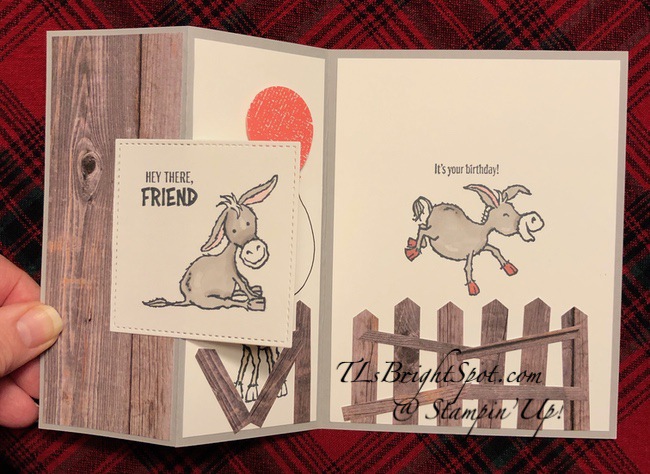
For the inside: there are two panels, the far right and the folded ‘in’ . Often the ‘in fold’ is not covered but for this card, I definitely wanted to do that.
Right panel ~ stamp the donkey from Darling Donkey stamp set in Tuxedo Black Memento ink in the center of the Whisper White panel, making certain it will be covered when the card is closed. Color in Stampin’ Blends: light & dark Gray Granite, light Flirty Flamingo for the ears, dark Flirty Flamingo for the hooves – after all this is a girl donkey 🙂 Stamp the sentiment above it from the same stamp set and in Tuxedo Black Memento ink. Adhere to the right panel of the card base with liquid glue, creating the inside of the card. It was at this point I decided the donkey need a fence and punched several ‘fencing’ using the Classic Label Punch and more of the same In Good Taste DSP. I punched various heights and widths then adhered to the panel with liquid glue.
Folded in panel ~ stamp the donkey from Darling Donkey stamp set in Tuxedo Black Memento ink on a Whisper White panel, blocking off the flower so it doesn’t get ink. Color in Stampin’ Blends light & dark Crumb Cake, light Flirty Flamingo for the ears. And yes, I used a bit of Color Lifter for highlight. Punch a small balloon using the Balloon Punch from Bright 6×6 DSP – Flirty Flamingo. Adhere with dimensionals and color with Wink of Stella. Add a balloon ‘tail’ from the balloon to the donkeys mouth. Cute right? Adhere this panel to the card and the card is complete. OOPS! I did add some more fencing to this guy.
Darling Donkey Birthday Fun Fold – #4
For the envelope… I used more of the same In Good Taste DSP to the envelope flap & trimmed to fit. For the envelope front I stamped the sentiment and the ‘sparkels’ in Tuxedo Black Memento ink and called it done.
Card Cuts are listed at the end of this post. Products used for today’s project may be found below. As a thank you to my customers, when the order is between $50-$150 I offer a SU! item of your choice valued at $10. Remember to use MY CURRENT HOST CODE SAZV3JTK– good until Jan 3. When the order is over $150, you still receive that free gift from me, but SU! has Stampin’ Rewards that may be used for additional products 😁
Today’s card is made with Sale-a-bration products, which begins Jan 5, 2021. And that, my friends is not far off. Yep, hard to believe, it is right around the corner.
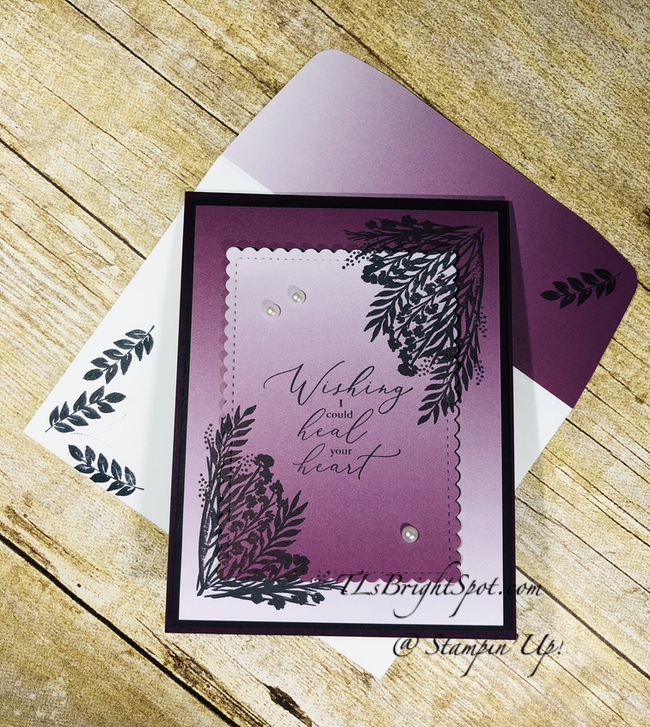
Corner Bouquet Sympathy #1
Isn’t it pretty? I don’t use Blackberry Bliss card stock very often but with this Oh So Ombre 6×6 DSP, it really is quite nice. The stamps are from the Corner Bouquet stamp set, and is FREE with a $50 purchase during Sale-a-bration. The Oh So Ombre 6×6 DSP is also FREE with a $50 purchase during Sale-a-bration.
Stampin’ Up! has changed (for the better BTW) the length of Sale-a-bration to two months twice a year, the first beginning Jan-Feb of 2021. It coincides with the release of the Jan – Jun Mini Catalog Jan 5. I’m sharing three of those free products today to get you excited about the new catalog. Let’s get to the card.
Corner Bouquet Sympathy #1
Cut a panel of Oh So Ombre 6×6 DSP; using the Stamparatus, stamp one corner with this smaller corner stamp in Tuxedo Black Memento ink. Why use the Stamparatus? Couple of reasons… 1) if the stamp is not clear enough after the first stamping, it is easy to re-ink and stamp again in exactly the same spot. It is next to imposssible to do that by eye: it gets a bit of a shadow and that paper couldn’t be used. 2) The Stamparatus allows for perfect placement.
Turn the paper 180 degrees to stamp in the opposite corner. Stamp with Tuxedo Black Memento ink.
Place the sentiment from the Heal your Heart stamp set (FREE with a $50 purchase during Sale=a=bration) in the center of the paper and stamp with Tuxedo Black Memento ink.
Using the largest die in the Stitched So Sweetly Dies, cut the center.
Adhere the larger panel to a piece of Basic Black card stock.
Adhere the die cut piece with dimensionals, being certain to line up the stamping just right. NOTE: the die cut piece is placed so the gradation of color is the opposite of the larger panel. I was able to do this because of the perfect placement of the corner stamp and use of the Stamparatus.
Add Pearl Basic Jewels.
Adhere this panel to a Blackberry Bliss card base with dimensionals ~ and your card front is done.
Corner Bouquet Sympathy: inside #2 and envelope #3
For the inside I stamped the corner with the same stamp from the Corner Bouquet stamp set in Tuxedo Black Memento ink on a panel of Whisper White card stock. Adhere with liquid glue to a piece of Basic Black card stock; then adhere this to the inside of the card & voila!
For the envelope I adhered another piece of the Oh So Ombre 6×6 DSP to the envelope flap. I stamped the small leaf on this and again on the front of the envelope – all in Tuxedo Black Memento ink ~ and the card is ready to send.
This card will go out today to a neighbor who just lost her father. I don’t know the circumstance other than he had health issues for some time. But the circumstances of his death aren’t needed. The focus is the loss of a loved one and to be supportive and caring.
Today’s card is not my design… it was from my upline, Mary Deatherage, who participated in a team training recently. She used different colors and embellishments, but the layout and design are hers. Thank you, Mary, for the inspiration!
Here are photos of the stamp sets and the DSP used in today’s project.
Products not part of Sale-a-bration are listed below. As a thank you to my customers, when the order is between $50-$150 I offer a SU! item of your choice valued at $10. Remember to use MY CURRENT HOST CODE SVFB9YJY – good until Dec 10, 2020. When the order is over $150, you still receive that free gift from me, but SU! has Stampin’ Rewards that may be used for additional products 😁
Card cuts for today’s project are listed at the end of this post.
Hello folks… Stampin’ Up is readying for a new catalog ~ the Jan-Jun 2021 Mini Catalog and the Jan-Feb Sale-a-bration. Today’s project features Art Gallery stamp set & coordinating dies, Floral Gallery Dies. Here’s a picture of both.
Art Gallery stamp set and Floral Gallery Dies
This is a two-step stamp set as you might realize from the florals at the top of the set. And I’ll confess, I haven’t played with the floral stamps – yet… I had an in-person class yesterday and my new products arrived l-a-t-e the night before. Sooo – what I DID DO is create this fun card using the large sentiment in the dies.
Floral Gallery Dies #1
I also used two fun Designer Series Papers that will be free with a $50 purchase during Jan-Feb. (more on that later) The first is Oh So Ombre 6×6 DSP – the Blackberry Bliss & Bermuda papers you see here. And notice how they fade to lighter shade? That’s the ombre 😏 The floral paper is called Flower & Field DSP, again free with a $50 purchased in Jan-Feb.
OK, enough about the papers – the sentiment comes from the Art Gallery stamp set and that fun Granny Apple Green die cut is also from this set of the Floral Gallery Dies. Aren’t those edges fun? They look as though they came from a movie ticket or something. And here’s what is left after the sentiment is die cut… which of course can be used on another card.
Floral Gallery Dies #2
Let’s talk the new catalogs for a minute – the Jan-Jun 2021 Mini Catalog and Sale-a-bration catalogs will be available for you to see in early December with ordering beginning Jan 3. If you have been a customer of mine this past year I will be sending (or giving if you are local) those catalogs as soon as I am able to get them. And just for clarity… the Sale-a-bration catalog shows free products available with purchases of $50 and $100, so two levels of free items. And these are available Jan-Feb only. Hope that helps.
Thanks for stopping by.
May you have a beautiful day.
Make someone happy by sending them a handmade card filled with love.