Stampin’ Ip! Ornate Garden Specialty DSP, Ornate Borders Dies

Todays Card is a fun use of the Stampin’ Up! Ornate Garden Specialty DSP and the Ornate Borders Dies. It’s a panel card, at least that’s what I’m calling it, meaning it doesn’t open 🙂 It simply has a panel that fits inside the folded DSP. Let’s take a look….

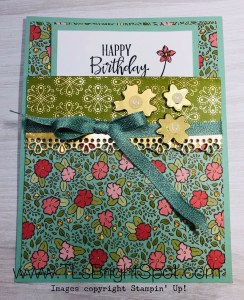
This Ornate Garden Specialty DSP is so sweet and I wanted to emphasize this particular pattern for as much of the card as possible. This is what I did…

  • Mint Macaron card base cut to 4 1/4″ x 5 1/2″; also cut 3 1/2″ x 4 1/2″ for the inside panel
  • Ornate Garden SDSP cut to 4″ x 5 1/4″; another with same dimension but score this at 4″
  • Adhere the 4 “x 5 1/4” SDSP to the card base using liquid glue
  • Cut a panel 1/2″ x 4″ from Gold foil. Using a die from the Ornate Borders Dies, run it through your embossing/ diecut machine. Adhere this diecut to the fold-over piece of SDSP. Cut about a 20″ length of Mint Macaron 1/4″ ribbon, run over it with your snail adhesive and adhere evenly around the back and front, covering slightly where the Gold Foil diecut was attached.Tie a bow. TIP: use your grid paper to make certain the ribbon is attached evenly. 
  • Using tear ‘n tape, adhere to the sides and bottom of this panel and attach to the card base.
  • Cut three flowers from Gold Foil scrap using the Ornate Border Dies. Adhere Glitter Enamel Dots to the center of each flower. Put on dimensionals and attach accordingly.
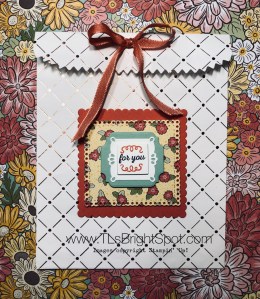
Now for the inside…

  • Whisper White cut to 2 is 7/8″ x 4 1/4″. Stamp your sentiment (I used the Peaceful Moments stamp set) with Stazon Jet Black ink. I like how clear this ink stamps! I also added a sweet flower from the Special Someone stamp set. This was colored using Flirty Flamingo and Daffodil Delight markers. TIP: When using Stazon Jet Black ink, DO NOT USE BLENDS TO COLOR! It simply smears the ink instead of adding color.
  • Using the Ornate Borders Dies once more, cut the same border die from Blushing Bride cs (approx. 1/2″ x 4″). Adhere to the Whisper White panel using liquid glue.
  • Adhere this Whisper White panel to the 3 1/2″ x 4 1/2″ Mint Macaron piece. Cute, cute!

The envelope…

  • Cut a piece of matching SDSP from the Ornate Garden SDSP pack 2 1/4″ x 6″. Adhere with liquid glue and trim.
  • Stamp the adorable flower used on the card panel insert on the envelope front (I did it five times!) Color using Flirty Flamingo marker for the petals and Daffodil Delight marker for the flower center.

Isn’t this card sweet?!

Thanks so much for stopping by.. May you have a beautiful day.

Make someone happy by sending them a handmade card.


Stampin’ Up! Ornate Thanks, Ornate Borders Dies, So Very Vellum Specialty DSP

Today’s card makes use of the Stampin’ Up! Ornate Thanks and Ornate Borders Dies, and So Very Vellum Specialty DSP and the Eyelet Lace embossing folder. It was inspired by TGIF Challenges #tgifc255. Here it is in all it’s glory – feminine and fresh, bringing a note of thanks to the receiver…

Here are the details for the card front:

  • Soft Seafoam 8 1/2″ x 5 1/2″, scored at 4 1/4″
  • So Very Vellum 3 3/4″ x 5 1/2″
  • Whisper White 1/2″ x 5 1/2″, 1/2″ x 3″ strip for the sentiment


  • Use the border die from the Ornate Borders dies to create this wonderful delicate edge. Adhere this to the left front of the So Very Vellum SDSP. This takes a very thin line of liquid glue. Adhere this, again with liquid glue, just along where the die edge is attached to the vellum. This is important – if glue is anywhere else on the vellum it will show. You don’t want that!
  • Stamp the sentiment from Ornate Thanks with Tuxedo Black Memento ink. Angle the one end. Put on dimesionals – I used three – and add to card front. Mine is placed 3/4″ up from the bottom. Add bling with the Noble Peacock Rhinestones. Front is complete!

Inside the card:

  • Whisper White 4″ x 5 1/4″ Stamp the sentiments from the Ornate Thanks stamp set using Tuxedo Black Memento ink and Soft Seafoam ink. Use a leftover strip from the embossed piece from the envelope flap and adhere to the bottom. This strip is  1/4″ x 5 1/4″

The envelope:

  • Nary a “neked” envelope to be found – right? Right! Cut a piece of Soft Seafoam 2 1/4″ x 6″, spritz lightly with water and run through the Eyelet Lace embossing folder. Adhere to the envelope flap using liquid glue. Trim. The leftover scrap was cut down and used on the inside of the card 🙂
  • Stamp the sentiment from Ornate Thanks in Tuxedo Black Memento ink.

I love this card! It is just so sweet. I hope you like it too. Remember that this stamp and die set can be yours beginning Apr 1- May 1. It is part of the Early Release Ornate Garden Suite of products.  While the items will be be available in the Annual 2020-2021 catalogue, they most likely will not be as a suite of products – and therefore will be more expensive.

I would love to have you shop with me. When you purchase product $50- $149 from me, you receive a free item of choice up to $10. A deal right? Use my current HOST CODE XYW2SYNV.

May you have a beautiful day. Make someone happy by sending them a handmade card.


Stampin’ Up! Ornate Garden SuiteTreat Bag or Card Holder

Hello again… We have had some beeeeauuutiful weather here lately – jonquils and some daffodils are up and blooming; and the hellebores are stunning. The only thing is, I’ve been feeling really punky and haven’t been able to get out and do my garden thing. I’m better mind you, just not up to snuff yet.

Today’s post is more of the products from the Ornate Garden Suite. I had used one of the dies to cut one of the gorgeous papers and needed to cut it down. Well – I didn’t line it up properly and goofed but I couldn’t bring myself to throw that piece out, so I tried again and it worked the way I intended. That stitched (almost) square with the cute scallop using the Ornate Garden Specialty DSP is the result. Take a look see.

Isn’t this fun? Here are the deets:

  • Copper Dotted Treat bag, fold over the top and punch two holes.
  • Cut out a square using the Layering Squares dies, scalloped of course – Terracotta Tile cs and adhere using snail.
  • The next layer is that stunning paper  (Ornate Garden Specialty DSP) using the Ornate Layers dies and cutting it down to almost a square. It isn’t perfect, but I liked that I made it work. Adhere this layer with dimensionals.
  • The next two layers: Mint Macaron cut using the Ornate Frames dies and Whisper White cut using another framelit from that set.
  • The top layer uses the smallest of the Layering Squares dies. It has been stamped with a sentiment from Itty Bitty Greetings stamp set.
  • The ribbon is from the Ornate Garden Ribbon Combo Pack and uses the Terracotta Tile from the set.

My plan is to make a card to put in this bag, and of course it would need to be in a larger size envelope due to the size of the treat bag. Perhaps you’ll see that card tomorrow. Good plan, right? Remember… this Ornate Garden Suite will become available to customers beginning Apr 1 – May 31and will be listed in the new Annual ’20-’21 Catalogue, but probably not available as a suite of products.

When you want to learn more about this suite and how to order, please contact me. If we do not connect via my blog, please send a note to my email at tlsbrightspot@gmail.com. Thanks for stopping by today. Remember… make someone happy by sending them a handmade card!

Stampin’ UP! Ornate Garden Suite

Eeeek! My order for the Ornate Garden Suite arrived, so yesterday I took some time to play. I only had time to create two items and I’m really excited about them. Take a peek. (OOPS … I’ll share the other items in tomorrows post.)

The card was super simple and oh my goodness, the Ornate Floral 3D embossing folder is just wonderful – little tiny flowers all over. That is going to become a favorite I’m sure. And the Ornate Layers dies – eeek! Stunning results!

Details:

  • Run the ….. lightly spritz a 4″ x 5 1/4″ piece of So Saffron cs  then run it through the Ornate Floral 3D embossing folder. The spritzing allows the papers’ fibers to bend to create deeper impressions instead of cracking and breaking and not as clear definition. Does that make sense?
  • Using about a 22″ piece of the Ornate Garden Ribbon Combo pack (I used the Old Olive ribbon in the package), wrap it around the embossed piece and tie a bow. Make certain it is centered on the paper. Use glue dots to keep in place. Adhere the embossed cs with liquid glue directly to the Whisper White thick 4 1/4″ x 11″ base.
  • Using the Ornate Layers dies cut a piece of Terracotta Tile. Cut a piece of Whisper White cs, stamp the front sentiment from the Ornate Thanks stamp set and adhere with liquid glue to the Terracotta Tile die cut. Adhere two little Gilded Gems from this wonderful suite of products. Put dimensionals on the back  of the die cut and place it centered over the ribbon. The front it complete!

The inside…

  • Cut another piece of So Saffron cs 4″ x 5 1/4″, run it through your diecut machine using another of the Ornate Layers dies. Is that gorgeous or what! This could so easily be a card front, or better yet, used to cut down the embossed piece.  Yes, yes! I must try that. On with the directions… Stamp the sentiment in Tuxedo Black Memento ink from the Ornate Thanks stamp set. Adhere to the inside of the Whisper White thick cs.
  • Those little die cut pieces are from another of the die cuts in this set that I saved, cuz I liked them. 🙂 I’ll share that die another day.

Be sure to decorate your envelope. I stamped the adorable little flower in Tuxedo Black Memento ink then used Stamp’ UP! blends to color it. Just remember, when using the blends on an envelope to slip a piece of scrap paper inside so the blends don’t bleed through the envelope. Ask me how I know that!!! And I adhered a piece from the Ornate Garden Specialty DSP to the flap. These papers are stunning folks! I can’t wait to share more of them with you.

Thanks for stopping by. Please remember to used my HOST CODE 2TMMA9HX when ordering $50 + in products. This gives you the opportunity to receive a free product of your choice from me – not to exceed $10.

May you have a beautiful day! Make someone happy by sending them a handmade card.


Ornate Garden Suite Available to Customers Apr 1!

Do you see this suite? It is gorgeous! You too can make items using this suite. It will be available to customers beginning April 1. Check out this video…

Here are some samples provided by Stampin’ UP

Look at that embossing folder – wow! Can’t wait to get my hands on this… As a demonstrator I am able to do a pre-order and THIS Ornate Garden Suite is going in my bucket today. Once received, I’ll share some of my creations.

Thanks for stopping by. Getting excited for the new Annual Catalogue from Stampin’ UP!? Me too! If you don’t have a demonstrator, I would gladly be that for you, offering tips and tricks for creating cards and more.