Christmastime Is Here!

Hello Readers! Sending Christmas cards has been one of those responsibilities that was once a chore… Why is it not a chore now? I make all my own cards of course and what is fun is to lay them all out on the table (they are all different as mass producing is just not my thing). Next I review my list of folks to whom we send cards. I write each name on little sticky notes and then comes the fun – who gets each card? It brings a smile to my face as rarely when I’m making Christmas cards do I think of who is to receive it. Putting those little sticky notes on each card is like a little prayer of thanks for that individual or family. I have to share part of my pile of sticky notes once the cards were addressed – ‘cuz I didn’t think of it until late that this might be a fun thing to share.
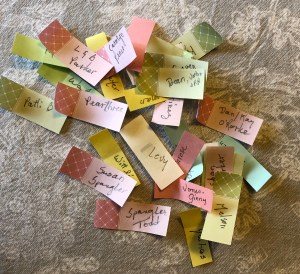
Isn’t that a fun pile?

Today’s cards are favorites (well, recent favorites). They are both made with the Christmastime Is Here Suite of products.
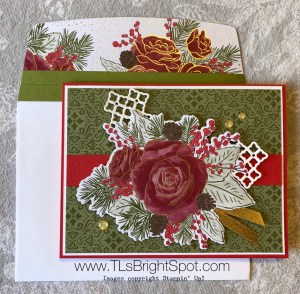
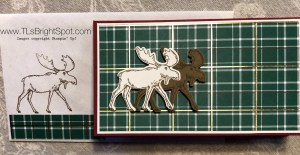
The first card is landscape style and begins with a card base of Poppy Parade followed by a layer of Whisper White then the DSP and a strip of Poppy Parade. On top of this is the flower diecut from another piece of the DSP. Isn’t that beautiful? Under it is a different diecut that I simply cut into two pieces to place where I wanted them. The ribbon and additional embellishments are also from the suite. The last thing I did was use Wink of Stella on the flower. Wherever there was a darker shade, I used the Wink of Stella to highlight it. It doesn’t show in the card but it looks really nice.
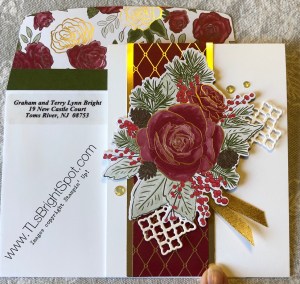
This second card is portrait style: Thick Whisper White card base, 1 1/2″ strip of DSP from the suite with gold foil on each edge: same lattice style diecut separated, ribbon and embellishments – all from the suite.

Christmastime Is Here products are a limited edition to the SU! line. If you are anxious to get this suite, I encourage you to do it now! Go to my online store and purchase it soon.

Thanks for stopping by. I hope you enjoyed this fun post. Remember to use my HOST CODE if your purchase is less than $150 so I can send you a free SU! product of your choice. This HOST CODE is good until Dec 4: FV493V6A

Happy shopping and remember to make someones day more beautiful by sending them one of your cards!

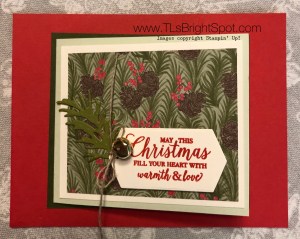
Christmastime Is Here DSP

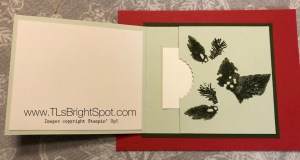
I just love this card; maybe because it is not the traditional fold, maybe ‘cquse of the colors, who knows, but I like it and hope you do as well. This could be a gift card holder or what I made of this one is simply a card.Either way, I’ll give directions for both.

Here are the deets:
Poppy Parade – 4 1/4″ x 5 1/2″
Mossy Meadow – 3 1/2″ x 4″ + scrap for the Beautiful Boughs diecut
Soft Seafoam – 3 1/4″ x 7 1/2″, scored at 3 3/4″ (if for a gift card: 3 1/4″ x 9 3/4, scored at 3 3/4″ & 7 1/2″)
Very Vanilla – 3 x 3 1/2″ (cut 2, one for inside) + scrap for the Beautiful Boughs label
Christmastime Is Here Specialty DSP – 2 3/4″ x 3 1/4″

Instructions are pretty simple:
* Adhere Mossy Meadow piece to the Poppy Parade
* Adhere the Soft Seafoam piece to that
* Adhere Very Vanilla to that
* Adhere the Christmastime Is Here Specialty DSP to that.
* Create the desired diecut from Mossy Meadow and adhere with Tombow glue
* Stamp Sentiment (mine is from Playful Penguins stamp set from the Holiday catty) and using dimensionals, adhere over the diecut.
* Attach a “bauble” with linen thread. (This pinecone is a retired item, but it could easily have been a jingle bell from the holiday catty!)
* Stamp desired sentiment onto the Very Vanilla CS for the inside and adhere with Tombow glue
DONE!!!
Here’s a picture of the card with the jingle bell:

Here is picture of the inside simply stamped and used as a gift card holder:

Thanks for stopping by! I hope you had a wonderful time with family and or friends for Thanksgiving. Our celebration will be Sunday as family is scattered this year (😞) Nevertheless – we are grateful for all around us and for family scattered hither and yon. Blessings on all of you as you continue about your day/ week.

Dashing Deer Wrapped in Plaid

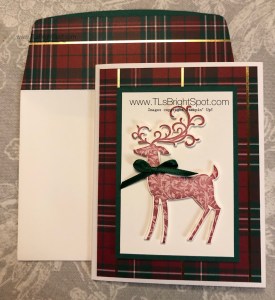
Hi Everyone, It’s been a couple of days since I posted and I wanted to touch base again. Today’s card is simple and elegant and was our project for class Monday night. Each person’s was a bit different as the various patterns of Wrapped In Plaid DSP made it distinctive.

Here’s the card:

Isn’t it elegant? I like that it has no sentiment on the front, just the simple beauty of the deer.
Here are the deets:
Thick Whisper White CS – 8 1/2″ x 5 1/2″, scored at 4 1/4″
Wrapped In Plaid DSP – 4″ x 5 1/4″
Shaded Spruce – 3′ x 4 1/4′
Whisper White – 2 3/4″ x 4″ (cut 2 of these, one for stamping and die cutting the deer), 4″ x 5 1/4″ for the inside.

Instructions:
* Adhere the Wrapped In Plaid DSP to the Whisper White CS.
* Adhere the other Whisper White CS piece to the Shaded Spruce. Add dimensionals to the Shaded Spruce and adhere to the card.
* Stamp the deer in Cherry Cobbler. I used my stamparatus since sometimes I want to ink and stamp the deer again and this makes it so easy to do! Using your favorite die cutting machine, cut out the deer. Place on dimensions, including the legs. Yes, it does mean you have to cut dimensionals apart, but it’s worth it for the stability. Adhere the deer to the card.
* Make a bow and adhere with glue dots. For this card the bow is a non-SU! product, but linen thread could have been used and that would have looked great too.

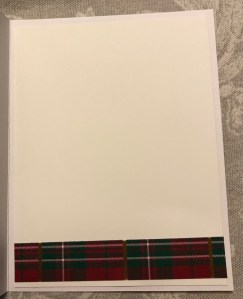
For the inside I used a scrap from cutting down the 6 x 6 DSP (about 3/4′ x 4″) to the bottom of the additional pice of Whisper White. Stamp your favorite greeting and voila – done!
Dashing Deer

Thanks for stopping by. Hope you like the card. If you have any questions, comments, please leave a message and I’ll get back to you. If you wish to place an order, please use my HOST CODE:FV493V6A if your purchases are under $150. (This HOST CODE is good until Dec 4.) If the order is over that amount, SU! will allow you to order additional goodies for free :o) Using the HOST CODE for purchases of $50-$149 will get you a free $10 product of your choice. Let me know what that item is and I’ll get it ordered for you. One free product / month/ customer.

Happy crafting – may you touch someone in a beautiful way by sending one of your fabulous cards to them!

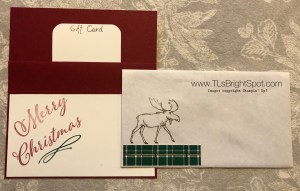
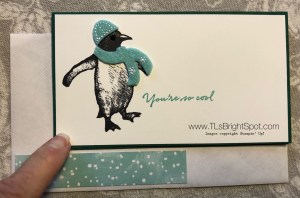
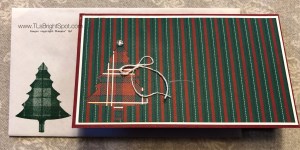
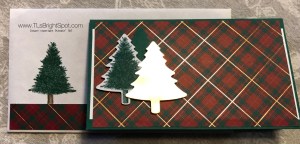
Gift Card Holder

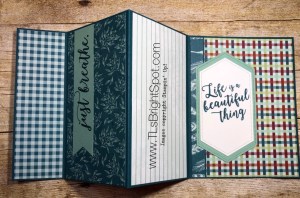
Thought I would share with you the gift card holders I made today. Inspired by one of my students. here they are… see below

* Card stock is 8 1/2 x 5 1/2, scored on the long side at 3 1/8, 4 1/4 & 5 3/8
* Fold in half, burnish; fold the other two scored sides the opposite direction. Card now looks as though it has a W in the middle. Adhere that ‘W’ inside.
* I made the front piece to hold the gift card by using tear n tape on the ends of the fold.
* Decorate as desired: my sizes for the front were..CS: 3 x 5 3/8, DSP: at 2 7/8 x 5 1/4. The inside dimension was 3 x 5 3/8

Have fun!!!
This is the outside: the envelope is a standard small envelope, decorated to coordinate with each individual card holder.

And here’s the inside:

As I made several (5 to be exact), here are photos of the outside of the others:
, , ,
If you have questions about creating these cute gift card holders, Please contact me. My email is TLsBrightSpot@gmail.com

If you would like to order SU! supplies: papers, stamp sets, dies, embellishments, the new paper trimmer – you name it, for itmes $50 – $149. for a free $10 item of your choice, please use my HOST CODE. It is good from Nov 23 – Dec 4. FV493V6A

Sneak Peek – Breathtaking Bouquet – 2020 Mini Catalogue

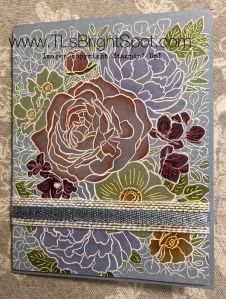
Todays card is from the new 2020 Mini Catalogue that opens for ordering Jan – Jun. The stamp set is called Breathtaking Bouquet Background Stamp Set. I used it in my Stamparatus with Versamark and then embossed with white embossing powder on Seaside Spray. I really like the softness of this color! The really fun part happened next as I began coloring the image with various Stampin’ Up! Blends. It takes a bit of time but somehow it’s soothing to me. Here are the Blends I have used for the flowers: Light and Dark So Saffron, Light and Dark Purple Posy (love this color too!), Light and Dark Flirty Flamingo, Light and Dark Pumpkin Pie,Light and Dark Blackberry Bliss. For the leaves I used Light and Dark Granny Apple Green plus Light and Dark Old Olive. The ribbons used to simply wrap the card were Whisper White Flax ribbon and the Seaside Spray 1/4″ Metallic ribbon from the Holiday catalogue. For the inside I used the Beautiful Bouquet Stamp set for the sentiment (using Purple Posy Stampin’ Blends) and the dragonflies from the Friend Like You stamp set using Seaside Spray ink pad.

Here are the deets for the card:
* 5 1/2″ x 8 1/2″ Seaside Spray CS, scored at 4 1/4″
* Seaside Spray Layer 4 x 5 1/4″ (front)
* Whisper White 4 X 5 1/4″ (inside)

Please notice the envelope – stamped in dragonflies as though they are circling the card!

TIP:
Cut your card stock for the stamping Breathtaking Bouquet, larger than 4 x 5 1/4 as the stamp set is large and you want it to stamp all the way to the edge. After stamping and embossing, pare down to appropriate size :o)

Here’s the card!

And the inside with the envelope.

Hope you enjoyed this sneak peek of a very pretty stamp.

Online Extravaganza + Card

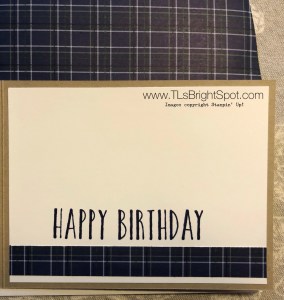
What a great last two days of stamping and creating! Yesterday it was eye pillows for our daughter who is teaching a class about Essential Oils (Young Living to be exact). I made 7 and they turned out so cute :o) Sorry – no picture of those. Today it was making a birthday card for my brother-in-law and I used some new paper from the Mini Catalogue – whee! The paper is from the Clubhouse Suite… this Designer Series Paper is called Country Club DSP and is very masculine – golf themed on one side, plaids and argyle on the other. Here’s the card I created:

And here are the stats:
* Crumb Cake CS – 8 1/2 x 5 1/2, scored at 4 1/4; 1 1/2 x 5 for banner (trimmed w/ the Triple Banner punch
* Whisper White CS – 4 x 5 1/4 (cut one for inside as well) + 2 1/4″ square for 2″ circle punch
* Country Club DSP – 3 1/2 x 4 3/4 + 3/4 x 5 1/4 for inside + piece for envelope flap (2 1/4 x 6)
* Garden Green CS – 1 1/2 x 4 trimmed down w? Triple Banner punch
* Night of Navy CS – about 2 1/2 square, cut down w/ Starburst punch
* Bakers Twine – Night of Navy/Sahara Sand for bow
* Perennial Birthday stamp set for the sentiments
* Toile Tidings Glitter Enamel Dots
* Corrugated embossing folder for the Crumb Cake banner

And here’s a picture of the inside of the card:

Remember that tomorrow – Nov 22 – is the last day of the Online Extavaganza! See my prior post with all the deets.
Happy stamping!

Hartford CT – Mini Catalogue Release Previews

Hartford CT 2019

The introduction of the Mini Catalogue (new name) was introduced to those demonstrators attending conventions around the world. I was able to attend the Hartford CT event and it was fabulous!
Here are photos of some of the items available in the new catty (which will be available to customers in late Dec.) The catalogue ordering dates are Jan-June. Having a preview allows the customer to prepare a WISH LIST/ ORDER LIST ahead of time. If you have placed an order with this past year and do not have another demonstrator, you will receive the new catty mid December. If you do not have a demonstrator and place a $50 order with me prior to Dec 2, you will receive a mini catalogue mid Dec. Enjoy these previews and begin making your list!

Hope this gives you some preview of the excitement that is building around this catalogue 🙂 Feel free to post questions regarding the products available. As always, during this particular sales time, there are promotions for free products when ordering certain dollar amounts. Below are two pictures of some of those.

Enjoy the previews!

Triple Fold Card

Fun fold cards are just that – FUN to create! One of the best parts of card making is creating something for a special someone. Somehow for me, it’s easier to make a card when I have a reason for that card. This card is for that woman who is struggling with some health issues, is getting better but needs encouragement. Let’s take a look.


The card was created with a 12″ x 5 1/2″ piece of Pretty Peacock. Score it on the long side at 4 1/4″, 7 1/4″ and 10 1/4″. The elegant papers used to decorate this project were taken from the Come to Gather Designer Series papers in the Holiday catalogue shown on page 48. Here are the stats for the card cuts:

  • for the front and reverse side of that fold, 1 5/8″ x 5 3/8″, cut two, using one side for the front of the card and thew other side of the card stock for the reverse side.
  • for the next two sections, 2 3/4″ x 5 3/8″, cutting two. Again use alternating sides of the DSP for each section.
  • For the last section, 4″ x 5 3/8″. What I did here is slice off 1/2″ the long side, turn that small piece to the reverse side.

Adhere all pieces to the appropriate panels. That third panel could easily be a piece of plain card stock for writing a lovely note :o) ~ just sayin’. On the last panel I have used the 2nd (on mint macaron card stock) and 3rd (on whisper white card stock) largest dies in the Stitched Nested Labels set shown on page 92 in the annual catalogue to include a sentiment. That nice saying came from the Colorful Seasons stamp set shown on page 56 in the annual catalogue. I used another of it’s sayings on the second panel, stamped on a 1 1/8″ piece of mint macaron card stock. It was originally cut as a 4″ length, then I cropped it using the banner triple punch shown on page 186 in the annual catalogue.

The belly band is 1″ x 12″. You may find when you gently wrap it around the card, that it needs to be shortened a bit.  Do that before adhering together with snail. Then decorate the belly band. I used the beautiful whisper white 5/8″ Flax Ribbon found on page 174 in the annual catalogue and adhered that also with snail. Using the Gathered Together stamp set (pages 47 & 48 in the Holiday catalogue), I stamped that gorgeous large leaf and colored it with several stamping blends: Pretty Peacock,  Granny Apple Green and just a hint of Cherry Cobbler. (see the full range of colors available in the Annual Catalogue on page 179. I then cut it with the Gathered Leaves dies (pg. 47 HC) and adhered with snail.

Notice how Stampin’ Up! products can be used in so many different ways? They coordinate like no other products out there! If you would like to place an order, please use my host code that is good until Oct 31, 2019. If your order is over $150, don’t use the host code – get your own free products SU! offers! If your orders are $50 or more, you will receive a free product from me ~ doesn’t that seem fun?

May you have a beautiful day! Make someone happy by sending them a handmade card  <:o)


Colorful Seasons

Hi Folks! Amy Koenders posted pictures on her blog yesterday of team members cards they had prepared. I’ve had several questions about mine and since I hadn’t posted info about it – it seems appropriate to do so now.

Begin with Grapefruit Grove cardstock cut to 8 1/2 x 5 1/2, scored at 4 1/4.

Using the stitched squares framelits, cut 3.

The large leaf in Colorful Seasons bundle was cut from Perennial Essence DSP, then the “topper” for that leaf was cut from copper foil and adhered using Tombow glue. Easy easy and it gives a gorgeous effect! Using your fingers, gently curl the leaves, cuz leaves are never flat, right? Adhere the leaf with dimensionals. I usually use at least two for a more secure holding. The cording was from the Nature’s Twine set, which is a bundle of four. I simply took my pick it tool and separated the threads to give this frayed look. Three little Metallic pearls were added for a bit of glamor. The sentiment comes from Gather Together, a brand new stamp set/ bundle in the Holiday catalogue, and was stamped in Gray Granite.

For the inside, I kept it really simple. The leaf was again cut from the Perennial Essence paper and adhered with Tombow glue. The envelope was decorated using stamps from the Gather Together stamp set – Grapefruit Grove for the pumpkins and Gray Granite for the sheaf spray on the front.

If you do not have a demonstrator and would like to have a catalogue, please contact me! Thanks for stopping by. May you have a beautiful day.

Peaceful Boughs and Feels Like Frost

Wow! The new SU! Holiday catalogue is now available and here’s a view of the cover.

There are some fabulous finds in this cattie – so be sure to look carefully at every page :o).

As a demonstrator we are able to preorder items from the various catalogues when they become available. The Peaceful Boughs bundle is really, really nice. I love those pine cones! Here is a card I made using the pine cones and one of the Designer Series Papers (DSP) called Feels Like Frost (6 x 6 in size!)

Here are the details…

Balmy Blue card stock cut at 8 1/2″ x 5 1/2″ and scored at 4 1/4″

Whisper White cardstock cut at 4″ x 5 1/4″

Feels Like Frost cut to 3 3/’ x 5″ … adhere to the Whisper White with liquid glue. Cut a length of the Old Olive/ Pretty Peacock reversible ribbon and adhere in back with glue dots or tape.

Using the Beautiful Boughs framelits, cut the solid piece (or back pice) of the pine cone from Early Espresso. Cut the front piece of the pine cone from Copper foil. Adhere these two pieces together with liquid glue. Adhere these pieces to the card front as shown. Take another small length of the same ribbon and tie it to the horizontal piece and adhere with a glue dot. That cute little pine cone dangling from the ribbon was a leftover from last years Holiday catalogue. (Sorry – a retired item!)

Below is a picture of the inside of the card – sentiment is stamped in Balmy Blue.

Thanks for stopping by! Please be sure to check out the new Holiday catalogue. If you do not have a demonstrator, feel free to contact me for a cattie or with questions. If you would like to place an order, I’m here to help and to encourage you. Create. Inspire. Share.