Stampin’ Up! Rhino Ready & Radiating Stitched Dies for the Happy Inkin’ Thursday Blog Hop

Welcome, welcome… to the Happy Inkin’ Thursday Blog Hop. We have a fun sketch challenge today to get our creative juices flowing. It will be fun to see what the others on the team share.

Stampin' Up! Happy Inkin' Thursday Blog Hop
Stampin' Up! Sketch Challenge 3/16/23
Stampin' Up! Rhino Ready & Radiating Stitched Dies

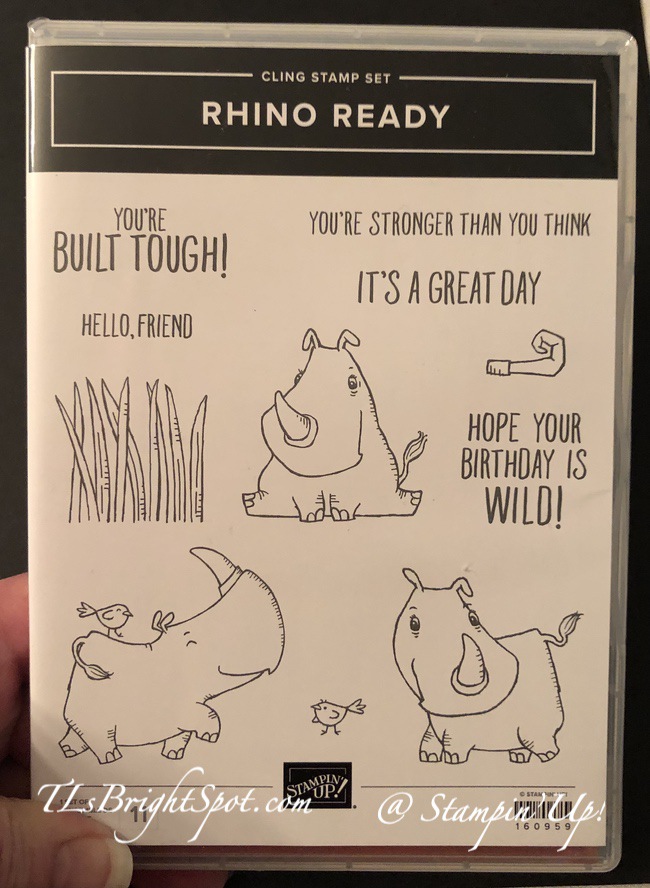
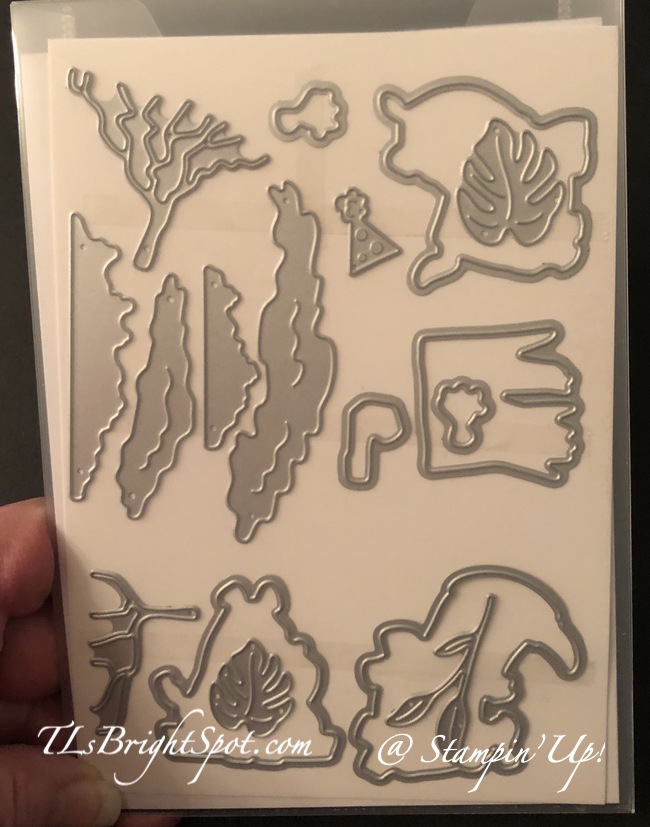
Here’s my card. These Ready Rhinos bundle are just too cute ~ I just HAD to make another card with them. And this is my first play with the Radiating Stitched Dies and I’m really liking them too. Both of these are part of the ONLINE EXCLUSIVES found on the online store. You may find that link here. But let’s get back to the card… The card base is Mossy Meadow cut as an A2 tent fold. The largest of the Radiating Stitched Dies was used to die cut Happy Forest Friends DSP and was adhered to the card base with Stampin’ Seal. The next to largest of the Radiating Stitched Dies was used to die cut the Sahara Sand layer and that was added to the card front with dimensionals. The rhino was stamped in Memento ink on a Basic White scrap, then colored with Smoky Slate Stampin’ Blends. Be sure to leave a little white areas for depth :O) The rhino was die cut with the Rhino Ready Dies. To die cut the leaves, I looked for a green DSP that had some variation to it and found it in the Hues of Happiness DSP pack – so… die cut 4 palm leaves, two small & two larger using the Rhino Ready Dies. I also stamped the sentiment in Memento ink on another Basic White scrap (sentiment is from Rhino Ready stamp set) and die cut that with a banner die from the Gingko Branch Dies.

I put dimensionals on the ends of the sentiment banner & Stampin’ Seal in between and placed it on the card. I added the rhino with dimensionals only on his right side, then slipped the palm leaves under the rhino, adding with liquid glue. My final touch for the card front was placing the three Flat Adhesive-Backed Pearls for a bit of glam.

Stampin' Up! Rhino Ready & Radiating Stitched Dies, inside

I have to say, I really like the inside of this card. Maybe it’s the texture per the Radiating Stitched Dies. Here’s what I did… I used the largest of the Radiating Stitched Dies to die cut a panel of Old Olive card stock, then die cut with the next smaller Radiating Stitched Die a panel of Basic White. I adhered the remaining palm leaf die cut earlier from the Rhino Ready Dies, with liquid glue. I then stamped the birthday sentiment using the Rhino Ready stamp with Memento ink. Both the Old Olive panel and the Basic White piece were adhered with Stampin’ Seal and the card was complete.

Stampin' Up! Rhino Ready and Radiating Stitched Dies card & envelope

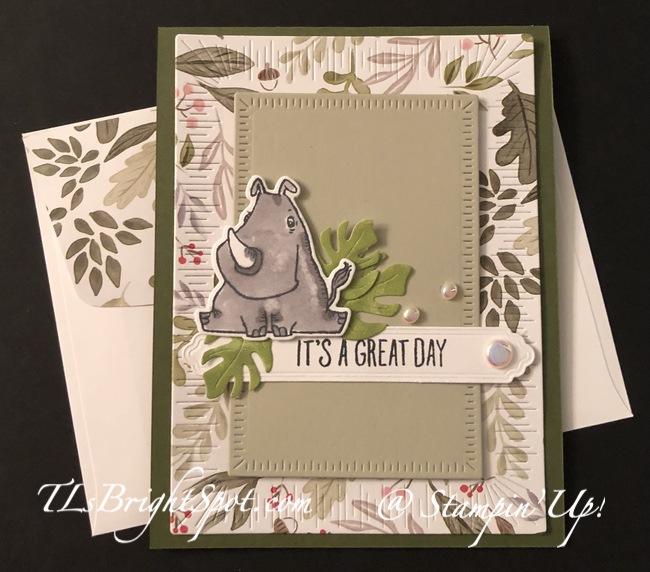
For the envelope I simply added a panel of the Happy Forest Friends DSP to the flap and called it enough. Love the Rhino Ready Bundle and the Radiating Stitched Dies – both from the ONLINE EXCLUSIVES. All other items to make this card are in a catalog. Everything is listed below when you are ready to purchase.

Now it is time to hop on to Carol and see what she has created… or click on a name to take you to another blog. Whatever you do, enjoy the hop!

Stampin' Up! Happy Inkin' Thursday blog hop, next button

Amy Koenders

Mary Deatherage

Kristi Gray

Jaimie Babarczy

Karen Finkle

Akiko Sudano

Karen Ksenzakovic

Tara Carpenter

Terry Lynn Bright ~ you are here!

Carol Buckalew

OK, want to buy products to make this card? Here ya go… And remember to use my HOST CODE XFYQSSE9 when shopping with me. . Here’s how it works… when you place an order of $50 or more (before shipping & taxes), you receive from me a SU! item valued up to $10 + Star-Studded Rewards. If your order exceeds $150, do not use my HOST CODE as SU! has it’s own rewards from which you may choose. You will still receive that FREE ITEM valued up to $10 from me + the Star-Studded Rewards. 😁👍 Please note… I have had to remove card stock as a free item due to increased cost of mailing – ugh.

For every $50 that you order from my online store (before shipping & taxes) and when you add my current Host Code, you will earn 1 STAR Reward.  Orders of $49.99 or below DO NOT earn any rewards.Example $50 = 1 STAR Reward, $100 = 2 STAR Rewards , $150 = 3 STAR Rewards etc. When you have earned 8 STAR Rewards you will get a FREE product order valued up to $40.00, your choice, and mailed directly to you! Is that a deal or what??? You also earn my monthly Online Class Tutorial of exclusive projects when you place an order. For any order $50 or more you will also receive 1 free gift from me valued up to $10. PRODUCTS FOR THIS CARD BELOW!

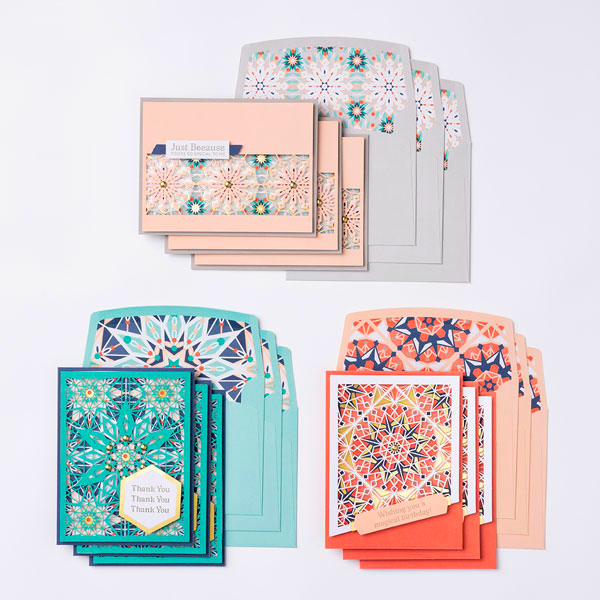
Get ready for the latest addition to the Kits Collection by Stampin’ Up! The Colorful Kaleidoscope Kit is filled with geometric shapes and unique kaleidoscopic patterns. It’s time to give a card that no one will forget!

Stampin' Up! Colorful Kaleidoscope kit
Stampin' Up! Colorful Kaleidosope kit parts
Stampin' Up! Colorful Kaleidoscope kit stamps

161804

COLORFUL KALEIDOSCOPE KIT

$23.00 USD | $32.00 CAD

Available starting 1 March

GET YOURS NOW! Click here to go my store to see more of the many kits available.

THIS KIT INCLUDES:

  • 9 full-size cards, 3 each of 3 designs, measuring 4-1/4″ x 5-1/2″ (10.8 x 14 cm) and 9 coordinating envelopes.
  • One photopolymer stamp set with all-occasion sentiments that go beyond the basics.
  • One Gray Granite Stampin’ Spot.
  • 9 peek-through laser cuts that can easily be layered to create a kaleidoscopic effect.
  • Precut die cuts that are lined with gold foil, perfect for all your stamped sentiments.
  • Mini Stampin’ Dimensionals, Tear & Tape Adhesive, and Foam Adhesive Strips.
  • Gold, pearlized embellishments.
  • The coordinating colors are Bermuda Bay, Calypso Coral, Gray Granite, Night of Navy, and Petal Pink.
  • Each project takes less than 60 minutes to complete. 
Stampin' Up! ONLINE EXCLUSIVES

Go to my ONLINE STORE to see all that is available. Just make sure my name is listed as your demonstrator when you check out!

Thanks for stopping by. May you have a beautiful day.

Make someone happy sending them a handmade card filled with love.

Stampin’ Up! Rhino Ready Floating Panel Fun Fold

Good Sunday morning. The ONLINE EXCLUSIVES have been a big hit and with the March 1 offerings was this fun bundle – the Rhino Ready stamp set and Rhino Ready Dies. The rhinos are so cute and a bit sassy and I couldn’t resist. Pinterest is a wonderful resource for ideas & instructions and I found this Floating Fun Fold by LeeAnn Greff that this new set was perfect for making this card.

Stampin' Up! Rhino Ready stamp set
Stampin' Up! Rhino Ready Dies

This is so incredibly easy ~ so here ya go…

  • The card base is Basic White and is 8 1/2 x 5 12, scored at 2 1/8 & 4 1/4
  • The two front panels are from the Subtles 6×6 DSP and are cut 2 x 5 1/4. Quick tip: I make sure when there is a pattern that the panels match side by side. These are Calypso Coral… adhere to the two front panels on the card base.
  • Using the Deckled Rectangle Dies, cut a Basic White panel to stamp, color & decorate for the floating panel
    • Stamp the Rhino with Memento ink and color with Gray Granite Stampin’ Blends
    • Die cut the birthday hat from a scrap of Subtles 6×6 DSP – this time in Pear Pizzazz. Add hat to the rhino with a dimensional. Add a Balmy Blue sequin from the Pastel Adhesive-backed Sequin pack.
    • Stamp the sentiment from the Rhino Ready stamp set in Memento ink on a Basic White strip, then die cut with the banner die from Something Fancy Dies. Adhere to the stamped panel with dimensionals. Add three Classic Matte Dots in Gray.
    • Stamp the bird from Rhino Ready stamp set in Memento ink, color with Dark Daffodil Delight Blends and die cut with the appropriate die from Rhino Ready Dies. Add with a mini dimensional cut in half added to the top of the bird and a dab of glue to the feet
  • Die cut another piece slightly larger than the rhino panel using the Deckled Rectangle dies and Gray Granite card stock. Adhere this to the back of the stamped rhino.
  • Now to create the ‘floating’ pieces 😀
    • Cut two pieces of card stock 3/4 x 1 3/4; fold in half. Estimating the half point on the front panels of the card base, add adhesive to one side of the folded strip and attach at the fold. Do the same with the other strip making sure the folds butt against one another.
    • Add adhesive to the loose end of the strip and set the rhino stamped panel on it. Do the other side. The attached strips should look like the photo below.
Stampin' Up! Rhino Ready Floating Fun Fun. floating mechanism
Stampin' Up! Rhino Ready Floating Panel Fun Fold. floating mechanism.2

Decorate the inside…

  • On a 4 x 5 1/4 Basic White panel, stamp the grass in Pear Pizzazz ink. The grass comes from the Rhino Ready stamp set.
  • Stamp the birthday sentiment from Rhino Ready stamp set in Memento ink
  • On a separate piece of Basic White, stamp the rhino with the bird on it’s back and stamp another individual bird.
    • Color the rhino with Gray Granite Blends and the birds with Dark Daffodil Delight. Die cut each with the coordinating dies in the Rhino Ready Dies.
    • Die cut three of the grasses from Pear Pizzazz and layer on top of one another, using liquid glue to secure. Add to the card as shown. This will be the ‘stopper’ to allow the card to remain folded when it stands for display.
    • Adhere the rhino in place with loiquid glue and the bird as well.
  • Adhere stamped piece to 4 1/8 x 5 38 piece of Gray Granite card stock and add to inside of card.
Stampin' Up! Rhino Ready Floating Panel Fun Fold.inside

Now for the envelope…

  • Stamp the grass along the bottom of the envelope with Pear Pizzazz ink, leaving an opening for the bird peeking through.
  • Stamp the bird in Memento ink and color with Dark Daffodil Delight Blend
  • Add Subtles 6×6 DSP in Calypso Coral to the flap, 2 1/4 x 6 & trim to fit. My piece of DSP was only about 2″ so I added a Gray Granite strip first, then the DSP
Stampin' Up! Rhino Ready Floating Panel Fun Fold card & envelope

This is such a cute card – could be used for any gender and any age as well. And I love that flexibility!!! This bundle is available right now as an ONLINE EXCLUSIVE, meaning it will not be in any catalog. No telling if this will be reordered should SU! run out, so get it before it goes away. 😀

Stampin' Up! ONLINE EXLUSIVES - Rhino Ready Bundle

Best way to see what’s available is to go to the ONLINE STORE …Click here to go my store.

For every $50 that you order from my online store (before shipping & taxes) and when you add my current Host Code, you will earn 1 STAR Reward.  Orders of $49.99 or below DO NOT earn any rewards.Example $50 = 1 STAR Reward, $100 = 2 STAR Rewards , $150 = 3 STAR Rewards etc. When you have earned 8 STAR Rewards you will get a FREE product order valued up to $40.00, your choice, and mailed directly to you! Is that a deal or what??? You also earn my monthly Online Class Tutorial of exclusive projects when you place an order. For any order $50 or more you will also receive 1 free gift from me valued up to $10. Remember to use MY current HOST CODE XFYQSSE9

THANKS FOR STOPPING BY. MAY YOU HAVE A BEAUTIFUL DAY.

MAKE SOMEONE HAPPY SENDING THEM A HANDMADE CARD FILLED WITH LOVE.