Stampin’ Up! Fun Fold w/ Flower & Field DSP

Yesterday was a holiday… did you relax, go for a hike, walk your dog three times around the block? What did you do for the break? Let me know…

I have a fun fold for you today – one using more of the Flower & Field DSP that’s FREE w/ a $50 purchase during Sale-a-bration. You will see more use of this fold as it’s just so easy. I first saw it on a video by another demonstrator, Patty Bennett. I’ve created mine in a landscape position while hers was all portrait. Nevertheless, it works the same – and here’s my card.

Fun fold w/ Flower & Field

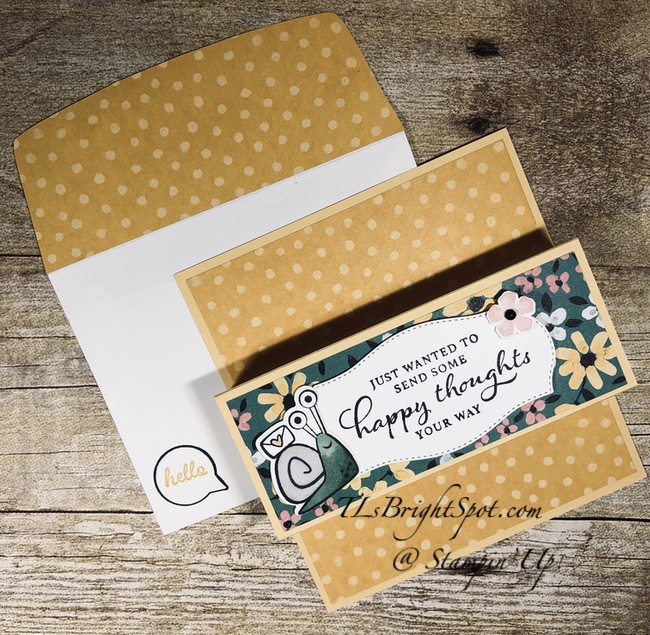
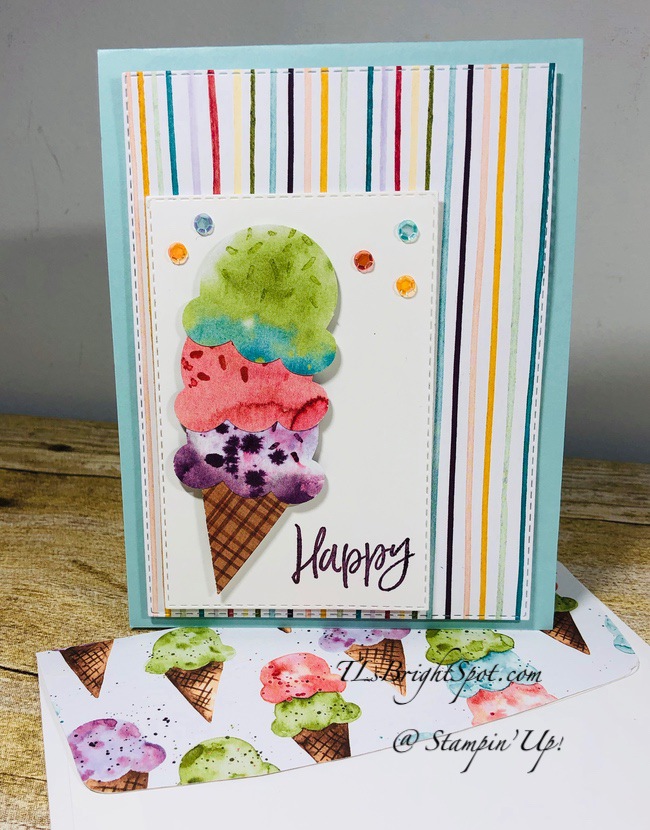
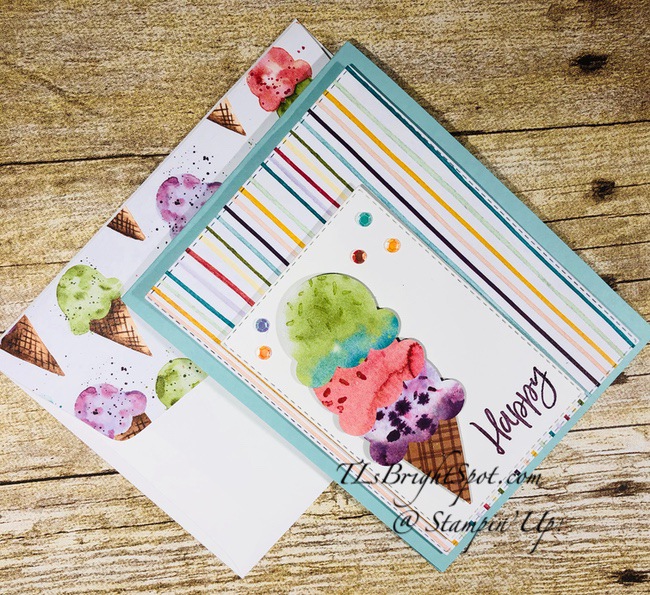
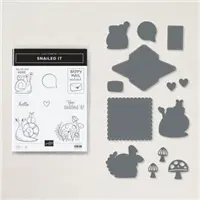
Isn’t this happy? I love the colors – bright, cheery ~ and that little snail, oh my…He comes from a new bundle call Snailed It and it comes with dies (Snail Dies no less!).I used several products to make this card, but it could be kept very simple. I just was wanting to u se the snail, so included it 🙂

Detail… beginning…

  • So Saffron card base 8 1/2 x 5 1/2. On the long side, score at 2, 3 1/8, 5 3/8 & 6 1/2. Burnish the folds to make them look like this…
Fun Fold w/ Flower & Field DSP – #2
  • Cut 3 panels of DSP that coordinate: two of the same & 1 different 1 3/4 x 5 1/4: Flower & Field DSP
  • Adhere panels with liquid glue as shown in first photo
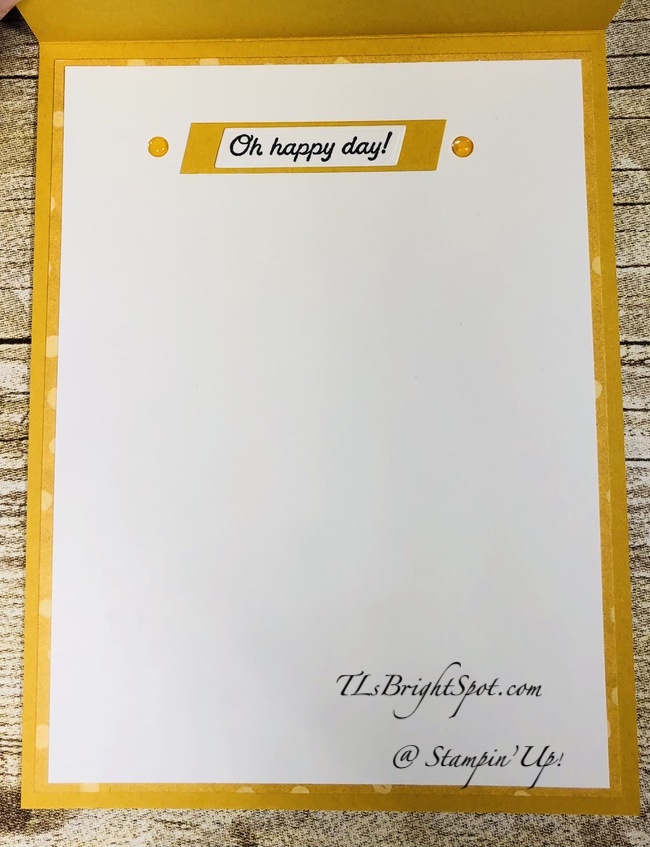
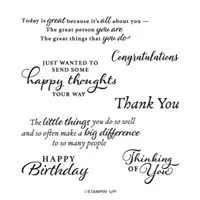
  • Stamp a sentiment on Basic White card stock for the front of the card – here I chose a cheerful one from the Happy Thoughts stamp set. The ink is Memento Black
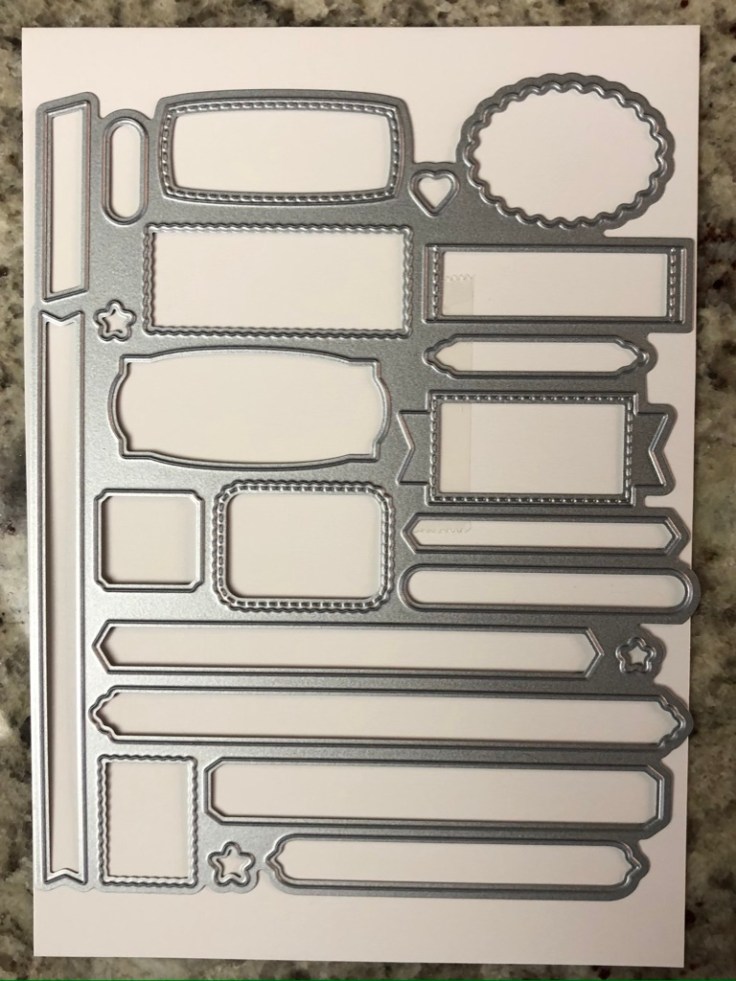
  • Cut it out with a die from Tasteful Labels Dies and adhere with dimensionals
  • To add some extra fun to the card, I pulled out the Snailed it bundle, stamped the snail in Memento Black ink and colored it with Stampin Blends: Just Jade, Light Smoky Slate for the shell (I also added sparkle to the shell with Wink of Stella), Lt Petal Pink for the heart. I die cut him with the Snail Dies and adheredwith liquid glue and mini dimensionals ~ the minis were under the envelope and the snail shell, liquid glue under the body.
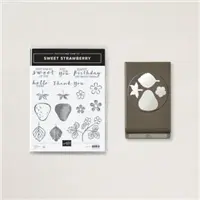
  • For another bit of fun, I added the sweet flower on a dimensional. It was stamped in Petal Pink ink and got a Matte Black Dot put in the middle. About the flower… this one comes from the Sweet Strawberry bundle which has a coordinating Strawberry Builder Punch that has this cute flower. BUT – you could fussy cut a flower from the paper! There is also a set of dies that coordinate with this paper – and it’s on it’s way, just not here yet (due Fri the tracker says) It’s called IN BLOOM and can be found in the Jan – Jun 2021 Mini Catalog on pg 45. Several of the dies coordinate with the Flower & Field DSP and will cut them out, adding fun little decoration to the flowers. I can’t wait!!
  • By the way – the front of the card is now complete!

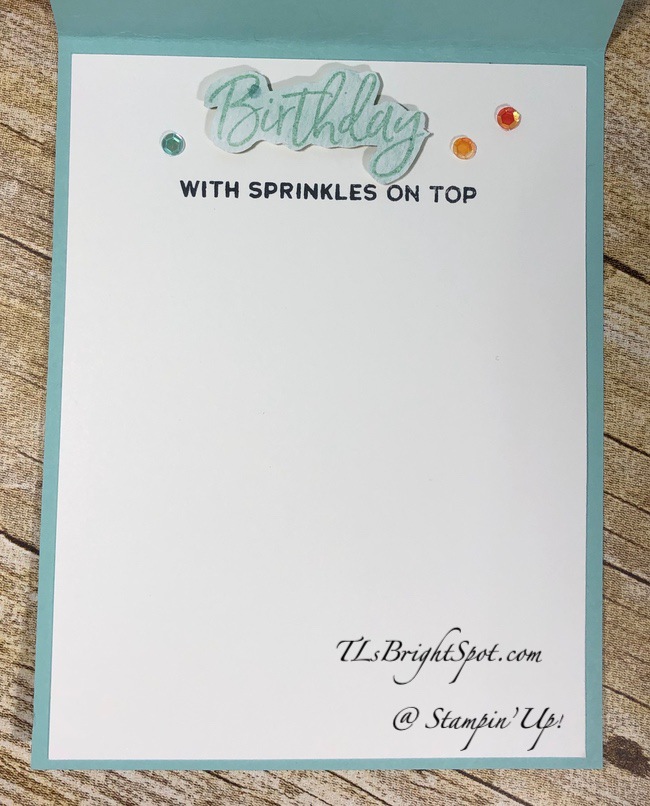
Turn the card over – stamp the word ‘hello’ from the Snailed It stamp set in Memento Black ink on a Basic White card piece – 1 3/4 x 5 1/4. HINT: remember which way your card goes – landscape! Adhere with liquid glue and your card is complete.

Cover the envelope flap with more of the Flower & Field DSP and stamp the front of the envelope with the word bubble in Memento Black ink and the word in So Saffron. Both come from the Snailed It stamp set. Voila!

Products for todays card are from the new Jan-Jun 2021 Mini Catalog ~ and those products are available now for purchase. You will find them in the product list below. As a reminder… I’ve made it easy for you to simply ‘add all to cart’. If I can help you in any way to order these items, please give me a holler. As a thank you to my customers, when the order is between $50-$150 I offer a SU! item of your choice valued at $10. Remember to use MY CURRENT HOST CODE RSVNH4XW- good Jan 5-20. When the order is over $150, you still receive that free gift from me, but SU! has Stampin’ Rewards that may be used for additional products, so don’t use the host code at that time. Now is also Sale-a-bration – a time from now through the end of February when Stampin’ Up! offers FREE items with $50 and $100 purchases. Those products are shown below today’s product list as well.

Sale-a-bration items FREE with $50 purchase – Level 1

Sale-a-bration items FREE with $100 purchase – Level 2

And when you HOST a party – or sales are $300 or more…

Thanks for stopping by.

May you have a beautiful day.

Make someone happy sending them a handmade card filled with love.

Stampin’ Up! Hydrangea Hill

Oh goodness ~ yesterday was an absolutely BONUS DAY… lots of goodies arrived from, where else? Stampin’ Up! Here’s my first card using this new and fabulous Hydrangea Hill bundle…

Hydrangea Hill – #1

Hopefully you can see how three-dimensional the flower itself is… and… here’s what I did:

  • On a panel of Basic White, stamp the solid ‘splotch’ in Highland Heather, using the Hydrangea Hill stamp set.
  • Stamp the flowers on top of this in Gorgeous Grape and die cut with the Hydrangea Dies
  • Die cut petals in both Purple Posy & Vellum – each die will cut nine (9) petals – so you’ll have 18 in all
  • Adhere the Vellum petals with liquid glue first – it only takes a small dot of glue, then adhere the Purple Posy petals in the same way. This allows some of the stamped petals to show through and gives it dimension.
  • Apply Pearl Basic Jewels to the Purple Posy petals – set aside
Hydrangea Hill – #2
  • On another panel of Basic White card stock stamp the sentiment from the Hydrangea Hill stamp set in Gorgeous Grape.
  • Stamp the stem/ leaves in Memento Black, then stamp with the ‘filler’ stamp in Pear Pizzazz. I really like how this stamp is not full-on solid for it adds texture to the leaves.
  • Now stamp the splotch of the flower head again in Highland Heather ink, right on top of that stem.
  • I stamped the petals in Gorgeous Grape, but there’s really no need as you will be covering this.
  • Place the prepared flower head on dimensionals and add over the splotch but off centering a bit so the splotch shows like a shadow.
  • Now add a Sheer Ribbon bow in Gorgeous Grape with a glue dot.
  • It still needed something so I pulled out the new Pastel Pearls and added just one. If you do not have these, you could color one of the Pearl Basic Jewels with a Stampin Blends.
  • Adhere this completed Basic White panel to Highland Heather with liquid glue, then to another panel of Gorgeous Grape. Put dimensionals on the back and adhere to a purple Posy card base and voila – the front is complete!
Hydrangea Hill – #3

For the inside, I took another panel of Basic White card stock and stamped an elongated ‘splotch’ in Highland Heather, then over-stamped with the sentiment in Gorgeous Grape. Yep, still from the Hydrangea Hill stamp set! I found a Purple Posy petal on the floor (how it got there – who knows!) so adhered it with a dot of liquid glue and added a Pearl Basic jewel. I adhered this panel to another of Highland Heather with liquid glue and then into the Purple Posy card base – and the card was done…

Hydrangea Hill – #4

For the envelope, I took some of the awesome Hydrangea Hill DSP and adhered it to the envelope flap. Then I took another of the ‘splotches’ and stamped it on the corner of the envelope – in Highland Heather ink. With Gorgeous Grape ink, I stamped the pretty posies on top of the splotch – FINIS!

This is such a pretty stamp set and so fun to use. There are some fun dies for the leaves I can’t wait to use… another day. 😁 Card cuts for this project will be listed at the bottom of this post.

Now – let’s talk about the Whisper White – Basic White card stock… Whisper White has been fazed out and is no longer available (the company producing it closed 😞). However, another company is now making the new product and of course it couldn’t be called the same – Basic White it is… and now available in all sizes, envelopes, note cards, you name it. Click on the link and you can start purchasing any time – it includes the numbers & everything – so making it easy peasy for you. https://su-media.s3.amazonaws.com/media/Promotions/2020/Basic-White/BASIC-WHITE-ANNOUNCEMENT-FLYER_US.pdf

You can find the list of those products just below. And I’ve made it easy for you to simply ‘add all to cart’. If I can help you in any way to order these items, please give me a holler. As a thank you to my customers, when the order is between $50-$150 I offer a SU! item of your choice valued at $10. Remember to use MY CURRENT HOST CODE RSVNH4XW- good Jan 5-20. When the order is over $150, you still receive that free gift from me, but SU! has Stampin’ Rewards that may be used for additional products.

Remember that now through the end of February is Sale-a-bration which means… drum roll please… FREE select product for every order of $50 or more… see photos below of those items.

And if your order exceeds $100…

Understand that if your order is $100 or more, you may choose two items at the $50 level or one at the $100 level – got it? Hope that is clear! If not, give me a holler… tlsbrightspot@gmail.com

Card cuts for today’s project:

Basic White 3 3/4 x 5 (2) + scrap for flower head die cut

Highland Heather 3 7/8 x 5 1/8 & 4 x 5 1/4 (inside)

Gorgeous Grape 4 1/8 x 5 3/8

Purple Posy 8 1/2 x 5 1/2 scored at 4 1/4

Thanks for stopping by.

May you have a beautiful day.

Make someone happy sending them a handmade card filled with love.

Stampin’ Up! True Love in Black & White

WOOHOO! Today is THE DAY… Jan to Jun 2021 Mini Catalog and Sale-a-bration are LIVE! Order, order order 😁 Yeeha… OK, enuf of that, right? Right! On with the show… Today’s card was super fun to make – I had not done one of these before and I don’t really know what to call it – so… calling it ‘Quilting in Paper Strips’. It’s made with the True Love Designer Series Paper available TODAY – just sayin’.

True Love Designer Series Paper – Quilting in Paper Strips – #1

TGIF has a challenge with the theme being black & white – and I’m entering this card in that challenge. No doubt there will be lots of entries – what the heck.

This True Love Designer Series Paper is just beautiful… to say the least. I don’t have the stamps & dies that coordinate with this paper – yet… but will soon… but as you can see, the paper did all the work for this card. And it was really super easy. Strips were added in a dark/ light kind of pattern. In true quilting, there is dark, medium, then light, and I got some of that but not totally. Nonetheless, I think this looks really sharp and I’m excited, especially since it’s my first try with this process.

The strips are cut in various widths – no need to really measure – anywhere from 3/8″ to 5/8″. I adhered them to a basic black card stock 3 7/8 x 5 1/8. I began with three strips going in the same direction, then three strips in another direction, spacing them a bit apart so you see the background color (in this case, the Basic Black), until the entire page was covered. And sometimes I adhered with liquid glue and sometimes with Stampin Seal. It just depended. I trimmed the edges so they were even, then attached this to a slightly larger piece of Whisper White card stock (4 x 5 1/4) with liquid glue. I then wrapped this with fun ribbon – Glittered Organdy Ribbon – around the card and secured in back with glue dots. I prepared a bow out of the same ribbon but did not attach it just yet. I wanted a sentiment… the Simply Succulent stamp set was right on my desk and I pulled from that the sentiment ‘thanks’, stamped that with Memento Black ink on a Whisper White scrap. I cut it with the smallest die from the Stitched So Sweetly Dies. I die cut another piece from the same die set – Stitched So Sweetly Dies in Basic Black card stock. I adhered the two together with liquid glue, put dimensionals on the back and adhered right over the ribbon. Then I adhered the bow with a glue dot. I added some more glam with three Rhinestone Basic Jewels. This completed panel was adhered to a Basic Black card base (4 1/4 x 11, scored at 5 1/2) with dimensionals and the card front was complete.

True Love Designer Series Paper – inside, #2

I fussy cut from one of the True Love Designer Series Papers, these gorgeous flowers. Normally I would cover them in color… but for the TGIF challenge, I couldn’t do that. I adhere them with liquid glue to this panel of Whisper White card stock, again at 3 7/8 x 5 1/8. I adhered this directly to the card base and the inside was done.

Despite the final picture… I redid the envelope… I actually did strips in the lower left corner 😁 I’ll see if I can upload the photo… having trouble. YAY – got it.. the photo at right.

For the envelope, I covered the flap in coordinating paper from True Love DSP and adhered one of the fussy cut flowers with leaves from the same paper with liquid glue – FINIS!

So – what do you think? I hope you like… If I can help you in any way to order these products, please give me a holler. As a thank you to my customers, when the order is between $50-$150 I offer a SU! item of your choice valued at $10. Remember to use MY CURRENT HOST CODE RSVNH4XW- good Jan 5-20. When the order is over $150, you still receive that free gift from me, but SU! has Stampin’ Rewards that may be used for additional products. Below are the products listed for todays card – feel free to send an order.

Price: $8.50

Sale-A-Brate 2021 Header

Click on the video to watch or click on the Sale-a-bration banner to see the FREE SU! products available when ordering between now & Feb 28.

THANKS FOR STOPPING BY.

May you have a beautiful Day,

Make someone happy sending them a handmade card filled with love.

Supply List

Stampin’ Up! Dragonflies Playing

Here it is Jan 3, 2021 ~ did you look forward to a new year, new beginnings, new challenges? Did you set some new goals? And perhaps more importantly, did you leave some worries, hurts behind? That may be the most difficult thing to do, but necessary… I’m rooting for you … and trying to do the same.

I played yesterday… with dragonflies, Laser-Cut Paper, the Dandy Garden Memories & More Card Pack and one or two other things. Let’s take a look at these creations.

Love, love, love this Laser-Cut Paper (available to customers Jan 5!). It’s on both cards 1 & 2. And the dragonfly on card 1 was created with vellum, 99% alcohol and inks. Card #3 uses the Dandy Garden Memories & More Card Pack & Dandy Garden 6×6 DSP. Let’s get into some detail for each of these cards.

Card #1

  • Thick Whisper White card base; covered on the front with a panel of Oh So Ombre 6×6 DSP (a FREE item during Sale-a-bration with a $50 purchase – begins Jan 5)
  • Laser-Cut Paper adhered to a panel of the same Oh So Ombre 6×6 DSP, but the ombre paper turned the opposite way. Wrap this with Striped Ribbon in Blackberry Bliss and tie a bow. Secure the ribbon with a glue dot under the knot. (The ribbon will be available Jan 5!) This was adhered to a Blackberry Bliss panel and popped onto the card front with dimensionals.
  • The sentiment panel was stamped with a sentiment from Dandy Garden stamp set (yep, available Jan 5) on a scrap of the oh So Ombre 6×6 DSP and die cut with Stitched So Sweetly Dies. Put on dimensionals and pop above the bow. Add the super sweet Metallic Pearls in silver.
  • The butterfly was created with vellum, 99% alcohol and inks using a brush. This took a bit of doing as you must work quickly and not get the vellum too saturated or it really wrinkles and becomes un-usable. After drying, I stamped the dragonfly in Tuxedo Black ink and punched it with the Dragonfly Punch. I then stamped another dragonfly on vellum and punched it as well. I adhered the two together with mini dimensionals and popped this onto the card front with additional mini dimensionals. I added three sweet Metallic Pearls in silver to the body and the card front was done.

For the inside of Card #1 I used one of the Laser-Cit Paper flowers and adhered it with dabs of liquid glue. I then added this frame in Blackberry Bliss card stock that was created with Stitched Rectangles Dies and trimmed.

For the envelope, I stamped the single posy from Dandy Garden stamp set in Tuxedo Black Memento ink, colored the center with stamped-off Blackberry Bliss ink with the appropriate stamp from the Dandy Garden stamp set, then colored the leaves with Stampin Blends in Old Olive. The flap was covered with a scrap of the Oh So Ombre 6×6 DSP and the card was complete.

Card #2

Dandy Laser-Cut Paper, Dandy Garden 6×6 DSP – card #2

I was enamored of the Dandy Laser-Cut Paper and couldn’t quit!. All these dragonflies in one is just gorgeous. I began by adhering a panel of Dandy Garden 6×6 DSP to a piece of Whisper White card stock. This was adhered to a card base of Misty Moonlight card stock. I then adhered the Dandy Laser-Cut Paper to a piece of vellum with dots of liquid glue, being careful not to use too much. This was popped up on mini dimensionals and adhered to the panel of the Dandy Garden 6×6 DSP. I pulled out the Dandy Garden Memories & More Card Pack and used the sentiment to peel & stick right on the card front. I then added a bow from the Flowers For Every Season Ribbon Combo Pack (in Misty Moonlight & Silver cording) and the front was done.

For the inside I stamped the dragonflies in Misty Moonlight ink from the Dragonfly Garden stamp set onto a panel of Whisper White card stock. I stamped the sentiment from the same stamp set in Misty Moonlight ink. I adhered the finished panel to the inside of he card with liquid glue. For the envelope, I used the same dragonfly from the Dragonfly Garden stamp set and stamped it in Misty Moonlight on the front of the envelope. I used another coordinating piece of the Dandy Garden 6×6 DSP to the envelope flap and finis!

Card #3

Dandy Garden Memories & More Card Pack – card #3

I found a panel in the Dandy Garden Memories & More Card Pack that I wanted to use and adhered it to a slightly larger piece of Whisper White card stock. I wrapped this with the stunning Mossy Meadow Braided Linen Thread and tied a knot. I placed a glue dot under the knot to hold it in place. I then added a super cute Ladybug Trinket climbing on the dandelion. It was added with a glue dot. I had found a piece of the Dandy Garden 6×6 DSP that I thought went really well with the front panel. The DSP was adhered to Bumblebee card stock and that was adhered to the Misty Moonlight card front. I returned to the ribboned panel, put dimensionals on the back and adhered it to finish the card front.

For the inside I stamped the single posy from the Garden Wishes stamp set in Tuxedo Black Memento ink, stamped the filler for the flower in Bumblebee ink and colored the leaves and flower stem with Old Olive Stampin Blends. This Whisper White panel was adhered to a slightly larger piece of Bumblebee card stock and that was then added to the inside of the card – all with liquid glue. For the envelope I stamped the same single dandelion to the front and colored it the same as the inside of the card. I used the same DSP as the card front for the envelope flap.

So – what do you think? What is your favorite card? Each is so different – I really like them all. But I think my favorite is the Misty Moonlight with the Dandy Laser-Cut dragonflies.

Most of the elements to create these cards will be available Jan 5 – just two days from now!!! If I can help you in any way to order these products, please give me a holler. As a quick reminder, Stampin’ Up! has a Giant Sale going on until Jan 4. Those products on sale will no longer be available after that date. As a thank you to my customers, when the order is between $50-$150 I offer a SU! item of your choice valued at $10. Remember to use MY CURRENT HOST CODE SAZV3JTK– good until Jan 3. When the order is over $150, you still receive that free gift from me, but SU! has Stampin’ Rewards that may be used for additional products.

Only a couple of days left… check out the Giant Year-end sale here

  • No minimum purchase required.
  • Retiring items are available while supplies last.
  • Exclusions apply: Carryover items will not be discounted.
  • Due to increased shipping times and possible shipping delays during the month of December, we can’t guarantee delivery before Christmas.
  • Ordering Deadlines:  January 4, 2021 at 11:50 PM (MT)

Stampin” Up! NEW Floating & Fluttering

Happy New Years Eve DAY! This year will be behind us in a flash – and 2021 will be ushered in. Are you doing ‘hoopla & horns’ to celebrate? Whatever you do, just be safe, ok.

Today’s card is a new item – available to customers VERY SOON – Jan 5! The Jan-Jun 2021 Mini Catalog, along with the Sale-a-bration catalog go live Jan 5, 2021. If you do not have a demonstrator, I’m happy to help. Here’s the bundle I worked with for this card.

Floating & Fluttering Bundle – available Jan 5, 2021

Just look at those fun images… this was my first play with this bundle and I’m anxious to do more. Notice there are no sentiments, but the images are wonderful. And that rectangle die – so sweet! And here’s the card I made.

Floating & Fluttering – #1

Supplies used:

  • Forever Greenery DSP – I appreciate how the leaf image on the DSP has the same shape as the leaves in the die cut, and that’s why I chose this paper
  • Garden Green card stock behind the DSP (and on the inside as well)
  • Thick Whisper White card base
  • Basic Black card stock as a liner to the focal image
  • Bumblebee card stock for the strips
  • Several inks: Petal Pink & Calypso Coral; Bumblebee & Pumpkin Pie; Soft Sea Foam & Garden Green; Tuxedo Black Memento.
  • 2020-2022 In Color Enamel Dots

I began by stamping the image from the Floating & Fluttering stamp set (all one stamp!) in Tuxedo Black Memento ink on Whisper White card stock. The largest butterfly and the full butterfly are both done by stamping first in Petal Pink, then the detail stamp in Calypso Coral. The half butterfly was first stamped in Bumblebee (lightly) then the detail in Pumpkin Pie. I then die cut it with the appropriate die from the Fluttering Dies. I mounted it with dimensionals and adhered it to a Whisper White base. This was then adhered to Basic Black card stock with liquid glue. I added sevaral 2020-2022 In Color Enamel Dots for a bit of interest – and the colors bring out the colors of the butterflies. It was at this point I went searching in my stash for a DSP that would look really nice as a background – and found the Forever Greenery DSP. I adhered it to Garden Green card stock with liquid glue, then onto the Thick whisper White card base, again with liquid glue. Alittle more detail was needed so I began playing around with various ribbons and card stock – and finalized on the two Bumblebee strips. There y were adhered with a bit of liquid glue in the center of each strip and the focal image was adhered with dimensionals, centering it just so. And the front was complete.

Floating & Fluttering, inside – #2

For the inside I used the same image as the front of the card just on the corners – and only a portion of the image. This was stamped in Tuxedo Black Memento ink on Whisper White. I decided not to color these images, but you certainly could. This was mounted on another panel of Garden Green card stock and adhered with liquid glue to the card base. FINIS.

Floating & Fluttering – #3

For the envelope I covered the flap with the same Forever Greenery DSP with liquid glue. Then I stamped a portion of the same stamp as the card front on the envelope itself, in Tuxedo Black Memento ink. I colored only the one butterfly by stamping first in Soft Sea Foam ink then the detail in Garden Green ink. Love this!

Hubby really liked this card 😊… One of the nice things about this is that it can be used for any occasion at this point. But if I wanted, I could add a sentiment. I like having a card without a sentiment – it covers a lot of bases!

Thanks for stopping by today. This stamp bundle will be available to order in just a couple of days – how exciting is that! Please let me know if I may help you in some way. Card cuts for this card are listed below.

As a thank you to my customers, when the order is between $50-$150 I offer a SU! item of your choice valued at $10. Remember to use MY CURRENT HOST CODE SAZV3JTK– good until Jan 3. When the order is over $150, you still receive that free gift from me, but SU! has Stampin’ Rewards that may be used for additional products.

Only a couple of days left… check out the Giant Year-end sale here

Sale Dates:  December 8, 2020 through January 4, 2021

  • No minimum purchase required.
  • Retiring items are available while supplies last.
  • Exclusions apply: Carryover items will not be discounted.
  • Due to increased shipping times and possible shipping delays during the month of December, we can’t guarantee delivery before Christmas.
  • Ordering Deadlines:  January 4, 2021 at 11:50 PM (MT)

The items that are retiring are only while supplies last!!

Card cuts:

  • Thick Whisper White card base 8 1/2 x 5 1/2 scored at 4 1/4
  • Garden Green 4 1/4 x 5 3/8 (front), 3 7/8 x 4 7/8 (inside)
  • Forever Greenery DSP 3 7/8 x 5 1/4 + envelope flap
  • Basic Back 2 7/8 x 3 7/8
  • Whisper White 2 3/4 x 3 1/4 (front panel) + stamped area, 3 3/4 x 4 3/4 (inside)

May you have a beautiful day.

Make someone happy sending them a handmade card filled with love.

Stampin’ Up! Birthday w/ Flower & Field DSP

The real focus of today’s card is the fun FREE DSP (with a $50 purchase of Stampin’ Up! product beginning Jan 5, 2021). This is such fun DSP – full of flowers and various backgrounds on the opposite side.

It begins with Bumblebee card stock then a layer of the Flowers & Fields DSP, adhered with liquid glue. I cut another layer of DSP and adhered it to a Whisper White panel with liquid glue before adding to the card base with dimensionals. The Many Messages stamp set and coordinating Messages Dies has lots of sentiments and I had several cut out. They had been stamped on Whisper White card stock in Tuxedo Black Memento ink and die cut with the Messages Dies – which goes perfectly with the paper! I adhered this particular sentiment on a piece of Bumblebee, put it on dimensionals and added it to the card front. A simple bow using the 1/4″ Whisper White Crinkled Ribbon was the final touch for the front.

Birthday w/ Flowers & Fields DSP – #3

For the inside, I adhered another panel of the Flowers & Fields DSP with liquid glue to the card base. To that a Whisper White panel was adhered with liquid glue. Another sentiment from the Many Messages stamp set was used after die cutting with the Messages Dies. This was adhered to a small piece of Bumblebee with liquid glue, then to the Whisper White panel. Two fun 2020-2022 Enamel Dots were added for a sweet touch – in Bumblebee of course. And the card was DONE!

Birthday w/ Flowers & Fields – #4

For the envelope I adhered a strip of the Flowers & Fields DSP and called it ready to send 😁 Such a bright cheery card for someone special!

Birthday w/ Flowers & Fields DSP – #5

Card stock cuts may be found at the end of this post. Products used for today’s project may be found below. As a thank you to my customers, when the order is between $50-$150 I offer a SU! item of your choice valued at $10. Remember to use MY CURRENT HOST CODE SAZV3JTK– good until Jan 3. When the order is over $150, you still receive that free gift from me, but SU! has Stampin’ Rewards that may be used for additional products 😁

Card cuts for today’s project:

  • Bumblebee 4 1/4 x 11 scored at 5 1/2, 1 x 2 & scrap (about 3/8 x 2 1/4 for inside
  • Whisper White 3 7/8 x 5 1/8 + scrap for sentiment)
  • Flowers & Fields DSP 3 3/4 x 4 1/4(bottom layer on front), 3 3/4 x 5 (large front panel), 4 x 5 1/4 + envelope flap

Christmas is just two days away…. remember the yearend sale Stampin’ Up! has going on and check the clearance rack as well. Sale-a bration and the new Jan-Jun 2021 Mini catalog go live Jan 5, 2021 – just FYI!

WooHoo! Stampin’ Up! has gone over the top… check out the Giant Year-end sale here

Sale Dates:  December 8, 2020 through January 4, 2021

  • No minimum purchase required.
  • Retiring items are available while supplies last.
  • Exclusions apply: Carryover items will not be discounted.
  • Due to increased shipping times and possible shipping delays during the month of December, we can’t guarantee delivery before Christmas.
  • Ordering Deadlines:  January 4, 2021 at 11:50 PM (MT)

Thanks for stopping by.

May you have a beautiful day.

Make someone happy sending them a handmade card filled with love.

Stampin’ Up! Art Gallery #2

It’s beginning to look a lot like Christmas… packages under the tree now means I did some wrapping yesterday! Ha – a bit more to do but feeling good about where I am in the process right now. How about you – you ready? Don’t wait, don’t hesitate…

Today’s card is made with new products available to customers beginning Jan 5, 2021. This is called Art Gallery & Floral Gallery Dies. It’s part of a suite that includes a 3D Embossing Folder that is awesome, some super ribbon, Gilded Leafing (which I haven’t played with yet!), Heat & Stick powder to adhere the leafing, and some incredible Golden Garden acetate & Fine Art Floral DSP. As I mentioned, the only product I haven’s used yet is the Gilded Leafing – so guess that’s on my ‘to do’ list, but maybe not today!

Art Gallery #2 – 1

I’ve used two coordinating papers from the Fine Art Floral DSP to create a fun background for the flower from the Art Gallery stamp set. The larger piece was adhered directly to the Thick Whisper White card base. My next step was to stamp the flower on Whisper White card stock in Merry Merlot, then the 2nd step stamp in Rococco Rose. I know, interesting combination… and the Rococco Rose doesn’t show much, which is ok. I then stamped the leaves & stem (one stamp) in Old Olive ink and die cut them both at the same time with the Floral Gallery Dies. I then die cut a second piece of the Fine Art Floral DSP using the third from largest die in Rectangle Stitched Dies. I adhered this stitched rectangle to a slightly larger panel of Flirty Flamingo card stock with liquid glue. This was attached to the floral card base with liquid glue. I adhered the flower with dimensionals to this panel, then the leaves/ stem with liquid glue, slipping it under the flower just a bit. I stamped the sentiment from the Art Gallery stamp set in Tuxedo Black Memento ink and die cut it with one of the dies in the Floral Gallery Dies. Don’t you love the fun edge? I adhered it with dimensionals, trimmed the end, added three Pearl Basic Jewels and called the front done.

For the inside of the card, I used the outline from the stitched rectangle die cut and adhered it to the inside of the card with liquid glue. I love this effect ~ it brings the colors of the front to the inside and creates boundaries as well. For the envelope I kept it very simple. I cut another piece of the Fine Art Floral DSP that coordinated with the two front DSP panels and adhered that with liquid glue to the flap. Here’s abetter photo.

Art Gallery #2 – 3

Above on the left is a picture of the stamp set. On the right is a photo of a previous card using the Pained Texture Embossing Folder, the gorgeous Golden Garden Designer Specialty Acetate and the gold Fine Art Ribbon. I thought you might like to see those products in use 😁

Card stock cuts may be found at the end of this post. Products used for today’s project may be found below. As a thank you to my customers, when the order is between $50-$150 I offer a SU! item of your choice valued at $10. Remember to use MY CURRENT HOST CODE SAZV3JTK– good until Jan 3. When the order is over $150, you still receive that free gift from me, but SU! has Stampin’ Rewards that may be used for additional products 😁

Card Cuts:

  • Thick Whisper White 4 1/4 x 11 scored at 5 1/2
  • Fine Art Floral DSP 4 1/4 x 5 1/2, 3 1/4 x 4 1/2, 2 1/4 x 6 (envelope flap)
  • Flirty Flamingo 3 1/4 x 4 1/2
  • Whisper White – 4 x 5 1/4 will allow for all three die cuts: flower, stem/ leaves & sentiment

WooHoo! Stampin’ Up! has gone over the top… check out the Giant Year-end sale here

Sale Dates:  December 8, 2020 through January 4, 2021

  • No minimum purchase required.
  • Retiring items are available while supplies last.
  • Exclusions apply: Carryover items will not be discounted.
  • Due to increased shipping times and possible shipping delays during the month of December, we can’t guarantee delivery before Christmas.
  • Ordering Deadlines:  January 4, 2021 at 11:50 PM (MT)

Thanks for stopping by.

May you have a beautiful day.

Make someone happy sending them a handmade card filled with love

Stampin’ Up! Darling Donkey Birthday Fun Fold

Hello again… Today’s card is full of fun – a birthday card using the Darling Donkey stamp set that will be available Jan 5, 2021 as a FREE ITEM when you purchase $50 in product – it’s Sale-a-bration time Jan 5 – end of Feb 2021. Woohoo! :O)

Darling Donkey stamp set available Jan 5, 2021 – Sale-a bration item

This little donkey is just too cute – love the impish smile… that square needs a back to it though so I may take that off, add a backing and put it on again. But let’s talk through how I did this. It’s a z-fold, so scored in the center and the front panel folded back on itself exactly in half, then the square added. Here’s what you need to create this card…

Darling Donkey Birthday Fun Fold – #1
  • Smokey Slate card base
  • In Good Taste DSP
  • Whisper White card stock
  • Stitched Shapes (largest square)
  • Classic Label Punch (fence)
  • Balloon Punch (balloon)
  • Tuxedo Black Memento ink
  • Blends: Flirty Flamingo (ears), Crumb Cake/ Gray Granite (donkeys), Color Lifter
  • Black Marker (tail for balloon)
  • Wink of Stella (color ther balloon)
Darling Donkey Birthday – #2
Darling Donkey Birthday Fun Fold – #3

Details:

  • Fold card base (Gray Granite) in half and fold the front flap in half back on itself – to create a z-fold
  • Cover the front fold using In Good Taste DSP
  • Stamp the front donkey in Tuxedo Black Memento ink on Whisper White card stock; color with Stampin’ Blends – light & dark Gray Granite. Use the Color Lifter to highlight – between the eyes & near his backside. (Yes – this one is definitely a male donkey!) Die cut with largest Stitched Shapes Dies (largest square). Here’s where I should have cut a scalloped square out of Basic Black card stock for a backing. Adhere to the front panel with liquid glue, centering.

For the inside: there are two panels, the far right and the folded ‘in’ . Often the ‘in fold’ is not covered but for this card, I definitely wanted to do that.

  • Right panel ~ stamp the donkey from Darling Donkey stamp set in Tuxedo Black Memento ink in the center of the Whisper White panel, making certain it will be covered when the card is closed. Color in Stampin’ Blends: light & dark Gray Granite, light Flirty Flamingo for the ears, dark Flirty Flamingo for the hooves – after all this is a girl donkey 🙂 Stamp the sentiment above it from the same stamp set and in Tuxedo Black Memento ink. Adhere to the right panel of the card base with liquid glue, creating the inside of the card. It was at this point I decided the donkey need a fence and punched several ‘fencing’ using the Classic Label Punch and more of the same In Good Taste DSP. I punched various heights and widths then adhered to the panel with liquid glue.
  • Folded in panel ~ stamp the donkey from Darling Donkey stamp set in Tuxedo Black Memento ink on a Whisper White panel, blocking off the flower so it doesn’t get ink. Color in Stampin’ Blends light & dark Crumb Cake, light Flirty Flamingo for the ears. And yes, I used a bit of Color Lifter for highlight. Punch a small balloon using the Balloon Punch from Bright 6×6 DSP – Flirty Flamingo. Adhere with dimensionals and color with Wink of Stella. Add a balloon ‘tail’ from the balloon to the donkeys mouth. Cute right? Adhere this panel to the card and the card is complete. OOPS! I did add some more fencing to this guy.
Darling Donkey Birthday Fun Fold – #4

For the envelope… I used more of the same In Good Taste DSP to the envelope flap & trimmed to fit. For the envelope front I stamped the sentiment and the ‘sparkels’ in Tuxedo Black Memento ink and called it done.

Card Cuts are listed at the end of this post. Products used for today’s project may be found below. As a thank you to my customers, when the order is between $50-$150 I offer a SU! item of your choice valued at $10. Remember to use MY CURRENT HOST CODE SAZV3JTK– good until Jan 3. When the order is over $150, you still receive that free gift from me, but SU! has Stampin’ Rewards that may be used for additional products 😁

Card Cuts:

  • Smoky Slate 8 1/2 x 5 1/2, scored @ 4 1/2 & 2 1/8: fold in half, then fold back on itself the small panel
  • In Good Taste DSP 2 x 5 1/4 + 2 1/4 x 6 for envelope + scraps for fencing
  • Whisper White 4 x 5 1/4, 2 x 5 1/4

Thanks for stopping by.

May you have a beautiful day.

Make someone happy sending them a handmade card filled with love.

WooHoo! Stampin’ Up! has gone over the top… check out the Giant Year-end sale here

Year End Closeout Sale Details:

Sale Dates:  December 8, 2020 through January 4, 2021

  • No minimum purchase required.
  • Retiring items are available while supplies last.
  • Exclusions apply: Carryover items will not be discounted.
  • Due to increased shipping times and possible shipping delays during the month of December, we can’t guarantee delivery before Christmas.
  • Ordering Deadlines:  January 4, 2021 at 11:50 PM (MT)

Shop early!  The items that are retiring are only while supplies last!!

Stampin’ Up! Oval Occasions Baby Card

Oh Goodness – I AM enjoying the new products being offered in the new Jan-Jun 2021 Mini Catalog! Today’s project features the Oval Occasions Bundle: Oval Occasions stamp set + Double Oval Punch. These can be ordered Jan 5, 2021 ~ unless of course if you join my team 😏, then you can order these products as part of your demonstrator order. Hint, hint.

I have also used the Detailed Hearts Die, which is kinda fun to work with. It’s in the 2020 Annual Catalog. Are you ready to take a peek?

Oval Occasions Bundle – Baby Card – #1

Here’s what I did…

  • Adhere an Adhesive sheet to the back of Blushing Bride card stock. Die cut using the Detailed Hearts Die: peel the backing and adhere to a panel of Whisper White card stock. Yes, remove the hearts. Some will be adhered to this card, others will be saved in a small ziploc bag for later use.
  • I put some of the hearts on dimensionals and covered them in Wink of Stella. This adds a bit of glam 🙂
  • I punched a scalloped oval from Blushing Bride card stock using the Double Oval Punch thewn added a length of Grayb Granite 1/4″ Shimmer Ribbon with Stampin Seal.
  • I then stamped the front sentiment on a Whisper White panel with Gray Granite ink, punched it out using the Double Oval Punch from the Jan-Jun 2021 Mini Catalog (can be ordered Jan 5!) I put dimensionals on the back and adhered it to the scalloped oval punched with the ribbon. This was adhered to the card front with liquid glue
  • This Whisper White panel is ready for dimensionals and to be adhered to the Thick Whisper White card base – and the card front is done…

For the inside…

Oval Occasions stamp set – baby #2

I stamped the bunny/floral image in Gray Granite ink on a Whisper White panel. I colored it using the ‘fun to use’ Watercolor Pencils and Blending Pen: Flirty Flamingo for the bunnies (lightly), Granny Apple Green for the leaves then shaded with Garden Green, Daffodil Delight for the flowers and shaded with Pumpkin Pie – each blended with the Blending Pen. This really smooths the pencil lines and blends the shading nicely. I added Wink of Stella to the bunnies. I then stamped the sentiment in Gray Granite ink. The heart was added from one of the leftover hearts from the Detailed Hearts Die. I simply peeled the adhesive backing and put it right on the card. Adhere this Whisper White panel to a piece of Blushing Bride with liquid glue then add to the inside of the card, again with liquid glue. Voila – the card is finis!

For the envelope…

Oval Occasions Bundle Baby Card – #3

I stamped the heart stamp from the Oval Occasions stamp set in Flirty Flamingo and this set is ready to be sent to a friend who just had a bay girl. LOVE that I can create and send right away.

Card Cuts are listed at the end of this post. Products used for today’s project may be found below. As a thank you to my customers, when the order is between $50-$150 I offer a SU! item of your choice valued at $10. Remember to use MY CURRENT HOST CODE SVFB9YJY – good until Dec 10, 2020. When the order is over $150, you still receive that free gift from me, but SU! has Stampin’ Rewards that may be used for additional products 😁

Thanks for stopping by.

May you have a beautiful day.

Make someone happy sending them a handmade card filled with love.

Card cuts for today’s project:

  • Thick Whisper White 4 1/4 x 11 scored at 5 1/2
  • Whisper White (2) 3 3/4 x 5 + enough for oval punch
  • Blushing Bride (2) 3 7/8 x 5 1/8 + enough for oval punch

WooHoo! Stampin’ Up! has gone over the top… check out the Giant Year-end sale here

Sale Dates:  December 8, 2020 through January 4, 2021

  • No minimum purchase required.
  • Retiring items are available while supplies last.
  • Exclusions apply: Carryover items will not be discounted.
  • Due to increased shipping times and possible shipping delays during the month of December, we can’t guarantee delivery before Christmas.
  • Ordering Deadlines:  January 4, 2021 at 11:50 PM (MT)

Shop early!  The items that are retiring are only while supplies last!!

Stampin’ Up! Sweet Ice Cream Birthday Card

Today’s card is bright and cheery (not that others haven’t been) and for our granddaughter who is turning 11 this next week. I kept trying to decide what kind of card to make when a Stampin’ Up! pre-order box arrived. This granddaughter loves ice cream with lots of sprinkles and very different flavors… therefore when you see the colors of the ice cream on the card, hopefully you’ll understand.

Sweet Ice Cream Birthday – #1

Isn’t this card full of fun colors? Here’s list of the products used…

  • * Sweet Ice Cream stamp set with coordinating Ice Cream Cone Builder Punch
  • * Ice Cream Corner DSP
  • Stitched Rectangle Dies
  • Artistry Blooms Adhesive-Backed Sequins
  • * Blending Brushes
  • Wink of Stella
  • Pool Part card stock (card base)
  • Whisper White card stock (inside)
  • Inks: Old Olive, Terracotta Tile, Blackberry Bliss, Pool Party and Tuxedo Black Memento

NOTE: those items with an * are new in the Jan – Jun 2021 Catalog and will be available Jan 5, 2021

How to create this card…

  • Cut card base – for this card I used pool Party card stock.
  • Die cut with the largest die in the Rectangle Stitched Dies, a panel using one of the papers in the Ice Cream Corner DSP pack. Adhere to the card base with dimensionals.
  • Using various papers of the Ice Cream Corner DSP, punch the four layers for the ice cream cone. Stamp with the sprinkles stamp using Old Olive ink, Terracotta Tile ink and Blackberry Bliss ink. Put these four pieces together with liquid glue from the bottom – up. Cover lightly with Wink of Stella.
  • Die cut a Whisper White panel using the Stitched Rectangle Dies. Color with Pool Party ink and the new Blending Brushes.
  • Stamp the word ‘Happy’ in Blackberry Bliss on the Whisper White panel. NOTE: know the placement of the ice cream cone prior to stamping!
  • Adhere the ice cream cone to the Whisper White panel with dimensionals.
  • Adhere several Artistry Blooms Adhesive-Backed Sequins. These bring out the colors of the ice cream cone!
  • Adhere this panel to the card front – and the front is complete

For the inside… and the envelope…

Stamp the word ‘Birthday” in PoolParty ink on one of the ‘color blobs’ on the Ice Cream Corner DSP; fussy cut the word; adhere with dimensionals to a Whisper White panel. Stamp the rest of the sentiment in Tuxedo Black Memento ink from the Sweet Ice Cream stamp set.. Adhere several of the Artistry Blooms Adhesive-Backed Sequins. Secure the panel to the card base with liquid glue.

For the envelope, adhere a panel of the Ice Cream Corner DSP to a Whisper White envelope and call it done!

Here are photos of the stamp set and the punch…

Card Cuts:

  • Pool Party card stock 4 1/4 x 11 scored at 5 1/2
  • Whisper White 4 x 5 1/4
  • Various Ice Cream Corner DSP: stitched rectangle 3 3/4 x 5 1/8 + small amounts from other papers in the pack to fit the punch

As a thank you to my customers, when the order is between $50-$150 I offer a SU! item of your choice valued at $10. Remember to use MY CURRENT HOST CODE SVFB9YJY – good until Dec 10, 2020. When the order is over $150, you still receive that free gift from me, but SU! has Stampin’ Rewards that may be used for additional products 😁

Thanks for stopping by.

May you have a beautiful day.

Make someone happy sending them a card made with love.