
Good Memorial Day! Men and women gave their lives that we might be free ~ free to practice our faith, free to speak out, etc and etc. The list is pretty long of the freedoms we have that other countries do not. Thank you to those who served both us and our country ~ for your dedication, for your strength of character, for your willingness. Bless you. I am so very grateful.
My card today is a fun fold and could be used for graduation, a birthday, a job promotion, for just about any type of celebration. It includes a place for a gift card or money or an additional note.too.

What a fun card to create. My juices were flowing. This card has three layers: card base, middle layer and the top decorated layer. I began with a card base of Azure Afternoon (what a beautiful shade of blue.) After scoring and burnishing, I punched the top two corners for a different look, using the Very Best Trio Punch. I added a layer of Blueberry Bushel to each of the three panels. The next layer is Bright & Beautiful 6×6 DSP on the top & bottom panels. For the center panel, I stamped with Azure Afternoon ink on a Basic White panel using the Beautiful Balloons stamp set. Next I attached an adhesive sheet to a small piece of the Bright & Beautiful DSP (part of the DSP Sale June 1!!!), removed the top of the adhesive sheet and added a piece of the Gold Celebrations Acetate. I die cut two balloons and a piece for the card holder. That acetate really added something special to the card! I added the smaller balloon to the center panel then added a length of the Simply Elegant trim in gold and adhered the Basic White panel to the center. The larger balloon was put on dimensionals and I added a bit of a tassel die cut from Gold Foil Sheets and attached these to the upper panel. I used the Radiating Stitches Dies to die cut a circle, then stamped the sentiment from Beautiful Balloons stamp set in Azure Afternoon ink. I used the 1 3/4 circle punch (from SU! ONLINE EXCLUSIVES) to punch an Azure Afternoon circle and adhered the two circles together. I added a Textured Ribbon in Wild Wheat to the top panel and placed the circle over (yep, it is on dimensionals as well.
For the bottom panel, I had added the Gold Celebrations Acetate to a Bright & Beautiful piece, then added the Tear n’ Tape to the sides and bottom and attached it to the card. And the card is done! Whoops – not quite… the ribbon at top… I punched an oblong opening using the Very Best Trio Punch, slipped another length of Textured Ribbon in Wild Wheat and tied it with a piece of Simply Elegant Trim in Gold.

Measurements:
- Card base 4 1/4 x 11 scored at 4 & 6 3/4
- Layer: 4 1/8 x 3 7/8; 4 1/8 x 2 5/8; 4 1/8 x 4 1/8
- DSP layer: 4 x 3 3/4; 4 x 2 12; 4 x 4
- Gift card panel: 2 x 4

SALES PERIOD: 1–30 JUNE you may find these on pages 129-133 in the 2023-2024 Annual Catalog – except for the ONLINE EXCLUSIVE PAPER.
- All order types qualify for this promotion.
- There is no limit to how many packages of Designer Series Paper may be purchased during this promotion.
- Only select Designer Series Papers are available at a 15% discount during this promotion. Please reference the table below or the flyer in the marketing toolkit to see the papers included in the sale.
- Orders must be placed—and closed—during the promotion period for the 15% discount to apply.
- Designer Series Paper ordered as part of a Starter Kit or with Stampin’ Rewards qualify for the 15% discount.
- Designer Series Papers are from the new 2023–2024 Annual Catalog (p. 129–132) and Online Exclusives.
161449 Bright & Beautiful 6×6 DSP $10.62
161467 Countryside Inn 12 x 12 DSP $10.62
161640 Delightfully Eclectic 12 x 12 DSP $25.50
161503 Earthen Elegance 12 x 12 DSP $10.62
161289 Fresh As A Daisy 12 x 12 DSP $10.62
163170 Glorious Gingham 6×6 DSP $8.92
161139 Hello, Irresistible6x6 DSP (ONLINE EXCLUSIVE) $10.62
161157 Inked Botanicals 6×6 DSP $10.62
161322 Les Shoppes 12 x 12 DSP $10.62
161534 Let’s Go Fishing 12 x 12 DSP $10.62
161192 Masterfully Made 12 x 12 DSP $10.62
161175 Stargazing 12 x 12 DSP $10.62
161304 Zoo Crew 12 x 12 DSP $10.62
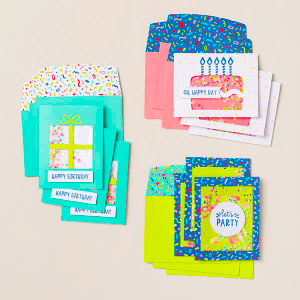
Stampin’ Up! has kits that are super quick and easy to make – great for a gathering as all elements are provided in the kit. Talk about CELEBRATE!
162390
CONFETTI BIRTHDAY KIT
$23.00 USD | $32.00 CAD
Available starting 2 May
Also available in French (item 16239
This month’s kit includes:
- Enough supplies to create 9 cards—3 each of 3 designs
- 9 coordinating envelopes
- Confetti Birthday photopolymer stamp set
- One Blueberry Bushel Ink Spot
- Printed card bases, card fronts, self-adhesive cellophane shaker bags, die-cut pieces, holographic foil labels, adhesive, embellishments, and a clear block
- Finished card size: 5-1/2″ x 4-1/4″ (14 x 10.8 cm)
- Coordinating colors: Blueberry Bushel, Coastal Cabana, Crushed Curry, Flirty Flamingo, Lemon Lime Twist, Poppy Parade
You may order kits from me here.
Stampin’ Up! has a monthly subscription for Paper Pumpkin that is also a kit all in one. The first order includes an acrylic block which can be used for all Paper Pumpkin kits after that. This particular kit must be ordered by June 10. Click on the photo above to go straight to my Paper Pumpkin area to subscribe :O) Click here to purchase Paper Pumpkin.

Stampin’ Up! ONLINE EXCLUSIVES are just that – products not offered in any catalog. My post today used two products from this list. You may shop those products here.
If you do not have a demonstrator and would like to order from me or need a catalog, I would like to help you create. When ordering $50 or more in product (before shipping/ taxes), use my HOST CODE 64NDVS4D to receive Star Rewards and a SU! gift valued to $10. Star Rewards build up so that when you have 8 rewards from me, you can receive a stamp set valued to $40. :O) And when your order is $50 or more prior to Shipping/ taxes, you also receive the monthly tutorial. :O)
You may order from me here.Thanks for stopping by. May you have a beautiful day!


