Stampin’ Up! Zany Zoo Birthday for the Happy Inkin’ Thursday Blog Hop

Stampin' Up! Happy Inkin' Thursday Blog Hop
Stampin' Up! Blog hop Theme Challenge
Stampin' Up! Zany Zoo b'day

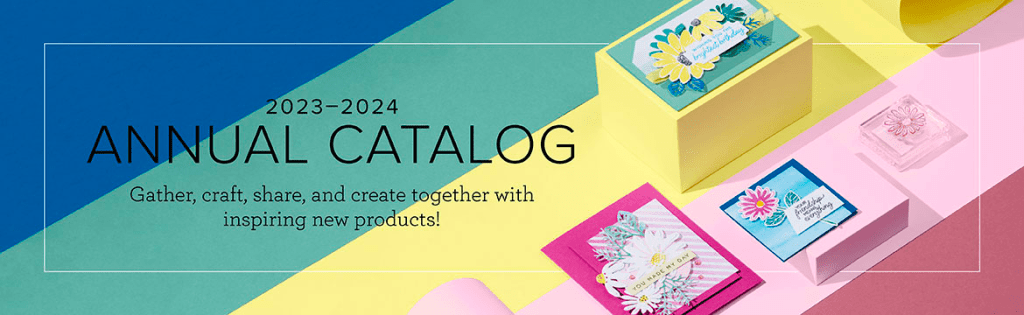
Welcome to the Happy Inkin’ Thursday Blog Hop! The theme for this week is CELEBRATE and I chose birthday. I’ve had the Zany Zoo Suite of products for a bit, but hadn’t used it yet. With this challenge, it was the perfect opportunity to play. I used the 2023-2024 Annual Catalog to give me a bit of inspiration – and the rest is history. Once I got going, the inspiration just kept coming.

This little singing turtle was an image I HAD to use. I cut it out of the Zany Crew Designer Series Papers. I really like the fact that Stampin’ Up! has started creating images on their DSP that can be die cut with the coordinating Dies. ~ and so I did, then colored it with Lemon Lime Twist Stampin’ Blends. I die cut a stool for him to stand on using the same Zany Zoo Dies. I also die cut this other creature holding balloons – is it a raccoon or is it a badger? I can’t decide! I colored it as well, this time with Crumb Cake Stampin’ Blends. I also die cut the sweet tulips and the single balloon, as well as the banner with the sentiment. All these came from the Zany Zoo Dies. The cute little music notes also come from the Zany Zoo stamp set, as does the sentiment on the banner die cut. The ‘grass’ along the bottom comes from the Beautiful Balloon Dies and is die cut from Lemon Lime Twist card stock.

The card base… is Pool Party card stock 4 1/4 x 11 scored at 5 1/2. I cut a panel of the Zany Crew DSP to 4 1/4 x 5 1/2 and trimmed the opposite corners. I colored the DSP with Pool Party ink and a Blending Brush. I adhered it with liquid glue as you see it. The next layer of Pool Party is 3 1/2 x 4 1/2 and was attached with dimensionals after it was completed . The DSP under the sentiment banner is the same pattern as the Pool Party colored DSP. Can’t you just ‘hear’ this cute frog singing Happy Birthday to you?! The single balloon is attached with Black Baker’s Twine form the Twine Essentials Pack. I attached it to the back of the balloon with a dab of liquid glue, then simply ‘tucked it’ near the hand after the balloon was added to the card with a dimensional. A two-fisted animal with balloons!

Stampin' Up! Zany Zoo birthday, inside

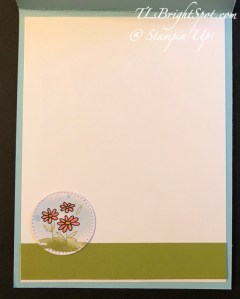
On the inside… I added a panel of Lemon Lolly card stock to the card base. The Basic White panel has a strip of the Zany Crew DSP that was colored with Pool Party and a Blending Brush, same as the DSP on the card front. The sentiment is stamped in Memento ink and comes from Zany Zoo stamp set. The additional stamping – looks like confetti – is also from Zany Zoo stamp set and is stamped with Memento ink. I colored various aspects of the confetti with Blends: Pool Party, Lemon Lolly, Pumpkin Pie, Lemon Lime Twist and Crumb cake. Mostly it took just a touch of ink.

Stampin' Up! Zany Zoo card & envelope

For the envelope… more Zany Crew DSP added to the flap. For the front I used the 2 3/8 circle punch to punch this fun image from the Zany Crew DSP and adhered it to the envelope with Stampin’ Seal all around the edges of the circle. Tis a happy, fun birthday card.

Now – Celebrate by visiting each of the creations on the hop today. Click on a name or use the ‘next’ button to take you to Carol and her fabulous creation.

Amy Koenders

Mary Deatherage

Jaimie Babarczy

Sue Prather

Karen Finkle

Akiko Sudano

Karen Ksenzakovic

Tara Carpenter

Terry Lynn Bright

Carol Buckalew

To purchase products used to make this card, please visit my store here. My html is working properly right now so I’m unable to do a showcase of the products :O( Hopefully that will be fixed soon.

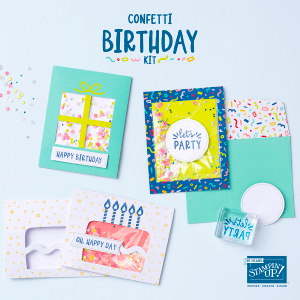
Stampin’ Up! has kits that are super quick and easy to make – great for a gathering as all elements are provided in the kit. Talk about CELEBRATE!

Stampin' Up!Confetti Birthday kit

162390

CONFETTI BIRTHDAY KIT

$23.00 USD | $32.00 CAD

Available starting 2 May

Also available in French (item 162391

This month’s kit includes: 

  • Enough supplies to create 9 cards—3 each of 3 designs
  • 9 coordinating envelopes
  • Confetti Birthday photopolymer stamp set
  • One Blueberry Bushel Ink Spot
  • Printed card bases, card fronts, self-adhesive cellophane shaker bags, die-cut pieces, holographic foil labels, adhesive, embellishments, and a clear block
  • Finished card size: 5-1/2″ x 4-1/4″ (14 x 10.8 cm)
  • Coordinating colors: Blueberry Bushel, Coastal Cabana, Crushed Curry, Flirty Flamingo, Lemon Lime Twist, Poppy Parade
Stampin' Up! Paper Pumpkin

Stampin’ Up! has a monthly subscription for Paper Pumpkin that is also a kit all in one. The first order includes an acrylic block which can be used for all Paper Pumpkin kits after that. This particular kit must be ordered by June 10. Click on the photo above to go straight to my Paper Pumpkin area to subscribe :O)

Stampin' Up! Online Exclusives

Online Exclusives are products not available in a catalog. This allows Stampin’ Up! to update, add to seasonally or when needed, products on demand. Click on the logo to go straight to my store to order.

Thanks for stopping by. May you have a beautiful day!

Stampin’ Up! Masterfully Made Suite

Oh goodness, I just played with a new suite of products and didn’t want to quit… This Majestically Made DSP is just beautiful: love the colors and the variety of patterns. And the Majestically Made stamp set & dies are beautiful. I chose to make a top fold card using the Lost Lagoon card stock and Lemon Lime Twist for contrast.

Stampin' Up! Majestically Made Suite

I cut a panel of DSP 4 x 5 and made five 1 x 4 pieces. I added these to a 4 1/8 x 5 3/8 panel of Lemon Lime Twist While this ribbon is not part of the suite of products found on pages 102-103 in the 2023-2024 Annual Catalog, I decided a simple fold over and adhered with a couple of glue dots. I die cut this gorgeous leaf using the Masterfully Made Dies and lemon Lime Twist card stock. I adhered the leaf in place with glue dots as well. I stamped the sentiment in Pretty Peacock ink on a scrap of the Masterfully Made DSP and die cut it with the banner die from Masterfully Made Dies. I added it over the ribbon & die cut leaf with dimensionals. For final touch I added three Adhesive-Backed Sequins Trio in White – also a part of this suite. This entire panel was added to the Lost Lagoon card stock with dimensionals.

Stampin' Up! Masterfully Made Suie, inside

For the inside of the card, I used Lost Lagoon ink and the Masterfully Made stamp set and randomly stamped the ‘wording’ stamp in second generation ink. I then stamped the large leaf from the same stamp set in the same second generation manner with Lost Lagoon ink. I adhered this to a panel of Lemon Lime Twist, then into the inside of the Lost Lagoon card base.

Stampin' Up! Masterfully made card & envelope.1
Stampin' Up! Masterfully Made card & envelope.2

For the envelope… a left over piece of the Masterfully Made DSP for the flap and for the front, more of the stamped off ‘words’ in Lost Lagoon ink from the Masterfully Made stamp set. And the set was done. Love it!

I’m not sure how Stampin’ Up! does it, but the Designer Series Papers seem to get better & better and… I have learned to USE THEM not HOARD THEM :O) One of my problems though, is I want to just play with one set at a time and there are so many new ones I haven’t played with yet!!! Ah, time.

If you do not have a demonstrator and would like to order from me or need a catalog, I would like to help you create. When ordering $50 or more in product (before shipping/ taxes), use my HOST CODE 64NDVS4D to receive Star Rewards and a SU! gift valued to $10. Star Rewards build up so that when you have 8 rewards from me, you can receive a stamp set valued to $40. :O) And when your order is $50 or more prior to shipping/ taxes, you also receive the monthly tutorial. :O)You may order from me here.

Thanks for stopping by! may you have a beautiful day.

Stampin’ Up! Delightfully Eclectic Box

Good morning! New day, new week, new plans. :O) I have a sweet box for you today made with the Delightfully Eclectic DSP and finished with Black & White 1/4″ Gingham Ribbon and the Cheerful Daisies stamp set.

Stampin' Up! Delightfully Eclectic DSP box
Stampin' Up! Delightfully Eclectic box on side
Stampin' Up! Delightfully Eclectic Box decorated

Now isn’t this a cute box? It’s fresh & I love the Black & White Gingham Ribbon with it. I stamped the sentiment in Fresh Freesia and die cut it with the appropriate die from Cheerful Daisy Dies, put dimensionals on top & bottom and added it over the ribbon. The daisy is also stamped in Fresh Freesia, with the center in stamped off once Memento ink. It was die cut with its appropriate die from Cheerful Daisy Dies and added with a single dimensional on the left & two stacked dimensionals on the right. The ribbon is held in place in the front with a couple of glue dots under the sentiment banner. What’s nice about that is the ribbon stays in place when it is untied to open the box. :O)

Here are the dimensions for the box and where to cut & trim.

Box: 4 x 11; score on long side 1, 5, 6. 10; score on short side at 1 and 3. Burnish all score lines then trim as shown.

Stampin' Up! Eclectic Box cuts/ tape.1
Stampin' Up! Eclectic box cuts /tape.2

You can see where the cuts are for this box and where the tape should be. You can choose to use adhesive tape as I did here or Stampin’ Seal+, which I used on another box. Both work very well.

The Delightfully Eclectic pack of paper holds 48 sheets, so lots of opportunities for playing with large sheets for boxes or gift bags.

If you do not have a demonstrator and would like to order from me or need a catalog, I would like to help you create. When ordering $50 or more in product (before shipping/ taxes), use my HOST CODE 64NDVS4D to receive Star Rewards and a SU! gift valued to $10. Star Rewards build up so that when you have 8 rewards from me, you can receive a stamp set valued to $40. :O) And when your order is $50 or more prior to Shipping/ taxes, you also receive the monthly tutorial. :O)

You may order from me here.

Thanks for stopping by. May you have a beautiful day!

Stampin’ Up! Happy Inkin’ Thursday Blog Hop

We have a sketch challenge for this week and I’m excited to share a couple of new porducts from the 2023-2024 Annual Catalog.

Stampin' Up! Happy Inkin' Sketch Challenge
Stampin ' Up! Happy Inkin' Thursday Blog hop
Stampin' Up! Inked Botanicals card front

This card uses the Inked Botanicals DSP, the Inked & tiled stamp set AND the Timeless Arrangements Dies. I’ve mixed some colors together that I would not normally do – – and like it.

I pulled out this fun pattern of DSP from the Inked Botanicals, then started die cutting images using the Timeless Arrangements Dies in Lost Lagoon (love this new color!) Calypso Coral, Crushed Curry and I pulled in a bit of Basic White as well. I stamped the sentiment from Inked & Tiled in Lost Lagoon on a Very Vanilla scrap and die cut it with the Timeless Arrangements Dies. I adhered the layers of springs and sprays together with liquid glue, attached the sentiment as well then set about doing the rest. The DSP is cut 3 x 4, the Crushed Curry at 3 1/4 x 4 1/2 and added those two together with liquid glue. I put dimensional on the back of those two pieces and adhered them to the Lost Lagoon card base. The sentiment and sprays were added with dimensionals along the bottom of the sentiment and a bit of liquid glue for the upper section.

Stampin' Up! Inked Botanicals w/ Inked & Tiled stamp set

For the inside, I used a Very Vanilla panel 4 x 5 1/4 and stamped it with Crushed Curry ink and one of the flowers from Inked & Tiled stamp set, adhered it into the card and voila – card is complete.

Stampin' Up! Inked Botanicals card/ envelope

For the envelope, more of the Inked Botanicals for the flap and the same flower for the envelope front, just this time in Crushed Curry & Calypso Coral inks. Such a fun, lively card. – and my daughter is going to love it. It goes out today!!!

Want to see more projects from this amazing group? Click the various name or the ‘next’ button..

Stampin' Up! Blog Hop buttons

Amy Koenders

Mary Deatherage

Jaimie Babarczy

Karen Finkle

Akiko Sudano

Karen Ksenzakovic

Tara Carpenter

Terry Lynn Bright ~ you are here!

Carol Buckalew

All the items to make today’s card may be found in the 2023-2024 Annual Catalog. If you do not have a demonstrator and need a catalog, give me a holler & we can fix that. Feel free to take a quick look at the catalog below by simply clicking on the image. Be sure to use my HOST CODE 64NDVS4D that is good for a couple of weeks, so that when you order $50 or more you get a FREE GIFT FROM ME valued up to $10 in a SU! product.

Stampin’ Up! Let’s Go Fishing Fun Fold for Amy’s Inkin’ Krew Blog Hop Group

Our hop for this week is “for the men/ boys’ and we can interpret that any way we like. I have a twin brother who likes to carve – and one of the ‘beasts’ he likes to carve is fish. He lives in Oregon and while I have not physically seen the fish he has carved, he is a detail-oriented man and has a real talent with color & design, and this just seemed like a fun idea to me, to create a card around fish. The Let’s Go Fishing DSP in the new 2023-2024 Annual Catalog is really beautiful. The colors are soft – and well, just perfect. I must now order the stamps, dies, etc.!

Stampin' Up! Amy's Inkin' Krew Blog Hop Group
Stampin' Up! Let's Go Fishing Fun Fold. Tue hop 5/9

I’ve used Boho Blue for my card base cut at 4 1/4 x 11 and scored at 5 1/2, 6 3/4 and 8 7/8. I added layers of Copper Clay to various panels: (2) 4 1/8 x 4 1/8, 3 x 3 (this is on dimensionals) and 1 1/8 x 4 1/8. DSP layers are 4 x 4 and 1 x 4. The Very Vanilla inside layer is 4 x 4. On it is a die cut from Very Vanilla layered onto Pecan Pie. I SHOULD HAVE used Copper Clay ink for the stamping and for the layer for the sentiment!!! It was a goof :O) Ok, where was I ??? :O)

Using the side view, you can see where the facing panel of Copper Clay & DSP are adhered. . on that of course, is the square set on it like a diamond – attached with dimensionals. The Boho Blue panel was run through the Splatters & Stripes Embossing Folder – you know, fish & bubbler! The fish were fussy cut and also added with dimensionals. A few 2023-2025 In Color Dots were added to the diamond shape and one just off, hopefully making it look like bubbles from the fish. C’mon, use your imagination…

Stampin' Up! Let's Go Fishing Fun Fold, side view
Stampin' Up! Let's Go Fishing Fun Fold, inside of card

For the inside of the card, a panel of the Copper Clay then a Very Vanilla panel stamped and with a stamped sentiment die cut. The fun stamped corners are from He’s All That stamp set – a very masculine stamp set. The sentiment is also from that same stamp set, stamped on Very Vanilla and die cut with All That Dies.. I die cut another layer in Pecan Pie, cut it down the middle and added each to the underside of the stamped piece. That got put on dimensionals so the upper portion had something to lean against or ‘stand’ against.I added two 2023-2025 In Color Dots to make the sentiment more pronounced.

Let’s see, I think I forgot one step – the 1 1/8 x 4 1/8 Copper Clay piece with the 1 x 4 Let’s Go Fishing DSP… that all added with liquid glue. The pictures are showing the perfect placement.

I think that’s it. GADS… Did I totally mess with your mind with those directions??? You will see some fun creations today, so take a peak around the various links. Use the ‘previous’ link to visit Karen Finkle or the ‘next’ link to visit Carol, or… click on a name to take you where you want to go. Have fun, enjoy the tour,

Stampin' Up! Amy's Inkin' Krew blog hop links
Stampin' Up! Amy's Inkin' Krew blog Hop link.2
  1. Tara Carpenter
  2. Karen Ksenzakovic
  3. Mary Deatherage
  4. Akiko Sudano
  5. Karen Finkle
  6. Terry Lynn Bright
  7. Carol Buckalew
  8. Amy Koenders

All the items to make today’s card may be found in the 2023-2024 Annual Catalog. If you do not have a demonstrator and need a catalog, give me a holler & we can fix that. Feel free to take a quick look at the catalog below by simply clicking on the image. Be sure to use my HOST CODE 64NDVS4D that is good for a couple of weeks, so that when you order $50 or more you get a FREE GIFT FROM ME valued up to $10 in a SU! product.

Ordering from me get’s a couple of things… besides the FREE ITEM, I also offer STAR rewards for each $50 order. AND, with that order you will receive a copy of this months tutorial. :O) Lots of fun ideas for sure!

Thanks for stopping by. May you have a beautiful day!

Make someone happy sending them a handmade card filled with love.

Stampin’ Up! Color Challenge for the Happy Inkin’ Thursday Blog Hop

Here’s the deal… I lost Internet yesterday – completely for an entire day. Hubby got a new Modem and it still didn’t work for about 2 1/2 hrs. GRRR. I pulled myself out of the blog hop cuz – no Internet until late on Wed. night and didn’t know when it would work, when it magically and finally DID.. I have removed the links below but wanted you to see the challenge – and of course, my card..

Stasmpin' Up! Color Challenge for the Happy Inkin' Thursday hop
Stampin' Up! Happy Inkin' Thursday Blog Hop
Stampin' Up! Cheerful Daisies for the hop 5/4

I started with a card base of Copper Clay and added a layer of Wild Wheat. Adhered to that is a Designer Series Paper layer of Fresh as a Daisy with the Moody Mauve side up. The top two layers are Wild Wheat & the Moody Mauve background of the Fresh As a Daisy DSP. Together, those were added with dimensionals. Next – die cutting the daisy using the Cheerful Daisy Dies in Basic White, two layers, and attaching them together with dabs of glue. I used the Light Wild Wheat Blends to add color to the center, then attached the daisy to the card front with dimensionals. I stamped the sentiment from Cheerful Daisy stamp set in Moody Mauve ink on a strip of Bubble Bath and slipped under the mounted daisy with a bit of glue on the backside. I added two die cuts of the branchy/twiggy thing, one in Wild Wheat and the other in Basic White. Because they are so thin, I added those with a coupler of glue dots. For a final touch, I added three Brushed Metallic Adhesive-Backed Dots.

Stampin' Up! Cheerful Daisies, inside card

For the inside, a layer of Wild Wheat was added to the card base. I then stamped the Basic White panel with this pretty daisy from the Cheerful Daisy stamp set in Bubble Bath ink. I didn’t think I would like this color combination, but I really do :O) The Bubble Bath is really a sweet shade of pink.

Stampin' Up! Cheerful Daisies card & envelope

For the envelope, more of the Moody Mauve from the Fresh As A Daisy DSP for the flap. For the envelope front, a single sweet daisy from the Cheerful Daisy stamp set in Bubble Bath ink.

Use this HOST CODE MDRCB2RQ today through May 8 to get DOUBLE STAR REWARDS for every $50 or more order (before shipping and taxes.) With every order of $50 you receive a free SU! gift from me valued to $10 + 2 STAR REWARDS. When you get 8 STARS you will receive a free stamp set of your choice valued up to $40. Sound like a deal? It is! And… if you want a little bit of everything, consider seriously joining my team. That gets you 20% off every order + early preorder and more benefits. JOIN MY TEAM here.

When checking out, make sure my name is listed as your demonstrator so you get appropriate credit!

Stampin' Up! Confetti Birthday kit

Kits Collections: Confetti Birthday is new to the collection and so vibrant.

This kit includes:

  • Enough supplies to create 9 cards—3 each of 3 designs
  • 9 coordinating envelopes
  • Confetti Birthday photopolymer stamp set
  • One Blueberry Bushel Ink Spot
  • Printed card bases, card fronts, self-adhesive cellophane shaker bags, die-cut pieces, holographic foil labels, adhesive, embellishments, and a clear block
  • Finished card size: 5-1/2″ x 4-1/4″ (14 x 10.8 cm)
  • Coordinating colors: Blueberry Bushel, Coastal Cabana, Crushed Curry, Flirty Flamingo, Lemon Lime Twist, Poppy Parade

Click here to shop kits

Thanks for stopping by. May you have a beautiful day!

Stampin’ Up! Countryside Inn At Play

Good morning! It is May 2 and you know what that is… the Stampin’ Up! 2023-2024 Annual Catalog is LIVE! WooHoo! Today’s card uses products from that new catalog: the Countryside Inn bundle and the Countryside Inn DSP. This DSP is so sweet in shades of blue and some fun little animals.

Stampin' Up! Countryside Inn.2

I used the Countryside in Dies to cut two panels, one in Night of Navy and the smaller in the Countryside Inn DSP. Before adhering them together, I added a strip of Basic White behind the smaller die cut. I pulled out my Petal Park stamp set and the Petal Park Builder Punch. I inked the three stamps of flowers in Misty Moonlight and stamped that a couple of times on Basic White, then punched them out. I punched another couple of sets in Pool Part and also in Night of Navy and began putting them together. Once the flowers were attached to this fun shape, I set about determining a background. I toyed with several ideas and decided on using the Hobnail Glass Dots embossing folder from the Online Exclusives and running it through on Basic White. I lined that with Night of Navy and added both to a Thick Basic White card base. I popped the die cut main ‘attraction’ on dimensionals and the card front was nearly complete. For a bit of sparkle I added the 2023-2025 In Color Dots in Boho Blue and Glossy Dots Assortment in Pool Party.

Stampin' Up! Countryside Inn.2 inside

For the inside I added a layer of Night of Navy panel, then stamped on a Basic White panel in Boho Blue. These stamps come from the Countryside Inn stamp set. Isn’t the circles one fun? This was adhered to thee inside and I moved on to the envelope

Stampin' Up! Countryside Inn.2 envelope front
Stampin' Up! Countryside Inn.2 Envelope flap

More stamped circles on the envelope front, with Boho Blue ink, then this very same DSP for the envelope flap ~ adhered and trimmed to fit. Done!

To get this wonderful set/suite of products, see the showcase below and click all to purchase everything to make this card.

Here’s another thing… catalog is LIVE today…click on the catalog banner to see it all…

Stampin' Up! 2023-2024 Catalog

Use this HOST CODE MDRCB2RQ today through May 9 to get DOUBLE STAR REWARDS for every $50 or more order (before shipping and taxes.) With every order of $50 you receive a free SU! gift from me valued to $10 + 2 STAR REWARDS. When you get 8 STARS you will receive a free stamp set valued up to $40. Sound like a deal? It is! And… if you want a little bit of everything, consider seriously joining my team. That gets you 20% off every order + early preorder and more benefits. JOIN MY TEAM here.

Stampin' Up! Confetti Birthday Kit

Kits Collections: Confetti Birthday is new to the collection and so vibrant.

This month’s kit includes: 

  • Enough supplies to create 9 cards—3 each of 3 designs
  • 9 coordinating envelopes
  • Confetti Birthday photopolymer stamp set
  • One Blueberry Bushel Ink Spot
  • Printed card bases, card fronts, self-adhesive cellophane shaker bags, die-cut pieces, holographic foil labels, adhesive, embellishments, and a clear block
  • Finished card size: 5-1/2″ x 4-1/4″ (14 x 10.8 cm)
  • Coordinating colors: Blueberry Bushel, Coastal Cabana, Crushed Curry, Flirty Flamingo, Lemon Lime Twist, Poppy Parade

Click here to shop kits

Stampin’ Up! Cheerful Daisies for the Happy Inkin Thursday Blog Hop

Welcome to our awesome Happy Inkin’ Thursday Blog Hop! There are some fun projects to be shared to day with this sketch challenge.

Stampin' Up! Happy Inkin' Thursday Challenge
Stampin' Up! Happy Inkin' Thursday Blog Hop
Stampin' Up! Cheerful Daisies for 4/27 Thur Hop

I’ve chosen to use the Cheerful Daisy Stamp set and it’s coordinating Cheerful Daisy Dies. They are so great – love the layering possibilities and the texture as well. Above you see the NEW Copper Clay card base. What a beauty this paper is… The DSP is from Fresh As A Daisy and is one of the panels on the first page of the Designer Series Paper.. I attached that front piece to a Basic White panel cut to the same size (3 1/8 x 4 14). I then took a small rectangle DSP on that front panel and cut it down so it shares the stage by sticking out at each side. I adhered that to the card front, then added the two panels with dimensionals. I die cut the daisy outline in Boho Blue (NEW), then the two coordinating layers in Basic White and adhered them all together with liquid glue. I popped it up on dimensionals & added it to the card front. I cut a length of this gorgeous Texture Ribbon in Copper Clay, folded it over and added it in place with Stampin Seal+. The final touch for the front was the 2023-2025 In Colt Dots – in Boho Blue of course.

Stampin' Up! Cheerful Daisies for the 4/27 hop, inside

I cut a piece of Boho Blue 3 3/8 x 4 3/4 and adhered it in place on the inside of the card. I added the Basic White piece on top (3 1/4x 4 5/8).

Again the daisy has three parts: the outline is Copper Clay, the two top portions are Basic White – all adhered together and added to the inside of the card.

Stampin' Up! Cheerful Daisies for the Hop 4/27, card & envelope

For the envelope… a bit of DSP on the bottom front of the envelope, to carry over a bit of the front of the card. For the flap, a different piece of Fresh As A Daisy DSP, adhered & trimmed to fit. What a fun project ~ and I loved every minute of putting it together.

Now it’s time to see what the other team members have to share. Click a link and have fun hopping

Stampin' Up! 'next' button for Happy Inkin' Thursday Blog Ho0p

Amy Koenders

Mary Deatherage

Jaimie Babarczy

Karen Finkle

Akiko Sudano

Karen Ksenzakovic

Tara Carpenter

Terry Lynn Bright ~ you are here!

Carol Buckalew

How do you get your hands on these items? Easy peasy… these will be available May 2 and are found in the catalog on pages 110-111. If you do not have a demonstrator or a catalog, please reach out to me… we can fix that! Another way to get your hands on them is to JOIN MY TEAM. Yep, become a demonstrator: hobby or business. Make it your own. Become a demonstrator and always get 20% off your purchases. You can be a hobby demo or go full steam ahead to do more. Either way, here to support you however you need. You may join my team here. We have many hobby demonstrators who strictly maintain their demonstrator status just for the discount, and other demonstrators who wish to grow a business. Either way, we have loads of FUN! Look at all of the smiling faces!

Stampin' Up! Team meeting via zoom

Becoming a Demonstrator offers some great benefits:

  • 20%+ Discount on your demonstrator orders
  • Be a part of a fun and supportive team and the Stampin’ Up!
  • community
  • Early access to new catalogs and promotion information
  • Early ordering for new products
  • Be a hobby demonstrator or start a business
  • No pressure to sell products
  • My full support when you join my team

If you have questions, please reach out to me: tlsbrightspot@gmail.com

Stampin' Up! Last Chance Products

SHOP Last Chance Products here

SHOP CLEARANCE RACK HERE. This is really the way to save! The items in the Clearance Rack are highly discounted.

USE MY CURRENT HOST CODE K4PPCYJA when you order

Stock Up Now Because Prices Are Increasing – As of May 2nd, prices will increase with the new Annual Catalog. Right now is the best time to stock up on basics and carryover products. New prices will be in effect (including for all catalog-related promotions, such as the catalog preorder) within the following product categories:

  • Cardstock
  • Designer Series Paper
  • Specialty Paper
  • Notecards and Envelopes
  • Classic Stampin’ Ink Pads and Refills
  • Stampin’ Blends
  • Stampin’ Write Markers
  • Select Specialty Inks
  • Stampin’ Cut & Emboss Machines and plates
  • Embossing Folders
  • Punches
  • Take Your Pick products
  • Storage
  • Clear Blocks
  • Select tools
  • Select adhesives
  • Select stamp sets
  • Paper Pumpkin

With the new catalog comes NEW Designer Series Paper ~ and I’m offering Paper Shares.

New Designer Series Paper Share –

$70.00 plus $8.50 for Priority Mail shipping

  • 12-Bright & Beautiful 6 x 6
  • 6-Countryside Inn
  • 12- Delightfully Eclectic
  • 6-Earthen Elegance
  • 6-Fresh As A Daisy
  • 5-Glorious Gingham 6 x 6
  • 12-Inked Botanicals 6 x 6
  • 6-Let’s Go Fishing
  • 6-Les Shoppes
  • 6-Masterfully Made
  • 6-Stargazing
  • 6-Zoo Crew
  • 10-2023-2025 In Color 6 x 6
  • 10-2022-2024 In Color 6 x 6
  • 20-Brights 6 x 6
  • 20-Neutrals 6 x 6
  • 20-Regals 6 x 6
  • 20-Subtles 6 x 6
  • 3-Gold Celebrations acetate
  • 3-Holographic Trio Specialty Paper
  • 5-White Center Specialty
  • 2-More Dazzle Specialty 6 X 6
  • 5-Soft Shimmer Paper Combo Pack
  • 5-2022-2024 In-Color Textured Specialty Paper
  • 5-2023-2025 In-Color Luster Specialty Paper

Anyone is welcome to join in my share, just remember, I can only ship to addresses within the US.  If you’d like to join, email the following information to tlsbrightspot@gmail.com. Make sure you indicate a single share or double share :

  • Your first and last name
  • The email address that is connected to your PayPal account. I only accept PayPal for payment.  ***You do not need to have a PayPal account to pay the invoice, you can choose to pay by credit card without having a PayPal account

Deadline to sign up for my share is Sunday, April 30th at 5:00 PM ET.

Amy Koenders

Mary Deatherage

Jaimie Babarczy

Karen Finkle

Akiko Sudano

Karen Ksenzakovic

Tara Carpenter

Terry Lynn Bright ~ you are here!

Carol Buckalew

Stampin’ Up! Playing in Daisies

Good morning! I have a bright, cheerful card for you today. It uses retiring Rain or Shine DSP and the carrying over Playing in the Rain stamps & Dies.. You might remember that I’m making daisy cards for a couple of folks as I’m attending a convention the first weekend in May. As I was pulling retiring items I saw this adorable paper and quickly made this card.

Stampin' Up! Playing in the Rain bundle

All the DSP used for this card are from the Rain or Shine collection. I only have a bit left, which is good since it’s retiring. :o) I cut the DSP panel with the second largest of the retiring Stitched Rectangles Dies, then adhered it to a slightly larger panel of Old Olive. I took another piece of the DSP (see the raindrops strip behind), it’s 1 3/4 x 5 1/2 and adhered it to the Balmy Blue card base. The Old Olive piece is adhered, centering, with dimensionals. I die cut the turtle from one of the Designer Series Papers in this pack and adhered it with dimensionals as though he were walking through the field of flowers. I added a white bow from the Baker’s Twine Essentials Pack using the white twine and pulling two threads from a length to make the bow. I stamped the sentiment in Old Olive ink on a Basic White scrap and die cut it with the Stylish Shapes Dies. I cut a strip about 5/8 x 3″ from another piece of the DSP and added it to the back of the circle with Stampin’ Seal+, then attached the circle with dimensionals to the card front. I trimmed the ends of the strip after adhering it. I added three Glossy Dots to the circle for some added sparkle.

Stampin' Up! Playing in the Rain card inside

For the inside, I added a strip of Old Olive to the Basic White panel, then used another Stylish Shapes Die to cut this fun flower image and adhered it over the Old Olive strip. The panel was adhered to the inside of the card and done!

Stampin' Up! Playing in the Rain card & Envelope.

For the envelope… the backside of this particular piece of DSP is this fun check – and I adhered it to the envelope flap and trimmed to fit. For the front, I stamped the adorable daisies in Memento ink and colored with Daffodil Delight Blends. This creates a fun, cheerful card for any occasion.

Couple of things…

  • LAST CHANCE PRODUCTS are only available through May 1 You may find that link here
  • As the 2023-2024 Annual catalog launch is nearing, I am offering a Designer Series Paper share of all the new Designer Series Papers.

New Designer Series Paper Share –

$70.00 plus $8.50 for Priority Mail shipping

  • 12-Bright & Beautiful 6 x 6
  • 6-Countryside Inn
  • 12- Delightfully Eclectic
  • 6-Earthen Elegance
  • 6-Fresh As A Daisy
  • 5-Glorious Gingham 6 x 6
  • 12-Inked Botanicals 6 x 6
  • 6-Let’s Go Fishing
  • 6-Les Shoppes
  • 6-Masterfully Made
  • 6-Stargazing
  • 6-Zoo Crew
  • 10-2023-2025 In Color 6 x 6
  • 10-2022-2024 In Color 6 x 6
  • 20-Brights 6 x 6
  • 20-Neutrals 6 x 6
  • 20-Regals 6 x 6
  • 20-Subtles 6 x 6
  • 3-Gold Celebrations acetate
  • 3-Holographic Trio Specialty Paper
  • 5-White Center Specialty
  • 2-More Dazzle Specialty 6 X 6
  • 5-Soft Shimmer Paper Combo Pack
  • 5-2022-2024 In-Color Textured Specialty Paper
  • 5-2023-2025 In-Color Luster Specialty Paper

Anyone is welcome to join in my share, just remember, I can only ship to addresses within the US.  If you’d like to join, email the following information to tlsbrightspot@gmail.com. Make sure you indicate a single share or double share :

  • Your first and last name
  • The email address that is connected to your PayPal account. I only accept PayPal for payment.  ***You do not need to have a PayPal account to pay the invoice, you can choose to pay by credit card without having a PayPal account

Deadline to sign up for my share is Sunday, April 30th at 5:00 PM ET.

Thanks for stopping by!

Stampin’ Up! Fresh As A Daisy Cards

WooHoo – welcome to Tuesday! The other day I tore into my package of Fresh As A Daisy DSP and the very first sheet is full of card front panels, which I immediately cut apart. I shared my first card using the coordinating Cheerful Dies and Cheerful Daisy stamp set – you may find that here. Today’s cards – yep, two of them, use more of that DSP but very little of the dies. Here is card 1…

Stamp[in' Up! Fresh as a Daisy
Stampin' Up! Freash as a daisy card inside
Stampin' Up! Fresh as a daisy card & envelope

The panel is layered onto an Early Espresso panel, then wrapped in this gorgeous Wild Wheat Textured Ribbon and added to the Thick Basic White card base with dimensionals. I stamped the sentiment from Cheerful Daisies stamp set with Early Espresso ink on Basic White and die cut it with the banner die from Cheerful Daisy Dies. This was adhered over the ribbon. I looped a length of the same ribbon around the band and tied a single knot., then added a glue dot under the knot to secure in place. Final touches: Brushed Metallic Adhesive-Backed Dots on the sentiment and Wink of Stella on each of the brown flower centers.

Stampin' Up! Fresh as a daisy with Wink of Stella

For the inside, I stamped the daisy in Wild Wheat and the center in Early Espresso, using Wink of Stella on the brown center of the flower :O) This was a Basic White panel and was adhered directly to the inside of the card. I stamped the same images on the envelope front, same inks and everything. I’m hoping you can see the Wink of Stella shine in this single photo.

For the second card… totally different colors but from that same Fresh As A Daisy sheet as the card above.

Stampin' Up! Fresh As A Daisy card 2
Stampin' Up! Fresh As.A Daisy card 2, inside
Stampin' Up!  Fresh As A Daisy card 2 w/ envelope

How different is this card from the previous, right?! The main color that pops is the new Bubble Bath. I adhered this DSP front to a slightly larger piece of Crushed Curry. I ran a Garden Green piece through the Basic 3D embossing folder called Cross Hatch (purchased from the Online Store!) I added this directly to the Thick Basic White card base, then added the DSP panel with dimensionals on top of it. I stamped the sentiment on a 1/2″ strip of Basic White with the new Bubble Bath ink and added it to the card front with dimensionals. The banner got two Glossy Dots Assortment in Daffodil Delight, then I added three more to the DSP panel. The final touch was this bow made with the Gold & Vanilla Satin Edge Ribbon, added with a glue dot.

Again, a super simple inside: this daisy stamp from Cheerful daisies, stamped in Crushed Curry ink on the Basic White panel. This piece was attached to the inside of the card. The envelope got the same treatment, one on the envelope front and one on the flap. Done, done.

I am making a group of about five cards (maybe more) to give to a friend – all daisy inspired. I’m attending a convention first weekend in May and that’s when I’ll give them to her :O)

Speaking of May… couple of things… May 2 is when the new 2023-2024 Annual Catalog goes live. If you do not have a demonstrator and are interested in a catalog, let me know I am also offering a Designer Series Paper share – see below. There are just a couple more days to sign up for that. AND Last Chance Products are available through May 1

Products to make today’s cards are available May 2. BUT… if you think you might want to get these products early, you can do that. JOIN MY TEAM, become a demonstrator and always get 20% off your purchases. You can be a hobby demo or go full steam ahead to do more. Either way, here to support you however you need. You may join my team here. We have many hobby demonstrators who strictly maintain their demonstrator status just for the discount, and other demonstrators who wish to grow a business. Either way, we have loads of FUN! Look at all of the smiling faces!

Stampin' Up! Team photo

Becoming a Demonstrator offers some great benefits:

  • 20%+ Discount on your demonstrator orders
  • Be a part of a fun and supportive team and the Stampin’ Up! community
  • Early access to new catalogs and promotion information
  • Early ordering for new products
  • Be a hobby demonstrator or start a business
  • No pressure to sell products
  • My full support when you join my team

If you have questions, please reach out to me: tlsbrightspot@gmail.com

GO TO MY ONLINE STORE AND ORDER…order from me here The embossing folder can be purchased now :O)

SHOP CLEARANCE RACK HERE. This is really the way to save! The items in the Clearance Rack are highly discounted.

USE MY CURRENT HOST CODE K4PPCYJA when you order

Stock Up Now Because Prices Are Increasing – As of May 2nd, prices will increase with the new Annual Catalog. Right now is the best time to stock up on basics and carryover products. New prices will be in effect (including for all catalog-related promotions, such as the catalog preorder) within the following product categories:

  • Cardstock
  • Designer Series Paper
  • Specialty Paper
  • Notecards and Envelopes
  • Classic Stampin’ Ink Pads and Refills
  • Stampin’ Blends
  • Stampin’ Write Markers
  • Select Specialty Inks
  • Stampin’ Cut & Emboss Machines and plates
  • Embossing Folders
  • Punches
  • Take Your Pick products
  • Storage
  • Clear Blocks
  • Select tools
  • Select adhesives
  • Select stamp sets
  • Paper Pumpkin

New Designer Series Paper Share –

$70.00 plus $8.50 for Priority Mail shipping

  • 12-Bright & Beautiful
  • 6-Countryside Inn 6 x 6
  • 12- Delightfully Eclectic
  • 6-Earthen Elegance 6 x 6
  • 6-Fresh As A Daisy 6 x 6
  • 5-Glorious Gingham 6 x 6
  • 12-Inked Botanicals
  • 6-Let’s Go Fishing 6 x 6
  • 6-Les Shoppes 6 x 6
  • 6-Masterfully Made 6 x 6
  • 6-Stargazing 6 x 6
  • 6-Zoo Crew 6 x 6
  • 10-2023-2025 In Color 6 x 6
  • 10-2022-2024 In Color 6 x 6
  • 20-Brights 6 x 6
  • 20-Neutrals 6 x 6
  • 20-Regals 6 x 6
  • 20-Subtles 6 x 6
  • 3-Gold Celebrations acetate
  • 3-Holographic Trio Specialty Paper
  • 5-White Center Specialty
  • 2-More Dazzle Specialty 6 X 6
  • 5-Soft Shimmer Paper Combo Pack
  • 5-2022-2024 In-Color Textured Specialty Paper
  • 5-2023-2025 In-Color Luster Specialty Paper

Anyone is welcome to join in my share, just remember, I can only ship to addresses within the US.  If you’d like to join, email the following information to tlsbrightspot@gmail.com. Make sure you indicate a single share or double share :

  • Your first and last name
  • The email address that is connected to your PayPal account. I only accept PayPal for payment.  ***You do not need to have a PayPal account to pay the invoice, you can choose to pay by credit card without having a PayPal account

Deadline to sign up for my share is Sunday, April 30th at 5:00 PM ET.

Thanks for stopping by!