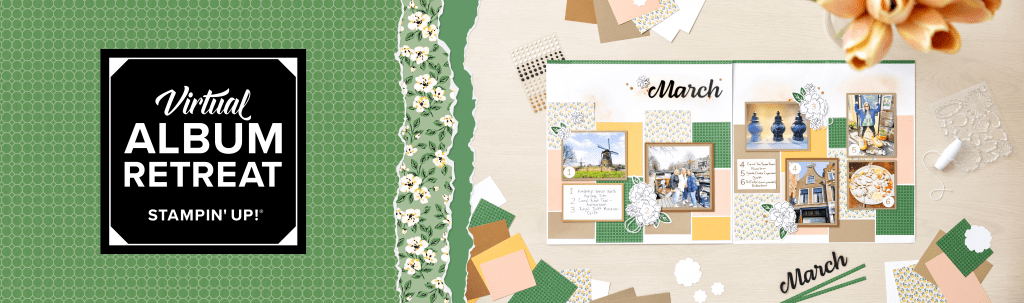
If you are a scrapbooker, this could be right for you… see the details below.
Introducing the Virtual Album Retreat, a brand-new event that’s unlike anything we’ve ever done before! During this three-day, virtual event, you’ll create 12 scrapbook spreads using the Month by Month Album Retreat 2025 kit, craft with customers and fellow demonstrators who love scrapbooking, learn new techniques, and connect on a personal level with fellow crafters and Stampin’ Up! staff. We’ll even have some fun giveaways!
Important Dates
Month by Month Album Retreat 2025 kit available for purchase
May 28, 2025
Virtual Album Retreat
July 16–18, 2025, 2:00–10:30 p.m. (MT)
Virtual Album Retreat Facebook Live recorded videos available
Available immediately following each session
When: July 16–18, 2025, 2:00–10:30 p.m. (MT)
Where: Private Facebook Group
Registration: There is no registration for this event! By purchasing the Month by Month Album Retreat 2025 kit, you’ll get access to an exclusive Facebook group where the live event will stream.
Price of Month by Month Album Retreat 2025 kit: $250 USD | $340 CAD
Language of Event: This event will be presented in English only.
After the Event: You can access the recorded event videos on the Virtual Album Retreat Facebook group page.
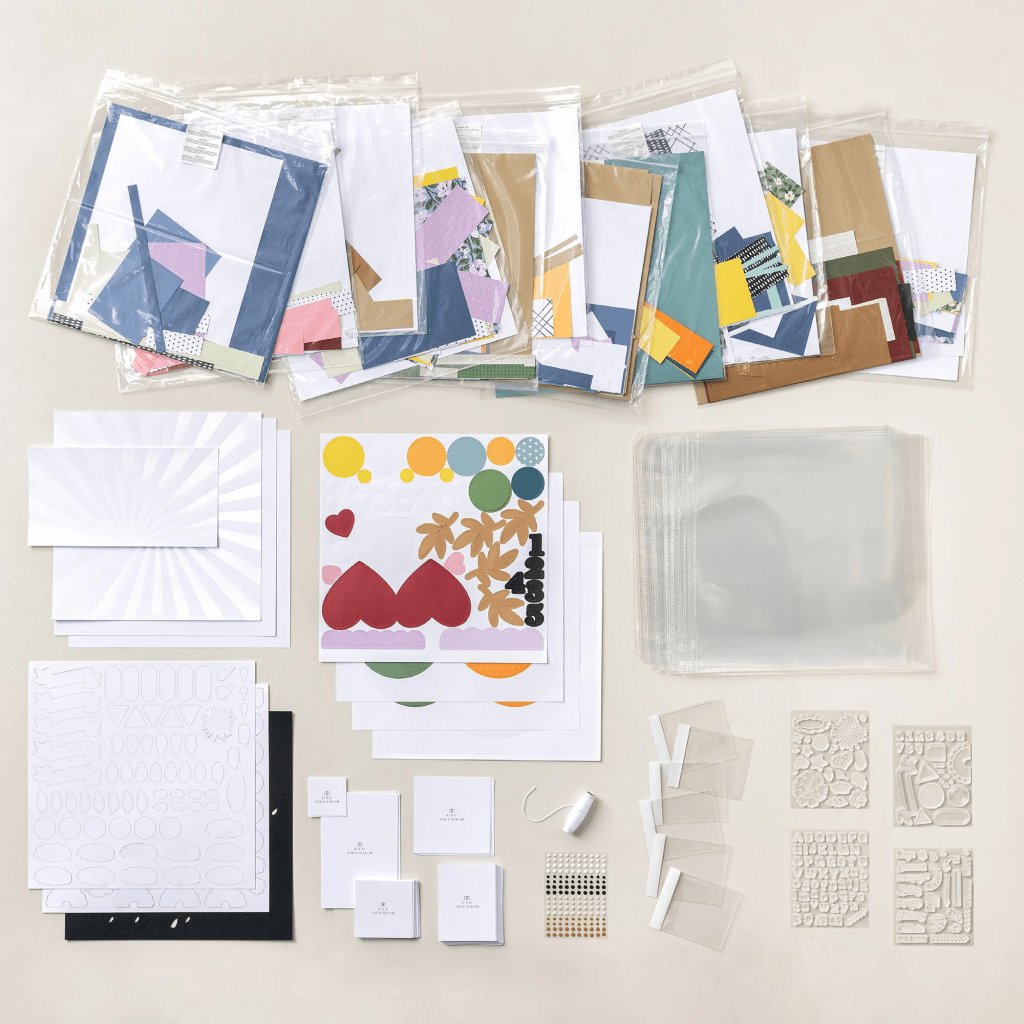
Item: Month by Month Album Retreat 2025 (167338)
Includes: Exclusive stamp sets, designed precut sheets, cardstock, embellishments, and more
Price: $250 USD | $340 CAD
Ordering Begins: May 28, 2025 (Kits are only available while supplies last, so be sure to order ASAP! And you’ll want to order early to make sure you get your products in time for the event!)
Stampin’ Up! is putting forth some bargains that are extraordinary… here is the most recent…
BUY ONE GET ONE 50% OFF STARTING SOON
On All SUITES and SUITE PRODUCTS!
Starting June 3, all available suites and suite products from the 2025–2026 Annual Catalog and Online Exclusives are buy one, get one 50% off! If you’ve had your eye on a new suite from the annual catalog or you really like the look of a stamp set from an Online Exclusives suite, you don’t have to choose—you can get both!
Sales Period: June 3–30, 2025
Ordering Deadlines
Phone: June 30, 2025, at 6:59 p.m. (MT)
Online: June 30, 2025, at 11:59 p.m. (MT)
Here are the details:
All available suites and suite products from the 2025–2026 Annual Catalog and Online Exclusives are buy one, get one 50% off.
When you shop the sale, the 50% off discount will apply to the lower-priced item (for example, if you buy a suite collection and a stamp set from a suite, the suite would be full price, and the stamp set would be 50% off).
Suite collections are available if all items are in stock; if all items are not in stock, you can still shop the available suite products.
You don’t have to buy a suite and suite products all from the same suite collection for the discount to apply. You can buy any suite products from any suite.
The discount will appear in your cart once you’ve added two items within the sale parameters to your cart.
Products are available only while supplies last.
See and shop all qualifying suites in the online store.
A couple of things while we’re at it… Through May 31, 2025 Stampin’ Up! has a super JOIN PROMOTION and I bring that up because as a demonstrator, there is an automatic 20% off the purchase price of items even when there are bargains as mentioned above.
Starter Kit Special is NOW AVAILABLE!
Have you heard? From May 6–31, new demonstrators get $165 USD | $220 CAD worth of products in their Starter Kit for just $99 USD | $135 CAD. (That’s $66 USD | $85 CAD in extra products—our biggest Starter Kit Special yet!) As a bonus, new demonstrators also score FREE shipping on their Kit, FREE business supplies, and a FREE Paper Pumpkin kit! Become a demonstrator and enjoy all the perks that come with that, like a 20–25% product discount, exclusive early access to products, the opportunity to earn a modest supplemental income, the chance to attend incredible training and crafting events, and so much more!
Become a Stampin’ Up! demonstrator between May 6–31 and choose $165 worth of products for only $99! (And did we mention your Starter Kit comes with FREE shipping, FREE business supplies, AND a bonus, FREE Paper Pumpkin kit?) Click HERE to join with me & create your Starter Kit! What’s to lose – 20% discount/ 20% commission on all orders.
THANKS FOR STOPPING BY – MAY YOU HAVE A BEAUTIFUL DAY!
Welcome to this fabulous weekly hop. We have a theme challenge today and I’ve created a sympathy card.
For the card front, I stamped this gorgeous tree using the Loveliest Tree stamp set, Basic Gray ink and Basic White cut 3 1/2 x 4 3/4. After stamping, I used a Blending Brush to gently add color all around the edges of the card. I added this panel to Basic Gray cut 3 3/4 x 5, put dimensionals on the back and attached it to a Thick Basic White card base, 8 1/2 x 5 1/2 scored at 4 1/4, creating a top fold card. For this sentiment, I stamped using Basic Gray ink and the Loveliest Tree stamp set on a scrap of Basic White, then die cut it with Tailor Made Tags Dies. I used Bakers Twine Essential Pack to thread through the hole and frayed the ends. I put dimensionalson this tage and added it to the card front.
For the inside of the card, I used Basic Gray ink, but also used the Comforting Thoughts stamp set for the sentiment and the small leaf image from Loveliest Tree stamp set – stamped on a Basic White panel 3 1/2 x 4 3/4, adhered to Basic Gray 3 3/4 x 5, then popped into the inside of the card.
For the envelope… I stamped this sweet leaf image from Loveliest Tree in Basic Gray ink both on the flap and on the front of the envelope. Simple, elegant, peaceful.
Want to purchase this set from me – or something more? See below how to do that. For now – visit tthe others participating in the hop – theme challenge – outdoors.. Click on the icons or on a name to visit the remaining participants.
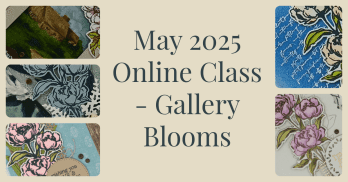
OK – info on ordering from me…. first of all – no more HOST CODE is needed – YAY! Instead for every order of $20 + Stampin’ Up! has it’s own rewards. And for every $50 order from me in my ONLINE STORE you will earn Daisy Patch Points – one Daisy for every $50 purchase from me. Save those Daisy Patch Points up to 8 points and you’ll be able to order a free gift from me valued to $40. And for that $50 purchase from me, you’ll also receive the monthly tutorial – and for May it features the Gallery Blooms bundle.
Now, here’s the deal… I’ve had a knee replacement recently and staples will be removed May 20 – so between now (May 12) and May 20, 2025 at end of day, I’m offering double Daisy Patch Points for every purchase of $50+.Check out my Daisy Patch Rewards Program.
As you probably already know, the 2025-2026 Annual Catalog is now LIVE to customers AND there were two new kits unveiled in the Kits Collection, PLUS more ONLINE EXCLUSIVES released! Stampin’ Up! is ROCKIN’ IT. And here’s another thing – the JOINING PROMOTION. Become a demonstrator (would love to have you on my team!)
Starter Kit Special is NOW AVAILABLE!
Have you heard? From May 6–31, new demonstrators get $165 USD | $220 CAD worth of products in their Starter Kit for just $99 USD | $135 CAD. (That’s $66 USD | $85 CAD in extra products—our biggest Starter Kit Special yet!) As a bonus, new demonstrators also score FREE shipping on their Kit, FREE business supplies, and a FREE Paper Pumpkin kit! Become a demonstrator and enjoy all the perks that come with that, like a 20–25% product discount, exclusive early access to products, the opportunity to earn a modest supplemental income, the chance to attend incredible training and crafting events, and so much more!
Become a Stampin’ Up! demonstrator between May 6–31 and choose $165 worth of products for only $99! (And did we mention your Starter Kit comes with FREE shipping, FREE business supplies, AND a bonus, FREE Paper Pumpkin kit?) Click HERE to join with me & create your Starter Kit! What’s to lose – 20% discount/ 20% commission on all orders.
THANKS FOR STOPPING BY – MAY YOU HAVE A BEAUTIFUL DAY!
Welcome to Amy’s Inkin’ Krew Blog Hop. Today’s challenge is ‘for the boys/ men’ and I’ve created a sailing card. This is a favorite hobby for my hubby & several of his buddies – me too. Having said that – there are LOTS of women who sail so don’t discount them for competition!!!
I started with a Secret Sea card base 4 1/4 x 11 scored at 5 1/2 with the fold to the left. The Sunrise Sailing bundle includes a hybrid embossing folder, which means it embosses but can also die cut certain images with coordinating dies – and that’s what I did, I used a Basic White panel about 6×6 (the embossing folder is large), added the sailboat die cutting side up in the proper place on the embossing folder, and ran it through my die cutting/ embossing machine. And what happens? A gorgeously embossed background and a die cut sailboat. :O) With Balmy Blue ink and a Blending Brush, I gently highlighted the clouds and the bottom of the boat. I switched inks to first Misty Moonlight then Secret Sea to highlight the water with a Blending Brush. I stamped the sails of the boat with Real Red ink – still using the Sunrise Sailing stamp set. There are bird dies in this Sunrise Sailing Dies, so I cut 3 birds from Basic Black card stock, added the two to the front covering the embossed birds, and reserved the other bird for the inside of the card. I cut down the embossed Basic White panel to 4 x 5 and adhered it to a Balmy Blue 4 1/8 x 5 1/8. I added the sailboat over the opening with dimensionals. These were added to the Secret Sea card base with dimensionals. I stamped the sentiment in Secret Sea ink on a Basic White scrap, fussy cut it and added it to the card front with glue. Of course it was from the Sunrise Sailing stamp set! Final touch – 2025-2027 In Color Flat Pearls.
For the inside… I had a leftover piece of the water that had been highlighted with Misty Moonlight & Secret Sea and adhered that to a 4 x 5. I adhered the remaining bird from the die cut birds- Sunrise Sailing Dies of course – as though it was ‘fishing’ for it’s lunch. This I added to a Balmy Blue panel 4 1/8 x 5 1/8, then to the inside of the card.
For the envelope… I embossed a piece of Misty Moonlight card stock 2 1/4 x 6 with the So Swirly embossing folder (more water image), adhered it to the flap & trimmed to fit. For the front, I stamped this water image in Misty Moonlight ink then the birds in Secret Sea – these come from the Sunrise Sailing Bundle . WooHoo! Love this set – so versatile, easy to use, and fabulous.
Want to purchase this set from me – or something more? See below how to do that. For now – visit tthe others participating in the hop – “for the men/ boys”. Click on the icons or on a name to visit the remaining participants.
OK – info on ordering from me…. first of all – no more HOST CODE is needed – YAY! Instead for every order of $20 + Stampin’ Up! has it’s own rewards. And for every $30 order from me in my ONLINE STORE you will earn Darling Daisy Points – one Darling Daisy for every $30 purchase from me. Save those Darling Daisy Points up to 15points and you’ll be able to order a free gift from me valued to $40. And for that $30 purchase from me, you’ll also receive the monthly tutorial – and for May it features the Gallery Blooms bundle.
Now, here’s the deal… I’ve had a knee replacement recently and staples will be removed May 20 – so between now (May 12) and May 20 at end of day, I’m offering double Darling Daisy Points for every purchase of $30+.
As you probably already know, the 2025-2026 Annual Catalog is now LIVE to customers AND there were two new kits unveiled in the Kits Collection, PLUS more ONLINE EXCLUSIVES released! Stampin’ Up! is ROCKIN’ IT. And here’s another thing – the JOINING PROMOTION. Become a demonstrator (would love to have you on my team!)
Starter Kit Special is NOW AVAILABLE!
Have you heard? From May 6–31, new demonstrators get $165 USD | $220 CAD worth of products in their Starter Kit for just $99 USD | $135 CAD. (That’s $66 USD | $85 CAD in extra products—our biggest Starter Kit Special yet!) As a bonus, new demonstrators also score FREE shipping on their Kit, FREE business supplies, and a FREE Paper Pumpkin kit! Become a demonstrator and enjoy all the perks that come with that, like a 20–25% product discount, exclusive early access to products, the opportunity to earn a modest supplemental income, the chance to attend incredible training and crafting events, and so much more!
Become a Stampin’ Up! demonstrator between May 6–31 and choose $165 worth of products for only $99! (And did we mention your Starter Kit comes with FREE shipping, FREE business supplies, AND a bonus, FREE Paper Pumpkin kit?) Click HERE to join with me & create your Starter Kit! What’s to lose – 20% discount/ 20% commission on all orders.
Happy Thursday and welcome to this special hop. We have a sketch challenge today and I’ve used the Country Woods DSP & the Textured Notes stamp set to create it.
I began with a Thick Basic White card base standard A2 size. Using the Textured Notes stamp set, I stamped these awesome leaves: the smaller ones in Crushed Curry and the larger ones in Memento ink. For the first card I cut he Country Woods DSP 1 1/4 x 5 1/2 and attached that to a panel of Basic Gray 1 1/2 x 5 12, put dimensionals on the back and added it to the card, centering the panel. My last step was to add Iridescent Floral Gems.
The sentiment is stamped in VersaMark ink using the Textured Notes stamp set, sprinkled with white WOW embossing powder & heat set it with the heat gun. I popped it up with dimensionals.
For the inside… on a Basic White panel 4 x 5 1/4, I stamped the smaller leaves from the Textured Notes stamp set in Crushed Curry ink and stamped again without reinking. I did that on the top left of the panel and the bottom right, then adhered it to the inside of the card. This card seems like a masculine card to me & I love the versatility of it.
For the envelope front I stamped the smaller leaves from the Textured Notes stamp set in Crushed Curry ink and continued stamping without reinking – inked the stamp and did the same on the flap. then followed the same process on the flap.
On the second card I used the very same process but the card base is Smoky Slate and the DSP is just a teeny bit wider – maybe 1 3/8 x 5 1/2 and the attached paper is Crushed Curry 1 1/2 x 5 1/2. Everything else is the same. :o) The sentiment is stamped in VersaMark ink using the Textured Notes stamp set, sprinkled with white WOW embossing powder & heat set it with the heat gun. I popped it up with dimensionals.
I prefer the first card – what is your preference?
Now, on with the hop – click on the next button to take you to the fabulous Amy or click on a name to visit another team member.
As you probably already know, the 2025-2026 Annual Catalog is now LIVE to customers AND there were two new kits unveiled in the Kits Collection, PLUS more ONLINE EXCLUSIVES released! Stampin’ Up! is ROCKIN’ IT. And here’s another thing – the JOINING PROMOTION. Become a demonstrator (would love to have you on my team!)
Starter Kit Special is NOW AVAILABLE!
Have you heard? From May 6–31, new demonstrators get $165 USD | $220 CAD worth of products in their Starter Kit for just $99 USD | $135 CAD. (That’s $66 USD | $85 CAD in extra products—our biggest Starter Kit Special yet!) As a bonus, new demonstrators also score FREE shipping on their Kit, FREE business supplies, and a FREE Paper Pumpkin kit! Become a demonstrator and enjoy all the perks that come with that, like a 20–25% product discount, exclusive early access to products, the opportunity to earn a modest supplemental income, the chance to attend incredible training and crafting events, and so much more!
If you do not have a catalog, click the image below to see the new In Colors and all the wonderful products.
Get Notified When Products Are Back in Stock!
One request we hear often is, “Can I get notified when an unavailable item comes back in stock?” We are excited to announce that in the next week or so, you will be able to do just that!
If a product is currently unavailable, a box will appear above the product detail where you can request an email notification when/if the product returns. This feature will be available to demonstrators, customers, and guests. If you are logged in as a demonstrator or customer, your email address will automatically populate, with the option to edit it if needed. Guests will need to enter their email address manually.
After your preferred email address is entered, check the box to agree to receive the notification email, then click Notify Me. You will then receive a confirmation email that includes the item number and name of the product you signed up to be notified about. If you change your mind, you can click the unsubscribe button in the confirmation email and it will unsubscribe you only from that specific product notification.
When/if the product becomes available, you will receive a single email notifying you it’s back in stock. The email will include the item number, name, and an image of the product. If the product sells out again, you will need to sign up again to be notified when/if it returns. Perfect, right?!
The Latest on Cloud Cover Ink
The clouds have parted, and we have more to share about our new In Color, Cloud Cover. In the March 18 Weekly Update, we announced we wouldn’t release the Cloud Cover Classic Stampin’ Pad (165284) and Classic Stampin’ Ink Refill (165279) with our 2025–2026 Annual Catalog preorder. This was due to unforeseen quality issues—the ink color was shifting beyond our quality parameters. Since our initial announcement, we’ve been hard at work researching the matter. Here’s what we know:
A chemical reaction between our Cloud Cover ink formula and the chemical makeup of the firm foam used in our Classic Stampin’ Pads has been determined to be the cause of the color shift.
Such a reaction is rare, but the chemistry can play tricks, even after development and our rigorous quality testing.
Because this was an unforeseen issue, we are unable to predict when the shift in color will occur. In one batch of pads, the color accuracy met quality standards. In another, the shift is too significant to pass our tests. Because we pride ourselves on offering beautiful coordinating colors, this inconsistency simply won’t do. Therefore, we will not release Cloud Cover Classic Stampin’ Pads to customers.
Classic Stampin’ Pad aside, there IS a Cloud Cover ink option for customers—Stampin’ Spots!
Classic Stampin’ Spot Small Assortment 1 (166716) – this includes Real Red, Petal Pink, Garden Green, Cloud Cover & Early Espresso
OR
Classic Stampin’ Ink Refill (165279)
Uninked Stampin’ Spots (141822)
Questions? Please reach out to me.
May you have a beautiful day. Thanks for stopping by.
Welcome to this fantastic Thursday Hop! We have a color challenge today for the hop… hope you enjoy what you see today.
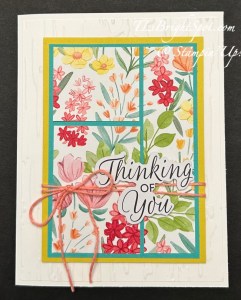
Oh what a fun, bright, feminine card… and I absolutely love this Florals in Bloom DSP! Here’s what I did… I cut a panel of the DSP 2 3/4 x 4, then cut on the short side @ 1 1/2, trimming that to create two panels 1 3/4 x 1 1/2 & 1 3/4 x 2 1/2. That leaves a 1″ strip which I cut @ 2 1/2, leaving a 1 1/2 pice. I adhered these directly to the Summer Splash 3 x 4 1/4, then to Darling Duckling 3 1/4 x 4 1/2. I wrapped a Strawberry Slush Twine around two times & tied a bow. This twine is from a Bakers Twine 3 color pack. Over this I added the sentiment on dimensionals from Greetings for All Ephemera Pack. I embossed a Basic White piece 4 x 5 1/4 using the Birchwood 3D embossing folder and adhered it to the Thick Basicb White card base (8b 1/2 x 5 1/2 scored at 4 1/4. I attached the front panel with dimensionals and bingo, the front was complete.
For the inside… On another Basic White panel cut 4 x 5 1/4, I stamped the outline of the flowers in full strength Strawberry Slush, then stamped the fill in flowers in stamped off once Strawberry Slush. I stamped the stem/ leaves stamp in Granny Apple Green. And the sentiment – from the Greetings for All Ephemera Pack. Adhere the panel to the inside of the card. OH… the stamped flowers are from Pretty Florals stamp set – notice how it matches the DSP!!! These items are part of a suite of products available May 6.
For the envelope… more of the Florals in Bloom DSP on the flap, adhered & trimmed to fit. And yep – that same sweet flower on the envelope front from Pretty Florals. This also comes with dies!!!
Want to get these??? Join with me May 6 to place an order from the new 2025-2026 Annual Catalog AND the new ONLINE EXCLUSIVES. Clicking here to go to my store.
Take a gander at what others on the hop are sharing today… click on the next button to visit Amy or click on a name. Happy hopping!
Remember – double rewards from Stampin’ Up! May 2-3 when placing orders those days!!! The global crafting community will be celebrating National Scrapbooking Day on May 3 —and we’re joining in the fun by offering you 2x Stampin’ Rewards for 2 days! Opt in if you have not done so already…What better way to celebrate one of our favorite crafting holidays? And the best part? This offer applies to ALL products, not just scrapbooking items! (Non-commissionable items and existing Paper Pumpkin subscriptions are excluded.)
Hello folks – this is my 2nd post for the day and here it is the day before May Day – May 1 – and I’m excited to share this fun fold. It’s made with retiring Country Lace DSP to create the fault line technique :O)
Begin with a Crumb Cake card base 4 1/4 x 11 scored @ 5 1/2 & @ 6 1/2. Burnish the 5 1/2 then burnish the 6 1/2 bringing it forward. Adhere that 1″ area to the card back so just the right side flips up. Add Basic White 7/8 x 4 1/4 to the 1″ area then add Country Lace DSP 3/4 x 4 1/4 over the Basic White.
Holding two layers of Country Lace together (both cut 3 x 4 7/16) & slowly tear at an angle – short side to short side – creating this fun edge. Now separate these pieces and add to a Basic White panel 4 7/16 x 4 1/4, leaving space as shown. Add to the Crumb Cake card front. (If you have seen the falut line technique in videos, I have done this just a bit differently – in that I added the Basic White panel to fit the book binder front) Stamp the sentiment in Crumb Cake ink using the Blooming Phrases stamp set – an ONLINE EXCLUSIVE and available May 6! Because this is a photopolymer stamp, I curved it to fit the curve of the DSP :O) I added three Adhesive-Backed Metallic Gems.
For the inside of the card, I stamped the word happy, taping off some of the elements of that stamp before inking with Crumb Cake ink. Then I stamped the word ‘birthday’, also in Crumb Cake ink. These also come from the Blooming Phrases stamp set. Next I stamped the balloons in Memento ink – these come from Spring Corners stamp set, currently available in the ONLINE store. I colored these with Stampin’ Blends: Balmy Blue, Summer splash & Pool Party then added Wink of Stella for a bit of sparkle.
For the envelope, more of the retiring Country Lace DSP adhered to the flap & trimmed to fit. I colored the balloons in the same manner using the same Stampin’ Blends: Pool Party, Balmy Blue & Summer Splash – and yes, Wink of Stella.
I love the contrast of the balloon colors with the very soft colors of the DSP – they really stand out nicely.
Remember – double rewards from Stampin’ Up! May 2-3 when placing orders those days!!! The global crafting community will be celebrating National Scrapbooking Day on May 3 —and we’re joining in the fun by offering you 2x Stampin’ Rewards for 2 days! Opt in if you have not done so already…What better way to celebrate one of our favorite crafting holidays? And the best part? This offer applies to ALL products, not just scrapbooking items! (Non-commissionable items and existing Paper Pumpkin subscriptions are excluded.)
2 fun! Celebrate National Scrapbooking Day with 2x Rewards for 2 Days!
Have you heard? The global crafting community will be celebrating National Scrapbooking Day on May 3 —and we’re joining in the fun by offering you 2x Stampin’ Rewards for 2 days! Opt in if you haven’t done so yet! What better way to celebrate one of our favorite crafting holidays? And the best part? This offer applies to ALL products, not just scrapbooking items! (Non-commissionable items and existing Paper Pumpkin subscriptions are excluded.)
Earn double rewards (2x rewards) for two days only, from May 2–3!
This offer applies to ALL products (excluding non-commissionable products and existing Paper Pumpkin subscriptions).
All orders qualify once the rewards threshold of $20 USD | $25 CAD is met.
To participate, customers must have a Stampin’ Up! account and be opted in to Stampin’ Rewards.
Thjis includes LAST CHANCE PRODUCTS, items in the Jan-Apr 2025 Mini Catalog, the 2024-2025 Annual Catalog – scrapbooking supplies too!
Shop with me by clicking here. For purchases of $50+ from me, you will receive the May Tutorial bundle in your in-box. Make sure my name is listed as your demonstrator when you check out :O)
Good Thursday & WELCOME to our fabulous hop! Today we have a sketch challenge & I’m mixing some items from the retiring Jan-Apr Mini Catalog, a carry over set of dies & a sentiment from the new 2025-2026 Annual Catalog (available May 6).
The Floral Delight 12 x 12 DSP is just so full of spring & cheer! And the coordinating Delightful Wishes bundle is a fun play :O)
How to put together:
Cut DSP 5 1/4 x 12 & score @ 2, 4, 8, & 10; fold & lightly score mountain, valley, valley, mountain
On each short end measure down from top 2 5/8″ & mark. (This is 1/2 the 5 1/4). Cut from closest score to mark on each end & retain pieces removed.
Add these retained pieces to each front panel, decorating it & making it appear as though the panel was folded forward.
Decorate
For this card I cut two circles using the Spotlight on Nature Dies- one from the back side of a DSP in Delightful Floral & another from Basic White. These were adhered together with dimensionals
Adhere these to the left front panel ONLY, centering left to right
Decorate & add embellishments
Using the Delightful Wishes Dies, I die cut the branch from Pecan Pie & several flowers from one of the DSP sheets in Floral Delight DSDP
I adhered the branch directly to the circle & several of the flowers to the branch.
I pulled out the Greetings For All Mix & Match Ephemera Pack (new in the 2025-2026 Annual Catalog coming May 6) and adhered the sentiment with dimensionals
I added Adhesive-Backed Shiny Sequins for a bit of shine & sparkle
This entire piece was adhered to a 4 1/4 x 5 1/2 Daffodil Delight card base.
For the inside… I die cut the outline for the word wishing (Delightful Wishes Dies) in Lemon Lolly & adhered it to the Basic White 3 7/8 x 5 1/8 inside panel. Next I added an Adhesive Sheet to the back of a Daffodil Delight piece and die cut the word itself. This made it easy to adhere to the Lemon Lolly outline. Next I inked the rest of the sentiment in two parts (the word ‘you’ first) with Daffodil Delight ink and stamped them on the insert panel. This was added to the inside of the card – – and boom! This card is ready.
For the envelope… a 2 1/4 x 6 piece of Floral Delight DSP was adhered to the flap & trimmed to fit.
Quick, easy and lovely to look at & receive – and an excellent way to show off both sides of the Designer Series Paper. Want to purchase these products? See how to do that below the list of those participating in today’s hop. :O) Enjoy the creativity you will see today!
Want to shop? Click here to go to my store – and be sure to visit the LAST CHANCE PRODUCTS and the ONLINE EXCLUSIVES too.
Yesterday, today and tomorrow (4/23-4/25, 2025) is FREE SHIPPING WITH an order of $75 + from STAMPIN’ UP! Take advantage, making certain my name is listed as your demonstrator :O)
Thanks for stopping by. May you have a beautiful day!
Hello Monday! It’s a new week, actually a new day – – and it is NOT raining here. Whew! We need the rain to fill our reservoirs; I like rain; but the days are a bit gloomy. We had sunshine for a bit of the day & it felt good. Thank you for the rain; and thank you for the sunshine!
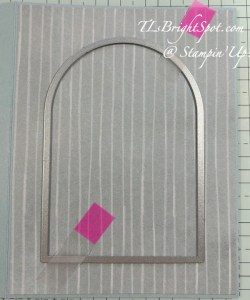
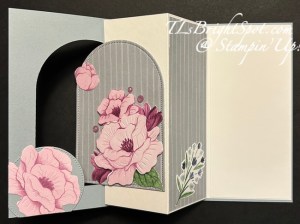
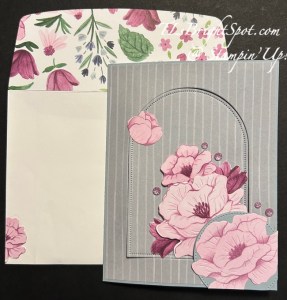
My card today uses the ever-popular Arches Dies found in the ONLINE EXCLUSIVES. I’ve paired it with one of the new In Colors for 2025-2026 called Cloud Cover plus a beautiful Florals In Bloom DSP. I either fussy cut the flowers with my paper snips, or die cut them with a die from Pretty Florals Dies or Sweet Blooms Dies. Both of these dies and the DSP are part of a new suite of products in the 2025-2026 Annual Catalog – the Florals In Bloom Suite.
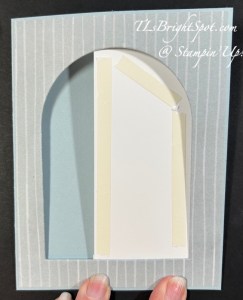
This card begins with a standard A2 card base in Cloud Cover. The DSP layer is just 1/8″ smaller all around and is from the Florals In Bloom pack. It is from the other side of this sheet that I either fussy cut or die cut the flowers for the front of this card. :O) Ah, but I jump ahead… after adhering the DSP to the card front, open card & use the 4th largest die in the Arches Dies to center it on the front & die cut the arch. This may take running it back & forth a couple of times.
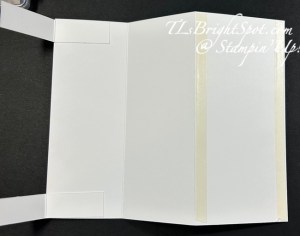
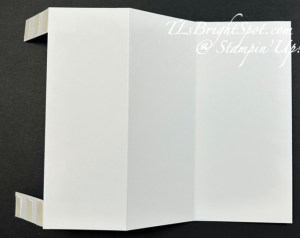
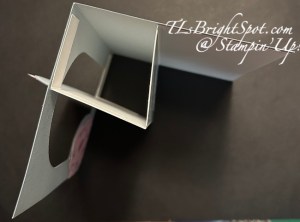
Now prepare the inside panel… 6 1/2 x 5 3/8 scored at 2 & 4 on the long side. Prepare two ‘hinges’ cutting 3″ x 1 1/4″, scored @ 1 1/2. Add Tear n’ Tape in several places then cut in half lengthwise, thereby creating 2 hinges. Add Tear n’ Tape to the BACK SIDE of the 2 1/2″ panel. On that same back side, add the hinges with the fold at the outside edge, one at top & one at bottom. Refer to photos below.
back side of card insert front side of card insert
Remove tape cover & add insert to to inside of card with 1/8″ edge top, right & bottom. Fold insert along score lines, remove tape cover on hinges and with them flat & sticky side up, close card front. Boom! Now, with card closed & ‘window’ uncovered, add adhesive or Tear n’ Tape to open area – see photo… & attach die cut arch & decorate! ….
As mentioned earlier, I either fussy cut with my paper snips or die cut with appropriate dies all the flowers. On the bottom right, this flower was Cloud Cover so that when the card is opened, there is a ‘like’ image inside – cut 2. After adhering, circle & flower were trimmed to card front edges.
Additional info:
DSP added to inside of card is 1 7/8 x 5 1/4, decorated with a die cut from the DSP (Sweet Blooms Dies)
Basic White panel on far right is 2 3/8 x 5 1/4
Embellishments on fron are 2024-2026 In Color Shimmer Gems
Wink of Stella was added to shaded areas of all flowers
This is what the card looks like from the top
For the envelope…
More of the same DSP from Florals In Bloom DSP pack (just the other side) adhered to the flap & trimmed to fit. On the front, another fussy cut flower added to the edge of the envelope front.
I had so much fun creating this card. It was pretty easy really and the fun came in the decorating. I would love to see what you do with this Window Pop-Out card design.
As I mentioned earlier, this suite of products are all available in the 2025-2026 Annual catalog, which goes live to customer May 6. That’s a few short weeks away. But… if you were to join my team, you could purchase the items to make this card (& more) as part of your starter kit. Wouldn’t that be fun? And in any future orders you would always get at least 20% off your purchase, just for being a demonstrator. And being a part of this team – well, lots of creative folks to inspire & encourage and learn more & more. so, think about it & come join the fun. Join with me here.
Want to just shop? You can see everything in my store by clicking here… Kits Collections, Last chance Products, ONLINE EXCLUSIVES, specials, Paper Pumpkin – it’s all in that link. Need a new 2025-2026 Annual Catalog – just let me know!
In just a couple of days… April 15 to be exact, Stampin’ Up! is going to be offering rewards to every customer beginning with a $20 purchase & above. No more host codes to worry about, just order & reap the benefits.