Stampin’ Up! Snailed It w/ Mini Shipping Boxes

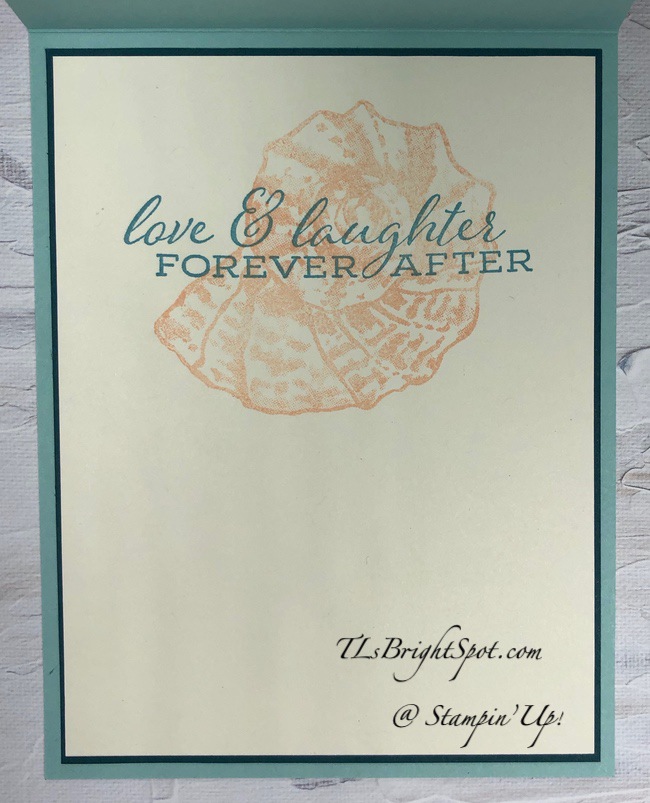
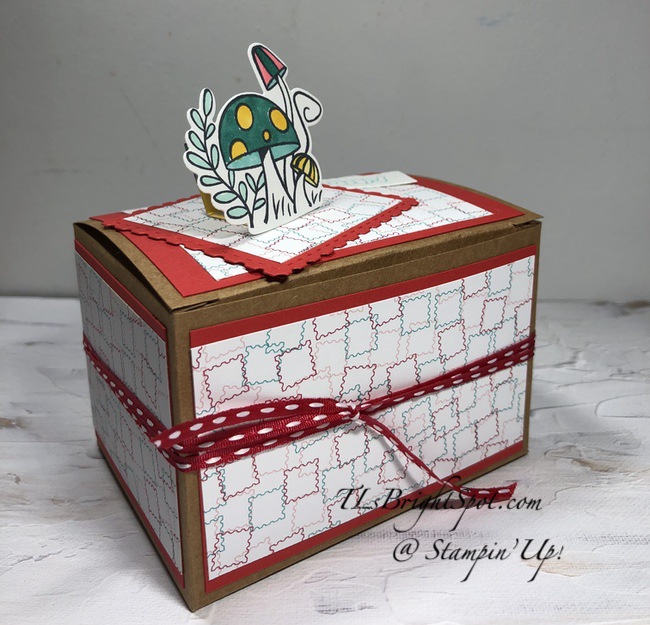
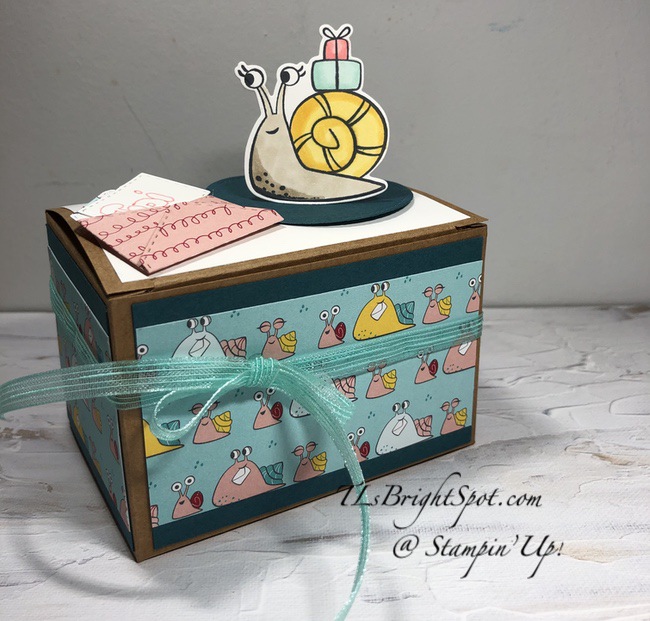
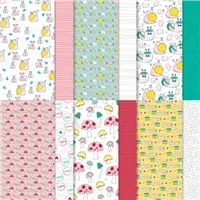
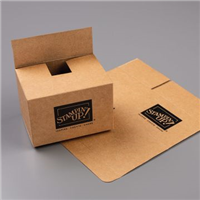
Blessed Good Friday today… gosh, this has come oh so quickly for me… hard to believe it’s here already. I’ve been preparing some little gems to send forth to others using the SU! Mini Shipping Boxes and the Snailed It bundle. This is such a cute set… and I had lots of fun using the coordinating Snail Mail DSP. Let’s take a peek.

Aren’t these fun? Filled w/ little goodies for each to open, these will be a nice little treat. I covered each of the sides:

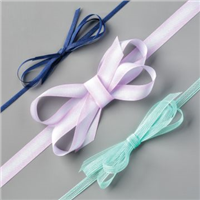
Bermuda Bay for the first box, Real Red for Box #2 and Pretty Peacock for box #3. (Card stock cuts will be listed at the bottom of this post.) I then used various sheets of the Snail Mail DSP to adhere to them – yep, liquid glue is my choice, but feel free to use Stampin’ Seal if that’s what you prefer. I then tied various coordinating ribbon around each: Braided Linen Trim, Playful Pets Trim Combo Pack, and finally Playing w/ Patterns Ribbon Combo Pack. Then I decorated the top.

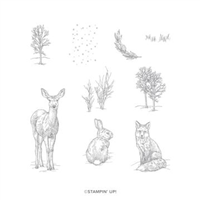
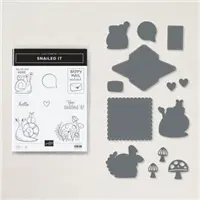
I stamped each of the stamps with Memento Black ink then colored with appropriate Blends to coordinate with the particular box. Box #1 used Flirty Flamingo and Bermuda Bay, and I stamped the bubble in Flirty Flamingo ink; box #2 used Bermuda Bay, Daffodil Delight, Flirty Flamingo and Pool Party Blends; box #3 used Crumb Cake, Daffodil Delight, Pool Party and Flirty Flamingo. I die cut the mushroom and the snail with their respective dies using the Snail Dies. The Happy Mail rectangle was trimmed with paper snips. For box #2 I die cut the square using the Snail Dies and covered it with the same DSDP. Box #3 I also cut an envelope using the Snail Dies (cute cute envelope!) There is also a small rectangle die in the Snail Dies and I cut 3 using Basic White card stock, then used a Stampin’ Write marker to write the recipients name. I also made a pop-up for each box with a 1/2″ x 3 1/2 strip, scored every 3/4″. See the side-view photo.

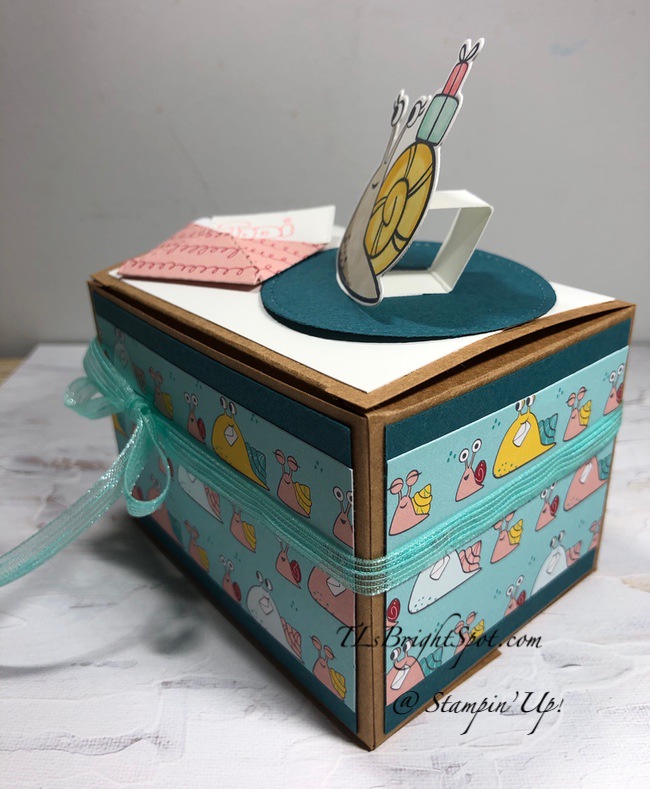
And here’s one of the top view…

Snailed It w/ Mini Shipping Boxes – top view

When I closed and filled the box, I adhered the bottom together with Seal + and put a Thick Basic White card piece in the bottom to make it more sturdy. I’m very pleased with how these turned out and hope the recipients like them too. Sending each of them special hugs…

I hope you like today’s project. I would love to see what you do with these fun shipping boxes. Products from today’s project may be found in the list below – for easy shopping 🙂 Just FYI – this bundle and the embossing folder are something you will continue to see… hint, hint. As a reminder… I’ve made it easy for you to simply ‘add all to cart’. If I can help you in any way to order these items, or others, please give me a holler. As a thank you to my customers, when the order is between $50-$150 I offer a SU! item of your choice valued at $10. Remember to use MY CURRENT HOST CODE – 63SXY3X6– good April 1- 15 . When the order is over $150, you still receive that free gift from me, but SU! has Stampin’ Rewards that may be used for additional products, so don’t use the host code at that time. If you have questions just let me know. Card cuts are listed at the bottom of this post.

Join my team now… you may do that here.

We have lots of fun and are a creative bunch that encourages & supports one another.

Remember that Stampin’ Up! has lots of wonderful items on their retired list. SHOP EARLY BEFORE ITEMS ARE SOLD OUT! Sale ends May 3.

03.23.21_HEADER_LAST-CHANCE_NA

  • PDF list
  • Excel Spreadsheet list
  • Card cuts for today’s project:

    • card stock bases: 3 3/4 x 2 1/2 (2 for front & back); 2 3/4 x 2 1/2 (2 for sides); 3 3/4 x 2 3/4 for top
    • Snail Mail DSP: 3 3/4 x 2 1/4 (2 for front & back); 2 3/4 x 2 1/4 (2 for sides); 3 1/2 x 2 1/2 when needed for top, + extra DSP for any embellishment (envelope)
    • Basic White 4 x 5/14 for die cuts

    Thanks for stopping by.

    May you have a beautiful day.

    Make someone happy sending them a handmade card or gift filled with love ❤️

    Stampin’ Up! Birthday w/ Fine Art Floral

    Are there ever some colors you wouldn’t think of putting together and yet – kabamm – they are awesome! Today’s card features Mossy Meadow & Calypso Coral combo that I really, really like!

    But first – Spring is in the air here on the East coast… Helebores or Lenten Rose as some folks call them, are up and beautiful… and I just have to share… Daffodils, Jonquils, crocus are up and in full bloom as well, but Helebores are special. 🙂

    Are these gorgeous or what! Pretty soon – well, in a few weeks really – they will be enveloped by the large Hostas that surround them. They are one of the first bloomers of Spring and thrive in. the cool temps this season provides.

    OK – the project for today…

    Fine Art Gallery Birthday – #1

    This photo does not show how stunning this card really is – or maybe I should use the word elegant. It’s subtle due to the Mossy Meadow card base, and elegant with the use of the Golden Acetate DSP and contrasting flowers in Calypso Coral ink. The Fine Art 3/8″ ribbon and Gold Glitter Enamel dots just really pull this all together. LOVE IT! To give credit where credit is due, this was part of our team tutorial and created by a team member Sue Prather – thank you Sue!

    The card base as I mentioned earlier is Mossy Meadow card stock. I adhered the Golden Acetate DSP to the front of the card with Stampin Seal, just in the center of the acetate. This will be covered by the next layer.

    Stamp the small floral bouquet from the Fine Art Gallery stamp set in Mossy Meadow ink onto a panel of Very Vanilla card stock. On a smaller panel of Very Vanilla, stamp the same floral bouquet in stamped-off once Calypso Coral ink. Now stamp the floral filler with full strength Calypso Coral ink to create the wonderful contrast. Die cut the bouquet with the appropriate dies from the Floral Gallery Dies, then snip the flower heads off the stem and trim as necessary. Fit over the Mossy Meadow stamped image by adhering with dimensionals. Stunning! Now adhere the Gold Glitter Enamel dots to each of the ‘buds’. Adhere this panel to a slightly larger piece of Mossy Meadow card stock with liquid glue. Wrap a length of the Fine Art Ribbon around the left end of this panel and knot. Secure with a glue dot under the knot. Adhere to the front of the card with dimensionals.

    All that’s left to do for the front of the card is the sentiment panel. Stamp the sentiment from the Art Gallery stamp set in Mossy Meadow ink on a Very Vanilla scrap. (Amy suggests using VersaMark and gold embossing powder.) Die cut with this fun rectangle die from, the Floral Gallery Dies, then adhere to a slightly larger piece of Mossy Meadow card stock. Adhere the strip with dimensionals, adding a second layer on the far right end. Add one more Gold Glitter Enamel Dot to the right end and voila – the card front is done…

    Sorry, I did not photo the inside of the card – however… adhere a 1/2″ strip of the Golden Acetate DSP to a Very Vanilla panel on the far left side, all the way to the edge with just a swipe of Stampin Seal at top & bottom. Stamp one of the floral images as before: stamped-off Calypso Coral ink first, then full strength for the filler. Now do the envelope.

    Fine Art Gallery Birthday – #2

    I used a strip of Mossy Meadow card stock and ran it through the Painted Texture 3D embossing folder then adhered it to the envelope flap and trimmed to fit. I stamped the floral image as before: stamped-off once Calypso Coral ink then full strength Calypso Coral for the filler. I then took my Calypso Coral marker and made little pin dots just above the flower – and this beauty is done!

    Fine Art Gallery Birthday – #3

    Products from today’s project may be found in the list below – for easy shopping 🙂 Just FYI – this bundle and the embossing folder are something you will continue to see… hint, hint. As a reminder… I’ve made it easy for you to simply ‘add all to cart’. If I can help you in any way to order these items, or others, please give me a holler. As a thank you to my customers, when the order is between $50-$150 I offer a SU! item of your choice valued at $10. Remember to use MY CURRENT HOST CODE – XTK4JNGQ– good Mar 16 – 31. When the order is over $150, you still receive that free gift from me, but SU! has Stampin’ Rewards that may be used for additional products, so don’t use the host code at that time. If you have questions just let me know. Card cuts are listed at the bottom of this post.

    Also, should you be interested in similar tutorials from our team, you may join my team now… you may do that here. We have lots of fun and are a creative bunch that encourages & supports one another.

    Discounts on favorite products from the 2020-2021 Annual Catalog ~ shop early so you don’t miss out.

    03.23.21_HEADER_LAST-CHANCE_NA

    Sales Period: 24 March, 1:00 PM (MT) – 3 May 2021, 11:59 PM (MT)

    Thanks for stopping by.

    May you have a beautiful day.

    Make someone happy sending them a handmade card filled with love.

    Card cuts:

    • Mossy Meadow card stock ~ 8 1/2 x 5 1/2 scored at 4 1/4, 3 x 4 1/4 for front panel, & sentiment strip – approx 1/2 x 3, 2 1/4 x 6 embossed for envelope flap
    • Very Vanilla card stock ~ 3 7/8 x 5 1/8 for front panel, 4 x 5 1/4 for inside and scrap for sentiment
    • Golden Garden DSP ~ 4 x 5 1/4 for front, 1/2 x 3 7/8 for inside

    Stampin’ Up! Retiring Pretty Perennials

    Wow! It’s Easter Week…. how this has slipped up on me…. lots going on in the Stampin’ Up! world, Spring is showing off the daffodils, crocus, star flowers and love the Helebores or Lenten Rose as some people know it. This is a shade loving perennial and blooms quite early. Ours are surrounded by Hosta and the flowers get lost amidst the greenery. But for now, they show off their glory cuz the Hosta are just beginning to peak through the soil. :O)

    Today’s card features the lovely and one of my favorite bundles in the Mini Catalog – Pretty Perennials – and it is retiring. While Stampin’ Up! has not released the retiring list from the Mini Catalog, as a demonstrator we get a preview of the new cattie – and this bundle is not in it! I have kept this card very, very simple and almost monochromatic. I definitely have an affinity for monochromatic cards… I may have to add a rhinestone to this, but for now…

    Retiring Pretty Perennials – #1

    Isn’t this fun? And the Stitched Whimsy Dies around the edge – love it. Products used in this card is a pretty short list.

    • Basic White Thick
    • Basic White
    • 2020-2022 In Color 6×6 DSP using Magenta Madness
    • Stitched Whimsy Dies (Jan – Jun Mini Catalog)
    • Pretty Perennials Bundle (Jan- Jun Mini Catalog)
    • Magenta Madness ink

    Let’s get to the ‘how to’ so you can make this card.

    I die cut several pieces using the Perennial Petals Dies and Basic White card stock and then used what I wanted – so there were some extras left over. I used the Stitched Whimsy Dies to create an impression on the Basic White panel, then stamped the word ‘happy’ before adhering anything to the card front. i began adhering the Petals die cuts with liquid glue, beginning with the leaf spray. Isn’t this a wonderful leaf spray die cut? Love the openness and as though it’s ‘blowing in the wind’ kind of look. I adhered each of the flower parts just in the center, as I wanted just enough dimension for a bit of 3D. This Basic White panel was layered on a slightly larger piece of 2020-2022 In Color 6×6 DSP. I added dimensionals to the back and adhered this to the Thick Basic White card front.

    Retiring Pretty Perennials #2 – inside

    For the inside… I stamped the word birthday in Magenta Madness ink on another Basic White panel, then added more parts of the die cuts from the Perennial Petals Dies with liquid glue. I adhered this to a panel of 2020-2022 In Color 6×6 DSP and into the inside of the card and voila!

    Retiring Pretty Perennials – #3

    For the envelope, I stamped the sentiment along the left in Magenta Madness ink and covered the flap with more of the 2020-2022 In color 6×6 DSP and the project was complete. What a simple and lovely card to have in my stash!

    Now let’s talk a bit about some of the retiring items, cuz I don’t want you to miss out! The products that have surprised me the most are the Embossing Powders and some of the dies. While the embossing powders are not ‘on sale’ they are retiring and will not be available once sold out. Layering Circles, Layering Ovals, Layering Squares, Stitched Shapes – all retiring!!! Oh my… Seabed embossing folder – 10% off, Scripty EF 10% off, Old World Paper 3D EF – also 10% off. While the Subtle 3D EF is not on sale, it is retiring… what?

    03.23.21_HEADER_LAST-CHANCE_NA

    Sales Period: 24 March, 1:00 PM (MT) – 3 May 2021, 11:59 PM (MT)

  • Only select items in the 2020–2021 Annual Catalog will be discounted.
  • Sale applies to all order types except host items (see Last-Chance Products List for items on sale).
  • No minimum purchase is required.Retiring items are available while supplies last.
  • Items and discounts may vary by market (depending on inventory levels).
  • Exclusions apply: Carryover items and some retiring items will not be discounted.
  • Excel Spreadsheet list
  • PDF list
  • A couple of beautiful dies at a fabulous bargain: Detailed Bands at 60% off, Butterfly Beauty at 40%, Friendly Silhouettes also at 40% off. Happy Dies are 60% off. Beautiful World Dies are 75% off… this is such a great deal – especially if you travel. This entire Suite is retiring – check it out in the annual cattie – pgs 24-26.

    I’m not going to go through the whole catalog, but have your cattie in front of you when reviewing the list. Mark those you want and order ASAP! As a thank you to my customers, when the order is between $50-$150 I offer a SU! item of your choice valued at $10. Remember to use MY CURRENT HOST CODE – XTK4JNGQ– good Mar 16 – 31. When the order is over $150, you still receive that free gift from me, but SU! has Stampin’ Rewards that may be used for additional products, so don’t use the host code at that time. If you have questions just let me know.

    Below is a product list of items used in today’s projects. They come from the 2020-2021 Annual Catalog ~ and those products are available now for purchase. You will find them in the product list below. As a reminder… I’ve made it easy for you to simply ‘add all to cart’. If I can help you in any way to order these items, or others, please give me a holler.

    Thanks for stopping by.

    May you have a beautiful day.

    Make someone happy sending them a handmade card filled with love.

    Card cuts for today’s project:

    Thick Basic White ~ 4 1/4 x 11 scored at 5 1/2

    2020-2022 In Color 6×6 DSP ~ 4 1/8 x 5 3/8 (2)

    Basic White ~ 4 x 5 1/4 (3) one of which is used for die cuts, one for the inside, the other the front

    Stampin’ Up! Friends Are Like Seashells

    WOOHOO! Are you reveling in the the retirement list? It IS pretty amazing, isn’t it? Just remember some items are retiring AS A BUNDLE and will be carried over into the new catalog… so look carefully at the list. Bundles, of course, are always 10% less expensive than when separated into two individual items. Just sayin’. At the end of today’s post I will again share the retirement list and connections to my online store.

    Today’s project(s) are two cards using the Friends Are Like Seashells bundle and the Seashells 3D Embossing Folder which coordinates with this et. I’ve used other products as well and will list those as I give directions.

    Here are the two cards.

    These two are so different but generally use the same ingredients. Directions for each card follows.

    Card #1

    • Card base is Pool Party card stock 4 1/4 x 11 scored at 5 1/2
    • Next layer is Pretty Peacock embossed with the Seabed 3D embossing folder (4 x 5 1/4) and adhered with Seal +
    • The top layer is Pearlescent Paper that has been die cut with the Seaside Seashells Dies, then a Blending Brush used to color the undersea leaves with Pear Pizzazz ink, then each shell stamped: Balmy Blue, Petal Pink, Crumb Cake, Gorgeous Grape and finally So Saffron ink. Allow to dry thoroughly then run through the Seashells 3D embossing folder. Oh what beautiful texture this gives! I put dimensionals all over trying to support even many of the broadest seaweed. Of course I had to trim some of the dimensionals into strips and I also used mini dimensionals too. Once I had the dimensionals where I wanted them I adhered it over the Pretty Peacock. This bold contrast really makes it pop.
    • I added three Opal Rounds.
    • On a 3/4″ strip of Very Vanilla card stock I stamped the sentiment in Balmy Blue using the A Wish for everything stamp set.. I adhered this to a 7/8″ layer of Pretty Peacock with liquid glue and punched the end with the Lovely Labels Pick a Punch. I wrapped Linen thread around the end of the banner a couple of times and tied a sweet bow. I added two more of the opal Rounds to the banner, attached dimensionals to the back and adhered it to the card. Voila!

    For the inside of this card I adhered a Pretty Peacock panel 4 x 5 1/4 with liquid glue. I stamped the shell in Petal Pink then the sentiment in Balmy Blue ink – on a Very Vanilla piece 3 7/8 x 5 1/8. The sentiment comes from the Forever Fern stamp set. This was adhered with liquid glue and the card was done.

    For the envelope I took a strip of Pretty Peacock and ran it through the Seabed 3D embossing folder then adhered it to the envelope flap with liquid glue. I took a couple of the underwater seaweed stamps and stamped them on the front of the envelope, one in full strength Pear Pizzazz, the other in stamped-off Pear Pizzazz.

    Love this card! And here’s a HELPFUL HINT… the ink takes a bit of time to dry on the Pearlescent Paper. Use that time to do the inside of the card, the banner, the envelope.

    Card #2

    • I began this card by first creating the pearl Blushing Bride card stock for the seashells. I did that by using my Blending Brush and the Frost White Shimmer Paint. I used my Blending Brush working in small sections of the paper and brushed it on in circles, trying not to touch the paper, just the edges. Touching the paper while the shimmer paint is wet leaves fingerprints and you don’t want that. Set it aside to dry and work on the rest of the card. By the way ~ this is beautiful when dry!
    • The card base is Basic Gray card stock 8 1/2 x 5 1/2 scored at 4 1/4. I embossed the front of the card with the Seabed Embossing Folder. It didn’t really show in the photo – not sure why…
    • I stamped my sentiment on a piece of Very Vanilla card stock with Crumb Cake ink and the Friends are like Seashells stamp set. I die cut it with the Painted Labels Dies.
    • While I was waiting for the pearlizing to dry I went ahead and did the envelope… I ran the flap through the Seashells Embossing Folder. How to do this? With the flap in the folder, fold the envelope around the folder and put it through your machine. 🙂 For the front of the envelope I stamped a starfish in Crumb Cake ink and the envelope was done.
    • With the Blushing Bride pearlized paper dry I die cut the paper with the Seaside Shells Die. I then stamped the Nautilus shell with more Blushing Bride ink and the conch shell with Balmy Blue ink and set them aside to dry.
    • While that was drying I did the inside of the card… I stamped the sentiment from the Friends are like Seashells in Crumb Cake ink then the starfish, also in Crumb Cake ink – on a panel of Very Vanilla card stock 3 3/4 x 5. I adhered this to a panel of Blushing Bride 4 x 5 1/4 with liquid glue. These were adhered to the inside of the card, again with liquid glue.
    • Back to the stamped & die cut shells… I ran them through the Seashells 3 D Embossing and oh my, they almost look real. I love how they turned out. I put the dimensionals on the back and adhered them where I wanted.
    • I added a large Opal Rounds to the banner then put dimensionals on the right side and Stampin’ Seal on the left and put in place. I added two more Opal Rounds to the card front and voila – all done!

    Yep – got over zealous and wrote on the card before taking the photo… ugh! And it’s hard to see the embossed envelope flap or the embossing on the card front, but I did do it. Guess I didn’t have my lights set properly 😦

    These two cards didn’t take that long to do ~ and it’s fun creating something so different with the same supplies. This makes gorgeous cards! Love the font of the sentiments and the sentiments themselves are nice too. Here they are again – side by side.

    If I can help you in any way to order these items, or others, please give me a holler. As a thank you to my customers, when the order is between $50-$150 I offer a SU! item of your choice valued at $10. Remember to use MY CURRENT HOST CODE – XTK4JNGQ– good Mar 16 – 31. When the order is over $150, you still receive that free gift from me, but SU! has Stampin’ Rewards that may be used for additional products, so don’t use the host code at that time. If you have questions just let me know.

    Below is a product list of items used in today’s projects. They come from the 2020-2021 Annual Catalog as well as the butterfly which is a preorder item from the new Jan-Jun Mini Catalog~ and those products are available now for purchase. You will find them in the product list below. As a reminder… I’ve made it easy for you to simply ‘add all to cart’.

    The perfect time to shop- – SALE TIME!

    Discounts on favorite products from the 2020-2021 Annual Catalog ~ shop early so you don’t miss out.

    03.23.21_HEADER_LAST-CHANCE_NA

    Sales Period: 24 March, 1:00 PM (MT) – 3 May 2021, 11:59 PM (MT)

  • Only select items in the 2020–2021 Annual Catalog will be discounted.
  • Sale applies to all order types except host items (see Last-Chance Products List for items on sale).
  • No minimum purchase is required.
  • Retiring items are available while supplies last.
  • Items and discounts may vary by market (depending on inventory levels).Exclusions apply:
  • Carryover items and some retiring items will not be discounted.
  • Official retiring lists from Stampin’ Up!

  • PDF lis
  • Excel Spreadsheet list
  • Items carrying over from a mini catalog into another mini catalog will not be available until that catalog is released.
  • Items carrying over from the annual catalog to another catalog will be available continuously.
  • For information about the Last-Chance Supply Items, click here.
  • For information about the Last-Chance Products from the 2021 January–June Mini Catalog, click here.
  • ick here to go to my website to start shopping and place your order 🙂

    Thanks for stopping by.

    May you have a beautiful day.

    Make someone happy sending them a handmade card filled with love.

    Stampin’ Up! 2020-2021 Annual Catalog Retiring List

    03.23.21_HEADER_LAST-CHANCE_NA

    The perfect time to shop- – SALE TIME! Discounts on favorite products from the 2020-2021 Annual Catalog ~ shop early so you don’t miss out.

    Sales Period: 24 March, 1:00 PM (MT) – 3 May 2021, 11:59 PM (MT)

    • Only select items in the 2020–2021 Annual Catalog will be discounted.
    • Sale applies to all order types except host items (see Last-Chance Products List for items on sale).
    • No minimum purchase is required.
    • Retiring items are available while supplies last.
    • Items and discounts may vary by market (depending on inventory levels).
    • Exclusions apply: Carryover items and some retiring items will not be discounted.

    Ordering deadline for retiring products is May 3, 2021 at 11:59 PM (MT)

    Official retiring lists from Stampin’ Up!

    • Items carrying over from a mini catalog into another mini catalog will not be available until that catalog is released.
    • Items carrying over from the annual catalog to another catalog will be available continuously.
    • For information about the Last-Chance Supply Items, click here.
    • For information about the Last-Chance Products from the 2021 January–June Mini Catalog, click here.

    Click here to go to my website to start shopping and place your order 🙂

    HOST CODE… now through Mar 31… XTK4JNGQ

    If I can help you in any way to order these items, or others, please give me a holler. As a thank you to my customers, when the order is between $50-$150 I offer a SU! item of your choice valued at $10. Remember to use MY CURRENT HOST CODE – XTK4JNGQ– good Mar 16 – 31. When the order is over $150, you still receive that free gift from me, but SU! has Stampin’ Rewards that may be used for additional products, so don’t use the host code at that time. If you have questions just let me know.

    HAPPY SHOPPING!

    Stampin’ Up! Dandy Garden Memories & More Card Pack

    This card pack – Dandy Garden Memories & More is a wonderful addition to making cards – or, if you are a scrapbooker, perfect for that as well. I am sharing two cards today that feature the laser-cut elements of this card pack. They are the focal point for these two cards. Obviously I have paired the laser-cut panels with other Stampin’ Up! products… 🙂 Playing with Patterns 6×6 DSP forms the background papers for both cards. I have also included Brilliant Wings Dies, but a full listing will be at the end of this post. Let’s take a look at the cards.

    Dandy Garden Memories & More Card Pack – Card #1

    The background paper is is from the Playing with Patterns 6×6 DSP and features a dotted Calypso Coral. I cut it slightly larger than the laser-cut panel then matted it on a panel of Basic White card stock – all done with liquid glue. I next added the ribbon by using Seal + and running it across the triple layers. I took a length of ribbon from the Flowers for Every Season Ribbon Combo Pack and created folds for extra dimension and charm. I then added three very sweet Ladybug Trinkets with glue dots. I put this on dimensionals and added it to the card base of Calypso Coral card stock.

    For the inside I simply added two stickers from the card pack: the strip which brings in the Calypso Coral and also a bee as though it is taking supplement from the flower. For the envelope I took another one of the card pack items and adhered it to the envelope flap, adhering with liquid glue. I also added one of the stickers that coordinates with the card front.

    Card #2 is very light & springy. I added the laser-cut panel to a piece of the Playing w/ Patterns 6×6 DSP. I then die cut an outline of the butterfly with another panel of the same DSP pack using the Brilliant Wings Dies. I then die cut the detail of the butterfly in Basic White card stock and layered them together with a bit of liquid glue just along the body, then adhered it directly to the card front with more liquid glue. I added three Metallic Pearls to the butterfly body – in silver. I wanted a ribbon and used one of the ribbons from the Playing w/ Patterns Ribbon Combo Pack – Purple Posy variegated. I used a glue dot under the knot to hold it in place. I stamped the sentiment from Field of Flowers stamp set in Gorgeous Grape ink on a Basic White strip. I adhered that to the same DSP as is the backdrop of the butterfly and trimmed the ends with the Banners Pick a Punch. I put this on dimensionals and added it just beneath the ribbon. I added two more of the silver Metallic Pearls to this sentiment banner.

    Dandy Garden Memories &N More Card Pack – card #2

    For the inside I stamped the sentiment from the Field of Flowers stamp set in Gorgeous Grape ink, then added more of the same DSP as on the front of the card with liquid glue.

    For the envelope I stamped the grassy portion in Granny Apple Green ink from the same Field of Flowers stamp set. I then added the flowers in Gorgeous Grape ink. The envelope flap got more of the same Playing with Patterns 6×6 DSP.

    I love this kind of card to have on hand. They can so easily be a sympathy card or birthday card or just a simple note. Hope you like!

    Below is a product list of items used in today’s projects. They come from the 2020-2021 Annual Catalog as well as the butterfly which is a preorder item from the new 2021-2022 Annual Catalog.~ and those products are available now for purchase. You will find them in the product list below. As a reminder… I’ve made it easy for you to simply ‘add all to cart’. If I can help you in any way to order these items, or others, please give me a holler. As a thank you to my customers, when the order is between $50-$150 I offer a SU! item of your choice valued at $10. Remember to use MY CURRENT HOST CODE – XTK4JNGQ– good Mar 16 – 31. When the order is over $150, you still receive that free gift from me, but SU! has Stampin’ Rewards that may be used for additional products, so don’t use the host code at that time. If you have questions just let me know.

    Quick reminder – the retirement list goes live Mar 24 – tomorrow – at 1 PM MT (that’s 3 PM Eastern time). I will pass that on to you as soon as I have that info. Items are a first come first serve basis – so order early if there is something you really want.

    Card cuts for today’s project:

    Card #1

    • Calypso Coral card stock 8 1/2 x 5 1/2 scored at 4 1/4
    • Basic White card stock 3 3/4 x 5, 4 x 5 1/4 (inside)
    • Playing w/ Patterns 6×6 DSP 3 1/2 x 4 3/4

    Card #2

    • Purple Posy card stock 4 1/4 x 11 scored at 5 1/2
    • Playing w/ Patterns 6×6 DSP 3 3/8 x 4 7/8, 3/4 strip for front banner & inside + 2 1/4 x 6 for envelope flap
    • Basic White card stock 4 x 5 1/4 (inside

    Thanks for stopping by.

    May you have a beautiful day.

    Make someone happy sending them a handmade card filled with love.

    Stampin’ Up! Nature’s Beauty Shines

    Did you ever notice how some stamp sets are soothing? Perhaps that sounds odd, but it’s like background music that is always there and is comforting, while other music makes you want to dance/ move. This is the former: reliable and comforting and somehow simple but elegant. This stamp set has been on my desk for a couple of days, just waiting … and I finally took the plunge with it.

    Nature’s Beauty Shines – #1

    No DSP on this card! I feel as though I should make this again ~ in Very Vanilla, just to see the difference. Maybe I will, but for now it’s Basic White Thick we have for the card base. I stamped the bunny from Nature’s Beauty stamp set in Smoky Slate ink on a Basic White panel, then die cut it with the second largest of the Stitched Squares Dies. I then stamped the grasses from the same stamp set with Soft Sea Foam ink and Granny Apple Green ink. Because of the darker green grass, I die cut a scalloped square using the Layering Squares Dies and Granny Apple Green card stock. I adhered these two together with liquid glue. I then took the Sheer Ribbon in Pool Party and wove it back and forth, adhered it to the back of this panel with Seal+. I took another strip of Basic White card stock and ran it through the Meadow Moments Embossing Folder. (Love this embossing folder!) I adhered this embossed panel to the card front, off-set. I stamped the sentiment from Itty Bitty Greetings stamp set in Granny Apple Green ink. Next I adhered the bunny panel with the ribbon with dimensionals. I added three Artistry Blooms Adhesive-Backed Sequins and called the front done.

    Nature’s Beauty Shines – inside, #2

    For the inside I adhered a leftover panel I had in my stash and used it as a frame. I stamped the cute egg from Hey, Chick stamp set in Smoky Slate ink. I then stamped the grasses from Nature’s Beauty stamp set in Soft Sea Foam ink then Granny Apple Green ink and the inside was complete as well.

    Nature’s Beauty Shines – #3

    For the envelope I kept it really simple by simply embossing the envelope flap with the same Meadow Moments Embossing Folder. I love the simplicity of this card and how unassuming. Hope you like it as well. Card cuts are listed at the bottom of this post.

    Below is a product list of items used in today’s projects. They come from the 2020-2021 Annual Catalog ~ and those products are available now for purchase. You will find them in the product list below. As a reminder… I’ve made it easy for you to simply ‘add all to cart’. If I can help you in any way to order these items, or others, please give me a holler. As a thank you to my customers, when the order is between $50-$150 I offer a SU! item of your choice valued at $10. Remember to use MY CURRENT HOST CODE – XTK4JNGQ– good Mar 16 – 31. When the order is over $150, you still receive that free gift from me, but SU! has Stampin’ Rewards that may be used for additional products, so don’t use the host code at that time. If you have questions just let me know.

    Remember the 2019-2021 In Colors will be retiring soon: Terracotta Tile, Rococo Rose, Pretty Peacock, Seaside Spray and Purple Posy. Those items are available while supplies last. We have been told that the warehouse is low on Rococo Rose inventory, so if you want any of that, best to get it soon :O) In a previous post I listed many items that could be purchased with these colors and you may find that post here.

    Being a part of the Stampin’ community brings all kinds of fringe benefits ~ early access to new catalogs, guaranteed 20% (or more) discount on all Stampin’ Up! products, free tutorials, access to web sites that will encourage and strengthen your abilities. Join my team now… you may do that here. Your kit can be your choice of items in your $99 Starter Kit (valued at $125!)

    Card cuts for today’s project:

    • Basic White Thick 4 1/4 x 11 scored at 5 1/2
    • Basic White 3 x 4 1/4 for embossing; about 3 1/4 square for die cut
    • Granny Apple Green about 3 1/2 square for scalloped die cut

    Thanks for stopping by.

    May you have a beautiful day.

    Make someone happy sending them a handmade card filled with love.

    Stampin’ Up! Forever Greenery Sympathy

    Sympathy cards can be really difficult to make, mostly because of the subject. Forever Greenery DSP helps to lighten that burden with beautiful papers. My first card/s use the Forever Gold Laser-Cut SDSP as embellishment and make this simple and elegant.

    The layout for these two cards is exactly the same, I just used different papers from the DSP pack and a circular laser-cut piece vs a rectangular laser-cut. It’s wonderful how different these two are and yet so similar. The sentiment comes from Path of Petals stamp set for both cards. For the card on the left, I used a 2″ circle punch to create the circle and stamped leaves in Pretty Peacock ink using the Forever Fern stamp set. You also see Pear Pizzazz card stock outlining the DSP. On the card at right I used leaves from Touched My Heart stamp set and stamped in Soft Sea Foam ink, same as the card stock behind the DSP. I embellished both cards with Metallic Pearls.

    And here are the insides for these two cards

    The card on left is stamped in Pretty Peacock: the sentiment from Path of Petals stamp set, leaves from the Forever Fern stamp set. The card at right uses the stamps from Touched My Heart stamp set stamped in Pretty Peacock ink and the leaves stamped in Soft Sea Foam ink.

    This is the second set of sympathy cards – again same layout, just different papers and embellishments.

    Again – same layout for these two. The backing for the DSP and sentiment band on the left card is Very Vanilla card stock. The ribbon is Very Vanilla / Gold Pleated ribbon and again I used Metallic Pearls for embellishment. The card on the right uses Pear Pizzazz card stock for backing of the DSP and for the sentiment panel, and Pearl Basic Jewels for embellishment. The ribbon is Old Olive/ Pretty Peacock 3/8″ Ribbon – a pretty double-sided one. Both use the sentiment from Woven Heirlooms stamp set.

    And here are the insides of each.

    The card on the left shows Soft Sea Foam card stock for the backing of the Very Vanilla card stock. It was stamped with leaves from the Forever Fern stamp set in Soft Sea Foam ink. The card on the right is stamped in Pretty Peacock ink on Basic White card stock and uses the Woven Heirlooms stamp set.

    Voila – four sympathy cards created in a flash. Here they are with the envelopes.

    Below is a product list of items used in today’s projects. They come from the 2020-2021 Annual Catalog ~ and those products are available now for purchase. You will find them in the product list below. As a reminder… I’ve made it easy for you to simply ‘add all to cart’. If I can help you in any way to order these items, or others, please give me a holler. As a thank you to my customers, when the order is between $50-$150 I offer a SU! item of your choice valued at $10. Remember to use MY CURRENT HOST CODE – XTK4JNGQ– good Mar 16 – 31. When the order is over $150, you still receive that free gift from me, but SU! has Stampin’ Rewards that may be used for additional products, so don’t use the host code at that time. If you have questions just let me know.

    Pretty Peacock is one of the 2019-2021 In Colors that is retiring soon. Get your while supplies last!

    Thanks for stopping by.

    May you have a beautiful day.

    Make someone happy sending them a handmade card filled with love.

    Stampin’ Up! Memories & More Card Pack

    Flowers For Every Season Memories & More Card Pack is bright, beautiful and full of flowers. AND they are super fun to create – sympathy cards/ birthday cards & more. I did just the first two with this group and am super happy with how they turned out. I did a bit of embellishing – who can resist – but not much. I’m going to share one at a time & tell the additions for that card, then move on to the next. Here’s the first card.

    Obviously this is a sympathy card… I added Seaside Spray card stock behind the floral pattern and behind the sentiment panel as well. The sentiment on the card front is from Touched My Heart stamp set. The sentiment is on dimensionals and it has 5 Pearl Basic Jewels added. For the inside I used Flowers For Every Season 6×6 DSP, Basic White card stock and a single sticker from the Flowers For Every Season Memories & More Card Pack.

    Additions for this set are the Bumblebee Ribbon, Cinnamon Cider card stock and ink, and stickers from the Flowers For Every Season Memories & More Card & Envelope pack for the card front & the inside as well.

    To this card I used So Saffron card stock for each of the background papers. The sentiment panel uses the stamp set Peaceful Moments stamp set. Additions were Wink of Stella to the yellow flowers and fun stickers from the Flowers For Every Season Memories & More Card Pack. The sentiment panel is on dimensionals.

    This fourth card uses Magenta Madness ribbon (2020-2022 In Color Ribbon), Basic White card stock behind the floral image. For the inside, stickers from the card pack were added to the Basic White panel which was adhered to another piece of Flowers For Every Season 6×6 DSP.

    Opal Rounds were used as additional embellishments for the card front and Flirty Flamingo card stock was used as background papers on both the front & inside of the card. A single sticker was added to the Basic White panel on the inside.

    These are lovely cards with a finished size larger than what we are used to: 4 1/4 x 6 1/4. The layers and embellishments make them very appropriate for a beginner to intermediate stamper. Below is a product list of items used in today’s project. They come from the 2020-2021 Annual Catalog as well as the Jan-Jun Mini Catalog ~ and those products are available now for purchase. You will find them in the product list below. As a reminder… I’ve made it easy for you to simply ‘add all to cart’. If I can help you in any way to order these items, or others, please give me a holler. As a thank you to my customers, when the order is between $50-$150 I offer a SU! item of your choice valued at $10. Remember to use MY CURRENT HOST CODE – XTK4JNGQ– good Mar 16 – 31. When the order is over $150, you still receive that free gift from me, but SU! has Stampin’ Rewards that may be used for additional products, so don’t use the host code at that time. If you have questions just let me know.

    Thanks for stopping by.

    May you have a beautiful day.

    Make someone happy sending them a handmade card filled with love.

    Stampin’ Up! Kangaroo & Easter

    It’s Saturday and Spring is in the air… the crocus and snow drops, daffodils & jonquils – oh yes… Love, love Spring. And today’s card says Spring all over it. The Kangaroo & Co bundle is new to me and I just had to use it.

    Kangaroo Easter – #1

    Is that ‘roo face cute or what?! Let’s talk through how to make this card, shall we?

    Preparation:

    • Purple Posy 4 1/4 x 11 scored at 5 1/2
    • Basic White 4 x 5 1/4 (2) + about 3 1/2 x 5 for dies + scrap for banner
    • 2019-2021 In Color 6×6 DSP in Purple Posy 3 1/2 x 5
    • Highland Heather scraps 3/4 x 1 1/2 (3) + scrap for banner

    How to:

    • Adhere the 2019-2021 In Color 6×6 DSP panel to the Basic White panel then to the card base, all with liquid glue.
    • Stamp the Kangaroo from Kangaroo & Co in Smoky Slate on the Basic White strip. Also stamp the flower bouquet in Memento Black ink on the same strip.
    • Color the Kangaroo with Smoky Slate Stampin’ Blends, the ears & nose with Dark Petal Pink.
    • Color the bouquet with Stampin’ Blends: Dark Pool Party for the leaves, Daffodil Delight and Highland Heather for the flowers. Die cut both.
    • Adhere the three Highland Heather strips as shown, using liquid glue.
    • Put dimensionals on the Kangaroo and adhere as shown.
    • The ‘roo has a pouch. I put a single dimensional on the bouquet and slipped an edge into the pouch.
    • Add a bow form the Flowers for Every Season Ribbon Combo Pack and adhere with a glue dot.
    • Stamp the sentiment from Kangaroo & Co stamp set with Smoky slate ink on a 3/4 wide strip. Trim one end with the Banners Pick a Punch.
    • Adhere to a 1″ Highland Heather scrap that was trimmed with the same Banners Pick a Punch. This strip has the scalloped edge as it was a leftover from a scalloped die cut from a previous project :). Adhere these two to the card front, slipping them slightly under the die cut Kangaroo.
    • Adhere 3 Iridescent Pearls to the banner and the card front is complete.
    Kangaroo Easter – #2
    • The inside was super fast – I used my Blending Brush to add a bit of Highland Heather ‘glow’ to a Basic White panel.
    • Stamp the sentiment from A Wish for Everything stamp set using Highland Heather ink.
    • Adhere the panel to the inside of the card and voila…
    Kangaroo Easter – #3

    The envelope was stamped with the cute envelope from the Kangaroo & Co stamp set with Highland Heather ink. I colored the heart using a Highland Heather marker. The flap got more 2019-2021 In Color 6×6 DSP in Purple Posy and this card is ready for Easter!

    Below is a product list of items used in today’s project. They come from the 2020-2021 Annual Catalog as well as the Jan-Jun Mini Catalog ~ and those products are available now for purchase. You will find them in the product list below. As a reminder… I’ve made it easy for you to simply ‘add all to cart’. If I can help you in any way to order these items, or others, please give me a holler. As a thank you to my customers, when the order is between $50-$150 I offer a SU! item of your choice valued at $10. Remember to use MY CURRENT HOST CODE – XTK4JNGQ– good Mar 16 – 31. When the order is over $150, you still receive that free gift from me, but SU! has Stampin’ Rewards that may be used for additional products, so don’t use the host code at that time. If you have questions just let me know.

    Just a quick reminder, the 2019-2021 In Colors are retiring soon. In a previous post I mentioned several items available to purchase in those colors: Terracotta Tile, Rococo Rose, Purple Posy, Pretty Peacock and Seaside Spray. You may find that post here.

    Now is the perfect time to become a team member of Stampin’ Up! – with your choice of items in your $99 Starter Kit (valued at $125!) Act quickly… JOIN MY Team here. Being a part of the Stampin’ community brings all kinds of fringe benefits ~ early access to new catalogs, guaranteed 20% (or more) discount on all Stampin’ Up! products, free tutorials, access to web sites that will encourage and strengthen your abilities. Join my team now… Again – you may do that here.

    Thanks for stopping by.

    May you have a beautiful day.

    Make someone happy sending them a handmade card filled with love.