Black Friday Sale Coming Soon
You asked, and we listened! Announcing our first-ever Black Friday sale! From November 25 to December 1, get up to 40% off select products.

SHOP WITH ME HERE
FROM NOVEMBER 25 – DECEMBER 1, GET40% OFF SELECT PRODUCTS

Black Friday Sale Coming Soon
You asked, and we listened! Announcing our first-ever Black Friday sale! From November 25 to December 1, get up to 40% off select products.
SHOP WITH ME HERE
FROM NOVEMBER 25 – DECEMBER 1, GET40% OFF SELECT PRODUCTS
Welcome to our Thursday hop! Thanks for jumping in… If you came from Tara, I’m sure you were inspired by her creation – and I hope you will be inspired here as well. We have a color challenge today & I chose to work with the Traditions of Christmas Specialty DSP. What makes it specialty you ask – the gold! And it’s gorgeous!

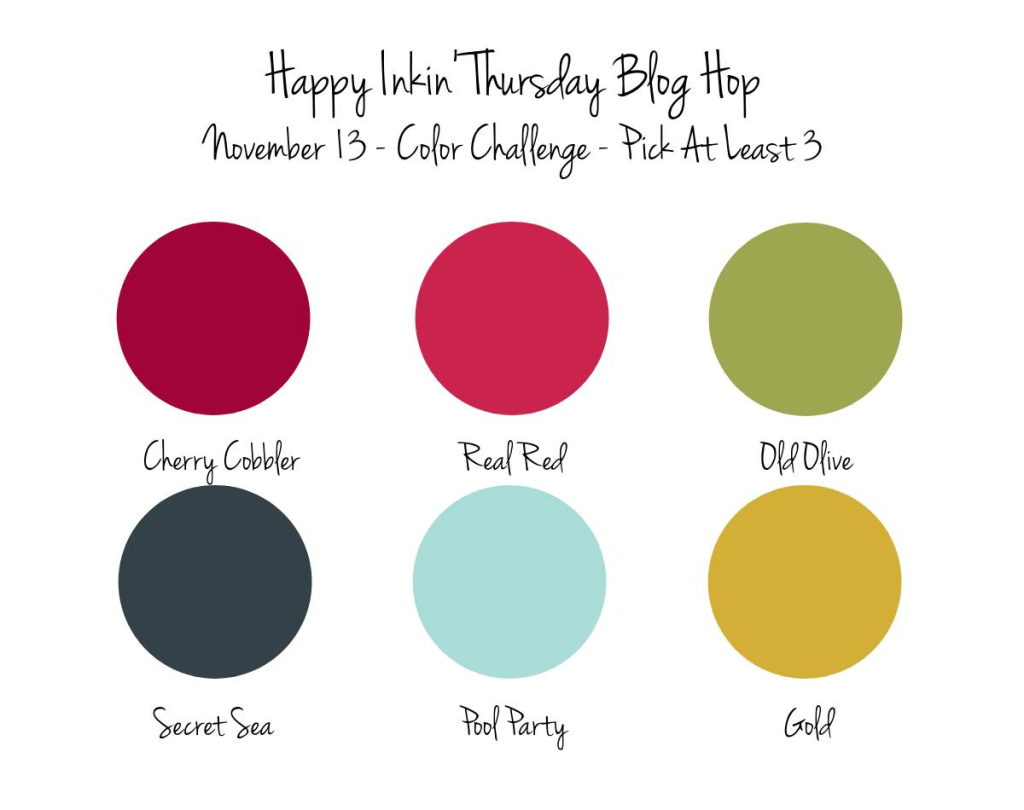

I think I incorporated all the colors but Secret Sea by using the Traditions of Christmas SDSP. This is such gorgeous paper and my pack is nearly gone. Of course, my card class is using it to make this exact card today 😀
To make this beauty… begin with a card base of 4 1/4 x 5 1/2 and layer it with a panel of Pool Party that is embossed with the Peaceful Greenery embossing folder. Yes, I used this embossing folder in yesterdays card as well. Set this aside to create the fun fold front… cut 4 1/4 x 11 & score. (see below for all card cuts & scoring info) Attach Traditions of Christmas SDSP panels as shown in next photo. The Basic White panels: the smaller is stamped in Real Red ink using the Traditional Labels stamp set. The larger Basic White panel has the 5/8 wide SDSP strip. The Nests of Winter panel is attached on the ‘back’ of the front fold. Again – see the photo below for reference. I kept the photo in large size in order for you to see all the panels.
Once all pieces are attached to the folded panels, attach ribbon to the back of the folded section, then attach that entire folded section to the embossed panel, centering all around. Tie ribbon into bow to determine placement of sentiment.
Sentiment piece is Real Red & Pool Party layered. The gold foil sentiment is created with the fabulous Christmas Words Collage Hybrid Embossing Folder & Dies. All are attached with adhesive, then attached to the card front, centering.
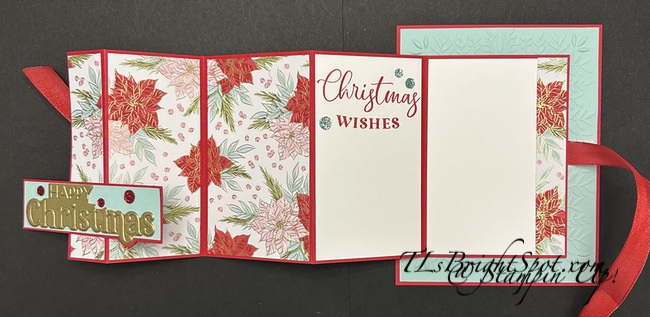
For the envelope I used the same piece of Traditions of Christmas SDSP as the front panels of the card. And that was it. This card is not too heavy and the bulk is enhanced by the bow. In lieu of the bow, a belly band could easily be used.

Finis! What do you think? I love the softness & contrast of the Pool Party against the Real Red. And this would be fun with other papers than this Christmas – I can’t wait to try another.
Now on with the hop. Don’t miss a single post – they should be extra special today. Click on the ‘next’ button or click on a name. Happy hopping!

Want to purchase the products to make this card? Shop my online store here. Want to consider joining my team? JOIN MY TEAM HERE
CARD CUTS FOR THIS PROJECT:
Product List
![Real Red Classic Stampin' Pad [ 147084 ]](https://assets1.tamsnetwork.com/images/EC042017NF/147084s.jpg "Real Red Classic Stampin' Pad [ 147084 ]")
![Traditional Sparkling Sequins [ 165875 ]](https://assets1.tamsnetwork.com/images/EC042017NF/165875s.jpg "Traditional Sparkling Sequins [ 165875 ]")
![Pool Party 8-1/2" X 11" Cardstock [ 122924 ]](https://assets1.tamsnetwork.com/images/EC042017NF/122924s.jpg "Pool Party 8-1/2\" X 11\" Cardstock [ 122924 ]")
![Real Red 8-1/2" X 11" Cardstock [ 102482 ]](https://assets1.tamsnetwork.com/images/EC042017NF/102482s.jpg "Real Red 8-1/2\" X 11\" Cardstock [ 102482 ]")
![Gold Foil Sheets [ 132622 ]](https://assets1.tamsnetwork.com/images/EC042017NF/132622s.jpg "Gold Foil Sheets [ 132622 ]")
![Basic White 8 1/2" X 11" Cardstock [ 166780 ]](https://assets1.tamsnetwork.com/images/EC042017NF/166780s.jpg "Basic White 8 1/2\" X 11\" Cardstock [ 166780 ]")
![Clear Wink Of Stella Glitter Brush [ 141897 ]](https://assets1.tamsnetwork.com/images/EC042017NF/141897s.jpg "Clear Wink Of Stella Glitter Brush [ 141897 ]")
![Basic White Medium Envelopes [ 159236 ]](https://assets1.tamsnetwork.com/images/EC042017NF/159236s.jpg "Basic White Medium Envelopes [ 159236 ]")
![Stampin' Cut & Emboss Machine [ 149653 ]](https://assets1.tamsnetwork.com/images/EC042017NF/149653s.jpg "Stampin' Cut & Emboss Machine [ 149653 ]")
![Paper Trimmer [ 152392 ]](https://assets1.tamsnetwork.com/images/EC042017NF/152392s.jpg "Paper Trimmer [ 152392 ]")
![Stampin' Dimensionals [ 104430 ]](https://assets1.tamsnetwork.com/images/EC042017NF/104430s.jpg "Stampin' Dimensionals [ 104430 ]")
![Multipurpose Liquid Glue [ 110755 ]](https://assets1.tamsnetwork.com/images/EC042017NF/110755s.jpg "Multipurpose Liquid Glue [ 110755 ]")
![Mini Glue Dots [ 103683 ]](https://assets1.tamsnetwork.com/images/EC042017NF/103683s.jpg "Mini Glue Dots [ 103683 ]")
![Paper Snips [ 103579 ]](https://assets1.tamsnetwork.com/images/EC042017NF/103579s.jpg "Paper Snips [ 103579 ]")
![Take Your Pick [ 144107 ]](https://assets1.tamsnetwork.com/images/EC042017NF/144107s.jpg "Take Your Pick [ 144107 ]")
![Tuxedo Black Memento Ink Pad [ 132708 ]](https://assets1.tamsnetwork.com/images/EC042017NF/132708s.jpg "Tuxedo Black Memento Ink Pad [ 132708 ]")
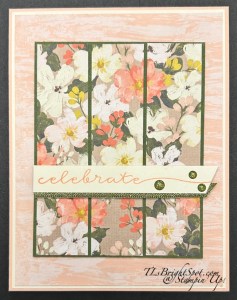
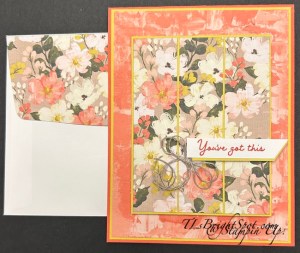
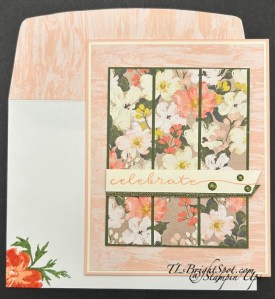
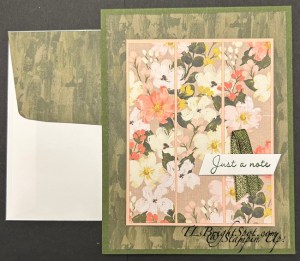
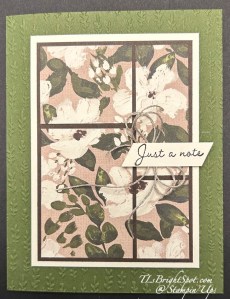
Can you tell? I am obsessed with Brushed with Beauty DSP 🥴 and today’s cards – all three – use the same pattern of DSP but different card bases & layers. How I determined which card bases & layers was by the colors in that particular set of three panels, what really showed off the colors in that set of panels. Here are the three cards…
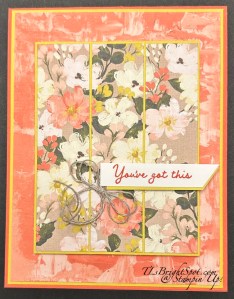
Calypso Coral card base with Darling Duckling for layers with a Linen Thread double bow, no additional embellishment.
Petal Pink card base with Very Vanilla & Mossy Meadow layers; 1/4″ Mossy Meadow & Gold Ribbon under the sentiment & Low Profile Sparkling Dots in Mossy Meadow for embellishment.

Mossy Meadow card base with a single layer of Petal Pink behind triple panel & 1/4″ Mossy Meadow & Gold Ribbon with Basic White.
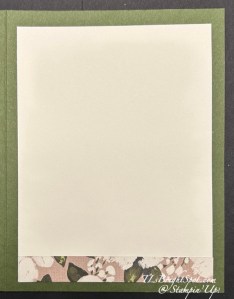
On the inside of each card…
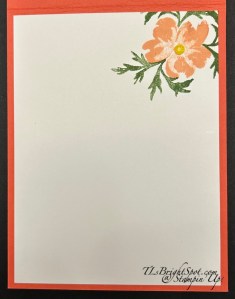
Petal Pink & Mossy Meadow for stamping the flower & leaf images. A single Low Profile Sparkle Dot in Darling Duckling for the flower center.

Again, Petal Pink and Mossy Meadow inks for the flower & leaf images and again the Low Profile Sparkle Dots for the flower center.
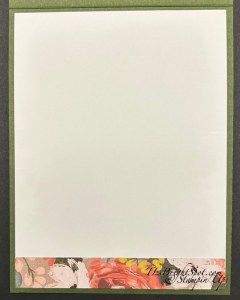
And finally, a 5/8″ wide strip of the Brushed with Beauty DSP adhered to the Basic White insert.
And here they are with their envelopes…
Remember, this DSP will be available November 4 as part of a new release of ONLINE EXCLUSIVE products. Want to purchase these sooner than later – become a Demonstrator with me! These can be purchased as part of your demonstrator starter kit 😀 then after joining always get that 20% discount on all your purchases. 👍
Each of these shows a different part of the Brushed with Beauty DSP available Nov 4. Of course… if you are a demonstrator (hint, hint!) these items can be ordered NOW! It’s getting really close… Stampin’ Up! has this incredible DEAL for joining as a demonstrator through Oct 31 – and folks, that is TODAY!!! Just sayin’ it’s the v-e-r-y last day to join with these deals. Check it out, cuz it goes away S-O-O-N.

From October 1 to 31, anyone who purchases the Starter Kit can choose between two amazing offers. In addition to FREE shipping, FREE business supplies, and a FREE Paper Pumpkin kit, you can either get $125 worth of products for just $35, an amazing first time ever offer, OR $189 worth of products for just $99!


What are the benefits of joining…???
2) exclusive early access to the latest releases online and in catalogs
3) the opportunity to earn a modest supplemental income
4) the chance to attend incredible training and crafting events
5) Scrapbooking has never been better in Stampin’ Up! history. Have you seen all the new scrapbook products Stampin’ Up! has? It’s amazing…
6) There’s never an obligation to sell, you can join to enjoy the discount for yourself.
It’s also fun to learn new skills, develop new crafting techniques & share your passion for crafting. If you’re like me, it’s really fun to meet new people & connect with fellow crafters. How can I help & support you – lots of ways… through connection, team meetings, our team facebook page, updates. Feel free to connect with me – ask questions – get excited.
Thanks for stopping by, may you have a beautiful day! Make someone happy by sending them a handmade card filled with ❤️

Brushed with Beauty Suite – available as an ONLINE EXCLUSIVE NOVEMBER 4, 2025
Product List
![Petal Pink 8-1/2" X 11" Cardstock [ 146985 ]](https://assets1.tamsnetwork.com/images/EC042017NF/146985s.jpg "Petal Pink 8-1/2\" X 11\" Cardstock [ 146985 ]")
![Low Profile Sparkle Dots [ 166157 ]](https://assets1.tamsnetwork.com/images/EC042017NF/166157s.jpg "Low Profile Sparkle Dots [ 166157 ]")
![Linen Thread [ 104199 ]](https://assets1.tamsnetwork.com/images/EC042017NF/104199s.jpg "Linen Thread [ 104199 ]")
![Heat Tool (Us And Canada) [ 129053 ]](https://assets1.tamsnetwork.com/images/EC042017NF/129053s.jpg "Heat Tool (Us And Canada) [ 129053 ]")
It’s cool again today – 40 degrees… I’m definitely going to wear a heavier jacket when I walk tomorrow! Brushed with Beauty dSP is a new release item come Nov 4 as part of an ONLINE EXCLUSivE suite of products. The paper is gorgeous and I can’t quit using it. When I showed this card to my hubby he immediately said it looked like a windowpane – so I’m coining that word for making this kind of layout. 😁
What is great about this layout is how versatile it is with so many of our Stampin’ Up! papers. And here’s how to do it…
DIRECTIONS FOR WINDOWPANE CARD
For the inside… I cut a piece of this stunning Brushed with Beauty DSP 1/2 x 3 3/4 and adhered it to the bottom of a Vary Vanilla panel 3 3/4 x 5, then added this to the inside of the card.

For the envelope… another piece of this beautiful Brushed with Beauty DSP in a coordinating pattern – 2 14 x 6, adhered & trimmed to fit. Bam – done!
Remember, this DSP will be available November 4 as part of a new release of ONLINE EXCLUSIVE products. Want to purchase these sooner than later – become a Demonstrator with me! These can be purchased as part of your demonstrator starter kit 😀 then after joining always get that 20% discount on all your purchases. 👍
From October 1 to 31, anyone who purchases the Starter Kit can choose between two amazing offers. In addition to FREE shipping, FREE business supplies, and a FREE Paper Pumpkin kit, you can either get $125 worth of products for just $35, an amazing first time ever offer, OR $189 worth of products for just $99!
What are some of the benefits of becoming a demonstrator?
a 20–25% product discount
2) exclusive early access to the latest releases online and in catalogs
3) the opportunity to earn a modest supplemental income
4) the chance to attend incredible training and crafting events
5) Scrapbooking has never been better in Stampin’ Up! history. Have you seen all the new scrapbook products Stampin’ Up! has? It’s amazing…
6) There’s never an obligation to sell, you can join to enjoy the discount for yourself.


It’s also fun to learn new skills, develop new crafting techniques & share your passion for crafting. If you’re like me, it’s really fun to meet new people & connect with fellow crafters. How can I help & support you – lots of ways… through connection, team meetings, our team facebook page, updates. Feel free to connect with me – ask questions – get excited.
Thanks for stopping by, may you have a beautiful day! Make someone happy by sending them a handmade card filled with ❤️
Brushed with Beauty Suite available November 4 –
online exclusives
Stampin’ Up! has all kinds of kits, a monthly Paper Pumpkin, supplies of all kinds for scrapbooking. Browse and…
Product List
![Gathering Leaves Embossing Folder [ 165983 ]](https://assets1.tamsnetwork.com/images/EC042017NF/165983s.jpg "Gathering Leaves Embossing Folder [ 165983 ]")
![Embossing Additions Tool Kit [ 159971 ]](https://assets1.tamsnetwork.com/images/EC042017NF/159971s.jpg "Embossing Additions Tool Kit [ 159971 ]")
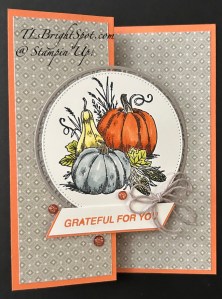
Today’s hop challenge is all about “giving thanks” – and I am grateful for many people in my life. This card is for one of those folks. I’m using products from the November 2025 Online Exclusives – part of the Brushed with Beauty Suite. This bundle is called Words for Beauty.
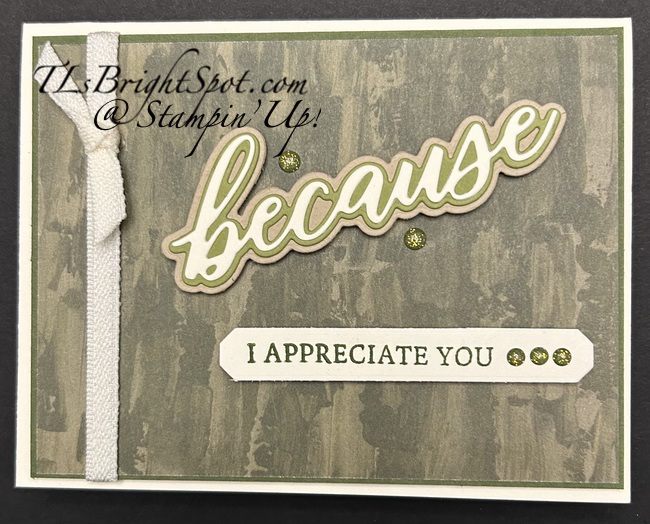
This card uses what I’m going to call, the ‘backside’ of the DSP. The floral side is absolutely gorgeous and I wanted to use that, but it didn’t seem to fit with the words. The panel is adhered to a Mossy Meadow then added to the Very Vanilla card base with dimensionals. The ribbon is is Very Vanilla…. wrapped around & held in place in back with Tear n Tape. I tied a simple half know & held it in place with a glue dot.The large word ‘because’ actually has three dies. The backing is Crumb Cake, the second layer is Old Olive and the front is Very Vanilla. after adhering together I attached them with dimensionals. The sentiment banner is stamped in Mossy Meadow ink on Basic White & die cut with one of the dies in the set. The embellishments are the Low Profile Dots in Old Olive – and I used five.
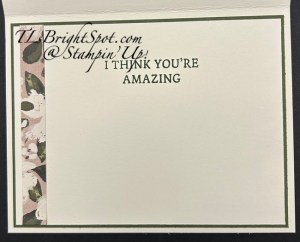
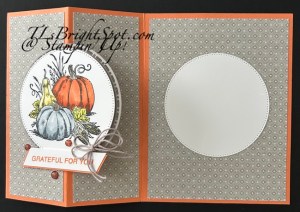
The sentiment is stamped in Mossy Meadow ink on Very Vanilla card stock, and comes from the Words of Beauty stamp set. It’s attached to Mossy Meadow card stock and added to the inside of the card. The 1/2 strip is the other side of the Brushed with Beauty DSP. You’ll see it used later this week 😀
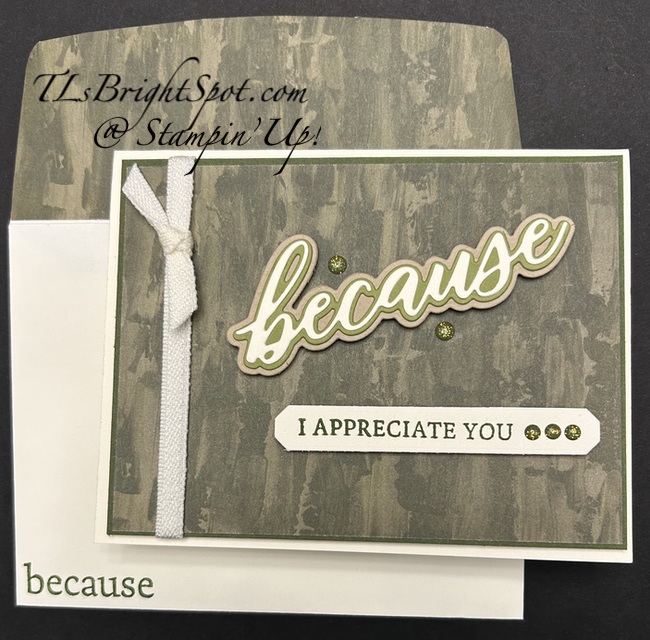
I left this photo extra large so you could see the three layers of the larger word. It just didn’t show much in the smaller size. For the envelope… more of the same ‘back side’ of the Brushed with Beauty DSP attached to the flap & trimmed to fit. the sentiment on the front is again from the Words of Beauty stamp set.
Because I’m a demonstrator I have the privilege of being able to order Online Exclusive early – to play with new product and promote them. So it’s a huge benefit to me and my customers & I get very excited with playing with new ‘stuff’. I’m saying all this because now is the perfect to join with me so you can play too. Stampin’ Up! has this wonderful promotion goin on through the month of October. See below the list of those participating in today’s hop – for all the details.
Take a peek at what the others have created by clicking on the links below. Enjoy the hop!


From October 1 to 31, anyone who purchases the Starter Kit can choose between two amazing offers. In addition to FREE shipping, FREE business supplies, and a FREE Paper Pumpkin kit, you can either get $125 worth of products for just $35, an amazing first time ever offer, OR $189 worth of products for just $99!
What are some of the benefits of joining…
1) a 20–25% product discount
2) exclusive early access to the latest releases online and in catalogs
3) the opportunity to earn a modest supplemental income
4) the chance to attend incredible training and crafting events
5) Scrapbooking has never been better in Stampin’ Up! history. Have you seen all the new scrapbook products Stampin’ Up! has? It’s amazing…
6) There’s never an obligation to sell, you can join to enjoy the discount for yourself.
Are you a scrapbooker? Take a look at our new Scrapbooking Workshop Kits now available from the January 2025 Scrapbooking Brochure.
Thanks for stopping by. May you have a beautiful day. Make someone happy by sending them a handmade card filled with ❤️
Howdy folks – it’s Sunday. Yesterday was gorgeous & I’m hoping today will be the same. I have a pretty fall card to share with you today – hope you like… it’s made with the fabulous Amber Autumn stamp set and Autumn Toile 12×12 DSP.
I love this stamped image. It’s peaceful, serene and all fall. I used Timid tiger for the card base, scored it in half then folded back one side. The DSP layers are Autumn Toile 12×12 DSP. This is kind of a Gray Granite. I stamped the image in Memento ink on a Basic White panel then colored with Stampin’ Blends: Lemon Lolly, Lemon Lime Twist, Cloud Cover, Crumb Cake, & Timid Tiger. I die cut this with the largest of the Stitched Shapes circle dies. I die cut another from Basic White while I was at it to use on the inside of the card. I attached the stamped die cut image with dimensionals to Gray Granite die cut with the Spotlight on Nature dies. It gives it a nice border. This was added to the folded back panel. I then stamped the sentiment in Tiimid Tiger on a Basic White strip, trimmed it at an angle and added a Timid Tiger strip behind it. It was added with mini dimensionals and a dab of glue. I attached a double bow from the Baker’s Twine Essential Pack in gray with a glue dot. The embellishments are Cajon Craze & Gold Dots.
I attached the remaining circle with adhesive, making certain it was lined up just right so it didn’t show when the card is closed. I know to whom this is being sent, so left it plain – no stamping – to write my message. It looks very plain, but when I add my personal note, it will be fine! If you so desired, you could stamp something here, then add a panel on the back of the card for your lengthy message. :O)

For the envelope… more of the same Autumn Toile 12×12 DSP on the flap trimmed to fit. I forgot to take a photo of the envelope front 🥴, but it has a partial image of the pumpkins, colored the same as the card.
Card dimensions:
Card base: 8 1/2 x 5 1/2 scored at 2 1/8 & 4 1/4. Burnish mountain, valley + scrap
DSP layers: 1 7/8 x 5 1/4 (2); 4 x 5 1/4; 2 1/4 x 6 (flap)
Gray Granite: 3 3/4 x 3 3/4
Basic White: 3 3/8 x 3 3/8 (2); + scrap for sentiment

Have you been wishing for a SALE of the Stampin’ Up! Kits? It begins Monday October 6 and goes through October 8 – a full three days! Some kits may sell out faster than others, so my suggestion is to place that order early. The kits come with everything you need for a fun and creative experience – from season’s greetings to birthday wishes to home decor! And during these three days, I’m giving DOUBLE DAISY PATCH REWARDS with every $50 order (before shipping & tax.) So take a peek at what’s available right here and make your list to shop early on October 6! Remember DOUBLE DAISY PATCH REWARDS with every $50 order (before shipping & tax.)
A few of my favorite kits… remember this are just SOME of my favorites 😀
shop with me here: https://www.stampinup.com/?demoid=2169800
I also have to mention – yes, in the same breath – the JOINING PROMOTION…
From October 1 to 31, anyone who purchases the Starter Kit can choose between two amazing offers. In addition to FREE shipping, FREE business supplies, and a FREE Paper Pumpkin kit, you can either get $125 worth of products for just $35, an amazing first time ever offer, OR $189 worth of products for just $99!
Here’s one of the reason I’m putting BOTH of these in a single email – they can WORK TOGETHER! If you are really new to stamping, kits are a perfect place to start. If it’s a card kit, it will include an ink spot & a block for the photopolymer stamps included in the kit. If it’s a seasonal kit, such as an ornament kit, it includes everything to make that kit. And when those kits are on sale – it’s a perfect time to buy, even stock up to consider giving as gifts..
What are benefits of joining… let me tell you…
1) a 20–25% product discount
2) exclusive early access to the latest releases online and in catalogs
3) the opportunity to earn a modest supplemental income
4) the chance to attend incredible training and crafting events
5) Scrapbooking has never been better in Stampin’ Up! history. Have you seen all the new scrapbook products Stampin’ Up! has? It’s amazing…
6) There’s never an obligation to sell, you can join to enjoy the discount for yourself.
Thanks for stopping by. May you have a beautiful day. Make someone happy by sending them a handmade card filled with ❤️
Product List![Amber Autumn Bundle (English) [ 165893 ]](https://assets1.tamsnetwork.com/images/EC042017NF/165893s.jpg "Amber Autumn Bundle (English) [ 165893 ]")
![Stitched Shapes Dies [ 145372 ] (Retired)](https://assets1.tamsnetwork.com/images/EC042017NF/145372s.jpg "Stitched Shapes Dies [ 145372 ] (Retired)")
![Spotlight On Nature Dies [ 163580 ]](https://assets1.tamsnetwork.com/images/EC042017NF/163580s.jpg "Spotlight On Nature Dies [ 163580 ]")
![Baker's Twine Essentials Pack [ 155475 ]](https://assets1.tamsnetwork.com/images/EC042017NF/155475s.jpg "Baker's Twine Essentials Pack [ 155475 ]")
![Cajun Craze & Gold Dots [ 165984 ]](https://assets1.tamsnetwork.com/images/EC042017NF/165984s.jpg "Cajun Craze & Gold Dots [ 165984 ]")
![Timid Tiger 8 1/2" X 11" Cardstock [ 165626 ]](https://assets1.tamsnetwork.com/images/EC042017NF/165626s.jpg "Timid Tiger 8 1/2\" X 11\" Cardstock [ 165626 ]")
Have you been wishing for a SALE of the Stampin’ Up! Kits? It begins Monday October 6 and goes through October 8 – a full three days! Some kits may sell out faster than others, so my suggestion is to place that order early. The kits come with everything you need for a fun and creative experience – from season’s greetings to birthday wishes to home decor! And during these three days, I’m giving DOUBLE DAISY PATCH REWARDS with every $50 order (before shipping & tax.) So take a peek at what’s available right here and make your list to shop early on October 6! Remember DOUBLE DAISY PATCH REWARDS with every $50 order (before shipping & tax.)
A few of my favorite kits… remember this are just SOME of my favorites 😀
shop with me here: https://www.stampinup.com/?demoid=2169800
I also have to mention – yes, in the same breath – the JOINING PROMOTION…

From October 1 to 31, anyone who purchases the Starter Kit can choose between two amazing offers. In addition to FREE shipping, FREE business supplies, and a FREE Paper Pumpkin kit, you can either get $125 worth of products for just $35, an amazing first time ever offer, OR $189 worth of products for just $99!
Here’s one of the reason I’m putting BOTH of these in a single email – they can WORK TOGETHER! If you are really new to stamping, kits are a perfect place to start. If it’s a card kit, it will include an ink spot & a block for the photopolymer stamps included in the kit. If it’s a seasonal kit, such as an ornament kit, it includes everything to make that kit. And when those kits are on sale – it’s a perfect time to buy, even stock up to consider giving as gifts..
What are benefits of joining… let me tell you…
1) a 20–25% product discount
2) exclusive early access to the latest releases online and in catalogs
3) the opportunity to earn a modest supplemental income
4) the chance to attend incredible training and crafting events
5) Scrapbooking has never been better in Stampin’ Up! history. Have you seen all the new scrapbook products Stampin’ Up! has? It’s amazing…
6) There’s never an obligation to sell, you can join to enjoy the discount for yourself.
JOINING PROMOTION BEGINS OCTOBER 1-31, 2025!
New team members who purchase their starter kit from October 1 to 31 will be able to choose between these two offers:
1) $125 USD | $165 CAD worth of products for just $35 USD | $48 CAD
2) $189 USD | $252 CAD worth of products for just $99 USD | $135 CAD
Benefits of becoming a Demonstrator

Crafting is even more fun with community, and there’s never been a better time to join. Become a demonstrator and enjoy all the perks that come with that, like a 20–25% product discount, exclusive early access to the latest releases and catalogs, the opportunity to earn a modest supplemental income, the chance to attend incredible training and crafting events, and so much more! Have you ever thought about joining the Stampin’ Up! community? Are you into scrapbooking and have you seen all the new scrapbook products Stampin’ Up! has? Wouldn’t you love to get all these products at a discount? Consider joining the Stampin’ Up! community between October 1-31, and save on everything you buy ❤️ Are you new to stamping and don’t know where to start, but would like to join to save? Connect with me… I’m here to help and assist you anyway that I can. OCTOBER is the best time ever to join!! The best part is you can put November Online Exclusive preorder items in your Starter Kit. Contact me and we can talk about how to proceed. There’s never an obligation to sell, you can join to enjoy the discount for yourself. 😀 Watch the video below for inspiration
Do you love people? Are you creative? Do you have a positive attitude?
Oct 1 – JOIN MY TEAM to become the best you can be!
Together we can make magic happen.
Join with me here
Thanks for stopping by. May you have a beautiful day. Make someone happy sending them a handmade card filled with ❤️
Good morning, good morning. This is my 2nd post today – the 1st was all about the fabulous Stampin’ Up! 24 Hr. STAMP SALE – TODAY ONLY – 9/18/2025. You can see that post here…
It’s Thursday… and time for our fabulous hop. We have a color challenge today & I decidedf to play with a set of dies called Amber Trees Dies, and yes it comes with a stamp set as well.


I made this card using the very fun Autumn Trees Dies. And no, I have not used these dies before – so this was a new set for me to try – and I loved it. First I did the die cut of the tree itself – the trunk and green were all part of the same die and I colored it after die cutting. I used a sponge dauber and wished I had used Blending Brushes. I like the way Blending Brushes create variations of intensity of a color. Next time! I used Garden Green and Early Espresso inks to color this. I then used another die and ran it through two times: once on Cajun Craze card stock and secondly on Crushed Curry – it shows in all these pretty leaves. I cut the Crushed Curry apart & placed them in various places around the tree adhering with tiny dots of liquid glue. I then added the Cajun Craze layer, also with dots of liquid glue. I then took my Wink of Stella & tapped it against a block to add sparkles all over. Of course, it doesn’t show in the photo 😖 I set this aside to put together the card base.
Card base: Pecan Pie 4 1/4 x 11 scored at 5 1/2
Layer: Mossy Meadow 4 1/8 x 5 3/8
Gathering Together Specialty DSP: 4 x 5 1/4
I added the tree to the card front with dimesnionals. I stamped the sentiment using the Amber Autumn stamp set in Mossy Meadow ink then added a strip of Mossy Meadow to the bottom to create a shadow effect. I put dimensionals on the ends of the sentiment banner & attached it over the trunk of the tree. Finis!
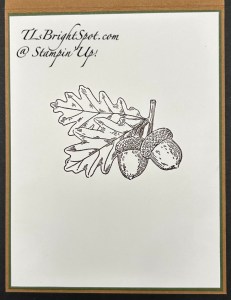
For the inside, I stamped this gorgeous stamp of acorns & leaves, symbolizing fall, in Early Espresso ink on a Basic White panel. It comes from the Amber Autumn stamp set (bundle available!) This was added to another Mossy Meadow cut 4 18 x 5 3/8 then attached to the inside of the card.

For the envelope, I stamped the same acorns & leaves image in Early Espresso ink on the front of the envelope. A piece of Gathering Together Specialty DSP was attached to the flap & trimmed to fit. To purchase the materials to make this card, please see the product list below.
Time to visit the others participating in today’s hop – enjoy everyone’s creations! Click on the next button to visit Nicole or click on a name to see what others have made.

Remember today is Stampin’ Up! 24 Hour 15% off Stamp & Stamp Tool Sale. Shop here!
Thanks for stopping by. May you have a beautiful day. Make someone happy by sending them a handmade card filled with ❤️
Product List![Autumn Trees Bundle [ 165900 ]](https://assets1.tamsnetwork.com/images/EC042017NF/165900s.jpg "Autumn Trees Bundle [ 165900 ]")
![Pecan Pie 8 1/2" X 11" Cardstock [ 161717 ]](https://assets1.tamsnetwork.com/images/EC042017NF/161717s.jpg "Pecan Pie 8 1/2\" X 11\" Cardstock [ 161717 ]")
![Cajun Craze 8-1/2" X 11" Cardstock [ 119684 ]](https://assets1.tamsnetwork.com/images/EC042017NF/119684s.jpg "Cajun Craze 8-1/2\" X 11\" Cardstock [ 119684 ]")
![Sponge Daubers [ 133773 ]](https://assets1.tamsnetwork.com/images/EC042017NF/133773s.jpg "Sponge Daubers [ 133773 ]")
![Stampin' Blends Color Lifter [ 144608 ]](https://assets1.tamsnetwork.com/images/EC042017NF/144608s.jpg "Stampin' Blends Color Lifter [ 144608 ]")
Happy Tuesday! I have a really pretty card for you today – actually three cards – all using the same Delicate Pines bundle, Elegant Pine Snowflakes 12×12 DSP & other coordinating products – to make this super easy fun fold design.

Here’s what the card looks like from the top – and why it is called an interlocking z-fold

That Basic White piece is what makes the ‘z’ and allows the card to swing through the opening.
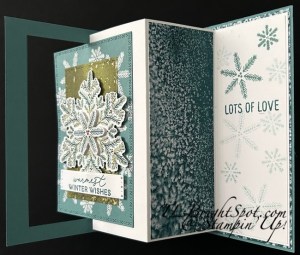
Here you see the entire card, open and showing all it’s glory. That die cut snowflake on the front is die cut from the fabulous Elegant Pines 12×12 DSP – it coordinates! I used Lost Lagoon card stock, die cut the opening on the front of the card using the 2nd largest die from Textured Notes Dies. The die cut panel was cleaned with an embossing buddy, stamped in VersaMark ink using the Delicate Pines stamp set (2 different snowflakes), sprinkled w/ Wow! White embossing powder and heat set. While that was cooling I cut a piece of DSP 4 1/8 x 5 3/8 and added it to the inside of the card. I pulled out another sheet of the Elegant Pines 12×12 DSP and using another die of the Textured Notes Dies, cut the olive green rectangle. I also die cut a snowflake from another of the papers in the pack, then die cut the center of the snowflake with another of the dies in the Delicate pines Dies. I put double dimensionals on the back of the smaller snowflake and single layer of dimensionals on the larger snowflake. I added the olive green rectangle to the embossed piece then added the large snowflake & then the smaller snowflake. I stamped the sentiment in Lost Lagoon ink & die cut it with a die from the Snowflake Kisses Dies, put dimensionals on the ends only and added it over the bottom of the snowflake. Time to create the interlocking section…
Cut a Basic White piece 5 1/4 x 8 & score @ 2, 4, & 6; burnish score lines in mountain, mountain, valley. Cut another piece of Basic White 1 7/8 x 5 1/8, stamp sentiment & snowflakes in Lost Lagoon ink, sometimes stamped off once & sometimes full strength. Add this to the last panel of the z-fold. Cut a piece of coordinating DSP 1 7/8 x 5 1/8 and add to the panel to the left, next to the stamp[ed panel. Now it’s time to add this to the card base….
Put adhesive on the back side of the last panel of the z-fold – the one with the stamped images – and add it to the inside of the card covering some of the Designer Series Paper. Fold next panel over, leaving the next two panels flat. Close the card base so you see exactly where to add adhesive – on the end panel only… top, left side & bottom.Open card front, leaving the z-fold flat & add adhesive as instructed. Close card allowing adhesive to adhere firmly. Open & close a couple of times & note exactly where to place the decorative front… on the 2nd panel of the z-fold. Add adhesive to that 2nd panel, close card front and slip the decorated panel in the opening. Bingo!!!

For the envelope… add a piece of Elegant Pines Snowflakes DSP to the flap & trim to fit. Stamp the snowflakes from Delicate Pines stamp set in Lost Lagoon ink, stamped off once for the large snowflake and full strength for the two small snowflakes.
As mentioned earlier, I created two similar card using this same interlocking z-fold and the Delicate Pine bundle along with the Elegant Pines Snowflakes 12×12 DSP. Here they are…
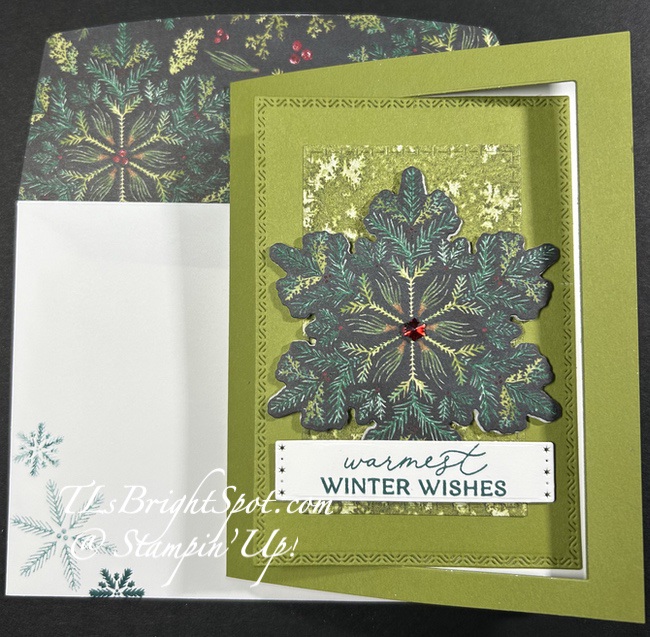

This is card 2 but created on Old Olive card stock and using a Faceted Snowflake Gem in the center of the snowflake. No embossing on this card & no extra die cut on the snowflake.


This card also used Old Olive for the card base, is embossed all over the card front in Wow! Whjite embossing powder. Old Olive ink was used for stamping on the inside of the card & on the envelope. Pretty Peacock is the ink of choice on the card front sentiment.
A couple of things to share from Stampin’ Up!… October will be a JOINING PROMOTION month – and it would be wonderful to have you join my team. Please look at what you gain when becoming a demonstrator… 20% off ever order after joining; availablility for previewing & ordering new products before they are available to the general public; attend conventions as a demonstrator, have extraordinary support from the others on this team, encouragement and new ideas. Joining information here
Thanks for stopping by. May you have a beautiful day. Make someone happy by sending them a handmade card filled with ❤️
Product List![Delicate Pines Bundle (English) [ 166074 ]](https://assets1.tamsnetwork.com/images/EC042017NF/166074s.jpg "Delicate Pines Bundle (English) [ 166074 ]")
![Snowflake Kisses Bundle (English) [ 166023 ]](https://assets1.tamsnetwork.com/images/EC042017NF/166023s.jpg "Snowflake Kisses Bundle (English) [ 166023 ]")
![Faceted Snowflakes [ 166077 ]](https://assets1.tamsnetwork.com/images/EC042017NF/166077s.jpg "Faceted Snowflakes [ 166077 ]")
![Textured Notes Dies [ 165555 ]](https://assets1.tamsnetwork.com/images/EC042017NF/165555s.jpg "Textured Notes Dies [ 165555 ]")
![Lost Lagoon 8-1/2" X 11" Cardstock [ 133679 ]](https://assets1.tamsnetwork.com/images/EC042017NF/133679s.jpg "Lost Lagoon 8-1/2\" X 11\" Cardstock [ 133679 ]")
![Basics Embossing Powders [ 155554 ]](https://assets1.tamsnetwork.com/images/EC042017NF/155554s.jpg "Basics Embossing Powders [ 155554 ]")
![Traditions Of Christmas 12" X 12" (30.5 X 30.5 Cm) Specialty Designer Series Paper [ 165853 ]](https://assets1.tamsnetwork.com/images/EC042017NF/165853s.jpg "Traditions Of Christmas 12\" X 12\" (30.5 X 30.5 Cm) Specialty Designer Series Paper [ 165853 ]")
![Nests Of Winter 12" X 12" (30.5 X 30.5 Cm) Designer Series Paper [ 164183 ]](https://assets1.tamsnetwork.com/images/EC042017NF/164183s.jpg "Nests Of Winter 12\" X 12\" (30.5 X 30.5 Cm) Designer Series Paper [ 164183 ]")
![Traditional Labels Bundle (English) [ 165865 ]](https://assets1.tamsnetwork.com/images/EC042017NF/165865s.jpg "Traditional Labels Bundle (English) [ 165865 ]")
![Real Red 1/2" (1.3 Cm) Shiny Ribbon [ 165876 ]](https://assets1.tamsnetwork.com/images/EC042017NF/165876s.jpg "Real Red 1/2\" (1.3 Cm) Shiny Ribbon [ 165876 ]")
![Peaceful Greenery 3 D Embossing Folder [ 165928 ]](https://assets1.tamsnetwork.com/images/EC042017NF/165928s.jpg "Peaceful Greenery 3 D Embossing Folder [ 165928 ]")
![Christmas Words Collage Hybrid Embossing Folder (English) [ 165912 ]](https://assets1.tamsnetwork.com/images/EC042017NF/165912s.jpg "Christmas Words Collage Hybrid Embossing Folder (English) [ 165912 ]")
![Just A Note Cling Stamp Set (English) [ 166098 ]](https://assets1.tamsnetwork.com/images/EC042017NF/166098s.jpg "Just A Note Cling Stamp Set (English) [ 166098 ]")
![Blooming Phrases Photopolymer Stamp Set (English) [ 165523 ]](https://assets1.tamsnetwork.com/images/EC042017NF/165523s.jpg "Blooming Phrases Photopolymer Stamp Set (English) [ 165523 ]")
![Calypso Coral 8-1/2" X 11" Cardstock [ 122925 ]](https://assets1.tamsnetwork.com/images/EC042017NF/122925s.jpg "Calypso Coral 8-1/2\" X 11\" Cardstock [ 122925 ]")
![Calypso Coral Classic Stampin' Pad [ 147101 ]](https://assets1.tamsnetwork.com/images/EC042017NF/147101s.jpg "Calypso Coral Classic Stampin' Pad [ 147101 ]")
![Petal Pink Classic Stampin' Pad [ 147108 ]](https://assets1.tamsnetwork.com/images/EC042017NF/147108s.jpg "Petal Pink Classic Stampin' Pad [ 147108 ]")
![Mossy Meadow 8-1/2" X 11" Cardstock [ 133676 ]](https://assets1.tamsnetwork.com/images/EC042017NF/133676s.jpg "Mossy Meadow 8-1/2\" X 11\" Cardstock [ 133676 ]")
![Mossy Meadow Classic Stampin' Pad [ 147111 ]](https://assets1.tamsnetwork.com/images/EC042017NF/147111s.jpg "Mossy Meadow Classic Stampin' Pad [ 147111 ]")
![Darling Duckling 8 1/2" X 11" Cardstock [ 165622 ]](https://assets1.tamsnetwork.com/images/EC042017NF/165622s.jpg "Darling Duckling 8 1/2\" X 11\" Cardstock [ 165622 ]")
![Very Vanilla 8 1/2" X 11" Cardstock [ 166784 ]](https://assets1.tamsnetwork.com/images/EC042017NF/166784s.jpg "Very Vanilla 8 1/2\" X 11\" Cardstock [ 166784 ]")
![Mossy Meadow & Gold 1/4" (6.4 Mm) [ 166158 ]](https://assets1.tamsnetwork.com/images/EC042017NF/166158s.jpg "Mossy Meadow & Gold 1/4\" (6.4 Mm) [ 166158 ]")
![Early Espresso 8-1/2" X 11" Cardstock [ 119686 ]](https://assets1.tamsnetwork.com/images/EC042017NF/119686s.jpg "Early Espresso 8-1/2\" X 11\" Cardstock [ 119686 ]")
![Early Espresso Classic Stampin' Pad [ 147114 ]](https://assets1.tamsnetwork.com/images/EC042017NF/147114s.jpg "Early Espresso Classic Stampin' Pad [ 147114 ]")
![Autumn Toile 12" X 12" (30.5 X 30.5 Cm) Designer Series Paper [ 165882 ]](https://assets1.tamsnetwork.com/images/EC042017NF/165882s.jpg "Autumn Toile 12\" X 12\" (30.5 X 30.5 Cm) Designer Series Paper [ 165882 ]")
![Gray Granite 8-1/2" X 11" Cardstock [ 146983 ]](https://assets1.tamsnetwork.com/images/EC042017NF/146983s.jpg "Gray Granite 8-1/2\" X 11\" Cardstock [ 146983 ]")
![Basic White 8 1/2" X 11" Thick Cardstock [ 159229 ]](https://assets1.tamsnetwork.com/images/EC042017NF/159229s.jpg "Basic White 8 1/2\" X 11\" Thick Cardstock [ 159229 ]")
![Lemon Lime Twist Stampin’ Blends Combo Pack [ 161682 ]](https://assets1.tamsnetwork.com/images/EC042017NF/161682s.jpg "Lemon Lime Twist Stampin’ Blends Combo Pack [ 161682 ]")
![Lemon Lolly Stampin’ Blends Combo Pack [ 161673 ]](https://assets1.tamsnetwork.com/images/EC042017NF/161673s.jpg "Lemon Lolly Stampin’ Blends Combo Pack [ 161673 ]")
![Cloud Cover Stampin’ Blends Combo Pack [ 165287 ]](https://assets1.tamsnetwork.com/images/EC042017NF/165287s.jpg "Cloud Cover Stampin’ Blends Combo Pack [ 165287 ]")
![Crumb Cake Stampin' Blends Combo Pack [ 154882 ]](https://assets1.tamsnetwork.com/images/EC042017NF/154882s.jpg "Crumb Cake Stampin' Blends Combo Pack [ 154882 ]")
![Timid Tiger Stampin’ Blends Combo Pack [ 165291 ]](https://assets1.tamsnetwork.com/images/EC042017NF/165291s.jpg "Timid Tiger Stampin’ Blends Combo Pack [ 165291 ]")
![Gathering Together 12" X 12" (30.5 X 30.5 Cm) Specialty Designer Series Paper [ 165969 ]](https://assets1.tamsnetwork.com/images/EC042017NF/165969s.jpg "Gathering Together 12\" X 12\" (30.5 X 30.5 Cm) Specialty Designer Series Paper [ 165969 ]")
![Gathering Together Suite Collection (English) [ 165987 ]](https://assets1.tamsnetwork.com/images/EC042017NF/165987s.jpg "Gathering Together Suite Collection (English) [ 165987 ]")
![Crushed Curry 8-1/2" X 11" Cardstock [ 131199 ]](https://assets1.tamsnetwork.com/images/EC042017NF/131199s.jpg "Crushed Curry 8-1/2\" X 11\" Cardstock [ 131199 ]")
![Garden Green Classic Stampin' Pad [ 147089 ]](https://assets1.tamsnetwork.com/images/EC042017NF/147089s.jpg "Garden Green Classic Stampin' Pad [ 147089 ]")
![Elegant Pine Snowflakes 12" X 12" (30.5 X 30.5 Cm) Designer Series Paper [ 166066 ]](https://assets1.tamsnetwork.com/images/EC042017NF/166066s.jpg "Elegant Pine Snowflakes 12\" X 12\" (30.5 X 30.5 Cm) Designer Series Paper [ 166066 ]")
![Elegant Pine Snowflakes Suite Collection (English) [ 166079 ]](https://assets1.tamsnetwork.com/images/EC042017NF/166079s.jpg "Elegant Pine Snowflakes Suite Collection (English) [ 166079 ]")
![Lost Lagoon Classic Stampin' Pad [ 161678 ]](https://assets1.tamsnetwork.com/images/EC042017NF/161678s.jpg "Lost Lagoon Classic Stampin' Pad [ 161678 ]")
