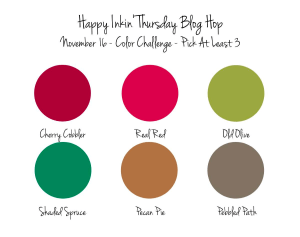
Good morning! Time for another Inkin’ Hop. The theme challenge this week is a color challenge – imagine that?! Just look at all these wonderful colors.

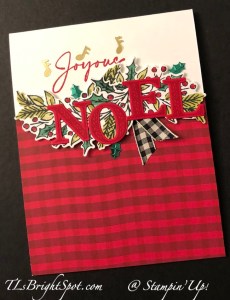
Notice all those colors for the challenge? They are in the coloring and the Joy of Christmas DSP. The Joy of Noel Bundle is just so wonderful… I love the words, the decorative stamps and the dies. What I did here is stamp the holly & berry ‘spray’ in Memento ink, twice, on Basic White card stock. I always find it easier to color a larger piece than a small one, so I color it then die cut. Make sense? The coloring is done with Stampin’ Blends: Old Olive (both light & dark) for the leaves, Shaded Spruce (both light & dark) for the holly, Light Real Red for the berries sand a bit of Dark Cherry Cobbler for shading on the berries. I die cut these and set them aside to prep the Thick Basic White card base. I caut a piece of the red plaid pattern from the Joy of Christmas DSP and adhered it to the card front. I laid the two die cut ‘spray’ pieces just for placement purposes to know where to stamp the sentiment. After removing them I stamped the sentiment from Joy of Noel stamp set in Real Red ink. I adhered the two die cut ‘spray’s on dimensionals along the top line of the DSP. I scattered some notes & holly from the Loose Holly Gems & Sequins package. I stamped the word ‘noel’ on Real Red card stock with Real Red ink, die cut them and adhered them directly to the ‘sprays’. As a final touch, I cut a short length of the Large Check Ribbon in Black & Very vanilla and attached it under the spray with a glue dot. Very cheerful & festive!
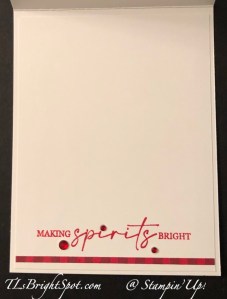
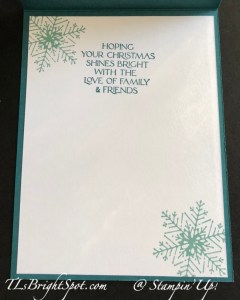
For the inside, I took a panel of Basic White card stock and adhered a very narrow strip of the Joy of Christmas DSP near the bottom of the panel. I then stamped the sentiment in Real Red ink, still using the Joy of Noel stamp set. I attached three red gems from the Loose Holly Gems & Sequins package with a dob of glue, adhered the panel to the inside of the card and done!
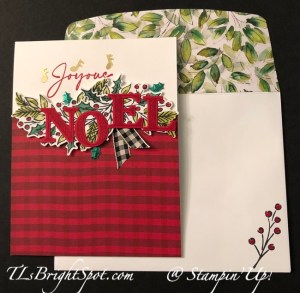
For the envelope, I took another pattern from the Joy of Christmas DSP, adhered it to the flap & trimmed it to fit. On the front I stamped the berry spray in Memento ink, then added Stampin’ Blends in Real Red to the berries. This card is so clean & traditional, friendly & bright. – I really like it.
Now… it’s time to move along to visit others participating in today’s hop. Click on a name or use the ‘next’ button to take you to Carol.

Terry Lynn Bright – you are here!
Today is the LAST DAY for the Seasonal sale.
See below for more info.
Sales Period: 14–16 November 2023
Ordering Deadlines
Phone: 16 November 2023 at 6:59 p.m. (MT)
Online: 16 November 2023 at 11:59 p.m. (MT)
- 10% off ribbons and trims.
- 15% off inks, including pads, refills, markers, and Blends. Bundles are not included.
- 20% off papers, including cardstock, specialty paper, and Designer Series Paper.
- Shop online to see the full selection of discounted products available. This is a limited time offer.
- Discounts are automatically applied when sale items are added to any order, including Starter Kits.
- Please keep in mind that due to the high volume of orders, the distribution center may fall behind our typical shipping timeframes. We will do everything we can to return to our regular service levels as quickly as possible.
- Please note: Some items may sell out due to high demand. The discount will automatically be applied to qualifying items that are in stock. Per our updated policy, backorders are not available.
To order Stampin’ Up! products, please use this link to my online store. The Seasonal Sale is for products in the ANNUAL CATALOG ONLY. You will find ONLINE EXCLUSIVES, Clearance Rack, Sep-Dec Mini Catalog, the Annual Catalog, kits, Paper Pumpkin – you name it. Shop at your convenience :O)
When ordering from me please use my NEW HOST CODE HSJD7BR6 so that I receive proper notification and YOU GET THE Benefits of a FREE SU! item valued up to $10 :O) AND the Monthly Card Tutorial. (I like to treat my customers!) If your order is over $150, please don’t use the host code as SU! has benefits. I’ll still be notified and you can receive that FREE ITEM!
Note: Make sure that you can see my name on the final checkout page listed as your Demonstrator when you order so that you know that you’re ordering with me and you’ll get my rewards! PLUS… the monthly Online Tutorial when your order is over $50. The November Tutorial features the beautiful Winter Meadow suite of products which can found in the Jul-Dec 2023 Mini Catalog on pages 36-38!
Join my team here and still order these products as part of your starter kit – wow! Great time to join!!!
Other fun products Stampin’ Up! has right now…
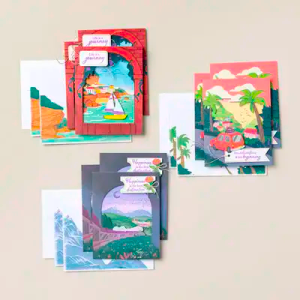
NEW KIT (THE BEST DESTINATION KIT) ADDED AS OF NOVEMBER 1!

163186
THE BEST DESTINATION KIT
$20.00 USD | $28.00 CAD
Available starting 1 November 1.
This kit lets you make nine tri-fold cards with a colorful, nostalgic, travel vibe.
- Enough supplies to create 9 cards—3 each of 3 designs
- 9 coordinating envelopes
- Best Destination Photopolymer Stamp Set
- One Gorgeous Grape Ink Spot
- Printed card bases, printed die cuts, adhesive, embellishments, and a clear block
- Finished card size: 5-1/2″ x 4-1/4″ (14 x 10.8 cm)
- Coordinating colors: Balmy Blue, Boho Blue, Cajun Craze, Calypso Coral, Coastal Cabana, Crushed Curry, Daffodil Delight, Early Espresso, Flirty Flamingo, Fresh Freesia, Gorgeous Grape, Granny Apple Green, Misty Moonlight, Pecan Pie, Petal Pink, Pretty Peacock, and Shaded Spruce
Kits can be ordered using this link to my online store.
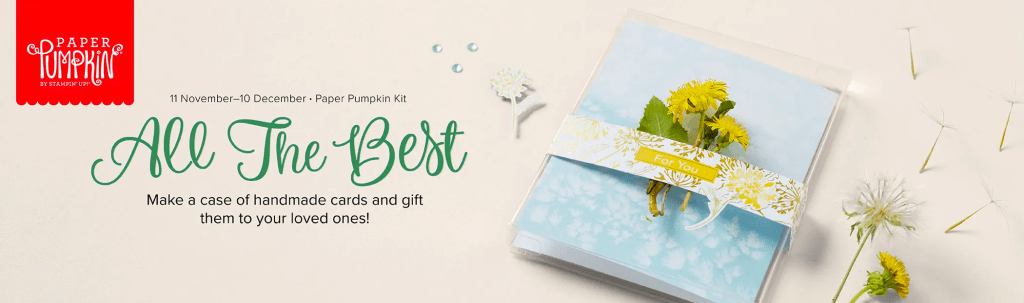
Paper Pumpkin is an all time favorite for many. Each month something new appears in your mailbox. Nov 11 to Dec 10 is the ALL THE BEST PP Kit. Send a wish to all your loved ones with the December Paper Pumpkin Kit! It comes with nine card fronts, three each of three designs, and nine coordinating envelopes. It has paper pieces detailed with gold foil, embellishments, an all-occasion stamp set, and an acetate box where you can store your finished cards! You can gift the kit itself or the finished product in the acetate box; either way, it’s the perfect last minute gift for any occasion.
ACETATE BOX
The All the Best Paper Pumpkin Kit comes with an acetate box that fits your finished cards and envelopes! This makes easy storage of a finished product or allows you to gift your cards to someone. The kit also comes with a belly-band, so you can add your own personal touch to the box. Subscribe by 10 December to make a handmade gift for those you love.
GOLD FOIL DETAILS
The paper pieces in the December Paper Pumpkin kit have gold foil detailing. Whether it’s an elegant boarder, or woven into the floral artwork, it’s a detail that will surely catch your recipient’s eye! It’s the perfect way to take any paper craft to the next level.
HAND DRAWN ARTWORK
The beauty of the December Paper Pumpkin Kit lies in the hand drawn artwork. The bright blue skies and elegant yellow flowers compliment the different design elements perfectly. It’s a simple yet sophistacted design that will catch any recipient’s eye!
Subscribe to the December Paper Pumpkin Kit between 11 November and 10 December by clicking here!
Thanks for stopping by. I hope you enjoyed my card today. Would love to hear from you. If I can be of help in some way, please let me know.