Stampin’ Up! Ornate Garden SuiteTreat Bag or Card Holder

Hello again… We have had some beeeeauuutiful weather here lately – jonquils and some daffodils are up and blooming; and the hellebores are stunning. The only thing is, I’ve been feeling really punky and haven’t been able to get out and do my garden thing. I’m better mind you, just not up to snuff yet.

Today’s post is more of the products from the Ornate Garden Suite. I had used one of the dies to cut one of the gorgeous papers and needed to cut it down. Well – I didn’t line it up properly and goofed but I couldn’t bring myself to throw that piece out, so I tried again and it worked the way I intended. That stitched (almost) square with the cute scallop using the Ornate Garden Specialty DSP is the result. Take a look see.

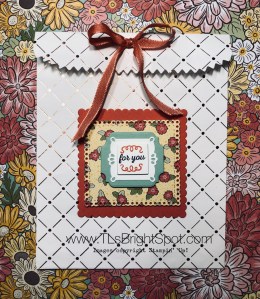
Isn’t this fun? Here are the deets:

  • Copper Dotted Treat bag, fold over the top and punch two holes.
  • Cut out a square using the Layering Squares dies, scalloped of course – Terracotta Tile cs and adhere using snail.
  • The next layer is that stunning paper  (Ornate Garden Specialty DSP) using the Ornate Layers dies and cutting it down to almost a square. It isn’t perfect, but I liked that I made it work. Adhere this layer with dimensionals.
  • The next two layers: Mint Macaron cut using the Ornate Frames dies and Whisper White cut using another framelit from that set.
  • The top layer uses the smallest of the Layering Squares dies. It has been stamped with a sentiment from Itty Bitty Greetings stamp set.
  • The ribbon is from the Ornate Garden Ribbon Combo Pack and uses the Terracotta Tile from the set.

My plan is to make a card to put in this bag, and of course it would need to be in a larger size envelope due to the size of the treat bag. Perhaps you’ll see that card tomorrow. Good plan, right? Remember… this Ornate Garden Suite will become available to customers beginning Apr 1 – May 31and will be listed in the new Annual ’20-’21 Catalogue, but probably not available as a suite of products.

When you want to learn more about this suite and how to order, please contact me. If we do not connect via my blog, please send a note to my email at tlsbrightspot@gmail.com. Thanks for stopping by today. Remember… make someone happy by sending them a handmade card!

Stampin’ UP! Clubhouse fun fold card

Hello – today’s card is definitely masculine and I hope you like it. It can be used for a birthday, congratulations or simply a friendly card. I created it for someone who is a golfer and just needs a ‘pick me up’. Here it is…

What do you think? One of the aspects about SU! that I like so much is that colors coordinate pretty much across the board. When they package their Designer Series Paper, it lists on the back of the package coordinating colors for that particular design. And what I’ve learned is often other shades of a particular color,  say green, may work in nicely as well. And that’s what I did on this card – worked in a different shade of green.

Here are the details…

  • Cut a piece of thick Whisper White cs 6 1/4″ x 5 1/2″, scoring on the long side at 2″.
  • Cut a piece of Country Club DSP 1 3/4″ x 5 1/4″ and adhere using liquid glue to the left portion of the card front. Refer to the photo for help.
  • Using Night of Navy ink, stamp both the sentiment as well as the golfer from the Clubhouse stamp set on Whisper White card stock. Using the Golf Club dies cut out the golfer and JUST the Greatest Guy part of the sentiment.
  • Using the Stitched So Sweetly dies and Pear Pizzaz cs, cut out a rectangle large enough for the golfer.
  • Using the next larger die from Stitched So Sweetly dies, cut a piece of Night of Navy cs.
  • Using liquid glue, adhere the Pear Pizzaz to the Night of Navy cs. Using dimensionals, adhere the golfer to these two pieces. See photo for placement. Set aside.
  • Cut another piece of DSP 4″ x 5 1/4″ and adhere to the inside of the card.
  • Cut a piece of Whisper White  2 1/2″ x 3 3/4″ for the inside. Stamp in Night of Navy ink accordingly. I used the golf ball and this wonderful sentiment. When you look at the photo of the inside of the card, you will see that I separated this into two sections. There’s a simple explanation for that… I goofed when stamping and stamped the sentiment upside down! I was so annoyed with myself. So how to fix it? I simply cut it into two sections 🙂

Back to the front and adhering the panel to the card front.

With the card closed adhere the panel approximately 5/8″ from the left, top and bottom. This will mean it is pretty well centered on the card. I put the glue on the card front instead of the panel cuz I wanted to be sure not to have glue where it wasn’t needed.

Now complete the inside. Open the card and adhere the Whisper White panel to the inside so it is approx. 7/8″ from the fold, bottom and and right edges. What you want to be certain of is that this panel does not show when the card front is closed.

Remember to decorate the envelope – no “naked” envelopes please! And be certain to sign your card. People love to see your name or initials on there.

I hope you like today’s card. Masculine cards are sometimes tricky to create but I like the way this turned out.

Sale-a bration is quickly coming to an end – Mar 31. If you are still wanting to pick up any of these fabulous products do so right away. Reach out to me if you have questions – love to hear from you.

May you have a beautiful day. Make someone happy by sending them a handmade card.


Fall – Nature’s Roots

Sharing a couple of cards made recently. I’m sooo bad at posting. This first card is a fall card using watercolor paper and Nature’s Roots thinlits. The ribbon is Granny Apple Green Textured Weave. Having scraps left over from a previous project  made this super easy and quick to do. In other words, don’t throw your scraps away!

If you have questions, feel free to contact me. If you’re interested in Stampin’ Up! Products I would be very happy to discuss them with you.

Colorful Seasons

Hi Folks! Amy Koenders posted pictures on her blog yesterday of team members cards they had prepared. I’ve had several questions about mine and since I hadn’t posted info about it – it seems appropriate to do so now.

Begin with Grapefruit Grove cardstock cut to 8 1/2 x 5 1/2, scored at 4 1/4.

Using the stitched squares framelits, cut 3.

The large leaf in Colorful Seasons bundle was cut from Perennial Essence DSP, then the “topper” for that leaf was cut from copper foil and adhered using Tombow glue. Easy easy and it gives a gorgeous effect! Using your fingers, gently curl the leaves, cuz leaves are never flat, right? Adhere the leaf with dimensionals. I usually use at least two for a more secure holding. The cording was from the Nature’s Twine set, which is a bundle of four. I simply took my pick it tool and separated the threads to give this frayed look. Three little Metallic pearls were added for a bit of glamor. The sentiment comes from Gather Together, a brand new stamp set/ bundle in the Holiday catalogue, and was stamped in Gray Granite.

For the inside, I kept it really simple. The leaf was again cut from the Perennial Essence paper and adhered with Tombow glue. The envelope was decorated using stamps from the Gather Together stamp set – Grapefruit Grove for the pumpkins and Gray Granite for the sheaf spray on the front.

If you do not have a demonstrator and would like to have a catalogue, please contact me! Thanks for stopping by. May you have a beautiful day.