SU! Mini Gatefold

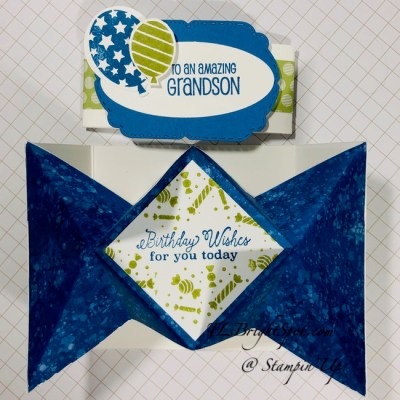
Hello there… Weather advisory for the East coast is to stay INSIDE today – it will feel like 104! Yeck!  Be safe…I have been doing doing several different fun folds lately and well, I just couldn’t stop… todays is a mini version, a little 3″ card for a grandson turning 20… Cannot believe he is 20! 6’4″ and handsome – oh my…I’m just a little bit prejudiced. 😍 Anyway, the card… This young man has come to expect something fun in the way of a card, not something you can buy at the store – yay.. getting them trained. :o) So here it is…

Mini Gate Fold
#1

Mini Gate Fold #2

Mini Gate Fold
#3

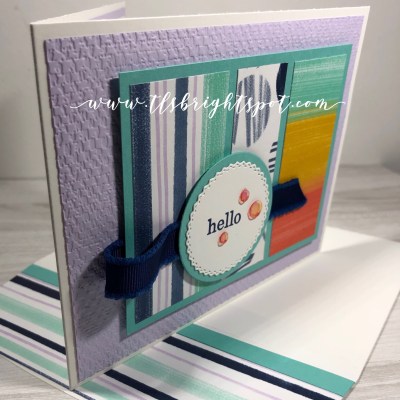
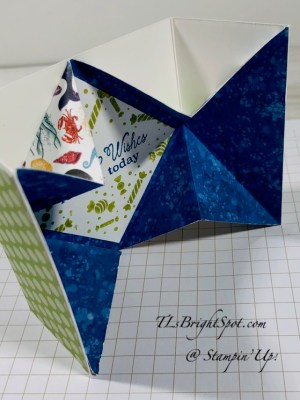
This is so cute – perhaps because it is small. And I just love the way the folds are… here it is from a another angle.

Mini Gate Fold
#4

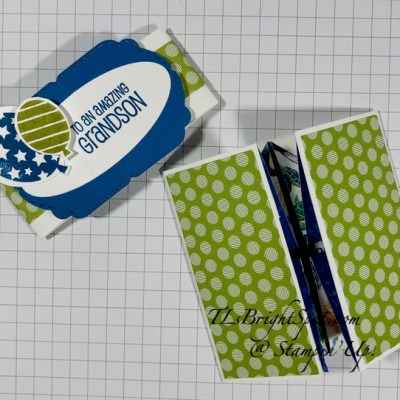
Now you can really see all the folds. Here are the products used in this cute mini card:

  • Whale of a Tail DSP
  • Whisper White card base + belly band
  • Details Bands Dies – oval in Whisper White cs
  • Celebration Labels and Dies for the larger portion of the banner, Pacific Point cs
  • So Much Happy stamp set – balloons, fussy cut
  • A Grand Kid stamp set – front banner sentiment
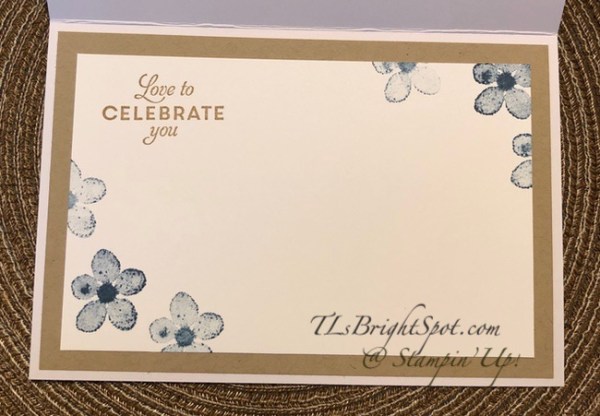
  • Little Treats stamp set – inside sentiment
  • Pear Pizzazz and Pacific Point inks

Let’s see if I can tell you how to do this…

  • card stock base (Whisper White) is 3 x 6 scored at 1 1/2 and 4 1/2 on long side. Burnish well.
  • DSP panel (Whale of a Time) is 3 x 6. Mark center on the long side, at the top & bottom lightly with pencil. Fold from the top left to center bottom making a triangle – burnish and open. Fold from the left bottom to the center top making another triangle – burnish and open. Fold left portion to center, as in step one – burnish and open.
  • Do the same on the right side: right top to center bottom making a triangle, burnish and open. Right bottom to center top making a triangle, burnish and open. Right to center, burnish and open. It will look like picture #4 above even though it isn’t attached to anything yet. 😊
  • Cut a panel in Whisper White for inside sentiment, 2″ square. Stamp the sentiment from Little Treats stamp set in Pacific Point ink. Then stamp the party favors in Pear Pizzazz ink. Remember to stamp ON THE DIAGONAL. Adhere to the DSP.

Mini Gate Fold
#3

  • Now adhere adhere the DSP to the Whisper White card base: triangle on the left first making certain it is al the way to the edge. With the papers flat, adhere the center diagonal square then the right triangle.
  • Belly band: 1″ x about 7″ to go around in Whisper White, DSP is 3/4″ x about 7. Adhere the papers together and wrap around card. Secure in front with Tear n Tape. It should slide easily on and off the card.
  • Cut banner in Pacific Point using the smallest Celebration Labels & Dies. Put dimensionals on back and attach to belly band where it overlaps.
  • Stamp the banner sentiment from A Grand Kid in Pacific Point – off to the right side to allow room for the balloons. Cut with the oval from Detailed bands dies. Adhere with liquid glue to the Pacific Point banner.
  • Stamp balloons from the So Much Happy stamp set: one in Pacific point and one in Pear pizzazz. Fussy cut both. Adhere the larger with liquid glue and the smaller with a dimensional. Slide over the card and bingo this cute little mini is ready for giving.

I love this. Mini cards are just a different kind of treat and this one is extra special cuz it’s a Gate Fold.

That does it for today. Think about shopping during SU! Bonus Days. Items for this card are listed in the Aug-Dec 2020 Mini Catalog which goes live to customers 4 Aug. AND the 2020 – 2021Annual catalog. Don’t have a catalog or a demonstrator? Then talk to me and we can fix that 😁

SU! has some awesome items in their 2020-2021 Annual Catalog and a real bonus going on now – called BONUS DAYS. For every purchase of $50 from now until 3 Aug. you will receive from SU! by email, a $5 coupon that is redeemable 4-31 Aug. Such a deal!

Bonus Days. Earn in July, spend in August.

And when you order from me, please use my July host code to receive a SU! item worth $10 when your purchase is $50-$150. Sounds like another good deal, right?! It is…

Thanks for stopping by.

May you have a beautiful day.

Make someone happy by sending them a handmade card made with love.


SU! 2020-2022 In Color Box for Flowers for Every Season Memories and More Cards and Envelopes

Hi Everyone.. Yesterday I shared five cards made from the Flowers for Every Season Memories and More Card Pack, Cards & Envelopes. They were really fun to do! Because they are kind of a ‘set’, I made a box for them – and here it is… and so easy…

Flowers For Every Season memories and More Gift Card Box
#1

Here are the measurements…

  • for the bottom: 7 1/4 x 9 1/4,  scored on each side at 1 5/16. I used Thick Whisper White for a firm base. Burnish all sides, trim as shown and add Tear ‘n Tape, also where shown
  • for the top: 7 1/4 x 9 1/4, scored on each side at 1 1/4. I used Cinnamon Cider 2020-2022 In Color . Burnish all sides, trim as shown and add Tear ‘n Tape, also where shown.

Box, cutting & tape positioning #2

  • Remove cover on tape and put together with the small tabs going to the inside of the box.
  • For the top:
    • Whisper White 4 1/2 x 6 1/2, 1 x 6 1/2 ( x 2), 1 x 4 1/2 (x 2)
    • 2020-2022 In Color 6×6 DSP (Cinnamon Cider) 4 x 6 (x 2), 3/4 x 6 (x 2), 3/4 x 4 (x 2)
    • Adhere DSP to Whisper White then adhere to the Cinnamon Cider top and sides
    • Decorate: Create a belly band & bouquet
      •  cut a 1 x 12 strip of coordinating DSP. I used World of Good SDSP. Wrap around entire box. Since this is about 1/2″ short of reaching around the box, adds a strip of Thick Whisper White to pull ends together on the backside and on top. See photo…

        Sides of box #4

      • Cut a panel from Whisper White using the Timeless Label Punch and adhere over the top of the two strips. This creates your belly band.
      • Belly Band for box #3

        • Stamp the daisies from the Daisy Lane stamp set, 2 medium and 2 large using Bumblebee ink and Whisper White cs. Punch out using the coordinating Daisy Medium and Large punches. Curl the petals with a bone folder and adhere together with liquid glue.
        • Using the Forever Flourishing Dies, cut out two leaves, one from Just Jade and one from Whisper White. Adhere with liquid glue to the Timeless Label punch panel.
        • Adhere the daisy over the leaves. Tie a bow with the Whisper White 1/2″ Faux Linen Ribbon from the Flowers For Every Season Combo Pack and adhere with a glue dot. Slip this carefully over the box… DONE! Easy, right?!

          Flowers For Every Season memories and More Gift Card Box
          #1

All of these items are available in the 2020-2022 Annual Catalog. If you do not have a demonstrator and no catalog, I would be happy to send you one. Just let me know. Here is a link to this catalog for your review…2020 AC US

Right now, SU! has a special called BONUS DAYS. For every $50 you spend from now until 3 Aug, you receive an email from SU! with a $5 coupon to be redeemed 4-31 Aug. Got it?Bonus Days. Earn in July, spend in August.

And when you order from me, please use my July host code to receive a SU! item worth $10 when your purchase is $50-$150. Sounds like a deal, right?!

Thanks for stopping by.

May you have a beautiful day.

Make someone happy by sending them a handmade card made with love.


SU! Flowers For Every Season Memories and More Card Pack, Envelopes and Cards

Hi Everyone. Ever have one of those nights where sleep is over at 3 AM? It doesn’t happen to me often but it certainly did last night/ this morning… I’ll probably need a nap when I finish this post! I had fun creating five cards with the Memories and More Card Pack, Cards and Envelopes and made five pretty quickly. Because the Cards and Envelopes are all the 2020-2022 In Colors, I wanted to do one of each. I layer, it’s just what I do, so I’ll list all the products used after the pictures.

Flowers For Every Season Memories and More Card Pack #1

Butterfly Wishes stamp set, inside #1


Detailed Bands Dies, inside #2

Flowers For Every Season Memories & More Card Pack #2


Flowers For Every Season Memories & More Card Pack #3

Tasteful Touches stamp set, inside #3


Flowers For Every Season Memories & More Card Pack #4

Daisy Lane stamp set, inside #4

Flowers For Every Season Memories & More Card Pack #5

Flowers For Every Season Memories & More Card Pack #5 inside


Aren’t these a fun set? Next project I think is to make a box for them ~ maybe for tomorrow’s post 🙂 At any rate, these were my 3 AM creations… not napping now, our LIVESTREAM worship service begins soon. I keep getting distracted, phone calls, breakfast, life… so this post has taken longer than it should have. Ah well.

Product list:

Ribbons

  • Flowers For Every Season Ribbon combo Pack ~ Whisper White 1/2″ Faux Linen
  • 2020-2022 In Color Ribbon ~ Cinnamon Cider, Just Jade
  • 3/16″ Braided Linen Trim
  • 1/4″ Gingham Ribbon

Papers

  • 2020-2022 In Color DSP
  • Whisper White, Bumblebee, Crumb Cake, Just Jade

Stamp sets/ Dies/ Punches

  • Butterfly Wishes,Tasteful Touches, Daisy Lane
  • Detailed Bands Dies
  • Timeless Label Punch, Butterfly Duet Punch

Embellishments

  • Pearl Basic Jewels, Gold Glitter Enamel Dots, Boho Indigo Product Medley – flowers

Inks/ Markers

  • Just Jade, Cinnamon Cider, Misty Moonlight inks
  • Misty Moonlight, So Saffron markers

OK – now it’s your turn to go create some fun cards using the Flowers For Every Season Memories and More Card Pack.  If you do not have a demonstrator I would be happy to work with you, send a catalog, get you connected. When you order from me, please use my host code when your order is $50-$150 to receive a SU! item worth $10 from me. If your order is more than $150, do not use the host code… as SU! will allow you to use Rewards to order additional products. Right now SU! is offering BONUS DAYS from now through Aug 3. During that time you will earn a $5 coupon for every $50 order… and that coupon can be redeemed Aug 4-31. August 4 is also when the August- December 2020 M ini Catalog goes live for customers – and I can send that catalog to you as well 😏👌Bonus Days. Earn in July, spend in August.

Thanks for stopping by.

May you have a beautiful day.

Make someone happy by sending them a handmade card made with love.

2020 AC US


SU! Guilded Autumn Specialty DSP, Double Z Fold

Hello… Today is Fun Fold Friday – at least for today anyway. Fun Folds can be complicated or easy, This one is pretty easy: it’s as though you are creating two cards, one smaller, and putting together. Let’s take a look…


Guilded Autumn Specialty DSP, Double z Fold #1

Is that fun or what? And beautiful? SU! has done it again with their gorgeous coordinating papers. These papers come from the Guilded Autumn Specialty DSP pack in the August ~ December 2020 Mini Catalog. If you want to know how to get your pack of these papers, contact me and we’ll connect!

Now let’s talk about how to put this card together:

  • Crumb Cake  is our card base 8 1/2 x 5 1/2, scored at 2 1/8 and 4 1/4 on the long side; cut another piece for the smaller portion 3 3/4 x 6 1/4, score at 2 1/8 and 4 1/4 along the long side
  • Cut Early Espresso (2) 2 x 5 3/8  and 4 1/8 x 5 3/8 for the card base; for the smaller card cut Early Espresso (3) 1 7/8 x 3 5/8
  • Cut Specialty DSP (2) 1 7/8 x 5 1/4, 4 x 5 1/4; for the smaller card cut Specialty DSP (2) 1 3/4 x 3 1/2
  • Cut Very Vanilla 1 3/4 x 3 1/2
  • Stamp the sentiment on Very Vanilla using Early Espresso ink ~ mine is from Path of Petals stamp set
  • Adhere all Specialty DSP to the appropriate size Early Espresso.
  • Adhere these panels to their respective card bases, including the Very Vanilla sentiment panel
  • Adhere these to their respective card bases EXCEPT THE LARGEST PANEL.
  • Wrap a ribbon around the right edge of this largest panel and tie as knot. Adhere in back with glue dots and also under the knot. My ribbon is from the Guilded Autumn Suite and it is called Mint Macaron 1/2″ Basketweave Ribbon. It comes in a combo pack called the Basketweave Metallic Ribbon Combo Pack. Gorgeous! Now adhere this large panel into your card base.

Now it is time to adhere the two cards together.. I find it helpful to use my grid paper for placement.. This NOT difficult… place the smaller card in the center of the larger panel and adhere with liquid glue. TIP: I find it helpful to use my grid paper for centering.

Now close the card with the smaller, loose card flap coming over the top of the base card. Keeping the base card closed, adhere the loose panel with liquid glue. Bingo…

I used my Oval Dies to cut a scalloped oval out of Early espresso. Stamp the appropriate sentiment in Early Espresso ink on a panel of Very vanilla (mine is from Good Morning Magnolia stamp set) then die cut with another plain Oval Die. Adhere together with liquid glue. Put dimensionals on the back and attach to the small front card. YAY! Your card is complete and wonderful and ready to send. Mine is going to a family that I have worked with over the last 30 plus years that has done printing for me. The woman died after a very short illness. UGH! Loss is so hard, especially during these physically distant times….

Anyway, back to the card…  for the envelope I adhered a strip of Early Espresso then the additional Specialty DSP to the envelope flap and nothing else. I hope you try making this fun fold. I like all the layering… it adds a ton of elegance to the card.

Guilded Autumn Specialty DSP, Double Z Fold

Thanks for stopping by.

May you have a beautiful day.

Make someone happy by sending them a handmade card filled with love.

SU! Daisy Lane, Forever Gold Laser-Cut Specialty Paper

Hello again… can you believe it is Thursday already? My goodness this week has flown ~ at least for me. Today’s card is full of bright colors and just says ‘happy” all over it. I’m excited no share it with you… it uses some products from last years catalog and some from this years 2020-2021 Annual Catalog.

Daisy Lane stamp set
Large and Medium Daisy Punch
Forever Gold Laser-Cut Specialty Paper and 2020-2022 In Color 6×6 DSP
#1

Bright, cheerful, it is just F-U-N. Created on the Note Cards/ Envelopes pack, this card is smaller than a regular size card. Finished it measures 3 1/2 x 5, a perfect size.

  • Layer Magenta Madness 3 3/8 x 4 7/8 onto the note card front
  • Layer the Magenta Madness 2020-2022 In Color 6×6 DSP 3 1/4 x 4 3/4
  • Layer one of the Forever Gold Laser-Cut Specialty DSP, but on the white side. Adhere with Stampin Seal
  • Stamp two large daisies with Bumblebee from the Daisy Lane stamp set and punch with the large daisy punch.
  • Do the same with the Medium daisy: stamp 2 in Bumblebee, punch 2
  • Gently curl the petals with a bone folder, going up
  • Adhere together with liquid glue
  • Adhere to the Forever Gold Laser-
  • Cut Specialty Paper with two glue dots. Put Basic Pearls in the center ~ I used five
  • Tie a bow using the 1/4″ Gingham Ribbon in Bumblebee and adhere with a glue dot. Your card front is complete.

The best part about this card is that the inside could be absolutely anything you wanted it to be: get well, thinking of you, you got this, just about anything. Since a shower card was requested, that’s what I did… made it a shower card.

Under My Umbrella stamp set
#2

Cute, right?

  • Stamp the umbrella in Magenta Madness.
  • Stamp the flowers in Bumblebee
  • Now go back and stamp the sentiment

I keep saying this over and over – it’s like a broken record, but SU! coordinates its products so they may be used in so many different ways.

Remember these are Bonus Days at SU! For every $50 spent by you, a coupon is sent via email worth $5 toward purchases in August. Such a deal! The August – December 2020 Mini Catalog is now out and I have sent mine to my customers. If you do not have a demonstrator, I would be happy to send you a catalog – just let me know! This is the perfect time to get connected. 😁

Bonus Days. Earn in July, spend in August.

Use my host code when your SU! purchase is between $50-$150 to earn a SU! item from me worth $10. You’ll still receive your coupon from SU! during July and get this bonus from me.

Thanks for stopping by

May you have a beautiful day.

Make someone happy by sending them a handmade card n- it’s a gift of love.

SU! Boho Indigo Product Medley Spanner Card

Hello… Happy Fourth!!! Woohoo… We are so used to being ‘out and about’ for  this holiday, attending a picnic or two – with the pandemic life is very different… Enjoy your day whatever you are doing. Go0d Bless America… Now, on to the card for today…

I was on Pinterest the other day and found this fun idea for a card and of course I HAD to try it myself… it’s called a spanner card. I rather like a good challenge, something new ~ here is what I created using the Boho Indigo Product Medley

Boho Indigo Product Medley
Spanner Card
#1

It was fairly easy but did take several steps to make. Let’s get started in the telling…

Begin with an 8 1/2 x 5 1/2 Misty Moonlight cs, scored at 4 1/4. Using your paper trimmer, cut the front panel on each side 1 1/4″  from the edge TO THE SCORE LINE.  Cut a piece of window sheet 1 1/4″ x 3 1/2 and adhere to the card front at the bottom. (I used Tear n Tape for the window sheet) This creates the ‘span’ to hold the two front panels together 😏. Cut 2 panels of Very Vanilla 1 1/8 x 4 1/8 and one.panel 1 1/4 x 3 1/8. Cut panels of Boho Indigo cs: 2 at 1 x 4 and 2 at 1 x 3. Adhere the Very Vanilla to the side front panels and one covering the window sheet. Then adhere the Boho Indigo panels over these. Do not adhere the the last 1x 3 Boho Indigo strip yet.

This product medley has these fabulous green leaves and I adhered three of these to the card front. The largest was attached with a glue dot, the palm leaf is on dimensionals and the smallest frond is adhered to the window sheet ON THE BACK SIDE OF THE CARD FRONT.  This creates wonderful dimension. Now cover the back side of the window sheet with that last 1 x 3 strip. Here’s what it looks like from the inside…

Boho Indigo Product Medley
Spanner Card
#2

The only thing left to do for the front is the sentiment banner. Cut a 3/4 x about 2 1/2 strip of Very Vanilla. Trim one end by using the Lovely Labels Pick a Punch. Stamp the sentiment in Garden green from the Bloom and Grow stamp set. Add Gilded Gems from the Ornate Garden Suite of products. Put dimensionals on the back and adhere to the card front.

For the inside… there are two sections really: one is the rest of the card front… cut a panel of the embossed Very Vanilla from the Boho Indigo Product Medley (gorgeous papers!) 3 x 4 1/8 and adhere to that cut front panel. The above picture shows that embossed piece clearly.

Now let’s complete the real inside of the card… cut a Very Vanilla 4 x 5 1/4 and adhere with liquid glue. Cut two strips of the Boho Indigo cs 1 x 3 3/4 and adhere with liquid glue. I added no sentiment as this will be a handwritten card, a friendly uplift to a dear person.

Boho Indigo Product Medley
Spanner card
#3

Your card is now complete. Let’s do the envelope… Cut a panel of the Boho Indigo cs 2 1/4 x 6 and adhere to the flap. Trim to fit. Remember those punch-out leaves from this product medley? I took the punched piece and ‘taped’ around it with post-it notes leaving just the leaf I wanted open, and sponged it with a sponge dauber and Garden Green. Then I took my Light Soft Suede Blends marker and made the lines on the palm leaf. I stamped the hello sentiment from the …. Bloom and Grow stamp set and my envelope was complete. TIP: slip a scrap piece of cs into your envelope when using a blends marker. This keeps it from bleeding through the envelope!

Wasn’t that fun? A new type of card for me and I like it – a spanner card…

BoHo Indigo Product Medley
Spanner Card
#4

NEW, NEW, NEW… The Aug – Dec Mini Catalog is available for Demonstrators and we were able to place a preorder to play with products.  I am soooo excited – my box is set to be delivered today – eek! Depending on when my box arrives, perhaps I’ll pop on later today to share some new products with you.  If you want a catalog and you do not have a demonstrator, please connect with me. SU! is offering a fabulous deal right now… for every $50 order, you receive a $5 coupon in your email for use from Aug 4- the end of Aug. Deal? Yes! Shop with me and get extra bonus… a $10 SU item of your choice when you spend over $50. (One free item per customer per month please.) I’m also setting up STAR rewards that will earn points as well toward SU! product. I’m working out the fine points and hope to have that info out later today as well. All kinds of great happenings going on! Sending hugs your way for now ~ hope to ‘see’ you later!

Thanks for stopping by.

May you have a beautiful day.

Make someone happy by sending them a handmade card.

SU! Playful Alphabet Dies and Z Fold

Hello… last baby card I promise! Made with the Playing with Patterns 6×6 DSP and the Playful Alphabet Dies, this is another fun fold card. Here ’tis…

Playful Alphabet Dies
Playing with Patterns 6×6 DSP
#1

The card base is Purple Posy 4 1/4 x 11 scored at 2 3/4 and 5 1/2. Burnish the 5 1/2 as though the card were going flat, then fold back the 2 3/4 scored panel – this makes a z – therefore… ta da… a Z Fold Card. Cut a panel of Coastal Cabana 2 3/8 x 4. Adhere a panel of the Playing with Patterns 6×6 DSP cut to 2 x 3 7/8. Wrap a length of the Silver/ Misty Moonlight ribbon from the Flowers for Every Season Ribbon Combo Pack three times around and tie in knot. Hold in place on the back with tape. Put dimesnionals on this panel back and set aside.

Adhere Foam Adhesive Sheet strip (about 1 x 2 1/2) to a piece of coordinating DSP then die cut the letters B-O-Y using the Playful Alphabet Dies. Adhere to the card front by simply removing the backing on the Foam Adhesive strip! Now adhere this completed panel to the front of your Z-Fold. Add three 2020-2022 In Color Enamel Dots – these are Just Jade.

For the inside… Coastal Cabana 4 x 5 1/4 then Whisper White 3 3/4 x 5, then add a coordinating strip 1/4″ from right end. Voila! The envelope got the same DSP adhered to the flap. Baby card #5 is done…

#2

Playful Alphabet Dies
Playing with Patterns 6×6 DSP
#3

Here are all five cards – and yes, they have been sent already! What a fun gift set to forward to a new Mom. Hope she really likes them; I had such fun creating them for her.

Playful Alphabet Dies
Playing with Patterns 6×6 DSP
Pattern Play stamp set

Playful Alphabet Dies
Waterfall card

Playing with Patterns 6×6 DSP
Playful Alphabet Dies
Gatefold

Tasteful Labels Dies
Playing with Patterns 6×6 DSP

Thanks for stopping by.

May you have a beautiful day.

Make someone happy by sending them a handmade card.

SU!Tasteful Labels Dies, Playing with Patterns 6×6 DSP

Hello again… baby card #4. So different from the other three and still from the very same DSP! Love this… and this may be my favorite so far…

Playing with Patterns 6×6 DSP
Tasteful Labels Dies
#1

I love how this turned out, maybe because it’s bright, cheerful and has several coordinating colors. The base of the card is Thick Whisper White 4 1/4 x 11 scored at 5 1/2. Cut a panel of Purple Posy 4 x 5 1/4 and run through your die cutting/ embossing folder using the gorgeous and very versatile Tasteful Textile 3D embossing folder. Adhere with Stampin Seal to the card front. TIP: When adhering embossed panels I find it helpful to use Stampin Seal. I find it covers better somehow and I just prefer the way it holds the panel. 

The next layer is Coastal Cabana 4 1/4 x 3 1/4. Then cut three panels of the Playing with Patterns 6×6 DSP that coordinate and compliment each other. These are cut 1 1/2 x 3, 1 x 3, and 1 1/4 x 3. TIP: Adhere the two end pieces first and the center one last. This allows for perfect centering of all panels. Cut a length of Night of Navy 1/2″ Frayed Grosgrain Ribbon from the Boho Indigo Product Medley. (This gorgeous ribbon – just sayin’) Know where you want the ribbon to end and adhere that section with Stampin Seal. Then wrap the end of the ribbon to the back of the card creating a loop. Adhere to the back with Stampin Seal. I love the way this looks, as though it is creating a banner :O). Put dimensionals on this panel and set aside.

Die cut a circle from Coastal Cabana with the Layering Circles Dies. Die cut another circle using the Tasteful Labels Dies (there is such a collections of cool labels in this die set!) from Whisper White. Stamp the sentiment with Night of Navy from the Best Year stamp set. Adhere this to the Coastal Cabana circle with liquid glue. Add three Artistry Blooms Adhesive-Backed Sequins. Put dimensionals on this circle duo (top and bottom only) and adhere over the ribbon.

Take this Coastal Cabana panel and attach to the card front about 1/2″ from the right edge. Your card front is now complete. Again, the inside is super duper easy: layer Purple Posey 4 x 5 1/4 and Whisper White 3 3/4 x 5; add a strip of coordinating DSP; adhere to the card inside and the card is done. The envelope gets a strip 2 1/4 x 6 adhered to the flap and trimmed. Done, done, done.

Tasteful Labels Dies
Playing with Patterns 6×6 DSP
#2

Since this is card #4, here are the other three to be sent as a new baby gift. I have intentionally not put thank you sentiments or congratulations on any of these as they can be used as an announcement or any other purpose., sharing a photo even.

Playing with Patterns 6×6 DSP
Playful Alphabet Dies
Gatefold

Waterfall card

Playful Alphabet Dies
Playing with Patterns 6×6 DSP
Pattern Play stamp set

Aren’t these a fun assortment? Tomorrow I will share the last of the baby cards, then move on to something else… 😳

Thanks for stopping by.

May you have a beautiful day.

Make someone happy by sending them a handmade card.

Not for nothin’… today, Jul 2, SU! Demonstrators around the world will be ordering from the Aug- Dec Mini Catalog. This used to be called the Holiday catalog but SU! decided to have a longer sales period for this cattie and renamed it. Smart, right? Anyway – I can’t share anything just yet, but will soon! Keep your eyes peeled 😜 for more new stuff!

SU! Playful Alphabet Dies Fun Fold

Hi Y’all… I’m on a roll here with the baby cards AND the Playful Alphabet Dies AND the Playing with Patterns 6×6 DSP. My goal is five cards with papers all from the same stash but totally different style, fold, etc. So far I think I have been successful. Here is today’s card ~ a Gate Fold

Playing with Patterns 6×6 DSP
Playful Alphabet Dies
Gaten Fold
#1

After looking at it (again and again!), I think it needs another layer behind the banner ~ may have to do that… For the time being, here’s how this card is made…

Calypso Coral cs cut to 4 1/4 x 11 then scored at 2 3/4 and 8 1/4. Add a layer of Coastal Cabana cs to each front panel, 2 5/8 x 4 1/8. (You could easily make this 2 1/2 x 4). Cut two additional panels, this time in Playing with Patterns 6×6 DSP. These two panels were each 2 x 4. Adhere, centering, to the side panels. Cut a label using the Tasteful Labels Dies. (Gosh, I use these so much – they are very versatile). With the Playful Alphabet Dies cut the letters B-O-Y from Whisper White and adhere to the label with liquid glue.Adhere the Coastal Cabana label only on the left front panel. Add five Playing with Patterns Resin Dots and your card front is done.

Gatefold
Playful Alphabet Dies
Playing with Patterns 6×6 DSP
#2

The inside is easy peasy… Coastal Cabana layer 4 x 5 1/4, then Whisper White 3 3/4 x 5. Add a strip of the Playing with Patterns 6×6 DSP that coordinates and bingo, the card is complete!

Gatefold
Playing with Patterns 6×6 DSP
#3

The envelope…  Simply adhere a 2 14 x 6 panel of the Playing with Patterns 6×6 DSP. Voila! Card #3 in this ‘baby bundle’ for our daughter to give as a gift to the new mother. In case you missed the last two posts, here are photos of those…

Playful Alphabet Dies
Playing with Patterns 6×6 DSP
Pattern Play stamp set

Waterfall card

Thanks for stopping by.

May you have a beautiful day.

Make someone happy by sending them a handmade card.

SU! Waterfall Card with Playful Alphabet Dies

Hi Everyone! Yesterday I told you my task is to create several baby cards for my daughter’s girlfriend.Today’s card is another to add to that gift set and it uses the Playful Alphabet Dies AND the Playing with Patterns 6×6 DSP. I did absolutely no stamping on this project but it is a new fun type card I haven’t made before. It’s called a waterfall card ~ here ’tis…

Playful Alphabet Dies
#1

This is pretty easy and I’ll talk you through it then do a very short video of how it works. The card base is Purple Posey 8 1/2 x 5 1/2, scored at 4 1/4. Cut Misty Moonlight 4 1/8 x 5 3/8 and adhere to the card front. Cut a panel of Playing with Patterns DSP 4 x 5 1/4 and adhere to the Misty Moonlight. Cut a Misty Moonlight strip 1 1/2 x 8 and score at 1 1/2, 2 1/4, 3, and 3 3/4. Burnish.  Cut four (4) 1 1/2 squares out of Bumblebee cs. Cut three (3)  1 3/8 squares out of coordinating Playing with Patterns 6×6 DSP. Cut one (1) 1 3/8 square out of Whisper White. With your Playful Alphabet Dies, die cut the letters B-O-Y out of that Whisper White Square.  This was a tight squeeze but it did work. Adhere this Whisper White to one of the yellow squares. From the die cuts, I chose to adhere the letter B, the middle of the O and left the Y to show through. Adhere this panel to the square on the 1 1/2 x 8 strip, JUST UNDER THE FOLD LINE (not on it!).Place a strip of Tear n Tape to the bottom of this panel on the back side of the Misty moonlight. Adhere the next Bumblebee square with Tear n Tape JUST UNDER THE NEXT SCORE LINE.  Continue adhering the last two squares in this same manner.

The purpose of adhering the squares just under the score line is to allow them to ‘fall’ into place as you pull the strip. Make sense?  Here are individual pictures of the placement.

Waterfall card
#3

Waterfall card #4


Waterfall card
#5

Take a peek at this video. to watch it unfold.

Cut a strip of Misty Moonlight 1/2 x 4 and a coordinating 3/8 x 4 strip of Playing with Patterns 6×6 DSP. Adhere the DSP to the Misty moonlight. Remember the Tear n Tape at the bottom of the panel with the word B-O-Y? Adhere to the front of this strip, in the center,  and bottom of the strip. Now lay flat on your card but do not yet adhere. Take a peek at this picture… the long blue section is UNDERNEATH the strip while the B-O-Y piece is adhered to the bottom of the cross strip. Get it?

Waterfall card
Playful Alphabet Dies
#2

Once you determine the correct placement of the waterfall/ cross strip, adhere Tear n Tape to the cross strip but not across the waterfall strip. The waterfall needs to slide through the opening smoothly but there should not be too much room for sideways movement. Punch a hole about 1/4″ up from the bottom of the pull strip and insert a length of ribbon  – probably 7″  before folding in half.  This becomes your cute “pull” for the waterfall. I used Daffodil Delight 1/4″ as I forgot I had Bumblebee 1/4″, but it worked!

Now do the inside… super simple… Misty Moonlight 4 x 5 1/4, Whisper White 3 7/8 x 5 3/8. A
dd a strip of coordinating  Playing with Patterns 6×6 DSP and adhere to the inside.

#6

The envelope flap has coordinating Playing with Patterns DSP and that’s it! Voila! Such a FUN CARD to make. I hope you try it…

Waterfall card
#5

Thanks for stopping by.

May you have a beautiful day.

Make someone happy by sending them a handmade card!