Unknown's avatar

About TL's Bright Spot

I love to be creative - in the garden, crafting, and in leadership roles. There is something wonderful that happens when we design something new and share it with others. It's fun and makes everyone happy.

Stampin’ Up! Elegantly Said Welcome

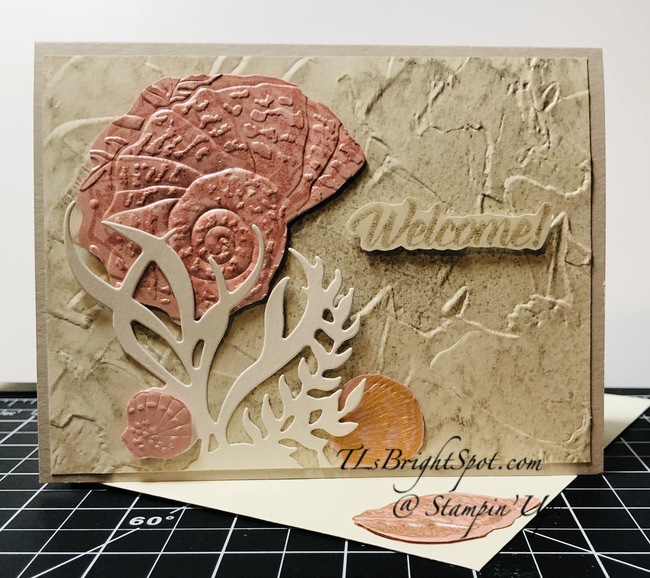
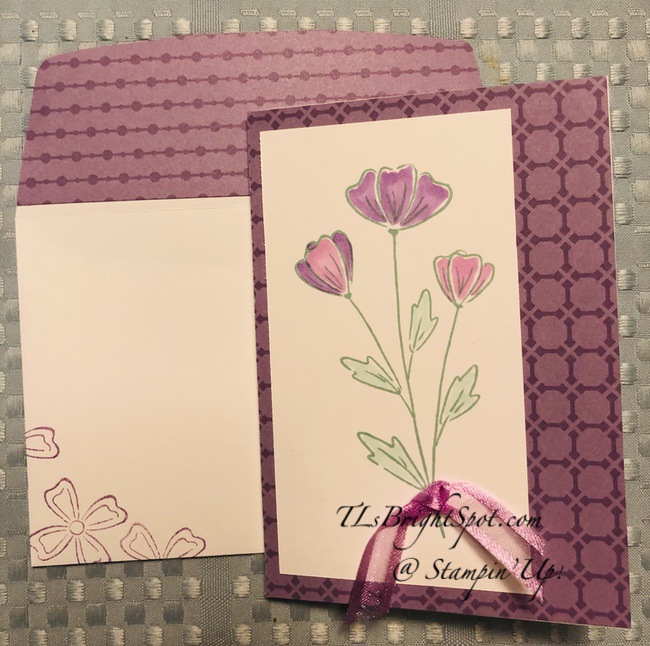
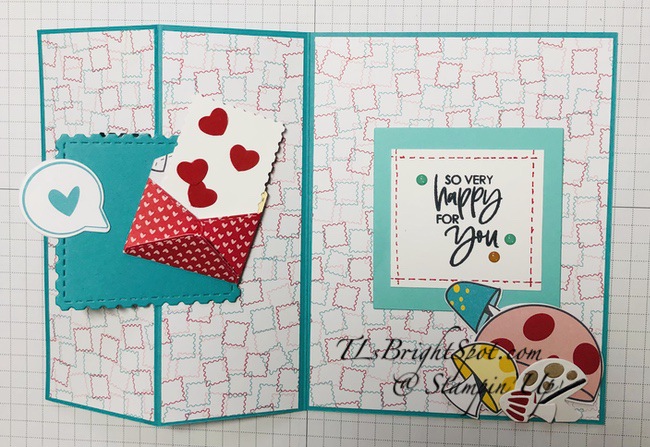
The Elegantly Said bundle is just as it says – elegant: elegant DSP pack with silver, gold, copper and the punch – create a tag for any length and wonderful scripty font sentiments. Today’s card is a mix of DSP and embossing.

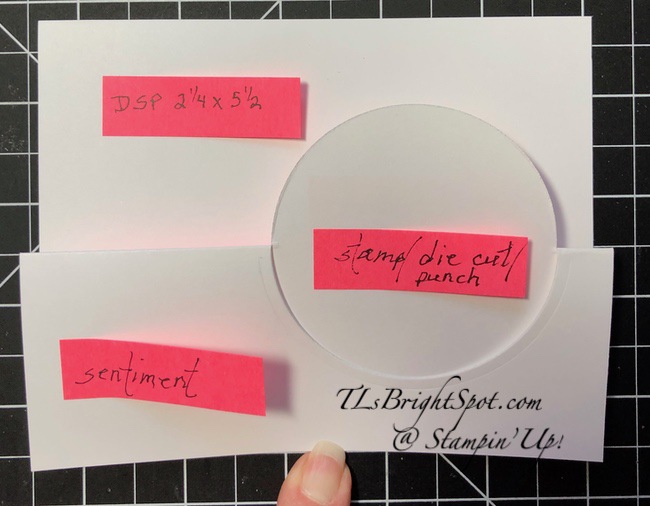
I used Basic Gray card stock for my base today, then a layer of Very Vanilla. I used two new papers in the Simply Elegant Specialty DSP package, then a narrow strip to cover the join. To create the tag, I cut it just a tiny bit more narrow that the opening, but only a tiny bit. Because of all the curves, this tag can be a bit tricky if wanting to lengthen it, so here’s a neat trick… slip a larger piece of paper – maybe 3 x 3 into the punch as though you were going to punch a short tag; slip the narrow piece into the top or bottom, remove the 3 x 3, and punch. Repeat this process for the other end. And voila – one beautiful lengthened tag!

Elegantly Said Welcome – #1

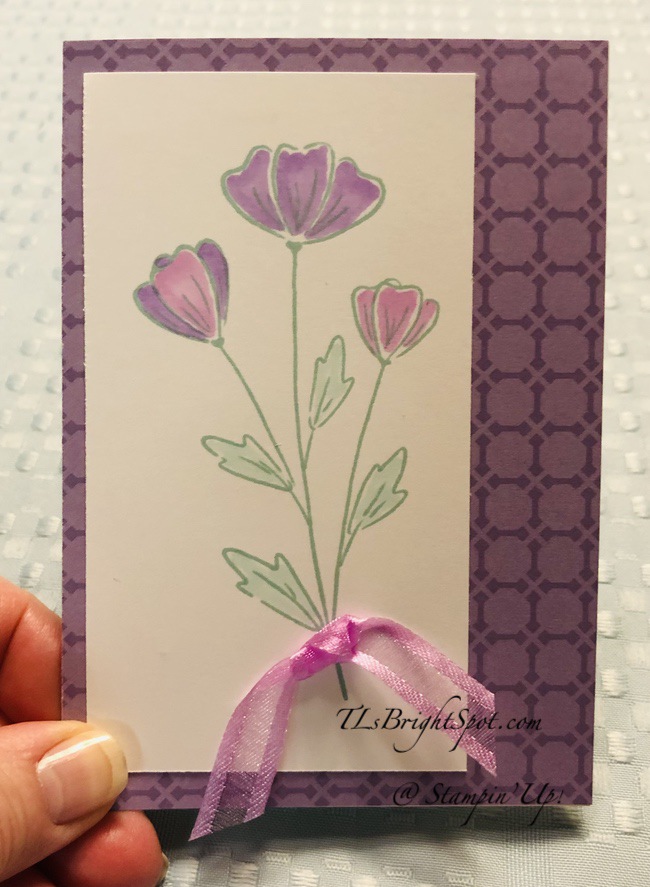
After creating the length I wanted, I stamped the flower image from the Elegantly Said stamp set in VersaMark, then into Copper Embossing Powder and heat set. I used both pieces (silver & gold) of the Simply Elegant Trim pack and tied a knot around the point of the tag. The tag got dimensionals and was added to the card front. Now we have two layers on dimensionals: the Very Vanilla w/ the DSP AND the tag.

For the sentiment panel, I stamped the sentiment from the Let’s Create Together stamp set in Basic Gray ink on a piece of Vary Vanilla card stock, then used the Label Me Fancy Punch to create the ends. Again, it’s more narrow than the punch as I wanted a Basic Gray Background to surround it. I used the same technique as above to punch the ends. The Very Vanilla sentiment panel was adhered to the Basic Gray with liquid glue then over the Elegant Tag also with liquid glue. I then added three (3) Metallic Jewels in gold. This brings in all the elements of the larger panel of DSP: silver, gold & copper.

Elegantly Said Welcome – #2

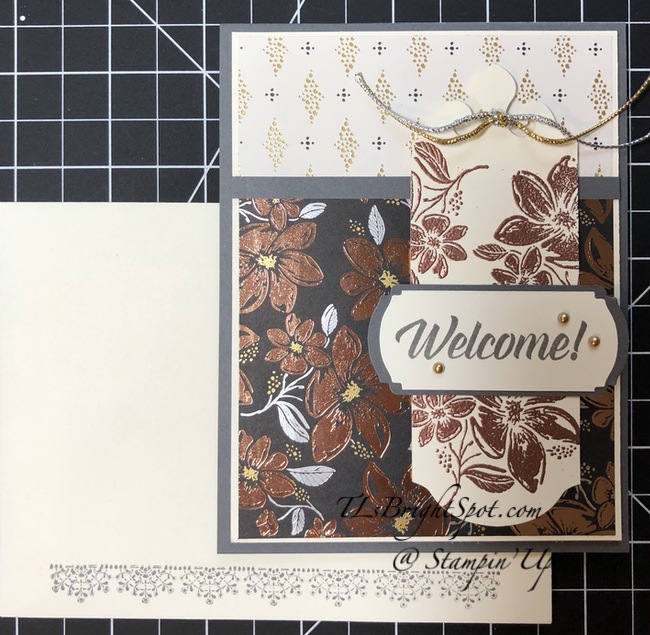
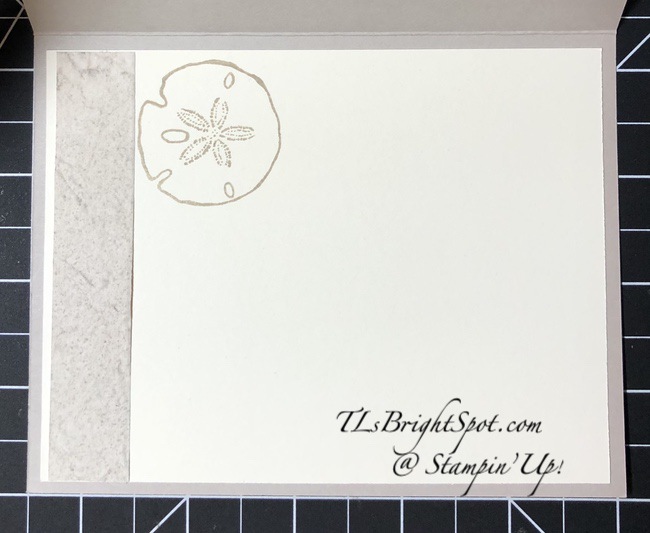
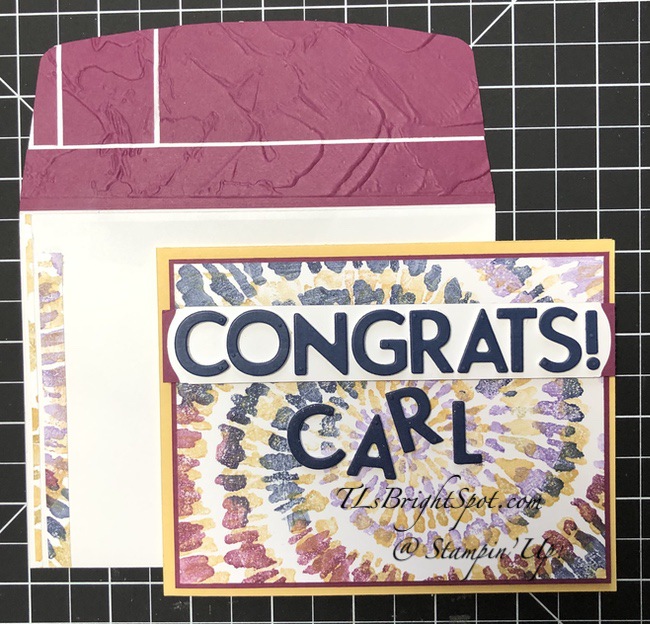
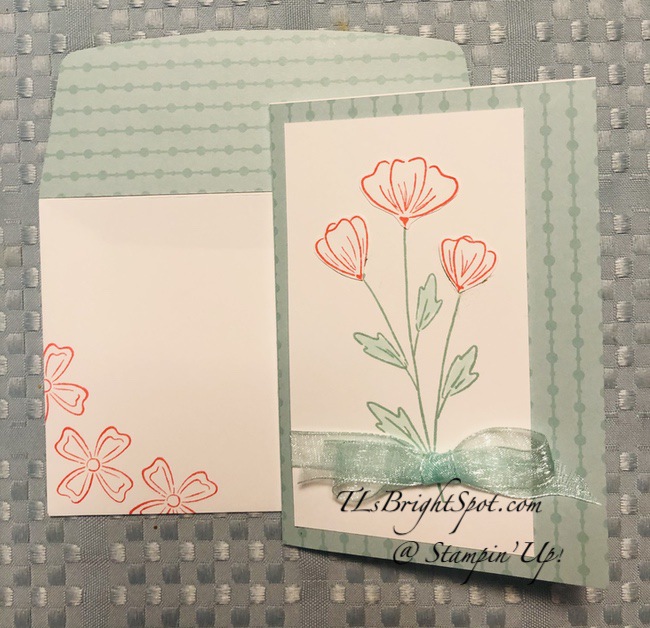
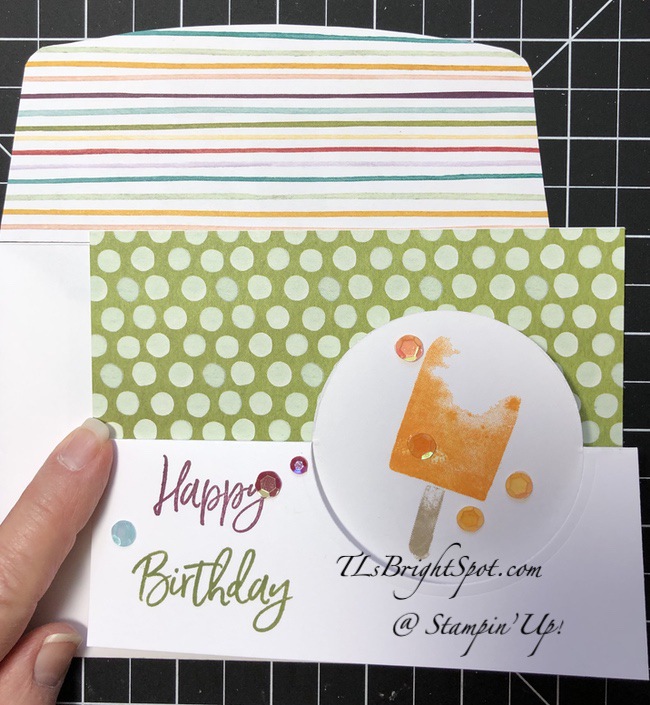
For the envelope I decided simplicity – and stamped this very sweet decoration on the bottom with stamped off once Basic Gray. It comes from the Elegantly Said stamp set!

Playing with this set as it’s fairly new to me and I want to experiment. The DSP only arrived so this was first play with that pack. The papers are beautiful.

Products for todays project are from the 2021-22 Annual Catalog They may be found in the list below. I’ve made it easy for you to simply ‘add all to cart’. If I can help you in any way to order these items, or others, please give me a holler. As a thank you to my customers, when the order is between $50-$150 I offer a SU! item of your choice valued at $10. Remember to use MY NEW HOST CODE – ZD9N2JRR . When the order is over $150, you still receive that free gift from me, but SU! has Stampin’ Rewards that may be used for additional products, so don’t use the host code at that time. If you have questions just let me know. Card cuts are listed at the bottom of this post. If you would like to be able to order products early from catalogs, join my team now… you may do that here. We have lots of fun and are a creative bunch that encourages & supports one another.

Remember, lots going on in the Stampin’ Up! world: JOIN Promotion, HOST promotion, AND KIT promotion. The kit promotion really is a perfect way to get folks together, to introduce some very simple and basic card or packaging making. More information below for each of these. And of course, if you have questions, please contact me.

The first is the JOIN promotion… for $99 you may choose $155 worth of products beginning 4 May through the end of May. It just doesn’t get much better than that. Click the image to join.

Bouquet of Hope by Paper Pumpkin
  • A new demonstrator can select any eligible Stampin’ Up! products up to the stated value.
  •  The Starter Kit also includes business resources like catalogs, brochures, order forms, and postcards.
  • The Starter Kit also includes a FREE past Paper Pumpkin kit.
  • In addition to the amazing added value to their Starter Kit, when new team members join Stampin’ Up! they get to be a part of our amazing community of crafters. Plus, they get to enjoy sharing simple and fun crafting experiences with others, early access to products, and exclusive access to training events.

HOST promotion 4 May – 14 June

Connect, Craft & Collect

From 4 May–14 June 2021, qualifying orders will receive our generous Stampin’ Rewards PLUS additional rewards! Hosts can earn Stampin’ Rewards based on order totals for an entire party. Outside of the party setting, Stampin’ Rewards are available to those who place individual orders that meet the order totals shown here.

HOST ORDER TOTAL*STAMPIN’ REWARDSADDITIONAL STAMPIN’ REWARDS 50% OFF ITEM**
$150.00 USD/$200.00 CAD10%
$250 USD/$300 CAD10%$25 USD/$30 CAD
$300 USD/$375 CAD12%
$450 USD/$550 CAD14%1
$600+ USD/$725+ CAD16%

Stampin’ Rewards can be spent on any merchandise in either of the current catalogs, including the host exclusive items on pages 170-171 in the new Annual Catalog and page 88 in the January-June Mini Catalog!

  • Workshop orders, customer orders, and online orders all qualify for the extra $25 in Stampin’ Rewards if they reach the $250 level.
  • The order must reach the qualifying amount of $250 in merchandise prior to shipping and tax.
  • The extra $25 rewards are only valid once per order no matter how high the order total.
  • Starter Kit orders do not qualify for this promotion.
  • Stampin’ Rewards can not be used on a 50% off item.
  • Deadline to submit an order and receive the extra $25 in free Stampin’ Rewards:  June 14, 2021 at 11:50 PM (MT).

KITS PROMOTION BEGINS 1 JUNE, more information coming soon!

5.01.21_DHEADER_KITSPREORDER_NA

Created to be both an easy business-building tool and the perfect introduction to papercrafting!

More information to come.

Thanks for stopping by.

May you have a beautiful day.

Make someone happy sending them a handmade card filled with love.

Stampin’ Up! Friends Are Like Seashells Welcome

We had quite a ‘show’ on our bird feeders yesterday: Baltimore Orioles (both male & female), Rose Breasted Grosbeak, Red-Bellied Woodpeckers, Downy Woodpeckers, Catbird and Cardinals. Oh my, we had trouble getting work done. God’s creations are just amazing and I rarely get my fill. But yesterday was amazing! The Orioles were around the day before, but only a couple. This time there were at least four males and two females. They rarely stay long, but we had put out grape jelly and an orange cut in half and they really were going for it. Such glorious creatures!

New neighbors are moving in later this month and I’m creating a list of who lives where on our street to help them get acquainted. Our street is a cul de sac and it’s ideal for kids and bicycles and basketball – and we all know one another. If we need anything, we can count on our neighbors. Along with the listing of who lives where, I’ve made a card (surprise!)

Friends Are Like Seashells Welcome – #1

This card begins with a Sahara Sand card base. Adhered to that is a panel of Sand & Sea DSP that has been run through the painted Texture 3D embossing folder. I had created some time ago, some of my own shimmer paper using Blushing Bride card stock and the Frost White, which is now retired. Using the die as a template, I stamped the various shell designs on the now shimmery Blushing Bride card stock with various inks: Blushing Bride, Mango Melody and Sahara Sand. I ran the Blushing Bride piece through the die cutting machine with the Seaside Seashells Dies and then through the Seashells 3D embossing folder, then fussy cut the various shells and used what I needed for this card – and saved the others for another project. I also ran a piece of the Shimmer paper through using only a portion of the same die (oops! I think that paper is retired! You could use the Pearlescent paper. It’s just a bit darker.) That looks a lot like a piece of coral to me and was a perfect contrast for this card.

I began layering the pieces: the largest shell was adhered with dimensionals; the small pink shell was adhered directly to the pale Shimmer paper; the ‘coral’ piece was adhered with both liquid glue at the base and a couple of mini dimensionals to add depth. I stamped the sentiment with Sahara Sand ink on Pearlescent Paper (see how it is just a bit darker?) and fussy cut it then added it to the card with dimensionals. And the card front was done!

Friends Are Like Seashells Welcome, inside – #2

For the inside I adhered a strip of the Sand & Sea DSP that had been run through the Painted Texture 3D embossing folder then stamped the sand dollar with Sahara Sand ink, adhered the panel to the inside of the card and voila!

Friends Are Like Seashells Welcome – #3

For the envelope I adhered two pieces of coordinating card stock to the envelope flap: Sand & Sea DSP + Sahara Sand and ran that through the Painted Texture 3D embossing folder. For the front of the envelope I adhered one of the fussy cut shells with liquid glue – and the card is ready to give to our new neighbors when they move in later this month. Nothing like being prepared!

Products for todays project are from the 2021-22 Annual Catalog They may be found in the list below. I’ve made it easy for you to simply ‘add all to cart’. 😉 If I can help you in any way to order these items, or others, please give me a holler. As a thank you to my customers, when the order is between $50-$150 I offer a SU! item of your choice valued at $10. Remember to use MY NEW HOST CODE – ZD9N2JRR . When the order is over $150, you still receive that free gift from me, but SU! has Stampin’ Rewards that may be used for additional products, so don’t use the host code at that time. If you have questions just let me know. If you would like to be able to order products early from catalogs, join my team now… you may do that here. We have lots of fun and are a creative bunch that encourages & supports one another.

Joining Special!!! And Stampin’ Up! has outdone themselves with promotions. The first is the JOIN promotion… for $99 you may choose $155 worth of products beginning today through the end of May. It just doesn’t get much better than that. Click the image to join.

Bouquet of Hope by Paper Pumpkin

Questions? Contact me @ tlsbrightspot@gmail.com

Stampin’ Up! has another promotion right now as well… it is a HOST promotion 4 May – 14 June

Connect, Craft & Collect
HOST ORDER TOTAL*STAMPIN’ REWARDSADDITIONAL STAMPIN’ REWARDS 50% OFF ITEM**
$150.00 USD/$200.00 CAD10%
$250 USD/$300 CAD10%$25 USD/$30 CAD
$300 USD/$375 CAD12%
$450 USD/$550 CAD14%1
$600+ USD/$725+ CAD16%

Stampin’ Up! Spiral Dye Congrats

Yesterday must have been a whirlwind at the Stampin’ Up! offices. With the 2021-2022 Annual Catalog going live, the joining special, the Host special – wow! They are rockin’ it! Today I am celebrating our grandson who was just admitted to University of Performing Arts. He will begin in the fall and is so excited, he is just beside himself. 🙂 He’s been involved in theater for some time and this has been a dream for a while. The pandemic and costs slowed the process, but now it’s a ‘go’ and today’s card is all about that.

Spiral Dye Congrats – #1

Does this look kinda like tie dye to you? It certainly does to me… and tie dye shirts are popular to this day. So how did I do this… first of all I looked at a couple of videos: Mary Deatherage & Bruno Bertucci are two of them I watched – and I encourage you to do that. Next thing was to set up my Stamparatus and since this is one big stamp, that was easy. I use this Stamparatus a LOT. I began with a square Basic White card stock and chose markers to use for coloring the stamp: Rich Razzleberry, Night of Navy and Highland Heather for the first go around, then So Saffron for the second. Why markers you ask… if using more than one color, the ink pads just don’t work. And for some reason, the sponge daubers come off too light. So… the brush end of the markers worked well and was pretty quick. I started with the Highland Heather first and simply colored the stamp and stamped it on the square Basic White card stock. I followed around coloring all the stamp using the colors mentioned. Once I had colored the entire dye I rotated the paper a full 180 degrees and colored the entire stamp with So Saffron. I probably could have used the ink pad for this since it was just one color – but I didn’t. Next time…

Once I had done all the stamping I determined the mats and card base. After futzing around a bit, So Saffron became the card base with the next layer Rich Razzleberry (on dimensionals). I knew I wanted to die cut the letters, so pulled out Playful Alphabet Dies and Foam Adhesive and Night of Navy card stock. I adhered the Foam Adhesive to a Night of Navy strip that was probably 1 1/4 x 6. That could be a bit long – but not much. I didn’t want to waste the Foam Adhesive! I ran the letters through the die cut machine at least three times to make certain the cuts went all the way through. They were perfect and popped out nicely. I adhered them to a Basic White strip that I had already cut to the proper length and had trimmed the ends with the Fancy Label Punch. I didn’t want the ends on this piece square and this was just enough curve. I layered this strip to a piece of Rich Razzleberry with Stampin’ Seal, then put dimensionals on the back and placed it on the card front. I die cut our grandsons name – also out of Night of Navy with Foam Adhesive on the back and covered the name with Wink of Stella. It was then added to the card front.

This is thick – and if I were mailing it, would need to go in a padded envelope. But thankfully – I’m not mailing it… We get to see our Grands IN PERSON for the first time since August of 2020!!! WOOHOO!!! Happy Mother’s Day to me – and to our daughter… I’m getting carried away – back to the card… If I didn’t explain, the layers are like this: So Saffron card base; Rich Razzleberry on dimensionals with the Spiral Dye card adhered with liquid glue to it – followed by the words/ letters. The card front is now complete.

Spiral Die Congrats, inside – #2

For the inside I took a panel of Basic White and added some of the trimmed Spiral Dye card stock with Stampin’ Seal. I then stamped the two sentiments from A Grand Kid stamp set in Rich Razzleberry ink – again using my Stamparatus. I really like the mixed fonts on this! The Basic White panel was adhered to Rich Razzleberry with liquid glue then into the inside of the card and voila – all done! I think he’s going to like this…

Spiral Dye Congrats – #3

I wanted to do something different on the flap so took some Rich Razzleberry scraps and adhered them with liquid glue, trimmed the extra. I then ran it through the Painted Texture 3D Embosssing Folder, which gave it some great texture. For the front I adhered some extra strips of leftover card front pieces. Done, done, done.

This was definitely a fun play with a new stamp – the Spiral Dye. I also see this with a butterfly – again.. another day, another card 🙂

Products for todays project are from the 2021-22 Annual Catalog They may be found in the list below. I’ve made it easy for you to simply ‘add all to cart’. 😉 If I can help you in any way to order these items, or others, please give me a holler. As a thank you to my customers, when the order is between $50-$150 I offer a SU! item of your choice valued at $10. Remember to use MY NEW HOST CODE – ZD9N2JRR . When the order is over $150, you still receive that free gift from me, but SU! has Stampin’ Rewards that may be used for additional products, so don’t use the host code at that time. If you have questions just let me know. Card cuts are listed at the bottom of this post. If you would like to be able to order products early from catalogs, join my team now… you may do that here. We have lots of fun and are a creative bunch that encourages & supports one another.

Joining Special!!! And Stampin’ Up! has outdone themselves with promotions. The first is the JOIN promotion… for $99 you may choose $155 worth of products beginning today through the end of May. It just doesn’t get much better than that. Click the image to join.

Bouquet of Hope by Paper Pumpkin

Questions? contact me @ tlsbrightspot@gmail.com

Connect, Craft & Collect
HOST ORDER TOTAL*STAMPIN’ REWARDSADDITIONAL STAMPIN’ REWARDS 50% OFF ITEM**
$150.00 USD/$200.00 CAD10%
$250 USD/$300 CAD10%$25 USD/$30 CAD
$300 USD/$375 CAD12%
$450 USD/$550 CAD14%1
$600+ USD/$725+ CAD16%


Thanks for stopping by.

May you have a beautiful day.

Make someone happy sending them a handmade card filled with love.

Stampin’ Up! 2021-2022 Annual Catalog is LIVE!Plus – Part 2 of Flowers of Friendship

WOOHOO! This is what you’ve been waiting for … the NEW and wonderful 2021-2022 Annual Catalog.

2021–2022 Annual Catalog

And Stampin’ Up! has outdone themselves with promotions. The first is the JOIN promotion… for $99 you may choose $155 worth of products beginning today through the end of May. It just doesn’t get much better than that.

Bouquet of Hope by Paper Pumpkin

Questions? contact me @ tlsbrightspot@gmail.com

Join my team now… you may do that here. We have lots of fun and are a creative bunch that encourages & supports one another.

Stampin’ Up! has another promotion going on as well… From 4 May–14 June 2021, qualifying orders will receive our generous Stampin’ Rewards PLUS additional rewards! Hosts can earn Stampin’ Rewards based on order totals for an entire party. Outside of the party setting, Stampin’ Rewards are available to those who place individual orders that meet the order totals shown below.

This means, if you have joined and become a demonstrator, you receive 20% off your order PLUS the additional Stampin’ Rewards.

Connect, Craft & Collect
HOST ORDER TOTAL*STAMPIN’ REWARDSADDITIONAL STAMPIN’ REWARDS 50% OFF ITEM**
$150.00 USD/$200.00 CAD10%
$250 USD/$300 CAD10%$25 USD/$30 CAD
$300 USD/$375 CAD12%
$450 USD/$550 CAD14%1
$600+ USD/$725+ CAD16%

Cards today are super duper simple – meant to be… and they can be used in conjunction with the mini Paper Pumpkin box I shared with you yesterday – or not. Here they are…

Aren’t these fun? And as I mentioned, easy peasy.

  • Adhere a panel of Subtles 6×6 DSDP to the Note Card front.
  • Stamp the floral image from Flowers of Friendship stamp set in Pool Party ink on a Basic White panel.
    • For the card on the left I re-stamped just the upper portion of the floral panel on a scrap of Basic white using Polished Pink ink – one of the NEW In Colors available today. I fussy cut the buds and adhered them with just a dab of liquid glue. I then colored the leaves with Pool Party Stampin’ Blends. I wrapped Sheer Ribbon in Pool Party around the panel, tied a bow and adhered that with a glue dot.
    • For the card on the right, I colored the flower buds with Highland Heather & Fresh Fresia Stampin’ Blends; colored the leaves with Light Pool Party Blends; and tied a simple knot with NEW Fresh Frsia Open Weave Ribbon and adhered it with a glue dot.
  • I adhered the white panel directly to the DSP covered Note Card with Seal + and the card front was done.

I used the very same 2020-2022 Subtles 6×6 DSP on the envelope flaps in Pool Party and in Highland Heather. I stamped the flower image from Flowers of Friendship in Polished Pink and in Fresh Freesia inks and the cards are done. Voila! They can be sent individually or put in the very cute Mini PP box I shared in yesterday’s post

Flowers of Friendship Mini PP Box

Products for todays project are from the 2021-22 Annual Catalog They may be found in the list below. I’ve made it easy for you to simply ‘add all to cart’. 😉 If I can help you in any way to order these items, or others, please give me a holler. As a thank you to my customers, when the order is between $50-$150 I offer a SU! item of your choice valued at $10. Remember to use MY CURRENT HOST CODE . When the order is over $150, you still receive that free gift from me, but SU! has Stampin’ Rewards that may be used for additional products, so don’t use the host code at that time. If you have questions just let me know. Card cuts are listed at the bottom of this post. If you would like to be able to order products early from catalogs, join my team now… you may do that here. We have lots of fun and are a creative bunch that encourages & supports one another.

Thanks for stopping by.

May you have a beautiful day.

Make someone happy sending them a handmade card/ gift filled with love.

Stampin’ Up! Flowers of Friendship Mini PP

Guess what today is… the day before the 2021-2022 Annual Catalog goes LIVE! Excitement!!! I’m sharing with you today one of the bundles: Flowers of Friendship, which includes a punch, Flowers & Leaves Punch – and I’ve used it and one of the Mini Paper Pumpkin boxes.

Flowers of Friendship Mini PP

Isn’t this fun? I began by adhering the various papers to the box top: Pool Party for the foundation layer, then a panel of Pattern Party DSP and another layer of the same DSP but a different pattern, obviously. I then stamped the various flowers, leaves in Memento Black ink – but oh wait – I created a template for that!

Flowers & Leaves Punch template

To create the template… punch, then use that to place the stamps on the acrylic block. This allows you to stamp those four, then punch all four. So… stamp (I used memento Black ink), color each (I’ll explain), then punch. Neat, huh?! You can see I did that several times.

I used several Stampin’ Blends for coloring: Light Pool Party for the leaves, Pale Papaya, Highland Heather, Flirty Flamingo & one of the NEW In Colors, Polished Pink. When looking at the box, you’ll notice I also created a single flower stamped in Polished Pink then colored with Stampin’ Blends Flirty Flamingo & Polished Pink.. For the flower centers I used Playing with Patterns Resin Dots. Some of the flowers In layered together with dimensionals. The leaves were adhered with liquid glue to the backs of the flowers. I adhered everything to the Pool Party sentiment banner then stamped the sentiment in Memento Black ink. For the final touch, ‘cuz it needed something… I added a bit of Sheer Ribbon in Pool Party and attached it with a glue dot to the back of the flower. I adhered the sentiment banner with Seal +.

Love this! Now to fill it… maybe with candies or note cards or… a combination. Fun! Hope you like.

Thanks for stopping by.

May you have a beautiful day.

Make someone happy sending them a handmade item of choice – made with love!

Products for today’s project may be found below… Products for todays project are from the 2020-21 Annual Catalog which ends May 3 and some are from the NEW 2021-2022 Annual Catalog. They may be found in the list below. I’ve made it easy for you to simply ‘add all to cart’. 😉 If I can help you in any way to order these items, or others, please give me a holler. As a thank you to my customers, when the order is between $50-$150 I offer a SU! item of your choice valued at $10. Remember to use MY CURRENT HOST CODE – FKR9ZJZZ – good May 1-15. When the order is over $150, you still receive that free gift from me, but SU! has Stampin’ Rewards that may be used for additional products, so don’t use the host code at that time. If you have questions just let me know. Card cuts are listed at the bottom of this post. If you would like to be able to order products early from catalogs, join my team now… you may do that here. We have lots of fun and are a creative bunch that encourages & supports one another. Stampin’ Up! has a joining special from 4 May to the end of May and it is a perfect time to join – get $155 worth of product for $99 + free business supplies + free shipping + all the fun being a part of Stampin’ Up!! This is the best deal ever!! See the details below…… last chance products are available through May 3…

Bouquet of Hope by Paper Pumpkin

Whether you’d like to start a business or would simply like the great discount, I am here to support you in any way that I can. There is no risk and no penalty if you decide that being a Demonstrator isn’t right for you.  With this great deal, there is no reason not to join in May!!

AND beginning 4 May through June 14 of 2021, qualifying orders will receive Stampin’ Rewards PLUS additional rewards! Hosts can earn Stampin’ Rewards based on order totals for an entire party. Outside the party setting,
Stampin’ Rewards are available to those who place individual orders that meet certain order totals. Stampin’ Up is promoting a new kits product line to help new demonstrators with their $300 minimum per quarter. Stampin’ Up! is about connecting with others and sharing the love of crafting. HOSTING a party is becoming easier all the time. Now, when connecting & crafting you will collect the rewards. What with COVID restrictions decreasing and the new kits promotion, this is an ideal time to become a demonstrator. If you would like to be able to order products early from catalogs, join my team between May 4- 31, 2021… you may do that here. We have lots of fun and are a creative bunch that encourages & supports one another.

Connect, Craft & Collect

Stampin’ Up! Little Card, Big Thanks

Mixing different stamp sets to create a card is just plain invigorating! I’ve been attending a virtual convention the past couple of days and wanted to create some thank you cards for the officers being installed and the outgoing president. I chose to play with two NEW stamp sets (available May 4)… Quiet Moments and Flowers of Friendship. I wanted something not too fussy and not big either. The Basic White Note Cards & Envelopes are the perfect size – 3 1/2 x 5! Here is the card and the coordinating envelope – and I made several.

Little Card, Big Thanks

I stamped the floral bouquet from Quiet Moments stamp set in Memento Black ink on the note card. I then stamped the word stamp in Smoky Slate ink – also from Quiet Moments stamp set. I stamped the sentiment from Flowers of Friendship stamp set in Pale Papaya ink – one of the NEW 2021-2023 In Colors on Basic White card stock. (I cut three strips 1 1/4 x 4 1/4 in order to get two punched sentiments from one strip.) I then punched them using the Label Me Fancy Punch. I added three Genial Gems (NEW & available May 4) to each sentiment banner. I wanted a background for this banner & chose to punch more banners from Smoky Slate card stock, cut them in half and adhered them equally behind the stamped banner. Because I wanted just a bit more color, I chose to cut lengths of Woven Ribbon in Pale Papaya (yep – NEW & available May 4) and adhere that to the card front with Stampin’ Seal. The banner went over that with dimensionals – and voila, the card was done!

For the envelope I chose to stamp the single flower from Quiet Moments stamp set in Memento Black ink and color it with the Pale Papaya Stampin’ Blends plus Cinnamon Cider Blends for the centers of the flower. This was a fun, simple project that I can send in Monday’s mail to say thank you to some wonderful women.

I hope you like the cards. They were quick and easy and sometimes we need that. Only a couple of these products can be purchased today and I’ll put them in the product list – others will be available May 4, just two days from now. These Note Cards are so handy to have available!

Products for todays project are from the 2020-21 Annual Catalog which ends May 3 and some are from the NEW 2021-2022 Annual Catalog. They may be found in the list above. I’ve made it easy for you to simply ‘add all to cart’. 😉 If I can help you in any way to order these items, or others, please give me a holler. As a thank you to my customers, when the order is between $50-$150 I offer a SU! item of your choice valued at $10. Remember to use MY CURRENT HOST CODE – FKR9ZJZZ – good May 1-15. When the order is over $150, you still receive that free gift from me, but SU! has Stampin’ Rewards that may be used for additional products, so don’t use the host code at that time. If you have questions just let me know. Card cuts are listed at the bottom of this post. If you would like to be able to order products early from catalogs, join my team now… you may do that here. We have lots of fun and are a creative bunch that encourages & supports one another. Stampin’ Up! has a joining special from 4 May to the end of May and it is a perfect time to join – get $155 worth of product for $99 + free business supplies + free shipping + all the fun being a part of Stampin’ Up!! This is the best deal ever!! See the details below…… last chance products are available through May 3…

  • New demonstrators who purchase their Starter Kit between May 4 and May 31 will be able to redeem $155 of Starter Kit eligible products for $99.
  • New demonstrators who submit their Independent Demonstrator Agreement (IDA) before May 4 or after May 31 will not be eligible for this offer.
  • A new demonstrator can select any eligible Stampin’ Up! products up to the stated value. 
  • The Starter Kit includes business resources like catalogs, brochures, order forms, and postcards at no additional charge.
  • The Starter Kit also includes a FREE past Paper Pumpkin kit.The Starter Kit promotion begins May 4.Deadline to purchase the Starter Kit and receive the extra $30 in free products:  May 31, 2021 at 11:50 PM (MT).
  • Whether you’d like to start a business or would simply like the great discount, I am here to support you in any way that I can. There is no risk and no penalty if you decide that being a Demonstrator isn’t right for you.  With this great deal, there is no reason not to join in May!!

    Bouquet of Hope by Paper Pumpkin

    AND beginning 4 May through June 14 of 2021, qualifying orders will receive Stampin’ Rewards PLUS additional rewards! Hosts can earn Stampin’ Rewards based on order totals for an entire party. Outside the party setting,
    Stampin’ Rewards are available to those who place individual orders that meet certain order totals. Stampin’ Up is promoting a new kits product line to help new demonstrators with their $300 minimum per quarter. Stampin’ Up! is about connecting with others and sharing the love of crafting. HOSTING a party is becoming easier all the time. Now, when connecting & crafting you will collect the rewards. What with COVID restrictions decreasing and the new kits promotion, this is an ideal time to become a demonstrator. If you would like to be able to order products early from catalogs, join my team between May 4- 31, 2021… you may do that here. We have lots of fun and are a creative bunch that encourages & supports one another.

    Connect, Craft & Collect
    Connect, Craft & Collect

    Thanks for stopping by.

    May you have a beautiful day.

    Make someone happy sending them a handmade card filled with love.

    Stampin’ Up! Prized Peony Thanks

    Prized Peony is such a beautiful stamp set and it is carrying over, as are the coordinating Peony Dies – just not as a bundle. I also used on today’s card the Ornate Thanks Dies and the Ornate Frames Dies – both of which are carrying over – yay! Let’s look at this card.

    Prized Peony Thanks – #1

    This is such an elegant and yet simple card – and the sentiment could be congratulations or sympathy or birthday and it would be appropriate. It’s a perfect kind of card to have on hand – one with each of those sentiments. Hmmm – it’s got me thinking now that I’ve written that. Let’s get to the details.

    Begin with a Thick Basic White card base, score at 4 3/4 then at 5 1/2. Fold the card in half and burnish. Then fold the card front on the other score line, folding it back on itself and burnish. Adhere that 3/4″ area together – liquid glue or Seal +. Add your DSP: I used the Peony Garden DSP and cut two pieces, one at 5/8 x 4 1/4, the other 4 5/8 x 4 1/4. Adhere both strips directly to the card with liquid glue or Stampin’ Seal. Wrap a ribbon around the glued end panel and tie a knot. Secure with a glue dot. Here I used Metallic Edged Ribbon with silver trim. With Gray Granite card stock, die cut a border with the Ornate Frames Dies. Stamp your sentiment with Gray Granite ink on a Basic White scrap – here I used the Ornate Thanks stamp set. Die cut with one of the Ornate Frames Dies that fit the border just prepared. Adhere the two together with liquid glue and attach to the front of the card with dimensionals. And the card front is done!

    Prized Peony Thanks – #2

    For the inside of the card, I cut a panel of Basic White 4 x 4 1/2 and stamped the smaller peony in Gray Granite ink. I colored it using NEW Stampin’ Blends: Pale Papaya and Soft Succulent. These new Blends colors will be available May 4 – just a couple of days away! I adhered this panel to a piece of Gray Granite card stock with liquid glue then adhered this to the inside of the card – and voila!

    Prized Peony Thanks – #1

    For the envelope, you can see I added more of the Peony Garden DSP to the flap. I also stamped the same sweet smaller peony on the front of the envelope in Gray Granite ink and colored it with the same NEW Stampin’ Blends: Pale Papaya & Soft Succulent. (I’ve mention this before but want to reinforce – when coloring on an envelope with Blends, be certain to put a scrap panel of card stock in the envelope so the color does not go through to the backside of it.) Now your card is ready to send to someone special… so get the address on it and send. 🙂

    Products for todays project are from the 2020-21 Annual Catalog which ends May 3 and some are carrying over as I mentioned. They may be found in the list below. I’ve made it easy for you to simply ‘add all to cart’. 😉 If I can help you in any way to order these items, or others, please give me a holler. As a thank you to my customers, when the order is between $50-$150 I offer a SU! item of your choice valued at $10. Remember to use MY CURRENT HOST CODE – 2HWX9GEA – good Apr 16-30. When the order is over $150, you still receive that free gift from me, but SU! has Stampin’ Rewards that may be used for additional products, so don’t use the host code at that time. If you have questions just let me know. Card cuts are listed at the bottom of this post. If you would like to be able to order products early from catalogs, join my team now… you may do that here. We have lots of fun and are a creative bunch that encourages & supports one another. Stampin’ Up! has a joining special from 4 May to the end of May and it is a perfect time to join – get $155 worth of product for $99 + free business supplies + free shipping + all the fun being a part of Stampin’ Up!! This is the best deal ever!! See the details below…

    • New demonstrators who purchase their Starter Kit between May 4 and May 31 will be able to redeem $155 of Starter Kit eligible products for $99.
    • New demonstrators who submit their Independent Demonstrator Agreement (IDA) before May 4 or after May 31 will not be eligible for this offer.
    • A new demonstrator can select any eligible Stampin’ Up! products up to the stated value.
    •  The Starter Kit includes business resources like catalogs, brochures, order forms, and postcards at no additional charge.
    • The Starter Kit also includes a FREE past Paper Pumpkin kit.
    • The Starter Kit promotion begins May 4.
    • Deadline to purchase the Starter Kit and receive the extra $30 in free products:  May 31, 2021 at 11:50 PM (MT).

    Whether you’d like to start a business or would simply like the great discount, I am here to support you in any way that I can. There is no risk and no penalty if you decide that being a Demonstrator isn’t right for you.  With this great deal, there is no reason not to join in May!!

    Bouquet of Hope by Paper Pumpkin

    AND beginning 4 May through June 14 of 2021, qualifying orders will receive Stampin’ Rewards PLUS additional rewards! Hosts can earn Stampin’ Rewards based on order totals for an entire party. Outside the party setting,
    Stampin’ Rewards are available to those who place individual orders that meet certain order totals. Stampin’ Up is promoting a new kits product line to help new demonstrators with their $300 minimum per quarter. Stampin’ Up! is about connecting with others and sharing the love of crafting. HOSTING a party is becoming easier all the time. Now, when connecting & crafting you will collect the rewards. What with COVID restrictions decreasing and the new kits promotion, this is an ideal time to become a demonstrator. If you would like to be able to order products early from catalogs, join my team between May 4- 31, 2021… you may do that here. We have lots of fun and are a creative bunch that encourages & supports one another.

    Connect, Craft & Collect
    Connect, Craft & Collect

    Feel free to contact me for further details: tlsbrightspot@gmail.com

    Products for today’s card – as promised…

    Thanks for stopping by.

    May you have a beautiful day.

    Make someone happy sending them a handmade card filled with love.

    Stampin’ Up! Snail Mail Flip Card

    Hi there! It is Apr 29 and getting mighty close to the end of the 2020-2021 Annual Catalog (May 3) AND ordering opportunities for the NEW 2021-2022 Annual Catalog, (May 4). WOOHOO! It is sad when we part with some of our favorites, but the new is always challenging and fun. LOVING the new In Colors by the way… more on that later. Let’s see our card 🤗

    Todays card is made using a fun bundle from the Jan-Jun Mini Catalog called Snailed It and Snail Mail DSP.

    Snail Mail Flip Card – #1

    The colors in this are so fresh & bright. I’m loving this. I took the Bermuda Bay card base and folded it in half, then took the front and folded it back on itself. I covered each of the panels in Snail Mail DSP with liquid glue. I then took that fun squarish die from the Snail Dies, laid it on the front of the fold and die cut just half. You do this by laying your top cutting plate just on the portion that you desire to cut and run it through your machine. I then die cut two panels, still using the same squarish die and more Bermuda Bay card stock. I adhered these to the front and back of the 1/2 die cut on the card base. I then decorated these panels.

    For the front panel I stamped the cute snail in Memento Black ink on a Basic White scrap. I colored the snail using both Light & Dark Crumb Cake Stampin’ Blends for the snail, then NEW Soft Succulent Stampin’ Blends for the snails shell. I took a Real Red Marker and colored the heart. This was adhered to the panel with dimensionals. I stamped the word ‘hello’ from the Snailed It stamp set in Real Red ink on another Basic White scrap and die cut it with the bubble die in the Snail Dies. I adhered this with liquid glue so it looked as though the snail was talking to us. 🙂 I added 2020-2022 In Color Enamel Dots

    For the back panel I die cut a bubble with the heart from more of the Snail Mail DSP and adhered it with both liquid glue and a dimensional. (It covered the back of the front bubble perfectly!) I then die cut the very cute envelope from more of the Snail Mail DSP and put it together with just dabs of liquid glue where the folds meet. I then used the Rectangular Postage Punch to punch a Basic White piece and covered it with several die cut hearts (Real Red) using the Snail Dies. I decided ton secure this punched piece inside the envelope so it wouldn’t fall out, then adhered that to the panel – as shown.

    For the larger panel I used the Layering Squares to die cut a Pool Party piece larger than the die from the Snail Dies, so that when the card is closed it created a nice border. I then cut a piece of Basic White and stamped it with a sentiment from Color & Contour stamp set (NEW!) in Memento Black ink. In took a Real Red marker and created an outline all around. I then added more of the 2020-2022 In Color Enamel Dots and adhered this to the Pool Party Panel.

    For the bottom right decoration, I fussy cut three mushrooms from one of the Snail Mail DSP. I adhered the bottom ‘room directly to the card with liquid glue. The largest ‘room was adhered with dimensionals. The yellow ‘room was added with liquid glue and a dimensional under the stem. I then die cut two more ‘rooms from the Snail Dies with Basic White card stock. The larger ‘room, I saved the pieces that came out and colored them: Dark Crumb Cake Blends and a Black marker. Once the die cut ‘room was in place I put dots of liquid glue in the openings and added the colored pieces. I fussy cut a red ‘room the same size as the smallest die cut ‘room and adhered them together. This was added with liquid glue. The card was nearly done!

    Snail Mail Flip Card – #2

    Because I wanted a place to write something, I turned the card over and adhered a Basic White panel to which I had added a Snail Mail DSP strip along the long side. NOW the card was complete. 😊

    Snail Mail Flip Card – #3

    For the envelope I added more of the Snail Mail DSP to the flap and and an additional strip across the bottom of the front of the envelope. VOILA! Fun card, right?!

    Snail Mail Flip Card – #1

    Products for todays project are from the 2020-21 Annual Catalog which ends May 3, and from the Jan-June Mini Catalog. They may be found in the list below. I’ve made it easy for you to simply ‘add all to cart’. 😉 If I can help you in any way to order these items, or others, please give me a holler. As a thank you to my customers, when the order is between $50-$150 I offer a SU! item of your choice valued at $10. Remember to use MY CURRENT HOST CODE – 2HWX9GEA – good Apr 16-30 . When the order is over $150, you still receive that free gift from me, but SU! has Stampin’ Rewards that may be used for additional products, so don’t use the host code at that time. If you have questions just let me know. Card cuts are listed at the bottom of this post. If you would like to be able to order products early from catalogs, join my team now… you may do that here. We have lots of fun and are a creative bunch that encourages & supports one another.

    last chance products: Items from the 2020-2021 Annual Catalog are on sale through May 3.

    03.23.21_HEADER_LAST-CHANCE_NA

    Thanks for stopping by.

    May you have a beautiful day.

    Make someone happy sending them a handmade card filled with love.

    Stampin’ Up! Sweet Ice Cream Fun Fold

    Hello there… do you know what today? Besides Tue the 27th? It is one week until the 2021-2022 Annual Catalog goes LIVE…. which also means – it’s LESS THAN one week until the end of the 2020-2021 Annual Catalog. Remember there are last chance products awaiting and that sale ends May 3.

    Today’s card is one I am using in a class for today. Folks will be learning tips & tricks to create SIX fun folds. They won’t be fully creating all of them, not in two hours, but they will do the folds and adhering card stock & DSP then adding sticky notes so they can finish them at home. This particular group wanted a firehose version. We’ll see how it goes – it’s a LOT in that short a time!

    Sweet Ice Cream Fun Fold – #1

    Above is the finished product. Here are two photos prior to decorating and with post-its.

    I began with a standard 5 1/2 x 8 1/2 Thick Basic White panel, scored at 4 1/4. I marked very lightly the 21/8 mark just where I wanted to die cut the circle. And of course, this doesn’t have to be a circle – it can be an oval or square or a diamond, but for this card, it’s a circle. With the marking I placed the Layering Circles die fairly close. to the right edge of the paper and placed it on the die cutting machine. In order to die cut just half the circle, place the top plate over the area to be die cut – and with the markings I knew just where that was. The neat part is, the machine will cut only where the top plate is 👍 Once removed from the machine, create the score line at 2 1/8, avoiding scoring the circle. Burnish the folds so they are mountain, valley – as shown. Now stamp and decorate!

    Sweet Ice Cream Fun Fold – #4

    This is the ‘inside’ of the card. There’s lots of room for the sender to write something personal, yet, when the card is closed, it won’t be seen.

    • The DSP is from the Ice Cream Corner DSP and can be found in the Jan-Jun Mini Catalog. It is cut 2 1/4 x 5 1/2 and adhered with liquid glue.
    • The cone was created with more of the Ice Cream Corner DSP and using the Ice Cream Corner Builder Punch
    • Stamp the sentiments using the Sweet Ice Cream stamp set. I used Rich Razzleberry, Old Olive and Bermuda Bay
    • Stamp the ‘sprinkles’ using Early Espresso ink
    • Add Artistry Blooms Adhesive-Backed gems and this portion is complete

    The front of the card is already partially done – just the circle needs decorating. I stamped the popsicle in Mango Melody ink and Sahara Sand ink and added more of the Artistry Blooms Adhesive Backed gems – and the card was done.

    Sweet Ice Cream Fun Fold -#1

    For the envelope I added more of the Ice Cream Corner DSP and the card was done – voila!

    Products for todays project are from the 2020-21 Annual Catalog which ends May 3, and from the Jan-June Mini Catalog. They may be found in the list below. I’ve made it easy for you to simply ‘add all to cart’. 😉 If I can help you in any way to order these items, or others, please give me a holler. As a thank you to my customers, when the order is between $50-$150 I offer a SU! item of your choice valued at $10. Remember to use

    MY CURRENT HOST CODE – 2HWX9GEA – good Apr 16-30

    When the order is over $150, you still receive that free gift from me, but SU! has Stampin’ Rewards that may be used for additional products, so don’t use the host code at that time. If you have questions just let me know. Card cuts are listed at the bottom of this post. If you would like to be able to order products early from catalogs, join my team now… you may do that here. We have lots of fun and are a creative bunch that encourages & supports one another.

    Trying some of the NEW Designer Series Paper from the 2021-2022 Annual Catalog gets you in the spirit of creating with some gorgeous papers. I’m offering a Designer Series Paper share from that Annual Catalog and it would be my pleasure to supply you!  I‘ll place my share order early on May 4 and use the expedited shipping option so I should be able to have the shares cut, bundled and back out to you that very next week. Please place your order with me by May 2 @ 9 PM ET.

    TLsBrightSpot 2021-2022 Annual Catalog

    Designer Series Paper Shares!

    New Designer Series Paper Share – $55.00 plus $7.75 for Priority Mail shipping

    You will receive one 6×6 sheet of each design from the following DSP packs (the number behind the name indicates how many 6×6 sheets of that paper pack you will receive):

    • Beauty Of The Earth – 6
    • Bloom Where You’re Planted – 6
    • Expressions In Ink Specialty – 6
    • Hand-Penned – 6
    • In The Wild – 6
    • Pansy Petals – 6
    • Simply Elegant Specialty – 6
    • Sweet Symmetry – 6
    • Tidings Of Christmas 6″ x 6″ – 6
    • You’re A Peach – 6
    • 2020-2022 In Color 6″ x 6″ – 10
    • 2021-2023 In Color 6″ x 6″ – 10
    • Brights 6″ x 6″ – 20
    • Neutrals 6″ x 6″ – 20
    • Regals 6″ x 6″ – 20
    • Subtles 6″ x 6″ – 20
    • Ombre Specialty – 4 (one of each color)
    • 2021-2023 In Color Shimmer Vellum – 5 (one of each color)
    • Gold & Rose Gold 6″ x 6″ – 2 (one of each color)
    • Linen Specialty – 1
    • Ombre Gift Bags – 5 (one of each color)

    In all, you’ll receive 172 – 6” x 6” sheets of designer or specialty paper plus the awesome food safe gift bags!

    Double DSP Share – $110 + $8 Shipping by Priority Mail – if you’d like double shares of the designer paper, I can do that as well. The designer paper sheets will be cut into 6×12 so that you’ll be able to get 3 full A2 size card fronts from each sheet (Tidings Of Christmas, 2020-2022 In color, 2021-2023 In Color, Brights, Neutrals, Regals, Subtles and Gold & Rose Gold 6×6, you’ll get double sheets of those since they’re already precut).

    FREE Gift from me! – As a bonus for joining my share, you’ll get a sampling of the new host exclusive Pattern Party 12″ x 12″ Designer Series Paper!

    Anyone is welcome to join in my share (please note, I can only ship to addresses within the US).  If you’d like to join, either complete the form below or email the following information to tlsbrightspot@gmail.com.

    • Your first and last name
    • Your share selection
    • The email address that is connected to your Paypal account. I only accept Paypal for payment unless you are a customer of mine.  If you are a customer, I will accept payment by check.  ***You do not need to have a Paypal account to pay the invoice, you can choose to pay by credit card without having a Paypal account.

    Deadline to sign up for my share is Sunday, May 2 at 9:00 PM ET.

    Thanks for stopping by.

    May you have a beautiful day.

    Make someone happy sending them a handmade card filled with love.

    Stampin’ Up! Creating Own Background w/ Hand-Penned

    Hi Everyone – it’s a rainy Sunday. How the plants have loved the cool weather and Spring rains! It really helps them get established with strong roots, which leads to our roots. What are your strong roots? What is it that keeps you grounded? Great question, right? And one that requires some thought. I’m going to suggest you write those ideas down on paper. Writing them down helps confirm them, makes them more real, firms them in your head and can encourage action in one direction or another.

    Today’s ‘action’ or creation is one where we create our own background and I’ve used a new bundle called Hand-Penned. It’s lovely and looks a bit like watercolor – it’s fluid. And I’ve coordinated two of the new In Colors: Polished Pink and Pale Papaya, which would not have occurred to me to do at one point. But I like this combo along with Flirty Flamingo. Let’s take a look.

    Creating own background w/ Hand-Penned – #1

    I began by stamping the floral pattern randomly on a Basic White panel with Polished Pink ink. It’s a fairly large stamp so it only took a couple of times to cover the panel. Then I played with several filler colors before settling on stamped-off Flirty Flamingo ink. This took a bit of time to fill in all the areas – and I’ve said before I rather lean toward monochromatic. That means leaves and flowers all were stamped with the stamped-off once Flirty Flamingo ink. And notice it doesn’t fill in the entire leaf or flower – a bit like watercolors. Nor is it a perfect match for all the flowers – it’s fluid, giving it an easy look. Once done I played with colors for the mat, knowing I wanted a contrast but something soft, and settled on the Pale Papaya. What do you think? I really like it… it’s like a neutral that makes the pink pop but not too much. Because of the mat, I wanted to use more of that on the front to tie it in and chose to use one of the new ribbons: Pale Papaya & White 1/2″ ribbon and simply folded it back on itself. I attached it to the card front with Stampin’ Seal but could have used a glue dot or two just as easily. I then took the Penned Flower Dies and die cut one in Pale Papaya card stock. I stamped the sentiment in Polished Pink ink on a scrap of Basic White card stock and die cut it with the Ornate Frames Dies. I die cut a background layer, again with the Ornate Frames dies, but in Polished Pink card stock. I popped the Basic White sentiment on with dimensionals, added dimensionals to the Polished Pink panel and layered it over the die cut flower flourish (which had been adhered with spots of liquid glue). For a bit of glam, I added three In Color Rhinestones in Pale Papaya. This entire front panel was adhered to the Polished Pink card base with dimensionals – and the front was done.

    Creating own Background w/ Hand-Penned, inside – #2

    For the inside, I did the same as with the front: stamped the outline of the floral image with Polished Pink ink in the two corners of a Basic White panel, then stamped the filler stamps with stamped-off once Flirty Flamingo ink. I layered this on another Pale Papaya card stock then into the inside of the card – and the card was complete.

    Creating own Background w/ Hand-Penned – #3

    For the front of the envelope, I followed the same procedure: stamped the outline of the floral image in Polished Pink ink then used the filler stamps, stamped off once with Flirty Flamingo ink. Voila! I really really like this color combo! The Flirty Flamingo with the Polished Pink is a great combinations and using Pale Papaya as an off-set neutral worked.

    I hope you like the card and have this Hand-Penned bundle as on your list for a first purchase. It is gorgeous.
    The new items will be available soon – May 4, so make that list! If I can help you in any way, please let me know. If you do not have a demonstrator and need a catalog, I’m happy to get one to you. For nay purchases through me, please use my

    CURRENT HOST CODE: 2HWX9GEA, good Apr 16-30

    If I can help you in any way to order these items, or others, please give me a holler. As a thank you to my customers, when the order is between $50-$150 I offer a SU! item of your choice valued at $10. Remember to use MY CURRENT HOST CODE – 2HWX9GEA – good Apr 16-30 . When the order is over $150, you still receive that free gift from me, but SU! has Stampin’ Rewards that may be used for additional products, so don’t use the host code at that time. If you have questions just let me know. Card cuts are listed at the bottom of this post. If you would like to be able to order products early from catalogs, join my team now… you may do that here. We have lots of fun and are a creative bunch that encourages & supports one another.

    For items available to purchase now, please see the list below.

    I am offering Designer Series Paper Shares for the new 2021-2022 Annual Catalog. Please see my offer below.

    Trying some of the NEW Designer Series Paper from the 2021-2022 Annual Catalog gets you in the spirit of creating with some gorgeous papers. I’m offering a Designer Series Paper share from that Annual Catalog and it would be my pleasure to supply you!  I‘ll place my share order early on May 4 and use the expedited shipping option so I should be able to have the shares cut, bundled and back out to you that very next week. Please place your order with me by May 2 @ 9 PM ET.

    TLsBrightSpot 2021-2022 Annual Catalog

    Designer Series Paper Shares!

    New Designer Series Paper Share – $55.00 plus $7.75 for Priority Mail shipping

    You will receive one 6×6 sheet of each design from the following DSP packs (the number behind the name indicates how many 6×6 sheets of that paper pack you will receive):

    • Beauty Of The Earth – 6
    • Bloom Where You’re Planted – 6
    • Expressions In Ink Specialty – 6
    • Hand-Penned – 6
    • In The Wild – 6
    • Pansy Petals – 6
    • Simply Elegant Specialty – 6
    • Sweet Symmetry – 6
    • Tidings Of Christmas 6″ x 6″ – 6
    • You’re A Peach – 6
    • 2020-2022 In Color 6″ x 6″ – 10
    • 2021-2023 In Color 6″ x 6″ – 10
    • Brights 6″ x 6″ – 20
    • Neutrals 6″ x 6″ – 20
    • Regals 6″ x 6″ – 20
    • Subtles 6″ x 6″ – 20
    • Ombre Specialty – 4 (one of each color)
    • 2021-2023 In Color Shimmer Vellum – 5 (one of each color)
    • Gold & Rose Gold 6″ x 6″ – 2 (one of each color)
    • Linen Specialty – 1
    • Ombre Gift Bags – 5 (one of each color)

    In all, you’ll receive 172 – 6” x 6” sheets of designer or specialty paper plus the awesome food safe gift bags!

    Double DSP Share – $110 + $8 Shipping by Priority Mail – if you’d like double shares of the designer paper, I can do that as well. The designer paper sheets will be cut into 6×12 so that you’ll be able to get 3 full A2 size card fronts from each sheet (Tidings Of Christmas, 2020-2022 In color, 2021-2023 In Color, Brights, Neutrals, Regals, Subtles and Gold & Rose Gold 6×6, you’ll get double sheets of those since they’re already precut).

    FREE Gift from me! – As a bonus for joining my share, you’ll get a sampling of the new host exclusive Pattern Party 12″ x 12″ Designer Series Paper!

    Anyone is welcome to join in my share (please note, I can only ship to addresses within the US).  If you’d like to join, either complete the form below or email the following information to tlsbrightspot@gmail.com.

    • Your first and last name
    • Your share selection
    • The email address that is connected to your Paypal account. I only accept Paypal for payment unless you are a customer of mine.  If you are a customer, I will accept payment by check.  ***You do not need to have a Paypal account to pay the invoice, you can choose to pay by credit card without having a Paypal account.

    Deadline to sign up for my share is Sunday, May 2 at 9:00 PM ET.