
Yesterday must have been a whirlwind at the Stampin’ Up! offices. With the 2021-2022 Annual Catalog going live, the joining special, the Host special – wow! They are rockin’ it! Today I am celebrating our grandson who was just admitted to University of Performing Arts. He will begin in the fall and is so excited, he is just beside himself. 🙂 He’s been involved in theater for some time and this has been a dream for a while. The pandemic and costs slowed the process, but now it’s a ‘go’ and today’s card is all about that.
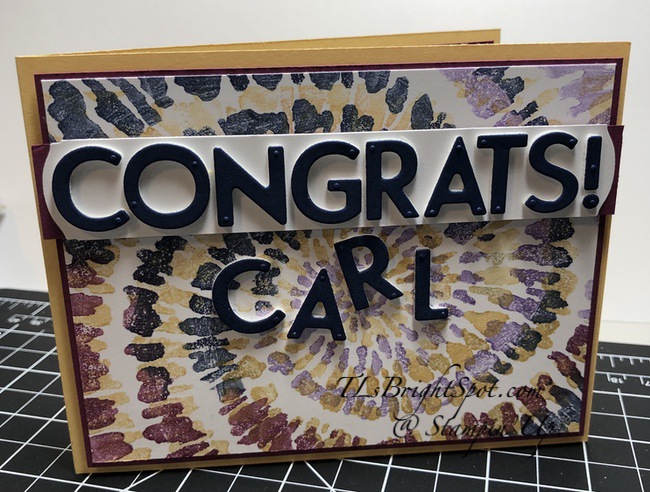
Does this look kinda like tie dye to you? It certainly does to me… and tie dye shirts are popular to this day. So how did I do this… first of all I looked at a couple of videos: Mary Deatherage & Bruno Bertucci are two of them I watched – and I encourage you to do that. Next thing was to set up my Stamparatus and since this is one big stamp, that was easy. I use this Stamparatus a LOT. I began with a square Basic White card stock and chose markers to use for coloring the stamp: Rich Razzleberry, Night of Navy and Highland Heather for the first go around, then So Saffron for the second. Why markers you ask… if using more than one color, the ink pads just don’t work. And for some reason, the sponge daubers come off too light. So… the brush end of the markers worked well and was pretty quick. I started with the Highland Heather first and simply colored the stamp and stamped it on the square Basic White card stock. I followed around coloring all the stamp using the colors mentioned. Once I had colored the entire dye I rotated the paper a full 180 degrees and colored the entire stamp with So Saffron. I probably could have used the ink pad for this since it was just one color – but I didn’t. Next time…
Once I had done all the stamping I determined the mats and card base. After futzing around a bit, So Saffron became the card base with the next layer Rich Razzleberry (on dimensionals). I knew I wanted to die cut the letters, so pulled out Playful Alphabet Dies and Foam Adhesive and Night of Navy card stock. I adhered the Foam Adhesive to a Night of Navy strip that was probably 1 1/4 x 6. That could be a bit long – but not much. I didn’t want to waste the Foam Adhesive! I ran the letters through the die cut machine at least three times to make certain the cuts went all the way through. They were perfect and popped out nicely. I adhered them to a Basic White strip that I had already cut to the proper length and had trimmed the ends with the Fancy Label Punch. I didn’t want the ends on this piece square and this was just enough curve. I layered this strip to a piece of Rich Razzleberry with Stampin’ Seal, then put dimensionals on the back and placed it on the card front. I die cut our grandsons name – also out of Night of Navy with Foam Adhesive on the back and covered the name with Wink of Stella. It was then added to the card front.
This is thick – and if I were mailing it, would need to go in a padded envelope. But thankfully – I’m not mailing it… We get to see our Grands IN PERSON for the first time since August of 2020!!! WOOHOO!!! Happy Mother’s Day to me – and to our daughter… I’m getting carried away – back to the card… If I didn’t explain, the layers are like this: So Saffron card base; Rich Razzleberry on dimensionals with the Spiral Dye card adhered with liquid glue to it – followed by the words/ letters. The card front is now complete.
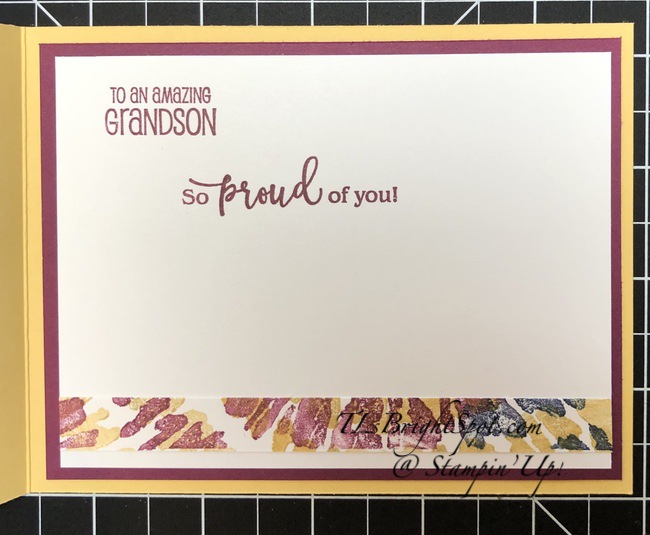
For the inside I took a panel of Basic White and added some of the trimmed Spiral Dye card stock with Stampin’ Seal. I then stamped the two sentiments from A Grand Kid stamp set in Rich Razzleberry ink – again using my Stamparatus. I really like the mixed fonts on this! The Basic White panel was adhered to Rich Razzleberry with liquid glue then into the inside of the card and voila – all done! I think he’s going to like this…
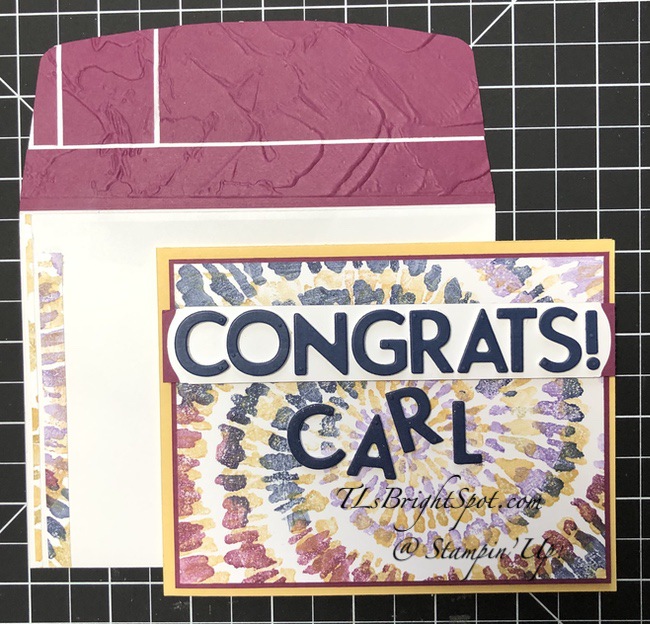
I wanted to do something different on the flap so took some Rich Razzleberry scraps and adhered them with liquid glue, trimmed the extra. I then ran it through the Painted Texture 3D Embosssing Folder, which gave it some great texture. For the front I adhered some extra strips of leftover card front pieces. Done, done, done.
This was definitely a fun play with a new stamp – the Spiral Dye. I also see this with a butterfly – again.. another day, another card 🙂
Products for todays project are from the 2021-22 Annual Catalog They may be found in the list below. I’ve made it easy for you to simply ‘add all to cart’. 😉 If I can help you in any way to order these items, or others, please give me a holler. As a thank you to my customers, when the order is between $50-$150 I offer a SU! item of your choice valued at $10. Remember to use MY NEW HOST CODE – ZD9N2JRR . When the order is over $150, you still receive that free gift from me, but SU! has Stampin’ Rewards that may be used for additional products, so don’t use the host code at that time. If you have questions just let me know. Card cuts are listed at the bottom of this post. If you would like to be able to order products early from catalogs, join my team now… you may do that here. We have lots of fun and are a creative bunch that encourages & supports one another.
Joining Special!!! And Stampin’ Up! has outdone themselves with promotions. The first is the JOIN promotion… for $99 you may choose $155 worth of products beginning today through the end of May. It just doesn’t get much better than that. Click the image to join.

Questions? contact me @ tlsbrightspot@gmail.com

| HOST ORDER TOTAL* | STAMPIN’ REWARDS | ADDITIONAL STAMPIN’ REWARDS | 50% OFF ITEM** |
|---|---|---|---|
| $150.00 USD/$200.00 CAD | 10% | ||
| $250 USD/$300 CAD | 10% | $25 USD/$30 CAD | |
| $300 USD/$375 CAD | 12% | ||
| $450 USD/$550 CAD | 14% | 1 | |
| $600+ USD/$725+ CAD | 16% |
Thanks for stopping by.
May you have a beautiful day.
Make someone happy sending them a handmade card filled with love.

Such a cool card! Fun colors and design. 🙂
LikeLiked by 1 person
Thanks Amy! I had fun doing it.
LikeLike
Good futzing around–it made.a beautiful card! Congrats to Carl and yay for getting to see the grands. Enjoy the weekend. TFS
LikeLiked by 1 person
This says to me you really READ my stuff! Thank you!!!! So excited to see our GRANDS & our daughter, SIL.. HUGS!
LikeLike
Wonderful! This set is so much fun – and yes it DOES look like tie-die!! Love how you used the markers to add so many colors!! I know that Carl will love it and he’s going to have such fun in his new educational adventures!!
LikeLiked by 1 person
Thanks Mary… and yes, he IS going to enjoy this new adventure.
LikeLike