
Welcome, welcome. We have a wonderful floral challenge for us today & I’ve chosen a new, soon to be released July ONLINE Exclusive to use in this shutter card. The Framed Violets bundle is part of the Violet Dreams Suite of products: Adhesive-Backed Blooms, 1/4″ Satin Ribbon in Fresh Freesia, Violet Dreams 12×12 DSP & the Framed Violets bundle already mentioned.


When looking at this card, notice the stamped sentiment on Basic White, then notice below the stamped sentiment on Hydrangea Hue – that’s all part of the slider mechanism. It is so cool in person!
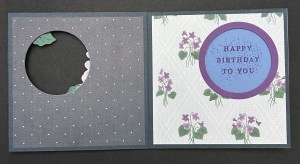
And here’s a top/ down view…

How to make this card… notice there are two colors used on this card, a light color (Hydrangea Hue) & a Basic White and there are two panels of the Hydrangea Hue.
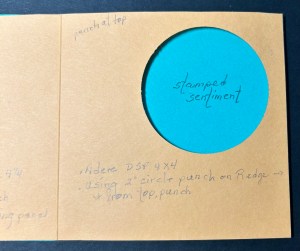
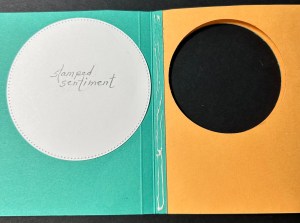
Front Panel: Color 1 – 4 14 x 8 1/4 scored at 5 1/2. The smaller section is what creates the shuttle or ‘slider’ of the card. Cover the larger section with DSP cut 4 x 5 1/4. Use a 2″ hole punch to create the opening on the front side. Center Panel: this is Secret Sea – 4 1/4 x 8 1/2 scored at 4 1/4. Add a 4 x 4 DSP to each side. With the fold to the left, place so this panel is flush with the right edge of the card front; hold in place, trace the 2″ circle, then punch the 2″ circle where marked. Close this Secret Sea piece & trace the circle to the right side of the Secret Sea (see the floral pattern in the open card), punch the 2″ circle again using the tracing to line up.. There should now be three circles: front and both sides of the Secret Sea inside panel. Adhere the backside of the left section of this folded panel to the inside of the front panel, matching edges so they are even. DO NOT TRY TO LINE UP WITH THE FOLD! Back Panel: The color of this panel should match that of the card front. In my case – Hydrangea Hue: 4 1/4 x 5 3/4 score at 5 1/2. Cut a Basic White piece about 3 1/4 x 3 1/4 and adhere close to the score line and that becomes the stamped sentiment we see with the card closed. Do not adhere just yet :O) First, burnish the score line well, fold it inwards and add adhesive along the 1/4″ fold. With the folded edge in, add to the center panel even with the right edge of that panel. It will look like the photo at left, below. Now add the Basic White piece so it fits behind the opening and can be stamped. (yes, mine is a circle cut with the Stitched Shapes Dies). Now add adhesive along that score line as shown in photo at right and close card. This keeps the card from being floppy.
Now you may do your stamping sentiments. With the card closed, stamp on the Basic White panel – that’s what shows when the card is closed. For my car rd I stamped in Gorgeous Grape ink and used the sentiment from the Framed Violets stamp set. Open the card and stamp on the ‘slider’ portion. Again, Gorgeous Grape ink and the sentiment is from Framed Violets stamp set.
Now it’s time to decorate the various layers: To create the ‘frame’ around the circle I used a 2 3/8 circle punch and a 2″ circle punch and adhered it to the front & one on the right inside circle as well. card front: I used the Framed Violets Dies to die cut the violets from Basic White then colored the violets using Stampin’ Blends in Highland Heather. I used the tiniest of the Rhinestone Basic Jewels for the flower centers. The leaves arew die cut using the Framed Violets Dies and Peaceful Pine. I added the flowers & leaves with dabs of glue then added the bow with a glue dot: 1/4″ Satin Ribbon in Fresh Freesia (part of the suite). The additional gems are Adhesive-Backed Blooms that add that final touch of sparkle. Love these!
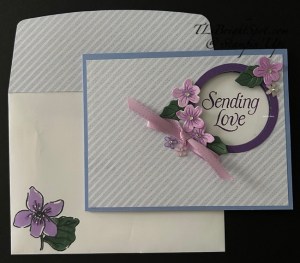
And below is the card & envelope – this sweet, sweet violet from the Framed Violets stamp set stamped in Memento ink then colored with Highland Heather & Peaceful Pine Stampin’ Blends. The same pattern of DSP from Violet Dreams 12×12 was added to flap & trimmed to fit. This becomes such a beautiful gift to a birthday gal – all by itself. Love!!
See below for information about ordering from me or becoming part of my stampin’ team 😀
Click on the next button to see what others have created for today’s hop!

Order or join my team right here

- All order types qualify for this promotion.
- Free shipping is for three days only. You and your customers must place your orders between June 11 and 13 to qualify.
- Free shipping automatically applies to the shopper’s cart after the qualifying amount has been met, which is $75 USD | $100 CAD (before tax).
- All orders must meet the qualifying amount to be eligible for free shipping. Coupon codes and Stampin’ Rewards will lower the total amount of an order.
- Craft Classes do not have shipping charges. Purchasing a Craft Class will increase the total cart amount but will not contribute to the free shipping qualifying amount.
- The additional cost for expedited shipping is NOT covered by this promotion.

This is stunning Terry Lynn 🙂 Love that shimmer paper on the front and those clusters of violets. Perfect fold too.
LikeLike
Such a sweet card Terry Lynn! Love the little flowers around your sentiment, perfect! 🙂
LikeLike
SOO sweet! I love the simple design and the little spray of posies!! 🙂
LikeLike