
Good morning! I’m so excited to share this card with you – it’s a beauty, I used some new products that will be coming out in the May-August 2026 Catalog that you can order on May 5.
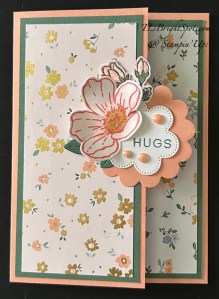
The card base is Crisp Cantaloupe. Don’t you just love that name of a color? The layers are Peaceful Pine and various papers from the Bloom Boutique Specialty Paper Pack. The flowers & leaves come from a new bundle – Boutique Blossoms and the scalloped die cuts use the Scalloped Blooms bundle. Before I share all the details about how to make this card, let’s see the inside where the slider is.
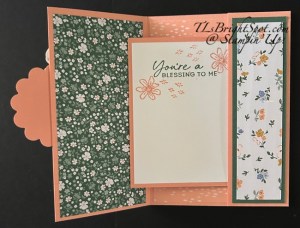
More gorgeous paper shown here from the same Bloom Boutique SDSP. And the slider? That’s the sentiment panel – and it slips inside the panel on the right.
So, directions… I chose to do the inside first so let’s start there.
- The card base is the standard 8 1/2 x 5 1/2 scored on the long side @ 2 3/4 & 6 3/4. Burnish the score lines as both will fold to the inside.
- Cut the left DSP panel 2 1/2 x 5 1/4 and adhere
- Cut the center DSP panel 3 3/4 x 5 1/4 and adhere
- Fold the last panel inwards with a narrow line of adhesive at just the top & bottom (see photo)
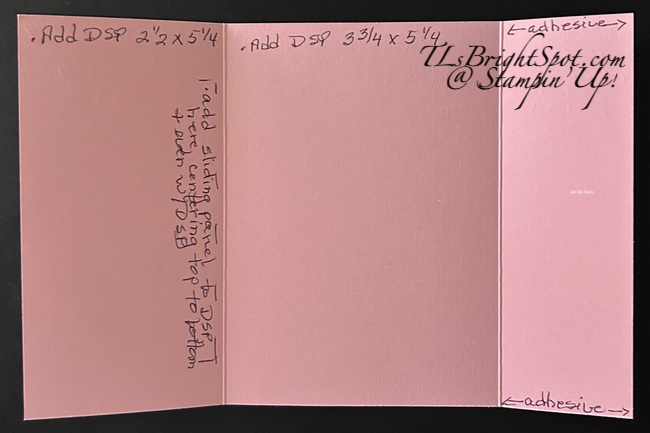
Decorate this folded over section with contrasting card stock (Peaceful Pine 1 1/2 x 5 1/4) then an overlay of DSP (1 1/4 x 5)
Creating the Slider for the card:
- Cut a piece of card stock same color as card base (Crisp Cantaloupe) 3 3/4 x 4 1/4 & score 1/2″ on short side. Burnish & add adhesive to the scored end
- Add this to the left inside panel even with the DSP & equidistant top to bottom
- Fold this to the right, add a stamped Basic White piece 3 x 4 to the ‘slider’ front, then slip it into the opening on the right (I stamped the sentiment in Peaceful Pine ink – new In Color! and the flowers in Crisp cantaloupe – also new In Color! The sentiment is from Scalloped Blooms & the flowers are from Boutique Blossoms)
Now let’s decorate the front, which is really only the left panel 😀 Cut a contrasting card stock (Peaceful Pine) 2 1/2 x 5 1/4 and a DSP panel 2 1/4 x 5. Add to card front.
- Die cut two panels of Scalloped Blooms Dies (Crisp Cantaloupe & Basic White) Stamp the BW piece in Peace Pine ink using a stamp from the Scalloped Blooms stamp set
- Stamp small flowers in Peaceful Pine ink & the medium flower outline stamp in Crisp Cantaloupe. Stamp the filler stamp for both flowers in Barely Blush ink (another new IN COLOR!) Use the Light Peaceful Pine Stampin’ Blend to add color to the leaves of the small flowers. Die cut & set aside.
- Die cut the small group of leaves (Peaceful Pine)
- Add each of these die cuts to the die cut scallops and attach to card front.
- Final touch… add three (3) 2026-2028 In Color Dots
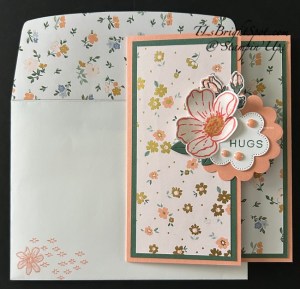
Envelope… Add another piece of the Bloom Boutique SDSP 2 1/4 x 6 to the flap & trim to fit. Stamp the front with flowers from the Bloom Boutique stamp set with Crisp Cantaloupe ink. YAY – this is ready to send to someone special!
To purchase the items shown to make this card look at pages. in the new May-August 2026 catalog.
Thanks for stopping by. Shop with me here!
SEND A CARD WITH ❤️

Such a pretty card! Love the fun fold design and the designer paper that you’ve used is perfect! 🙂
LikeLike
So pretty! This is one of my fave fun folds -and you’ve decorated it beautifully! 🙂
LikeLike