
Happy Inkin’ Thursday Blog Hop Day! We have a color change this week and I have created a fun fold and used lots of DSP & layers :O) You may have joined me from the fabulous Tara and if so, thanks for hopping over.

And here’s my card…

I’ve used Boughs of Holly 12 x 12 DSP, the Mistletoe Magic stamp set, Stitched Rectangles Dies and a few other Stampin’ Up! products to make this stunning card. It’s bold, it catches your eye, but it is not gawdy by any means. Love this fun fold and I’ve made it before – just not very recently. Let’s see if I can break this down so you too, can make this fun fold.
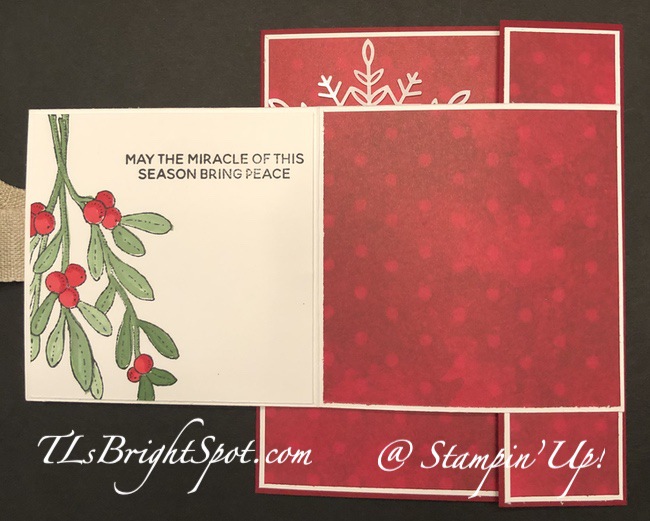
The card base is Cherry Cobbler card stock. The next layer is either Basic White or Mossy Meadow followed by the Boughs of Holly DSP. You can also see that I added a Wonderful Snowflake at one corner to just ‘show off’. I really like the accent it makes :O) The sentiment on the front is stamped in Cherry Cobbler ink with the Mistletoe Magic stamp set. I happen to really like this font so you may see it often. It was die cut with one of the Stitched Rectangles and is adhered with dimensionals to the small folded card in front. I’ve added a few Iridescent Pearls to the die cut for a bit of sparkle.

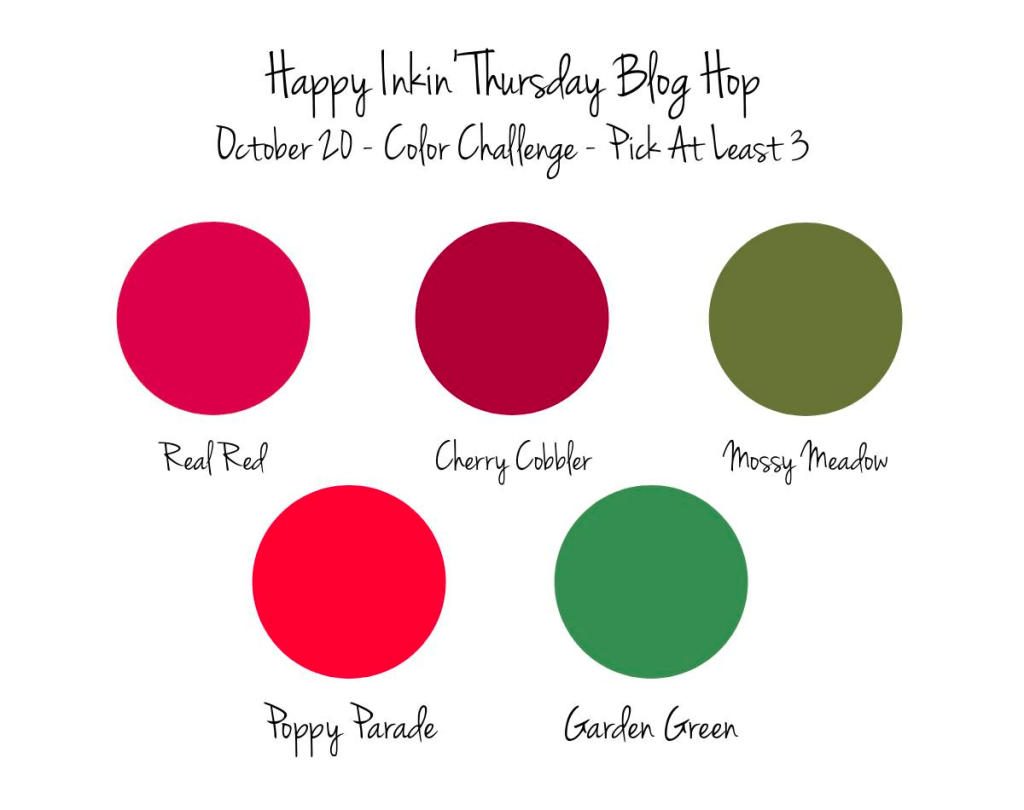
In this photo you can see how the inside of the card opens – and the Wonderful Snowflake shows to its fullest glory. This also shows off the beautiful Boughs of Holly DSP.

In the far right photo you can see the full inside of the card. And here’s the thing – you would not have to have both panels in stamped Basic White. The one on the left could just as easily be another panel of DSP. Both panels are stamped with Memento ink. The bow is colored with Cherry Cobbler Blends, while the mistletoe is colored with Garden Green reinker and a Water Painter + Cherry Cobbler Blends for the berries. The sentiment is from Mistletoe Magic also and stamped in Cherry Cobbler ink. This will be a card in which lots of news updates will be written. :O)

In this photo you can see the full front of the card with the focus on the small card & the ribbon. The ribbon is attached on the Basic White card front with the Mossy Meadow & DSP layers adhered over it. The ribbon is Natural Finish Ribbon and I love it. It can be stamped and it makes a wonderful bow.

Here the mini card is open to show off more DSP.
And the photo on the right show the mini card fully opened. You could just as easily have the stamped panel on the right & DSP on the left. I might prefer that another time; this is just how it came together this time. The stamped panel is stamped in Memento ink using the Mistletoe Magic stamp set & colored with Real Red Blends and Garden Green reinker & a Water Painter. Add reinker to the lid of the Garden green ink pad, add a single drop of water from the Water painter, swish around to ink the brush and paint the leaves without adding any water at all.
This photo shows exactly the ribbon and how it ‘fits’ holding the card. It is only attached under the mini card front, while the rest is loose to wrap around the card to secure it closed and make a half bow.

Here you see the finished card and the envelope: more of the Boughs of Holly DSP on the flap and on the front the beautiful mistletoe from Mistletoe Magic stamp set. And yep – stamped in Memento ink, colored with Cherry Cobbler Blends and Garden Green Reinker with a Water Painter. All card cuts will be listed below. I look forward to you sharing your creations with me.
Now… on with the hop! Click on the next button or click on a name – either one. Enjoy the fantastic projects you will see from our team.

Terry Lynn Bright ~ you are here! 😀
Below is a list of products to make this card. Would appreciate your business and you shopping with me. Stampin’ Up! has an awesome joining special right now – which makes me ask – why wouldn’t you join now?It’s a fabulous time to join Stampin’ Up! For a limited time, new team members will get even MORE FREE products in their customizable Starter Kit. Sign up between 4–31 October and you’ll get $125 USD | $165 CAD $155 USD | $206 | $135 CAD worth of products + free business supplies + all the fun being a part of our fantastic community! You may do that here.
My Star-Studded Rewards as a THANK YOU
For each $50 that you order from my online store (before shipping & taxes) and when you add my current Host Code, you will earn 1 STAR Reward. Orders of $49.99 or below DO NOT earn any rewards.Example $50 = 1 STAR Reward, $100 = 2 STAR Rewards , $150 = 3 STAR Rewards etc.
When you have earned 8 STAR Rewards you will get a FREE product order valued up to $40.00, your choice, and mailed directly to you! Is that a deal or what??? You also earn my monthly Online Class Tutorial of exclusive projects when you place an order. For any order $50 or more you will also receive 1 free gift from me valued up to $10. Remember to use MY current HOST CODE: 4TMA4FZU Click here to go my store.
Here are more really cool specials Stampin’ Up! is offering and that you can purchase through my store by clicking here .

You can see cards I have made with the Fitting Florets Suite of products here, here, and here.
Add just the right touch of elegance to any occasion, including Christmas and seasonal celebrations, with the sweet Fitting Florets Collection. From color schemes to sentiments and embellishments to dies, these unique products blend together so that your cards and crafts fit whatever occasion you might need. Send birthday wishes, express your gratitude, or spread Christmas cheer—with so many options to mix and match you’ll be set no matter the celebration all year!
Starting 1 November 2022, customers can order items from the Fitting Florets Collection. All items in the collection can be ordered separately. No limits apply during the customer sales period.
The following exclusive products are only available while supplies last:
- Framed & Festive Cling Stamp Set (item 160888)*
- Fitting Florets Designer Series Paper (item 161814)
- Gold Adhesive-Backed Swirls (item 161822)
The following will be available for purchase in the Mini Catalog starting January 2023:
- Framed Florets Bundle (item 162407)
- Framed Florets Photopolymer Stamp Set (item 161815)*
- Framed Florets Dies (item 160623)
161056 BIRTHDAY CARD ORGANIZER KIT. $25 USD | $34 CAD
- Kit includes one 8″ x 10″ (20.3 x 25.4 cm) monthly planner with space to record birthdays each month as well as a pocket sleeve to hold birthday cards.
- Includes 12 full-size birthday cards, 6 of 2 designs, and 12 coordinating envelopes.
- Includes Glue Dots, Stampin’ Dimensionals, Adhesive-Backed Embellishments, and Tear & Tape Adhesive
- Includes die-cut florals and pieces ready for you to use—no prep work required!
- Includes sticker sentiments and die-cut labels in Dutch, English, French, and German
- Coordinating colors: Basic Black, Evening Evergreen, Petal Pink, Sahara Sand, and Soft Succulent
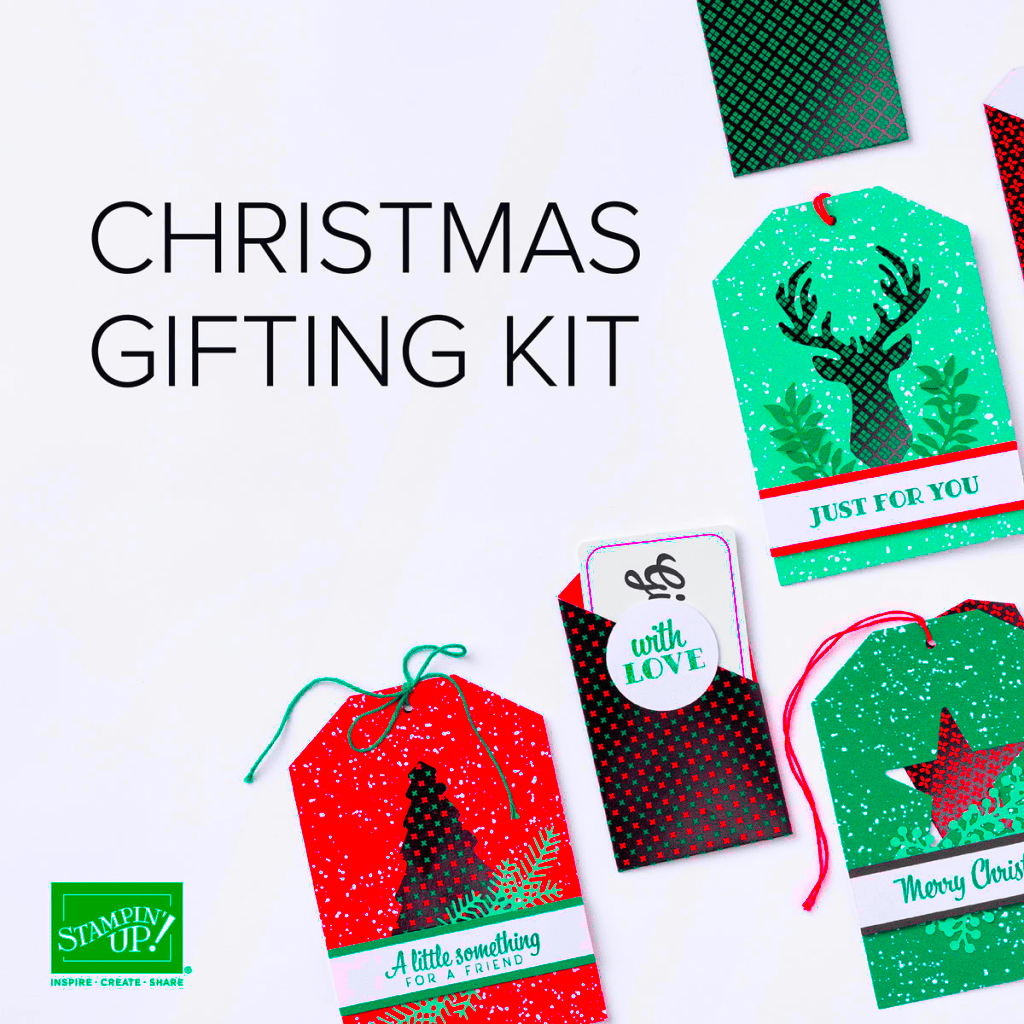
60342 CHRISTMAS GIFTING KIT $21 USD | $29 CAD
- Kit includes 9 tags and 9 gift card holders—3 each of 3 designs
- Includes the exclusive Christmas Gifting Stamp Set and a Shaded Spruce Classic Stampin’ Spot
- Sized to fit standard gift cards
- Coordinating colors: Basic Black, black foil, Mint Macaron, Real Red, Shaded Spruce
Thanks for stopping by.
May you have a beautiful day.
Make someone happy sending them a handmade card filled with love.
Card cuts for today’s project:
Cherry Cobbler: 5 1/2 x 10 scored at 4 1/4 & 8 1/2
Basic White: 4 x 5 1/4 (inner panels); 3 1/2 x 7 scored at 3 1/2 (mini card); 4 1/8 x 5 3/8 (left front panel); 1 3/8 x 5 3/8 (side panel); 3 3/8 x 3 3/8 (mini card stamped inside panel); 3 x 1 (Stitched Rectangle die cut)
Mossy Meadow: 3 3/8 x 3 3/8 (mini card layer)
DSP – Boughs of Holly: 4 x 5 1/4 (left front); 1 1/4 x 5 1/4 (side panel); 3 1/4 x 3 1/4 (mini card front); 2 1/4 x 6 (envelope flap)


