Stampin’ Up! 6 x 3 Gift Cards

Good morning! I have some small gift cards for you today. I was inspired by a. post by Artisan Design Team member Tammy White who made 3 x 3 cards. I happen to like something a bit larger in order to write my message, whatever that is. And, I like it in an envelope. Stampin’ Up! has envelopes for 3″ size creations and they really are quite perfect for a 6 x 3 gift card.

Stampin' Up! 6 x 3 Gift Cards
Stampin' Up! 6 x 3 Gift Cards.2

Aren’t these fun? The card stock base is Thick Basic White cut 6 x 3 and scored @ 3. Each uses a panel of Winter Meadow DSP, some torn and one attached on an angle. I like this particular panel of DSP – shades of Pebbled Path & Smoky Slate, trees and deer. It’s comforting and not bold and can be used for a masculine gift as well. Supplies to make these were not a lot, but the list may seem long – I just don’t do two exactly alike and there’s the rub!

For the gift card on the far left: I ran the bottom Winter Meadow DSP through the Snowflake Sky 3D embossing folder and die cut the pine bough from Shaded Spruce card stock using the Joy of Noel Dies. Embellishments the Adhesive-Backed Glitter Sequins. I also used the remaining glitter from the October Paper Pumpkin on the pine bough. It doesn’t show in this photo, but in real life it does! The stamp on the envelope front is from the Magical Meadow stamp set and stamped in Lost Lagoon ink.

The gift card next to it has a piece of the Snowflake Magic SDSP as the bottom layer. The two die cut pieces are from Shimmer Paper and Snowflake Magic SDSP die cut with Magical Meadow Dies. They are held in place with a glue dot and a Metallic Ribbon In Tahitian Tide was added over top. Three Adhesive-Backed Glitter Sequins were added for a bit of bling.

In the next photo, the gift card on the left the Winter Meadow DSP is added at an angle and on dimensionals. The die cuts use the Magical Meadow Dies, Shimmer Paper and Snowflake Magic SDSP. You can see one of the die cuts was trimmed and peeking out from the left side under the DSP. Over top is a double bow tied with separated black twine from the Baker’s Twine Essentials Pack. The envelope front was stamped in Pebbled Path ink using the same stamp from Magical Meadow stamp set.

Stampin' Up! 6 x 3 Gift Card.4
Stampin' Up! 6 x 3 Gift Card 4 inside

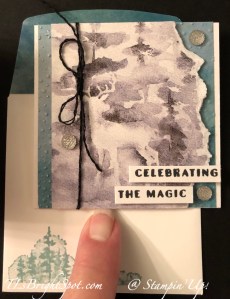
The last card is probably my favorite: it has the Snowflake Sky 3D EF embossed panel of Winter Meadow DSP on the card with the layer of the trees/ deer from Winter Meadow DSP on dimensionals. Before attaching the top layer, I wrapped separated black twine around one end and tied a bow, securing it with a glue dot. The twine is from the Baker’s Twine Essentials Pack. On this card I added three gems from the Faceted Gems Trio Pack. I also stamped a portion of the sentiment in Memento ink using the Stars At Night stamp set, then stamped the rest of the sentiment on the inside of the gift card on the adhered torn DSP. The envelope front got the same tree stamp from Magical Meadow stamp set in Lost Lagoon ink.

Want to purchase the supplies for this card? Supplies can be ordered using this link to my online store. You will find ONLINE EXCLUSIVES, Clearance Rack, Sep-Dec Mini Catalog, the Annual Catalog, kits, Paper Pumpkin – you name it. Shop at your convenience :O)

When ordering from me please use my NEW HOST CODE HSJD7BR6 so that I receive proper notification and YOU GET THE Benefits of a FREE SU! item valued up to $10 :O) AND the Monthly Card Tutorial. (I like to treat my customers!) If your order is over $150, please don’t use the host code as SU! has benefits. I’ll still be notified and you can receive that FREE ITEM!

Note: Make sure that you can see my name on the final checkout page listed as your Demonstrator when you order so that you know that you’re ordering with me and you’ll get my rewards! PLUS… the monthly Online Tutorial when your order is over $50. The November Tutorial features the beautiful Winter Meadow suite of products which can found in the Jul-Dec 2023 Mini Catalog on pages 36-38!

NEW KIT (THE BEST DESTINATION KIT) ADDED AS OF NOVEMBER 1!

Stampin' Up! Best Destination kit
Stampin' Up!! Best Destination Kit stamps

163186

THE BEST DESTINATION KIT

$20.00 USD | $28.00 CAD

Available starting 1 November 1

This kit lets you make nine tri-fold cards with a colorful, nostalgic, travel vibe.

  • Enough supplies to create 9 cards—3 each of 3 designs
  • 9 coordinating envelopes
  • Best Destination Photopolymer Stamp Set
  • One Gorgeous Grape Ink Spot
  • Printed card bases, printed die cuts, adhesive, embellishments, and a clear block
  • Finished card size: 5-1/2″ x 4-1/4″ (14 x 10.8 cm)
  • Coordinating colors: Balmy Blue, Boho Blue, Cajun Craze, Calypso Coral, Coastal Cabana, Crushed Curry, Daffodil Delight, Early Espresso, Flirty Flamingo, Fresh Freesia, Gorgeous Grape, Granny Apple Green, Misty Moonlight, Pecan Pie, Petal Pink, Pretty Peacock, and Shaded Spruce

Supplies can be ordered using this link to my online store.

Thanks for stopping by. I hope you enjoyed my card today. Would love to hear from you. If I can be of help in some way, please let me know.

Stampin’ Up! Snowflakes with Wishes All Around

Good morning, good morning! It’s hubby’s & my anniversary today :O) … My card for today uses the amazing Wishes All Around bundle and I’ve chosen to use the snowflake wreath and a similar layout to yesterday’s card, but simpler.

Stampin' Up! Wishes All Around Bundle, Snowflakes

The Winter Meadow 12×12 DSP seemed a perfect backdrop, and I adhered a strip to a Thick Basic White card base. I cut a piece of the Silver & Gold Adhesive-Backed Glimmer Paper (in silver of course) and ran it through the die cutting machine with the snowflakes die from Wishes All Around Dies. This paper is so neat! Just remove the backing and adhere :O) And I did… to a piece of Basic White. At this point I should have stamped the sentiment in the middle. But no, I didn’t do that :O( I die cut more snowflakes and this time from a piece of the same pattern of Winter Meadow 12×12 DSP. I adhered these on top of the other snowflakes, every other one, on black mini dimensionals. That way they don’t show so much. On top of those snowflakes I added these gorgeous Iridescent Pearl Basic Jewels. This square was added to another slightly larger square with dimensionals, then adhered in place with liquid glue to the card base. I used the second smallest die in the Deckled Circles Dies to die cut a circle from Basic White, stamped it in Misty Moonlight ink with the Wishes All Around sentiment. I adhered it in the center of the snowflake wreath ~ and the card front was done.

Stampin' Up! Wishes All Around, Snowflake card inside

For the inside, on another piece of Basic White I adhered more snowflakes die cut with the Wishes All Around Dies: two from the Silver & Gold Adhesive-Backed Glimmer paper and another from Winter Meadow 12×12 DSP. I added a small Iridescent Pearl Basic Jewel to this last snowflake. I opted NOT TO add a sentiment at this point as this could be a very general card. If i need to add a sentiment before sending, I can.

Stampin' Up! Wishes All Around, Snowflake wreath card & envelope

For the Basic White envelope, I stamped this fun three-snowflake stamp in Misty Moonlight ink, also from then Wishes All Around stamp set. I stamped it several times on the envelope front and a couple of times on the flap, re-inking the stamp each time.

I’ll add a link here so you can view yesterday’s card using the same Wishes All Around Bundle and a similar layout. It’s just fun to compare.

Want to purchase the supplies for this card? Supplies can be ordered using this link to my online store. You will find ONLINE EXCLUSIVES, Clearance Rack, Sep-Dec Mini Catalog, the Annual Catalog, kits, Paper Pumpkin – you name it. Shop at your convenience :O)

When ordering from me please use my NEW HOST CODE HSJD7BR6 so that I receive proper notification and YOU GET THE Benefits of a FREE SU! item valued up to $10 :O) AND the Monthly Card Tutorial. (I like to treat my customers!) If your order is over $150, please don’t use the host code as SU! has benefits. I’ll still be notified and you can receive that FREE ITEM!

Note: Make sure that you can see my name on the final checkout page listed as your Demonstrator when you order so that you know that you’re ordering with me and you’ll get my rewards! PLUS… the monthly Online Tutorial when your order is over $50. The November Tutorial features the beautiful Winter Meadow suite of products which can found in the Jul-Dec 2023 Mini Catalog on pages 36-38!

NEW KIT (THE BEST DESTINATION KIT) ADDED AS OF NOVEMBER 1!

Stampin' Up! New Kit!
Stampin' Up! Best Destination Kit stamp set

163186

THE BEST DESTINATION KIT

$20.00 USD | $28.00 CAD

Available starting 1 November

This kit lets you make nine tri-fold cards with a colorful, nostalgic, travel vibe.

  • Enough supplies to create 9 cards—3 each of 3 designs
  • 9 coordinating envelopes
  • Best Destination Photopolymer Stamp Set
  • One Gorgeous Grape Ink Spot
  • Printed card bases, printed die cuts, adhesive, embellishments, and a clear block
  • Finished card size: 5-1/2″ x 4-1/4″ (14 x 10.8 cm)
  • Coordinating colors: Balmy Blue, Boho Blue, Cajun Craze, Calypso Coral, Coastal Cabana, Crushed Curry, Daffodil Delight, Early Espresso, Flirty Flamingo, Fresh Freesia, Gorgeous Grape, Granny Apple Green, Misty Moonlight, Pecan Pie, Petal Pink, Pretty Peacock, and Shaded Spruce

Supplies can be ordered using this link to my online store.

Thanks for stopping by. I hope you enjoyed my card today. Would love to hear from you. If I can be of help in some way, please let me know.

Stampin’ Up! Stars At Night Dies with Watercoloring

Good Tuesday! It’s Oct 31 – trick or treaters went around last night in our area and we had quite a few of them. Thank goodness not much of our candy is left! :O) Today is the last day of the JOINING PROMOTION. This is such a special deal that if you’re on the fence, take a leap of faith & jump right in. My team & I are here to help you. Read more info below.

I’ve a watercolor card for you today and it was fun to create. I was inspired by several folks who have posted watercolor cards, and while I’m not as good at it as I’d like to be, I’m still pleased with the card.

Stampin' Up! Stars At Night Dies w/ watercoloring

Let’s begin by creating the watercolor background: Misty Moonlight ink, Night of Navy ink and finally Orchid Oasis ink. What I like about this is the depth that is created – it really looks like space to me. I wet my paper thoroughly then began with the widest of the Water Painters and added Misty Moonlight ink. Keeping the paper wet, I added Night of Navy ink, but tried to leave the center area mostly just the Misty Moonlight. Then I added the Orchid Oasis ink the same way, keeping the paper wet. I dropped a few drops of clear water on the paper to give more depth, then set aside this piece to dry. Keep in mind, no two pieces are ever the same and that’s the beauty of watercolors.

While this was drying, I pulled out the Holographic Foil Paper and with the silver sheet, used the hybrid folder and die cut this beautiful embossed star (that’s in the center of the card) with the Stars At Night Dies. I also die cut a couple more stars from this same sheet using the Stars At Night Dies. On a scrap of Orchid Oasis paper, I stamped the sentiment from the Night Divine stamp set in VersaMark ink then sprinkled it with Silver Embossing Powder and heat set it. Once it was cool, I fussy cut the sentiment and set it aside.

Now that the watercolor paper was dry I used the Deckled Rectangle Dies to create this fun edge. I ran it through again with the starburst die in the upper center of the card. See all those little openings surrounding the Holographic star? That’s what it does, plus… cut out a starburst which I saved to use on the inside of the card :O). Ok, what’s next… oh yes, cut a piece of 2023-2025 In Color Shimmer Paper in Boho Blue and adhere the deckled watercolor paper over it. I flicked the watercolor piece with Wink of Stella to give it some sparkle. I used liquid glue to adhere the star and little dots of glue for the additional small stars. I put the fussy cut sentiment on dimensionals and attached it over the center of the large star. This panel got dimensionals and was added to an Orchid Oasis card base.

Stampin' Up! Stars At Night w/ Watercolor Paper, inside

On a panel of Very Vanilla card stock, I stamped the sentiment from Night Divine stamp set in Orchid Oasis ink. I added the leftover starburst center then another star die cut from the Holograph Paper in the center of the starburst. This panel was added to the inside of the card and finis.

Stampin' Up! Stars At Night w/ Watercoloring card & envelope

On the Very Vanilla envelope, I stamped the sentiment from Night Divine stamp set in Orchid Oasis ink. We made this in my card class two weeks ago and the ladies loved it.

The countdown is on… Stampin’ Up! offer of the Joining Promotion ends at close of day Oct 31 – today! Let me refresh your memory about the Joining Promotion

Stampin' Up! 35 year JOINING PROMOTION

Celebrating 35 years of Stampin’ Up!, new demonstrators will be able to choose 35% OFF the cost of their Starter Kit or get 35% MORE product with their Starter Kit.

With option 1 (35% off the normal cost of the starter kit), the new demo would receive $125 worth of products and pay $64.35 + tax. and of course, shipping is FREE.

MORE – MORE – MORE… With either option, those who sign up for the starter kit between Oct 3 and Oct 31 will automatically get signed up for the ONSTAGE@HOME Registration, again FREE! This is a virtual event being held November 11. (Normally the cost of registration would be $77) If you join as demonstrator during the time frame mentioned, you will receive in your email, all the information necessary to attend this virtual event.

Have I intrigued you, inspired you, made you think maybe this is the time to join as a demonstrator? If so, – would love to have you. Remember, hobby demonstrator (for the 20% discount) or a business demo (at least 20% off all demonstrator orders – or more) or somewhere in between. It just doesn’t matter. What does matter is if you like to stamp, color, ink up, create – that’s where it all blends into having fun and doing it with others.

JOIN MY TEAM HERE.

  • Those who sign up for this offer have the opportunity to watch the event independently, gathered together with other demonstrators, or with their Team Leader.
  • Demonstrators who join during this promotion will be automatically added to the OnStage attendees; you won’t even need to register separately.
  • Demonstrators who join during this promotion will also receive an email with all the information about this event.

Whether you’d like to start a little side business or simply take advantage of the awesome 20% discount, I would very much love for you to join my Krew team! We have a great time together – even though we live all over the country!

Want to purchase the supplies for this card? Supplies can be ordered using this link to my online store. You will find ONLINE EXCLUSIVES, Clearance Rack, Sep-Dec Mini Catalog, the Annual Catalog, kits, Paper Pumpkin – you name it. Shop at your convenience :O)

When ordering from me please use my HOST CODE 2J2X3YRM so that I receive proper notification and YOU GET THE Benefits of a FREE SU! item valued up to $10 :O) AND the Monthly Card Tutorial. (I like to treat my customers!) If your order is over $150, please don’t use the host code as SU! has benefits. I’ll still be notified and you can receive that FREE ITEM!

Note: Make sure that you can see my name on the final checkout page listed as your Demonstrator when you order so that you know that you’re ordering with me and you’ll get my rewards! PLUS… the monthly Online Tutorial when your oder is over $50. The October Tutorial features the beautiful Merriest Trees Bundle which can found in the Jul-Dec 2023 Mini Catalog on page 12!

Thanks for stopping by today. May you have a beautiful day!

Stampin’ Up! Beary Cute and Tiny Trees Dies

Hello Saturday! We are having a bit of summer here in NJ once again… 80 degrees today! However, fall is definitely upon us ~ the trees surrounding us have turned those gorgeous shades of yellow, orange, deep reds. It is just stunning. With all this talk of fall, you would think my card would be about that, but it isn’t :O) It’s Christmas with the Beary Christmas 12 x 12 DSP and the Tiny Trees Dies.

Stampin' Up! Beary Cute and Tiny Trees Dies

I began this card by die cutting the Garden Green front piece with the Tiny Trees Dies. I added Foam Adhesive Strips to the back of the die cut and attached a slightly larger panel of Granny Apple Green foil sheet. (This comes from the Melon Mambo & Granny Apple Green Foil Sheets pack.) These were added to a Garden Green card base. I die cut two Basic White circles with the Deckled Circles Dies. The smaller one I stamped with the sentiment in Balmy Blue ink from Beary Cute stamp set, then stamped again with the ‘snowflake’ stamp in the same Beary Cute stamp set. I fussy cut this bear carrying packages from the Beary Christmas 12×12 DSP and attached him to the larger circle with dimensionals. I slipped this Sparkle Ribbon under his feet to make it look as though he was walking on ice. I added three Pastel Adhesive-Backed Sequins to the circle for more bling. These two circles were attached to the card front as you see them.

Stampin' Up! Beary Cute stamp set

For the inside… I stamped this simple outline image of a tree in Garden Green ink, using a stamp from the Beary Cute stamp set. I stamped the hat in Real Red ink from the same stamp set – and called it complete.

Stampin' Up! Beary Cute & Tiny Trees card & envelope

For the envelope… I fussy cut two more bears from the Beary Christmas 12×12 DSP and added them to the envelope front. I took another piece of the DSP for the flap.

What a bright, cheery card, right? What’s helpful about this card, is it could be sent to someone of a different faith – as it doesn’t say Merry Christmas on it. It’s good to have a few of these in your stash.

Want to purchase the supplies for this card? Supplies can be ordered using this link to my online store. You will find ONLINE EXCLUSIVES, Clearance Rack, Sep-Dec Mini Catalog, the Annual Catalog, kits, Paper Pumpkin – you name it. Shop at your convenience :O)

Note: Make sure that you can see my name on the final checkout page listed as your Demonstrator when you order so that you know that you’re ordering with me and you’ll get my rewards! PLUS… the monthly Online Tutorial when your oder is over $50. The October Tutorial features the beautiful Merriest Trees Bundle which can found in the Jul-Dec 2023 Mini Catalog on page 12!

Stampin’ Up! has an incredible joining special going on that ends in just a few days – like end of day Oct 31, and the thing is, I don’t want you to miss it. You have a few more days to take advantage of this, so let me give you the particulars.

Stampin' Up! 35 year Joining Promotion

Starting Oct 3 and going through to Oct 31 is a Starter Kit Special you will not want to miss. Celebrating 35 years of Stampin’ Up!, new demonstrators will be able to choose 35% OFF the cost of their Starter Kit or get 35% MORE product with their Starter Kit.

With option 1 (35% off the normal cost of the starter kit), the new demo would receive $125 worth of products and pay $64.35 + tax. and of course, shipping is FREE.

MORE – MORE – MORE… With either option, those who sign up for the starter kit between Oct 3 and Oct 31 will automatically get signed up for the ONSTAGE@HOME Registration, again FREE! This is a virtual event being held November 11. (Normally the cost of registration would be $77) If you join as demonstrator during the time frame mentioned, you will receive in your email, all the information necessary to attend this virtual event.

Have I intrigued you, inspired you, made you think maybe this is the time to join as a demonstrator? If so, – would love to have you. Remember, hobby demonstrator (for the 20% discount) or a business demo (at least 20% off all demonstrator orders – or more) or somewhere in between. It just doesn’t matter. What does matter is if you like to stamp, color, ink up, create – that’s where it all blends into having fun and doing it with others.

JOIN MY TEAM HERE.

  • Those who sign up for this offer have the opportunity to watch the event independently, gathered together with other demonstrators, or with their Team Leader.
  • Demonstrators who join during this promotion will be automatically added to the OnStage attendees; you won’t even need to register separately.
  • Demonstrators who join during this promotion will also receive an email with all the information about this event.

Whether you’d like to start a little side business or simply take advantage of the awesome 20% discount, I would very much love for you to join my Krew team! We have a great time together – even though we live all over the country!

Thanks so much for stopping by.

May you have a beautiful day!

Stampin’ Up! Stars At Night Bundle

Good Friday morning! Todays card uses this gorgeous Stars At Night Bundle, Misty Moonlight card stock and Basic White with sponge daubers.

Stampin' Up! Stars At Night

I ran the Misty Moonlight panel through the Stars At Night Hybrid Embossing Folder then using my sponge dauber & Basic White ink pad to add spots of color, adding additional highlighting for specific stars. It makes them almost glow. Once satisfied with the amount of white, I stamped the Basic White piece and from the same Stars At Night stamp set, first using Smoky Slate ink to stamp the small starburst spray, then stamped the sentiment in VersaMark ink, sprinkled it with Silver embossing powder, heat set and once cool die cut it with the banner die from Stars At night Dies. I used Stampin’ Seal to adhere the 1/2″ Sheer Ribbon to card the front then added the banner die cut with dimensionals. For a bit more bling, small Festive Pearls in Silver were added to the centers of three stars. This panel was adhered to a Basic White piece slightly larger. This got dimenionals and was attached to the Misty Moonlight card base.

Stampin' Up! Stars At Night, inside

For the inside – again, the small starburst spray and the sentiment came from the Stars At Night stamp set and were stamped on the Basic White panel with Misty Moonlight ink.

Stampin' Up! Stars At Night card & envelope

For the envelope… a beautiful stamp of stars (single stamp) was stamped both on the front and on the flap in Misty Moonlight ink.

The Stars At Night Bundle includes three parts: the stamp set, coordinating dies and the hybrid embossing folder. It is an amazing bundle with so many possibilities. While these pictures turned out very dark – much to my disappointment – the card really is quite beautiful.

Want to purchase the supplies for this card? Supplies can be ordered using this link to my online store. You will find ONLINE EXCLUSIVES, Clearance Rack, Sep-Dec Mini Catalog, the Annual Catalog, kits, Paper Pumpkin – you name it. Shop at your convenience :O)

When ordering from me please use my HOST CODE 2J2X3YRM so that I receive proper notification and YOU GET THE Benefits of a FREE SU! item valued up to $10 :O) AND the Monthly Card Tutorial. (I like to treat my customers!) If your order is over $150, please don’t use the host code as SU! has benefits. I’ll still be notified and you can receive that FREE ITEM!

Note: Make sure that you can see my name on the final checkout page listed as your Demonstrator when you order so that you know that you’re ordering with me and you’ll get my rewards! PLUS… the monthly Online Tutorial when your oder is over $50. The October Tutorial features the beautiful Merriest Trees Bundle which can found in the Jul-Dec 2023 Mini Catalog on page 12!

Stampin’ Up! has an incredible joining special going on that ends in just a few days – like end of day Oct 31, and the thing is, I don’t want you to miss it. You have a few more days to take advantage of this, so let me give you the particulars.

Stampin' Up! 35 year joining promotion

Starting Oct 3 and going through to Oct 31 is a Starter Kit Special you will not want to miss. Celebrating 35 years of Stampin’ Up!, new demonstrators will be able to choose 35% OFF the cost of their Starter Kit or get 35% MORE product with their Starter Kit.

With option 1 (35% off the normal cost of the starter kit), the new demo would receive $125 worth of products and pay $64.35 + tax. and of course, shipping is FREE.

MORE – MORE – MORE… With either option, those who sign up for the starter kit between Oct 3 and Oct 31 will automatically get signed up for the ONSTAGE@HOME Registration, again FREE! This is a virtual event being held November 11. (Normally the cost of registration would be $77) If you join as demonstrator during the time frame mentioned, you will receive in your email, all the information necessary to attend this virtual event.

Have I intrigued you, inspired you, made you think maybe this is the time to join as a demonstrator? If so, – would love to have you. Remember, hobby demonstrator (for the 20% discount) or a business demo (at least 20% off all demonstrator orders – or more) or somewhere in between. It just doesn’t matter. What does matter is if you like to stamp, color, ink up, create – that’s where it all blends into having fun and doing it with others.

JOIN MY TEAM HERE.

  • Those who sign up for this offer have the opportunity to watch the event independently, gathered together with other demonstrators, or with their Team Leader.
  • Demonstrators who join during this promotion will be automatically added to the OnStage attendees; you won’t even need to register separately.
  • Demonstrators who join during this promotion will also receive an email with all the information about this event.

Whether you’d like to start a little side business or simply take advantage of the awesome 20% discount, I would very much love for you to join my Krew team! We have a great time together – even though we live all over the country!

Thanks so much for stopping by.

I hope you like the card – very fun – and gorgeous.

May you have a beautiful day!

Stampin’ Up! October Paper Pumpkin

My Paper Pumpkin kit arrived last week and it’s a beauty. The kit has a liquid glitter included to add sparkle. The cards are very 3D, meaning layers of homes or trees. And the kit is called Home for the Holidays.

Stampin' Up! Oct. '23 Paper Pumpkin
Stampin' Up! Oct. '23 Paper Pumpkin, 2

These are very traditional type cards, Victorian style homes and lots of trees. I wonder what your home is like? Ours is nothing like this… colonial style, two story, trees are maple & dogwood, not spruce. I tried taking a close-up of the glittery parts but they were too blurry to show well, so this is it. There are enough parts to make 8 cards – and envelopes are included of course. While you may not be able to tell, there is a glittery paper under each of the sentiments :O) There are other sentiment included that could have been used on the banner, but I’m a Merry Christmas gal – so that was it for me! The November PP kit coordinates with the October Home for the Holidays Paper Pumpkin Kit! See the info below.

This is the next Paper pumpkin kit…

Stampin' Up! Nov '23 Paper Pumpkin

ABOUT THE KIT

Kit Name: Warm Wishes

This kit includes:

  • 8 boxes; 4 each of 2 designs
  • 1 Mossy Meadow Stampin’ Spot
  • Iridescent glitter accents on paper
  • Precut paper pieces
  • Linen thread
  • Treat bags
  • Warm Wishes photopolymer stamp set
  • Completed box size: 4-1/4″ x 4-1/2″ x 1-1/2″ (10.8 x 11.4 x 3.8 cm) and 4/1/4″ x 3-3/4″ x 1-1/2″ (10.8 x 9.5 x 3.8 cm)
  • Coordinating Stampin’ Up! colors: Balmy Blue, Blueberry Bushel, Cherry Cobbler, Crushed Curry, Daffodil Delight, Lemon Lolly, Mossy Meadow, Night of Navy, Old Olive, Pecan Pie, Real Red

ADD-ON DETAILS

Warm Wishes Cards & Envelopes
Available for purchase starting 11 October; only while supplies last.
Item number: 163985
$14.00 USD | $20.00 CAD

This add-on includes:
• 20 Cards & Envelopes 
• Irisdescent glitter accents on paper
• Folded card size: 5″ x 7″

Click here if you would like to be a part of the Paper Pumpkin ‘fan club’ and receive a kit each month.

Supplies can be ordered using this link to my online store. You will find ONLINE EXCLUSIVES, Clearance Rack, Sep-Dec Mini Catalog, the Annual Catalog, kits, Paper Pumpkin – you name it. Shop at your convenience :O)

When ordering from me please use my HOST CODE 2J2X3YRM so that I receive proper notification and YOU GET THE Benefits of a FREE SU! item valued up to $10 :O) AND the Monthly Card Tutorial. (I like to treat my customers!) If your order is over $150, please don’t use the host code as SU! has benefits. I’ll still be notified and you can receive that FREE ITEM!

Note: Make sure that you can see my name on the final checkout page listed as your Demonstrator when you order so that you know that you’re ordering with me and you’ll get my rewards! PLUS… the monthly Online Tutorial when your oder is over $50. The October Tutorial features the beautiful Merriest Trees Bundle which can found in the Jul-Dec 2023 Mini Catalog on page 12!

Stampin’ Up! is offering an amazing deal as they are

celebrating 35 years in business.

Stampin' Up! 35 year Joining Promotion

Starting Oct 3 and going through to Oct 31 is a Starter Kit Special you will not want to miss. Celebrating 35 years of Stampin’ Up!, new demonstrators will be able to choose 35% OFF the cost of their Starter Kit or get 35% MORE product with their Starter Kit.

With option 1 (35% off the normal cost of the starter kit), the new demo would receive $125 worth of products and pay $64.35 + tax. and of course, shipping is FREE.

MORE – MORE – MORE… With either option, those who sign up for the starter kit between Oct 3 and Oct 31 will automatically get signed up for the ONSTAGE@HOME Registration, again FREE! This is a virtual event being held November 11. (Normally the cost of registration would be $77) If you join as demonstrator during the time frame mentioned, you will receive in your email, all the information necessary to attend this virtual event.

Have I intrigued you, inspired you, made you think maybe this is the time to join as a demonstrator? If so, – would love to have you. Remember, hobby demonstrator (for the 20% discount) or a business demo (at least 20% off all demonstrator orders – or more) or somewhere in between. It just doesn’t matter. What does matter is if you like to stamp, color, ink up, create – that’s where it all blends into having fun and doing it with others.

JOIN MY TEAM HERE.

  • Those who sign up for this offer have the opportunity to watch the event independently, gathered together with other demonstrators, or with their Team Leader.
  • Demonstrators who join during this promotion will be automatically added to the OnStage attendees; you won’t even need to register separately.
  • Demonstrators who join during this promotion will also receive an email with all the information about this event.

Whether you’d like to start a little side business or simply take advantage of the awesome 20% discount, I would very much love for you to join my Krew team! We have a great time together – even though we live all over the country!

Thanks so much for stopping by.

May you have a beautiful day!

Stampin’ Up! Merriest Trees Fun Fold

Good morning! I played with a very fun set for this card, one I haven’t used in a while ~ Merriest Trees Bundle. I also used a coordinating DSP called A Walk In The Forest 12×12 DSP. The reason it coordinates is because the tree dies can be used to die cut trees from the DSP :O) – love this!

Stampin' Up! Merriest Trees Fun Fold

See that gorgeous tree on the flap? That is cut from the DSP, A Walk In The Forest. The string of lights and the star at the tree top are die cut using the Merriest Trees Dies and Holographic Trio Specialty DSP with Adhesive Sheets applied to the back for easy adhering to the die cut tree (just peel & stick!) The ornaments are stamped in Berry Burst ink on Basic White with the Merriest Trees stamp set, then die cut with the appropriate die from the Merriest Trees Dies. They are attached to the tree with mini dimensionals – they just fit!!! I die cut an extra tree in Basic White to adhere to the back of the DSP die cut tree – for uniformity & strength. The tree is adhered directly to the flap. The packages on the lower front of the card are stamped in Berry Burst ink and pretty Peacock ink using stamps stamps & dies from the Merriest Trees bundle. The packages are adhered directly to the panel and the bow is on a mini dimensional. Let’s see, the Basic White background has been run through the Snowflake Sky 3D Embossing Folder after stamping in Pretty Peacock ink with a sentiment from Merriest Trees stamp set. Here’s a better photo of the inside of the card.

Stampin' Up! Merriest Tree Fun Fold, inside

Ok, let me tell you how to put this card together.

  • Cut card base & additional flap (Lost Lagoon):
    • 6 x 5 1/2 scored on long side @ 4 1/4
    • 4 1/4 x 3 scored on long side @ 3 3/8
      • Add this panel to the base piece with the fold even at the cut line at top & 1/2″ from right edge
  • Cut layers:
    • Pretty Peacock
      • 4 x 5 1/4 – add to card base, centering
      • 2 7/8 x 3 1/8 – add to flap, centering
      • 1 1/2 x 5 1/1 3/8 x 4 – add to bottom front folded panel
    • Basic White
      • 3 7/8 x 5 1/8
        • Stamp with sentiment from merriest Trees stamp set in Pretty Peacok ink
        • Run through Snowflake Sky 3D EF
        • Adhere to card base
      • 1 3/8 x 5 1/8 – add to inside bottom front folded area, centering
      • 3 1/2 x 4 3/4 – add to back of die cut tree from A Walk In The Forest DSP
      • 2 1/2 x 3 – stamp 3 sets of ornaments in Berry
        Burst ink and die cut with Merriest Trees Dies; stamp presents in Berry Burst & Pretty Peacock inks then die cut with appropriate dies from Merriest Trees Dies
      • 2 1/4 x 6 – run through the Snowflake 3D EF and adhere to envelope flap
    • Holographic SDSP –
      • 2 3/4 x 1 1/2
        • add adhesive sheet to back
        • die cut light string & star for tree top
          • add light string & star to DSP die cut tree after removing backing on adhesive sheet
    • Winter Melody DSP
      • 2 3/4 x 3
        • run through Snowflake Sky 3D EF
        • adhere to front flap
        • add decorated tree to front flap
      • 1 3/8 x 5 1/8
        • adhere to bottom front panel
        • add die cut packages w/ liquid glue
    • Berry Burst
      • scrap – stamp bow from Merriest Trees stamp set & die cut with bow die from Merriest Trees Dies
      • Put mini dimensional on back of die cut bow & add to Pretty Peacock package.
Stampin' Up! Merriest Tree Fun Fold, decorated

As a final touch, I added Festive Pearls in silver to the star at top of the tree & on two of the snowflakes.

Stampin' Up! Merriest Tree Fun Fold card & envelope

For the envelope – you can see the Basic White embossed panel is already adhered to the flap & trimmed to fit. On the envelope front I stamped the sentiment from Merriest Trees in Berry Burst ink. Another Christmas card ready to go! I think it’s time I count card prepped, what do you think?

Isn’t this a FUN CARD? I really like how it turned out. The color combination is a bit different – Berry Burst with Lost Lagoon & Pretty Peacock, but I think it looks good.

Want to purchase the supplies for this card? Supplies can be ordered using this link to my online store. You will find ONLINE EXCLUSIVES, Clearance Rack, Sep-Dec Mini Catalog, the Annual Catalog, kits, Paper Pumpkin – you name it. Shop at your convenience :O)

When ordering from me please use my HOST CODE 2J2X3YRM so that I receive proper notification and YOU GET THE Benefits of a FREE SU! item valued up to $10 :O) AND the Monthly Card Tutorial. (I like to treat my customers!) If your order is over $150, please don’t use the host code as SU! has benefits. I’ll still be notified and you can receive that FREE ITEM!

Note: Make sure that you can see my name on the final checkout page listed as your Demonstrator when you order so that you know that you’re ordering with me and you’ll get my rewards! PLUS… the monthly Online Tutorial when your oder is over $50. The October Tutorial features the beautiful Merriest Trees Bundle which can found in the Jul-Dec 2023 Mini Catalog on page 12!

Stampin’ Up! is offering an amazing deal as they are

celebrating 35 years in business.

Stampin' Up! Joining Promotion

Starting Oct 3 and going through to Oct 31 is a Starter Kit Special you will not want to miss. Celebrating 35 years of Stampin’ Up!, new demonstrators will be able to choose 35% OFF the cost of their Starter Kit or get 35% MORE product with their Starter Kit.

With option 1 (35% off the normal cost of the starter kit), the new demo would receive $125 worth of products and pay $64.35 + tax. and of course, shipping is FREE.

MORE – MORE – MORE… With either option, those who sign up for the starter kit between Oct 3 and Oct 31 will automatically get signed up for the ONSTAGE@HOME Registration, again FREE! This is a virtual event being held November 11. (Normally the cost of registration would be $77) If you join as demonstrator during the time frame mentioned, you will receive in your email, all the information necessary to attend this virtual event.

Have I intrigued you, inspired you, made you think maybe this is the time to join as a demonstrator? If so, – would love to have you. Remember, hobby demonstrator (for the 20% discount) or a business demo (at least 20% off all demonstrator orders – or more) or somewhere in between. It just doesn’t matter. What does matter is if you like to stamp, color, ink up, create – that’s where it all blends into having fun and doing it with others.

JOIN MY TEAM HERE.

  • Those who sign up for this offer have the opportunity to watch the event independently, gathered together with other demonstrators, or with their Team Leader.
  • Demonstrators who join during this promotion will be automatically added to the OnStage attendees; you won’t even need to register separately.
  • Demonstrators who join during this promotion will also receive an email with all the information about this event.

Whether you’d like to start a little side business or simply take advantage of the awesome 20% discount, I would very much love for you to join my Krew team! We have a great time together – even though we live all over the country!

Thanks so much for stopping by.

I hope you like the card – very fun – and gorgeous.

May you have a beautiful day!

Stampin’ Up! Swing & Sway w/ Handcrafted Elements Dies

Good Saturday morning! Goodness, did we have RAIN yesterday! And while it was raining, I was crafting, at least some of the time. :O) The ‘big deal’ these days is a Swing & Sway card & I had JUST gotten the Handcrafted Elements Dies – and there is this gorgeous ornament die I HAD to use. So – here ya go…

Stampin' Up! Handcrafted Ornaments Dies.1

Is this ornament pretty or what! It was die cut using the Melon Mambo & Granny Apple Green 12×12 Foil Sheets – l-o-v-e. The card base is Very Vanilla, which softens the boldness of the ornament. The sentiment panel is stamped in Melon Mambo ink using the Stars At Night stamp set and die cut with a die from Stars At Night Dies :O) The embossed panels are done with the Distressed Tile 3D embossing folder. There’s a single Glossy Dots Assortment in Melon Mambo at the top of the ornament. Here’s how we put this together:

  • “Very Vanilla card stock 5 1/2 x 10 1/4 scored at 4 1/4, 7 1/4, 9
Stampin' Up! Swing & Sway card score lines
  • Cut three panels of Very Vanilla 1 x 5 1/4 and run through the Distressed Tile EF. Add these to card base: one on the inside panel near edge, centering it top to bottom; another on the fold (as shown, near score line & centering top/ bottom; and lastly to front panel, centering it. Refer to top photo
  • Die Cut ornament from Melon Mambo & Granny Apple Green 12×12 Foil Sheets and adhere together
  • Cut a Very Vanilla strip 1/2 x 2; die cut hole close to top with Tailor Made Tags Dies
  • Stamp sentiment with Melon Mambo ink using the Stars At night stamp set; die cut with appropriate die from Stars at Night Dies.
  • Add mini dimensional to front panel, allowing room for sentiment panel & ornament + swaying mechanism
  • Adhere ornament to swaying mechanism

Above you see all the parts.

Stampin' Up! Swing & sway

Above the ornament & swaying mechanism are in place. It does not get adhered to anything – or it would not sway, right?! Remove cover on mini dimensional and adhere sentiment panel to this with additional dimensionals on the sentiment banner to hold it securely. Refer to top photo again.

With the card pretty much completed, decorate the inside. I die cut two stars using the Handcrafted Elements Dies and the same Melon Mambo & Granny Apple Green 12×12 Foil Sheets. I stamped another sentiment using the Stars At Night stamp set and melon Mambo ink.

Stampin' Up! Handcrafted Ornaments Dies card, inside

For the envelope, I wanted simplicity – the card is elegant. I embossed another panel of the Very Vanilla card stock (2 1/4 x 6) with the same Distressed Tile Embossing Folder and adhered it to the flap & trimmed it to fit. Done! This is a gorgeous card and so simple to do. If you didn’t want to do a fun fold, simply do a regular card, emboss a slightly smaller panel for the front and follow the same procedure for the swaying mechanism and ornament. OR… say something else… a bear maybe? I think I must try that… :O)

Stampin' Up! Swing & Sway w/ Handcrafted Ornaments Dies card & envelope

Want to make this? Supplies can be ordered using this link to my online store. You will find ONLINE EXCLUSIVES, Clearance Rack, Sep-Dec Mini Catalog, the Annual Catalog, kits, Paper Pumpkin – you name it. Shop at your convenience :O)

When ordering from me please use my HOST CODE 2J2X3YRM so that I receive proper notification and YOU GET THE Benefits of a FREE SU! item valued up to $10 :O) AND the Monthly Card Tutorial. (I like to treat my customers!) If your order is over $150, please don’t use the host code as SU! has benefits. I’ll still be notified and you can receive that FREE ITEM!

Note: Make sure that you can see my name on the final checkout page listed as your Demonstrator when you order so that you know that you’re ordering with me and you’ll get my rewards! PLUS… the monthly Online Tutorial when your oder is over $50. The October Tutorial features the beautiful Merriest Trees Bundle which can found in the Jul-Dec 2023 Mini Catalog on page 12!

Stampin’ Up! is offering an amazing deal as they are

celebrating 35 years in business.

Stampin' Up! 35 year Joining Promotion

Starting Oct 3 and going through to Oct 31 is a Starter Kit Special you will not want to miss. Celebrating 35 years of Stampin’ Up!, new demonstrators will be able to choose 35% OFF the cost of their Starter Kit or get 35% MORE product with their Starter Kit.

With option 1 (35% off the normal cost of the starter kit), the new demo would receive $125 worth of products and pay $64.35 + tax. and of course, shipping is FREE.

With option 2 (35% more SU! product) the new demo would pay the usual $99 plus tax of course, and get $168.75 worth of SU! product that you get to choose! And as before – – shipping is FREE! (This would probably be my suggestion – more product!)

MORE – MORE – MORE… With either option, those who sign up for the starter kit between Oct 3 and Oct 31 will automatically get signed up for the ONSTAGE@HOME Registration, again FREE! This is a virtual event being held November 11. (Normally the cost of registration would be $77) If you join as demonstrator during the time frame mentioned, you will receive in your email, all the information necessary to attend this virtual event.

Have I intrigued you, inspired you, made you think maybe this is the time to join as a demonstrator? If so, – would love to have you. Remember, hobby demonstrator (for the 20% discount) or a business demo (at least 20% off all demonstrator orders – or more) or somewhere in between. It just doesn’t matter. What does matter is if you like to stamp, color, ink up, create – that’s where it all blends into having fun and doing it with others.

JOIN MY TEAM HERE.

  • Those who sign up for this offer have the opportunity to watch the event independently, gathered together with other demonstrators, or with their Team Leader.
  • Demonstrators who join during this promotion will be automatically added to the OnStage attendees; you won’t even need to register separately.
  • Demonstrators who join during this promotion will also receive an email with all the information about this event.

Whether you’d like to start a little side business or simply take advantage of the awesome 20% discount, I would very much love for you to join my Krew team! We have a great time together – even though we live all over the country!

Thanks so much for stopping by.

I hope you like the card – very fun – and gorgeous.

May you have a beautiful day!

Stampin’ Up! Front Flap Fold with Wishes All Around Dies

Hello Tuesday! I have a bright & fun Christmas Card for you today… made with Joy of Christmas Designer Series Paper, Wishes All Around dies and Christmas Classics stamp set.

Stampin' Up! Wishes All Around Dies Fun Fold

I wanted this card to look country-ish, therefore the woodgrain and the plaid Joy of Christmas Designer Series Paper. While it doesn’t show much here, I did run the woodgrain DSP through the Merry Melody 3D Embossing Folder before adhering it. The wreath comes from Shaded Spruce card stock die cut with the a wreath from the Wishes All Around Dies. I also die cut three sprigs from Old Olive card stock with other die from this set. I attached the wreath to a Basic White circle die cut with the Deckled Circles Dies – using the 5th from smallest circle. Before adhering, I stamped the sentiment in Real Red ink using the Christmas Classics stamp set. After adhering, I added Gold Holly Leaves for a bit of sparkle. I also added a Real Red Ribbon bow from the Real Red & Garden Green Combo Pack which is attached with a glue dot. I slipped in lengths of Threaded Twine as I was tying the bow :O) Also notice the red dots – those are Pearlized Enamel Dots Effects in Real Red. They take a bit to dry & harden so it might be best to wait until the card is completed to do that step :O)

Stampin' Up! Wishes All Around fun fold inside

I really like the inside of the card… I stamped the pine needles in Shaded Spruce ink; the sentiments in Real Red ink and more Shaded Spruce ink. These come from the Christmas Classics stamp set – one of my favorites. This Basic White panel was added to the inside of the card: layers of Smoky Slate card stock and Joy of Christmas DSP on the Real Red card base.

Ok – let me tell you how to make card cuts for this front flap fun fold- so easy.

  • Card base is a standard 4 1/4 x 11 scored at 5 1/2.
  • Remove 2 3/4 from the top portion of the card base: reserve for the front flap
  • Layers for the top front of the card:
    • Smoky Slate 2 1/2 x 4 1/8
    • DSP 2 3/8 x 4
  • Layers for the front flap
    • Real Red, the removed portion of the card base
    • DSP 2 5/8 x 4 1/8
  • Inside
    • Smoky Slate 4 1/8 x 5 3/8
    • DSP 4 x 5 1/4
    • Basic White 3 x 4 1/4
Stampin' Up! Wishes All Around Fun Fold card & envelope

For the envelope, I added more of this stunning Joy of Christmas DSP to the flap & trimmed it to fit. I also stamped more of the pine fronds using Shaded Spruce ink and Christmas Classics stamp set. Isn’t this a friendly card? Who wouldn’t want to get this in the Christmas mail!

If you would like to order this or any other items, this is a link to my online store. You will find ONLINE EXCLUSIVES, Clearance Rack, Sep-Dec Mini Catalog, the Annual Catalog, kits, Paper Pumpkin – you name it. Shop at your convenience :O)

When ordering from me please use my HOST CODE 2J2X3YRM so that I receive proper notification and YOU GET THE Benefits of a FREE SU! item valued up to $10 :O) AND the Monthly Card Tutorial. If your order is over $150, please don’t use the host code as SU! has benefits. I’ll still be notified and you can receive that FREE ITEM!

Note: Make sure that you can see my name on the final checkout page listed as your Demonstrator when you order so that you know that you’re ordering with me and you’ll get my rewards! PLUS… the monthly Online Tutorial when your oder is over $50. The October Tutorial features the beautiful Merriest Trees Bundle which can found in the Jul-Dec 2023 Mini Catalog on page 12!

Stampin’ Up! is offering an amazing deal as they are celebrating 35 years in business.

Stampin' Up! 35 year Joining Promotion

Starting Oct 3 and going through to Oct 31 is a Starter Kit Special you will not want to miss. Celebrating 35 years of Stampin’ Up!, new demonstrators will be able to choose 35% OFF the cost of their Starter Kit or get 35% MORE product with their Starter Kit.

With option 1 (35% off the normal cost of the starter kit), the new demo would receive $125 worth of products and pay $64.35 + tax. and of course, shipping is FREE.

With option 2 (35% more SU! product) the new demo would pay the usual $99 plus tax of course, and get $168.75 worth of SU! product that you get to choose! And as before – – shipping is FREE!

MORE – MORE – MORE… With either option, those who sign up for the starter kit between Oct 3 and Oct 31 will automatically get signed up for the ONSTAGE@HOME Registration, again FREE! This is a virtual event being held November 11. (Normally the cost of registration would be $77) If you join as demonstrator during the time frame mentioned, you will receive in your email, all the information necessary to attend this virtual event.

Have I intrigued you, inspired you, made you think maybe this is the time to join as a demonstrator? If so, – would love to have you. Remember, hobby demonstrator (for the 20% discount) or a business demo (at least 20% off all demonstrator orders – or more) or somewhere in between. It just doesn’t matter. What does matter is if you like to stamp, color, ink up, create – that’s where it all blends into having fun and doing it with others.

JOIN MY TEAM HERE.

BUT WAIT!  There’s MORE!!

You’ll ALSO get FREE OnStage@Home Registration!

Those who sign up for a Starter Kit during this offer will also be automatically registered for FREE* to our virtual OnStage event on 11 November – that’s a $77 value!  And – you don’t even have to travel – just do it from home.  In your jammies, if you like!

  • Those who sign up for this offer have the opportunity to watch the event independently, gathered together with other demonstrators, or with their Team Leader.
  • Demonstrators who join during this promotion will be automatically added to the OnStage attendees; you won’t even need to register separately.
  • Demonstrators who join during this promotion will also receive an email with all the information about this event.

Whether you’d like to start a little side business or simply take advantage of the awesome 20% discount, I would very much love for you to join my Krew team! We have a great time together – even though we live all over the country!

RUSTIC CHRISTMAS COUNTDOWN KIT

Stampin' Up! Rustic Christmas Kit

This kit includes: 

  • Enough supplies to create 25 individual envelopes
  • Printed die cuts, printed labels, adhesive, embellishments, clothespins, and twine
  • Folded envelope size: 4″ x 3″ (10.2 x 7.6 cm)
  • Coordinating colors: Cherry Cobbler, Crumb Cake, Mossy Meadow, Old Olive

This is just one of the kits available – shop here

Thanks for stopping by. May you have a beautiful day!

Stampin’ Up! More Beary Christmas Memories & More

Good Tuesday morning. Ok, true confessions. I cannot believe it is already October 3! Time seems to be slipping through my fingers. Aargh! But here we are… Before I share my cards with you today, Do you know what today is for Stampin’ Up! Today is the beginning of a special for new demonstrators.

Stampin' Up! Celebrating 35 years - new promo

Starting tomorrow Oct 3 and going through to Oct 31 is a Starter Kit Special you will not want to miss. Celebrating 35 years of Stampin’ Up!, new demonstrators will be able to choose 35% OFF the cost of their Starter Kit or get 35% MORE product with their Starter Kit.

With option 1 (35% off the normal cost of the starter kit), the new demo would receive $125 worth of products and pay $64.35 + tax. and of course, shipping is FREE.

With option 2 (35% more SU! product) the new demo would pay the usual $99 plus tax of course, and get $168.75 worth of SU! product that you get to choose! And as before – – shipping is FREE!

MORE – MORE – MORE… With either option, those who sign up for the starter kit between Oct 3 and Oct 31 will automatically get signed up for the ONSTAGE@HOME Registration, again FREE! This is a virtual event being held November 11. (Normally the cost of registration would be $77) If you join as demonstrator during the time frame mentioned, you will receive in your email, all the information necessary to attend this virtual event.

Have I intrigued you, inspired you, made you think maybe this is the time to join as a demonstrator? If so, – would love to have you

JOIN MY TEAM HERE.

Now… let me share more of the Beary Christmas Memories & More Card Pack that I put together.

Stampin' Up! Beary C'mas Mem'ries & More card pack.1
Stampin' Up! Beary C'mas Mem'ries & More card pack.2
Stampin' Up! Beary C'mas Mem'ries & More card pack.3

You may have learned that I tend to make different cards and not all the same design. Yep, that’s part of my DNA, don’t duplicate. While the far left card and the far right card are similar, still, they are not the same.

Card 1, far left, uses a red card base in the card pack. Adhered directly to the card base is one of the larger panels from the pack of the very cute bears – or should I say Beary Cute :O) I used a piece of Vellum Basic DSP (polka dots) and adhered it to a Misty Moonlight strip cut the entire width. I added stickers from the Beary Christmas Memories and More card pack to the strip and three Irridescent Pastel Gems in Balmy Blue.

Card 2, middle, also uses a red card base from the Beary Christmas Memories & More Card Pack. I used my paper snips to trim down one of the card images and added it directly to the card base. I then cut a banner with the Nested Essentials Dies from Balmy Blue card stock. With my paper snips I again trimmed one of the smaller cards to use the sentiment banner. I adhered the sentiment banner to the Balmy Blue one, put dimensionals on and attached it to the card. I added three Festive Pearls in Red.

Card 3, far right, is the simplest yet: Balmy Blue card base from the Beary Christmas Mem’ries & More Cards & Envelopes; a Basic White panel then the bear image all adhered one on the other. I trimmed down this sentiment banner from one of the cards in the pack and attached it directly to the card. As a final touch I added an Irridescent Pastel Gem to each end of the sentiment. And done! Three more cards for my Christmas card list :O) This is such a great card pack and of course, I used the coordinating Beary Christmas Memories & More Cards & Envelopes for the card pack. So convenient!!!

Kits are just one of the items Stampin’ Up! does so well. If interested in other kit options, please visit my store here.

Stampin' Up! Paper Pumpkin Home for the Holidays

Paper Pumper is a monthly Stampin’ Up! kit that is different every month. The next kit is the Home for Holidays kit.

This kit includes:

  • All the supplies you’ll need to create 8 sparkly and dazzling Christmas cards—4 each of 2 designs—and eight coordinating envelopes.
  • A coordinating photopolymer stamp set with endearing holiday sentiments and festive designs.
  • A Real Red Stampin’ Spot
  • A bottle of Glitter Glue
  • Beautiful Christmasy-themed precut pieces

Finished folded card size: 4-1/4″ x 5-1/2″ (10.8 x 14 cm)

Coordinating Stampin’ Up! colors: Balmy Blue, Blueberry Bushel, Cherry Cobbler, Crumb Cake, Crushed Curry, Daffodil Delight, Lemon Lolly, Mossy Meadow, Night of Navy, Old Olive, Pecan Pie, Real Red

One of the fun things about this particular Paper Pumpkin kit is that the Home for the Holidays Kit perfectly coordinates with the November Paper Pumpkin Kit!

You can subscribe to PAPER PUMPKIN from my shop by clicking HERE

Ok what else? World Card Making Day is THIS SATURDAY OCTOBER 7! Our group is participating by holding some of our own facebook live creations when SU! is not doing their lives.

Stampin' Up! World Card Making Day

Who: Everyone, including new customers!

When: 7 October 2023 from 2:00 to 5:00 p.m. (MT)

Where: Online

Price of Event: Free

Registration Dates: 6 September–7 October 2023

Connect with me to register for this event!

Which specific browsers are supported?

For the optimal viewing experience, we recommend using Chromium based browsers such as Google Chrome or Microsoft Edge. You can also get good results on Mozilla Firefox or Safari; however, there can be times where there may be slight visual differentiation (video controls, website design, etc.). We recommend always using the latest version of your chosen browser.

Can I watch the event with people that didn’t register?
That’s a big yes! Anyone and everyone are welcome to join in the fun. Registration is the best way to keep up on event details, but it’s not required.

Stampin' Up! WCMD event by the Inkin' Krew