Stampin’ Up! Christmas to Remember

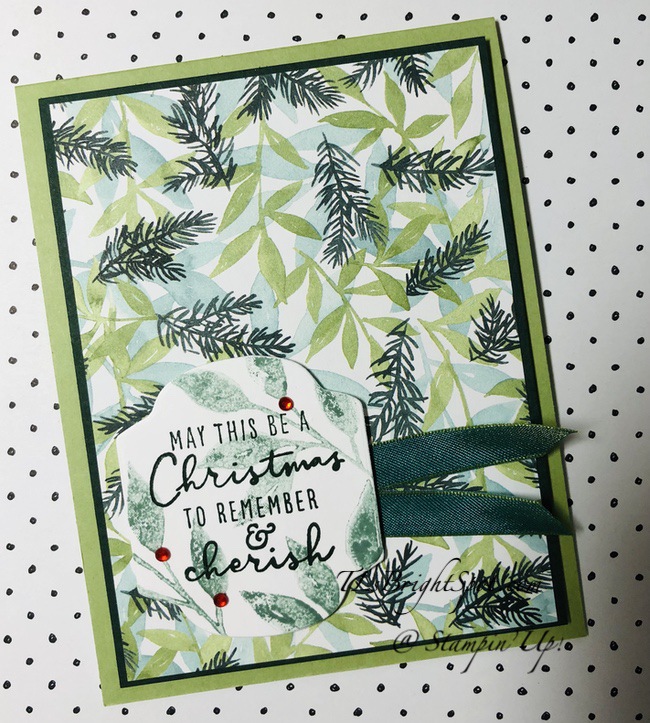
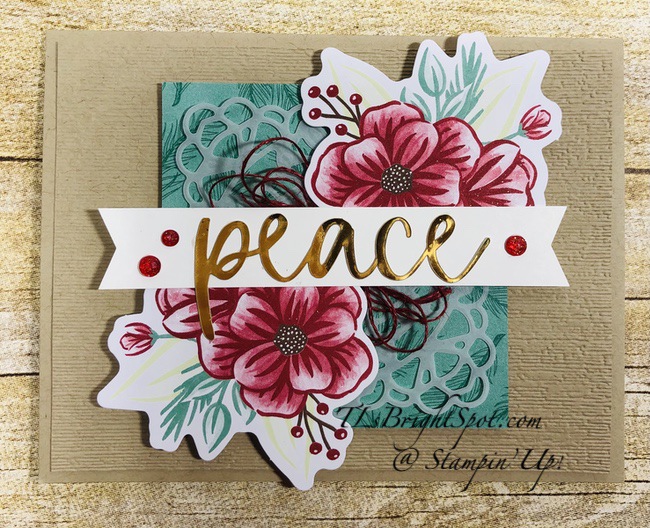
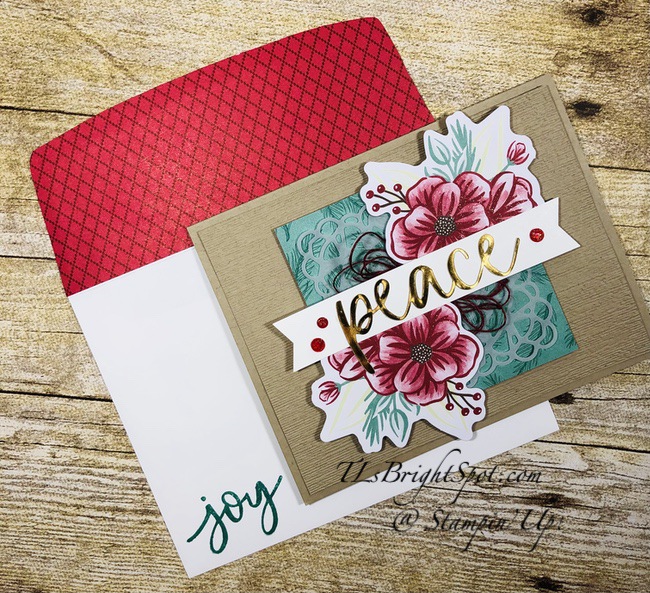
Hello again… The Jul-Dec 2021 Mini catalog is LIVE – woohoo! What’s your favorite? One of my favorites is the Painted Christmas Suite of products. Yes, I have been using it a lot. I’m a traditional girl, but I also like that the DSP in this suite is not red/ green, but mostly shades of green. card has lots of layers but is really pretty simple. The die used is from the Christmas Pinecone Dies which is paired with Christmas to Remember stamp set. The suite has two stamp sets: one with sentiments (Christmas to Remember) and Christmas Season which has the pinecone, pine needles, holly and various leaves stamps. They are meant to go together. It also has two die sets, Seasonal Labels Dies and Christmas Pinecone Dies.

Christmas.1

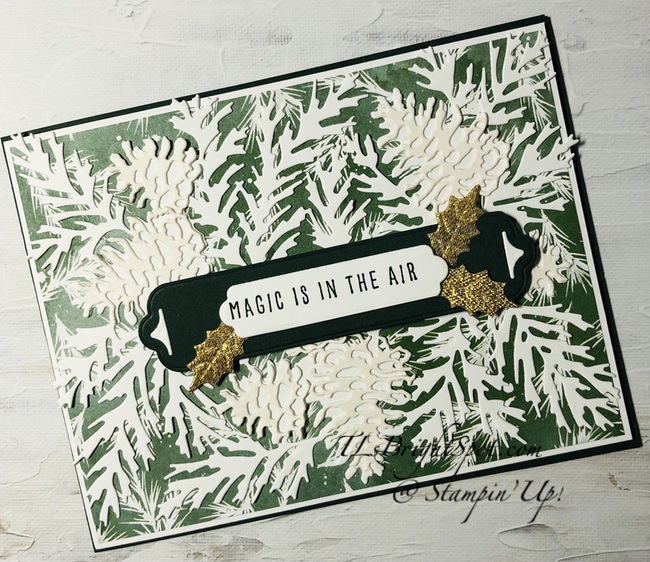
For this card I began by punching four rectangles from a piece of the Painted Christmas DSP. The punch used is the Rectangular Postage Stamp Punch – and it’s from the same DSP, just the other side.. I mounted these on a piece of Pear Pizzazz card stock, then wrapped a length of Shimmer Ribbon in gold around it and secured it in back with Stampin’ Seal. I die cut the background pine in Evening Evergreen, then the overlay in the Be Dazzling 6×6 DSP that is a freebie in the Sale-a-bration catalog.I trimmed off two of the pine sections, lightly adhered them together with liquid glue and added them to the card front. I then took a scrap of Basic White and punched the oval using the Double Oval Punch. It was stamped with one of the leaves from Christmas Season stamp set with Soft Sea Foam ink 2nd generation (that means stamped off). Then I stamped the word MERRY in Evergreen ink from the Christmas to Remember stamp set. This oval got dimensionals and was adhered to the center of the card. I added three 2021-2023 In Color Jewels to the oval.

The card base is Evening Evergreen. The next layer is Soft Sea Foam and Pear Pizzazz added to the base with dimensionals. Then the completed panel was added to it with dimensionals.

Christmas.2

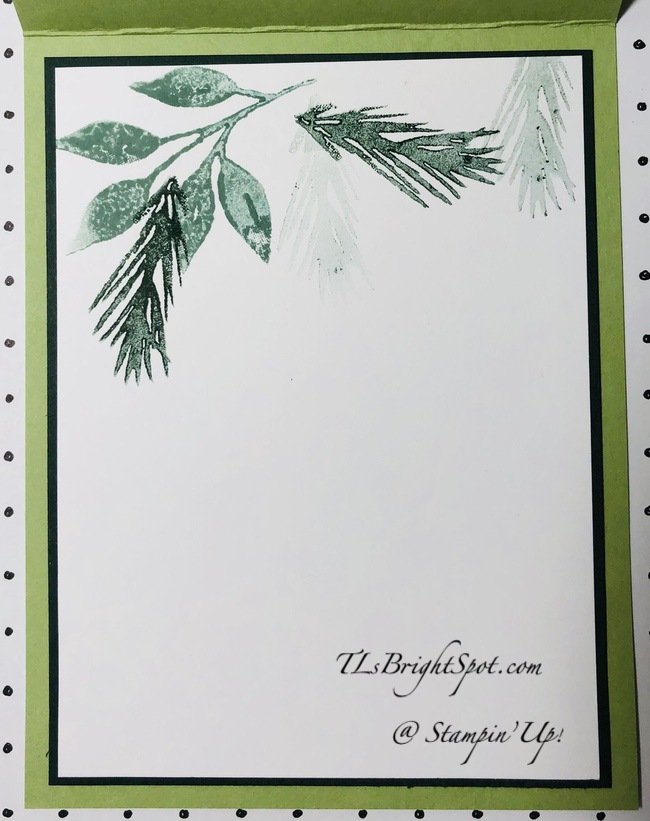
For the inside, I added more of the same die cuts adhered with liquid glue to a Basic White panel, then stamped the sentiment in Evening Evergreen ink. Yep, this is from the Christmas to Remember stamp set. This panel was added to Soft Sea Foam with liquid glue then into the inside of the card. And the card is done…

Christmas.3

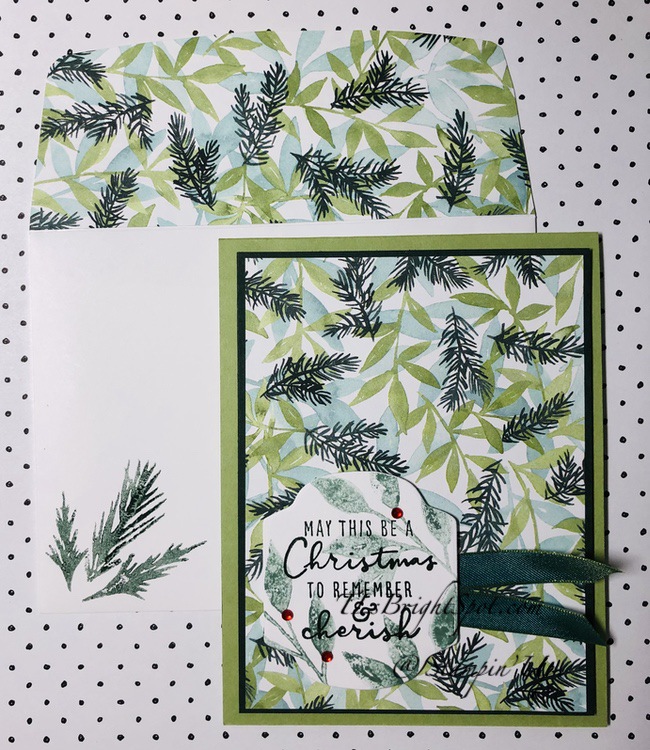
The envelope flap has the same DSP from Painted Christmas DSP pack adhered, then the leaves were stamped in Soft Sea Foam and the pines in Evening Evergreen. Come the end of November, this will go to some favorite folks. I love the glitter of the Be Dazzling 6×6 DSP. It adds extra glam to the card 🙂 Want to know how to get some of this fabulous DSP? Read on…

06.21_HEADER_SAB_ENG

How do you pre-earn Sale-A-Bration products? It’s simple! For every $50 USD | $60 CAD and $100 USD | $120 CAD you spend, you’ll be able to take your pick of Sale-A-Bration products to add to your order—for free!

And if you JOIN and become a demonstrator during Sale-a-bration… you have the opportunity to get one of the bundles below FREE!

JOIN BUNDLE OPTIONSPRICELIMIT
156795Arctic Bears Bundle$47.50 USD | $64.75 CAD1
156819Beauty Of Tomorrow Bundle$50.25 USD | $68.25 CAD1
156801Christmas Season Bundle$54.00 USD | $73.75 CAD1
156806Christmas To Remember Bundle$60.25 USD | $81.75 CAD1
156807Frosted Gingerbread Bundle$48.50 USD | $66.50 CAD1
158609Gorgeous Leaves Bundle$44.00 USD | $60.25 CAD1
156813Nature’s Harvest Bundle$53.00 USD | $72.75 CAD1
156816Peaceful Cabin Bundle$54.00 USD | $72.75 CAD1
156391Peaceful Deer Bundle$36.00 USD | $48.50 CAD1
156789Penguin Place Bundle$31.50 USD | $42.25 CAD1
156798Sweet Little Stockings Bundle$47.50 USD | $64.75 CAD1
156810Whimsical Trees Bundle$51.25 USD | $70.00 CAD1

Those who join Stampin’ Up! during Sale-A-Bration may select one bundle from the list above to add to their Starter Kit at no additional cost.

Remember…Card cuts will be listed at the bottom of this post. If you do not have a demonstrator and need a Jul-Dec 2021 Mini Catalog, please reach out to me – happy to send one to you. And when I send it, there will be a Sale-a-bration catalog in with it! That means more FREE items to choose from with every order of $50, or $100 or multiples of that. Please also use my current host code U7F3EZE9 when ordering. I offer my customers a free item from Stampin’ Up! valued to $10 with your order of $50 and above. Click here to go my store. When the order is over $150, you still receive that free gift from me, but SU! has Stampin’ Rewards that may be used for additional products, so don’t use the host code at that time. If you have questions just let me know. If you would like to be able to order products early from catalogs AND enjoy that 20% discount, join my team now… you may do that here. We have lots of fun and are a creative bunch that encourages & supports one another. Would love to have you!

YouTube
Thanks for stopping by. May you have a beautiful day. Inspire. Create. Share. Nothing beats a handmade card!

Card Cuts for today’s project:


Evening Evergreen card base 8 1/2 x 5 1/2 scored at 4 14

Soft Sea Foam 4 1/8 x 5 3/8 (2)

Pear Pizzazz 4 x 5 1/4; 2 7/8 x 4 1/8

Basic White 4 x 5 1/4 + scrap for oval

Stampin’ Up! Painted Christmas DSP Shows Off

WOOHOO! The Jul-Dec 2021 Catalog is L-I-V-E! Yay… Welcome. Today I’m sharing a card using the Painted Christmas DSP that is now available for purchase. It’s beautiful.

Painted C’mas DSP Shows Off.1

I’ve used a rather non-traditional color for the card base – Pear Pizzazz. It coordinates so well with this particular sheet of DSP. I’ve used the Christmas Season stamp set to stamp on the die cut sentiment banner in Soft Succulent 2nd generation. I used the Seasonal Labels Dies to create the banner. And finally, I used the Christmas to Remember stamp set to stamp the sentiment in Evening Evergreen. I set this aside while I put the card together.

  • Pear Pizzazz for the card base
  • Painted Christmas DSP adhered to Evening Evergreen card stock. Dimensionals on the back and adhered to the card base
  • Cut a length of Reversible Ribbon and adhere with glue dots.
  • Put dimensionals on the back of the sentiment banner and adhere over the ribbon
  • Add three Red Rhinestone Basic Jewels and the card front is complete.
Painted C’mas DSP Shows Off.2

For the inside I used a couple of the stamps in the Christmas Season stamp set to create a beautiful ‘header’. I used Soft Succulent 2nd for the larger leaf. I then stamped the pine needles in Evening Evergreen ink 2nd & 3rd generation. Of course, these were stamped on Basic White card stock. I adhered this to a panel of Evening Evergreen, then into the inside of the card.

Painted C’mas DSP Shows Off.3

For the envelope I added more of the same beautiful DSP to the envelope flap, then stamped the pine stamp from Christmas Season stamp set in Evening Evergreen. And – done. A quick card that is just beautiful. These stamps and dies may be found on pages 16-17 of the Jul-Dec 2021 Mini Catalog.

Remember that I mentioned the Jul-Dec 2021 Mini Catalog is now live – as of today! Click below to go straight to the catalog.

July–December 2021 Mini Catalogue

Remember that Sale-a-bration is also in effect from Aug 3 (today) to Sep 30. That means more bonus. For every $50 spent there are rewards that you may choose. There are stamps and DSP and a Die or two as well that coordinate with the stamps. This is just way too hard to pass up!

06.21_HEADER_SAB_ENG

Card cuts will be listed at the bottom of this post. If you do not have a demonstrator and need a Jul-Dec 2021 Mini Catalog, please reach out to me – happy to send one to you. And when I send it, there will be a Sale-a-bration catalog in with it! That means more FREE items to choose from with every order of $50, or $100 or multiples of that. Please also use my current host code U7F3EZE9 when ordering. I offer my customers a free item from Stampin’ Up! valued to $10 with your order of $50 and above. Click here to go my store. When the order is over $150, you still receive that free gift from me, but SU! has Stampin’ Rewards that may be used for additional products, so don’t use the host code at that time. If you have questions just let me know. If you would like to be able to order products early from catalogs AND enjoy that 20% discount, join my team now… you may do that here. We have lots of fun and are a creative bunch that encourages & supports one another. Would love to have you!

Thanks for stopping by. May you have a beautiful day. Inspire. Create. Share. Nothing beats a handmade card!

Card cuts for today’s project…

Pear Pizzazz card base 4 1/4 x 11 scored at 5 1/2

Evening Evergreen 3 7/8 x 5 1/8 (2)

Painted Christmas DSP 3 3/4 x 5

Basic White 3 3/4 x 5 (inside) + approximately 2 1/2 x 2 1/2 for sentiment die cut

Stampin’ Up! Diagonal Gatefold Envelope

Hi there! It’s Wednesday the 28th – just days away from the END of the 15% off select DSP sale (Aug 2) and the LAUNCH of the Jul-Dec 2021 Mini Catalog (Aug 3) & Sale-a-bration catalogs (Aug 3 – Sep 30). WhooHoo! Shall we call this WooHoo Wednesday? Silliness, right? OK … today’s project is the envelope for a Diagonal Gatefold card. The card information was shared in yesterday’s post which you may see here. The envelope is created with one of the paper packs avail in the 2021- 2022 Annual Catalog called Pattern Party DSP. It is available when you make a purchase of $300 or more. The pack is wonderful – black & white on one side and colorful on the other. Below is the finished envelope for a look see. The “address” label on the front shows the other side of this particular piece.

Diagonal Gatefold Envelope.1

The how to…

  • Cut the DSP 8 1/2 x 12: score on the LONG side 3/4, 7 3/4; score on the SHORT side 7/8, 6 3/4
  • Burnish all score lines and trim – see photo for reference
Diagonal Gatefold Envelope.2
  • Use the Detailed Trio Punch to round the edges of the flap
  • Add Tear n Tape to the outside pieces just long enough for the fold up of the bottom.
  • Add Tear n Tape to the flap as well
Diagonal Gatefold Envelope.3
  • Fold up bottom and adhere. You can clearly see that I ran the Tear n Tape too long on the sides. I simply rolled it down once the covering was removed and it worked perfectly.
  • Using the Seasonal Labels Dies to cut a panel for the front to use as an address label. I used some of the same Pattern Party DSP for the label. The seasonal Labels Dies will be available in the Jul-Dec 2021 Mini Catalog beginning Aug 3. It is part of the Christmas Season Bundle.

Love how this envelope turned out – and so glad I had the Pattern Party DSP pack to use for it!

If you do not have a demonstrator and need a Jul-Dec 2021 Mini Catalog, please reach out to me – happy to send one to you. And when I send it, there will be a Sale-a-bration catalog in with it! That means more FREE items to choose from with every order of $50, or $100 or multiples of that. Please also use my current host code 4TKMUNQH when ordering. I offer my customers a free item from Stampin’ Up! valued to $10 with your order of $50 and above. Click here to go my store. When the order is over $150, you still receive that free gift from me, but SU! has Stampin’ Rewards that may be used for additional products, so don’t use the host code at that time. If you have questions just let me know. If you would like to be able to order products early from catalogs AND enjoy that 20% discount, join my team now… you may do that here. We have lots of fun and are a creative bunch that encourages & supports one another. Would love to have you!

Stampin’ Up! has some of the most beautiful Designer Series Papers on the market – and right now they have a sale on select DSP at 15% off the market price. Here are more details.

SALE ENDS AUG 2

  • All order types qualify for this promotion.
  • There is no limit to how many packages of Designer Series Paper may be purchased during this promotion.
  • Only select Designer Series Papers are available at a 15% discount during this promotion.
  • Orders must be placed—and closed—during the promotion period for the 15% discount to apply.
  • Designer Series Paper ordered as part of a Starter Kit or with Stampin’ Rewards qualify for the 15% discount.

Remember that Aug 3 is the start of the Jul-Dec 2021 Mini Catalog.

July–December 2021 Mini Catalogue

During a portion of the mini catalog, there are also Sale-a-bration opportunities. What that means is when you purchase $50 or $100 worth of products, SU! is offering FREE product in the way of stamps, paper and even a die that are only offered during this time frame: Aug 3 – Sep 30. In other words, purchasing any SU! product during the time of Sale-a-bration will get you FREE product! And remember – you also get an item of choice valued at $10 from me when your purchase is $50 plus (before tax & shipping)

06.21_HEADER_SAB_ENG

US SCHOOL SUPPLY SALES TAX HOLIDAY

Eleven states will be offering a sales tax holiday for school supplies during the months of July or August. Products that are eligible according to the statute include “items normally used by students in a standard classroom for educational purposes.” To see the names of participating states, products exempted from tax, and sales tax holiday dates, click here.

Please note that you must place your order with Stampin’ Up! during the tax holiday period in order to receive these items tax-free (which is midnight on the first day to midnight on the last day of the tax holiday). Also, keep in mind that this is a state sales tax holiday; the state statute may not apply to county, city, and special jurisdiction taxes.

If you have customers who live in states who benefit from the sales tax holiday (yay!), be sure to give them a call and let them know.

Note: Georgia, Louisiana, and Wisconsin have suspended the sales tax holiday for this year.

Thanks for stopping by. May you have a beautiful day. Inspire. Create. Share. Nothing beats a handmade card!

Stampin’ Up! Diagonal Gate Fold for Christmas

It’s Tuesday – shall we call it Terrific Tuesday? I sorta like that 🙂 Todays card is just that – terrific. This is a fun fold that is not new, but since I never made one, well, it was time. I’ve used the Tidings of Christmas 6×6 DSP and combined it with the Evergreen Elegance bundle which may be found in the Annual Catalog, page 91. This is such a fun and easy card to make.

Diagonal Gatefold C’mas.1

How to make…do all your scoring first, then cut your papers and adhere.

Scoring

  • begin with your card base 5 1/2 x 8 1/4, scored on the long side at 2 3/4 & 5 1/2. (mine is Cherry Cobbler)
  • score the left panel from the upper left corner to the 1st score line on the diagonal
  • score the right panel from the upper left corner of the 2nd score line to the bottom right corner
  • burnish the score lines so they are mountain, valley, valley, mountain

Cutting your papers

  • cut each card stock layer 2 5/8 x 5 3/8 (there will be 4, three in Soft Succulent, 1 in Basic White
  • cut TWO of the Soft Succulent layers on the diagonal from the upper left corner to the lower right corner (the remaining piece will be the center panel)
  • cut the Basic White panel from the upper right corner to the lower left corner
  • cut a Basic White panel for the card center 2 1/2 x 5 1/4
  • cut DSP layers 2 1/2 x 5 1/4 (I cut three coordinating panels)
  • cut TWO DSP layers on the diagonal from the upper left corner to the lower right corner
  • cut ONE DSP layer from the upper right corner to the lower left corner (this is my Soft Succulent DSP layer), there will be one of these left over

TIP: When cutting your DSP layers, if there is a definite direction to the design, make certain you are cutting it in the proper direction. 🙂

Diagonal Gatefold C’mas.2

Next steps

  • Stamp the center Basic White panel and add decoration
    • The sentiment is stamped in Cherry Cobbler ink using the Evergreen Elegance stamp set
    • The trees at the bottom are punched using the Evergreen Border Punch, Soft Succulent card stock and Evening Evergreen card stock and adhered to the panel with liquid glue
    • Adhere this panel to the center of the card
  • Stamp the diagonally trimmed Basic White panel using Evening Evergreen ink and the smallest tree from the Evergreen Elegance stamp set: first full strength, then the two side trees without re-inking
  • Adhere this Basic White panel as shown in photo
Diagonal Gatefold C’mas.3

You are nearly done…

  • Adhere the trimmed panels with liquid glue: layers are card stock then DSP!
  • Stamp the sentiment for the front banner in Cherry Cobbler ink using the Evergreen Elegance stamp set – on a Basic White strip
  • Cut the banner with this beautiful die using the Seasonal Labels Dies (this is in the Jul-Dec Mini Catalog on page 17 and is part of the Christmas Season bundle)
  • Adhere the die cut sentiment banner to a piece of Soft Succulent card stock 1 1/8 x 4 1/4
  • Close the card and adhere the banner with dimensionals on the left side only
  • Add Holiday Rhinestone Basic Jewels to the banner and to the tree – voila! Beautiful, right?
Diagonal Gatefold C’mas.4

This card will need a handmade envelope as the finished size is 5 1/2 x 6. I will include directions for the envelope in tomorrow’s post. 🙂

If you do not have a demonstrator and need a Jul-Dec 2021 Mini Catalog, please reach out to me – happy to send one to you. And when I send it, there will be a Sale-a-bration catalog in with it! That means more FREE items to choose from with every order of $50, or $100 or multiples of that. Please also use my current host code 4TKMUNQH when ordering. I offer my customers a free item from Stampin’ Up! valued to $10 with your order of $50 and above. Click here to go my store. When the order is over $150, you still receive that free gift from me, but SU! has Stampin’ Rewards that may be used for additional products, so don’t use the host code at that time. If you have questions just let me know. If you would like to be able to order products early from catalogs AND enjoy that 20% discount, join my team now… you may do that here. We have lots of fun and are a creative bunch that encourages & supports one another. Would love to have you!

Stampin’ Up! has some of the most beautiful Designer Series Papers on the market – and right now they have a sale on select DSP at 15% off the market price. Here are more details.

DSP Sale 2021

Sale runs until August 2 – just days away!

  • All order types qualify for this promotion.
  • There is no limit to how many packages of Designer Series Paper may be purchased during this promotion.
  • Only select Designer Series Papers are available at a 15% discount during this promotion.
  • Orders must be placed—and closed—during the promotion period for the 15% discount to apply.
  • Designer Series Paper ordered as part of a Starter Kit or with Stampin’ Rewards qualify for the 15% discount.
ITEMPAGEDESCRIPTIONPRICE
155841130BEAUTY OF THE EARTH 12″ X 12″ (30.5 X 30.5 CM) DESIGNER SERIES PAPER$11.50 USD | 15.75 $ CAD
$9.78 USD | 13.39 $ CAD
155696131BLOOM WHERE YOU’RE PLANTED 12″ X 12″ (30.5 X 30.5 CM) DESIGNER SERIES PAPER$11.50 USD | 15.75 $ CAD
$9.78 USD | 13.39 $ CAD
155499131HAND-PENNED 12″ X 12″ (30.5 X 30.5 CM) DESIGNER SERIES PAPER$11.50 USD | 15.75 $ CAD
$9.78 USD | 13.39 $ CAD
152494132IN GOOD TASTE 12″ X 12″ (30.5 X 30.5 CM) DESIGNER SERIES PAPER$21.00 USD | 29.00 $ CAD
$17.85 USD | 24.65 $ CAD
155817132IN THE WILD 12″ X 12″ (30.5 X 30.5 CM) DESIGNER SERIES PAPER$11.50 USD | 15.75 $ CAD
$9.78 USD | 13.39 $ CAD
155807132PANSY PETALS 12″ X 12″ (30.5 X 30.5 CM) DESIGNER SERIES PAPER$11.50 USD | 15.75 $ CAD
$9.78 USD | 13.39 $ CAD
155605133SWEET SYMMETRY 12″ X 12″ (30.5 X 30.5 CM) DESIGNER SERIES PAPER$11.50 USD | 15.75 $ CAD
$9.78 USD | 13.39 $ CAD
155718133TIDINGS OF CHRISTMAS 6″ X 6″ (15.2 X 15.2 CM) DESIGNER SERIES PAPER$11.50 USD | 15.75 $ CAD
$9.78 USD | 13.39 $ CAD
155686134YOU’RE A PEACH 12″ X 12″ (30.5 X 30.5 CM) DESIGNER SERIES PAPER$11.50 USD | 15.75 $ CAD
$9.78 USD | 13.39 $ CAD

Remember that Aug 3 is the start of the Jul-Dec 2021 Mini Catalog.

July–December 2021 Mini Catalogue

During a portion of the mini catalog, there are also Sale-a-bration opportunities. What that means is when you purchase $50 or $100 worth of products, SU! is offering FREE product in the way of stamps, paper and even a die that are only offered during this time frame: Aug 3 – Sep 30. In other words, purchasing any SU! product during the time of Sale-a-bration will get you FREE product! And remember – you also get an item of choice valued at $10 from me when your purchase is $50 plus (before tax & shipping)

06.21_HEADER_SAB_ENG

Below is some information about a Sales Tax Holiday for particular states

US SCHOOL SUPPLY SALES TAX HOLIDAY

Eleven states will be offering a sales tax holiday for school supplies during the months of July or August. Products that are eligible according to the statute include “items normally used by students in a standard classroom for educational purposes.” To see the names of participating states, products exempted from tax, and sales tax holiday dates, click here.

Please note that you must place your order with Stampin’ Up! during the tax holiday period in order to receive these items tax-free (which is midnight on the first day to midnight on the last day of the tax holiday). Also, keep in mind that this is a state sales tax holiday; the state statute may not apply to county, city, and special jurisdiction taxes.

If you have customers who live in states who benefit from the sales tax holiday (yay!), be sure to give them a call and let them know.

Note: Georgia, Louisiana, and Wisconsin have suspended the sales tax holiday for this year.

Thanks for stopping by. May you have a beautiful day. Inspire. Create. Share. Nothing beats a handmade card!

Stampin’ Up! Painted Christmas Suite

Yesterday I indicated today’s card would b e from the new catalog – and it definitely IS! This Painted Christmas Suite has just beautiful products in it: Gold Holly Leaves; two stamp bundles (yes! TWO!), ribbon (not used on this card), and gorgeous, gorgeous Designer Series Paper.

Painted C’mas Suite.1

Here you can see the Gold Holly Leaves (adhered with a glue dot), these extra fun banner dies, and the stunning pine cone dies. The pine cone dies are in two parts: a more solid background and the more intricate top layer. I die cut the more solid layer in Basic White then there were a couple of single pine cone dies with the intricate pattern – and those were die cut from Shimmer paper. (there is also a large intricate die, but I chose not to use that here.) These were adhered to the DSP with liquid glue.

The sentiment banner is two separate dies and the cute little white ‘add on’ are also part of it. The larger is die cut from Evening Evergreen card stock and layered on the card with dimensionals. The small white pieces were added with just a dot of liquid glue. The sentiment is from Christmas to Remember stamp set (in the suite of products), stamped in Evening Evergreen and added with dimensionals. Then the Gold Holly Leaves were attached with glue dots.

The layers are: Evening Evergreen card base, Basic White and the Painted Christmas DSP.

Painted C;mas Suite.2

For the inside the sentiment is from the Painted Christmas stamp set and the pine needles are from Christmas Season stamp set – both stamped in Evening Evergreen on the Basic White panel.

Painted C’mas Suite.3

Here it is much easier to see how beautiful this piece of DSP is – on the envelope flap. And the pine needle stamp is the same used on the inside of the card stamped in Evening Evergreen.

This suite of products includes two stamp bundles: Christmas Season, which includes images of pine cones, berrries, leaf spray, holly leaves and more and it’s coordinating Seasonal Labels Dies; and Christmas To Remember stamp set that has various sentiments and it’s coordinating Christmas Pinecone Dies that includes the dies (and more) that I used on the card front. As mentioned earlier, this suite also includes the Gold Holly leaves, the ribb on and the DSP – all to coordinate. They may b e found on pages 16-19 of the Jul-Dec Mini Catalog.If you do not have a catalog, nor a demonstrator, I can help you with that. 😁 Items from this catalog will be available to customers August 3.

If I can help you in any way to order these items, or others, please give me a holler. As a thank you to my customers, when the order is between $50-$150 I offer a SU! item of your choice valued at $10. Remember to use MY NEW HOST CODE for July – 4TKMUNQH . When the order is over $150, you still receive that free gift from me, but SU! has Stampin’ Rewards that may be used for additional products, so don’t use the host code at that time. If you have questions just let me know. If you would like to be able to order products early from catalogs AND enjoy that 20% discount, join my team now… you may do that here. We have lots of fun and are a creative bunch that encourages & supports one another.

Stampin’ Up! C’mas Card w/ Blends / Alcohol

WooHoo! It is Jul 1 ~ and do you know what that means? 15% off select Designer Series Papers – Yippee! I’m placing my order right after this post goers live – oh, and you can find more information below.

Today’s card is super simple but does take some planning ahead to create the ‘backdrop’ or your own DSP. Here’s the card…

Can you see the use of the Evergreen Forest 3D Embossing Folder? I think the second photo shows it better. I was hoping it would show more, but it doesn’t so much. I love the look though. And the Gilded Leafing in a few places adds an elegant element and it kinda looks like lightning going through the trees. The front sentiment comes from the Poinsettia Petals stamp set, gold embossed & die cut with the Ornate Layers Dies then layered on a larger panel of Just Jade card stock.This sentiment banner was mounted on dimensionals and added to the card front. I added three Holiday Gems for a bit of glam 🙂

Steps for making the card front:

  • Begin with a panel of Vellum 4 1/4 x 5 1/2
  • With the darkest of Stampin’ Blends, add color to the Vellum. Here I used Dk. Just Jade & Dk. Granny Apple Green.
  • Spritz with 91% or greater Alcohol just till colors begin to ‘move’. If necessary, lift the Vellum for the alcohol to run a bit. The Vellum will curl some on the edges but once you have the colors the way you want them, just leave it flat to dry. This does not take very long. You can work on the rest of the card while waiting OR you can use the low setting on your heat tool to help it dry faster.
  • Once the Vellum is dry, trim to the size desired (I cut this to 4 x 5 1/4) and reserve the cut pieces.
  • Adhere it to a panel of Basic White – same size. There are two ways to do this…
    • Idea 1: Use a piece of sponge and lightly add liquid glue all over the card stock, then adhere Vellum to it.
    • Idea 2: Use Stampin’ Seal along the edges and a swipe down the middle of the Basic White panel. It’s important to get it to the edge of the card stock as the Vellum can still curl.
  • Run through the Evergreen Forest Embossing Folder
  • Adhere this Vellum/ Basic White to a layer of Gold Foil Sheets cut slightly larger (4 1/8 x 5 3/8) with liquid glue.
  • Adhere this to the card base (Just Jade 4 1/4 x 11 scored at 5 1/2) – again with liquid glue.
C’mas Card w/ Blends/ Alcohol.1

For the inside of the card…

C’mas Card w/ Blends/ Alcohol.2

On a panel of Basic White, adhere one of the remaining strips with Stampin’ Seal. Stamp the tree in Evening Evergreen ink stamped off once, then the ‘grass’ in Just Jade, also stamped off. Adhere the panel to the inside of the card with liquid glue. This tree & grass is from the Evergreen Elegance stamp set.

For the envelope…

C’mas Card w/ Blends/ Alcohol.4

Adhere the remaining Vellum strip to the envelope front w/ Stampin’ Seal. Stamp the flap in full strength Just Jade ink using the ‘splotch’ from the Artistically Inked stamp set.

Love how this turned out! And creating the card front with Vellum, Blends & Alcohol was freeing…. In other words, it is creativity at work. I encourage you to try this using various colors. What’s to lose?

Products for todays project are from the 2021-22 Annual Catalog. They may be found in the list below. I’ve made it easy for you to simply ‘add all to cart’. If I can help you in any way to order these items, or others, please give me a holler. As a thank you to my customers, when the order is between $50-$150 I offer a SU! item of your choice valued at $10. Remember to use MY NEW HOST CODE – 4A6RJ2TA . When the order is over $150, you still receive that free gift from me, but SU! has Stampin’ Rewards that may be used for additional products, so don’t use the host code at that time. If you have questions just let me know. If you would like to be able to order products early from catalogs AND enjoy that 20% discount, join my team now… you may do that here. We have lots of fun and are a creative bunch that encourages & supports one another.

OK… here’s more info on the 15% off Designer Series Paper SALE!

Jul 1 – Aug 2 is a new promotion by Stampin’ Up! – 15% OFF SELECT DESIGNER SERIES PAPERS.

  • All order types qualify for this promotion.
  • There is no limit to how many packages of Designer Series Paper may be purchased during this promotion.
  • Only select Designer Series Papers are available at a 15% discount during this promotion.
  • Orders must be placed—and closed—during the promotion period for the 15% discount to apply.
  • Designer Series Paper ordered as part of a Starter Kit or with Stampin’ Rewards qualify for the 15% discount.
TEMPAGEDESCRIPTIONPRICE
155841130BEAUTY OF THE EARTH 12″ X 12″ (30.5 X 30.5 CM) DESIGNER SERIES PAPER$11.50 USD | 15.75 $ CAD
$9.78 USD | 13.39 $ CAD
155696131BLOOM WHERE YOU’RE PLANTED 12″ X 12″ (30.5 X 30.5 CM) DESIGNER SERIES PAPER$11.50 USD | 15.75 $ CAD
$9.78 USD | 13.39 $ CAD
155499131HAND-PENNED 12″ X 12″ (30.5 X 30.5 CM) DESIGNER SERIES PAPER$11.50 USD | 15.75 $ CAD
$9.78 USD | 13.39 $ CAD
152494132IN GOOD TASTE 12″ X 12″ (30.5 X 30.5 CM) DESIGNER SERIES PAPER$21.00 USD | 29.00 $ CAD
$17.85 USD | 24.65 $ CAD
155817132IN THE WILD 12″ X 12″ (30.5 X 30.5 CM) DESIGNER SERIES PAPER$11.50 USD | 15.75 $ CAD
$9.78 USD | 13.39 $ CAD
155807132PANSY PETALS 12″ X 12″ (30.5 X 30.5 CM) DESIGNER SERIES PAPER$11.50 USD | 15.75 $ CAD
$9.78 USD | 13.39 $ CAD
155605133SWEET SYMMETRY 12″ X 12″ (30.5 X 30.5 CM) DESIGNER SERIES PAPER$11.50 USD | 15.75 $ CAD
$9.78 USD | 13.39 $ CAD
155718133TIDINGS OF CHRISTMAS 6″ X 6″ (15.2 X 15.2 CM) DESIGNER SERIES PAPER$11.50 USD | 15.75 $ CAD
$9.78 USD | 13.39 $ CAD
155686134YOU’RE A PEACH 12″ X 12″ (30.5 X 30.5 CM) DESIGNER SERIES PAPER$11.50 USD | 15.75 $ CAD
$9.78 USD | 13.39 $ CAD
Customer Flyer

Thanks for stopping by. May you have a beautiful day. Inspire. Create. Share. Nothings beats a handmade card.

Stampin’ Up! Paper Pumpkin Leftovers

Sometimes when we make our Paper Pumpkin kits, there are left overs, remains, pieces. Yesterday I was doing a little tidying (and boy did it need it!) and came across the November PP box. Inside were some parts to the kit, not many, but my mind clicked and I made one more Christmas card. Here it is…

November PP leftovers

Recognize those flowers? I really like how this turned out… Crumb Cake card base & layer, ‘Tis the Season 6×6 DSP, Square Vellum Doilies, the flowers, Cherry Cobbler Linen Thread from the kit, Whisper White banner and the foil sentiment from the kit ~ three major items from the kit made this card! I’m pleased as punch. 😏

I began with the Crumb Cake card base 8 1/2 x 5 1/2, scored at 4 1/4. I had another piece of Crumb Cake card stock handy (4 x 5 1/4) and ran it through the Subtle 3D Embossing Folder and adhered it with liquid glue to the card front. Next I took one of the papers in ‘Tis the Season 6×6 DSP and cut it to a bit larger than the Square Vellum Doily (3 1/4 square). I adhered the vellum to the paper with Stampin Seal. Next I added the two flowers left over from the November Paper Pumpkin kit – on dimensionals, and covered just the flower in Wink of Stella. Between them is a several looped bow using the Cherry Cobbler Linen Thread from the kit, adhered with a glue dot. I cut a Whisper White banner 5/8 x about 4 3/4 and trimmed the ends with the Banner Pick a Punch. To this I added the foil sentiment piece – again from the November PP kit – with tiny dots of liquid glue. The banner was adhered to the flowers with liquid glue. This whole 3 1/4″ square was adhered to the Crumb Cake card with dimensionals – and the front was complete. OH! I did add three Wonderful Gems to the banner :}

Although I forgot to take a picture (and the card is mailed already!) for the inside, I had a panel of Whisper White 4 x 5 1/4 stamped in Just Jade ink with a portion of one of the sentiments from the Joy to the World stamp set from the November Paper Pumpkin kit. This was adhered with liquid glue to the inside of the card. For the envelope, I simply took another piece of the ‘Tis the Season 6×6 DSP (2 1/2 x 6) and adhered it to the envelope flap & trimmed to fit. I stamped the word ‘Joy’ from the Joy to the World stamp set in Just Jade ink and the card/ envelope were done.

November PP leftovers

The December Paper Pumpkin kit arrived in my mailbox yesterday and I can’t wait to work on it. Paper Pumpkin is just full of surprises ~ sometimes cards to put together, sometimes boxes or bags. Stampin’ Up! is very creative in all their kits and I encourage you to try it. You don’t necessarily have to purchase a full year, try a month or three month membership. The January Paper Pumpkin kit is available to order through Jan 10, 2021, so think about it, just not too long! Below are more details about that kit. Click on the Sending Hearts photo to subscribe. ❤️

ABOUT THE JANUARY KIT

Name Sending Hearts

Details

  • Kit contains enough supplies to create eight cards—four each of two designs—and coordinating envelopes.
  • Card size: 4-1/4″ x 5-1/2″ (10.8 x 14 cm)
  • Envelope size: 4-1/2″ x 5-3/4″ (11.4 x 14.6 cm)
  • Coordinating colors: Basic Black, gold, Petal Pink, Poppy Parade, Smoky Slate, white

ABOUT THE ADD-ON

Name Little Love Boxes

Details

  • Add-on contains 20 printed mini boxes and 24 die-cut decorative pieces and sentiment labels.
  • Item number: 156842
  • Price: $8 USD/$11 CAD 
  • Available 1 January, while supplies last!

Products used for today’s project may be found below. As a thank you to my customers, when the order is between $50-$150 I offer a SU! item of your choice valued at $10. Remember to use MY CURRENT HOST CODE SAZV3JTK– good until Jan 3. When the order is over $150, you still receive that free gift from me, but SU! has Stampin’ Rewards that may be used for additional products 😁

WooHoo! Stampin’ Up! has gone over the top… check out the Giant Year-end sale here

Sale Dates:  December 8, 2020 through January 4, 2021

  • No minimum purchase required.
  • Retiring items are available while supplies last.
  • Exclusions apply: Carryover items will not be discounted.
  • Due to increased shipping times and possible shipping delays during the month of December, we can’t guarantee delivery before Christmas.
  • Ordering Deadlines:  January 4, 2021 at 11:50 PM (MT)

Shop early!  The items that are retiring are only while supplies last!!

Thanks for stopping by.

May you have a beautiful day.

Make someone happy sending them a handmade card filled with love.

Stampin’ Up! Heartwarming Hugs Fun Fold

Hi there! I’ve been mailing catalogs to my customers and including a card with instructions as part of the package. All of a sudden I realized I needed two more… so got busy and created these. I blogged about this fun fold some time ago and you can find that post here.

Heartwarming Hugs Easel card – #1

The directions and card stock cuts are the same, I just used different DSP and I like this too! I’ll list the card stock cuts again for your convenience. 🙂

Products used:

  • Wrapped in Christmas stamp set (circular stamp)
  • Freezin’ Fun stamp set (banner for easel)
  • 1 1/2″ Circle Punch
  • Starburst Punch or 2″ Circle punch
  • Classic Label Punch
  • Heartwarming Hugs DSP
  • Red Foil Sheets
  • Mossy Meadow card stock
  • Whisper White card stock
  • Real Red ink

Card stock cuts:

  • Card base: 8 1/2 x 5 1/2, scored at 4 1/4. Make cuts in card front panel to the score line at 1 1/2″ & 4″
  • DSP side strips: ~ (2) 1 3/8 x 4 1/8
  • DSP center panels ~ (2) 2 3/8 x 2
  • Whisper White card stock ~ 3 x 4 1/8 + scraps for circular stamp and banner sentiment
  • Red Foil Sheets – punch 2″ circle

Directions:

  • Prepare card base as described in cardstock cuts
  • Adhere DSP strips to side panels of card front with liquid glue
  • Adhere Whisper White panel to inside card with liquid glue
  • Adhere side panels to card back with liquid glue, overlapping the Whisper White panel
  • Fold the center (loose) panel in half and burnish well
  • Adhere the remaining 2 DSP panels to top & bottom sections just folded in half
  • Stamp banner sentiment (for the easel) in Real Red ink using the Freezin’ Fun stamp set. Punch with the Classic Label Punch. Adhere to a strip of Mossy Meadow 5/8 x 2 ¼. Put dimensionals on back and adhere to the Whisper White panel of the card about ¾” from bottom
  • Stamp circle sentiment using the Wrapped in Christmas stamp set in Real Red ink on Whisper White card stock and punch with 1 ½” circle punch
  • Punch a 2” circle from Red Foil Sheets paper.
  • Adhere stamped circle to this glimmer paper. HINT: suggest using Stampin’ Seal to adhere stamped piece to the foil – no slippage! Put dimensionals on the LOWER HALF of this circle and adhere just at the fold

Your card is complete ~ enjoy!

Heartwarming Hugs Easel card – #2

So I’m curious which card you prefer ~ the DSP combination on the left, or the one on the right? Truly, I can’t decide!

Products used for today’s project may be found below. As a thank you to my customers, when the order is between $50-$150 I offer a SU! item of your choice valued at $10. Remember to use MY CURRENT HOST CODE SAZV3JTK– good until Jan 3. When the order is over $150, you still receive that free gift from me, but SU! has Stampin’ Rewards that may be used for additional products 😁

Thanks for stopping by.

May you have a beautiful day.

Make someone happy sending them a handmade card filled with love.

WooHoo! Stampin’ Up! has gone over the top… check out the Giant Year-end sale here

Sale Dates:  December 8, 2020 through January 4, 2021

  • No minimum purchase required.
  • Retiring items are available while supplies last.
  • Exclusions apply: Carryover items will not be discounted.
  • Due to increased shipping times and possible shipping delays during the month of December, we can’t guarantee delivery before Christmas.
  • Ordering Deadlines:  January 4, 2021 at 11:50 PM (MT)

Shop early!  The items that are retiring are only while supplies last!!

Stampin’ Up! Money or gift card holder

It’s that time of year, isn’t it – for giving gifts of appreciation and thanks. Today’s post shares gift holders I made to hold cash or a check or a gift certificate. If you wanted to use a gift card, it will certainly fit.

Money holder

Aren’t these pretty? Details? Here ya go!

  • Card base… 7 1/4 wide x 7 in height
    • score ON SHORT SIDE @ 1 5/8 & 4 5/8
    • mark the bottom center ON THE LONG SIDE and punch with 3/4″ punch
    • burnish score line
    • adhere tear n tape to the bottom section on the inside to create a pocket
  • Cut and add DSP:
    • 7 x 2 1/4; 7 x 1 3/8 and 7 x 2 3/4 for the back (not shown completed above)
    • the lower panel needs a punch as well – I suggest after adhering, simply use the same punch in the same spot
    • all panels were adhered with liquid glue
  • remove tear n tape covering and adhere the lower section to the middle and voila!
Money holder – #3

All you need to do now is a belly band…

  • card stock 1 x about 6- 61/4
    • beginning at the back of the envelope, wrap the strip around to the front so the lower portion of the strip is under the upper portion of the strip. I tried to make the upper strip meet at the edge of tghe upper strip.
    • Adhere the two ends together with liquid glue. Once good and dry, remove the band, burnish the folds and decorate.

Each sentiment panel width and length varied depending on the sentiment used. I embellished with a punched image or a die cut image then adhered that to the strip and the strip adhered to the band, covering the area where the two ends meet. Make sense?

Starting with the top pocket hold, here are the various products used:

  • Pretty Peacock card stock for the base, covered with Brightly Gleaming Specialty DSP. The sentiment panel is Very Vanilla card stock using the Christmas Gleaming stamp set for the sentiment and the ornament. The ornament was punched with the Gleaming Ornaments Punch Pack. Pretty Peacock ink. The banner was trimmed on the end with the Banners Pick a Punch.
  • #2 pocket holder begins with Pacific Point card stock covered with the Snowflake Splendor DSP. The sentiment panel is Whisper White card stock stamped with the Snowflake Wishes stamp set in Pacific Point ink. The snowflake was first stamped with a snowflake in Pacific Point ink on Whisper White card stock from the same stamp set then die cut with the So Many Snowflake Dies.
  • #3 pocket holder begins with Highland Heather card stock covered with another piece of this fabulous Snowflake Splendor DSP. The sentiment panel is Whisper White card stock stamped with a sentiment from Christmas Gleaming stamp set in Pacific Point ink. The snowflake is Balmy Blue Glimmer Paper die cut with So Many Snowflake Dies.

And there you have it – a great project that doesn’t take a huge chunk of time and is beautiful to give and receive! Products used for today’s project may be found below. As a thank you to my customers, when the order is between $50-$150 I offer a SU! item of your choice valued at $10. Remember to use MY CURRENT HOST CODE SAZV3JTK– good until Jan 3. When the order is over $150, you still receive that free gift from me, but SU! has Stampin’ Rewards that may be used for additional products 😁

Thanks for stopping by.

May you have a beautiful day.

Make someone happy sending them a handmade gift filled with love.

WooHoo! Stampin’ Up! has gone over the top… check out the Giant Year-end sale here

Sale Dates:  December 8, 2020 through January 4, 2021

  • No minimum purchase required.
  • Retiring items are available while supplies last.
  • Exclusions apply: Carryover items will not be discounted.
  • Due to increased shipping times and possible shipping delays during the month of December, we can’t guarantee delivery before Christmas.
  • Ordering Deadlines:  January 4, 2021 at 11:50 PM (MT)

Shop early!  The items that are retiring are only while supplies last!!

Stampin’ Up Wrapped in Christmas Easel Card

So sorry for the late post – hubby and I bought a fresh cut tree yesterday and it was extra heavy- it took both of us to carry it in and get it set up. Then lights, etc…. No, not done yet; hubby is still working on the lights. I’ll share a picture Monday as we won’t get it done until late Sunday afternoon. 🌲🎄🤶🏻

Such fun making this card… an easel card – which I haven’t made in some time. One of my teammates sent an easel card and I was inspired to create several.

Wrapped in Christmas with Snowflake Splendor Easel card – #1

I love the bling from the Balmy Blue Glimmer Paper. Hear are details on how to do this…

  • Cardstock base is 8 1/2 x 11, scored at 4 1/4 (this happens to be Misty Moonlight, but I also used Pacific Point card stock which coordinates with the DSP. When I used Pacific Point card stock, I also used Pacific Point ink.
  • Use your paper trimmer to make two cuts JUST TO THE SCORE LINE on the card front: 1 1/2 & 4
  • Fold the center portion in half and burnish well with your bone folder. This becomes the stand up on the card.
  • Cut 2 strips of Snowflake Splendor DSP and adhere with liquid glue to the side panels
  • Cut 2 additional panels of coordinating Snowflake Splendor DSP and adhere with liquid glue to the center folded panel, one piece above the fold, the other below it. NOTE: I think it looks best if these pieces are cut so the pattern on the DSP matches top to bottom panels
  • Cut a panel of Whisper White and adhere to the INSIDE of the card, centering
  • Adhere side panels to card base with liquid glue.
  • Stamp the sentiment from Freezin’ Fun stamp set in Misty Moonlight ink on Whisper White. Punch out with the Classic Label Punch. Adhere to a strip of Misty Moonlight with liquid glue. Put dimensionals on back and adhere to the Whisper White panel, about 3/4″ from bottom. This creates the easel :O) and allows the upper panel to stand up.
  • Punch a starburst with the Starburst Punch (OOPS! retired item 😞)and Balmy Blue Glimmer Paper
  • Stamp the sentiment from Wrapped in Christmas in Misty Moonlight ink and punch with the 1 1/2″ circle punch. Adhere to the Glimmer paper. NOTE: by scrapping some of the ‘glimmer’ away the paper will adhere more readily. Add liquid glue to that area and bingo, the sentiment adheres.
  • Put dimensionals ON THE LOWER HALF of the Glimmer Paper and attach to the lower center panel near the fold line. Because the lower sentiment is on dimensionals, this allows the upper portion of the card to ‘stand’.
Wrapped in Christmas with Snowflake Splendor Easel Card – #2

I have made several of these, which I don’t usually do, but they were fun and easy and look pretty neat. Notice how the color variations in the DSP make the cards look so different. Hope you enjoyed this design. Card cuts will be listed at the end of this post. Let me know if you have questions.

Card cuts:

  • Card base: 8 1/2 x 11, scored at 4 1/4: top of the card cut to score line at 1 1/2″ and 4″
  • DSP strips for side panels- 1 3/8 x 4 1/8 (cut 2)
  • DSP panels for folded area – 2 3/8 x 2 (cut 2)
  • Whisper White – 3 x 4 1/4 + banner sentiment + circle sentiment
  • Misty Moonlight / Pacific Point for sentiment banner 2 1/4 x 5/8
  • Glimmer paper – use circle dies for 1 3/4 or slightly larger frame for circle sentiment

Thanks for stopping by.

May you have a beautiful day.

Make someone happy sending them a handmade card filled with love.