Stampin’ Up! Creating Own Background w/ Hand-Penned

Hi Everyone – it’s a rainy Sunday. How the plants have loved the cool weather and Spring rains! It really helps them get established with strong roots, which leads to our roots. What are your strong roots? What is it that keeps you grounded? Great question, right? And one that requires some thought. I’m going to suggest you write those ideas down on paper. Writing them down helps confirm them, makes them more real, firms them in your head and can encourage action in one direction or another.

Today’s ‘action’ or creation is one where we create our own background and I’ve used a new bundle called Hand-Penned. It’s lovely and looks a bit like watercolor – it’s fluid. And I’ve coordinated two of the new In Colors: Polished Pink and Pale Papaya, which would not have occurred to me to do at one point. But I like this combo along with Flirty Flamingo. Let’s take a look.

Creating own background w/ Hand-Penned – #1

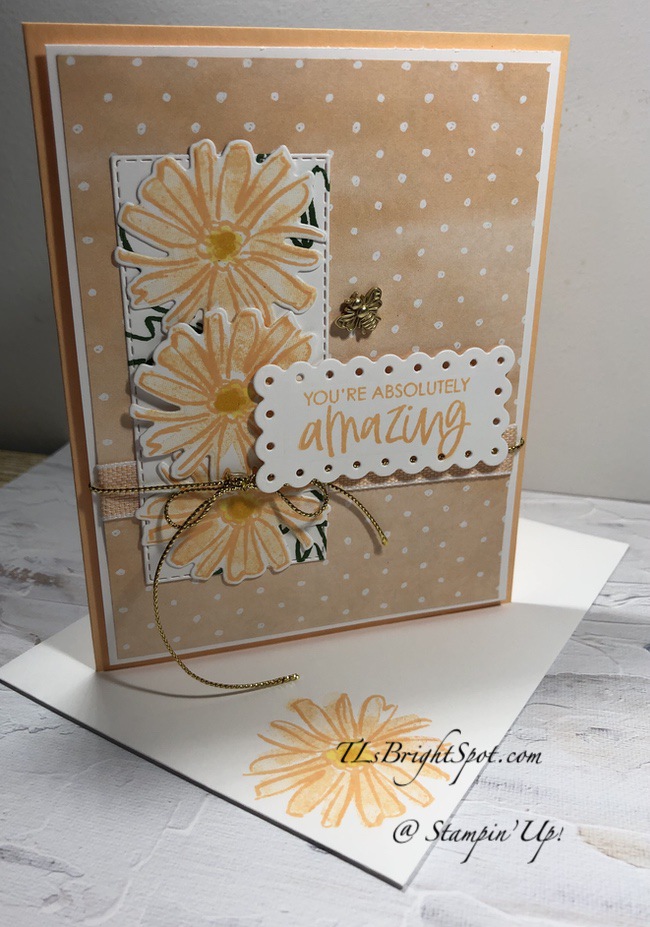
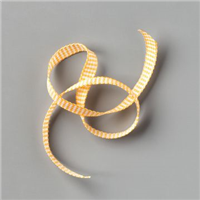
I began by stamping the floral pattern randomly on a Basic White panel with Polished Pink ink. It’s a fairly large stamp so it only took a couple of times to cover the panel. Then I played with several filler colors before settling on stamped-off Flirty Flamingo ink. This took a bit of time to fill in all the areas – and I’ve said before I rather lean toward monochromatic. That means leaves and flowers all were stamped with the stamped-off once Flirty Flamingo ink. And notice it doesn’t fill in the entire leaf or flower – a bit like watercolors. Nor is it a perfect match for all the flowers – it’s fluid, giving it an easy look. Once done I played with colors for the mat, knowing I wanted a contrast but something soft, and settled on the Pale Papaya. What do you think? I really like it… it’s like a neutral that makes the pink pop but not too much. Because of the mat, I wanted to use more of that on the front to tie it in and chose to use one of the new ribbons: Pale Papaya & White 1/2″ ribbon and simply folded it back on itself. I attached it to the card front with Stampin’ Seal but could have used a glue dot or two just as easily. I then took the Penned Flower Dies and die cut one in Pale Papaya card stock. I stamped the sentiment in Polished Pink ink on a scrap of Basic White card stock and die cut it with the Ornate Frames Dies. I die cut a background layer, again with the Ornate Frames dies, but in Polished Pink card stock. I popped the Basic White sentiment on with dimensionals, added dimensionals to the Polished Pink panel and layered it over the die cut flower flourish (which had been adhered with spots of liquid glue). For a bit of glam, I added three In Color Rhinestones in Pale Papaya. This entire front panel was adhered to the Polished Pink card base with dimensionals – and the front was done.

Creating own Background w/ Hand-Penned, inside – #2

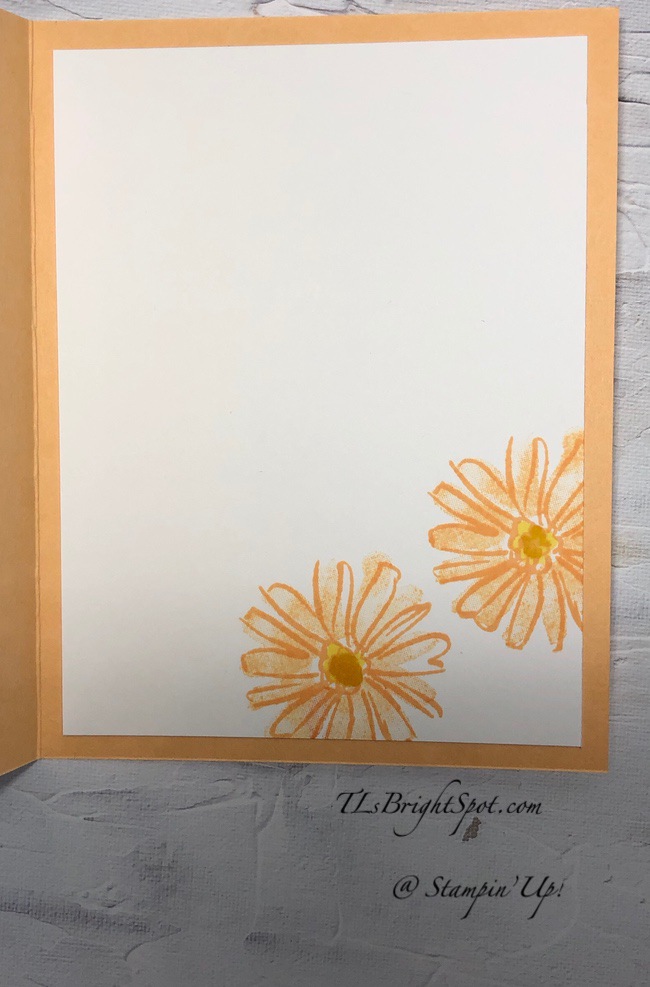
For the inside, I did the same as with the front: stamped the outline of the floral image with Polished Pink ink in the two corners of a Basic White panel, then stamped the filler stamps with stamped-off once Flirty Flamingo ink. I layered this on another Pale Papaya card stock then into the inside of the card – and the card was complete.

Creating own Background w/ Hand-Penned – #3

For the front of the envelope, I followed the same procedure: stamped the outline of the floral image in Polished Pink ink then used the filler stamps, stamped off once with Flirty Flamingo ink. Voila! I really really like this color combo! The Flirty Flamingo with the Polished Pink is a great combinations and using Pale Papaya as an off-set neutral worked.

I hope you like the card and have this Hand-Penned bundle as on your list for a first purchase. It is gorgeous.
The new items will be available soon – May 4, so make that list! If I can help you in any way, please let me know. If you do not have a demonstrator and need a catalog, I’m happy to get one to you. For nay purchases through me, please use my

CURRENT HOST CODE: 2HWX9GEA, good Apr 16-30

If I can help you in any way to order these items, or others, please give me a holler. As a thank you to my customers, when the order is between $50-$150 I offer a SU! item of your choice valued at $10. Remember to use MY CURRENT HOST CODE – 2HWX9GEA – good Apr 16-30 . When the order is over $150, you still receive that free gift from me, but SU! has Stampin’ Rewards that may be used for additional products, so don’t use the host code at that time. If you have questions just let me know. Card cuts are listed at the bottom of this post. If you would like to be able to order products early from catalogs, join my team now… you may do that here. We have lots of fun and are a creative bunch that encourages & supports one another.

For items available to purchase now, please see the list below.

I am offering Designer Series Paper Shares for the new 2021-2022 Annual Catalog. Please see my offer below.

Trying some of the NEW Designer Series Paper from the 2021-2022 Annual Catalog gets you in the spirit of creating with some gorgeous papers. I’m offering a Designer Series Paper share from that Annual Catalog and it would be my pleasure to supply you!  I‘ll place my share order early on May 4 and use the expedited shipping option so I should be able to have the shares cut, bundled and back out to you that very next week. Please place your order with me by May 2 @ 9 PM ET.

TLsBrightSpot 2021-2022 Annual Catalog

Designer Series Paper Shares!

New Designer Series Paper Share – $55.00 plus $7.75 for Priority Mail shipping

You will receive one 6×6 sheet of each design from the following DSP packs (the number behind the name indicates how many 6×6 sheets of that paper pack you will receive):

  • Beauty Of The Earth – 6
  • Bloom Where You’re Planted – 6
  • Expressions In Ink Specialty – 6
  • Hand-Penned – 6
  • In The Wild – 6
  • Pansy Petals – 6
  • Simply Elegant Specialty – 6
  • Sweet Symmetry – 6
  • Tidings Of Christmas 6″ x 6″ – 6
  • You’re A Peach – 6
  • 2020-2022 In Color 6″ x 6″ – 10
  • 2021-2023 In Color 6″ x 6″ – 10
  • Brights 6″ x 6″ – 20
  • Neutrals 6″ x 6″ – 20
  • Regals 6″ x 6″ – 20
  • Subtles 6″ x 6″ – 20
  • Ombre Specialty – 4 (one of each color)
  • 2021-2023 In Color Shimmer Vellum – 5 (one of each color)
  • Gold & Rose Gold 6″ x 6″ – 2 (one of each color)
  • Linen Specialty – 1
  • Ombre Gift Bags – 5 (one of each color)

In all, you’ll receive 172 – 6” x 6” sheets of designer or specialty paper plus the awesome food safe gift bags!

Double DSP Share – $110 + $8 Shipping by Priority Mail – if you’d like double shares of the designer paper, I can do that as well. The designer paper sheets will be cut into 6×12 so that you’ll be able to get 3 full A2 size card fronts from each sheet (Tidings Of Christmas, 2020-2022 In color, 2021-2023 In Color, Brights, Neutrals, Regals, Subtles and Gold & Rose Gold 6×6, you’ll get double sheets of those since they’re already precut).

FREE Gift from me! – As a bonus for joining my share, you’ll get a sampling of the new host exclusive Pattern Party 12″ x 12″ Designer Series Paper!

Anyone is welcome to join in my share (please note, I can only ship to addresses within the US).  If you’d like to join, either complete the form below or email the following information to tlsbrightspot@gmail.com.

  • Your first and last name
  • Your share selection
  • The email address that is connected to your Paypal account. I only accept Paypal for payment unless you are a customer of mine.  If you are a customer, I will accept payment by check.  ***You do not need to have a Paypal account to pay the invoice, you can choose to pay by credit card without having a Paypal account.

Deadline to sign up for my share is Sunday, May 2 at 9:00 PM ET.

Stampin’ Up! Inspired Thoughts Sympathy

How’s everybody? Are you feeling as though things are getting a wee bit back? Maybe not so scary but still cautious and careful? Well, I do. Maybe it’s because it’s Spring and so much new life in nature, but somehow I feel more secure. Oh yes, still wearing a mask, still not going out much, still washing hands all the time, but I have a very positive feeling. And I’m grateful… about all kinds of things. What do you think about making a grateful list? Be detailed, name exactly what it is or who it is. Ok – don’t know why I got off on a kick like that, but no apologies for it. There are some good things that have come out of Covid. Yes, some not so good as well, but my focus is on the good. So – happy Friday!

Despite being grateful, we still have loss. Today’s card is one of sympathy and it’s made by a canopy of trees. Yes, this is a NEW 2021-2022 bundle called Inspired Thoughts that includes the Inspiring Canopy Dies. Let’s take a look at the card.

Inspired Thoughts Sympathy – #1

I wanted this to be spring trees in bloom – so imagine that, would you? And that’s a flowering shrub by the sentiment. Imagination is a wonderful thing, isn’t it. I created a bit of sky by using my Blending Brushes on the Basic White panel. I first used Balmy Blue ink, then I moved to Misty Moonlight and that gave me the effect I wanted. These trees are all one die and I die cut them in Soft Suede card stock.. And the leaves/ flowers on the trees are four different dies and I cut several of them. They are from Beauty of the Earth DSP. I’ve left open branches cuz when I look at the trees around us, there are several that have no leaves or flowers. And that’s the way these trees are.

One of the neat aspects of this die set is the trees are connected by a ‘rolling’ ground and included in the set is a curvy die. That is what has created this wonderful rolling green landscape. I used Granny Apple Green card stock to cut two panels. They actually cover the connecting ‘ground’ of the trees cuz that was Soft Suede and I wanted a spring grass – bright and new. Everything is adhered to the card base with liquid glue – I just didn’t flatten the canopy.

The sympathy banner wording is from the stamp set Inspired Thoughts and is stamped on a Basic White panel with Soft Suede ink. I die cut the banner with a Stitched Rectangle Die. This was adhered with dimernsionals at the top of the banner and a dab of liquid glue along the bottom. I added sever Champagne Rhinestones to make it look as though the flowers were being blown off by the wind – and yes, for a bit of glam as well :). This panel was attached to a slightly larger piece of Mossy Meadow card stock with liquid glue. I put dimensionals on the back and attached it to a Thick Basic White card base.

Inspired Thoughts Sympathy, inside – #2

For the inside, I used my Blending Brush again and lightly covered the Basic White panel with just Misty Moonlight ink this time. I stamped the sentiment from Inspired Thoughts stamp set in Soft Suede ink. This panel was adhered to Mossy Meadow, then to the inside of the card with liquid glue. And the card was done!

Inspired Thoughts Sympathy – #3

For the envelope i used a stamp set called Etched In Nature. Unfortunately there have been some difficulties with this set and it will not be sold, even though it is in the new catalog. I should not have used it. 😦 There are some other beautiful butterfly stamps – Positive Thoughts is one of them. I used butterflies as they are a symbol of new life, a rebirth. And when we die, there is a rebirth of our souls in another place. That’s what the butterfly signifies for me. It was stamped in Misty Moonlight ink.

Most of today’s items to make this card will be available come May 4 for customers. Other items, card stock and the inks used, the rhinestones and Blending Brushes are orderable now. If you do not have a demonstrator and would like a catalog, please contact me… TLsBrightSpot@gmail.com. I have more catalogs that just arrived 👍 Other products that CAN be ordered and be ready to make this card may be found below. I’ve made it easy for you to simply ‘add all’ to your cart 🙂 Please use my current HOST CODE 2HWX9GEA that is good Apr 16-30.

Thanks for stopping by.

May you have a beautiful day.

Make some happy sending them a handmade card filled with love.

Stampin’ Up! Color and Contour Part 2

So, I’ve played again with the Color & Contour Bundle, die cut some flowers, added some DSP and made two cards. The design was taken primarily from another demonstrator – Amy Koenders, cuz I really like her card, but I wanted to make it my own – so chose different colors etc. and here’s what I did. Thank you Amy, for the inspiration!

Aren’t these fun? So… same layout, different In Colors, different DSP, different ribbon, different card stock. I REALLY like how these turned out. Change the sentiment and you could do this card for just about anything – except masculine 🙂 NOT a man card at all…

Here’s what I did… I made two cards simultaneously, doing all the stamping for each card, just in different colors.

  • Cut a panel of DSP (3 7/8 x 5 1/8) and adhere to a slightly larger panel (4 x 5 1/4) with liquid glue.
    • For the Pale Papaya card I used Hand-Penned DSP and adhered it to Basic White
    • For the Polished Pink card, I used Pattern Party DSP and adhered it to Polished Pink card stock
  • Stitched Rectangle Dies to die cut a Basic White panel – die cut 2
  • Stamp the open leaf from the Color & Contour stamp set in Garden Green ink, randomly on the die cut panel, about 4 times. Set aside. Do 2 of these.
  • On another piece of Basic White card stock (about 2 x 5) stamp 3 flowers in outline form using Pale Papaya ink. On a panel 4 x 5 1/4, stamp the two flowers (this is for the inside)
  • Stamp this same flower on the envelope front – yep, Pale Papaya ink
  • Now do the same thing using Polished Pink ink: 3 flowers on the 2 x 5 Basic White panel, 2 flowers on the 4 x 5 1/4 and one on the front of the envelope.
  • Now go back to the Pale Papaya ink and stamp the filler for the flowers, stamping off once each time: ink, stamp off, stamp on the paper
  • Fill in the Polished Pink flowers in the same way: ink, stamp off, stamp on the paper.
  • Die cut the 3 flowers on the 2 x 5 panel: both Pale Papaya & the Polished Pink.
  • Adhere two flowers to each die cut & stamped rectangle with Stampin Seal. Adhere the center flower with a single dimensional
  • Add trim to the DSP panel:
    • for the Pale Papaya card I added Woven 1/2″ Ribbon in Pale Papaya, securing in back with Seal+
    • for the Polished Pink card I die cut the fun scallop with the largest scallop rectangle in the Scalloped Contour Dies and adhered it with liquid glue
  • Adhere the Stitched Rectangle that now has the 3 flowers on it to the DSP panel, adhering with Seal+
  • Wrap each front with ribbon:
    • for the Pale Papaya card I used a new Simply Elegant Trim in gold, wrapped it around the DSP panel and made a bow, tying it over the flowers. I adhered the bow with a glue dot.
    • for the Polished pink card I wrapped Snail Mail Twine in White around the DSP panel twice and tied a bow, securing it with a glue dot.
  • Create the sentiment panel for each card:
    • for the Pale Papaya card the sentiment is stamped in Pale Papaya ink on a Basic White piece and die cut with one of the Scalloped Contour Dies. I put dimensionals on the back and adhered it to the card front.
    • For the Polished Pink card the sentiment is stamped in – what else – Polished Pink – and die cut with a Stitched Rectangle Die. Again, Put dimensionals on the back and adhere to the card front.
  • For a final touch on the Pale Papaya card, I added a Bumblebee trinket to bring out the gold cord.
  • These front panels are adhered to their appropriate card bases with dimensionals – and the card front is complete.

For the inside of the card… the Basic White panels have already been created by doing all the stamping at once – yay.

  • For the Pale Papaya card, adhere the inside Basic White panel with liquid glue to the card base and voila – Done!
  • For the Polished pink card, adhere the Basic White panel to a slightly larger Polished Pink card stock (4 x 5 1/4) with liquid glue then into the inside of the card – and voila – Done!

You can see in the photo above the stamped envelope which we created when doing all the initial stamping. For the pale Papaya card I added more of the Hand-Penned DSP to the envelope flap. Fun! Love these cards!

Pretty soon (May 4) customers will be order from the NEW 2021-2022 ANNUAL CATALOG. If you do not have a demonstrator and need a catalog, I’m happy to send you one. Just let me know 😁.

I’m also doing a Designer Series Paper Share. What a great way to play with all the new papers without having to purchase all them.

Trying some of the NEW Designer Series Paper from the 2021-2022 Annual Catalog gets you in the spirit of creating with some gorgeous papers. I’m offering a Designer Series Paper share from that Annual Catalog and it would be my pleasure to supply you!  I‘ll place my share order early on May 4 and use the expedited shipping option so I should be able to have the shares cut, bundled and back out to you that very next week. Please place your order with me by May 2 @ 9 PM ET.

TLsBrightSpot 2021-2022 Annual Catalog

Designer Series Paper Shares!

New Designer Series Paper Share – $55.00 plus $7.75 for Priority Mail shipping

You will receive one 6×6 sheet of each design from the following DSP packs (the number behind the name indicates how many 6×6 sheets of that paper pack you will receive):

  • Beauty Of The Earth – 6
  • Bloom Where You’re Planted – 6
  • Expressions In Ink Specialty – 6
  • Hand-Penned – 6
  • In The Wild – 6
  • Pansy Petals – 6
  • Simply Elegant Specialty – 6
  • Sweet Symmetry – 6
  • Tidings Of Christmas 6″ x 6″ – 6
  • You’re A Peach – 6
  • 2020-2022 In Color 6″ x 6″ – 10
  • 2021-2023 In Color 6″ x 6″ – 10
  • Brights 6″ x 6″ – 20
  • Neutrals 6″ x 6″ – 20
  • Regals 6″ x 6″ – 20
  • Subtles 6″ x 6″ – 20
  • Ombre Specialty – 4 (one of each color)
  • 2021-2023 In Color Shimmer Vellum – 5 (one of each color)
  • Gold & Rose Gold 6″ x 6″ – 2 (one of each color)
  • Linen Specialty – 1
  • Ombre Gift Bags – 5 (one of each color)

In all, you’ll receive 172 – 6” x 6” sheets of designer or specialty paper plus the awesome food safe gift bags!

Double DSP Share – $110 + $8 Shipping by Priority Mail – if you’d like double shares of the designer paper, I can do that as well. The designer paper sheets will be cut into 6×12 so that you’ll be able to get 3 full A2 size card fronts from each sheet (Tidings Of Christmas, 2020-2022 In color, 2021-2023 In Color, Brights, Neutrals, Regals, Subtles and Gold & Rose Gold 6×6, you’ll get double sheets of those since they’re already precut).

FREE Gift from me! – As a bonus for joining my share, you’ll get a sampling of the new host exclusive Pattern Party 12″ x 12″ Designer Series Paper!

Anyone is welcome to join in my share (please note, I can only ship to addresses within the US).  If you’d like to join, either complete the form below or email the following information to tlsbrightspot@gmail.com.

  • Your first and last name
  • Your share selection
  • The email address that is connected to your Paypal account. I only accept Paypal for payment unless you are a customer of mine.  If you are a customer, I will accept payment by check.  ***You do not need to have a Paypal account to pay the invoice, you can choose to pay by credit card without having a Paypal account.

Deadline to sign up for my share is Sunday, May 2 at 9:00 PM ET.

I hope you enjoyed today’s post. Love reading your comments, thank you very much!

Thanks for stopping by.

May you have a beautiful day.

Make someone happy sending them a handmade card filled with love.

Stampin’ Up! Elegantly Said Sympathy

Sympathy cards are never easy… most of the time we know the folks pretty well and that makes it even more difficult. And that’s the case for this card. It’s going to someone with whom I have a long history, a caring relationship. I wanted something rather special and I think this card fits that. It’s made with a NEW stamp set (imagine that!) available to customers May 4 ~ and it’s called Elegantly Said and it come with the Elegant Tag Punch. If you look on page 68 in the new catalog, you will find a card waaay similar, different color and elements but same. I want to give credit as it is not my own creation.

Elegantly Said Sympathy – #1

It’s made with one of the new In Colors, Evening Evergreen as the card base. I then took another panel and stamped two of the stamps, covering the panel, using Evening Evergreen ink. Tone on tone is really one of my favorite. I then inked the large scrolly stamp in VersaMark ink and stamped in several places. I sprinkled it with White Embossing Powder and heat set it. I took a panel of Vellum and adhered it to the card front with Seal + only where the tag will be set. I then wrapped a length of Open Weave 3/8″ Ribbon in Soft Succulent to the center of the Vellum, securing it in back and again where the tag will be. I used the Elegant Tag Punch to create a piece out of Soft Succulent card stock – yep – new In Color. I stamped the sentiment in Evening Evergreen ink using the Inspired Thoughts stamp set (yep, NEW!) I tied a bow with the same Open Weave 3/8″ Ribbon and adhered it with a glue dot. I added five Genial Gems for more elegance, put dimensionals on the back of the tag and attached it to the stamped card. I put dimensionals on the back of the stamped card and adhered it to the card base and the front was done.

Elegantly Said Sympathy, inside – #2

For the inside, I stamped the beautiful flower from the Elegantly Said stamp set in stomped off once Evening Evergreen ink on a panel of Basic White card stock. I then stamped the sentiment using Inspired Thoughts stamp set and Evening Evergreen full strength. I adhered this to the inside and the card was complete.

Elegantly Said Sympathy – #3

For the envelope I stamped the same flower used on the inside of the card but full strength for the envelope flap and the front of the envelope. Voila! Ready to send today… It’s funny, odd, I didn’t even look in my stash to see if I had a sympathy card. I just knew I wanted to make something. It’s helps in the healing I think.

OK – so you know most of these products will be available for purchase to customers May 4 – all part of the new 2021-2022 Annual Catalog. If you do not have a demonstrator and would like a catalog, please contact me… TLsBrightSpot@gmail.com. I have more catalogs arriving today 👍 Other products that CAN be ordered and be ready to make this card may be found below. I’ve made it easy for you to simply ‘add all’ to your cart 🙂 Please use my current HOST CODE 2HWX9GEA that is good Apr 16-30.

Remember Stampin’ Up! has LAST CHANCE PRODUCTS that will no longer be available after May 3. Check it out.

03.23.21_HEADER_LAST-CHANCE_NA

Thanks for stopping by.

May you have a beautiful day.

Make someone happy sending them a handmade card filled with love.

Stampin’ Up! Color and Contour Bundle

Oh golly – a new set fell on my desk today – what a shame… 🥴 It’s called Color & Contour and the coordinating dies are Scalloped Contour Dies. Oh I DID have fun and I see more of this set in my future. Here’s what I did.

Colors & Contours Bundle – #1

I’m not sure this is a very good photo, but you can see the card- and a hint of what I did on the inside. But let’s talk about the front first. I took a Basic White panel and stamped the outline of the flower in Fresh Freesia ink three times. I then stamped the filler for the flower using Fresh Freesia ink again, but stamping off once each time. One of the neat parts about the filler stamp… it has no direct ‘fit’ to the outline stamp, which makes it really easy! I colored the centers with Daffodil Delight Stampin Blends. I then randomly stamped the leaf image in Garden Green ink. I stamped the sentiment from the Color & Contour stamp set using Stazon ink on Fresh Freesia card stock and die cut it with Stitched Rectangles dies (carrying over!) I ran a bit of Seal + on the back of this stamped piece and wove the Gingham Ribbon in Bumblebee back & forth. I added dimensionals to the back and adhered it to the front of the card. I decided I wanted to split this panel so cut it, leaving the right side panel larger. I adhered both panels to Fresh Freesia card stock with liquid glue. These two pieces I adhered to a Thick Basic White card base with dimensionals – and the card front was done!

Colors & Contours Bundle – #2

For the inside of the card I used the largest of the dies in the Scalloped Contour Dies to die cut a basic White panel. I stamped the flower and leaf as before, coloring the center with Daffodil Delight Stampin’ Blends. This was adhered to a panel of Fresh Freesia card stock with liquid glue, then to the inside of the card. Done!

Colors & Contours Bundle – #3

For the envelope I followed the same procedure for the flower: used the outline stamp in Fresh Freesia ink, then the filler stamp with stamped off Fresh Freesia ink, and colored the flower center with Daffodil Delight Stampin’ Blends. I covered the envelope flap with a panel of Hand-Penned DSP and stamped the open leaf design on that in Garden Green ink. Voila!!! This is such a bright, cheery card and I really like this new bundle.

And this is the bundle…

Aren’t those scalloped rectangles fun? and there is a die for the daisy like flower and the larger flower as well. Love the fonts, so perfect with the stamps. And the scalloped edge – oh yes!

Ok, I’ve rattled on enough… As you already know, most of today’s items will be available for customer purchase May 4. Hope you are making your list. If you do not have a demonstrator, I would be happy to send you a catalog. Just let me know. Other products are listed below.I’ve made it easy for you to simply ‘add all to cart’. If I can help you in any way to order these items, or others, please give me a holler. As a thank you to my customers, when the order is between $50-$150 I offer a SU! item of your choice valued at $10. Remember to use MY CURRENT HOST CODE – 2HWX9GEA– good April 16- 30 . When the order is over $150, you still receive that free gift from me, but SU! has Stampin’ Rewards that may be used for additional products, so don’t use the host code at that time. If you have questions just let me know. Card cuts are listed at the bottom of this post. If you would like to be able to order products early from catalogs, join my team now… you may do that here. We have lots of fun and are a creative bunch that encourages & supports one another.

Remember SU! is in it’s final days (now through May 3) of LAST CHANCE ITEMS THAT ARE RETIRING.

03.23.21_HEADER_LAST-CHANCE_NA

Now… I am offering a Designer Series Paper Share to my customers. Trying some of the NEW Designer Series Paper from the 2021-2022 Annual Catalog gets you in the spirit of creating with some gorgeous papers. I’m offering a Designer Series Paper share from that Annual Catalog and it would be my pleasure to supply you!  I‘ll place my share order early on May 4 and use the expedited shipping option so I should be able to have the shares cut, bundled and back out to you that very next week. Please place your order with me by May 2 @ 9 PM ET.

TLsBrightSpot 2021-2022 Annual Catalog

Designer Series Paper Shares!

Trying some of the NEW Designer Series Paper from the 2021-2022 Annual Catalog gets you in the spirit of creating with some gorgeous papers. I’m offering a Designer Series Paper share from that Annual Catalog and it would be my pleasure to supply you!  I‘ll place my share order early on May 4 and use the expedited shipping option so I should be able to have the shares cut, bundled and back out to you that very next week. Please place your order with me by May 2 @ 9 PM ET.

TLsBrightSpot 2021-2022 Annual Catalog

Designer Series Paper Shares!

New Designer Series Paper Share – $55.00 plus $7.75 for Priority Mail shipping

You will receive one 6×6 sheet of each design from the following DSP packs (the number behind the name indicates how many 6×6 sheets of that paper pack you will receive):

  • Beauty Of The Earth – 6
  • Bloom Where You’re Planted – 6
  • Expressions In Ink Specialty – 6
  • Hand-Penned – 6
  • In The Wild – 6
  • Pansy Petals – 6
  • Simply Elegant Specialty – 6
  • Sweet Symmetry – 6
  • Tidings Of Christmas 6″ x 6″ – 6
  • You’re A Peach – 6
  • 2020-2022 In Color 6″ x 6″ – 10
  • 2021-2023 In Color 6″ x 6″ – 10
  • Brights 6″ x 6″ – 20
  • Neutrals 6″ x 6″ – 20
  • Regals 6″ x 6″ – 20
  • Subtles 6″ x 6″ – 20
  • Ombre Specialty – 4 (one of each color)
  • 2021-2023 In Color Shimmer Vellum – 5 (one of each color)
  • Gold & Rose Gold 6″ x 6″ – 2 (one of each color)
  • Linen Specialty – 1
  • Ombre Gift Bags – 5 (one of each color)

In all, you’ll receive 172 – 6” x 6” sheets of designer or specialty paper plus the awesome food safe gift bags!

Double DSP Share – $110 + $8 Shipping by Priority Mail – if you’d like double shares of the designer paper, I can do that as well. The designer paper sheets will be cut into 6×12 so that you’ll be able to get 3 full A2 size card fronts from each sheet (Tidings Of Christmas, 2020-2022 In color, 2021-2023 In Color, Brights, Neutrals, Regals, Subtles and Gold & Rose Gold 6×6, you’ll get double sheets of those since they’re already precut).

FREE Gift from me! – As a bonus for joining my share, you’ll get a sampling of the new host exclusive Pattern Party 12″ x 12″ Designer Series Paper!

Anyone is welcome to join in my share (please note, I can only ship to addresses within the US).  If you’d like to join, either complete the form below or email the following information to tlsbrightspot@gmail.com.

  • Your first and last name
  • Your share selection
  • The email address that is connected to your Paypal account. I only accept Paypal for payment unless you are a customer of mine.  If you are a customer, I will accept payment by check.  ***You do not need to have a Paypal account to pay the invoice, you can choose to pay by credit card without having a Paypal account.

Deadline to sign up for my share is Sunday, May 2 at 9:00 PM ET.

Thanks for stopping by.

May you have a beautiful day.

Make someone happy sending them a handmade card filled with love.