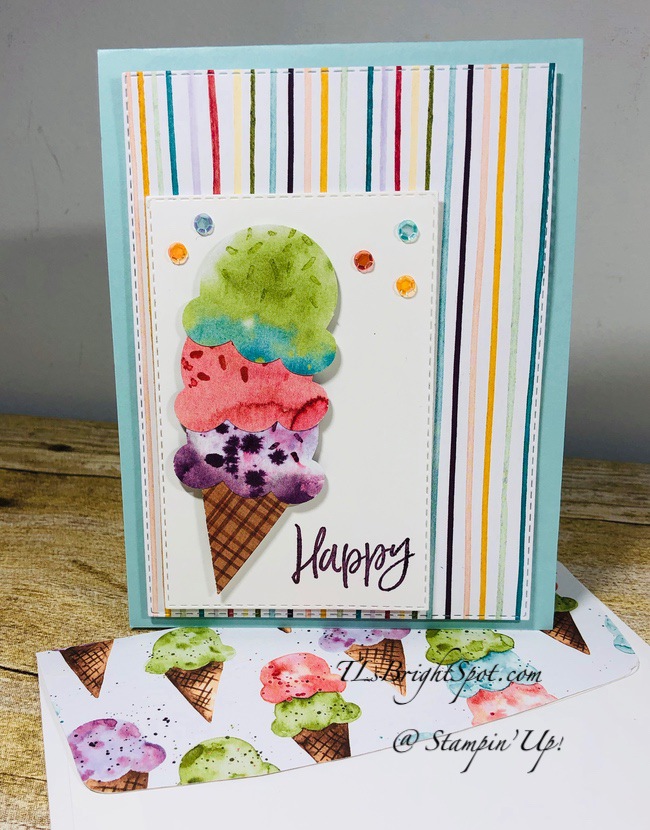
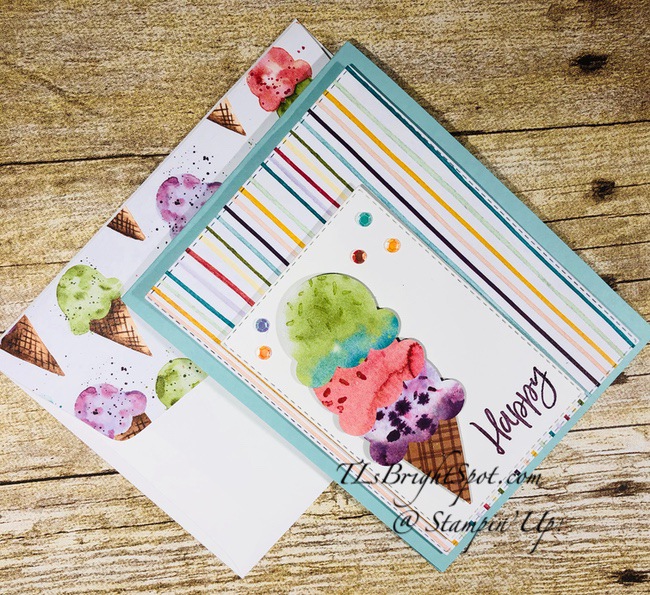
Today’s card is bright and cheery (not that others haven’t been) and for our granddaughter who is turning 11 this next week. I kept trying to decide what kind of card to make when a Stampin’ Up! pre-order box arrived. This granddaughter loves ice cream with lots of sprinkles and very different flavors… therefore when you see the colors of the ice cream on the card, hopefully you’ll understand.
Sweet Ice Cream Birthday – #1
Isn’t this card full of fun colors? Here’s list of the products used…
* Sweet Ice Cream stamp set with coordinating Ice Cream Cone Builder Punch
* Ice Cream Corner DSP
Stitched Rectangle Dies
Artistry Blooms Adhesive-Backed Sequins
* Blending Brushes
Wink of Stella
Pool Part card stock (card base)
Whisper White card stock (inside)
Inks: Old Olive, Terracotta Tile, Blackberry Bliss, Pool Party and Tuxedo Black Memento
NOTE: those items with an * are new in the Jan – Jun 2021 Catalog and will be available Jan 5, 2021
How to create this card…
Cut card base – for this card I used pool Party card stock.
Die cut with the largest die in the Rectangle Stitched Dies, a panel using one of the papers in the Ice Cream Corner DSP pack. Adhere to the card base with dimensionals.
Using various papers of the Ice Cream Corner DSP, punch the four layers for the ice cream cone. Stamp with the sprinkles stamp using Old Olive ink, Terracotta Tile ink and Blackberry Bliss ink. Put these four pieces together with liquid glue from the bottom – up. Cover lightly with Wink of Stella.
Die cut a Whisper White panel using the Stitched Rectangle Dies. Color with Pool Party ink and the new Blending Brushes.
Stamp the word ‘Happy’ in Blackberry Bliss on the Whisper White panel. NOTE: know the placement of the ice cream cone prior to stamping!
Adhere the ice cream cone to the Whisper White panel with dimensionals.
Adhere several Artistry Blooms Adhesive-Backed Sequins. These bring out the colors of the ice cream cone!
Adhere this panel to the card front – and the front is complete
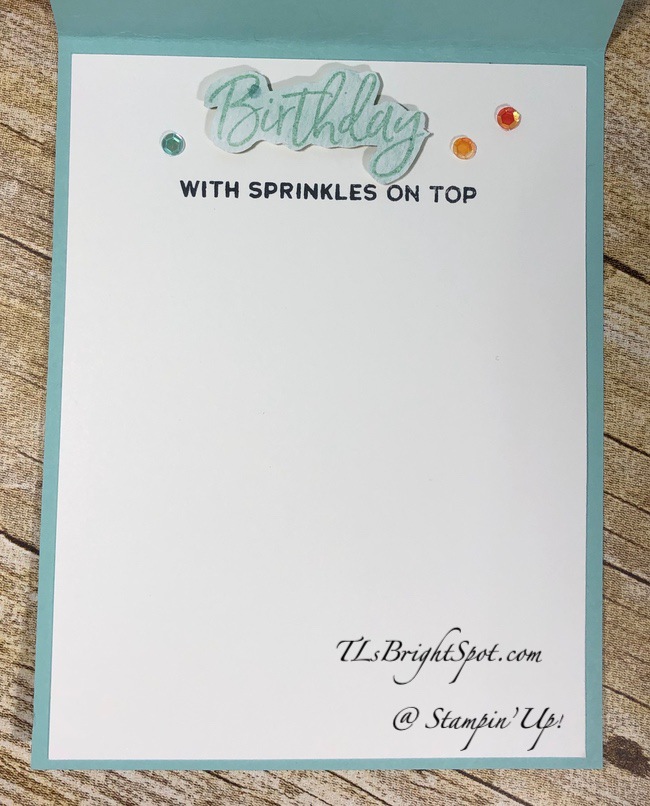
For the inside… and the envelope…
Sweet Ice Cream Birthday Card – #2, 3
Stamp the word ‘Birthday” in PoolParty ink on one of the ‘color blobs’ on the Ice Cream Corner DSP; fussy cut the word; adhere with dimensionals to a Whisper White panel. Stamp the rest of the sentiment in Tuxedo Black Memento ink from the Sweet Ice Cream stamp set.. Adhere several of the Artistry Blooms Adhesive-Backed Sequins. Secure the panel to the card base with liquid glue.
For the envelope, adhere a panel of the Ice Cream Corner DSP to a Whisper White envelope and call it done!
Various Ice Cream Corner DSP: stitched rectangle 3 3/4 x 5 1/8 + small amounts from other papers in the pack to fit the punch
As a thank you to my customers, when the order is between $50-$150 I offer a SU! item of your choice valued at $10. Remember to use MY CURRENT HOST CODE SVFB9YJY – good until Dec 10, 2020. When the order is over $150, you still receive that free gift from me, but SU! has Stampin’ Rewards that may be used for additional products 😁
Thanks for stopping by.
May you have a beautiful day.
Make someone happy sending them a card made with love.
Stampin Up! announced this information about Whisper White paper products:
Whisper White has been a Stampin’ Up! staple for so long. We love it and we know you love it, too. We are sad to announce that the suppliers mill producing our Whisper White cardstock has permanently closed due to impacts from the COVID-19 pandemic. Unfortunately, we weren’t given much notice on this closure. This means that the technology unique to this particular supplier is now unavailable to us and we can no longer offer our Whisper White cardstock and related products, such as Whisper White Note Cards & Envelopes. Please note that this won’t affect any of our other cardstocks, this only affects Whisper White.
We know Whisper White has a huge fan base; we’re big fans, too! And we are crushed that it’s going away. Even though this decision was out of our hands, rest assured that we jumped right into action to find the best replacement paper possible. We have dedicated many hours to source and test alternative cardstock options from several suppliers to find the perfect fit that still maintains the Stampin’ Up! quality you know and trust. We are happy to share that we have found a winner for our new cardstock, Basic White!
The quality of our new Basic White was thoroughly tested by our quality assurance and product teams. It also tested very well with demonstrators and concept artists who gave it a huge thumbs up. We believe in the quality of the new Basic White cardstock and we know it will become your new crafting staple!
What does this mean for you?
With Whisper White going out of production, this means a number of Whisper White products will be affected. Below is a list of all products that will be replaced with our new Basic White cardstock. These items are now available while supplies last with an order limit of 2 per item per order.
Whisper White 12 x 12 (30.5 x 30.5 cm) Cardstock (124302)
Assorted Memories & More Cards & Envelopes (149710)
Whisper White Note Cards & Envelopes (131527) SOLD OUT
Whisper White 3 x 3 (7.6 x 7.6 cm) Envelopes (145829)
Whisper White 8-1/2 x 11 Cardstock (100730)
Whisper White 8-1/2 x 11 Thick Cardstock (140272) – SOLD OUT
Whisper White Medium Envelopes (107301)
Stop by the online store to get the following Whisper White products that you love before they’re gone forever!
The Thick Whisper White card stock and Note Cards & Envelopes are already sold out! So….get some quick if you need it!
As a thank you to my customers, when the order is between $50-$150 I offer a SU! item of your choice valued at $10. Remember to use my NEW HOST CODE: SAZV3JTK when ordering. When the order is over $150, you still receive that free gift from me, but SU! has Stampin’ Rewards that may be used for additional products 😁
So sorry for the late post – hubby and I bought a fresh cut tree yesterday and it was extra heavy- it took both of us to carry it in and get it set up. Then lights, etc…. No, not done yet; hubby is still working on the lights. I’ll share a picture Monday as we won’t get it done until late Sunday afternoon. 🌲🎄🤶🏻
Such fun making this card… an easel card – which I haven’t made in some time. One of my teammates sent an easel card and I was inspired to create several.
Wrapped in Christmas with Snowflake Splendor Easel card – #1
I love the bling from the Balmy Blue Glimmer Paper. Hear are details on how to do this…
Cardstock base is 8 1/2 x 11, scored at 4 1/4 (this happens to be Misty Moonlight, but I also used Pacific Point card stock which coordinates with the DSP. When I used Pacific Point card stock, I also used Pacific Point ink.
Use your paper trimmer to make two cuts JUST TO THE SCORE LINE on the card front: 1 1/2 & 4
Fold the center portion in half and burnish well with your bone folder. This becomes the stand up on the card.
Cut 2 strips of Snowflake Splendor DSP and adhere with liquid glue to the side panels
Cut 2 additional panels of coordinating Snowflake Splendor DSP and adhere with liquid glue to the center folded panel, one piece above the fold, the other below it. NOTE: I think it looks best if these pieces are cut so the pattern on the DSP matches top to bottom panels
Cut a panel of Whisper White and adhere to the INSIDE of the card, centering
Adhere side panels to card base with liquid glue.
Stamp the sentiment from Freezin’ Fun stamp set in Misty Moonlight ink on Whisper White. Punch out with the Classic Label Punch. Adhere to a strip of Misty Moonlight with liquid glue. Put dimensionals on back and adhere to the Whisper White panel, about 3/4″ from bottom. This creates the easel :O) and allows the upper panel to stand up.
Punch a starburst with the Starburst Punch (OOPS! retired item 😞)and Balmy Blue Glimmer Paper
Stamp the sentiment from Wrapped in Christmas in Misty Moonlight ink and punch with the 1 1/2″ circle punch. Adhere to the Glimmer paper. NOTE: by scrapping some of the ‘glimmer’ away the paper will adhere more readily. Add liquid glue to that area and bingo, the sentiment adheres.
Put dimensionals ON THE LOWER HALF of the Glimmer Paper and attach to the lower center panel near the fold line. Because the lower sentiment is on dimensionals, this allows the upper portion of the card to ‘stand’.
Wrapped in Christmas with Snowflake Splendor Easel Card – #2
I have made several of these, which I don’t usually do, but they were fun and easy and look pretty neat. Notice how the color variations in the DSP make the cards look so different. Hope you enjoyed this design. Card cuts will be listed at the end of this post. Let me know if you have questions.
Stampin Up! announced this information about Whisper White paper products:
Whisper White has been a Stampin’ Up! staple for so long. We love it and we know you love it, too. We are sad to announce that the suppliers mill producing our Whisper White cardstock has permanently closed due to impacts from the COVID-19 pandemic. Unfortunately, we weren’t given much notice on this closure. This means that the technology unique to this particular supplier is now unavailable to us and we can no longer offer our Whisper White cardstock and related products, such as Whisper White Note Cards & Envelopes. Please note that this won’t affect any of our other cardstocks, this only affects Whisper White.
We know Whisper White has a huge fan base; we’re big fans, too! And we are crushed that it’s going away. Even though this decision was out of our hands, rest assured that we jumped right into action to find the best replacement paper possible. We have dedicated many hours to source and test alternative cardstock options from several suppliers to find the perfect fit that still maintains the Stampin’ Up! quality you know and trust. We are happy to share that we have found a winner for our new cardstock, Basic White!
The quality of our new Basic White was thoroughly tested by our quality assurance and product teams. It also tested very well with demonstrators and concept artists who gave it a huge thumbs up. We believe in the quality of the new Basic White cardstock and we know it will become your new crafting staple!
What does this mean for you?
With Whisper White going out of production, this means a number of Whisper White products will be affected. Below is a list of all products that will be replaced with our new Basic White cardstock. These items are now available while supplies last with an order limit of 2 per item per order.
Whisper White 12 x 12 (30.5 x 30.5 cm) Cardstock (124302)
Assorted Memories & More Cards & Envelopes (149710)
Whisper White Note Cards & Envelopes (131527) SOLD OUT
Whisper White 3 x 3 (7.6 x 7.6 cm) Envelopes (145829)
Whisper White 8-1/2 x 11 Cardstock (100730)
Whisper White 8-1/2 x 11 Thick Cardstock (140272) – SOLD OUT
Whisper White Medium Envelopes (107301)
Stop by the online store to get the following Whisper White products that you love before they’re gone forever!
The Thick Whisper White card stock and Note Cards & Envelopes are already sold out! So….get some quick if you need it!
As a thank you to my customers, when the order is between $50-$150 I offer a SU! item of your choice valued at $10. Remember to use my NEW HOST CODE: SAZV3JTK when ordering. When the order is over $150, you still receive that free gift from me, but SU! has Stampin’ Rewards that may be used for additional products 😁
Today’s card is made with Sale-a-bration products, which begins Jan 5, 2021. And that, my friends is not far off. Yep, hard to believe, it is right around the corner.
Corner Bouquet Sympathy #1
Isn’t it pretty? I don’t use Blackberry Bliss card stock very often but with this Oh So Ombre 6×6 DSP, it really is quite nice. The stamps are from the Corner Bouquet stamp set, and is FREE with a $50 purchase during Sale-a-bration. The Oh So Ombre 6×6 DSP is also FREE with a $50 purchase during Sale-a-bration.
Stampin’ Up! has changed (for the better BTW) the length of Sale-a-bration to two months twice a year, the first beginning Jan-Feb of 2021. It coincides with the release of the Jan – Jun Mini Catalog Jan 5. I’m sharing three of those free products today to get you excited about the new catalog. Let’s get to the card.
Corner Bouquet Sympathy #1
Cut a panel of Oh So Ombre 6×6 DSP; using the Stamparatus, stamp one corner with this smaller corner stamp in Tuxedo Black Memento ink. Why use the Stamparatus? Couple of reasons… 1) if the stamp is not clear enough after the first stamping, it is easy to re-ink and stamp again in exactly the same spot. It is next to imposssible to do that by eye: it gets a bit of a shadow and that paper couldn’t be used. 2) The Stamparatus allows for perfect placement.
Turn the paper 180 degrees to stamp in the opposite corner. Stamp with Tuxedo Black Memento ink.
Place the sentiment from the Heal your Heart stamp set (FREE with a $50 purchase during Sale=a=bration) in the center of the paper and stamp with Tuxedo Black Memento ink.
Using the largest die in the Stitched So Sweetly Dies, cut the center.
Adhere the larger panel to a piece of Basic Black card stock.
Adhere the die cut piece with dimensionals, being certain to line up the stamping just right. NOTE: the die cut piece is placed so the gradation of color is the opposite of the larger panel. I was able to do this because of the perfect placement of the corner stamp and use of the Stamparatus.
Add Pearl Basic Jewels.
Adhere this panel to a Blackberry Bliss card base with dimensionals ~ and your card front is done.
Corner Bouquet Sympathy: inside #2 and envelope #3
For the inside I stamped the corner with the same stamp from the Corner Bouquet stamp set in Tuxedo Black Memento ink on a panel of Whisper White card stock. Adhere with liquid glue to a piece of Basic Black card stock; then adhere this to the inside of the card & voila!
For the envelope I adhered another piece of the Oh So Ombre 6×6 DSP to the envelope flap. I stamped the small leaf on this and again on the front of the envelope – all in Tuxedo Black Memento ink ~ and the card is ready to send.
This card will go out today to a neighbor who just lost her father. I don’t know the circumstance other than he had health issues for some time. But the circumstances of his death aren’t needed. The focus is the loss of a loved one and to be supportive and caring.
Today’s card is not my design… it was from my upline, Mary Deatherage, who participated in a team training recently. She used different colors and embellishments, but the layout and design are hers. Thank you, Mary, for the inspiration!
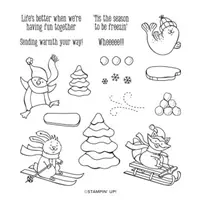
Here are photos of the stamp sets and the DSP used in today’s project.
Products not part of Sale-a-bration are listed below. As a thank you to my customers, when the order is between $50-$150 I offer a SU! item of your choice valued at $10. Remember to use MY CURRENT HOST CODE SVFB9YJY – good until Dec 10, 2020. When the order is over $150, you still receive that free gift from me, but SU! has Stampin’ Rewards that may be used for additional products 😁
Card cuts for today’s project are listed at the end of this post.
WooHoo! Stampin’ Up! has gone over the top… check out the Giant Year-end sale here
Also… they updated their Clearance Rack and it went liv e today as well. Click here
Enjoy shopping…
Current HOST CODE: SVFB9YJY until Dec 10. As a thank you to my customers, when the order is between $50-$150 I offer a SU! item of your choice valued at $10. Remember to use When the order is over $150, you still receive that free gift from me, but SU! has Stampin’ Rewards that may be used for additional products 😁
Today is the blog hop for Amy’s Inkin’ Krew and the theme is ‘celebrate’, however we wish to interpret that. Thursday is our son-in-laws birthday and we are celebrating that with todays card.
Let me share the card with you…
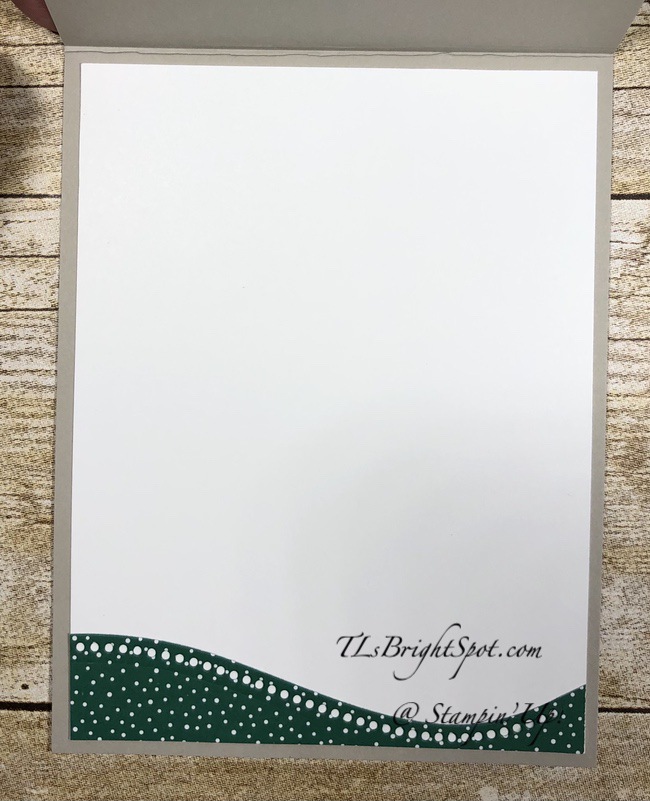
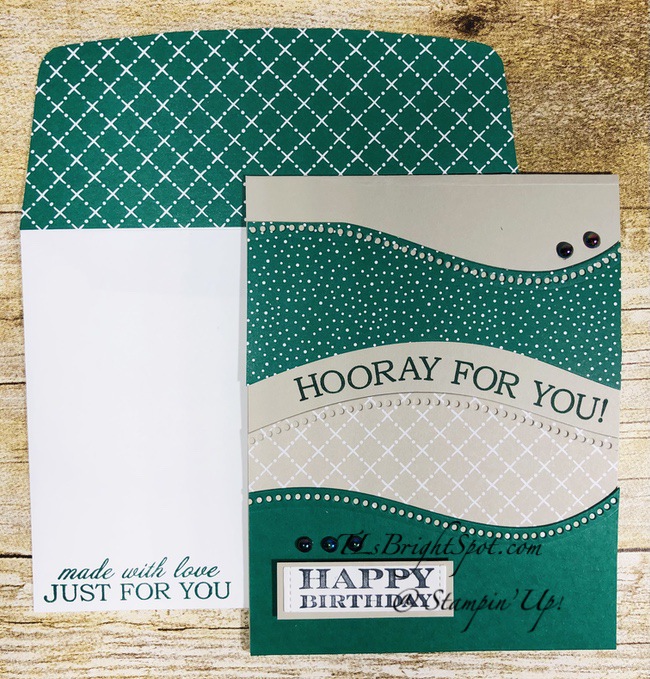
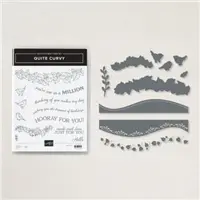
Quite Curvy Birthday – #1
I have used the Quite Curvy stamp set with coordinating Curvy Dies and the Classic Christmas 6 x6 DSP. These are order-able right now but the DSP will not be available after Jan 4.So how did I do this?
Sahara Sand card base cut 4 1/4 x 11 snd scored at 5 1/2
Shaded Spruce card stock 2 x 4 1/4 and die cut with one of the Curvy Dies
Classic Christmas 6×6 DSP 3 x 4 1/4 and die cut with the same die from Curvy Dies
Lay the papers on the card base to position the photopolymer stamp from Quite Curvy stamp set. I used my Stamparatus and because the stamp is flexible I could position the stamp just the way I wanted :O)
Stamp using Shaded Spruce ink directly to the Sahara Sand card base.
Adhere the two papers mentioned above with liquid glue, first the DSP since it is taller, then the Shaded Spruce panel. These will sit just below the sentiment just stamped.
Die cut another panel from the Classic Christmas 6×6 DSP. My panel started at 2 1/2 x 4 1/4. Cut both sides
Adhere this panel with liquid glue just above the stamped sentiment
The ‘Happy Birthday’ sentiment was stamped some time ago with the Many Messages stamp set and die cut with the coordinating Messages Dies (available Jan 5, 2021!) in Tuxedo Black Memento ink. The panel was adhered with liquid glue to a scrap of Shara Sand card stock about 5/8 x 2. This was attached to the card with dimensionals.
Iridescent Pearls were placed just above this panel. More were added on the curve at the upper right.
For the inside… and the envelope
Quite Curvy Birthday #2 & #3
I adhered a scrap of the die cut Classic Christmas 6×6 DSP to the bottom of a Whisper White panel cut 4 x 5 1/4 ~ with liquid glue. The Whisper White panel was adhered to the inside of the card and finis!
For the envelope I adhered yet another panel of the Classic Christmas 6×6 DSP (2 1/4 x 6) to the flap, trimmed to fit. I then stamped the sentiment in Shaded Spruce ink using the Quite Curvy stamp set. And the card was done.
This made a wonderfully masculine card and I’m really happy with it ~ think my son-in-law will be as well. I hope you like… a product list will be at the bottom of this post. As a thank you to my customers, when the order is between $50-$150 I offer a SU! item of your choice valued at $10. Remember to use MY CURRENT HOST CODE SVFB9YJY – good until Dec 10, 2020. When the order is over $150, you still receive that free gift from me, but SU! has Stampin’ Rewards that may be used for additional products 😁
Remember that today is the day of the Stampin’ Up Year-end Clearance for items in the Aug- Dec Mini Catalog.
No minimum purchase required.
Retiring items are available while supplies last.
Exclusions apply: Carryover items will not be discounted.
Due to increased shipping times and possible shipping delays during the month of December, we can’t guarantee delivery before Christmas.
Ordering Deadlines: January 4, 2021 at 11:50 PM (MT). The items that are retiring are only while supplies last!! And everything on this list is retiring!!
Please continue the blog hop by clicking on the ‘next’ or ‘previous’ button – enjoy… there are some awesome projects today!
It’s Monday – and another week begins… tomorrow is Dec 8 – a GIANT Year-end Clearance Day for Stampin’ Up! Before I get to my card for the day, here are the details about the sale.
Lots going on in the Stampin’ Up world: giant year-end clearance of retiring items from the 2020 Aug – Dec Mini Catalog. Look carefully at the list. Some items will not be offered as a bundle in the new catalog but are returning items. If you have questions, please contact me.
No minimum purchase required.
Retiring items are available while supplies last.
Exclusions apply: Carryover items will not be discounted.
Due to increased shipping times and possible shipping delays during the month of December, we can’t guarantee delivery before Christmas.
Ordering Deadlines: January 4, 2021 at 11:50 PM (MT). The items that are retiring are only while supplies last!! And everything on this list is retiring!!
Please see my Dec 5 post for the complete list. Now that I have your attention 😏, let’s look at today’s card.
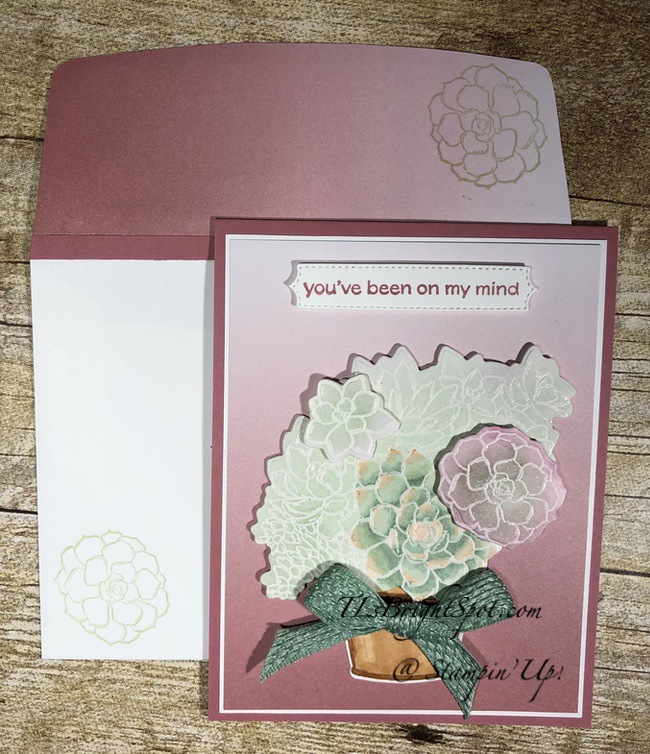
Simply Succulents – #1
This card has a couple of really nice elements to it: the Oh So Ombre 6×6 DSP, that center succulent colored in alcohol Blends, the bow, and I love the color of the flowerpot, and the sentiment banner is awesome.
Supplies you will need to create this card:
Simply Succulents stamp set and coordinating Potted Succulents Dies ~ available Jan 5, 2021
Rococco Rose card base 4 1/4 x 11 scored at 5 1/2
Whisper White card stock (2) 4 x 5 1/4 + another 4 x 5 1/4 for all the die cuts. Helpful TIP: you can die cut some of the pieces from the Whisper White panel used on the front of the card since it is covered by the DSP.
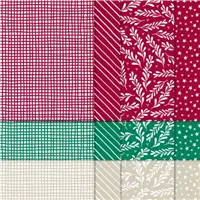
Oh So Ombre 6×6 DSP – available Jan 5, 2021
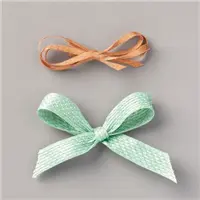
Basketweave & Metallic Ribbon Combo Pack – using the Mint Macaron Basketweave ribbon
Stampin Blends: Soft Sea Foam, Mint Macaron, Petal Pink, Cinnamon Cider, Color Lifter
extras…Versamark & Clear Embossing Powder, Wink of Stella
Blending Brushes – available Jan 5, 2021 ~ these are w-o-n-d-e-r-f-u-l
Yes, that’s a lot of supplies.. and let me just say ~ you could get by not using the Stampin Blends OR not using the Blending Brushes. There are two different effects going on in this card: the Blends for coloring the one large succulent and the Blending Brushes and inks for the very soft coloring using many inks. I wanted to try them together, The Blends really bring out all the detail of the succulent, while the Blending Brushes create a very soft look. Both are effective and it depends on what you’re wanting. I rather like the combined use here.
Stamp the large succulent and the two smaller succulents with Versamark ink on Whisper White card stock that has been rubbed with the embossing buddy. The embossing buddy helps remove static so the embossing powder sticks just to the ink. 🙂
Cover with Clear Embossing Powder, flick off the extra and heat set with your heat gun.
Color these pieces prior to die cutting.
With the Stampin Blends, color the largest succulent, first using the Soft Sea Foam, then Mint Macaron, then move the dark with more Soft Sea Foam. Add the Petal Pink blends to the tips of the succulent and a final touch of Blushing Bride Marker
With the Blending Brushes and inks, begin coloring with the lightest shade of green (Soft Sea Foam) using a circular motion and starting off the page. Begin adding color where you want more darkness: Mint Macaron, then the Highland Heather and finally Rich Razzleberry, but only a little of that.
Die cut your pieces using the Potted Succulent Dies
Stamp the flower pot in Cinnamon Cider ink on Whisper White card stock, color in using the Cinnamon Cider Blends. Use the Color Lifter to create highlights. Cover the pot with Wink of Stella. Die cut the flower pot with the Potted Succulent Dies.
Layer your pieces:
Adhere 4 x 5 1/4 Whisper White to the Rococco Rose card base with liquid glue
Adhere the 3 7/8 x 5 Oh So Ombre panel next, using liquid glue
Adhere the flower pot with liquid glue
Adhere the large succulent with dimensionals, then add the other two succulents, also with dimensionals
Add the bow with a glue dot: Basketweave & Metallic Ribbon Combo Pack, Mint Macaron
Stamp the sentiment from the Simply Succulent stamp set in Rococco Rose ink on Whisper White card stock and die cut with one of the awesome banner dies from the Potted Succulent Dies. Adhere to the card front with dimensionals. Your card front is done!
For the inside, on a panel of Whisper White 4 x 5 1/4, stamp one of the succulent stamps from the Simply Succulents stamp set in Soft Sea Foam ink. Stamp in the corners a few times. Adhere the panel to the inside of the card with liquid glue.
For the envelope, cover the flap with more of the Oh So Ombre 6×6 DSP with an added piece of Rococco Rose. Trim to fit. Stamp the same succulent used on the inside of the card in Soft Sea Foam, both on the flap and on the card front. Nicely done!
The product list may be found below ~ except for those items not available until Jan 5, 2021! As a thank you to my customers, when the order is between $50-$150 I offer a SU! item of your choice valued at $10. Remember to use MY CURRENT HOST CODE SVFB9YJY – good until Dec 10, 2020. When the order is over $150, you still receive that free gift from me, but SU! has Stampin’ Rewards that may be used for additional products 😁
Thanks for stopping by.
May you have a beautiful day.
Make someone happy sending them a handmade card filled with love.
Wow – Christmas is just around the corner… are you ready? I’m getting there, making tags right now for presents hubby & I will deliver. Christmas together with extended family will have to wait until next year. It will be better than ever, just by being together. So not complaining, just wistful I guess.
I tend to keep scraps from various Designer Series Papers and it was kinda fun mixing and matching.
Christmas Tags w/ scraps ~ #1 , 2
It the far left picture, I used papers from a couple of different sources: ‘Tis the Season 6×6 DSP, green plaid & red tree; Feels Like Frost 6×6 DSP. The stamped sentiment is from the new Many Messages stamp set & Messages Dies (available to customers Jan 5, 2021: the ‘Merry Christmas’ is from Perfectly Plaid stamp set, stamped in Cherry Cobbler ink.
In the far right photo, Feels Like Frost 6×6 DSP was used on both tags, along with more of the Tis The Season 6×6 DSP and tags from the new Many Messages stamp set & Messages Dies.
I began with Whisper White card stock cut 2″ wide and 5 1/4″ in length. The tops were punched using the Fancy Tag Topper punch and the bottoms using the Triple Banner Punch, which shortened them some; ribbons were Metallic Edge Ribbon in Silver plus All The Trimmings Ribbon Combo Pack in Poppy Parade. The DSP used were already in strips of various widths, I just used what was on hand, never measuring, sorry, and layered. The trees were punched using the Pine Tree Punch and sentiments are all on dimensionals. Star Elements were added to the trees. The back of the tags were left plain to write ‘To and From’. Products may be found later in this post 😁
Lots going on in the Stampin’ Up world: giant year-end clearance of retiring items from the 2020 Aug – Dec Mini Catalog. Look carefully at the list. Some items will not be offered as a bundle in the new catalog but are returning items. If you have questions, please contact me.
No minimum purchase required.
Retiring items are available while supplies last.
Exclusions apply: Carryover items will not be discounted.
Due to increased shipping times and possible shipping delays during the month of December, we can’t guarantee delivery before Christmas.
Ordering Deadlines: January 4, 2021 at 11:50 PM (MT). The items that are retiring are only while supplies last!! And everything on this list is retiring!!
In copying, the columns got all messed up… so look carefully at the list. At the bottom of the list are ** & *** that have meaning: ** indicate some in that bundle are NOT retiring (as in Warm Hugs); *** indicate these bundles are NOT RETIRING but will no longer be offered as a bundle (as in Poinsettia Petals)
Category Publication Item Number Description Page Retail Price Discount Percentage Sale Price
KITS AD2020 153650 JOY OF SHARING CARD KIT (ENGLISH) 4 $35.00 30% $24.50
KITS AD2020 153651 LA JOIE DE PARTAGER CARD KIT (FRENCH) 4 $35.00
KITS AD2020 153649 TAG BUFFET PROJECT KIT 5 $30.00 50% $15.00
STAMPSET AD2020 153612 TAG BUFFET PHOTOPOLYMER STAMP SET (ENGLISH) 5 $18.00
STAMPSET AD2020 153894 FOISON D’ÉTIQUETTES PHOTOPOLYMER STAMP SET (FRENCH) 5 $18.00
KITS AD2020 150703 CHRISTMAS COUNTDOWN PROJECT KIT 6 $30.00 50% $15.00
KITS AD2020 150705 MOST WONDERFUL TIME PRODUCT MEDLEY (ENGLISH) 7 $70.00 20% $56.00
KITS AD2020 151270 MOST WONDERFUL TIME PRODUCT MEDLEY REFILL 7 $26.00 20% $20.80
KITS AD2020 150717 LE PLUS BEAU DES NOËLS PRODUCT MEDLEY (FRENCH) 7 $70.00
BUNDLES AD2020 155106 HEARTWARMING HUGS SUITE COLLECTION (ENGLISH) 9 $123.25
BUNDLES AD2020 155107 CÂLINS RÉCONFORTANTS SUITE COLLECTION (FRENCH) 9 $123.25
EMBELLISHMENTS AD2020 153543 GLITTER STAR ORNAMENTS 9 $8.00 50% $4.00
EMBELLISHMENTS AD2020 153542 MOSSY MEADOW 3/8″ (1 CM) DIAGONAL STRIPE RIBBON 9 $7.50 50% $3.75
EMBELLISHMENTS AD2020 153546 REAL RED 3/16″ (4.8 MM) BRAIDED LINEN TRIM 9 $7.00 50% $3.50
PAPER AD2020 153508 MINI COFFEE CARRIER 9 $5.00 50% $2.50
STAMPSET AD2020 153478 WARM HUGS PHOTOPOLYMER STAMP SET (ENGLISH) 9 $17.00
TOOLS AD2020 153574 WRAPPED IN TEXTURE EMBOSSING FOLDERS 9 $8.00 50% $4.00
BUNDLE AD2020 155145 WARM HUGS BUNDLE (ENGLISH)** 10 $46.75
BUNDLE AD2020 155146 CÂLINS DOUILLETS BUNDLE (FRENCH)** 10 $46.75
STAMPSET AD2020 153699 CÂLINS DOUILLETS PHOTOPOLYMER STAMP SET (FRENCH) 10 $17.00
STAMPSET AD2020 153481 WRAPPED IN CHRISTMAS CLING STAMP SET (ENGLISH) 11 $22.00
STAMPSET AD2020 153703 NOËL EMBALLANT CLING STAMP SET (FRENCH) 11 $22.00
BUNDLE AD2020 155156 ENVELOPPÉ D’AMOUR BUNDLE (FRENCH) 12 $31.50
BUNDLE AD2020 155155 GIFT WRAPPED BUNDLE (ENGLISH) 12 $31.50
STAMPSET AD2020 153432 GIFT WRAPPED PHOTOPOLYMER STAMP SET (ENGLISH) 12 $17.00
STAMPSET AD2020 153729 ENVELOPPÉ D’AMOUR PHOTOPOLYMER STAMP SET (FRENCH) 12 $17.00 10% $15.30
TOOLS AD2020 153606 GIFT BOW BUILDER PUNCH 12 $18.00 20% $14.40
BUNDLE AD2020 155159 COLOMBE DE LA PAIX BUNDLE (FRENCH) 13 $49.50
BUNDLE AD2020 155158 DOVE OF HOPE BUNDLE (ENGLISH) 13 $49.50
STAMPSET AD2020 153406 STAMP SET CLING DOVE OF HOPE (ENGLISH) 13 $22.00
STAMPSET AD2020 153739 COLOMBE DE LA PAIX CLING STAMP SET (FRENCH) 13 $22.00
TOOLS AD2020 153526 DETAILED DOVE DIES 13 $33.00 10% $29.70
BUNDLES AD2020 155109 POINSETTIA PLACE SUITE COLLECTION (ENGLISH) 15 $94.00
BUNDLES AD2020 155110 MARCHÉ DU POINSETTIA SUITE COLLECTION (FRENCH) 15 $94.00
EMBELLISHMENTS AD2020 153534 BEADED PEARLS 15 $8.00 50% $4.00
PAPER AD2020 153486 PLUSH POINSETTIA SPECIALTY PAPER 15 $11.00 50% $5.50
PAPER AD2020 153487 POINSETTIA PLACE DESIGNER SERIES PAPER 15 $11.50 30% $8.05
BUNDLE AD2020 155148 POINSETTIA PETALS BUNDLE (ENGLISH)*** 16 $56.50
BUNDLE AD2020 155149 PÉTALES DE POINSETTIA BUNDLE (FRENCH)*** 16 $56.50
BUNDLE AD2020 155162 PAISIBLE NATIVITÉ BUNDLE (FRENCH) 17 $43.00
BUNDLE AD2020 155161 PEACEFUL NATIVITY BUNDLE (ENGLISH) 17 $43.00
STAMPSET AD2020 153310 PEACEFUL NATIVITY CLING STAMP SET (ENGLISH) 17 $20.00
STAMPSET AD2020 153745 PAISIBLE NATIVITÉ CLING STAMP SET (FRENCH) 17 $20.00
TOOLS AD2020 153525 NATIVITY DIES 17 $28.00 50% $14.00
BUNDLE AD2020 155167 PEACE & JOY BUNDLE 18 $45.00
STAMPSET AD2020 153430 PEACE & JOY PHOTOPOLYMER STAMP SET 18 $18.00
TOOLS AD2020 153530 JOY DIES 18 $32.00 30% $22.40
BUNDLE AD2020 156083 FÊTES ÉTINCELANTES VARIETY BUNDLE (FRENCH) 19 $63.00
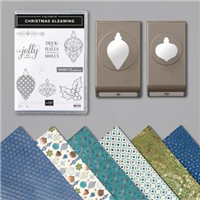
BUNDLE AD2020 156082 CHRISTMAS GLEAMING VARIETY BUNDLE (ENGLISH) 19 $63.00
PAPER AD2020 150429 BRIGHTLY GLEAMING SPECIALTY DESIGNER SERIES PAPER 19 $15.00 50% $7.50
STAMPSET AD2020 150692 FÊTES ÉTINCELANTES CLING STAMP SET (FRENCH) 19 $21.00
STAMPSET AD2020 150464 CHRISTMAS GLEAMING CLING STAMP SET (ENGLISH) 19 $21.00
TOOLS AD2020 150647 GLEAMING ORNAMENTS PUNCH PACK 19 $34.00 50% $17.00
BUNDLE AD2020 155205 FIRESIDE TRIMMINGS BUNDLE (ENGLISH) 20 $46.75
BUNDLE AD2020 155206 AU COIN DU FEU BUNDLE (FRENCH) 20 $46.75
STAMPSET AD2020 153856 AU COIN DU FEU PHOTOPOLYMER STAMP SET (FRENCH) 20 $17.00
STAMPSET AD2020 153458 FIRESIDE TRIMMINGS CLING STAMP SET (ENGLISH) 20 $17.00
TOOLS AD2020 153572 FIRESIDE DIES 20 $35.00 30% $24.50
BUNDLE AD2020 155169 SWEETEST TIME BUNDLE (ENGLISH) 21 $45.75
BUNDLE AD2020 155170 DOUCEURS DE LA SAISON BUNDLE (FRENCH) 21 $45.75
STAMPSET AD2020 153436 SWEETEST TIME PHOTOPOLYMER STAMP SET (ENGLISH) 21 $17.00
STAMPSET AD2020 153761 DOUCEURS DE LA SAISON PHOTOPOLYMER STAMP SET (FRENCH) 21 $17.00
TOOLS AD2020 153559 SWEETEST BORDERS DIES 21 $34.00 30% $23.80
STAMPSET AD2020 153442 TREE ANGLE PHOTOPOLYMER STAMP SET 22 $17.00 20% $13.60
STAMPSET AD2020 153322 GNOME FOR THE HOLIDAYS CLING STAMP SET (ENGLISH) 23 $19.00
STAMPSET AD2020 155973 NOËL CHEZ LES GNOMES CLING STAMP SET (FRENCH) 23 $19.00
STAMPSET AD2020 153332 STAMP SET CLING DON’T STOP BELIEVIN’ 23 $20.00
BUNDLES AD2020 155105 TRIMMING THE TOWN SUITE COLLECTION 25 $74.25
EMBELLISHMENTS AD2020 153540 ALL THE TRIMMINGS EMBELLISHMENTS 25 $8.00 50% $4.00
EMBELLISHMENTS AD2020 153541 ALL THE TRIMMINGS RIBBON COMBO PACK 25 $8.00 50% $4.00
PAPER AD2020 153491 TRIMMING THE TOWN DESIGNER SERIES PAPER 25 $11.50 10% $10.35
BUNDLE AD2020 155144 COMING HOME BUNDLE 26 $46.75
STAMPSET AD2020 153500 COMING HOME PHOTOPOLYMER STAMP SET 26 $18.00
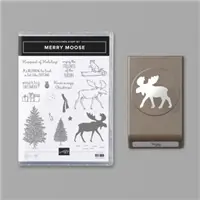
BUNDLE AD2020 153015 MERRY MOOSE BUNDLE 27 $31.50
STAMPSET AD2020 150494 MERRY MOOSE PHOTOPOLYMER STAMP SET 27 $17.00
TOOLS AD2020 153515 HOME TOGETHER DIES 27 $34.00 30% $23.80
TOOLS AD2020 150652 MOOSE PUNCH 27 $18.00
EMBELLISHMENTS AD2020 149598 JINGLE BELLS 28 $5.00 50% $2.50
STAMPSET AD2020 153765 PÂTURAGE DE NOËL CLING STAMP SET (FRENCH) 28 $21.00
STAMPSET AD2020 153316 YULETIDE PASTURE CLING STAMP SET (ENGLISH) 28 $21.00
EMBELLISHMENTS AD2020 153545 ADHESIVE-BACKED SNOWFLAKES 29 $6.00 50% $3.00
PAPER AD2020 153516 FESTIVE FELT SHEET COMBO PACK 29 $9.00 50% $4.50
STAMPSET AD2020 154730 CHRISTMAS MEANS MORE PHOTOPOLYMER STAMP SET 29 $16.00
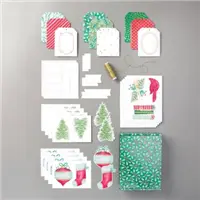
BUNDLES AD2020 155112 WONDER OF THE SEASON SUITE COLLECTION (ENGLISH) 31 $149.50
BUNDLES AD2020 155113 MERVEILLES DE LA SAISON SUITE COLLECTION (FRENCH) 31 $149.50
EMBELLISHMENTS AD2020 153537 WONDER OF THE SEASON RIBBON COMBO PACK 31 $9.00 50% $4.50
KITS AD2020 153538 WONDER OF THE SEASON MEMORIES & MORE CARD PACK 31 $12.00 50% $6.00
PAPER AD2020 153539 WONDER OF THE SEASON MEMORIES & MORE CARDS & ENVELOPES 31 $11.50 30% $8.05
PAPER AD2020 153489 ‘TIS THE SEASON 6″ X 6″ (15.2 X 15.2 CM) DESIGNER SERIES PAPER 31 $11.50 20% $9.20
PAPER AD2020 153488 WONDER OF THE SEASON SPECIALTY DESIGNER SERIES PAPER 31 $15.00 50% $7.50
BUNDLE AD2020 155152 MAGIE ET MERVEILLES BUNDLE (FRENCH) 32 $47.50
BUNDLE AD2020 155151 WISHES & WONDER BUNDLE (ENGLISH) 32 $47.50
STAMPSET AD2020 153421 STAMP SET CLING WISHES & WONDER (ENGLISH) 32 $22.00
STAMPSET AD2020 153713 MAGIE ET MERVEILLES CLING STAMP SET (FRENCH) 32 $22.00
TOOLS AD2020 153523 NORTH POLE WONDER DIES 32 $31.00 30% $21.70
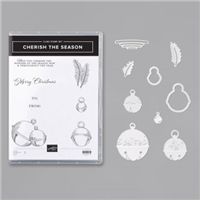
BUNDLE AD2020 155154 CHERISH THE SEASON BUNDLE 33 $35.00
STAMPSET AD2020 153417 CHERISH THE SEASON CLING STAMP SET 33 $18.00
TOOLS AD2020 154043 SOUNDS OF THE SEASON DIES 33 $21.00 20% $16.80
PAPER AD2020 150432 TOILE TIDINGS DESIGNER SERIES PAPER 34 $11.50 30% $8.05
STAMPSET AD2020 153440 JOYFUL HOLLY PHOTOPOLYMER STAMP SET 34 $17.00
BUNDLES AD2020 155116 SPLENDEUR EN FLOCONS SUITE COLLECTION (FRENCH) 37 $94.75
BUNDLES AD2020 155115 SNOWFLAKE SPLENDOR SUITE COLLECTION (ENGLISH) 37 $94.75
EMBELLISHMENTS AD2020 153548 SNOWFLAKE SPLENDOR 1/4″ (6.4 MM) RIBBON 37 $7.00 50% $3.50
PAPER AD2020 153512 SNOWFLAKE SPLENDOR DESIGNER SERIES PAPER 37 $11.50 20% $9.20
PAPER AD2020 153513 BALMY BLUE GLIMMER PAPER 37 $5.00 50% $2.50
TOOLS AD2020 153577 WINTER SNOW EMBOSSING FOLDER 37 $7.50 50% $3.75
BUNDLE AD2020 155173 TOUT EN FLOCONS BUNDLE (FRENCH)*** 38 $55.75
BUNDLE AD2020 155172 SNOWFLAKE WISHES BUNDLE (ENGLISH)*** 38 $55.75
BUNDLE AD2020 155186 SOUS UN MANTEAU BLANC BUNDLE (FRENCH)*** 39 $49.50
BUNDLE AD2020 155185 SNOW WONDER BUNDLE (ENGLISH)*** 39 $49.50
BUNDLE AD2020 155168 ORNAMENTAL ENVELOPES BUNDLE 40 $47.50
STAMPSET AD2020 153434 ORNAMENTAL ENVELOPES PHOTOPOLYMER STAMP SET 40 $17.00
TOOLS AD2020 153531 ENVELOPES DIES 40 $36.00 40% $21.60
STAMPSET AD2020 153350 LIGHT ME HOME CLING STAMP SET 41 $19.00
PAPER AD2020 150444 FEELS LIKE FROST 6″ X 6″ (15.2 X 15.2 CM) SPECIALTY DESIGNER SERIES PAPER 42 $15.00 50% $7.50
STAMPSET AD2020 152615 WARM & TOASTY CLING STAMP SET 42 $22.00
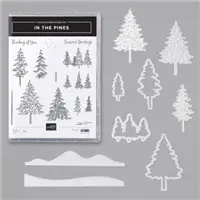
BUNDLE AD2020 155182 IN THE PINES BUNDLE 43 $51.25
STAMPSET AD2020 153448 IN THE PINES PHOTOPOLYMER STAMP SET 43 $21.00
TOOLS AD2020 153563 PINE WOODS DIES 43 $36.00 30% $25.20
BUNDLES AD2020 155123 GILDED AUTUMN SUITE COLLECTION (ENGLISH) 45 $96.25
BUNDLES AD2020 155124 AUTOMNE D’OR SUITE COLLECTION (FRENCH) 45 $96.25
EMBELLISHMENTS AD2020 153553 BASKET WEAVE & METALLIC RIBBON COMBO PACK 45 $8.00 50% $4.00
EMBELLISHMENTS AD2020 153552 ACORN TRINKETS 45 $8.00 50% $4.00
PAPER AD2020 153520 GILDED AUTUMN SPECIALTY DESIGNER SERIES PAPER 45 $15.00
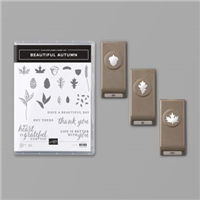
BUNDLE AD2020 155191 BEAUTÉ AUTOMNALE BUNDLE (FRENCH) 46 $50.25
BUNDLE AD2020 155189 BEAUTIFUL AUTUMN BUNDLE (ENGLISH) 46 $50.25
STAMPSET AD2020 153450 BEAUTIFUL AUTUMN PHOTOPOLYMER STAMP SET (ENGLISH) 46 $17.00
STAMPSET AD2020 153844 BEAUTÉ AUTOMNALE PHOTOPOLYMER STAMP SET (FRENCH) 46 $17.00
TOOLS AD2020 153609 AUTUMN PUNCH PACK 46 $39.00 20% $31.20
BUNDLE AD2020 153036 GATHER TOGETHER BUNDLE 47 $38.50
STAMPSET AD2020 150589 GATHER TOGETHER PHOTOPOLYMER STAMP SET 47 $17.00
TOOLS AD2020 150662 GATHERED LEAVES DIES 47 $26.00 50% $13.00
BUNDLE AD2020 155194 AUTUMN GOODNESS BUNDLE 48 $45.75
STAMPSET AD2020 153454 AUTUMN GOODNESS PHOTOPOLYMER STAMP SET 48 $17.00
TOOLS AD2020 153568 AUTUMN WHEELBARROW DIES 48 $34.00 30% $23.80
BUNDLE AD2020 155195 LOVE OF LEAVES BUNDLE (ENGLISH)*** 49 $47.50
BUNDLE AD2020 155196 BOUQUET DE FEUILLES BUNDLE (FRENCH)*** 49 $47.50
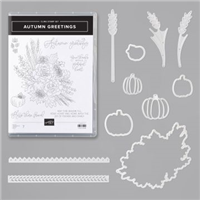
BUNDLE AD2020 155198 AUTUMN GREETINGS BUNDLE (ENGLISH) 50 $51.25
BUNDLE AD2020 155199 SALUTATIONS D’AUTOMNE BUNDLE (FRENCH) 50 $51.25
STAMPSET AD2020 153368 AUTUMN GREETINGS CLING STAMP SET (ENGLISH) 50 $23.00
STAMPSET AD2020 153916 SALUTATIONS D’AUTOMNE CLING STAMP SET (FRENCH) 50 $23.00
TOOLS AD2020 153569 AUTUMN ESSENTIALS DIES 50 $34.00 40% $20.40
PAPER AD2020 153532 GOLD CARDS & ENVELOPES 51 $10.00
STAMPSET AD2020 154871 LIFE IS BEAUTIFUL PHOTOPOLYMER STAMP SET 51 $17.00
BUNDLES AD2020 155122 MAGIC IN THIS NIGHT SUITE COLLECTION 53 $88.75
EMBELLISHMENTS AD2020 153549 IRIDESCENT PEARLS 53 $7.50 50% $3.75
PAPER AD2020 153517 MAGIC IN THIS NIGHT DESIGNER SERIES PAPER 53 $11.50 40% $6.90
TOOLS AD2020 153578 COBWEBS 3D EMBOSSING FOLDER 53 $9.00 30% $6.30
BUNDLE AD2020 155188 HALLOWS NIGHT MAGIC BUNDLE 54 $46.75
STAMPSET AD2020 153356 HALLOWS NIGHT MAGIC CLING STAMP SET 54 $21.00 10% $18.90
TOOLS AD2020 153565 HALLOWEEN MAGIC DIES 54 $31.00 30% $21.70
STAMPSET AD2020 153362 GHOULISH GOODIES CLING STAMP SET 55 $22.00
STORAGE AD2020 153519 RECTANGLE TINS 55 $12.00 30% $8.40
BUNDLES AD2020 155127 JOYEUX CARREAUX SUITE COLLECTION (FRENCH) 57 $65.25
BUNDLES AD2020 155126 PLAID TIDINGS SUITE COLLECTION (ENGLISH) 57 $65.25
EMBELLISHMENTS AD2020 153554 3/8″ (1 CM) EMBROIDERED RIBBON 57 $7.00 50% $3.50
PAPER AD2020 153527 PLAID TIDINGS 6″ X 6″ (15.2 X 15.2 CM) DESIGNER SERIES PAPER 57 $11.50
BUNDLE AD2020 155202 CÉLÉBRATION D’OCCASION BUNDLE (FRENCH) 58 $46.75
BUNDLE AD2020 155201 CELEBRATION TIDINGS BUNDLE (ENGLISH) 58 $46.75
STAMPSET AD2020 153852 CÉLÉBRATION D’OCCASIONS PHOTOPOLYMER STAMP SET (FRENCH) 58 $17.00
STAMPSET AD2020 153456 CELEBRATION TIDINGS PHOTOPOLYMER STAMP SET (ENGLISH) 58 $17.00
TOOLS AD2020 153570 CELEBRATION LABELS DIES 58 $35.00 50% $17.50
STAMPSET AD2020 153410 FLIGHT OF FANCY CLING STAMP SET 59 $20.00
PAPER AD2020 153509 MOSAIC GUSSETED CELLOPHANE BAGS 60 $7.00 20% $5.60
STAMPSET AD2020 154873 TURNOVERS PHOTOPOLYMER STAMP SET 60 $20.00 20% $16.00
BUNDLE AD2020 155212 INCONTOURNABLES DE SAISON BUNDLE (FRENCH)** 61 $35.00
BUNDLE AD2020 155211 EVERYTHING ESSENTIAL BUNDLE (ENGLISH)** 61 $35.00
STAMPSET AD2020 153866 INCONTOURNABLES DE SAISON CLING STAMP SET (FRENCH) 61 $21.00
STAMPSET AD2020 153382 EVERYTHING ESSENTIAL CLING STAMP SET (ENGLISH) 61 $21.00
BUNDLE AD2020 155209 CHOUETTES PENSÉES BUNDLE (FRENCH) 62 $51.25
BUNDLE AD2020 155208 HAVE A HOOT BUNDLE (ENGLISH) 62 $51.25
STAMPSET AD2020 153389 STAMP SET CLING HAVE A HOOT (ENGLISH) 62 $23.00
STAMPSET AD2020 153860 CHOUETTES PENSÉES CLING STAMP SET (FRENCH) 62 $23.00
TOOLS AD2020 153573 PEEK-A-HOOT DIES 62 $34.00 40% $20.40
STAMPSET AD2020 153460 STAMP SET PHOTOPOLYMER FESTIVE POST 63 $17.00
EMBELLISHMENTS AD2020 150443 SNOWFLAKE SEQUINS 64 $6.00 50% $3.00
STAMPSET AD2020 154036 BEAUCOUP À FÊTER PHOTOPOLYMER STAMP SET (FRENCH) 64 $17.00
STAMPSET AD2020 154034 LOTS TO CELEBRATE PHOTOPOLYMER STAMP SET (ENGLISH) 64 $17.00
BUNDLE AD2020 155215 BANDEROLES ENJOUÉES BUNDLE (FRENCH)*** 65 $36.00
STAMPSET AD2020 153462 FESTIVE CORNERS PHOTOPOLYMER STAMP SET (ENGLISH) 66 $17.00
STAMPSET AD2020 153883 COINS FESTIFS PHOTOPOLYMER STAMP SET (FRENCH) 66 $17.00
BUNDLE AD2020 155179 MENAGERIE MIX-UP BUNDLE 67 $51.25
STAMPSET AD2020 153446 MENAGERIE MIX-UP PHOTOPOLYMER STAMP SET 67 $21.00
TOOLS AD2020 153562 MENAGERIE DIES 67 $36.00 40% $21.60
STAMPSET AD2020 153392 PRESS ON CLING STAMP SET 68 $22.00
STORAGE AD2020 153544 ROUND TINS 68 $12.00 30% $8.40
BUNDLE AD2020 155177 LOISIRS D’HIVER BUNDLE (FRENCH) 69 $46.75
BUNDLE AD2020 155176 FREEZIN’ FUN BUNDLE (ENGLISH) 69 $46.75
STAMPSET AD2020 153797 LOISIRS D’HIVER CLING STAMP SET (FRENCH) 69 $23.00
STAMPSET AD2020 153341 FREEZIN’ FUN CLING STAMP SET (ENGLISH) 69 $23.00
TOOLS AD2020 153561 FREEZIN’ FRIENDS DIES 69 $29.00 30% $20.30
BUNDLE AD2020 155204 LITTLE TREATS BUNDLE 70 $53.00
STAMPSET AD2020 153376 STAMP SET CLING LITTLE TREATS 70 $21.00
TOOLS AD2020 153571 LITTLE TREAT BOX DIES 70 $38.00 30% $26.60
*Amount in Stampin’ Rewards; host sets can only be purchased using Stampin’ Rewards from a qualifying party.
**Bundle includes some products that are not retiring; refer to the Retiring List above to see what individual products are retiring.
***While the items in these bundles are not retiring, they will no longer be available in a bundle after 4 Jan, 2021.
AD2020 = August – December Mini Catalog 2020
As a thank you to my customers, when the order is between $50-$150 I offer a SU! item of your choice valued at $10. Remember to use MY CURRENT HOST CODE SVFB9YJY – good until Dec 10, 2020 (that’s today!). When the order is over $150, you still receive that free gift from me, but SU! has Stampin’ Rewards that may be used for additional products 😁
Thanks for stopping by.
May you have a beautiful day.
To send a letter is a good way to go somewhere without moving anything but your heart. Phyllis Theroux.
I have some amazing news from Stampin’ Up! before I share my project today: GIANT CLOSEOUT SALE FROM THE AUG-DEC MINI CATALOG beginning Dec 8 – Jan 4. These items will be first come, first sold, so if there is something you cannot live without, I recommend getting it early. I’ll post a link here…
Sale Dates: December 8, 2020 through January 4, 2021
No minimum purchase required.
Retiring items are available while supplies last.
Exclusions apply: Carryover items will not be discounted.
Due to increased shipping times and possible shipping delays during the month of December, we can’t guarantee delivery before Christmas.
Ordering Deadlines: January 4, 2021 at 11:50 PM (MT). The items that are retiring are only while supplies last!! And everything on this list is retiring!!
I can’t help thinking of items I have so enjoyed using: some of those are listed below…
WOW! I’m having a hard time realizing Christmas is just around the corner. It goes without saying ~ this has been a strange and complicated year… and you, my followers have been encouraging & helpful in making it easier. So – thank you.
As a thank you to my customers, when the order is between $50-$150 I offer a SU! item of your choice valued at $10. Remember to use MY CURRENT HOST CODE SVFB9YJY – good until Dec 10, 2020 (that’s today!). When the order is over $150, you still receive that free gift from me, but SU! has Stampin’ Rewards that may be used for additional products 😁
Thanks for stopping by.
May you have a beautiful day.
To send a letter is a good way to go somewhere without moving anything but your heart. Phyllis Theroux