SU! Playful Alphabet Dies Fun Fold

Hi Y’all… I’m on a roll here with the baby cards AND the Playful Alphabet Dies AND the Playing with Patterns 6×6 DSP. My goal is five cards with papers all from the same stash but totally different style, fold, etc. So far I think I have been successful. Here is today’s card ~ a Gate Fold

Playing with Patterns 6×6 DSP
Playful Alphabet Dies
Gaten Fold
#1

After looking at it (again and again!), I think it needs another layer behind the banner ~ may have to do that… For the time being, here’s how this card is made…

Calypso Coral cs cut to 4 1/4 x 11 then scored at 2 3/4 and 8 1/4. Add a layer of Coastal Cabana cs to each front panel, 2 5/8 x 4 1/8. (You could easily make this 2 1/2 x 4). Cut two additional panels, this time in Playing with Patterns 6×6 DSP. These two panels were each 2 x 4. Adhere, centering, to the side panels. Cut a label using the Tasteful Labels Dies. (Gosh, I use these so much – they are very versatile). With the Playful Alphabet Dies cut the letters B-O-Y from Whisper White and adhere to the label with liquid glue.Adhere the Coastal Cabana label only on the left front panel. Add five Playing with Patterns Resin Dots and your card front is done.

Gatefold
Playful Alphabet Dies
Playing with Patterns 6×6 DSP
#2

The inside is easy peasy… Coastal Cabana layer 4 x 5 1/4, then Whisper White 3 3/4 x 5. Add a strip of the Playing with Patterns 6×6 DSP that coordinates and bingo, the card is complete!

Gatefold
Playing with Patterns 6×6 DSP
#3

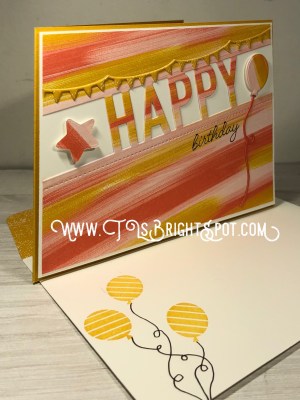
The envelope…  Simply adhere a 2 14 x 6 panel of the Playing with Patterns 6×6 DSP. Voila! Card #3 in this ‘baby bundle’ for our daughter to give as a gift to the new mother. In case you missed the last two posts, here are photos of those…

Playful Alphabet Dies
Playing with Patterns 6×6 DSP
Pattern Play stamp set

Waterfall card

Thanks for stopping by.

May you have a beautiful day.

Make someone happy by sending them a handmade card.

SU! Waterfall Card with Playful Alphabet Dies

Hi Everyone! Yesterday I told you my task is to create several baby cards for my daughter’s girlfriend.Today’s card is another to add to that gift set and it uses the Playful Alphabet Dies AND the Playing with Patterns 6×6 DSP. I did absolutely no stamping on this project but it is a new fun type card I haven’t made before. It’s called a waterfall card ~ here ’tis…

Playful Alphabet Dies
#1

This is pretty easy and I’ll talk you through it then do a very short video of how it works. The card base is Purple Posey 8 1/2 x 5 1/2, scored at 4 1/4. Cut Misty Moonlight 4 1/8 x 5 3/8 and adhere to the card front. Cut a panel of Playing with Patterns DSP 4 x 5 1/4 and adhere to the Misty Moonlight. Cut a Misty Moonlight strip 1 1/2 x 8 and score at 1 1/2, 2 1/4, 3, and 3 3/4. Burnish.  Cut four (4) 1 1/2 squares out of Bumblebee cs. Cut three (3)  1 3/8 squares out of coordinating Playing with Patterns 6×6 DSP. Cut one (1) 1 3/8 square out of Whisper White. With your Playful Alphabet Dies, die cut the letters B-O-Y out of that Whisper White Square.  This was a tight squeeze but it did work. Adhere this Whisper White to one of the yellow squares. From the die cuts, I chose to adhere the letter B, the middle of the O and left the Y to show through. Adhere this panel to the square on the 1 1/2 x 8 strip, JUST UNDER THE FOLD LINE (not on it!).Place a strip of Tear n Tape to the bottom of this panel on the back side of the Misty moonlight. Adhere the next Bumblebee square with Tear n Tape JUST UNDER THE NEXT SCORE LINE.  Continue adhering the last two squares in this same manner.

The purpose of adhering the squares just under the score line is to allow them to ‘fall’ into place as you pull the strip. Make sense?  Here are individual pictures of the placement.

Waterfall card
#3

Waterfall card #4


Waterfall card
#5

Take a peek at this video. to watch it unfold.

Cut a strip of Misty Moonlight 1/2 x 4 and a coordinating 3/8 x 4 strip of Playing with Patterns 6×6 DSP. Adhere the DSP to the Misty moonlight. Remember the Tear n Tape at the bottom of the panel with the word B-O-Y? Adhere to the front of this strip, in the center,  and bottom of the strip. Now lay flat on your card but do not yet adhere. Take a peek at this picture… the long blue section is UNDERNEATH the strip while the B-O-Y piece is adhered to the bottom of the cross strip. Get it?

Waterfall card
Playful Alphabet Dies
#2

Once you determine the correct placement of the waterfall/ cross strip, adhere Tear n Tape to the cross strip but not across the waterfall strip. The waterfall needs to slide through the opening smoothly but there should not be too much room for sideways movement. Punch a hole about 1/4″ up from the bottom of the pull strip and insert a length of ribbon  – probably 7″  before folding in half.  This becomes your cute “pull” for the waterfall. I used Daffodil Delight 1/4″ as I forgot I had Bumblebee 1/4″, but it worked!

Now do the inside… super simple… Misty Moonlight 4 x 5 1/4, Whisper White 3 7/8 x 5 3/8. A
dd a strip of coordinating  Playing with Patterns 6×6 DSP and adhere to the inside.

#6

The envelope flap has coordinating Playing with Patterns DSP and that’s it! Voila! Such a FUN CARD to make. I hope you try it…

Waterfall card
#5

Thanks for stopping by.

May you have a beautiful day.

Make someone happy by sending them a handmade card!

SU! Pattern Play Stamp Set and Playful Alphabet Dies

Hi Everyone! Ever have one of those mornings when you can’t sleep anymore? Yep, this was one of those. A little after 4 AM and my eyes were wide open. What to do? (as if there was any question!) Make a card!!! Yesterday I was talking with our daughter and her neighbor just had a baby boy. I said I would make some cards she could give her friend ~ and here’s the first one.

Pa
Playful Alphabet Dies
Playing with Patterns 6×6 DSP
#1

Foam Adhesive Sheets are the best for doing these letters – it was so easy… just adhere the foam adhesive to the back of your card stock, lay on your die cut piece and run it through your die cutting machine. I ran it through twice cause I wanted to be certain it cut through. And here’s a TIP: only adhere the foam adhesive to your designated area for cutout to avoid waste.

Here’s how to make this card…

  • Playing with Patterns 6×6 DSP ~ stripe is cut 1 1/2 x 5; large dots is cut 2 x 4
  • The Bumblebee is cut 1/8″ larger both in length and width
  • Misty Moonlight is cut 1/8″ larger both in length and width of the Bumblebee
  • The front stamped panel is 2 1/2 x 3 with Bumblebee 1/8″ larger and Misty Moonlight 1/8 larger than the Bumblebee
  • Adhere Foam Adhesive to a strip of DSP; die cut letters appropriately
  • I should have stamped the 2 1/2 x 3 Whisper White panel all over – so do that – THEN adhere the die cut letters. The stamping here was done with Bumblebee and centers colored with Purple Posy marker.
  • Card base is Purple Posy 8 1/2 x 5 1/2, scored at 4 1/4: adhere all panels

The inside was super easy ~ Misty Moonlight 4 x 5 1/4; Whisper White 3 7/8 x 5 1/8. Stamp the Whisper White with Misty Moonlight and adhere to Misty Moonlight then to the inside of the card. Voila! Your card is ready…

Pattern Play stamp set
#2

For the envelope, adhere a panel of the Playing with Patterns 6×6 DSP to the envelope flap, trim. Stamp the front of the envelop with Misty Moonlight and you are all finished.

Playful Alphabet Dies
Playing with Patterns 6×6 DSP
Pattern Play stamp set
#3

I love how all the papers in this DSP stack coordinate so well. SU! does an amazing job with their papers, and this is no exception. I hope you enjoyed today’s card.

Thanks for stopping by.

May you have a beautiful day.

Make someone happy by sending them a handmade card.


Stampin’ Up! Prized Peony, Peony Dies

Hello there!  Today’s card is another show-stopper (at least I think so) ~ the Peony Dies make it so simple! While I have created only one card, I have done two peonies 😏… When writing this post originally, I didn’t take photos of the step by step of putting these dies together, or some other things either. Since it was in my draft folder – I’ve revised a bit – so hope it isn’t too confusing!

Peony Dies
#1

Supplies needed for this card:

  • Rococo Rose ink
  • Sponge dauber
  • Thick Whisper White (card base), Whisper White (panel overlay)
  • Prized Peony stamp set
  • Peony Dies
  • Positive Thoughts stamp set (sentiments)
  • Stazon black ink (sentiments)
  • Forever Greenery Trim Combo Pack ribbon – very vanilla
  • Pearl Basic Jewels
  • Bumblebee cs for the stamen

I began by using the edge die from the Peony Dies to create this gorgeous border on Whisper White panel 4 1/4 x 5 1/2, and set it aside. The dies in this set make putting together the peony so easy – it’s four dies that decrease in size that simply slip into one another, and then the stamen goes in last.

Die cut the four parts for the peony out of Whisper White cs. Here are the four dies, smallest to largest.

Peony Dies
#!a

Using a sponge dauber, color each of the edges with Rococo Rose. At first I wanted to use Petal Pink or maybe Blushing Bride, but neither one suited ~ the Petal Pink was too light and the Blushing Bride, just no. Rococo Rose it was. TIP: When using the sponge dauber, go down the sides of each petal as well as along the top. AND… I slipped a piece of scrap into the slice of the paper to color the lower portion of each petal.

Peony Dies #2a

Peony Dies
#3a


Begin slipping in each petal making certain you have the coloring just the way you want it. It is MUCH easier to make adjustments  to the coloring as each petal goes together than if you try to do it later – just sayin’! Adhere the petals at the base as you go, with liquid glue. This next photo shows what points on the back side of the die cuts need to aligning.

Peony Dies #4a

The leaves are die cut from both Just Jade (background of the leaf) and Shaded Spruce for the detail portion. Adhere the peony with dimensionals, then add the leaves, adhering with liquid glue. When looking at the photo, notice I curled some of the leaves to make them three-dimensional. Leaves are never flat in nature!

Adhere the bow made from the Forever Greenery Trim Combo Pack. Yes, it is very vanilla, but I love the look… kinda makes it look a bit country.

Peony Dies
#1

For the inside… stamp the medium peony from Prized Peony stamp set in Rococo Rose. Stamp the sentiment in Stazon Black ink.

Prized Peony
#2

For the envelope, stamp the medium peony all over the envelope flap, open ing the flap and letting the peony come into the main portion of the envelope. Then stamp again in the lower left corner. Stamping was done in Rococo Rose.

Peony Dies
#1

Now… here is the completed 2nd rose: cs is Rococo Rose; White Craft ink for highlighting and Rococo Rose for shading. The stamen is Soft Sea Foam.

Peony Dies
#5a

Kinda fun to see the contrast from Whisper White cs to the Rococo Rose cs, isn’t it? Happy stamping, happy creating…

Thanks for stopping by.

May you have a beautiful day.

Make someone happy by sending them a handmade card.

Stampin’ Up! and DSP

Hi everyone! Monday, Monday – do you remember that song? Don’t ask me why but it’s rumbling through my brain. Goodness… Today’s card is super simple… a show-off of a DSP and some ribbon, a little of this and that. I like the color combo, the simplicity of it and the fact it could serve so many purposes AND that it shows off both sides of the DSP. Let’s take a look…

2020-2022 In Color 6×6 DSP
#1

Here are the supplies needed to make this quickie:

  • Misty Moonlight cs and ink
  • Bumblebee cs
  • Whisper White cs
  • 2020-2022 In Color 6×6 DSP – Misty Moonlight
  • Elegant Faceted Germs
  • Bumblebee Gingham 1/4″ Ribbon
  • Many Mates stamp set
  • Hooray To You stamp set
  • Ornate Frames Dies

That seems like a long list of supplies, but once the cs is cut, this card will go together licekety-split. Let me tell you how to do it…

Misty Moonlight cs is the card base cut 8 1/2 x 5 12 then scored at 4 1/4. Remove 3 1/4 of what should be the front of the card, so that 1″ is left beyond the score line. Cut the DSP 4 x 5 1/2. Lay the DSP inside the card, folding the 1″ section over it. Now use the adhesive (I used the new Stampin Seal) to run down the far left side of the DSP and the outer rim of the 1″ fold-over. Making certain the edges of the DSP align with the back of the card, close the 1″ fold-over so it adheres to the DSP. Voila! Now add all the fun stuff to make this card special…

Stamp the sentiment from Many Mates stamp set with Misty Moonlight ink onto a Whisper White scrap. Use the Ornate Frames Dies to cut it into a banner then cut another banner out of Bumblebee. The Whisper White banner gets dimensionals and is attached to the Bumblebee banner. Add the Elegant Faceted Gems – I used the white gems, the larger in the center and smaller ones on either side. These are so neat!  Add dimesnionals to the Bumblebee piece as well but set it aside while fussing with the Bumblebee Gingham 1/4″ ribbon. Here’s my TIP for the ribbon: Don’t cut it just yet; lay it where you think you might want it and run just a tiny bit of Stampin Seal to adhere the one section of the ribbon. I try to work the ribbon in about a 2″ space horizontally on the card. Attach as you get the placement just right.  Since Stampin Seal is used on both sides of the ribbon, use very small amounts in order to move it where you want it without tearing the paper – don’t press it down too firmly either. Get the ribbon the way you like it, then place the banner over top and sort of centered on the DSP. Since the banner is on dimensionals, it allows the ribbon bit of give. Now cut the ribbon – and woohoo, your card front is done!


The inside is a Whisper White panel 4 x 5 1/4, with a 1/2″ strip of the same DSP across the bottom. Add the sentiment using Misty Moonlight ink and the Hooray To You stamp set. Adhere the panel with liquid glue to the inside of your card and the card is done…

#2

The envelope gets a bit of stamping from the Hooray To You stamp set and a bit of DSP as well. And that’s it!

2020-2022 In Color DSP
#3

Wasn’t that easy and fun? You can do it too… Stampin’ Up has a a couple of “specials” going on right now. The first is when ordering over $150 double Stampin rewards kicks in – and the buyer receives rewards to get items free from Stampin’ Up!. right then and there! Not only that, but when you purchase from me and your purchase is between $50- $150, you receive a free $10 SU! item of your choice. Use my CURRENT HOST CODE J2E4VDM for that order. If your order is over $150, while you still get the frtee item from me, DO NOT use the Host Code as SU! will give you those double rewards. Sounds awesome doesn’t it! Let me know if I can help you get started… fee free to send me an email to tlsbrightspot@gmail.com


AND there’s a “joining a team” special as well – look at this cool flyer to get the details…  06.03.20_FLYER_RECRUITING_PROMO_NA

Thanks for stopping by.

May you have a beautiful day.

Make someone happy by sending them a handmade card.

SU! Hand- Drawn Blooms and Banner Blooms Dies

Hi Everyone – it’s going to be another scorcher here on the East coast followed by rain this afternoon ~ a definite stay in the air conditioning kind of day. Our daughter lives not far and their ac is broken – a new ‘mother board’ had to be ordered. They, my friends, are miserable! And with all this isolation and stuff, they are uncomfortable coming here for the night. Doubt they slept very well last night 😞 On with the card – right?

In yesterday’s post, I shared the die cut and I decided to see what I could make of it. It isn’t my favorite, but I think it turned out well, and it’s already in the mail, so there you go…

Banner Blooms Dies
#1

And here are the ingredients to make this lovely…

  • Gorgeous Grape cs/ ink
  • Pear Pizzazz cs (extra leaves) and marker
  • Whisper White (banner & inside panel)
  • Playing with Patterns 6×6 (die cut)
  • embellishments ~ Pearl Basic jewels, Playing with Patterns Resin Dots
  • Wink of Stella
  • Hand-Drawn Blooms stamp set
  • BAnner Blooms Dies
  • Sunflower Dies
  • Thick Whisper White cs

And here’s the how to…

Die cut the bouquet using the Banner Blooms Dies and Playing with Patterns of 6×6. Add Wink of Stella to the very small daisy like flowers, then wherever else suits you. It’s easier to do this before adhering but you can certainly add more later. Adhere very loosely with liquid glue to the Gorgeous Grape card base ~ in the banner area and a couple of places in the upper portion.. Notice in the picture the bottom half of the bouquet is not adhered at all. Stamp the banner with Memento Black ink on Whisper White and die cut using the Banner Blooms Dies. You will need to trim the excess. I wanted the extra little ‘tufts’ at the ends of the banner as I liked them :). Use a bone folder to soften the paper to make it bend and curl a bit. Adhere double dimensionals in the center only and glue dots near the ends, but allow the ends to curl up.

Now’s the time to do all the ‘trimmings’ ~ I added the Bumblebee Playing with Patterns Resin Dots and lots of tiny pearls (Pearls Basic Jewels) to the smallest flowers. I stamped one of the daisies from the Hand-Drawn Blooms stamp set in Gorgeous Grape, die cut it with the Banner Blooms Dies and covered it in Wink of Stella. This moves the ink color around a bit. I added a dimensional to it and placed it on one of the flowers that had a similar shape. I then die cut a couple of leaves from the Sunflower Dies in Pear Pizzazz. They are a similar shape to the leaves in the bouquet and gave a nice accent. Adhere this panel to a Thick Whisper White card base using dimensionals and your card front is ready!.

The inside and the envelope…

Hand-Drawn Blooms stamp set
#2

Hand-Drawn Blooms stamp set
#3


Let me say – I love this little daisy! It is just cute, cute, cute… I stamped it in Gorgeous Grape several times across the bottom of the Whisper White panel. I then added stems and leaves with a Pear Pizzazz marker.  This was adhered to a panel of Gorgeous Grape with liquid glue then added to the inside of the card, again with liquid glue.


For the envelope I covered the flap in a remnant of the Playing with Patterns 6×6 paper and added a strip of Highland Heather, then I stamped the cute daisy, again with Gorgeous Grape.

And woohoo – your card is ready! As I said earlier, this is already in the mail and I used it as an anniversary card for a very special couple.

I hope you liked today’s card. Be well, stay safe.


Thanks for stopping by.

May you have a beautiful day.

Make someone happy by sending them a handmade card.

SU! Hand Drawn Bloom stamp set and Banner Blooms Dies

Hi All – happy Wednesday! I hope you made through all the cards as part of Amy’s Inkin’ Krew Blog Hop… fun wasn’t it? Now for today’s inspiration… Hand Drawn Blooms and the matching Banner Bloom Dies – both new in the SU! 2020-2021 Annual Catalog. Here’s the card…

Hand Drawn Blooms stamp set
Banner Blooms Dies
#1

This reminds me so much of a country garden ~ I really, really like it! Here are the supplies I used…

  • lots of Blends: Granny Apple Green, Poppy Parade light & dar, Daffodil Delight light and dark, Highland Heather light and dark and Bronze
  • Garden Green cs and ink
  • Memento Black ink
  • Daffodil Delight cs (for the banner)
  • Whisper White cs AND Whisper White Thick cs
  • Rhinestone Basic Jewels
  • Hand Drawn
    Blooms stamp set
  • Banner Blooms Dies

And here’s the how to…

First of all, the floral bouquet is in two parts.. stamp the upper portion first (well, I did…) in Garden Green on a Whisper White panel, then stamp the bottom half. It’s a little fussy and took me practicing with a scrap but it worked. The Stamparatus is a big help with this since the top is fairly large and I stamped it a couple of times to get the shade of green I wanted and everything covered. Then the fun began with coloring the various flowers. These are such tiny flowers it doesn’t take much more than just a dot of the Blends tip for some of them.

Stamp the sentiment on a piece of Daffodil Delight with Memento Black ink, then die cut it with the Banner Blooms Dies. It will need trimming down to size as this is an ‘all in one die’! (There’s a picture later…I wanted the banner to be raised in the middle so once I did the die cut (from the Banner Blooms Dies), I doubled the dimensionals in the center and took my bone folder and gently rolled the paper. The banner tips curl up nicely. I also added a glue dot  just before the banner curls up at the end. Last but definitely not least, were the Rhinestone Basic Jewels. They added just the right sparkle to this card!

Adhere this card panel to a slightly larger Garden Green cs, put dimensionals on the back and adhere to a Thick Whisper White card base. Your card front is ready!

The inside…

Hand Drawn Blooms stamp set
Banner Blooms Dies
#2

So simple and fun… Die cut the stems/ leaves (all one die) in Garden Green cs and adhere with liquid glue to the Whisper White panel. Stamp the daisy in Memento Black in and color with Daffodil Delight Bends and the center with the Bronze. Die cut and adhere it with liquid glue. The smaller daisy is stamped right on the panel, with Memento Black ink and colored with Daffodil Delight. Adhere to a slightly larger Garden Green panel with liquid glue and then into the Thick Whisper White. Your card is complete!

The envelope was extra fun to do…

Hand Drawn Blooms stamp set
#3

Randomly stamp the poppy from the Hand drawn Blooms stamp set in Memento Black ink, both on the card front and the envelope flap. Color just the envelope front with both light and dark Poppy Parade Blends. TIP: When coloring an envelope, slip a large piece of scrap cs inside the envelope so the Blends do not bleed through :O) ask me how I know that! 

Your card is ready to send to someone… This could easily be a birthday or new job or graduation card – your imagination is the limit. Fun right? Now I want to share with you the whole fun die… It will be used in a future post, maybe even tomorrow :O) Who knows?

Banner Blooms Dies
#4

Now is a great time to join SU! And even be on my team! Right now SU! is offering a FREE BUNDLE of your choice as part of the inspiration to join as a demonstrator. A FREE BUNDLE of your choice! Who can pass that up?

To place an order please use my CURRENT HOST CODE J2E4VDGM if your order is between $50- $150 to receiver a free SU! item from me worth $10. Over $150 you still receive the free item from me AND the rewards SU! offers right now – and they are double right now – so double rewards… IF YOU do not have a demonstrator, pleaswe contact me for further details on receiving a catalog. In case you wish to peruse a catalog now – here is a PDF version.

2020 AC US

Thanks for stopping by.

May you have a beautiful day.

Make someone happy by sending them a handmade card.

SU! So Much Happy

Hello Everyone! Today’s card is made with the brand new So Much Happy Stamp Set and matching dies… Happy Dies. You are going to love this set… it has so much to offer and I had the best time making today’s card.

And thank you for stopping by… Amy’s Inkin’ Krew Blog Hop is full of fabulous cards and inspiration. Here’s mine…

So Much Happy stamp set
Happy Dies
Playing with Patterns DSP
#1

Oh so much to share about this card… first of all, masculine or feminine, child or adult – it fits!  Next – the dies (Happy Dies) and paper (Playing With Patterns 6×6 DSP) make this card so easy. And the stamp set ( So Much Happy) allows you to make this not just a birthday card but also a graduation or a celebration of a wonderful person.

Here’s a list of supplies…

  • So Much Happy stamp set (card front and envelope front)
  • Happy Dies (card front)
  • Playing with Patterns 6×6 DSP (card front)
  • Whisper White cs (background for card front and inside panel)
  • 2020-2022 In Color 6×6 ( banner on card front and envelope flap)
  • Best Year stamp set (for the inside sentiment)
  • Bumblebee cs and ink (card base and balloons on envelope)
  • Calypso Coral cs (balloon tail and inside panel)
  • Stazon black ink (sentiments)
  • Journaling pen (balloon tails on envelope)

And here’s the how to…

I started by choosing to play with the Playing With Patterns 6×6 DSP – so many fun papers in this stack! Because it already had this wonderful angle design, I followed that angle and used the die cut from the Happy Dies.  OK, what else? I played around with some other options for the balloon and star but returned to the scraps of the Playing With Patterns 6×6 DSP and came up with a match for the balloon tail as well (Calypso Coral) die cut both the balloon and star  and the tail at the same time. :o) Next I stamped the birthday sentiment. Then I wanted just one more accent… the Happy Dies have two dies that do not cut but EMBOSS your paper with a design. I used the one that looks like a broken underscore line and embossed it between the HAPPY and the birthday. Can you see it in the photo? If you put your curser on the photo and enlarge it, it’s visible and really adds a fun touch to the card. I adhered the balloon tail where I wanted it then adhered this DSP panel to Whisper White, put dimensionals on the balloon and star and attached. I wasn’t quite ready to stop – – I die cut the banner twice using the Happy Dies and the 2020-2022 In Color 6×6 DSP (Bumblebee). I die cut it twice to add dimension to the banner. This was adhered with small dots of liquid glue. This completed panel was adhered to the Bumblebee cs with dimesnionals. Card front complete!

The inside…

Best Year stamp set
#2

Don’t you love the different fonts in this sentiment?  And the sentiment is pretty darn neat too :o) This was stamped in Stazon black ink onto a Whisper White panel for a very crisp look – using the Best Year stamp set. This in turn, was adhered to Calypso Coral with liquid glue then attached to the card inside, again with liquid glue. Your card is done!

Now for the envelope… let’s take a peek at that envelope again…

So Much Happy stamp set
2020-2022 In Color 6×6 DSP
#3

I stamped the balloons with Bumblebee ink (new In Color!) and added the tails with my black Journaling pen. The envelope flap got covered with the 2020-2022 In Color 6×6 Bumblebee paper and the card set was done!

Now let me show you one of the other dies in this Happy Dies package that allows you to emboss a pattern on the card. You may need to enlarge the photon to see it though. I stamped the sentiment, added the embossing to the left and at near the bottom of the panel and adhered it to a Calypso Coral panel before realizing it was going in the wrong direction for my card! It’s been saved, have no worries there, but look for the embossing in the photo below.

Happy Dies
Best Year stamp set
#4

Such a fun cheerful card. I hope you enjoyed… Thanks for stopping by. May you have a beautiful day. Make someone happy by sending them a handmade card ❤️

Now on to the next person on the hop or go to the person before me… enjoy! And if you get lost along the way, here’s a list of those participating today.

  1. Karen Ksenzakovic: https://wp.me/paaNf4-2lT
  2. Leslie Larkin: https://leslielarkin.com/beautiful-world-bundle/
  3. Akiko Sudano: https://wp.me/paOv8E-1hC
  4. Karen Finkle: https://karenscardkorner.blogspot.com/2020/06/stampin-up-amys-inkin-krew-blog-hop.html
  5. Jaimie Babarczy: https://wp.me/p79UhD-3WJ
  6. Mary Deatherage: https://wp.me/p5snyt-dhf
  7. Terry Lynn Bright: https://wp.me/p8fxPh-y7
  8. Donna Leonard: http://stampdabbles.com/?p=2030
  9. Amy Koenders: https://wp.me/p2SFwf-jMS


SU!Thank You with DSP Focus

Hi Everyone! Today’s card was created for our neighbor who so generously gave us unused mulch… of course, I had to cart it uphill to our yard, but hey, it was free…  useful… and needed. So there you have it.😉 We have great neighbors! And I totally cased this card from Amy Koenders!

Here’s the card…

Ornate Thanks stamp set
Ornate Layers Dies
#1

And here’s a list of supplies…

  • Ornate Thanks stamp set
  • Ornate Layers Dies
  • Stitched Rectangles Dies
  • Misty Moonlight 2020-2022 In Color ribbon
  • In Good Taste DSP
  • Neutral 6×6 DSP – Night of Navy
  • Night of Navy ink & cs
  • Whisper White cs
  • Smokey Slate cs
  • Versamark
  • White embossing powder

And here’s how I did it…

I started by die cutting the two rectangles for the front using the Stitched Rectangles Dies. I adhered these two together with the new Stampin Seal (it works great… has an end cap so it doesn’t stick to anything else when you put it away. I’m happy with it.) I then adhered them to the card front (Smokey Slate) with the same Stampin Seal. With Night of Navy cs I stamped the card front sentiment with Versamark ink using the Ornate Thanks stamp set, sprinkled it with White Embossing powder and heat set it. TIP… this needs to cool a bit before handling as it’s kinda sticky while still warm. I then die cut it using the Ornate Layers Dies. This was put on dimensionals and set aside. I cut a length of ribbon from the Misty Moonlight 2020-2022 In Color spool and adhered it with the Stampin Seal. The sentiment on dimesnionals was placed over the top and centered on the card.

For the inside…

Ornate Thanks stamp set
#2

With a panel of Whisper White cs, I stamped the sentiment from Ornate Thanks stamp set in Night of Navy. I adhered a strip of the Neutral 6×6 DSP in Night of Navy 1/4″ from the bottom and added another strip of the In Good Taste DSP over the top. This was adhered to the Smokey Slate card base and the card was complete!

The envelope…

Ornate Thanks stamp set #3

Stamp the sentiment in Night of Navy from the Ornate Thanks stamp set. Adhere the Neutrals 6×6 Night of Navy to the envelope flap and the envelope is complete. Wheee. Easy peasy and so perfect for our neighbors.

All of these products may be found in the new 2020-2021 SU! catalog. If you do not have a demonstrator and wish to have a catalog, contact me. Either way, here’s a PDF copy for you to browse at your leisure.

2020 AC US

It is such a beautiful day and I am so very thankful…

for my health, for life, for sun, for rain, for nature, for all of God’s world.

It is not a perfect place, especially right now. But I am still thankful.

Thanks for stopping by.

Make someone happy by sending them a handmade card.

Stampin’ Up! NEW Beautiful World

It is Tuesday and just one more day before the 2020-2021n Annual Catalogue goes LIVE! Eek… More new stuff 😁 –  Today’s card features several products that are part of a suite of absolute gems… Beautiful World stamp set with coordinating World  I almost forgot… the Old World Paper 3D Embossing Folder (fabulous!). Let’s take a look…

Beautiful World stamp set
World Map Dies
#1

Basic ingredients for this card…

  • Cinnamon Cider cs
  • World of Good Specialty DSP
  • Old World Paper 3D Embossing Folder
  • Brass Foil Sheets
  • World of Good Memories and More Card Pack
  • Beautiful World stamp set
  • World 0f Map Dies
  • Lovely Labels Pick a Punch
  • Misty Moonlight cs/ ink
  • Very Vanilla cs (for the fussy cut sentiment and inside panel)

While this seems like a lot of items, this card goes together very quickly. – and here’s how to do that… card cuts are listed at the bottom of this post.

  • Using the fabulous (oh, did I say that already?) Old World Paper 3D Embossing folder, emboss a panel of the World of Good Specialty DSP. This paper is thin enough and I don’t think it needs spritzing before putting through the embossing folder.
  • Adhere this with liquid glue to your Cinnamon Cider cs base
  • Die cut the two worlds using the World Map Dies and a strip of the Brass Foil Sheets,
  • Adhere with liquid glue to a card from the World of Good Memories and More Card Pack
  • Put dimensionals on this and adhere to another panel of the World of Good Specialty DSP. Add dimensionals to this and adhere to the card front.
  • Stamp your sentiment from the Beautiful World stamp set with Misty Moonlight on Very Vanilla scrap and fussy cut. Adhere this to the Misty Moonlight strip that was cut with the Lovely Labels Pick A Punch.
  • Attach the label with liquid glue at the top and mini dimensionals along the bottom. Card front is complete!
  • Now for the inside and the envelope…
  • Stamp the world using the Beautiful World stamp set, stamping off twice with Misty Moonlight on a Very Vanilla panel.
  • Stamp the sentiment using the same set and Misty Moonlight ink, stamping at least twice to darken.
  • Adhere the Vary Vanilla panel to a piece of Misty Moonlight with liquid glue and attach to the card inside.
  • The envelope got this cuter little inkwell with Basic Gray ink and the feather in Misty Moonlight  – looks like an old world pen & ink!
  • Beautiful World stamp set
    #2

  • Whee – your card is complete! Isn’t this stunning? (even if I do say so myself) It is such a special masculine card. It could be used for a graduation card, someone changing jobs, someone exploring different options for their life. This particular card is going to someone who just passed a certification for a different direction in their career. I hope they like it!

TOMORROW IS THE BIG DAY… THE 2020-2021 ANNUAL CATALOGUE GOES LIVE TO CUSTOMERS – 12 noon Mountain Time, 2 PM Eastern time. Are you ready – is your listg prepared? When you shop with me, remember you receive a free item of your choice worth up to #10 for any SU! product – and when your purchase is $50-$150! That’s a good deal folks… If your purchase is over $150, you still receive a free gift from me, but you also receive Stampin’ Rewards from the company. And that’s a special deal as well. So shop with me and use my HOST CODE… J2E4VGM.

Thanks for stopping by.

May you have a beautiful day.

Make someone happy by sending them a handmade card!

I apologize for my late post… technical difficulties today!!!