SU! Tag Buffet #3

Today’s card is another using the wonderful Tag Buffet stamp set and using the stocking stamp. It’s so cute, that little stocking! Here’s the card…

Tag Buffet stamp set
#1

These are the stamp sets I used for this card:

  • Tag Buffet stamp set for the stocking
  • Dove of Hope stamp set for the for the sentiment on front.
  • Cherish the Season Stamp set for the pine branches and the inside sentiment

I also used:

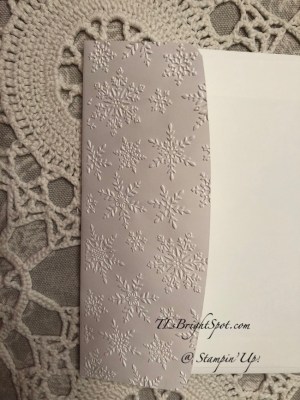
  • Winter Snow Embossing Folder with Whisper White Craft ink
  • Adhesive-So Sweetly Dies – the 3rd smallest, the largest and next to largest
  • Ornate Layers Dies for the inside
  • Wonder of the Season Combo Pack Ribbon – the Gold cord
  • Just Jade Stampin Blends for coloring the stocking, fussy cut and placed on dimensionals
  • Pick a Punch for the sentiment tag

Papers:

  • Just Jade cs 3 3/4 x 5 for the front panel run through the Snowflake embossing folder and 4 x 5 1/4 for the inside (this panel should have been a bit larger 4 x 5 3/8
  • Tis the Season 6×6 DSP approx.4 x 2 1/2 + 2 1/4 x 6 for the envelope flap
  • Whisper White approx. 3 x 4 1/4 and die cut the background for the stocking out of the center šŸ™‚Ā  and approx .4 1/4 x 5 1/4 for the inside die cut

All the layers are adhered with liquid glue except the stocking, which is on dimensionals. Here are more pictures…

Tag Buffet
#2

Tag Buffet, inside
#3


And here’s a final picture…

Tag Buffet
#5

This was a bit of a new format for this card, lots of layering and fairly simple, so wasn’t sure tons of directions were necessary.

Thanks for stopping by.

May you have a beautiful day.

Make someone happy by sending them a handmade card filled with love.

Below is a list of the supplies that will take you directly to my online store 😁 Enjoy shopping and creating… When you shop with me, you will receive a SU! item of choice worth $10 when your purchase is over $50. All you have to do is let me know what that is after placing your order (and yes, I WILL reach out to you when your order is placed!)

.<div><div><div id=”635c1263-e56c-4412-8ab8-2603588a2b2c”>https://mystampinblog.com/Showcase/Details/fff0eab3-4155-414f-bdb2-4ee4cf5992db?layout=Tiled&showSku=True&showPrice=True&showSalePrice=True&showAddToCart=False&showAddAllToCart=True&showDownload=True&transparent=True&bordered=True&hFontHeight=14&rFontHeight=13&imageHeight=120&middleContent=False</div>https://mystampinblog.com/Script/ShowcaseDetailsScript</div></div>


And now is the perfect time to join my team as well… SU! has this awesome deal going on until Sep 30… take a peek…

  • SU! has a promotion going on for new recruits that is a win-win for everyone… for $99 you will get a starter kit worth of products valued at $125 – plus two card sets with instructions & an additional stamp set & Rhinestones. What’s not to like about that? Join my team- and yes, do it NOW so you get all the benefits of this awesome deal. More details below.

.

  • In addition to the regular starter kit (forĀ $99 USD/$135 CAD, new recruits chooseĀ $125 USD/$165 CAD-worth of products) new recruit will also receive enough card stock pieces to make 16 cards, a pack of Rhinestone Basic Jewels, the So Much Love stamp set, and the Queen Anne’s Lace stamp set—all for their first event.
  • 8 packs of precut card stock of the coastal cabana pack will be provided, and 8 packs of precut card stock of the Granny Apple Green pack, for a total of 16 cards (packs include envelopes). The new recruit can choose what samples to replicate and how to distribute the packs to their customers.
  • Important note: Ink, adhesive, cutting tool, and clear block for stamping must be purchased separately. However, these products may be included as part of the Starter Kit product selection.


SU! Ornamental Envelopes and Celebrations Labels Z-Fold

Helllooooo. It’s Monday, the start of a new week. What’s your plan – who are you reaching out to? My card today is guess what – a CHRISTMAS CARD! Yep – I’m back to making them and a fun fold is always a bit exciting – and creating a Z-Fold is – just – easy. Let’s take a look…

Z-Fold, Celebration Labels w/ Ornamental Envelopes
#2

Z-Fold, Celebration Labels
#1


Fun look, right? I’ve used a few stamp sets on this card to get the sentiments or images I wanted. I love these ornaments and they were so fun to color. But I’m getting ahead of myself… Choose a DSP that will add color to the background but not compete with your main image. Here I chose Snowflake Splendor DSP and adhered it to the card front (that card stock is Pacific Point 4 1/4 x 11 and scored at 5 1/2). With the Celebration Labels Dies, cut one in Whisper White for your stamping and the next size larger for a nice background. You are actually cutting through the card front and the DSP and card stock layers. AND – big tip here, listen carefully – you are cutting from the back side of the card front . The reason for this is to have the plain side behind your main image and to have a decorated side when you open the card. It makes the larger die cut stand out more as well.Ā 

Stamp the ornaments from the Ornamental Envelopes stamp set, only using the four ornaments shown. In other words using sticky notes, tape off that section on the stamp you do not want in your image prior to inking, ink the appropriate area in Tuxedo Black Memento ink – then remove the sticky notes and stamp on the die cut Whisper White. Stamp the sentiment using the Itty Bitty Greetings stamp set in Granny Apple Green. Now color the ornaments – I used: Poppy Parade, Granny Apple Green, Daffodil DelightĀ  and Shaded Spruce Stampin Blends. Put dimensionals on the back and adhere to the solid color side of the larger die cut.

For the Z-Fold: cut a strip from Whisper White 2 1/2 x 10 and score at 4 & 8. Burnish these score lines well so they make a wonderful Z. This creates ‘panels that are 4″, 4″ and 1 1/2″. The smallest panel is the end that will attach to the Celebration Dies and the opposite end will adhere to the inside of the card. With the 4″ end and the score line against the score line of the card, adhere the two together with liquid glue, centering it from top to bottom.Ā  Look at this photo again for reference… Now it is time to adhere the die cuts for the front. With the card closed and the 1 1/2 strip facing you, place the die cut panel right into it’s place and adhere with liquid glue. Voila – the Z-Fold is created! Now you are ready to create the inside.

Z-Fold, Celebration Labels
#1For the inside, cutĀ  2 panels of Seaside Spray cs 2 3/8 x 3 7/8; then cut two panels of Whisper White cs 2 1/4 x 3 3/4. Stamp your Whisper White panels. I used Yuletide Pasture stamp set ‘cuz these animals remind me of those in the stable with baby Jesus. šŸ™‚ I stamped them in Soft Suede ink and then used the smallest of the Water Painters to ‘bleed’ the color. The collar of the sheep was colored with Poppy Parade, the bells with Daffodil Delight and the leaves with Granny Apple Green – all Stampin’ Blends.Ā The sentiment on the sheep panel was from the Itty Bitty Greetings stamp set and stamped in Granny Apple Green ink. The bullĀ  got fun ornaments hung from his horns using the Little Treats stamp set and colored with Poppy Parade, Granny Apple Green and the Daffodil Delight Stampin Blends.Ā 

Now these Whisper White panels are colored, adhere them to the Seaside Spray panels with liquid glue, then adhere to the inside of the card on the strips. This picture will help you. I apologize it’s in the wrong direction! Should have fixed that… 😦

Z-Fold inside card
#3

Now flip the card over and do something for the back – – I cut a panel of Whisper White 4 x 5 1/4, stamped the sentiment from the Little Treats stamp set in Granny Apple Green ink and adhered to the card with liquid glue. And your card is complete!!! Such fun. Love doing this.

Z-Fold, back
#5

Z-Fold
#4


Thanks for stopping by today.

May you have a beautiful day.

Make someone happy by sending them a handmade card filled with love.


SU! In The Pines Bundle

Ever have one of those nights when you can’t sleep? Well, that was my night last night – restless, wide-eyed. No doubt I will be worthless most of the day because of that. But for right now, I’m writing my post – and that’s a good thing… In The Pines… I’ve had this bundle for a while and it’s been ‘calling’ me to play, but I kept pulling out other stamp sets or Dies. It is so versatile, some marvelous tree dies. I got busy and created two cards, each very different from the other. Let’s take a peek…

In The Pines w/ coordinating Pine Woods Dies
Card #1

In The Pines w/ Pine Woods Dies
Card #2

Aren’t these trees gorgeous? Card #1 is two die cuts: the intricate part and the outline die. I used the outline after die cutting the detail in white then used the outline again for the green of the tree. The Tree in card #2 is a single tree. The background is the fabulous Evergreen Forest 3D embossing folder.

Let’s go back to card #1 and re-create it… With the Pine Woods Dies, die cut the detail of the tree from Whisper White cs. Then use the outline die to create the tree. Die cut another tree outline from Shaded Spruce cs and adhere the white tree to it with liquid glue. TIP: You could use an adhesive sheet for the detail of the tree and adhere it to the green that way, but I didn’t think of that until later.Ā 

I then took one of the papers from the Plaid Tiding 6×6 DSP and die cut a panel using one of the Stitched Rectangle Dies. I adhered the tree to that DSP with dimensionals. Using a larger Stitched Rectangle die, I cut a panel from Shaded Spruce cs. I adhered the DSP piece with the tree to the Shaded Spruce panel with dimensionals. This was then adhered to a Whisper White Note Card with liquid glue. I next attached a Star Element for the tree top, and a copper bow from the Basketweave & Metallic Ribbon Combo Pack. For the final touch of the front, I adhered Elegant Faceted Gems, both the white and the clear. To me this makes it look as though there are several presents under the tree :O)

For the inside I stamped the tree outline in Shaded Spruce and then the tree ‘filler’ in Garden Green stamped off once. It’s a very cute small tree. For the envelope I used the same Plaid Tidings 6×6 DSP to cover the envelope flap then stamped the same tree from the inside of the card to the envelope front. And Card #1 was complete!

In The Pines stamp set
inside card #1

In The Pines Bundle
Card #1


Card #2 I did very differently… I took a panel of Whisper White cs and ran it through the Evergreen Forest 3D embossing Folder. I then took a cosmetic brush and tapped it into a Shaded Spruce ink pad and smoothed it around adding color to the paper. I did the same with Garden Green and Granny Apple Green ink. This gave the tree wonderful dimension making them look similar to a real forest :). For the sky I again used the cosmetic brush with Balmy Blue first then an overlay of Seaside Spry. These were done very lightly but it shows clearly.Ā  I adhered this to a larger Whisper White panel with liquid glue. This then was added to a Garden Green card base with dimensionals. I die cut another tree using the Pine Woods Dies from Whisper White and adhered it to the card front with dimensionals. The sentiment was stamped in Garden Green ink on a Whisper White strip and comes from the Itty Bitty Greetings stamp set. I cut a banner for the end and adhered it with dimensionals. Here it is again…

In The Pines w/ Pine Woods Dies
Card #2

For the inside I took one of the tree stamps from In The Pines stamp set and stamped it in Garden Green ink on a Whisper White panel. This was adhered to the inside of the card with liquid glue. For the envelope I stamped the same trees both to the card front and the envelope flap. And card #2 was complete! What a fun bundle… I encourage you to try it.

In The Pines stamp set
inside card #2

In The Pines Bundle
Card #2

Fun set of cards, right? And so different, yet from the same bundle: In The Pines stamp set w/ coordinates Pine Woods Dies. Love it… Also the Evergreen Forest 3D Embossing Folder….

Shop with me and receive a SU! item of choice worth $10 if your purchase is between $50-$150 and use my CURRENT HOST CODE 4TEZ7HWY.Ā If your purchase is over $150, don’t use the Host Code as SU! will offer you special rewards. (You will still receive the free item from me though!)

OK, what else – only a couple more days to redeem those coupons from August. I have an order I’m placing today to use my last coupon..

Business…. during the month of September, SU! is going to have a ‘joining’ special – do hope you will join my team and become a creative junkie with me. Let me know if I can help you make that decision – if you have questions, etc.


Box of Sunshine shareable image


This is also the time to be cashing in those BONUS rewards earned during the month of August. Do not let those go to waste! If not used in August they will be lost forever.

Thanks for stopping by.

May you have a beautiful day.

Make someone happy by sending them a handmade card made with love.

Remember to cash in those Bonus Coupons from purchases made last month!

20200804_AD_en_US Annual Catalog PDF

August_89_2020 Mini Catalog PDF

Card Cuts:

Card #1

  • Note Cards & Envelopes – Whisper White
  • Whisper White scrap for tree – about 3 1/2″ x 2 1/2″
  • Plaid Tidings 6×6 DSP
  • Shaded Spruce cs about 4 3/4 x 3 1/2

Card #2

  • Whisper White embossed panel 4 x 5 1/4; panel behind it 4 1/8 x 5 3/8, inside 4 x 5 1/4 + scraps for die cut and sentiment banner
  • Garden Green cs 4 1/4 x 11 scored at 5 1/2


SU! Snow Wonder Stamp Set/ Dies

Tuesday, this musty be Wonderful Wednesday 😁… hee hee hee. And… time for another Christmas card! I know, I need to make some cards using items from the 2020 Annual Catalog, but Christmas, well, I can’t seem to get enough. This is such an EASY card, you could make several using papers from any of the Designer Series Papers and make it fall themed or a thank you or a birthday or even a sympathy card, make it masculine or super feminine. Here goes…

Snow Wonder stamp set/ Snow Time Dies

Snow Wonder Stamp Set/ Snow Time Dies


Can you see how you could remake this card? Another post šŸ™‚ The Designer Paper used here is called Heartwarming Hugs DSP. One of the greatest parts of SU! (and I know I have said this before, but..) is how they coordinate. The pack of DSP can so easily be interchanged without thinking too hard. Three strips were cut and adhered to a panel of Whisper White cs and that was adhered to the Pear Pizzazz card base – all with liquid glue. I stamped the sentiment from Snow Wonder stamp set on a Whisper White scrap with Pear Pizzazz ink then I die cut two banners using the Snow Time Dies, one in Pear Pizzazz and the stamped one in Whisper White. The sentiment banner got dimensionals and placed on top of the Pear Pizzazz banner. I took a length of the Double Stitched Satin Ribbon, 3/8″ Real Red, and looped it, adhering together with glue dots. Once I had it in place on the card front, I cut another length and put it crosswise. The banner went over this with dimesnionals on the back. I felt the front needed something more and used the All The Trimmings Embellishments, Real Red and popped them on the banner. Since they are self adhesive, easy peasy.

Snow Wonder stamp set/ Snow Time Dies

For the inside I took two snowflake embossing dies from the Snow Time Dies and ran them through the die cut machine. I took a sponge dauber and very lightly rubbed over them to show them off a bit more. I’m not sure the picture shows it very well. If you enlarge the photo, you can see the snowflakes. :l

Snow Time Dies – embossed

For the envelope, I used several scraps from the Heartwarming Hugs DSP and adhered them to the envelope flap. And voila! Quick, easy, fun!

Snow Wonder stamp set/ Snow Time Dies

Business…. during the month of September, SU! is going to have a ‘joining’ special – do hope you will join my team and become a creative junkie with me. Let me know if I can help you make that decision – if you have questions, etc.


Box of Sunshine shareable image


This is also the time to be cashing in those BONUS rewards earned during the month of August. Do not let those go to waste! If not used in August they will be lost forever.

Thanks for stopping by.

May you have a beautiful day.

Make someone happy by sending them a handmade card created with love.

Card cuts:

  • Heartwarming Hugs DSP 1 1/4 x 5 1/4 (cut 3)
  • Whisper White 4 1/8 x 5 3/8 (cut 2) + scrap for banner
  • Pear Pizzazz 4 1/4 x 11 scored at 5 1/2 + scrap for banner

SU! StitchedfStars

Hi there! It’s Terrific Tuesday – why not? We can make our day terrific, or not, and this is what I choose – terrific. Let’s go for it…

Today’s card is made with a die set that came out last year called Stitched Stars Dies. For the inside I used a stamp set from the new Aug-Dec 2020 Mini Catalog called Snow Wonder. They worked beautifully together.

Stitched Stars Dies

This is very 3 D as the large star has three dimensionals in its middle. Tis The Season 6×6 DSPĀ  is the centerpiece for this card. I love the contrast of another panel of the same DSP in the background. So let’s talk particulars… Die cut the 6 stars – I happened to use the same paper for all the stars and die cut them all at the same time. Then I took the largest star and scored it…from the center, score to all five points then score again from the center to each of the inner points of the star. Fold along the pointy score lines just with your hands and press firmly. Then fold in the opposite direction (valley) each of side score lines. it creates mountain/ valley creases. Before adhering, let’s prepare the card front panels.

Cut a panel of the Tis The Season 6×6 DSP that coordinates/ contrasts with the die cut stars. Behind this is a panel of coordinating cs – Cherry Cobbler. Both have been adhered to the card front with liquid glue. Now you are ready to place the stars. (Card cuts may be found at the end of this post.)

Put dimesnionals in the center of the star – I stacked three – and place on the front of the card panel. Place the other stars where you desire. I cut mini dimensionals in half to put on three of the other stars, stacking two of them together just with liquid glue. Only the smallest star was adhered to the card front with liquid glue. The three stars on dimesnionals also got a Real Red gem from Wonderful Gems pack.Ā I felt the large star needed something so searched my embellishments and found – drum roll here – Star Designer Elements – and placed one in the large star center. Voila – card front is complete!

For the inside, I adhered a panel of Cherry Cobbler cs to the Thick Whisper White card base with liquid glue. With regular Whisper White, I stamped the sentiment in the center with Cherry Cobbler ink and the Snow Wonder stamp Set. I then stamped the trees, stamping off twice, over the sentiment with Garden Green ink. It’s important to stamp off at least twice so this delicate sentiment shows through the trees. Adhere to the inside of the card. Done, done.

Snow Wonder stamp set for inside of card

For the envelope I used a coordinating red panel of Tis The Season 6×6 DSP for the envelope flap.

Stitched Stars Dies

So what do you think? So simply done but a very effective standout card. I do hope you will try this and share your results with me.

Business…. during the month of September, SU! is going to have a ‘joining’ special – do hope you will join my team and become a creative junkie with me. Let me know if I can help you make that decision – if you have questions, etc.


Box of Sunshine shareable image


This is also the time to be cashing in those BONUS rewards earned during the month of August. Do not let those go to waste! If not used in August they will be lost forever.

Thanks for stopping by.

May you have a beautiful day.

Make someone happy by sending them a handmade card made with love.

Remember to cash in those Bonus Coupons from purchases made last month!

20200804_AD_en_US Annual Catalog PDF

August_89_2020 Mini Catalog PDF

Card Cuts:

  • Thick Whisper White card base 8 1/2 x 5 1/2 scored at 4 1/4
  • Cherry Cobbler cs 3 1/2 x 4 1/4 (front), 4 x 5 1/4 (inside)
  • Tis the Season 6×6 DSP 3 3/4 x 5 (front), 4 1/2 square (die cutting stars), 2 1/4 x 6 (flap)
  • Whisper White 3 3/4 x 5 (inside)


SU! Wonder of the Season Memories and More Cards/ Envelopes

It’s a new day – AND a new week… let’s make them awesome… make a phone call you have intended to do for a long time but haven’t ; send a card to someone whom you think needs a ‘pick me up’; do a good deed without needing/ wanting recognition.Those are just some ‘off the cuff’ suggestions – you can probably come up with some of your own as well.

Todays cards were made using the Wonders of the Season Memories and More Card Pack + the coordinating Cards & Envelopes. There are two sizes cards in this pack: approx. 3 x 4 & 4 x 6. Also in the pack are several peel & stick stickers/ numbers that can be used for embellishing. More info can be found in the Aug-Dec Mini Catalog on pg 31.

For my first card I chose this gorgeous Just Jade 3 x 4 panel and one of the stickers with the word ‘Joy’. I peeled it off carefully and put it directly onto the panel, trying to center it as best I could. I then adhered it to a piece of Gray Granite cs with liquid glue. I pulled out my Pearls Basic Jewels and put several all over the panel. I adhered dimensionals to the back and adhered this to Whisper White, then another piece of Gray Granite. This toon got dimesnionals and was placed onto the Just Jade card base. And voila – the card front was complete.

Wonder of the Season Memories & More Card
#1

For the inside I adhered a panel of Whisper White then added one of the stickers that coordinates with the leaf pattern on the front. Done!

Inside card #1

Card #2 – this card uses one of the larger panels… I love the feathers and the gold. I adhered this green panel to a Brushed Metallic (gold), then directly onto the Wonder of the Season Memories & More card base. I die cut several feathers from the Brushed Metallic (gold) cs, cuz I didn’t know how many I wanted to use :O) The feather comes from the Nature’s Thoughts Dies. I then took a scrap of Whisper White and cut this beautiful banner using the Snow Time Dies. Notice how the banner has this wonderful raised edge all around it? It’s beautiful!! From another piece of Whisper White I die cut the word Peace, using two elements of the word from the Joy Dies. I adhered these together using liquid glue then onto the banner, also with liquid glue. The banner got dimensionals and was mounted in the center of the card. The single feather was added with liquid glue. DONE!

Wonder of the Season Memories & More Card
#2

Card #3 – I began by cutting the green panel from the card pack apart, saving the trims for another use later. The center panel was adhered to a strip of the Brushed Metallic (gold) cs. . I added several Wonderful Gems for a bit of glitz. I cut a panel of the Plaid Tidings 6×6 DSP and adhered it to one of the Wonder of the Season Memories & More cards.Ā The green panel got dimensionals and went right in the center of the card. Done again!

Wonder of the Season memories & More Cards
#3

Just like that, three Christmas cards ready for my stash. Each is so different and well, wonderful, in it’s own right. Card cuts are listed at the bottom of this post.

Wonders of the Season Memories & More Cards
#1

Wonders of the Season Memories & More Cards
#3


Wonder of the Season Memories & More Card
#2

Thanks for stopping by.

May you have a beautiful day.

Make someone happy by sending them a handmade card made with love.

Remember to cash in those Bonus Coupons from purchases made last month!

20200804_AD_en_US Annual Catalog PDF

August_89_2020 Mini Catalog PDF

Card Cuts:

  • Card #1: pattern – front: 3 x 4, Gray Granite 3 1/4 x 4 1/4, Whisper White 3 7/8 x 4 7/8, Gray granite 4 x 5 1/8; inside Whisper White 4 x 5 1/4
  • Card #2: panel + Brushed Metallic (gold)Ā  4 1/8 x 6 1/8; feathers cut from center of Brushed Metallic (gold) prior to adhering to card panel
  • Card #3: cut panel 1 1/2 x 6 + Brushed Metallic (gold) 1 5/8 x 6;

SU! Tree Angles/ Stitched Rectangles #2

Hello again – nice to have you visit! We have had a couple of cool days here in NJ and I LIKE IT! There have been some days recently that the humidity and heat have made it difficult to breathe. Of course the sun isn’t up yet, but it’s 64 degrees… my kind of weather. It’s interesting, I attended an ‘in person’ meeting Wed. evening – masks during the meeting, 6-8′ apart, ZOOM going for those unable to attend in person and when we spoke we brought down the mask – all this to say one of the gentleman in the group said – ‘I’m praying for normalcy’. That seems so long ago… I want to be able to hug my grandkids and daughters so badly, but for their sake (and mine) I’m not doing that. And you know, it changes our relationship somehow… I don’t like that, but it does. Maybe that’s why I’m hung up on Christmas cards – hoping that by then they can actually come in the house and I can hug them tight… Guess I’m trying analyze this compulsion of mine right now – hmmm.OK – on with it – today’s card. I wanted to play with the Tree Angle stamps with the coordinating Stitched Rectangles again and here’s what I did. Card cuts are listed at the end of this post.

Tree Angle Card #2

Look at those cute trees! So – confession… I didn’t really KNOW what I was going to do, I simply sat down to play. I wanted to do these trees, didn’t know what I was going to do with them. I stamped the smaller one in Real Red and the larger one in Shaded Spruce then die cut them with the coordinating Stitched Triangles. They needed stars – so I pulled out my Stitched Stars Dies and Balmy Blue Glimmer paper. For the smaller tree, the star is adhered with liquid glue. For the larger tree it’s adhered with a dimensional cut down to fit. I began rifling through DSP and remembered the Feels Like Frost 6×6 Specialty DSP. I cut it down a bit and placed the trees but did not adhere them yet. I decided a sentiment heat embossed in white would look really pretty, so that’s what I did – and it’s from the Tree Angle stamp set. Now that I think about it, it would also be pretty to heat emboss the whole piece with clear embossing powder to make it sparkle. Another time! Now that the sentiment was on, I adhered the larger tree with liquid glue and the smaller one with dimensionals. This was adhered to a panel of Pretty Peacock, then put on dimensionals and added to a Real Red card base.

The inside was super easy… I took one of the dies from the Stitched Rectangles Dies and simply laid it across the bottom of a Whisper White panel and die cut the strip. It created these fun triangles all in a row! I adhered this to another panel of Pretty Peacock cs with liquid glue and then right onto the inside of the Real Red card base. simplicity at it’s best!

Stitched Rectangles, inside

For the envelope, I simply ran the flap through the Winter Snow embossing folder and voila! the card was complete.

Winter Snow embossing folder

Tree Angle/ Stitched Rectangles Dies

One of the aspects of purchasing from SU! is how they coordinate their colors. Shaded Spruce, Pretty Peacock, Balmy Blue – they compliment each other. So if you have hesitation, try a bit and see how it works for you. Come Sep 1 (just two very short weeks away!) – Sep 31, SU! will offer a special deal when you join as a demonstrator. Stay tuned for more information on that and join my team!

Now also is the time to REDEEM THOSE BONUS COUPONS – for they will no longer be available to you in Sep. Shop with me using my current HOST CODE 4TEZ7HWYĀ which is good during the month of August. When you purchase through my online store and your product is $50-$150, you will receive a free SU! item of your choice worth $10. If your purchase is OVER that amount, you will still receive that free item from me, but SU! will offer you Stampin Rewards for products right then during your order. If you have questions about that, please do not hesitate to ASK! tlsbrightspot@gmail.com


Thanks for stopping by.

May you have a beautiful day.

Make someone happy by sending therm a handmade card created with love.

Card cuts for today’s project:

  • Feels Like Frost 6×6 Specialty DSP 4 x 5 1/4
  • Pretty Peacock 4 1/8 x 5 3/8 (front), 4 x 5 1/4 inside
  • Real Red 4 1/4 x 11 scored at 5 1/2
  • Whisper White 3 7/8 x 5 1/8 (inside) + scraps for trees


SU! Tree Angle/ Stitched Triangles

Hello again! Oh I can’t wait to show today’s card… I pulled out a new bundle I hadn’t played with yet – yes, there are stillĀ  a few.. This card is simple and I’m anxious to use some other papers to create something similar.

Stitched Triangles
#1

And here are the details… I die cut Whisper White cs with the largest of the right triangles and used that panel as the front of my card. Those Whisper White die cuts I used to reinforce the Heartwarming Hugs DSP by adhering with liquid glue when I die cut it with the same large right triangle. Next I stamped the sentiment from Wrapped in Christmas stamp set in Pear Pizzazz ink. I then adhered the Whisper White panel to a Pear Pizzazz piece with liquid glue, then onto the front of the Real Red cs. I then took the reinforced triangles and put several dimensionals on the back and adhered them right over the openings of the Whisper White Panel. A little glitz was needed (I like glitz!) so I added several Wonderful Gems in Real Red. Front is complete!

For the inside… I adhered a panel of Pear Pizzazz cs to the Real Red card base with liquid glue. I then stamped the ornaments from the Tree Angle stamp set in Real Red ink, stamping off at least once. This Whisper White panel was adhered to the Pear Pizzazz and the card was DONE…

Tree Angle stamp set, inside
#2

For the envelope I stamped the same ornament trio from Tree Angle stamp set in Real Red ink (stamping off at least once) across the bottom of the envelope front. The flap got another piece of the same Heartwarming Hugs DSP.Ā Such simplicity and such elegance… and so easy, I love it…


Thanks for stopping by.

May you have a beautiful day.

Make someone happy by sending them a handmade card made with love.

Remember to cash in those Bonus Coupons from purchases made last month!

Card cuts for today’s project:

  • Whisper White cs 4 x 5 1/4 (outside), 3 3/4 x 5 (inside)
  • Pear Pizzazz cs 4 1/8 x 5 3/8 (outside), 4 x 5 1/4 (inside)
  • Real Red cs 8 1/2 x 5 1/2 scored at 4 1/4
  • Heartwarming Hugs DSP 3 1/2 x 7Ā  for triangles + 2 1/4 x 6 for envelope flap


SU! Gnome for the Holidays

Hello again – it’s Monday… did you have a good weekend? And your plans for the week? This has become kind of a busy one for me, in comparison to all the seclusion/ quaranteen stuff.- two meetings IN PERSON no less… We wear masks, sit 6-8′ apart, it’s good. So – today’s card… I broke out a new stamp set – Gnome for the Holidays – they are so stinkin’ c-u-t-e! And oh yeah, got my new Cut & Emboss machine, which I love…. Works like a charm; smooth crankin’ both for cutting AND embossing – and I did both for today’s card. OK OK, I hear you – on with it already :O)

Gnome for the Holidays #1

Didn’t I tell you they were cute? I stamped them in Memento Black ink on Whisper White cs then colored them all with Blends:

  • the girl: both Lt and Dk Call Me Clover, Poppy Parade, Dk Highland Heather, So Saffron and dk Crumb Cake
  • for the center gnome: Lt Seaside Spray Lt & Dk Highland Heather, So Saffron, Lt & Dk Smokey Slate and Dk Crumb Cake
  • gnome on right: Lt & dk Call Me Clover, Poppy Parade, Lt & Dk Crumb Cake, Dk Highland Heather, So Saffron
  • I colored each of their noses with just a bit of Lt Petal Pink

I cut them down to size and adhered them with liquid glue to Highland Heather cs that had been die cut with the Stitched So Sweetly Dies. Next I cut a panel of Gorgeous Grape cs & ran it through the Old World Paper 3D embossing folder. I adhered the gnome panels to it with dimensionals. I took a Thick Whisper White card base and ran the front through the Winter Snow embossing folder – loving all this texture from the embossing! I adhered the Gorgeous Grape piece to the card front with liquid glue.

Next I stamped the sentiment (don’t you love this cute font!) from the Gnome for the Holidays stamp set in Garden Green ink on a Whisper White strip. I created a banner at the end and adhered it to a Highland Heather strip that also had a banner. I adhered this with dimensionals to the card front and Voila – card front is complete!

Gnome for the Holidays #2

So fun… now for the inside… Adhere a panel of Gorgeous grape with liquid glue. With a Whisper White panel stamp the sentiment in Garden Green ink (it’s from Gnome for the Holidays stamp set). Then stamp the tree from the Merry Moose stamp set in twice stamped off GardenĀ Green ink.Ā Adherer over the Gorgeous Grape and your card is fait accompl!

Gnome for the Holidays inside

For the envelope I embossed the flap with the Winter Snow embossing folder then stamped the gnome in Memento ink. I colored him with the Blends as noted above. TIP: slip a scrap of card stock into your envelope before coloring so the ink doesn’t bleed through the envelope!

Gnome for the Holidays #4

Fun fun… I’m labeling this a masculine card ‘cuz I think it could be :o) I hope you have enjoyed today’s card. I had such fun coloring and creating. If you would like to join my team – would enjoy working with you. For $99 you can sign up and get $125 worth of products at the same time and some wonderful discounts for products as well. Hobby stamper? Works for me! Let me know if I can help you get started in that direction…

Thanks for stopping by.

May you have a beautiful day.

Make someone happy by sending them a handmade card created with love.

20200804_AD_en_US. open this for the PDF for the August – December 3030 Mini catalog

2020 AC US open this PDF for the Annual 2020 catalog

Shop with me? Receive a SU! item worth $10 when your order is between $50-$150 and using my current host code – August Host Code 4TEZ7HWY. If your order is more than that, you STILL receive the $10 item from me but SU! has rewards for you as well :o)

Card cuts for todays card:

  • Thick Whisper White 4 1/4 x 11 scored at 5 1/2
  • Gorgeous Grape 3 1/8 x 5 1/2 (front), 4 x 5 1/4 (inside)
  • Highland Heather approximately 3 x 5 1/4 + scrap for sentiment strip
  • Whisper White 1 3/8 x 2 3/8 for each gnome + scrap for sentiment + 3 3/4 x 5 for inside panel

SU! Mini Pizza Box and Cards/ Punches

Gleaming Ornaments Punch Pack 3″ card

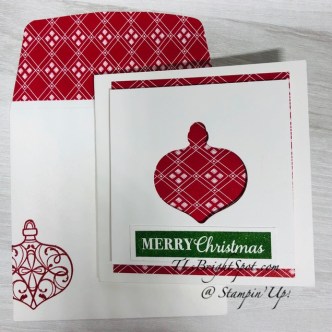
Hi Everyone! One day last week I covered a Mini Pizza Box and didn’t share it as I hadn’t created cards for the inside yet – so yesterday I got busy and did just that. I pulled out some fun carryover punches: Mr Moose (which I adore!), the Pine Tree Punch and Gleaming Ornaments Punch Pack. Because these are small cards (3 x 6 scored at 3), I used only the smaller of the Gleaming Ornaments punches. Let’s take a look…

Aren’t these fun? Let’s start with the box: Mini Pizza Box… Mossy Meadow cs (3 1/4″ square) adhered with liquid glue; Heartwarming Hugs DSP (2 3/4″ square) adhered to Pear Pizzazz cs (3″ square), then put on dimensionals and onto the Mossy Meadow piece. I adhered a Gold Hoops EmbellishmentĀ  (love these!) with liquid glue then tied a bow with theĀ  3/8″ Real Red Sheer Ribbon then attached a fun Jingle Bell with a goldĀ  cord from the Wonder of the Season Ribbon Combo Pack and attached with a glue dot. I stamped the three trees in Mossy Meadow on a Whisper White scrap and fussy cut them and adhered with dimensionals. The center tree got two layers of dimensionals.

For the three cards I cut Whisper White cs 3 x 6″ and scored at 3″, making them fit nicely in the Mini Pizza Box. I took another piece of Whisper White and punched the tree, moose and ornament.Ā  TIP: I marked a larger piece of the Whisper White 2 1/2 x 7 1/2 so I knew the 2 1/2″ square, marked the centers of each square so I would have the punch centered, punched each one then cut the strip into the 2 1/2″ squares. Perfect centering and easily punched!Ā This Whisper White square was put on dimesnionals and adhered to more of the Hearttwarming Hugs DSP (cut to 2 7/8″) which had been adhered to the 3 x 6 pieces.

For the sentiments:

  • Ornament card… stamped inĀ  Garden Green using the Christmas Gleaming stamp set on a Whisper White scrap and fussy cut then adhered with liquid glue.
  • Tree card… stamped in Real Red from the Gnome for the Holidays stamp set on a Whisper White strip and adhered with liquid glue.
  • Moose card… stamped in Crumb Cake from the Merry Moose stamp set

Envelopes: each of the envelope flaps got coordinating DSP from the Heartwarming Hugs DSP then stamped on the front with coordinating stamp sets:

  • Christmas Gleaming stamp setĀ  – ornament stamped in Real Red
  • Merry moose stamp set – moose stamped in Crumb Cake
  • Perfectly Plaid stamp set – tree stamped in Garden Green

Voila! This is such a cute set of gift cards. I can’t wait until it’s closer to the appropriate time to gift it :O)

All items may be found in the Aug – Dec 2020 Mini Catalog – see the PDF if you do not have a new cattie. Then let me know if you do not have a demonstrator how I may help you get that order placed so you, too, can have such fun creating! Here’s the PDF: August_89_2020

When you shop with me… get a free SU! item worth $10 when your purchase is $50- $150 and use my HOST CODE… during the month of August… 4TEZ7HWY. If your purchase is over $150 you’ll still get a free gift from me but don’t use the host code as SU! will offer you some sweet options for free product!

Thanks for stopping by.

May you have a beautiful day.

Make someone happy by sending them a handmade card.