
If you have joined me from the incredible Tara – welcome. If you’re just hopping in – great! Welcome to our fabulous hop! And how about the NEW Sep-Dec 2026 Catalog – pretty cool, right? What’s your favorite – or should I ask your ten (10) favorites? I would love to know. Today’s card shows one of my favorites.. the Elegant Leaves bundle. The delicate dies for the leaves are truly special.

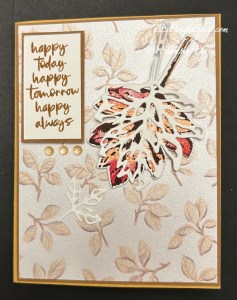
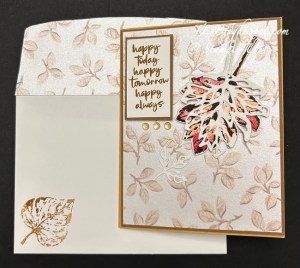
Where to begin??? I’ll begin with the stamps & dies – then move to the ‘how to’ of this fun fold. The above big leaf – I’m calling it a maple leaf – I inked the solid stamp with Timid Tiger, stamped it off, then added Real Red in various places with a sponge dauber and stamped this on Basic White. I then stamped the detail stamp in Early Espresso. I die cut the detail dies of this leaf from Basic White and attached it in various spots with dabs of liquid glue. I put dimensionals on the back & set it aside. I then proceeded to stamp several of the other leaves “just to have, in case’. They are… Lemon Lolly & Old Olive with the detail stamp being Early Espresso. I die cut each along with the detail die of each leaf – and that from Basic White. I adhered each of the intricate die cuts to the same leaf with liquid glue and set them aside. There is an additional very small detail leaf die on the card front that is nearly impossible to see – cut from Basic White – it’s there.
The sentiment for the front comes from the Elegant Leaves stamp set and is stamped in Pecan Pie ink on Basic White, then added to a Pecan Pie panel just 1/8″ larger I put dimensionals on the back & set it aside as well.
The card front… Pecan Pie 4 1/8 x 5 3/8 with a layer of the Glow of Harvest DSP 4 x 5 1/4 from the August POTM (product of the month). I added the maple leaf & the sentiment with the already attached dimensionals; the smallest leaf die cut is attached with liquid glue. I also added three embellishments of Radiant Gems. I set this aside to prepare the rest of the card & fun fold.
The Pop-Out Fun Fold directions… and then I’ll tell more about the ‘decorative parts’ of the card.
Card base: 8 1/2 x 5 1/2 scored @ 4 1/4. For this card – Golden Glow
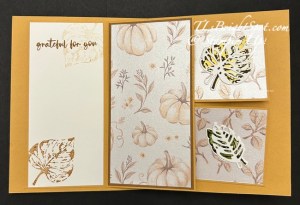
Inside layer: 5 1/4 x 5 1/4 scored @ 2 1/2 – Golden Glow. Layers for this on the inside… left – Basic White for stamping 2 1/4 x 5; right – DSP 2 1/4 x 5 (I added an additional layer of card stock 2 3/8 x 5 1/8 in Pecan Pie)
Pop-Up mechanism: 2 3/8 x 5 3/8 scored @ 1 1/4, 2 1/2, 3 3/4 & 5 Burnish well mountain, mountain, valley, valley. Make cross score lines creating an ‘x’ between score lines 2 1/2 & 5 & burnish well.
Pop-Out Squares: 2 3/8 x 2 3/8 (2) mine are Golden Glow card stock.
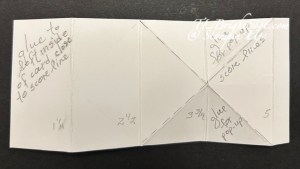
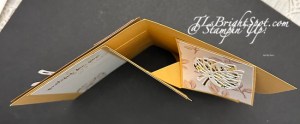
Attach the left end of the mechanism to the left inside of the card base, close to but not touching the center score, centering it top to bottom. See photo below.
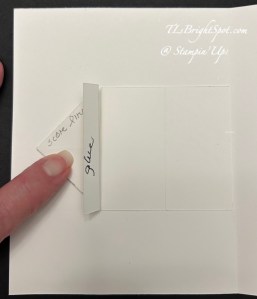
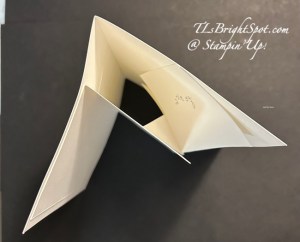
Fold mechanism flat with small tab facing up. Add glue to tab & close right side of card over this. Rub well to secure.
Attach the two 2 3/8″ squares to the mechanism, these will be the pop-ups. Refer to the mechanism photo for proper glue area.
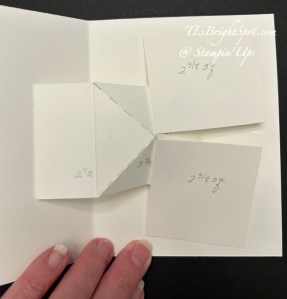
See the area in the photo above with the triangle & rectangle? Add adhesive to this and align the INSIDE LAYER – the right back side so the score line is close to the area where the glue is. Close the card, press firmly and allow glue to adhere well. Open & close the card several times to make certain it does so smoothly. Now add glue to the left side of the INSIDE LAYER and close card, rubbing to attach well. Now everything is secure.
Finish the card front by attaching the panels in place.
From the top, the card should look like this… remember, this is a template!
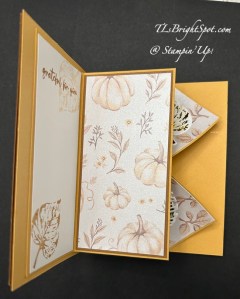
Below is my finished inside of the card… Glow of Harvest DSP on the squares are 2 1/4 x 2 14. The leaves on the squares (the pop-ups) are stamped in Lemon Lolly & Early Espresso for the top leaf, Old Olive and Early Espresso for the bottom leaf. The die cuts are Basic White – everything on these squares is added with liquid glue. The sentiment panel on the Basic White Inside Layer is Pecan Pie ink. The leaf is stamped off once.
The envelope… more of the Glow of Harvest DSP on the fl;ap & trimmed to fit. On the front is a leaf from the Elegant Leaves stamp set, stamped in Early Espresso after stamping off once – and… done!
Want to see more fall cards – treasures for sure. Click the next button or click on a name.
You may find all the items to make this card in my shop & below is a list. Order these – and more from me soon!

Shop with me here or see the list below of items to make this card.
Thanks for stopping by. May you have a beautiful day. Make someone happy by sending them a handmade card filled with ❤️
![Elegant Leaves Bundle (English) [ 168303 ]](https://assets1.tamsnetwork.com/images/EC042017NF/168303s.jpg "Elegant Leaves Bundle (English) [ 168303 ]")
![Glow Of Harvest 12" X 12" (30.5 X 30.5 Cm) Specialty Designer Series Paper [ 168598 ]](https://assets1.tamsnetwork.com/images/EC042017NF/168598s.jpg "Glow Of Harvest 12\" X 12\" (30.5 X 30.5 Cm) Specialty Designer Series Paper [ 168598 ]")
![Radiant Gems [ 168363 ]](https://assets1.tamsnetwork.com/images/EC042017NF/168363s.jpg "Radiant Gems [ 168363 ]")
![Timid Tiger Classic Stampin' Pad [ 165278 ]](https://assets1.tamsnetwork.com/images/EC042017NF/165278s.jpg "Timid Tiger Classic Stampin' Pad [ 165278 ]")
![Real Red Classic Stampin' Pad [ 147084 ]](https://assets1.tamsnetwork.com/images/EC042017NF/147084s.jpg "Real Red Classic Stampin' Pad [ 147084 ]")
![Sponge Daubers [ 133773 ]](https://assets1.tamsnetwork.com/images/EC042017NF/133773s.jpg "Sponge Daubers [ 133773 ]")
![Lemon Lolly Classic Stampin' Pad [ 161666 ]](https://assets1.tamsnetwork.com/images/EC042017NF/161666s.jpg "Lemon Lolly Classic Stampin' Pad [ 161666 ]")
![Old Olive Classic Stampin' Pad [ 147090 ]](https://assets1.tamsnetwork.com/images/EC042017NF/147090s.jpg "Old Olive Classic Stampin' Pad [ 147090 ]")
![Early Espresso Classic Stampin' Pad [ 147114 ]](https://assets1.tamsnetwork.com/images/EC042017NF/147114s.jpg "Early Espresso Classic Stampin' Pad [ 147114 ]")
![Golden Glow 8 1/2" X 11" Cardstock [ 167685 ]](https://assets1.tamsnetwork.com/images/EC042017NF/167685s.jpg "Golden Glow 8 1/2\" X 11\" Cardstock [ 167685 ]")
![Pecan Pie 8 1/2" X 11" Cardstock [ 161717 ]](https://assets1.tamsnetwork.com/images/EC042017NF/161717s.jpg "Pecan Pie 8 1/2\" X 11\" Cardstock [ 161717 ]")
![Basic White 8 1/2" X 11" Cardstock [ 166780 ]](https://assets1.tamsnetwork.com/images/EC042017NF/166780s.jpg "Basic White 8 1/2\" X 11\" Cardstock [ 166780 ]")
![Basic White Medium Envelopes [ 159236 ]](https://assets1.tamsnetwork.com/images/EC042017NF/159236s.jpg "Basic White Medium Envelopes [ 159236 ]")
![Take Your Pick [ 144107 ]](https://assets1.tamsnetwork.com/images/EC042017NF/144107s.jpg "Take Your Pick [ 144107 ]")
![Paper Trimmer [ 152392 ]](https://assets1.tamsnetwork.com/images/EC042017NF/152392s.jpg "Paper Trimmer [ 152392 ]")
![Paper Snips [ 103579 ]](https://assets1.tamsnetwork.com/images/EC042017NF/103579s.jpg "Paper Snips [ 103579 ]")
![Stampin' Dimensionals [ 104430 ]](https://assets1.tamsnetwork.com/images/EC042017NF/104430s.jpg "Stampin' Dimensionals [ 104430 ]")
![Multipurpose Liquid Glue [ 110755 ]](https://assets1.tamsnetwork.com/images/EC042017NF/110755s.jpg "Multipurpose Liquid Glue [ 110755 ]")
![Tuxedo Black Memento Ink Pad [ 132708 ]](https://assets1.tamsnetwork.com/images/EC042017NF/132708s.jpg "Tuxedo Black Memento Ink Pad [ 132708 ]")
![Stampin' Positioner [ 167768 ]](https://assets1.tamsnetwork.com/images/EC042017NF/167768s.jpg "Stampin' Positioner [ 167768 ]")
![Stampin' Cut & Emboss Machine [ 149653 ]](https://assets1.tamsnetwork.com/images/EC042017NF/149653s.jpg "Stampin' Cut & Emboss Machine [ 149653 ]")
![Mini Glue Dots [ 103683 ]](https://assets1.tamsnetwork.com/images/EC042017NF/103683s.jpg "Mini Glue Dots [ 103683 ]")
![White Gel Pens [ 166642 ]](https://assets1.tamsnetwork.com/images/EC042017NF/166642s.jpg "White Gel Pens [ 166642 ]")
![Clear Wink Of Stella Glitter Brush [ 141897 ]](https://assets1.tamsnetwork.com/images/EC042017NF/141897s.jpg "Clear Wink Of Stella Glitter Brush [ 141897 ]")
![Metallics Wow! Embossing Powder [ 165678 ]](https://assets1.tamsnetwork.com/images/EC042017NF/165678s.jpg "Metallics Wow! Embossing Powder [ 165678 ]")
![Basics Wow! Embossing Powder [ 165679 ]](https://assets1.tamsnetwork.com/images/EC042017NF/165679s.jpg "Basics Wow! Embossing Powder [ 165679 ]")
![Heat Tool (Us And Canada) [ 129053 ]](https://assets1.tamsnetwork.com/images/EC042017NF/129053s.jpg "Heat Tool (Us And Canada) [ 129053 ]")
![Embossing Additions Tool Kit [ 159971 ]](https://assets1.tamsnetwork.com/images/EC042017NF/159971s.jpg "Embossing Additions Tool Kit [ 159971 ]")
![Small Blending Brushes [ 160518 ]](https://assets1.tamsnetwork.com/images/EC042017NF/160518s.jpg "Small Blending Brushes [ 160518 ]")
 TLsBrightSpot
Just beautiful Terry Lynn! Love the paper that you’ve used, so pretty for fall! 🙂
LikeLiked by 1 person
Thanks so much Amy. So sorry for the link issue!
LikeLike
Pingback: Stampin’ Up! Fun For Fall for The Happy Inkin’ Thursday Blog Hop | Creative Stamping Designs
What a great fun fold card. I just love that DSP!
LikeLike
This DSP is soft in color & a beautiful sheen as well! Thank you.
LikeLike
Wow – this is just beautiful! And what a cool cool fun fold!! 🙂
LikeLiked by 1 person
Oh so glad you like it! It’s pretty easy once you’ve done a template 😀
LikeLike
This is gorgeous Terry Lynn 🙂 Love that DSP you used. Such a fun inside too
LikeLiked by 1 person
We did this in card class & folks loved it!
LikeLike