
Good Monday morning to you… a full week is ahead of us. Got anything wonderful planned? I can tell you we are going sailing this morning, IF (and that’s big if) there is enough wind. And then I need to make a bunch of cards for our daughter – who requested sympathy and thinking of you type cards. But for now, let’s focus on this fun fold. It’s quite easy. A stand-up card by itself.
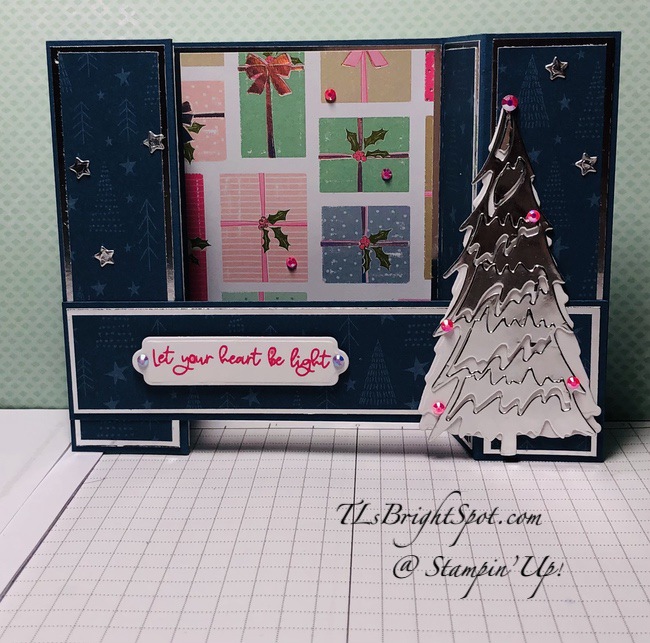
Oh my, this is a dark photo… later is a better one. I used Whimsical Trees with coordinating Christmas Trees Dies and the Whimsy & Wonder SDSP & the Seasonal Labels Dies for the sentiment. I did use Silver Foil for the tree and stars. Let’s get a better picture…
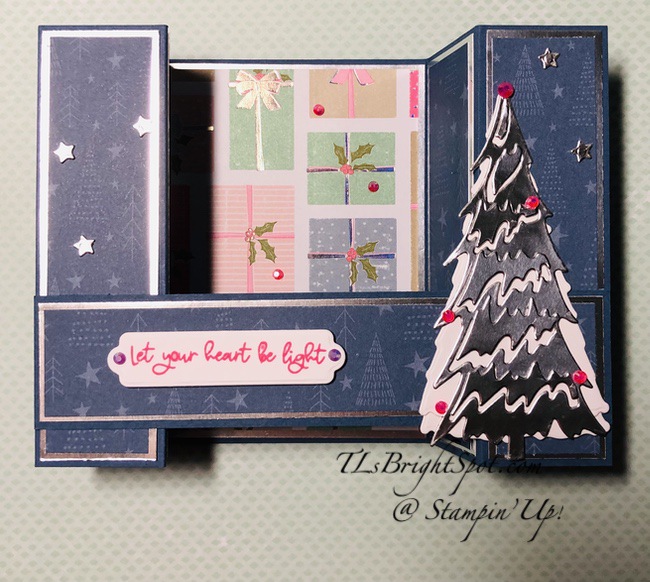
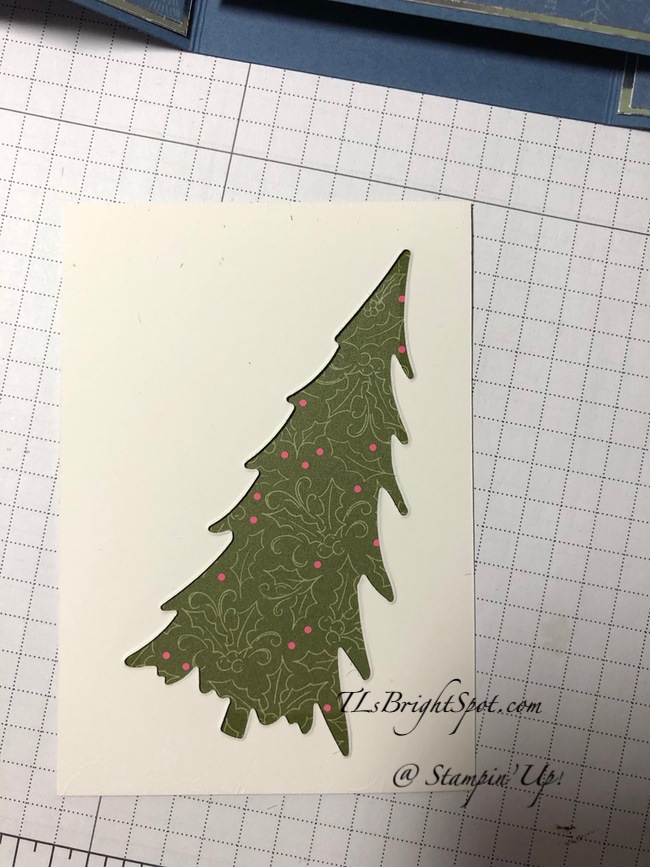
This is better – and it’s lying on it’s back. Let’s begin with the tree, shall we? I die cut the tree from Silver Foil and kept all the inner pieces. I then die cut the solid tree from Basic White card stock + an extension of the bottom of the tree about 1/2″. I happen to really like both trees and no, I don’t think they are supposed to go together. But I happen to like the way they layer. All the little pieces that are from the silver foil tree, I attached with dots of liquid glue, intentionally overlaying them so they appear like another layer of snow or tree. I attached the foil tree to the Basic White tree, again with dots of liquid glue, then added the tree extension behind. I die cut this tree from the foil panel that is layered with the packages ~ see photo :O) I also die cut several stars (the die cuts 5 at once) ~ all of the die cuts use the Christmas Trees Dies.
The next important step is preparing the papers… you don’t have to do the double layers of papers. I just happen to like the way it looks. Finished card size fits nicely in an A2 envelope… 4 1/4 x 5 1/2 when it folds flat.
TIP: When cutting the SDSP, it is best to make certain the “picture” of the papers flow from left to right AND that if there is a definitive up & down, that you keep that going in the proper direction. It doesn’t show so much with this Designer Paper, but with some it is very obvious. And when the card is flat, the direction of the papers definitely are apparent.
- Card base is 4 1/4 x 8 scored at 1 1/4x 2 1/2, 5 1/2 & 6 3/4; 1 1/4 x 5 1/2 (bridge panel). I used Misty Moonlight
- Silver Foil layers: 1 1/8 x 4 1/8 (4); 2 7/8 x 4 1/8 (center panel); 1 1/8 x 5 3/8 (bridge panel); 2 x 4 for tree / stars
- Whimsy & Wonder SDSP: 1 x 4 (4); 2 3/4 x 4 (center panel is coordinating); 1 x 5 1/4 (bridge panel)
Burnish all score lines and fold mountain, valley, valley, mountain. In other words, both the 1 1/4 & 6 3/4 folds should be mountain folds. Refer to the photo.
Attach all layers together as shown. I used Stampin’ Seal for this step, but liquid glue does give more adjustment leeway. Make sure all SDSP is facing the proper direction! For the bridge panel… once the layers are together, adhere the bridge to the far right panel of the card base. It is easiest to do this if the right panel is folded and the rest of the card flat. Now fold the card the opposite direction, so the far left of the card is folded and the right side of the card is flat – adhere the bridge to the left front panel. YAY!
Now decorate…
- Adhere the tree with liquid glue to the bridge & the tree top to the right front fold.
- Add 2021-2023 In Color Jewels to the tree in Polished Pink
- Add the foil die cut stars with dots of liquid glue
- Add 2021-2023 In Color Jewels to the inside panel (packages) in Polished Pink
- Stamp the sentiment in Polished Pink ink using the Whimsical Trees stamp set. Die cut with the Season Labels Dies. Attach with dimensionals. Add 2021-2023 In Color Jewels in Fresh Freesia.
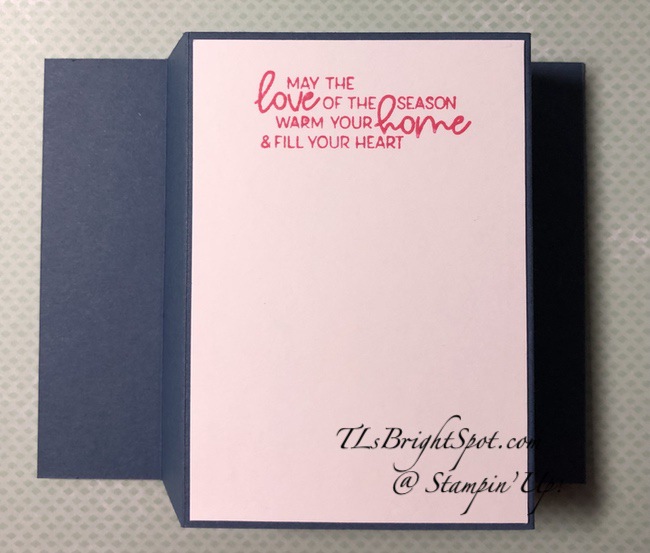
- Stamp sentiment in Polished Pink ink on a Basic White panel 2 7/8 x 4 1/8 with Whimsical Trees stamp set.
- Attach to backside of card and the card is done!
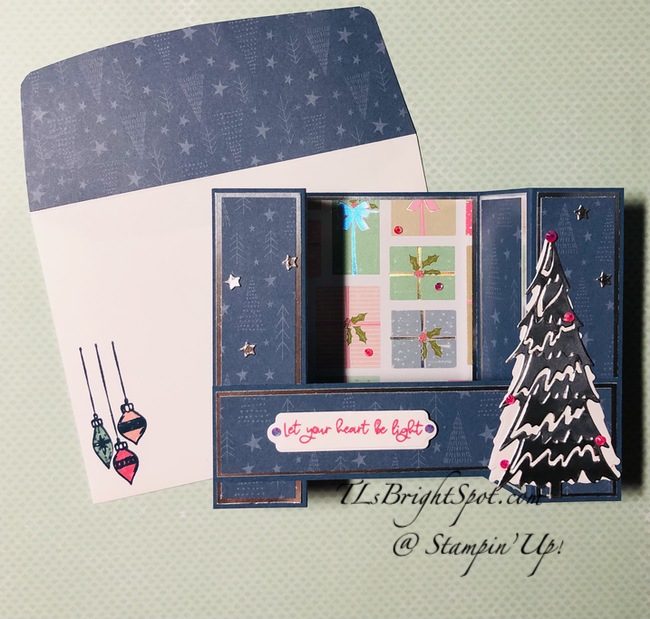
For the envelope… cover the flap in Whimsy & Wonder SDSP, trim to fit. Stamp the cute ornaments from Whimsical Trees stamp set in Moonlight Madness. Color with Markers: Soft Succulent, Polished Pink & Blushing Bride.
Love this fun fold!!! I has been a while since I have done this and I had a good time. So easy and looks great as a stand alone card.
Fun project for me – and I hope you liked it as well. If you do not have a demonstrator and need an Annual 2021 Catalog OR Jul-Dec 2021 Mini Catalog, please reach out to me – happy to send one to you. And when I send it, there will be a Sale-a-bration catalog in with it! That means more FREE items to choose from with every order of $50, or $100 or multiples of that. Please also use my current host code when ordering: R6U3VRBN. I offer my customers a free item from Stampin’ Up! valued to $10 with your order of $50 and above. Click here to go my store. When the order is over $150, you still receive that free gift from me, but SU! has Stampin’ Rewards that may be used for additional products, so don’t use the host code at that time. If you have questions just let me know. If you would like to be able to order products early from catalogs AND enjoy that 20% discount, join my team now… you may do that here. We have lots of fun and are a creative bunch that encourages & supports one another. Would love to have you!
Remember that Sale-a-bration is now through September 30! It’s the best time to buy (lots of free product) & JOIN ~ read on… it is ending SOON!!!

It is during this period that when you place an order of $50 or increments of that, there are FREE items available in the Sale-a-bration catalog. Stampin’ Up! does not usually offer more than one sale-a-bration in a year, but this year, they DID! WooHoo – fun products too… Again, contact me if you do not have a catalog.
How do you pre-earn Sale-A-Bration products? It’s simple! For every $50 USD | $60 CAD and $100 USD | $120 CAD you spend, you’ll be able to take your pick of Sale-A-Bration products to add to your order—for free
And if you JOIN and become a demonstrator during Sale-a-bration… you have the opportunity to get one of the bundles below FREE!
| OIN BUNDLE OPTIONS | PRICE | LIMIT | |
| 156795 | Arctic Bears Bundle | $47.50 USD | $64.75 CAD | 1 |
| 156819 | Beauty Of Tomorrow Bundle | $50.25 USD | $68.25 CAD | 1 |
| 156801 | Christmas Season Bundle | $54.00 USD | $73.75 CAD | 1 |
| 156806 | Christmas To Remember Bundle | $60.25 USD | $81.75 CAD | 1 |
| 156807 | Frosted Gingerbread Bundle | $48.50 USD | $66.50 CAD | 1 |
| 158609 | Gorgeous Leaves Bundle | $44.00 USD | $60.25 CAD | 1 |
| 156813 | Nature’s Harvest Bundle | $53.00 USD | $72.75 CAD | 1 |
| 156816 | Peaceful Cabin Bundle | $54.00 USD | $72.75 CAD | 1 |
| 156391 | Peaceful Deer Bundle | $36.00 USD | $48.50 CAD | 1 |
| 156789 | Penguin Place Bundle | $31.50 USD | $42.25 CAD | 1 |
| 156798 | Sweet Little Stockings Bundle | $47.50 USD | $64.75 CAD | 1 |
| 156810 | Whimsical Trees Bundle | $51.25 USD | $70.00 CAD | 1 |
Those who join Stampin’ Up! during Sale-A-Bration may select one bundle from the list above to
add to their Starter Kit at no additional cost.
Joining during this sale-a-bration time allows you to create your own starter kit: $99 cost, $125 worth of product + a FREE bundle (listed above for no additional cost) + FREE Sale-a-bration items. Oh my – why pass up this deal? Join now… you may do that here.
Thanks for stopping by. May you have a beautiful day. Inspire. Create. Share. Nothing beats a handmade card.

Such a cute card! Love the fun colors and fancy fold design! 🙂
LikeLiked by 1 person
This is a fun ‘fun fold’ for sure!
LikeLike
Bridge folds are one of my favorites and this sure is cute! Love the foil highlights. TFS
LikeLiked by 1 person
Thank you Susan! 😘
LikeLike