
We have had this delightfully cool weather this week but it is coming to an end with rain expected today followed by hot, hot air. Ugh – I really enjoy having our windows and doors open, hearing God’s creatures sing me awake in the mornings.There is a peace about it that soothes my soul.
Do you remember how I tend to gravitate toward tone-on-tone cards? Today’s is like that with a splash of color that really makes it pop. Have a look…
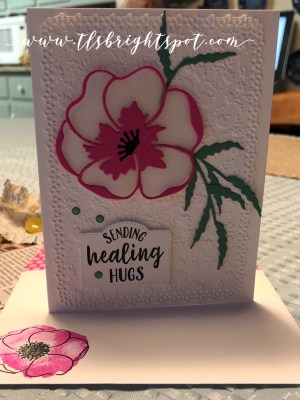
Painted Poppies
Poppy Moments Dies
#1
Gorgeous isn’t it? Or maybe stunning is the right word. At any rate, you are going to be delightfully pleased at how simple it is.
Supplies needed:
- Ornate Layers Dies
- Ornate Floral 3D Embossing Folder
- Poppy Moments Dies
- Painted Poppies stamp set
- All Dressed Up Dies (label for sentiment)
- 2020-2022 In Color Magenta Madness 6×6 DSP (envelope flap)
- 2020-2022 In Color Enamel Dots – Just Jade
- Magenta Madness cs
- Just Jade cs
- Whisper White & Thick Whisper White
- Vellum
- Basic Black cs
- Stazon Black ink
Take a Whisper White 4 1/4 x 5 1/2 panel and the Ornate Floral 3D Embossing Folder, run it through the die cutting/ embossing machine Using the large rectangle die in the Ornate Layers Dies, die cut that panel. So, so pretty. Adhere it to the Thick Whisper White 5 1/2 x 8 1/2 card base with the Stampin Seal.
Take a scrap of vellum (about 3 1/2″ square) and die cut the larger poppy from Poppy Moments Dies. Now die cut in Magenta Madness the outline of that same poppy. Adhere together just in the center with liquid glue. Die cut a center out of Basic Black cs and adhere with liquid glue. (I intentionally used the smallest die for this, but there are at least two other dies that would be appropriate. The choice is yours, which is half the fun!)
Die cut leaves from the Poppy Moments Dies out of Just Jade – I did three. These are very delicate leaves and I like to have them a bit loose on a card, less structured, more like nature. Adhere with liquid glue on just a few leaves. TIP: Because the background of the poppy is vellum and see-through, I didn’t want the stems & leaves really showing through. Therefore, when adhering I simply hid them behind a section of the Magenta Madness as best I could and trimmed the stems as necessary.
Stamp the needed sentiment (here I used So Sentimental stamp set) onto Whisper White using Black Stazon ink then die cut from Whisper White a label/ banner from the All Dressed Up Dies. Adhere with dimensionals. Add three Just Jade 2020-2022 In Color Enamel Dots. Your card front is complete!
For the inside…

Poppy Moments Dies
#2
With Magenta Madness cs die cut two of the smaller outline poppies. Adhere to the Thick Whisper White card inside with liquid glue. OPTION: Adhere enough Adhesive Sheet to the back of Magenta Madness prior to running through the die cutting machine. This allows for peel ‘n stick attaching to cs.I didn’t do this – cuz I forgot! Your card is now complete.

Painted Poppies
Poppy Moments Dies
#3
The envelope…
To the envelope flap, adhere a piece of Magenta Madness 2020-2022 In Color DSP, trim to fit. To the card front, with Magenta Madness ink, stamp off the poppy “background” stamp then stamp onto the envelope front. With Stazon Black ink, stamp the outline poppy. And the card is ready for mailing!

Painted Poppies stamp set
Poppy Moments Dies
#4
This card is going to a friend who just had a hip replacement. Its cheery colors will hopefully lift her spirits. I love how this card turned out – the Ornate Floral 3D Embossing folder adds a depth of elegance too.

JOIN MY TEAM
Before getting on with my day – and yours, I just want to share with you some exciting news from Stampin’ Up! The new die cutting/ embossing machine is going to be available for preorder to demonstrators Aug 4. I am so excited… this die cutting/ embossing machine has a solid magnet plate that should prevent the dies from being “pulled” to somewhere other than where you put them on the plate! YAY! So how can you be part of that preorder Aug 4 – JOIN MY TEAM! Above is a bit more info about how to join my team as a demonstrator AND below a bit more about the die cutting/ embossing machine. Pretty cool machine isn’t it? I can’t wait to order mine.
Thanks for stopping by.
May you have a beautiful day.
Make someone happy by sending them a handmade card.

beautiful card
LikeLiked by 1 person
So pretty Terry Lynn! Love the embossed background. 🙂
LikeLiked by 1 person
Lovely card, Terry Lynn – your poppy truly…pops!…against that textured background!
LikeLiked by 1 person
Thanks everyone… you made my day!
LikeLike