Stampin’ Up! Merriest Moments Layered

Hello Crafters… well, I did it, my first Facebook Live. Whew. And it wasn’t so bad. I didn’t shake throughout as I was afraid I might. I WAS crooked, so that’s something I must fix. All in all, a positive experience and I’m thankful & grateful to have been asked to participate in the Inkin’ Krew World Card-Making Day. Today’s post gives all the details about yesterday’s card and some particulars about the Merriest Moments Bundle. It’s confusing to some as it includes a Hybrid Embossing Folder. And what that means is it die cuts & embosses at the same time. What seems to confuse folks is what plates to use. We’ll start with that…

Embossing AND die cutting with Hybrid Embossing Folders: three ‘steps’

  1. Emboss as you normally would using the #1 base plate & #4 Specialty Plate used with 3D embossing folders.
  2. Cut & emboss with the outline die & hybrid folder: the die lies easily in the hybrid folder with the cutting blade facing you and the die in the side with the SU! logo. Place the card stock against it (at least a 4 1/4 x 5 1/2 sheet), close the folder. Use the #1 base plate & the #4 Specialty Plate… the embossing folder is sandwiched between… and roll it through the cut & emboss machine.
  3. Cut & emboss with the detail die and the hybrid folder: the detail die lies easily in the hybrid folder as did the outline die… cutting blade toward you & lying in the SU! logo side of the hybrid folder, place a piece of card stock in the folder (at least 4 1/4 x 5 1/2), close the folder. Use the #1 base plate & the #2 die plate & run it through the machine. Remove the card stock & the detail die, replace the detailed cut piece into the embossing folder & run it through as if embossing (#1 base plate & #4 Specialty Plate). This reinforces the embossing and gives the piece more detail embossing. With the detail die, it is really a two-step process but it gives a beautiful look.

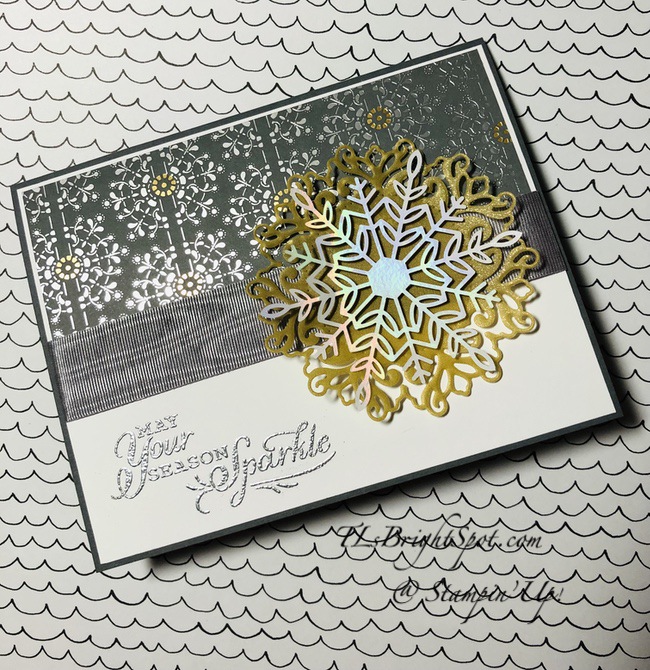
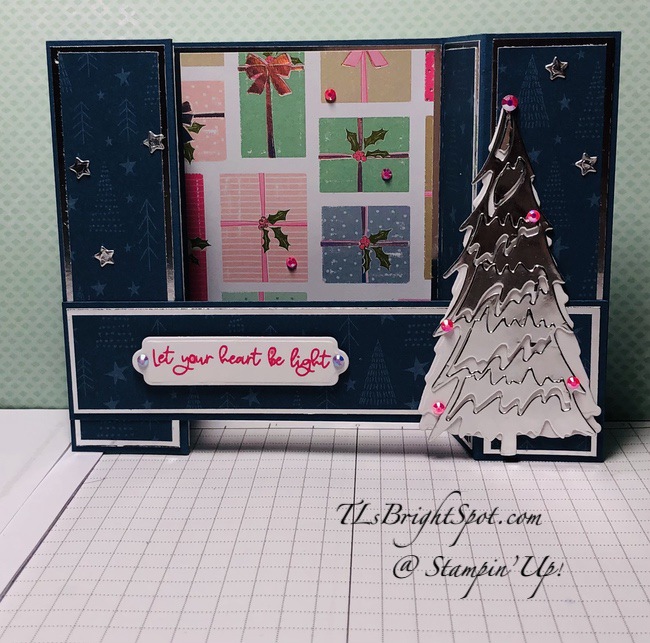
And here’s my finished card.

Merriest Moments Layered.1

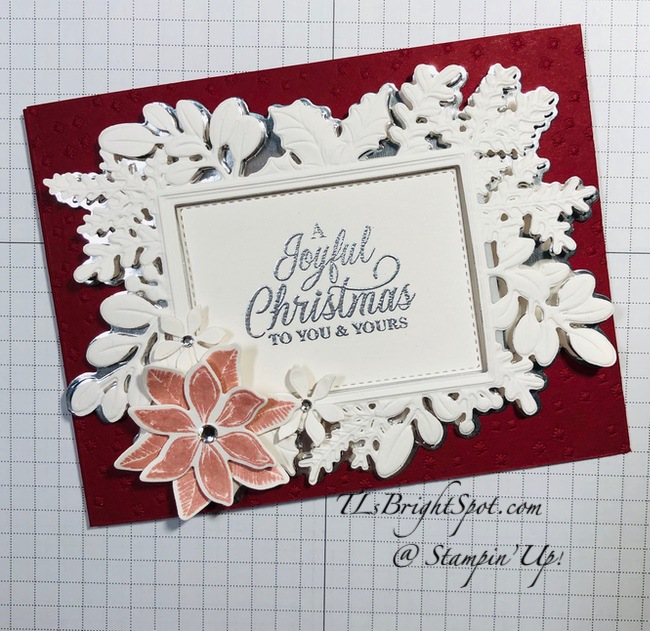
Cherry Cobbler card stock is the base (card cuts at the end of this post) with a layer of Cherry Cobbler run through the Merriest Moments Hybrid Embossing Folder, adhered directly to the base. The next layer is the Silver Foil run through the same Hybrid Folder but with the outline die included when running it through the machine. (see step 2 above). This was adhered to the card front with liquid glue just in the center portion of the cut & embossed piece. Then, with Shimmer Paper/ Pearlescent Paper card stock, I ran this through the machine as in step 3 (with the detail die) above PLUS I included the rectangular die also, removing the center portion of the piece.I embossed this center rectangle with silver embossing powder (stamp with versamark first, then sprinkle with embossing powder & heat set)using this fun sentiment from the Merriest Moments stamp set. I adhered this right onto the silver foil, using liquid glue. (you could use Stampin’ Seal). Add Foam Adhesive Strips along the border of the rectangle (back side of course) of this stunning Shimmer Paper/ Pearlescent Paper piece. Adhere to the card front, aligning the pattern just so. What is so nice about this is the way the silver foil peeks through, and how the Shimmer Paper/ Pearlescent Paper piece is raised and gives the sentiment more focus.

I could have stopped there, but didn’t. 😏 I stamped these very nice 2 sizes of flower petals (they look like poinsettia petals to me) in Blushing Bride ink on scraps of Shimmer Paper/ Pearlescent Paper, and die cut them. I also die cut three itty bitty petals just in the Shimmer Paper/ Pearlescent Paper. I layered the two Blushing Bride petals together, adhered the smaller to the larger with a mini dimensional and added a Rhinestone Basic Jewel to the center. This was glued (liquid glue) to the card front in the corner. I then added Rhinestone Basic Jewels to the mini Shimmer Paper/ Pearlescent Paper petals and adhered two of them as you see in the photo. Love, love, love.

Merriest Moments Layered.2

OOPS! This is sideways – blast. Imagine it straight :O)

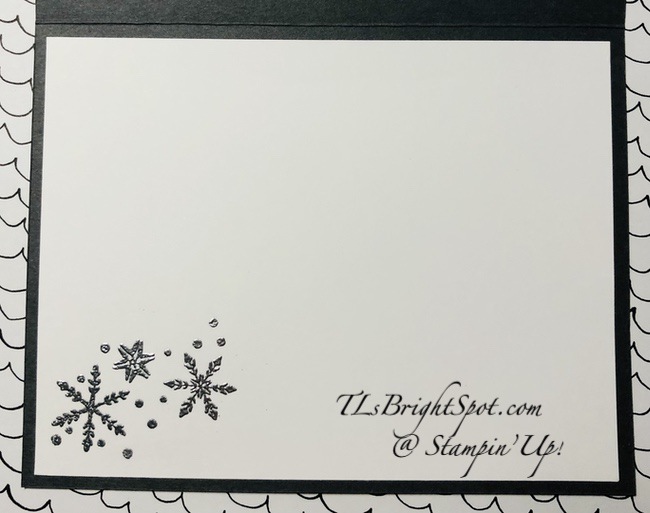
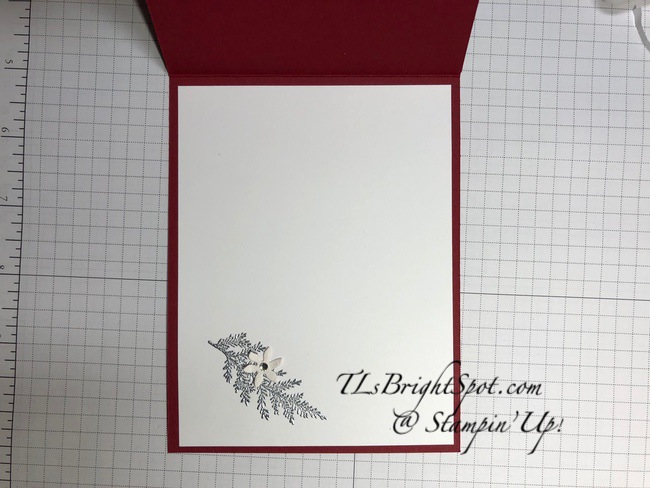
To a Basic White panel, I stamped the pine frond with VersaMark ink, sprinkled it with silver embossing powder and heat set it. I added the very last Shimmer Paper/ Pearlescent Paper mini petal to the frond with liquid glue, adhered the panel to the inside of the card and the inside was done. In fact, the whole card was done.

The envelope got a panel of Whimsy & Wonder SDSP trimmed to fit & voila! I love how this
SDSP coordinates with the silver foil on the card. And another Christmas card to my card stash for mailing Dec 1! Gosh, now that I think about it, I could begin addressing these :O)

Merriest Moments Layered.3

Now you have complete directions on how to use the Hybrid embossing folder – specifically the Merriest Moments Bundle. Not have a demonstrator so you can order? If you do not have a demonstrator and need an Annual 2021 Catalog OR Jul-Dec 2021 Mini Catalog, please reach out to me – happy to send one to you. Please also use my current host code when ordering: 26QYRFXB I offer my customers a free item from Stampin’ Up! item valued to $10 with your order of $50 and above. Click here to go my store. When the order is over $150, you still receive that free gift from me, but SU! has Stampin’ Rewards that may be used for additional products, so don’t use the host code at that time. If you have questions just let me know. If you would like to be able to order products early from catalogs AND enjoy that 20% discount, join my team now… you may do that here. We have lots of fun and are a creative bunch that encourages & supports one another. Would love to have you!

Thanks for stopping by. May you have a beautiful day. Remember: Inspire, Create, Share.

There’s nothing like a handmade card.

Card cuts:

Cherry Cobbler ~ 4 1/4 x 11 scored at 5 1/2; 4 1/4 x 5 1/2 (embossed panel)

Silver Foil Sheets ~ 4 1/4 x 5 1/2

Pearlescent Paper ~ 4 1/4 x 5 1/2 + scraps

Basic White ~ 4 x 5 1/2

Stampin’ Up! Reflected in Nature – Breathe

Whoa – it’s Oct 1! Oh my how the time has flown…. less than 90 days before Christmas. I’m stunned… and it’s chilly outside. It got down to 45 last night – definite sweater weather. Which b rings me to today’s card – a campsite, maybe fall, maybe winter with some snow. I love the scene! Today’s card is about being in the present, the now. The stamp is called Reflected in Nature. I’ve done it in two tones: Night of Navy and Balmy Blue.

Reflected in Nature – Breathe.1

My Night of Navy is very inky and I had to play with this a bit to get it as I wanted. The picture itself is quite nice and I wanted to be able to see it readily.. inked full strength it was too heavy. This is a single stamp, so in order to do the upper in one color and the lower in another, it was necessary to use a post-it note to cover one side to ink, remove the note then stamp, and follow the same procedure on the other side. This is best done with the Stamparatus. With the stamp in place it is easy to re-stamp if necessary and it’s on a Very Vanilla panel. You can see the background on the card has gone through an embossing folder – Timber 3D to be exact – perfect for the stamp. And that’s Balmy Blue card stock layered on a panel of Night of Navy. And I fussy cut around the inked picture, layered it on a strip of Night of Navy that I had torn the edges to make it look worn – to go with the natural scene. The sentiment is from the same stamp set, Reflected in Nature, and stamped in Night of Navy ink on a Very Vanilla panel. I die cut it with a label die from Harvest Dies. It was added to the card front with dimensionals. Did I mention the cabin stamp is also on dimensionals? I added three Holiday Rhinestone Jewels in navy.

Reflected in Nature – Breathe.2

On the inside Very Vanilla panel I stamped the sentiment – again from Reflected in Nature in Balmy Blue ink, then added the bird stamp in Night of Navy ink. It is really soaring! It is layered on a Night of Navy panel then adhered directly to the inside of the card.

Reflected in Nature – Breathe.3

For the envelope I ran the Night of Navy piece through the Timber 3D embossing folder then adhered it to the flap and trimmed to fit. On the front I stamped another sentiment in Night of Navy ink from Reflected in Nature stamp set. And this card is ready for someone special. It’s tailored, so easily can be masculine. I’ve another one of these I’m working on, in shades of gray.

I’ll do the product list, then I want to share something special about tomorrow – World Card Making Day and what our team is doing to celebrate it :O)

Several of our team have agreed to do a facebook live of a card they are making, including me (yikes!); there will be prizes & a game or two throughout the day… 9-5 – all on facebook. Please join us as we make some cards and have some fun!  There’s a Facebook page set up to host the event. 

Go to https://www.facebook.com/groups/inkinkrewworldcardmakingday and Join the Page. 

You will get approved, then select All Notifications so you don’t miss a thing!

World Card Making Day Inkin’ Krew FB Live Event!

2 October 2021

And below is the schedule. I can’t wait to see what everyone is doing. It’s going to be a fun day!

Not have a demonstrator so you can order? If you do not have a demonstrator and need an Annual 2021 Catalog OR Jul-Dec 2021 Mini Catalog, please reach out to me – happy to send one to you. Please also use my current host code when ordering: 26QYRFXB I offer my customers a free item from Stampin’ Up! item valued to $10 with your order of $50 and above. Click here to go my store. When the order is over $150, you still receive that free gift from me, but SU! has Stampin’ Rewards that may be used for additional products, so don’t use the host code at that time. If you have questions just let me know. If you would like to be able to order products early from catalogs AND enjoy that 20% discount, join my team now… you may do that here. We have lots of fun and are a creative bunch that encourages & supports one another. Would love to have you!

Thanks for stopping by. May you have a beautiful day. Inspire. Create. Share.

NOTHING BEATS A HANDMADE CARD!

Stampin’ Up! Picture This Christmas

about.LAST DAY OF SALE-A-BRATION!!! Can you believe it? It has gone by f-a-s-t… And, if you didn’t get all those free items, today is the last day for it. Do you need help in deciding to purchase – – or to join as a demonstrator? Let’s talk if you do… send me a message and I will do my best to answer your questions. And if I don’t know, I’ll find out.

Today’s card is, well, different. It’s a bit ‘fussy’ with bows. Don’t ask how I decided to do this, I just did. I started playing and this is the result. I have to say, it puts a smile on my face, it’s cheery. Are you full of suspence?

Picture This Christmas.1

The Whimsy & Wonder SDSP is really special. This silver and white stripe has the dark Mossy Meadow with dots on the opposite side. So when I die cut the silver & white, at first I didn’t know what to do with the cut-outs. I had no intention of using them, but you can see I DID. I sy cut the packages, put dimensionals on the back and attached them to the circles.Of course this needed a backing… Polished Pink card stock to the rescue – it brightens the whole piece. Next, what to do in the smaller circles… I had fussy cut some other items from a different sheet of the SDSP, but didn’t like them. I tied the Open Weave Polished Pink bow and liked it, then the Crinkled Seam Binding Ribbon was next. I wanted to incorporate silver somehow but the Simply Elegant Trim by itself wasn’t enough – so, I colored a length of the Crinkled Seam Binding with Blushing Bride ink, let it dry, and combined the two: Crinkled Seam Binding and the Simply Elegant Trim in Silver. Each of these is attached with a glue dot. I cut another piece of the Whimsy & Wonder SDSP and adhered it to Mint Macaron card stock, then added that to the Thick Basic White card base. The Polished Pink panel got dimensionals and was added to the card front & voila! done.

Picture This Christmas.2

For the inside I stamped the sentiment from the Whimsical Trees stamp set in Mint Macaron ink. Since I had several fussy cut pieces on the desk, I decided an ornament would be fun. But first I took the Mint Macaron Marker & drew a ‘string’ for hanging, then added the bauble with liquid glue. This was adhered to the inside of the card and voila! done again. :O)

Picture This Christmas.3


For the envelope, I stamped the tree on the front – Mint Macaron ink using the Whimsical Trees stamp set. Then on the flap I added a different pattern of the Whimsy & Wonder SDSP. Can you see where the ornament came from on the inside of the card? Fun card, different. This will have to go to someone special – the card looks better in real life – just sayin’.

Ok, what’s next – oh yes… you want to know all the products, right? Here goes…

And… here’s more info about joining my team as a demonstrator or simply order during Sale-a-bration.

Next is to talk to you about Sale-a-bration… it’s about to end ~ today is the 30th and the last day. What ARE you waiting for? Order now, even better, join my team now! When joining during Sale-a-bration, here’s what happens… join for $99, get product valued at $125 PLUS a free bundle!!! The free bundle list is just below and they are WOW bundles you won’t want to miss. You must join before the end of the day Sep 30 to get this value. You may join my team now ~ you may do that here.

Not have a demonstrator so you can order? If you do not have a demonstrator and need an Annual 2021 Catalog OR Jul-Dec 2021 Mini Catalog, please reach out to me – happy to send one to you. And when I send it, there will be a Sale-a-bration catalog in with it! (Probably not at this late date. 😦 That means more FREE items to choose from with every order of $50, or $100 or multiples of that. Please also use my current host code when ordering: R6U3VRBN. I offer my customers a free item from Stampin’ Up! item valued to $10 with your order of $50 and above. Click here to go my store. When the order is over $150, you still receive that free gift from me, but SU! has Stampin’ Rewards that may be used for additional products, so don’t use the host code at that time. If you have questions just let me know. If you would like to be able to order products early from catalogs AND enjoy that 20% discount, join my team now… you may do that here. We have lots of fun and are a creative bunch that encourages & supports one another. Would love to have you!

06.21_HEADER_SAB_ENG


It is during this period that when you place an order of $50 or increments of that, there are FREE items available in the Sale-a-bration catalog. Stampin’ Up! does not usually offer more than one sale-a-bration in a year, but this year, they DID! WooHoo – fun products too… Again, contact me if you do not have a catalog.

How do you pre-earn Sale-A-Bration products? It’s simple! For every $50 USD | $60 CAD and $100 USD | $120 CAD you spend, you’ll be able to take your pick of Sale-A-Bration products to add to your order—for free

And if you JOIN and become a demonstrator during Sale-a-bration… you have the opportunity to get one of the bundles below FREE!

OIN BUNDLE OPTIONSPRICELIMIT
156795Arctic Bears Bundle$47.50 USD | $64.75 CAD1
156819Beauty Of Tomorrow Bundle$50.25 USD | $68.25 CAD1
156801Christmas Season Bundle$54.00 USD | $73.75 CAD1
156806Christmas To Remember Bundle$60.25 USD | $81.75 CAD1
156807Frosted Gingerbread Bundle$48.50 USD | $66.50 CAD1
158609Gorgeous Leaves Bundle$44.00 USD | $60.25 CAD1
156813Nature’s Harvest Bundle$53.00 USD | $72.75 CAD1
156816Peaceful Cabin Bundle$54.00 USD | $72.75 CAD1
156391Peaceful Deer Bundle$36.00 USD | $48.50 CAD1
156789Penguin Place Bundle$31.50 USD | $42.25 CAD1
156798Sweet Little Stockings Bundle$47.50 USD | $64.75 CAD1
156810Whimsical Trees Bundle$51.25 USD | $70.00 CAD1


Those who join Stampin’ Up! during Sale-A-Bration may select one bundle from the list above to

add to their Starter Kit at no additional cost.

Joining during this sale-a-bration time allows you to create your own starter kit: $99 cost, $125 worth of product + a FREE bundle (listed above for no additional cost) + FREE Sale-a-bration items. Oh my – why pass up this deal? Join now… you may do that here.

Thanks for stopping by. May you have a beautiful day. Inspire. Create. Share.

Nothing beats a handmade card.

Stampin’ Up! You’re a Peach Birthday

Hello again… the countdown is zero minus 3 days (counting today) til the end of Sale-a-bration. Do you have all those free goodies yet? If not, better order quick. Better yet, have you become a demonstrator yet? Now is the perfect time… $99 to sign up but $125 worth of products PLUS a FREE BUNDLE ~ then as long as you are a demonstrator 20% (or more) off your purchasing price. The list of possible bundles to choose from is at the end of this post. Buy now ~ join now. 👍 you may do that here.

Today’s post is a birthday card – ordered by our daughter. She said she was down to one, could you send some more please? This is the first of the batch.

You’re A Peach Birthday.1

The DSP is You’re a Peach DSP layered on Pale Papaya, then Calypso Coral that was die cut with Stitched Rectangles Dies. And that beautiful spray? It comes from Artistic Dies and Gold/ Rose Gold 6×6 DSP. Isn’t it absolutely gorgeous – the spray & the Gold? I keep forgetting I have it. I kept the card pretty simple – so mailing would be a single stamp. Postage is increasing and that’s a consideration when I make cards for an order. The Calypso Coral panel is on dimensionals. The sentiment comes from Art Gallery stamp set and was stamped in Calypso Coral ink. I added three Metallic Pearls in gold for the final touch.

You’re A Peach Birthday.2

The inside… a background layer of Calypso Coral, then the Basic White stamped layer. Since I had the Art Gallery stamp set available, I stamped the sentiment then a couple of the small flowers, stamped off Calypso Coral for the larger stamp and Pale Papaya for the second or filler stamp. I took a Micron pen and inked around the flower to give it a bit of definition. I like the added touch. I adered the Basic White panel and the card was done!

You’re A Peach Birthday.3

For the envelope, I added a panel of the same You’re a Peach DSP to the flap & trimmed it to fit – and that was it. This is a bright cheery card and puts a smile on my face ~ I hope it does yours as well. I’ll give the product list, then I’ll share the list of bundles you can get – for FREE is you join up now as a demonstrator. I would love to have you on my team 😁

Remember that Sale-a-bration is now through September 30! It’s the best time to buy (lots of free product) & JOIN ~ read on… it is ending SOON!!!

06.21_HEADER_SAB_ENG


It is during this period that when you place an order of $50 or increments of that, there are FREE items available in the Sale-a-bration catalog. Stampin’ Up! does not usually offer more than one sale-a-bration in a year, but this year, they DID! WooHoo – fun products too… Again, contact me if you do not have a catalog.

How do you pre-earn Sale-A-Bration products? It’s simple! For every $50 USD | $60 CAD and $100 USD | $120 CAD you spend, you’ll be able to take your pick of Sale-A-Bration products to add to your order—for free

And if you JOIN and become a demonstrator during Sale-a-bration… you have the opportunity to get one of the bundles below FREE!

OIN BUNDLE OPTIONSPRICELIMIT
156795Arctic Bears Bundle$47.50 USD | $64.75 CAD1
156819Beauty Of Tomorrow Bundle$50.25 USD | $68.25 CAD1
156801Christmas Season Bundle$54.00 USD | $73.75 CAD1
156806Christmas To Remember Bundle$60.25 USD | $81.75 CAD1
156807Frosted Gingerbread Bundle$48.50 USD | $66.50 CAD1
158609Gorgeous Leaves Bundle$44.00 USD | $60.25 CAD1
156813Nature’s Harvest Bundle$53.00 USD | $72.75 CAD1
156816Peaceful Cabin Bundle$54.00 USD | $72.75 CAD1
156391Peaceful Deer Bundle$36.00 USD | $48.50 CAD1
156789Penguin Place Bundle$31.50 USD | $42.25 CAD1
156798Sweet Little Stockings Bundle$47.50 USD | $64.75 CAD1
156810Whimsical Trees Bundle$51.25 USD | $70.00 CAD1

Those who join Stampin’ Up! during Sale-A-Bration may select one bundle from the list above to

add to their Starter Kit at no additional cost.

Joining during this sale-a-bration time allows you to create your own starter kit: $99 cost, $125 worth of product + a FREE bundle (listed above for no additional cost) + FREE Sale-a-bration items. Oh my – why pass up this deal? Join now… you may do that here.

Thanks for stopping by. May you have a beautiful day. Inspire. Create. Share.

Nothing beats a handmade card.

Stampin’ Up! Simply Elegant and Wonderful Snowflakes

Hi everyone… a bit late today… it’s Monday and a sailing day and silly me didn’t get this written & scheduled last night… but here I am. Today’s card is made with the Simply Elegant DSP, Gold Shimmer Vellum (from the Jul-Dec Mini 2021 Catalog and Encircled in Beauty Dies plus one or two other items. I hadn’t broken open the Encircled in Beauty Dies and am so disappointed I haven’t used them more – they are, well, beautiful :O]

Simply Elegant DSP w/ Wonderful Snowflakes.1

This is such an easy layout to ‘change up’. Besides the Simply Elegant DSP which is a major focus, there is also the Wonderful Snowflake and the background for it is a die cut from Gold Shimmer Vellum using one of the Encircled in Beauty Dies. Another addition is 7/8″ wide Textured Ribbon in Smoky Slate – lots of grays & golds going on here. The special touch is the Silver Embossing Powder for the sentiment. To me, that really brings it all together. The sentiment comes from Snowflake Wishes stamp set. Card cuts will be listed at the bottom of this post.

Simply Elegant DSP &
Wonderful Snowflakes.2

For the inside, more snowflakes from Snowflake Wishes stamp set stamped n a Basic White panel with VersaMark ink, covered with Silver Embossing Powder and heat set. The snowflakes add a finishing touch to the inside – and I didn’t feel another sentiment was necessary, but it would be easy enough to do. Adhere panel to the inside of the card and that’s it!

Simply Elegant DSP & Wonderful Snowflakes.3

The flap got more of the same Simply Elegant DSP trimmed to fit. The front of the envelope got more of the snowflakes from Snowflake Wishes stamp set… stamped w/ VersaMark, covered with Silver Embossing Powder & heat set. And it’s ready for Christmas mailing 😁 This puts me at 31 Christmas cards… more to make with a goal of 100! I’m not good at mass producing, meaning… I don’t like to do it. I certainly can and may have to resort to it, but not yet.

Next is to talk to you about Sale-a-bration… it’s about to end ~ today is the 27th and the last day is Sep 30. What ARE you waiting for? Order now, even better, join my team now! When joining during Sale-a-bration, here’s what happens… join for $99, get product valued at $125 PLUS a free bundle!!! The free bundle list is just below and they are WOW bundles you won’t want to miss. You must join before the end of the day Sep 30 to get this value. You may join my team now ~ you may do that here.

Not have a demonstrator so you can order? If you do not have a demonstrator and need an Annual 2021 Catalog OR Jul-Dec 2021 Mini Catalog, please reach out to me – happy to send one to you. And when I send it, there will be a Sale-a-bration catalog in with it! (Probably not at this late date. 😦 That means more FREE items to choose from with every order of $50, or $100 or multiples of that. Please also use my current host code when ordering: R6U3VRBN. I offer my customers a free item from Stampin’ Up! item valued to $10 with your order of $50 and above. Click here to go my store. When the order is over $150, you still receive that free gift from me, but SU! has Stampin’ Rewards that may be used for additional products, so don’t use the host code at that time. If you have questions just let me know. If you would like to be able to order products early from catalogs AND enjoy that 20% discount, join my team now… you may do that here. We have lots of fun and are a creative bunch that encourages & supports one another. Would love to have you!

First – the list of products from today’s card. THEN the list of FREE Bundles available when you join as a demonstrator before the end of Sep 30.

Remember that Sale-a-bration is now through September 30! It’s the best time to buy (lots of free product) & JOIN ~ read on… it is ending SOON!!!

06.21_HEADER_SAB_ENG


It is during this period that when you place an order of $50 or increments of that, there are FREE items available in the Sale-a-bration catalog. Stampin’ Up! does not usually offer more than one sale-a-bration in a year, but this year, they DID! WooHoo – fun products too… Again, contact me if you do not have a catalog.

How do you pre-earn Sale-A-Bration products? It’s simple! For every $50 USD | $60 CAD and $100 USD | $120 CAD you spend, you’ll be able to take your pick of Sale-A-Bration products to add to your order—for free

And if you JOIN and become a demonstrator during Sale-a-bration… you have the opportunity to get one of the bundles below FREE!

OIN BUNDLE OPTIONSPRICELIMIT
156795Arctic Bears Bundle$47.50 USD | $64.75 CAD1
156819Beauty Of Tomorrow Bundle$50.25 USD | $68.25 CAD1
156801Christmas Season Bundle$54.00 USD | $73.75 CAD1
156806Christmas To Remember Bundle$60.25 USD | $81.75 CAD1
156807Frosted Gingerbread Bundle$48.50 USD | $66.50 CAD1
158609Gorgeous Leaves Bundle$44.00 USD | $60.25 CAD1
156813Nature’s Harvest Bundle$53.00 USD | $72.75 CAD1
156816Peaceful Cabin Bundle$54.00 USD | $72.75 CAD1
156391Peaceful Deer Bundle$36.00 USD | $48.50 CAD1
156789Penguin Place Bundle$31.50 USD | $42.25 CAD1
156798Sweet Little Stockings Bundle$47.50 USD | $64.75 CAD1
156810Whimsical Trees Bundle$51.25 USD | $70.00 CAD1


Those who join Stampin’ Up! during Sale-A-Bration may select one bundle from the list above to

add to their Starter Kit at no additional cost.

Joining during this sale-a-bration time allows you to create your own starter kit: $99 cost, $125 worth of product + a FREE bundle (listed above for no additional cost) + FREE Sale-a-bration items. Oh my – why pass up this deal? Join now… you may do that here.

Thanks for stopping by. May you have a beautiful day. Inspire. Create. Share.

Nothing beats a handmade card.

Card cuts for today’s card:

  • Basic Gray card base 8 1/2 x 5 1/2 scored at 4 14
  • Basic White 4 1/8 x 5 3/8; 4 x 5 1/4 (inside)
  • Simply Elegant DSP 2 x 4
  • Shimmer Vellum in Gold 3 x 3 for die cut

Stampin’ Up! Beautifully Penned w/ Hand Penned

The Beautifully Penned DSP is one of the FREE Sale-a-bration items available with a $50 purchase. And that purchase can be from the Jul-Dec Mini 2021 catalog or the Annual Catalog – – but only until Sep 30! This paper coordinates perfectly with the Hand Penned bundle and I wanted to share this card with you. First I colored using the Watercolor Pencils and the Blending Pen. Here’s a photo of that.

Flowers come in all colors so I played to my hearts content. As you can see, there’s more that can be done too! From this I will be able to create several cards. Here is my first…

Beautifully Penned w/ Hand Penned.1

I’m pleased with this! What do you think? Here’s what I did…

  • Die cut a Basic White panel with one of the Scalloped Contour Dies.
  • Cut a panel from the colored paper to adhere inside it. This panel is 2 x 3 5/16, just a notch beyond 3 1/4.
  • Adhere the Scalloped Contour piece to a Basic Black panel 2 1/2 x 3 7/8. Put dimensionals on the back and set aside.
  • Adhere a coordinating Beautifully Penned DSP to a So Saffron panel: wrap with the White ribbon from the Flowers For Every Season Combo Pack, securing in back with Seal+
  • Adhere these two pieces to a Thick Basic White card base 8 1/2 x 5 1/2 scored at 4 1/4
  • Adhere the flower panel with dimensionals to the card front – off-center.
  • Add a bow from the same ribbon, attaching with a glue dot.
  • On a Basic White scrap, stamp the sentiment from Hand-Penned stamp set in Memento Black ink and die cut with Potted Succulents Dies. Attach dimensionals to the bottom and a bit of liquid glue to the top of the banner and adhere in place. The card front is done!
Beautifully Penned w/ Hand Penned.2

The inside is just as pretty… stamp the flower from Hand-Penned stamp set in Memento Black ink on a Basic White panel. Color with Watercolor Pencils and use the Blender Pen to blend. Adhere to a So Saffron panel then to the inside of the card and voila!

You may be asking what colors I used for coloring. Well, I just played, which I’m encouraging you to do. Nature is full of ideas; look around you and follow those patterns. Some colors coordinate as does this at the right, and some contrast in ways we don’t expect – so play, create, let nature inspire you.

For the envelope I kept it very simple… Beautifully Penned DSP on the flap trimmed to fit.

Beautifully Penned w/ Hand Penned.3

The countdown for Sale-a-bration is 6 days if you count today. Remember what that means – no more free Stampin’ Up! goodies, no extra bundle if you decide to join as a demonstrator… more particulars follow. If you do not have a demonstrator and need an Annual 2021 Catalog OR Jul-Dec 2021 Mini Catalog, please reach out to me – happy to send one to you. And when I send it, there will be a Sale-a-bration catalog in with it! That means more FREE items to choose from with every order of $50, or $100 or multiples of that. Please also use my current host code when ordering: R6U3VRBN. I offer my customers a free item from Stampin’ Up! valued to $10 with your order of $50 and above. Click here to go my store. When the order is over $150, you still receive that free gift from me, but SU! has Stampin’ Rewards that may be used for additional products, so don’t use the host code at that time. If you have questions just let me know. If you would like to be able to order products early from catalogs AND enjoy that 20% discount, join my team now… you may do that here. We have lots of fun and are a creative bunch that encourages & supports one another. Would love to have you!

Remember that Sale-a-bration is now through September 30! It’s the best time to buy (lots of free product) & JOIN ~ read on… it is ending SOON!!!

06.21_HEADER_SAB_ENG


It is during this period that when you place an order of $50 or increments of that, there are FREE items available in the Sale-a-bration catalog. Stampin’ Up! does not usually offer more than one sale-a-bration in a year, but this year, they DID! WooHoo – fun products too… Again, contact me if you do not have a catalog.

How do you pre-earn Sale-A-Bration products? It’s simple! For every $50 USD | $60 CAD and $100 USD | $120 CAD you spend, you’ll be able to take your pick of Sale-A-Bration products to add to your order—for free

And if you JOIN and become a demonstrator during Sale-a-bration… you have the opportunity to get one of the bundles below FREE!

OIN BUNDLE OPTIONSPRICELIMIT
156795Arctic Bears Bundle$47.50 USD | $64.75 CAD1
156819Beauty Of Tomorrow Bundle$50.25 USD | $68.25 CAD1
156801Christmas Season Bundle$54.00 USD | $73.75 CAD1
156806Christmas To Remember Bundle$60.25 USD | $81.75 CAD1
156807Frosted Gingerbread Bundle$48.50 USD | $66.50 CAD1
158609Gorgeous Leaves Bundle$44.00 USD | $60.25 CAD1
156813Nature’s Harvest Bundle$53.00 USD | $72.75 CAD1
156816Peaceful Cabin Bundle$54.00 USD | $72.75 CAD1
156391Peaceful Deer Bundle$36.00 USD | $48.50 CAD1
156789Penguin Place Bundle$31.50 USD | $42.25 CAD1
156798Sweet Little Stockings Bundle$47.50 USD | $64.75 CAD1
156810Whimsical Trees Bundle$51.25 USD | $70.00 CAD1

Those who join Stampin’ Up! during Sale-A-Bration may select one bundle from the list above to

add to their Starter Kit at no additional cost.

Joining during this sale-a-bration time allows you to create your own starter kit: $99 cost, $125 worth of product + a FREE bundle (listed above for no additional cost) + FREE Sale-a-bration items. Oh my – why pass up this deal? Join now… you may do that here.

Thanks for stopping by. May you have a beautiful day. Inspire. Create. Share.

Nothing beats a handmade card.

Stampin’ Up! Detailed Pumpkin Dies

Talk about detail – this pumpkin has it! It’s gorgeous… and die cut from Copper Foil, even more so. It’s Friday, a day to be thankful (well, every day is one of those!) and TGIF day. I hosted a card class yesterday and will share photos of a few of the bridge cards folks made. Not everyone wanted theirs photographed, so I didn’t. I’ll post those at the end.

Detailed Pumpkin Dies.1

I was playing around… no sketch to follow or anything. Once this was die cut from foil it said, ‘use me alone – I’m stunning’ – so I did! Using Very Vanilla card stock and the Stitched Rectangle Dies, I cut a panel, and adhered the pumpkin with dots of liquid glue. (TIP: die cut the pumpkin from the foil used as backing for the Very Vanilla panel.) Adhere this VV panel to the Copper Foil with Stampin’ Seal. With another piece of Very Vanilla card stock, run it through the Bark 3D Embossing Folder. Adhere it to a slightly larger panel of Early espresso card stock. Coming back to the Fpol panel… add a length of Open Weave Ribbon in Pale Papaya to the back by running a strip of Stampin’ Seal in the area and attaching the ribbon as shown. Put dimensional on the back of the Foil panel and attach to the embossed panel. Add all of this to the Very Vanilla card base and the front is done!

Detailed Pumpkin Dies, inside panel.2

On another Very Vanilla piece I stamped the sentiment in VersaMark ink, sprinkled it with Copper Embossing Powder and heat set. The sentiment comes from the Heartfelt Wishes stamp set in the Jul-December 2021 Mini Catalog. (It has some gorgeous sentiments!) Adhere the VV panel to a slightly larger piece of Early Espresso card stock, then right into the inside of the card. Simply Elegant…

Detailed Pumpkins Dies.3

The envelope got more treatment of a panel of VV embossed with the Bark 3D Embossing Folder ~ that was it. I wanted this elegant and simple. Did I meet that goal? I think so, but you tell me.

This bundle ~ Pretty Pumpkins ~ will be around for a bit. The items in the Mini Catalogue can be ordered through Dec. But – fall, Thanksgiving, is well, now. Why wait? :O) Place your order soon so you can put these items to good use. If you do not have a demonstrator and need an Annual 2021 Catalog OR Jul-Dec 2021 Mini Catalog, please reach out to me – happy to send one to you. And when I send it, there will be a Sale-a-bration catalog in with it! That means more FREE items to choose from with every order of $50, or $100 or multiples of that. Please also use my current host code when ordering: R6U3VRBN. I offer my customers a free item from Stampin’ Up! valued to $10 with your order of $50 and above. Click here to go my store. When the order is over $150, you still receive that free gift from me, but SU! has Stampin’ Rewards that may be used for additional products, so don’t use the host code at that time. If you have questions just let me know. If you would like to be able to order products early from catalogs AND enjoy that 20% discount, join my team now… you may do that here. We have lots of fun and are a creative bunch that encourages & supports one another. Would love to have you!

Remember that Sale-a-bration is now through September 30! It’s the best time to buy (lots of free product) & JOIN ~ read on… it is ending SOON!!!

06.21_HEADER_SAB_ENG


It is during this period that when you place an order of $50 or increments of that, there are FREE items available in the Sale-a-bration catalog. Stampin’ Up! does not usually offer more than one sale-a-bration in a year, but this year, they DID! WooHoo – fun products too… Again, contact me if you do not have a catalog.

How do you pre-earn Sale-A-Bration products? It’s simple! For every $50 USD | $60 CAD and $100 USD | $120 CAD you spend, you’ll be able to take your pick of Sale-A-Bration products to add to your order—for free

And if you JOIN and become a demonstrator during Sale-a-bration… you have the opportunity to get one of the bundles below FREE!

OIN BUNDLE OPTIONSPRICELIMIT
156795Arctic Bears Bundle$47.50 USD | $64.75 CAD1
156819Beauty Of Tomorrow Bundle$50.25 USD | $68.25 CAD1
156801Christmas Season Bundle$54.00 USD | $73.75 CAD1
156806Christmas To Remember Bundle$60.25 USD | $81.75 CAD1
156807Frosted Gingerbread Bundle$48.50 USD | $66.50 CAD1
158609Gorgeous Leaves Bundle$44.00 USD | $60.25 CAD1
156813Nature’s Harvest Bundle$53.00 USD | $72.75 CAD1
156816Peaceful Cabin Bundle$54.00 USD | $72.75 CAD1
156391Peaceful Deer Bundle$36.00 USD | $48.50 CAD1
156789Penguin Place Bundle$31.50 USD | $42.25 CAD1
156798Sweet Little Stockings Bundle$47.50 USD | $64.75 CAD1
156810Whimsical Trees Bundle$51.25 USD | $70.00 CAD1


Those who join Stampin’ Up! during Sale-A-Bration may select one bundle from the list above to

add to their Starter Kit at no additional cost.

Joining during this sale-a-bration time allows you to create your own starter kit: $99 cost, $125 worth of product + a FREE bundle (listed above for no additional cost) + FREE Sale-a-bration items. Oh my – why pass up this deal? Join now… you may do that here.

Thanks for stopping by. May you have a beautiful day. Inspire. Create. Share.

Nothing beats a handmade card.

Cards from card class today… bridge fold card

This card made by Vicki

Stampin’ Up! Pillow Box Dies

Good day to you… it’s Thursday and I host a card class today. It’s always fun – no matter what we make. And no, I can’t tell you what we’re doing just yet, maybe tomorrow I can share photos. :O) Is that mean? Well, a tease maybe… Today I want to share the Pillow Box Dies with you – so stinking cute!

Are these adorable? They are only about 3″ in length, so they won’t fit much… maybe a pair of diamond earrings? No, I’m NOT hinting. Of course it would fit a few Hershey’s Kisses 😘 The die has score lines for the folds and everything – and the left photo shows the box fancy decorated using other dies in the set. (The flower dies come with it!!!) The box on the left is regular card stock – Mossy Meadow as a matter of fact, and crimping the curvy score lines on the ends was a bit tricky as the paper is thick and a bit stiff for this. I used ribbon from the Playful Pets Ribbon Trim Pack, die cut some of the flowers and attached them to the end of the ribbon with a glue dot. But the box on the right went together like a dream – and that tag die is part of the set as well :O). The DSP for this one is In The Wild. I wrapped Linen thread around it twice and tied a bow; die cut the tag, stamped it, and tied it to the thread with some White Baker’s Twine that I separated. Easy Peasy💕. These would be really fun at place settings for a dinner party – with names on the tags… or as stocking stuffers. How would you use these cuties? The information regarding these products is listed at the bottom of this post.

OK, now I’m going to change the subject… Sale-a-bration ends Sep 30 and NOW is the time to join up as a demonstrator. The deal is way too good to pass up. For $99 you may put items in your starter kit that amount to $125 PLUS Stampin’ Up! is offering a FREE bundle from a collection of bundles that are incredibly wonderful – and always get 20% off the products of your choice. What’s your hesitation? There is no pushing you to go, go, go. You make this a fun option for you. And, here’s a question … What’s the BEST that can happen? The BEST that can happen is crafting with others, sharing the fun, being creative, being part of a community that encourages & excites. So, join me, and others as a Stampin’ Up! Demonstrator. I’ll help you when & if you need it – Here is the link… you may do that here, now, before Sale-a-bration ends. Below is the list of free bundles.

OIN BUNDLE OPTIONSPRICELIMIT
156795Arctic Bears Bundle$47.50 USD | $64.75 CAD1
156819Beauty Of Tomorrow Bundle$50.25 USD | $68.25 CAD1
156801Christmas Season Bundle$54.00 USD | $73.75 CAD1
156806Christmas To Remember Bundle$60.25 USD | $81.75 CAD1
156807Frosted Gingerbread Bundle$48.50 USD | $66.50 CAD1
158609Gorgeous Leaves Bundle$44.00 USD | $60.25 CAD1
156813Nature’s Harvest Bundle$53.00 USD | $72.75 CAD1
156816Peaceful Cabin Bundle$54.00 USD | $72.75 CAD1
156391Peaceful Deer Bundle$36.00 USD | $48.50 CAD1
156789Penguin Place Bundle$31.50 USD | $42.25 CAD1
156798Sweet Little Stockings Bundle$47.50 USD | $64.75 CAD1
156810Whimsical Trees Bundle$51.25 USD | $70.00 CAD1

Thanks for stopping by. May you have a beautiful day. Inspire. Create. Share.

Nothing beats a handmade card.

Stampin’ Up! Bridge Fold Card in Whimsy

Good Monday morning to you… a full week is ahead of us. Got anything wonderful planned? I can tell you we are going sailing this morning, IF (and that’s big if) there is enough wind. And then I need to make a bunch of cards for our daughter – who requested sympathy and thinking of you type cards. But for now, let’s focus on this fun fold. It’s quite easy. A stand-up card by itself.

Bridge Fold Card in Whimsy.1

Oh my, this is a dark photo… later is a better one. I used Whimsical Trees with coordinating Christmas Trees Dies and the Whimsy & Wonder SDSP & the Seasonal Labels Dies for the sentiment. I did use Silver Foil for the tree and stars. Let’s get a better picture…

Bridge Fold Card in Whimsy.2

This is better – and it’s lying on it’s back. Let’s begin with the tree, shall we? I die cut the tree from Silver Foil and kept all the inner pieces. I then die cut the solid tree from Basic White card stock + an extension of the bottom of the tree about 1/2″. I happen to really like both trees and no, I don’t think they are supposed to go together. But I happen to like the way they layer. All the little pieces that are from the silver foil tree, I attached with dots of liquid glue, intentionally overlaying them so they appear like another layer of snow or tree. I attached the foil tree to the Basic White tree, again with dots of liquid glue, then added the tree extension behind. I die cut this tree from the foil panel that is layered with the packages ~ see photo :O) I also die cut several stars (the die cuts 5 at once) ~ all of the die cuts use the Christmas Trees Dies.

Bridge Fold Card in Whimsy.3

The next important step is preparing the papers… you don’t have to do the double layers of papers. I just happen to like the way it looks. Finished card size fits nicely in an A2 envelope… 4 1/4 x 5 1/2 when it folds flat.

TIP: When cutting the SDSP, it is best to make certain the “picture” of the papers flow from left to right AND that if there is a definitive up & down, that you keep that going in the proper direction. It doesn’t show so much with this Designer Paper, but with some it is very obvious. And when the card is flat, the direction of the papers definitely are apparent.

  • Card base is 4 1/4 x 8 scored at 1 1/4x 2 1/2, 5 1/2 & 6 3/4; 1 1/4 x 5 1/2 (bridge panel). I used Misty Moonlight
  • Silver Foil layers: 1 1/8 x 4 1/8 (4); 2 7/8 x 4 1/8 (center panel); 1 1/8 x 5 3/8 (bridge panel); 2 x 4 for tree / stars
  • Whimsy & Wonder SDSP: 1 x 4 (4); 2 3/4 x 4 (center panel is coordinating); 1 x 5 1/4 (bridge panel)

Burnish all score lines and fold mountain, valley, valley, mountain. In other words, both the 1 1/4 & 6 3/4 folds should be mountain folds. Refer to the photo.

Attach all layers together as shown. I used Stampin’ Seal for this step, but liquid glue does give more adjustment leeway. Make sure all SDSP is facing the proper direction! For the bridge panel… once the layers are together, adhere the bridge to the far right panel of the card base. It is easiest to do this if the right panel is folded and the rest of the card flat. Now fold the card the opposite direction, so the far left of the card is folded and the right side of the card is flat – adhere the bridge to the left front panel. YAY!

Now decorate…

  • Adhere the tree with liquid glue to the bridge & the tree top to the right front fold.
  • Add 2021-2023 In Color Jewels to the tree in Polished Pink
  • Add the foil die cut stars with dots of liquid glue
  • Add 2021-2023 In Color Jewels to the inside panel (packages) in Polished Pink
  • Stamp the sentiment in Polished Pink ink using the Whimsical Trees stamp set. Die cut with the Season Labels Dies. Attach with dimensionals. Add 2021-2023 In Color Jewels in Fresh Freesia.
Bridge Fold Card, backside.4

  • Stamp sentiment in Polished Pink ink on a Basic White panel 2 7/8 x 4 1/8 with Whimsical Trees stamp set.
  • Attach to backside of card and the card is done!
Bridge Fold Card in Whimsy.5

For the envelope… cover the flap in Whimsy & Wonder SDSP, trim to fit. Stamp the cute ornaments from Whimsical Trees stamp set in Moonlight Madness. Color with Markers: Soft Succulent, Polished Pink & Blushing Bride.

Love this fun fold!!! I has been a while since I have done this and I had a good time. So easy and looks great as a stand alone card.

Fun project for me – and I hope you liked it as well. If you do not have a demonstrator and need an Annual 2021 Catalog OR Jul-Dec 2021 Mini Catalog, please reach out to me – happy to send one to you. And when I send it, there will be a Sale-a-bration catalog in with it! That means more FREE items to choose from with every order of $50, or $100 or multiples of that. Please also use my current host code when ordering: R6U3VRBN. I offer my customers a free item from Stampin’ Up! valued to $10 with your order of $50 and above. Click here to go my store. When the order is over $150, you still receive that free gift from me, but SU! has Stampin’ Rewards that may be used for additional products, so don’t use the host code at that time. If you have questions just let me know. If you would like to be able to order products early from catalogs AND enjoy that 20% discount, join my team now… you may do that here. We have lots of fun and are a creative bunch that encourages & supports one another. Would love to have you!

Remember that Sale-a-bration is now through September 30! It’s the best time to buy (lots of free product) & JOIN ~ read on… it is ending SOON!!!

06.21_HEADER_SAB_ENG


It is during this period that when you place an order of $50 or increments of that, there are FREE items available in the Sale-a-bration catalog. Stampin’ Up! does not usually offer more than one sale-a-bration in a year, but this year, they DID! WooHoo – fun products too… Again, contact me if you do not have a catalog.

How do you pre-earn Sale-A-Bration products? It’s simple! For every $50 USD | $60 CAD and $100 USD | $120 CAD you spend, you’ll be able to take your pick of Sale-A-Bration products to add to your order—for free

And if you JOIN and become a demonstrator during Sale-a-bration… you have the opportunity to get one of the bundles below FREE!

OIN BUNDLE OPTIONSPRICELIMIT
156795Arctic Bears Bundle$47.50 USD | $64.75 CAD1
156819Beauty Of Tomorrow Bundle$50.25 USD | $68.25 CAD1
156801Christmas Season Bundle$54.00 USD | $73.75 CAD1
156806Christmas To Remember Bundle$60.25 USD | $81.75 CAD1
156807Frosted Gingerbread Bundle$48.50 USD | $66.50 CAD1
158609Gorgeous Leaves Bundle$44.00 USD | $60.25 CAD1
156813Nature’s Harvest Bundle$53.00 USD | $72.75 CAD1
156816Peaceful Cabin Bundle$54.00 USD | $72.75 CAD1
156391Peaceful Deer Bundle$36.00 USD | $48.50 CAD1
156789Penguin Place Bundle$31.50 USD | $42.25 CAD1
156798Sweet Little Stockings Bundle$47.50 USD | $64.75 CAD1
156810Whimsical Trees Bundle$51.25 USD | $70.00 CAD1


Those who join Stampin’ Up! during Sale-A-Bration may select one bundle from the list above to

add to their Starter Kit at no additional cost.

Joining during this sale-a-bration time allows you to create your own starter kit: $99 cost, $125 worth of product + a FREE bundle (listed above for no additional cost) + FREE Sale-a-bration items. Oh my – why pass up this deal? Join now… you may do that here.

Thanks for stopping by. May you have a beautiful day. Inspire. Create. Share. Nothing beats a handmade card.

Stampin’ Up! Halloween Fun…

Hi Folks! It’s time for another fun-filled Amy’s Inkin’ Krew Blog Hop. Get ready to see some f-u-n cards, maybe some spooky ones as well.

Halloween Fun.1

This is definitely NOT a spooky card… it’s meant to be light-hearted. The background is Basic White card stock that has been colored with Blending Brushes & a couple of different inks: Balmy Blue and Basic Gray for the sky – to assimilate dusk, when the bats begin. I used a Basic Borders Dies to create the clouds, then colored them lightly again as clouds are never all white. The bottom of the card is Old Olive ink used with Blending Brushes. The bats, pumpkin & broom were die cut using the Seasonal Swirls Dies.

  • Bats: Basic Black card stock
  • Broom from Basic White card stock and colored with Basic Black Marker for the handle and Dark So Saffron Blends & shaded with Light Pumpkin Pie Blends for the broom bristles
  • Pumpkin is die cut from Pumpkin Pie card stock and shaded with Dark Pumpkin Pie Blends and a bit of Cinnamon Cider for the stem

The very neat fence was die cut with the Sheep Dies & Crumb Cake card stock. This was shaded with sponge daubers & Old Olive ink and Basic Gray ink to give it some depth & make it look almost real. The sheep was stamped in Basic Gray ink on a Basic White panel & die cut with the Sheep Dies.

  • The sheep is adhered directly to the card front, as are the bats ~ with liquid glue
  • The BOO! was stamped in Basic Gray ink on a Basic White scrap and fussy cut. It comes from the Banner Year stamp set.
  • The broom was attached to the fence with dabs of liquid glue, and the fence added to the card front with mini dimensionals.
  • The pumpkin was adhered directly to the fence

The Basic White panel (4 x 5 1/4) was attached to Basic Gray with liquid glue. Dimensionals were added to the back and attached to the Basic Black card base ~ and the card front is complete.

Halloween Fun.2

The inside is stamps from the Banner Year stamp set: spider web is stamped in Memento Black ink, sentiment in Basic Gray ink and the pumpkin is both Pumpkin Pie and Old Olive ~ both stamped off once. These were stamped on a Basic White panel (4 x 5 1/4, then adhered to a Basic Gray panel (4 1/8 x 5 3/8) then adhered to the inside of the card.

Halloween Fun.3

The pumpkin is stamped-off once Pumpkin Pie ink. The stem/ leaf is Old Olive ink first generation. Both are from Banner Year stamp set. The flap is Pumpkin Pie card stock run through the Stitched Leaves Die and trimmed to fit. I work that die in whenever I can… love it. And that’s my card. Hope you like it. It’s light-hearted and fun. I haven’t used the Sheep Dies before and had a really good time with them.

If you do not have a demonstrator and need an Annual 2021 Catalog OR Jul-Dec 2021 Mini Catalog, please reach out to me – happy to send one to you. And when I send it, there will be a Sale-a-bration catalog in with it! That means more FREE items to choose from with every order of $50, or $100 or multiples of that. Please also use my current host code when ordering: R6U3VRBN. I offer my customers a free item from Stampin’ Up! valued to $10 with your order of $50 and above. Click here to go my store. When the order is over $150, you still receive that free gift from me, but SU! has Stampin’ Rewards that may be used for additional products, so don’t use the host code at that time. If you have questions just let me know. If you would like to be able to order products early from catalogs AND enjoy that 20% discount, join my team now… you may do that here. We have lots of fun and are a creative bunch that encourages & supports one another. Would love to have you!

Remember that Sale-a-bration is now through September 30! It’s the best time to buy (lots of free product) & JOIN ~ read on…

06.21_HEADER_SAB_ENG

It is during this period that when you place an order of $50 or increments of that, there are FREE items available in the Sale-a-bration catalog. Stampin’ Up! does not usually offer more than one sale-a-bration in a year, but this year, they DID! WooHoo – fun products too… Again, contact me if you do not have a catalog.

How do you pre-earn Sale-A-Bration products? It’s simple! For every $50 USD | $60 CAD and $100 USD | $120 CAD you spend, you’ll be able to take your pick of Sale-A-Bration products to add to your order—for free

And if you JOIN and become a demonstrator during Sale-a-bration… you have the opportunity to get one of the bundles below FREE!

OIN BUNDLE OPTIONSPRICELIMIT
156795Arctic Bears Bundle$47.50 USD | $64.75 CAD1
156819Beauty Of Tomorrow Bundle$50.25 USD | $68.25 CAD1
156801Christmas Season Bundle$54.00 USD | $73.75 CAD1
156806Christmas To Remember Bundle$60.25 USD | $81.75 CAD1
156807Frosted Gingerbread Bundle$48.50 USD | $66.50 CAD1
158609Gorgeous Leaves Bundle$44.00 USD | $60.25 CAD1
156813Nature’s Harvest Bundle$53.00 USD | $72.75 CAD1
156816Peaceful Cabin Bundle$54.00 USD | $72.75 CAD1
156391Peaceful Deer Bundle$36.00 USD | $48.50 CAD1
156789Penguin Place Bundle$31.50 USD | $42.25 CAD1
156798Sweet Little Stockings Bundle$47.50 USD | $64.75 CAD1
156810Whimsical Trees Bundle$51.25 USD | $70.00 CAD1

Those who join Stampin’ Up! during Sale-A-Bration may select one bundle from the list above to

add to their Starter Kit at no additional cost.

Joining during this sale-a-bration time allows you to create your own starter kit: $99 cost, $125 worth of product + a FREE bundle (listed above for no additional cost) + FREE Sale-a-bration items. Oh my – why pass up this deal? Join now… you may do that here.

Thanks for stopping by. May you have a beautiful day. Inspire. Create. Share. Nothing beats a handmade card.

Remember to follow the links for the blog hop…

next blog
  1. Karen Ksenzakovic
  2. Jillian Good
  3. Jaimie Babarczy
  4. Karen Finkle
  5. Mary Deatherage
  6. Tara Carpenter
  7. Donna Leonard
  8. Akiko Sudano
  9. Terry Lynn Bright
  10. Sue Prather
  11. Amy Koenders