
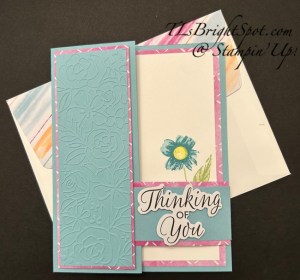
Hello crafters! I’ve a new fun fold for you today that I found on the Internet and had to give it a try. It has different names but this is what I’m calling it. 😀
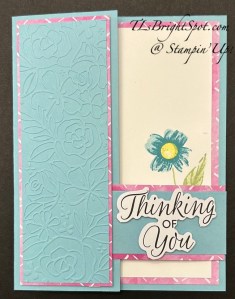
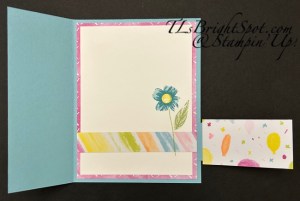
I used Balmy Blue for my card base, embossing one of the pieces and another for the tucked in flap. The Berry Burst color comes from the Celebration Express Memories & More Pack and the sentiment from Greetings For All Mix & Match Ephmera Pack. The stamped flower, stem &N leaves is from the Impressions Abloom stamp set, And the embossing is Glass Garden Embossing Folder (this contains two embossing folders!) The stamped flower is fist stamped off Balmy Blue ink, then the second step is full strength Balmy Blue. The flower center is Lemon Lolly – again a two-step stamp using the same stamped-off procedure as for the flower. The stem & leaf are Soft Sea Foam, following the same two-step for the leaf. Additional pieces were used from the Celebration Expressions Memories & More Card Pack for the strip on the inside of the card, the strip on the inside of the flap and the envelope flap. Card cuts will be listed below.

Step by step…
- Balmy Blue card base 8 1/2 x 5 1/2 scored @ 4 1/4. Remove 2 1/8 x 5 1/2 from front and trim down to 1 3/4 x 5 1/8 (emboss this panel)
- Add lBerry burst layer to embossed panel 1 7/8 x 5 1/4 – set aside
- Cut another panel of Balmy Blue 1 1/4 x 3 1/4 and score on long side at 1/2 (this panel can be wider, depending on how you plan your inside, but the 1/2 score remains the same. Burnish.
- Add this to the card base approximately 5/8″ from bottom of card back with the fold even with edge (again, depending on the plan for the inside of the card, this placement can be higher but should not be lower)
- Add Berry Burst layer to inside of card base 4 x 5 1/4
- Add decorative layer to back side of flap 1 1/2 x 2 3/4 (remember that if the flap is wider, this layer should also be 1/4″ wider)
- Add Basic White panel for stamping 3 3/4 x 5
- On this card I added a decorative strip behind the flap approximately 5/8 x 4
- Stamp the inside: Here I used the Impressions Abloom stamp set
- Add embossed + layer to left side of front panel with dimensionals… placement is important in order to tuck the flap in between dimensionals: dimensionals should be near bottom of panels to be attached, at top & at least 1/2″ from where flap tucks in.
- Tuck in flap & add sentiment to tucked in flap. This sentiment is on dimensionals and is from the Greetings For All Mix & Match Ephmera Pack.
For the envelope… Using the Celebration Expressions Memories & More Card Pack, I chose a coordinating piece to add to the envelope flap & trimmed it to fit. Done.. and ready to send to someone special. This card is going to a fellow teammate who needs a pick me up :O) I’m hoping she will love it.
Thanks so much for stopping by. May you have a beautiful day!
Make someone happy sending them a handmade card made with love.
Product List
![Celebration Expressions Memories & More Card Pack [ 165307 ]](https://assets1.tamsnetwork.com/images/EC042017NF/165307s.jpg "Celebration Expressions Memories & More Card Pack [ 165307 ]")
![Greetings For All Mix & Match Ephemera Pack (English) [ 164862 ]](https://assets1.tamsnetwork.com/images/EC042017NF/164862s.jpg "Greetings For All Mix & Match Ephemera Pack (English) [ 164862 ]")
![Balmy Blue 8-1/2" X 11" Cardstock [ 146982 ]](https://assets1.tamsnetwork.com/images/EC042017NF/146982s.jpg "Balmy Blue 8-1/2\" X 11\" Cardstock [ 146982 ]")
![Balmy Blue Classic Stampin' Pad [ 147105 ]](https://assets1.tamsnetwork.com/images/EC042017NF/147105s.jpg "Balmy Blue Classic Stampin' Pad [ 147105 ]")
![Soft Sea Foam Classic Stampin' Pad [ 147102 ]](https://assets1.tamsnetwork.com/images/EC042017NF/147102s.jpg "Soft Sea Foam Classic Stampin' Pad [ 147102 ]")
![Lemon Lolly Classic Stampin' Pad [ 161666 ]](https://assets1.tamsnetwork.com/images/EC042017NF/161666s.jpg "Lemon Lolly Classic Stampin' Pad [ 161666 ]")
![Basic White 8 1/2" X 11" Cardstock [ 166780 ]](https://assets1.tamsnetwork.com/images/EC042017NF/166780s.jpg "Basic White 8 1/2\" X 11\" Cardstock [ 166780 ]")
![Basic White Medium Envelopes [ 159236 ]](https://assets1.tamsnetwork.com/images/EC042017NF/159236s.jpg "Basic White Medium Envelopes [ 159236 ]")
![Bone Folder [ 102300 ]](https://assets1.tamsnetwork.com/images/EC042017NF/102300s.jpg "Bone Folder [ 102300 ]")
![Stampin' Dimensionals [ 104430 ]](https://assets1.tamsnetwork.com/images/EC042017NF/104430s.jpg "Stampin' Dimensionals [ 104430 ]")
![Paper Trimmer [ 152392 ]](https://assets1.tamsnetwork.com/images/EC042017NF/152392s.jpg "Paper Trimmer [ 152392 ]")
![Stampin' Cut & Emboss Machine [ 149653 ]](https://assets1.tamsnetwork.com/images/EC042017NF/149653s.jpg "Stampin' Cut & Emboss Machine [ 149653 ]")
![Linen Thread [ 104199 ]](https://assets1.tamsnetwork.com/images/EC042017NF/104199s.jpg "Linen Thread [ 104199 ]")
![Versamark Pad [ 102283 ]](https://assets1.tamsnetwork.com/images/EC042017NF/102283s.jpg "Versamark Pad [ 102283 ]")
![Heat Tool (Us And Canada) [ 129053 ]](https://assets1.tamsnetwork.com/images/EC042017NF/129053s.jpg "Heat Tool (Us And Canada) [ 129053 ]")
![Embossing Additions Tool Kit [ 159971 ]](https://assets1.tamsnetwork.com/images/EC042017NF/159971s.jpg "Embossing Additions Tool Kit [ 159971 ]")
![Multipurpose Liquid Glue [ 110755 ]](https://assets1.tamsnetwork.com/images/EC042017NF/110755s.jpg "Multipurpose Liquid Glue [ 110755 ]")
![Mini Glue Dots [ 103683 ]](https://assets1.tamsnetwork.com/images/EC042017NF/103683s.jpg "Mini Glue Dots [ 103683 ]")
![Stampin' Seal [ 152813 ]](https://assets1.tamsnetwork.com/images/EC042017NF/152813s.jpg "Stampin' Seal [ 152813 ]")
![Take Your Pick [ 144107 ]](https://assets1.tamsnetwork.com/images/EC042017NF/144107s.jpg "Take Your Pick [ 144107 ]")
