Stampin’ Up! Gift Card Box with Sweet Talk DSP

Hello again! It’s been a while since I’ve shared anything… life obligations kinda got in the way. It’s all good, just too much going on and something had to give. Unfortunately it was my crafting :O(

Hubby and I are in a choir and our concert was Sunday afternoon ~ with orchestra and a full audience! WooHoo!! It was… spectacular. Not to brag too much, but it really was good, and I feel so fortunate to be a part of it.

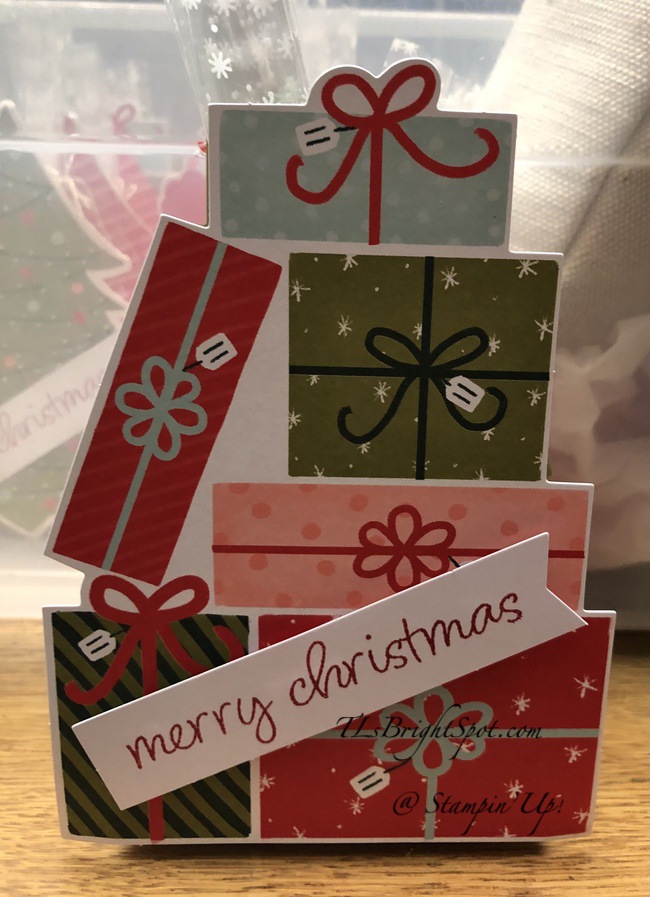
Today’s project is a gift card box made with some fabulous new Designer Series Paper. It’s called Sweet Talk 12 x 12 DSP. Of course the DSP has two sides.

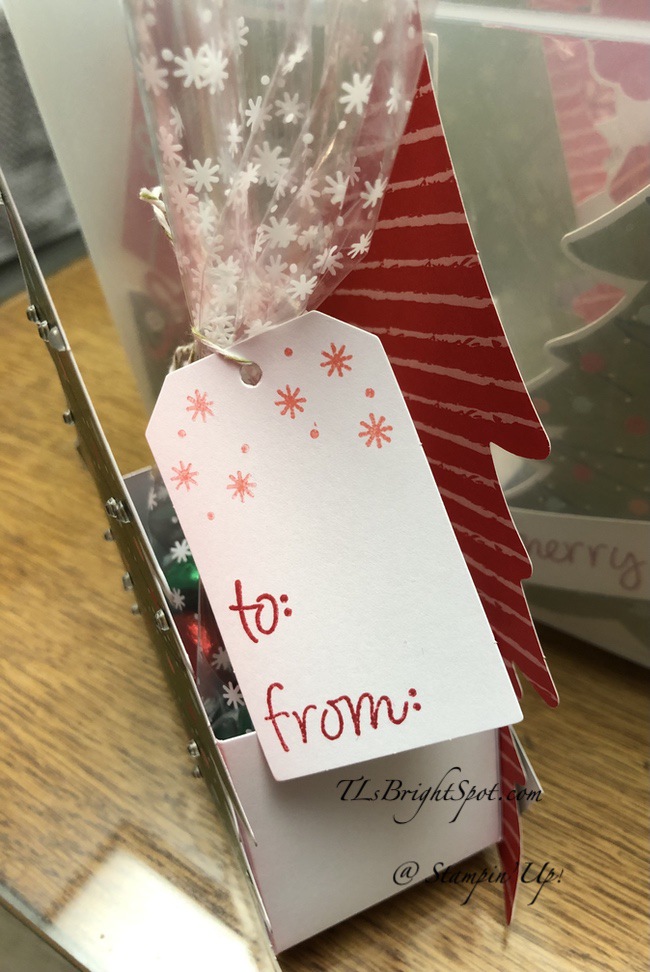
Coordinating colors for this paper pack are: Real Red, Petal Pink, So Saffron, Granny Apple Green, Pool Party and Highland Heather. Which piece do you think I chose to make the box lid? Well, I’ll tell you… the Highland Heather stripe. I love this paper! The small hearts with the combo of Real Red, Petal Pink and Highland Heather are another favorite, as is the other stripe. Ok – I bet you want to see the box … here it is.

Gift Card Box.1

And I used the Highland heather 1/2″ Grosgrain Ribbon to tie a bow. For the base, while it isn’t listed as a coordinating color, I used Blackberry Bliss card stock and it looks great with it! See the darkness in that stripe? Yep – it totally goes with it. Instructions? You want instructions? 😁

Instructions:

  • Cut gift box base from card stock – I used Blackberry Bliss – 6 1/2 x 8 and score all four sides at 1″, burnish well.
  • Trim each corner, cutting through the center of the burnish to the 1″ score line. Make a right ‘V’ cut to that same tab, trim same tab end on the right side.
  • Rotate to the left and trim next tab. Continue to rotate left and trim each tab end. See photo.
Gift Card Box. bottom

Here i added Tear n Tape to each tab end but you can easily use liquid glue. Adhere together.

Gift Box Top:

  • Cut box top 6 1/2 x 8 (again, I used the Sweet Talk 12 x 12 DSP)
  • Use a Box Lid Shim attached to the Simply Scored Scoring Tool. This shim allows for the lid to fit the box base without making the base buckle – and it is key for a perfect fitting lid. Make your own shim following directions below. I found these directions on YouTube by Connie Stewart.
    • Using a window sheet, cut a panel 2 x 8 and score @ 1/2″ & 1 1/4″. Burnish heavily.
    • Cut a piece of Daffodil Delight 1 x 8 & score at 1/2″ on the short side. Burnish. Add Tear n Tape to both sides of the 1/2″ length. Add to the window sheet on the INSIDE 1/2″, making certain the card stock fits all the way to the burnished score of the window sheet. Fold card stock over edge of window sheet and attach to outside 1/2″ edge.
    • Label shim: Box Lid Shim 😏 This way you will not forget it is only to be used for the lid.
  • Score lid @ 1″ on all sides using the Box Lid Shim.
  • Trim and adhere together the same as the box bottom.
Gift Card Box. top

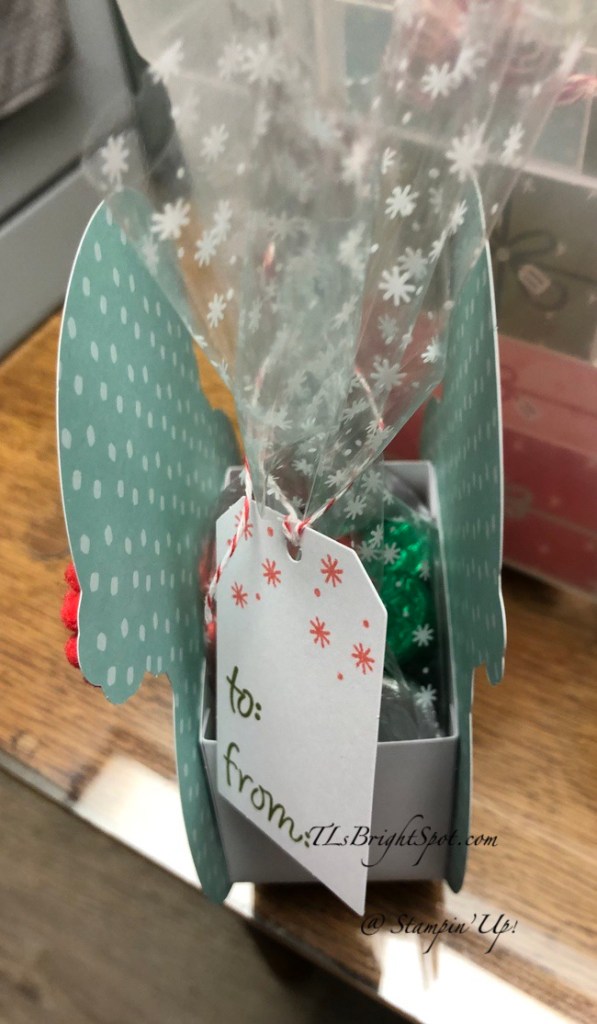
Now, fill this box with some pretty cards/ envelopes for a special gift – four to five will fit nicely, depending on embellishments or thickness of the cards. And I guarantee folks will love this gift!

Reminder! Wednesday, Dec 8, 2021, Stampin’ Up! is offering FREE SHIPPING with orders over $50. I, for one, plan to make good use of that! Use my current HOST CODE: UQ6U2WQZ to receive a free Stampin’ Up! item from me valued to $10.

  • The minimum qualifying amount to receive free shipping is $50 USD / $65 CAD or more (before tax).
  • If you are using a coupon code, please remember that coupon codes are non-commissionable and will lower the order’s retail amount. The order must still meet the qualifying threshold to be eligible for free shipping.
  • Be sure to act quickly: beginning at 12:00 AM and ending at 11:59 PM (MT) on 8 December, get FREE shipping with a purchase of $50 USD / $65 CAD or more. 

Not have a demonstrator so you can order? If you do not have a demonstrator and need an Annual 2021 Catalog OR Jul-Dec 2021 Catalog, please reach out to me – happy to send one to you. Please also use my current host code when ordering: UQ6U2WQZ I offer my customers a free item from Stampin’ Up! valued to $10 with your order of $50 and above. Click here to go my store. When the order is over $150, you still receive that free gift from me, but SU! has Stampin’ Rewards that may be used for additional products, so don’t use the host code at that time. If you have questions just let me know. If you would like to be able to order products early from catalogs AND enjoy that 20% discount, join my team now… you may do that here. We have lots of fun and are a creative bunch that encourages & supports one another. Would love to have you!

Thanks for stopping by. May you have a beautiful day. Send someone a handmade box filled with a lovely card or two.

Inspire. Create. Share.

Stampin’ Up! FREE Shipping

WOOHOO! Hold on… catch your breath… Stampin’ Up! is offering FREE SHIPPING Wednesday Dec 8 for orders $50 & over… This incredible deal lasts for 24 hours only,  beginning at 12:00 AM and ending at 11:59 PM (MT) Wednesday Dec 8!!! This includes items in the LAST CHANCE and CLEARANCE RACK. Just remember, the order must be $50 and over for FREE SHIPPING to be available.

MKTK_TH2_NA_1221_LAST_CHANCE_PRODUCTS

Use my HOST CODE UQ6U2WQZ to receive a FREE SU! item of your choice from me valued at $10. This is in addition to free shipping offered by Stampin’ Up! 


Questions… contact me!

Terry Lynn Bright

Independent Stampin’ Up! Demonstrator

www.TLsBrightspot.com

Stampin’ Up! Snowman for the Happy Inkin ‘ Thursday Blog Hop

Welcome to the Thursday Happy Inkin’ Krew Blog Hop! The theme challenge is snow/ winter, as you see below and here’s what I created using the Snowman Season stamp set.

Snowman Season stamp set. 1

This fun little snowman just puts a smile on my faced every time… how about you? He looks as though a dance is in the making :O).

May be an image of text that says 'Happy Inkin Thursday Blog Hop December 2 Theme Challenge Snow/Winter inter Snow'

To make this card I’ve used some scraps from the Painted Christmas 12 x 12 DSP, adhered them to a Basic White panel, then stamped the snowman on the lightest color panel with Memento ink. I colored the scarf with Real Red marker for the hat & scarf, Pumpkin Pie marker for the nose. I wrapped a length of double-stitched Real Red ribbon to the Basic White panel. I stamped the sentiment in Memento ink on a Basic White strip, fussy cut it and attached it over the ribbon with dimensionals. I took another length to create a 1/2 knotn after looping it under the existing ribbon. This was adhered to an Evening Evergreen panel then added to the Mint Macaron card base and the card front was done.

Snowman Season stamp set, inside

For the inside, I stamped the sentiment from Snowman Season stamp set in Real Red ink on the Basic White panel. I then took the snowman hat from the same stamp set and stamped it in Memento ink, then colored it with Garden Green marker for the holly and Real Red marker for the berries. I adhered this to an Evening Evergreen piece, then attached it to the inside of the card. DONE!

Snowman Season stamp set.3

For the envelope, more of the Painted Christmas 12 x 12 DSP with a narrow strip of Evening Evergreen card stock for contrast was added to the flap. And another of the snowmen from the Snowman Season stamp set went on the front of the envelope.

Fun, light card with ‘snow in the air.’

Now it’s time to move on to the rest of the members of the hop. You may click on a name or the next button to get where you wish to go.

Amy Koenders

Mary Deatherage

Kristi Gray

Jaimie Babarczy

Sue Prather

Karen Finkle

Akiko Sudano

Karen Ksenzakovic

Tara Carpenter

Terry Lynn Bright ~ you are here

strator so you can order? If you do not have a demonstrator and need an Annual 2021 Catalog OR Jul-Dec 2021 Catalog, please reach out to me – happy to send one to you. Please also use my current host code when ordering: 62EHPGHC I offer my customers a free item from Stampin’ Up! valued to $10 with your order of $50 and above. Click here to go my store. When the order is over $150, you still receive that free gift from me, but SU! has Stampin’ Rewards that may be used for additional products, so don’t use the host code at that time. If you have questions just let me know. If you would like to be able to order products early from catalogs AND enjoy that 20% discount, join my team now… you may do that here. We have lots of fun and are a creative bunch that encourages & supports one another. Would love to have you!

Thanks for stopping by. May you have a beautiful day.

Stampin’ Up! Anniversary with Beauty of the Earth

Hi Folks! Happy POST Thanksgiving… We are still celebrating in our home – family arrived yesterday and we had our feast today. Needless to say, I have been preoccupied with our being able to be together, and cooking. :O) I enjoy cooking, but mostly I appreciate that we can be together. There’s nothing better!

Here’s a card for you that was super fun to do. A friend of mine wanted a card in blues for an anniversary and I came up with this.

Anniversary with Beauty of the Earth

This card also had a belly band and for some reason a missed taking a picture of it. 😦 And you can see I used the Eden Dies for special trim on the edges. This IS a fun fold and opens like this…

Anniversary with Beauty of the Earth, inside

You can see I also used the Heart Punch Pack (Night of Navy & Basic White) over the Gold Fine Art Ribbon & Beauty of the Earth DSP. Gilded Gems were added to the heart to bring it all together. On the large Basic White panel I stamped leaves in second generation Misty Moonlight ink. The sentiment on this panel & the heart come from an ALL NEW stamp set that will be in the Jan-Jun 2022 Mini Catalog called Love and Happiness. I love the sentiments AND the fonts! This stamp set will be available Jan 3 for customers. Of course… if you JOIN MY TEAM NOW you can order this set right away :O) How’s THAT for incentive? AND… joining as a demonstrator through the end of November is just $75 and the bonus is $125 worth of product. It just doesn’t get any better than that.

Not have a demonstrator so you can order? If you do not have a demonstrator and need an Annual 2021 Catalog OR Jul-Dec 2021 Catalog, please reach out to me – happy to send one to you. Please also use my current host code when ordering: 62EHPGHC I offer my customers a free item from Stampin’ Up! valued to $10 with your order of $50 and above. Click here to go my store. When the order is over $150, you still receive that free gift from me, but SU! has Stampin’ Rewards that may be used for additional products, so don’t use the host code at that time. If you have questions just let me know. If you would like to be able to order products early from catalogs AND enjoy that 20% discount, join my team now… you may do that here. We have lots of fun and are a creative bunch that encourages & supports one another. Would love to have you! And… as a reminder – during the month of November only, joining is $75 and the products with joining are $125 worth of product ~ your choice too! Just sayin’, I haven’t seen this kind of deal since joining as as demo several years ago. This is the time!

Here’s what I’m encouraging and sharing with you: join to become a Stampin’ Up Demonstrator. You may do that with me – here. Joining during the month of November is $75 to create your own ‘starter kit’ ~ but you receive $125 worth of products that you get to choose. When you join, that’s free shipping for that one time, and I must say, I haven’t seen a $75 joining deal like this in my time with Stampin’ Up! This is a sweet package. Start with Savings is what they’re calling the joining promotion.

This image has an empty alt attribute; its file name is banner_th_na_1021_startkit.jpg

Thanks for stopping by. May you have a beautiful day. Send someone a handmade card and make their day! Inspire. Create. Share.

Stampin’ Up! Happy Inkin’ Thursday Blog Hop

Happy, happy, happy Thanksgiving! We have so MUCH for which to be thankful 🙏. Whatever you are doing or going, may you be safe and may you enjoy ❤️. Wishing you many blessings…

May be an image of text that says 'Happy Inkin Thursday Blog Hop november 25 Sketch Challenge'

Today’s card is a sneak peek of one of the Designer Series Papers in the Jan-Jun 2022 Mini Catalog. 😁 And it’s called Daffodil Afternoon 12 x 12 DSP. And yes, full of daffodils. I chose, however, to showcase this… It will be available to order Jan 3, 2022…. unless of course you JOIN with me as a Stampin’ Up! demonstrator. If you did that, you could order it right away ☺️. More info on joining later in this post.

Daffodil Afternoon 12 x 12 DSP

The adorable butterfly is from the coordinating Daffodil Daydream stamp set and the daisy is stamped using the Daisy Lane stamp set and Medium Daisy Punch. Back to this DSP… isn’t that stripe wonderful? It’s Pale Papaya and Flirty Flamingo… and the black with daisies, is from this same Daffodil Afternoon 12 x 12 DSP pack. These are two of my favorites in this particular pack of papers. The daisy & butterfly are on a Label Me Fancy punched paper. I colored the center of the daisy with Flirty Flamingo Blends, then the butterfly in Pale Papaya & Flirty Flamingo Blends. Both were stamped with Memento ink.

And here’s the inside of the card.

Daffodil Daydreams stamp set, inside

This little butterfly has been picking up pollen from all the flowers and is losing some of it as it flies around :O). The butterfly was stamped in Memento ink and not colored at all. The ‘pollen’ is stamped in Pale Papaya ink ~ both of these are from the Daffodil Daydream stamp set. And I used more of this same stripy Daffodil Afternoon 12 x 12 DSP on the envelope flap.

Daffodil Afternoon 12 x 12 DSP

Enjoy this special Thanksgiving hop. May this be a holiday to appreciate friends and family. You may move forward by clicking the ‘next’ button to see what fabulous creation Amy Koenders has for us today.

Amy Koenders

Mary Deatherage

Sue Prather

Karen Finkle

Akiko Sudano

Karen Ksenzakovic

Tara Carpenter

Terry Lynn Bright – you are here

Not have a demonstrator so you can order? If you do not have a demonstrator and need an Annual 2021 Catalog OR Jul-Dec 2021 Catalog, please reach out to me – happy to send one to you. Please also use my current host code when ordering: 62EHPGHC I offer my customers a free item from Stampin’ Up! valued to $10 with your order of $50 and above. Click here to go my store. When the order is over $150, you still receive that free gift from me, but SU! has Stampin’ Rewards that may be used for additional products, so don’t use the host code at that time. If you have questions just let me know. If you would like to be able to order products early from catalogs AND enjoy that 20% discount, join my team now… you may do that here. We have lots of fun and are a creative bunch that encourages & supports one another. Would love to have you! And… as a reminder – during the month of November only, joining is $75 and the products with joining are $125 worth of product ~ your choice too! Just sayin’, I haven’t seen this kind of deal since joining as as demo several years ago. This is the time!

Here’s what I’m encouraging and sharing with you: join to become a Stampin’ Up Demonstrator. You may do that with me – here. Joining during the month of November is $75 to create your own ‘starter kit’ ~ but you receive $125 worth of products that you get to choose. When you join, that’s free shipping for that one time, and I must say, I haven’t seen a $75 joining deal like this in my time with Stampin’ Up! This is a sweet package. Start with Savings is what they’re calling the joining promotion.

This image has an empty alt attribute; its file name is banner_th_na_1021_startkit.jpg

Thanks for stopping by. May you have a beautiful day. Nothing beats a handmade card!

Inspire. Create. share.

Stampin’n Up! November ’21 Paper Pumpkin

OK… I wrote this early Sunday morning, then things got a bit crazy and I didn’t finish it… :

Good mornin’! It’s Sunday… and I’m headed to a crafty fair today, my first time participating. It doesn’t feel like I made enough, but I’ll be there none the less. Excited & nervous at the same time… My November Paper Pumpkin arrived and I quickly made these fun treat holders. I added some retired and current Stampin’ Up! embellishments, some Hersey Kisses in the gift bags and voila – fun item to give kids at Christmas.

It’s clear here I added the Rhinestone Basic Jewels to the front of the tree and decided I didn’t want the tag covering those sparkles, so I added it to the back side with dimensionals. Pretty durn cute.

Fun snowman or woman :O) Here I added some retired SU! products: Black faceted gems and the tiny balls for the ear muffs. Since I ran out of the red, for the next snow person I added what looks like Flirty Flamingo tiny puffs. OOPS! I didn’t take a photo off that one! Grrr. Next is the stack of packages.

I tied a triple bow with the twine included in the kit and adhered it with liquid glue. To make sure it was very secure, I placed an acrylic block on it while I added the Rhinestones to the centers of the other bows. And – yes, I did all the embellishing before attaching the treat boxes!

Here are a couple of side views. so you can see the cute tags included in the kit and the treat bags too!

Aren’t these cute? Here I am on Monday evening finishing this post – aaargh… So let me say – these all sold ~ YAY! I was so pleased ‘cuz they are cute – at least to me. So, here’s a plug for Paper Pumpkin. You can purchase a subscription until the 10th of the month. You may order the December kit through Dec 10.

Lots of Pun Paper Pumpkin Kit
ABOUT THE KIT
Name Lots of Pun

Details
The kit contains enough elements to create 9 cards—3 each of 3 designs—and 9 coordinating envelopes. This all-inclusive kit includes printed card bases, die-cut paper pieces, embellishments, adhesive, and more!
The Lots of Pun Stamp Set is a builder stamp set! This means the included images can be mixed and matched to build a variety of unique characters with different looks and features.
Card size: 4-1/4″ x 5-1/2″ (10.8 x 14 cm)
Envelope size: 4-1/2″ x 5-3/4″ (11.4 x 14.6 cm)
Coordinating colors: Crumb Cake, Daffodil Delight, Early Espresso, Granny Apple Green, Pool Party, Poppy Parade
Includes a Classic Stampin’ Spot

How to get your kit? Subscribe with me here.

  • This month’s kit includes an all-occasion stamp set you can use to create all-occasion cards. 
  • Not only is the stamp set very versatile, it’s a builder stamp set! This means the stamp set’s images can be mixed and matched to build a variety of characters with different looks and features.
  • The kit’s playful patterns and delightful designs put an exciting spin on past Paper Pumpkin projects. Enjoy a fun ‘n’ fresh experience with this month’s kit!

Thanks for stopping by. May you have a beautiful day. Nothing beats handmade!

Inspire. Create. Share.

Staqmpin’ Up! Birthday w/ Christmas Cheer

Hello to Saturday! It’s the weekend and I hope you have some fun plans included in your day. Hubby & I got our Moderna booster yesterday and so far, no side effects. A bit of a sore arm, but that’s common with just about any injection. My card for today is for a friend of ours turning 90! He still drives to work. Yes, I did say work. He thrives on people and has a very sharp mind.

Isn’t this fun? I love the colors :O) And since he’s very Irish, the green is perfect. This is also a bit of a fun fold, ‘cuz of the way the top folds in to rest on the sentiment (which is raised on dimensionals). The DSP is Expressions in Ink SDSP (it has gold!)

Supplies:

  • Christmas Cheer Dies (to die cut the word ‘happy’)
  • Biggest Wish stamp set (BIRTHDAY, friend,& happy on inside)
  • Playful Alphabet Dies (# & 90)
  • Artistically Inked stamp set
  • Gilded Gems
  • Foam Adhesive Sheets (adhered to panel of DSP then die cut)
  • Evening Evergreen card stock 8 1/2 x 5 1/2 scored on the long side @ 2 1/8 & 4 1/4. Burnish both inward.
  • Mint Macaron card stock 1 7/8 x 5 3/8; 4 1/8 x 5 3/8
  • Basic White card stock 4 x 5 1/4;1 3/4 x 5 1/4; 1 3/4 x 4 (die cut happy); 1 3/4 x 3 (stitched rectangle die cut w/ word
  • Expressions in Ink SDSP 2 x 5 3/8 front top panel); 1 15/16 x 5 3/8 (lower front panel); 3 1/2 x 1 1/2 (die cut sentiment – happy); 2 1/4 x 6 (envelope flap)
  • Gold Foil Sheets (die cuts for # & 90)
  • Evening Evergreen ink (BIRTHDAY)
  • Mint Macaron ink (background for sentiments)
  • Just Jade ink (inside happy)

Directions:

  • Adhere Adhesive Backed Sheets to Expressions in Ink SDSP
  • With the Christmas Cheer Die, die cut the word ‘happy’. HINT… runt the die through once, turn it over and die cut again. This makes certain the die goes through the layers cleanly.
  • With the Stitched Rectangle Dies, die cut the rectangle in Basic White.
  • Remove the backing on the sentiment ‘happy’ and adhere to the stitched rectangle.
  • Adhere the two front panels of Expressions in Ink SDSP to the card base.
  • With Stampin’ Seal, run two lines of the seal on the lower half of the stitched rectangle; fold front lower panel on score line and adhere to the this lower panel. REMEMBER… the stitched rectangle stands up! Refer to photo.
  • Add two Gilded Gems to the Stitched Rectangle and the front is complete.

For the inside…

  • Adhere the smaller Mint Macaron panel & the similar size Basic White panels together. Attach these to the inside of the card – top
  • Adhere the largest Mint Macaron panel to the lower portion of the inside of the card.
  • With the Basic White inside panel, stamp the ‘splotch’ with Mint Macaron ink using the Artistically Inked stamp set.
  • Stamp the word ‘happy’ in Just Jade ink over this ‘splotch’. The word ‘happy’ comes from Biggest Wish stamp set.
  • On the smallest Basic White panel, stamp another ‘splotch’ in stamped off or 2nd generation Mint Macaron ink.
  • Stamp the word BIRTHDAY from the Biggest Wish stamp set in Evening Evergreen ink.
  • Die cut with another Stitched Rectangle Die.
  • Cut a 3/8 x 5 1/4 strip of Expressions in Ink SDSP and adhere to the Basic White panel.
  • Adhere the stitched Rectangle with dimensionals to the Basic White panel. HINT… this allows the upper fold to stand up :O)
  • Die cut the # sign & the two number 90 from Gold Foil scraps and adhere with liquid glue. These dies come from the Playful Alphabet Dies.
  • Adhere three Gilded Gems and the inside is complete!

For the envelope…

  • Add the Expression in Ink SDSP to the envelope flap
  • On the envelope front, stamp the ‘splotch’ in 2nd generation Mint Macaron ink from the Artistically Inked stamp set.
  • Stamp the word friend in Evening Evergreen ink using the Biggest Wish stamp set. FINIS…

Not have a demonstrator so you can order? If you do not have a demonstrator and need an Annual 2021 Catalog OR Jul-Dec 2021 Catalog, please reach out to me – happy to send one to you. Please also use my current host code when ordering: 62EHPGHC I offer my customers a free item from Stampin’ Up! valued to $10 with your order of $50 and above. Click here to go my store. When the order is over $150, you still receive that free gift from me, but SU! has Stampin’ Rewards that may be used for additional products, so don’t use the host code at that time. If you have questions just let me know. If you would like to be able to order products early from catalogs AND enjoy that 20% discount, join my team now… you may do that here. We have lots of fun and are a creative bunch that encourages & supports one another. Would love to have you! And… as a reminder – during the month of November only, joining is $75 and the products with joining are $125 worth of product ~ your choice too! Just sayin’, I haven’t seen this kind of deal since joining as as demo several years ago. This is the time!

Here’s what I’m encouraging and sharing with you: join to become a Stampin’ Up Demonstrator. You may do that with me – here. Joining during the month of November is $75 to create your own ‘starter kit’ ~ but you receive $125 worth of products that you get to choose. When you join, that’s free shipping for that one time, and I must say, I haven’t seen a $75 joining deal like this in my time with Stampin’ Up! This is a sweet package. Start with Savings is what they’re calling the joining promotion.

This image has an empty alt attribute; its file name is banner_th_na_1021_startkit.jpg

Thanks for stopping by. May hyou have a beautiful day. Nothing beats a handmade card.

Inspire. Create. Share.

Stampin’ Up! Note Card with Blessings of Home

Hello everyone! My card today is a note card with layers inspired by the Sunday Stamps challenge SSC270.

Here’s the image from that challenge…

This image has an empty alt attribute; its file name is llvYYmYYzIfxGNTCydnDiJcLkvYPYzIOzA6TVJhkV2dxnbMGAOXKd_G85u2Wx68VQiQGGrFMaO1igoORKkjFT00L1oG90jOpmEF8O1JFuLxGbPkiSgQIMxTmM32OjUhQ0ZdEwlCyjG0_cc5RX_C_mArkttE=s0-d-e1-ft

And here’s my note card…

Blessings of Home Note Card

I’ve used the beautiful Heart & Home 12 x 12 DSP (new in the J-J 2022 Mini Catalog). I also used the sentiment for the outside and inside from the Blessings of Home stamp set that coordinates with the DSP – yep, from the J-J 2022 Mini catalog. I also used Garden Gems for a bit of bling. Dimensions may be found at the end of this post.

Directions:

  • Cut floral Heart & Home 12 x 12 DSP 2 3/4 x 4 1/4 and adhere to Garden Green card stock 2 7/8 x 4 3/8
  • Adhere 1″ Pale Papaya strip
  • Cut another strip of the Heart & Home 12 x 12 DSP 1 x 4 3/4 and adhere to note card as shown
  • Adhere larger panel as shown.
  • Stamp the sentiment from Blessings of Home stamp set in Garden Green ink on a Basic White piece and die cut with the Encircled in Beauty Dies. Adhere with dimensionals.
  • Tie a knot with a length of the Pale Papaya Open Weave Ribbon and adhere with a glue dot. – Wow! The card front is done :O)
Blessings of Home Note Card. inside

For the inside, stamp the floral image in second generation Garden Green ink. (This might look better in Pale Papaya ink!) Stamp the sentiment from the Blessings of Home stamp set in full strength Garden Green ink – and finis…

For the envelope, I stamped a partial image of the floral bouquet with Garden Green ink. I didn’t want this too fussy

Blessings of Home Note Card & Envelope

Not have a demonstrator so you can order? If you do not have a demonstrator and need an Annual 2021 Catalog OR Jul-Dec 2021 Catalog, please reach out to me – happy to send one to you. Please also use my current host code when ordering: 62EHPGHC I offer my customers a free item from Stampin’ Up! valued to $10 with your order of $50 and above. Click here to go my store. When the order is over $150, you still receive that free gift from me, but SU! has Stampin’ Rewards that may be used for additional products, so don’t use the host code at that time. If you have questions just let me know. If you would like to be able to order products early from catalogs AND enjoy that 20% discount, join my team now… you may do that here. We have lots of fun and are a creative bunch that encourages & supports one another. Would love to have you! And… as a reminder – during the month of November only, joining is $75 and the products with joining are $125 worth of product ~ your choice too! Just sayin’, I haven’t seen this kind of deal since joining as as demo several years ago. This is the time!

Thanks for stopping by. May you have a beautiful day. Make someone happy by sending them a handmade card.

Inspire. Create. Share.

Stampin’ Up! Happy Inkin’ Thursday Blog Hop

May be an image of cosmetics and text that says 'Happy Inkin Thursday Blog Hop november 18 Color Challenge Pick At Least 3 Early Espresso Cinnamon Cider OldOlive RealRed Basic White'

And my card for today is a slimline card and sort of a fun fold. I was inspired by team mate Jaimie B. I loved the fold, it was a win-win kind of card that could be used for MANY occasions. For today’s challenge, I used it as a fall “appreciate you” kind of card. At the end of this post, because I really like the fold & the slim line, I will share three more that I created. As I mentioned already, this card can be used for just about anything ~ up & down or sideways. Here’s the card for the hop. And… I’m entering this card in the Just Us Girls challenge.

Slimline Gorgeous Leaves + Love of Leaves ~ Fun Fold

What do you think? Like? I LOVE it! I like the fold, I like the leaves, I like the DSP on this card. And the layers are fun, simple and yet, they add a really nice element to the card.

Basic elements of this card:

  • Early Espresso card stock, cut 7 1’2 x 8 1’2, scored on the short side at 1 3/4 & 5 1/4
  • Create layers:
    • Basic White or layer 1: 1 5/8 x 8 3/8; 2 x 8 3/8; overlay ~ 3 1/4 x 5 3/8
    • DSP – here I used Bloom Where You’re Planted 12 x 12 DSP: 1 1/2 x 8 1/4; 2 x 8 1/4
    • Adhere these together & attach to appropriate panel of card base.
  • Overlay: Real Red card stock 2 1/4 x 5 1/2 + Basic White 2 1/8 x 5 3/8 (emboss the Basic White piece – for this card I used Bark 3D Embossing Folder.
    • Adhere embossed Basic White panel to the Real Red piece then decorate

To decorate the Overlay:

  • On a Basic White piece, with Blending Brushes & Real Red ink, Old Olive ink and Early Espresso ink, color a Basic White piece.
  • Die cut this colored panel with the Intricate Leaves Dies., then color again using the same color inks and the Blending Brushes. It might be necessary to add Early Espresso ink at the edges ~ I did. Die cut with the Intricate Leaves Dies.
  • Stamp the smaller Maple leaf in Old Olive ink, second generation. With a blend Brush, add Real Red ink. Die cut with the Intricate Leaves dies.
  • Die cut the longer leaf from Brushed metallic card stock.
  • Run the Basic White panel for the Overlay through the Bark 3D Embossing Folder. Adhere to the Real Red panel.
  • Add leaves to this panel with liquid glue and the middle leaf on dimensionals.
  • Add the Overlay to the narrow panel of the card with Stampin’ Seal on only the left side of the overlay. Center on panel
Slimline Fun Fold

For the inside…Stamp the sentiment in Real Red ink using the Pretty Pumpkins stamp set on the Basic White panel (3 1/8 x 8 1/4). Stamp the fun decoration at the bottom in Old Olive ink and color with Old Olive and Cinnamon Cider Stampin’ Blends. Run panel through the cut & emboss machine with the Stitched Leaves Dies (coordinates with Love of Leaves stamp set). Adhere to a Real Red panel 3 1/4 x 8 3/8. Adhere to the center inside panel & voila!

Slimline Fun Fold, inside

Love, love, love. Hope you do as well :O) Here are three additional cards that I created using this same layout. I used one as a sideways card, yes, intentionally! Take a peek.

There will be some awesome projects today on the hop. If you have come from Tara Carpenter, welcome. Enjoy your trip through the hop. You may click on the name or use the ‘next’ button to head to Amy Koenders.

Amy Koenders

Mary Deatherage

Kristi Gray

Jaimie Babarczy

Sue Prather

Karen Finkle

Akiko Sudano

Karen Ksenzakovic

Tara Carpenter

Terry Lynn Bright – you are here

Today is the LAST DAY of the fabulous Seasonal Sale. If you have purchased your papers, ink pads & dies yet, take a look at what you can purchase, but only to the end of today are these items on super sale. Keep reading for all the scoop.

Not have a demonstrator so you can order? If you do not have a demonstrator and need an Annual 2021 Catalog OR Jul-Dec 2021 Mini Catalog, please reach out to me – happy to send one to you. Please also use my current host code when ordering: 62EHPGHC I offer my customers a free item from Stampin’ Up! valued to $10 with your order of $50 and above. Click here to go my store. When the order is over $150, you still receive that free gift from me, but SU! has Stampin’ Rewards that may be used for additional products, so don’t use the host code at that time. If you have questions just let me know. If you would like to be able to order products early from catalogs AND enjoy that 20% discount, join my team now… you may do that here. We have lots of fun and are a creative bunch that encourages & supports one another. Would love to have you! And… as a reminder – during the month of November only, joining is $75 and the products with joining are $125 worth of product ~ your choice too! Just sayin’, I haven’t seen this kind of deal since joining as as demo several years ago. This is the time!

Also during a very specified time in November (16-18) is a promotion of products from the 2021-2022 Annual Catalog. Joining during that period will bring more savings, more bargains your way. I cannot encourage you enough to make good use of these two promotions. Join with me during those specified days – Nov 16-18 and get bargains galore. Again… you may do that with me – here. As a demonstrator you will continue to enjoy 20-25% off every order through Stampin’ Up! If you join Nov 16, once you have your new Demonsrator ID #, you can order even more of these amazing products at an additional 20% off – through the 18th of November.

Below are the details of the November 16-18 promotion.

PROMOTION PERIOD: 16–18 NOVEMBER 2021

  • The sale will run for three days only.
  • The discount includes 10% off cardstock, 15% off ink pads (excluding ink pad bundles and third-party pads), and 20% off dies.
  • The discount applies to products featured in the 2021–2022 Annual Catalog only. Products from the July–December 2021 Mini Catalog are not included.
  • The sale is available through both online store purchases and demonstrator orders.

ORDER PERIOD

  • Phone: 16 November 2021 at 7:00 AM (MT) to 18 November 2021 at 6:50 PM (MT)
  • Online: 16 November 2021 at 12:00 AM (MT) to 18 November 2021 at 11:50 PM (MT)

Here’s what I’m encouraging and sharing with you: join to become a Stampin’ Up Demonstrator. You may do that with me – here. Joining during the month of November is $75 to create your own ‘starter kit’ ~ but you receive $125 worth of products that you get to choose. When you join, that’s free shipping for that one time, and I must say, I haven’t seen a $75 joining deal like this in my time with Stampin’ Up! This is a sweet package. Start with Savings is what they’re calling the joining promotion.

This image has an empty alt attribute; its file name is banner_th_na_1021_startkit.jpg

Thanks for stopping by. May hyou have a beautiful day. Nothing beats a handmade card.

Inspire. Create. Share.

Stampin’ Up! Big Sale!

Hi folks! Quick reminder that Stampin’ Up! has this wonderful sale that began today (16th) and it goes only through the 18th. below are details… It is also the perfect timer to join my team which you may do that with me – here. . as there is also this bonus of joining: $75 and $125 in product for your starter kit + free shipping, then all orders after signing up are 20% discount. As I have mentioned before, I haven’t seen this kind of promotion in my time with Stampin ‘ Up! – so why wait? Join now, right here.

This image has an empty alt attribute; its file name is banner_th_na_1021_startkit.jpg

Below are the details of the November 16-18 promotion.

PROMOTION PERIOD: 16–18 NOVEMBER 2021

  • The sale will run for three days only.
  • The discount includes 10% off cardstock, 15% off ink pads (excluding ink pad bundles and third-party pads), and 20% off dies.
  • The discount applies to products featured in the 2021–2022 Annual Catalog only. Products from the July–December 2021 Mini Catalog are not included.
  • The sale is available through both online store purchases and demonstrator orders.

ORDER PERIOD

  • Phone: 16 November 2021 at 7:00 AM (MT) to 18 November 2021 at 6:50 PM (MT)
  • Online: 16 November 2021 at 12:00 AM (MT) to 18 November 2021 at 11:50 PM (MT)
11.16.21_FLYER_TH_SEASONALSALE_NASPUK

And… here are some photos using many of the products in this sale.

Happy shopping! Give me a shout if you need help with anything. I’ll be back later with a regular post :O)

Thanks for stopping by!